Mystery Box: Crypto Countdown Case
|
|
|
- Eugene Atkins
- 6 years ago
- Views:
Transcription

1 Mystery Box: Crypto Countdown Case Created by John Park Last updated on :45:01 AM UTC
2 Guide Contents Guide Contents Overview Countdown to fun Parts & Materials Build the Circuit Crypto Countdown Case Circuit Switches To use a switch like a normal toggle To use a switch as a toggle, with the built-in switch LED permanently lit To use the switch as a toggle, with the built-in switch LED going from unlit to lit as the switch is flipped from OFF to ON Wire the Switches ON/OFF Circuit Display Power Button Lighting NeoPixel Indicator Lamp BEEEEEP Wiring Switches Power Button NeoPixel Upload the Code Make the Case Distressing Foam Mounting Panel Mounting the Parts Standoffs Power Button LED Indicator Piezo Mounting USB Connector Final Steps Deploy the Case Usage Adafruit Industries Page 2 of 73

3 Overview Picture this: You are a Cold War-era spymaster, stationed in West Germany. One of your operatives has risked life and limb to get her hands on this mysterious case. You inspect and then carefully open it to be greeted by an array of toggle switches, a countdown timer, and a power switch. Disarm it, and you'll have your hands on the vital launch code for a captured missile. Fail, and, well, it's best not to consider failure... Your best cryptographers have intercepted the following transmission: красный - белый - синий - зелёный - жёлтый Thinking back to your language training at Langley, you translate this to: RED - WHITE - BLUE - GREEN - YELLOW That's it! These colors must be the secret to disarming the case! You dare to turn on the power, the case arms itself, and a three minute countdown begins. You enter in the toggle switches, hopefully in the correct order. The timer stops. Whew. A secret code scrolls onto the display. The launch codes you needed! A job well done. Adafruit Industries Page 3 of 73
4 Countdown to fun Countdown timers with switches, lights, and beeps are a staple of action thrillers. This is a fun and fairly simple prop to build using a briefcase or other similar container. You could use it for a spy-themed escape room or mystery dinner, or as a prop for a movie or play. Better yet, use it to deliver a message to someone you know who likes solving puzzles. You can easily customize the timer, switch combination, and secret message in the included Arduino sketch, or you can add different, complex behaviors, create your own Mastermind-like game, and more. Adafruit Industries Page 4 of 73
 which is similar to a Pelican case, albeit lower strength and lower cost. If you happen to have a Halliburton aluminum attaché case, that would be perfect!")
5 Parts & Materials In addition to the parts listed on the right side of this guide, you'll want an interesting case in which to mount the electronics. I used this one ( which is similar to a Pelican case, albeit lower strength and lower cost. If you happen to have a Halliburton aluminum attaché case, that would be perfect! If you'd like to follow this guide exactly, that one's a good choice, as I've included CAD files for panels that fit that case. You can laser cut and etch two sheets of 3mm acrylic to make the panel, or print the template and use it as a guide for hand cutting cardboard or thin plywood with a band saw, coping saw, or knife. Additionally, you'll need some wire for making connections, a soldering iron and solder, and a small screwdriver. To distress the case I used watered-down black acrylic paint, the kind you can get at a craft or hobby store. I also used gray spray primer and red glossy spray paint for the star. You'll want some cardboard, or better yet, Mylar stencil sheet to make the start stencil, and access to a laser cutter (or use a hobby knife) to cut the pattern. Adafruit Industries Page 5 of 73

6 Adafruit Industries Page 6 of 73
7 Build the Circuit Crypto Countdown Case Circuit The case's circuit consists of: Inputs on/off button five toggle switches Outputs 14-segment alphanumeric LED display piezo buzzer NeoPixel RGB indicator LED Processing Feather M0 microcontroller Power 4400mAh Lithium Ion battery USB port for charging (and programming) This diagram shows how you'll connect things, using the Terminal Block Breakout FeatherWing for wiring. Adafruit Industries Page 7 of 73
8 Note: This diagram does not show the small transistor switching circuit you'll build on the prototyping area of the Terminal Block FeatherWing -- see below for more info Switches These toggle switches are not only really cool looking, but they are kind of fancy, too! They have some circuitry inside to allow their LEDs to light up, and can operate in one of three modes. Adafruit Industries Page 8 of 73
: To use a switch like a normal toggle connect a wire from Feather GND")
9 There are three connections to a switch: "GND", "+", and "=D"(also called "headlamp"). Here's how to use them with a Feather M0 (although this may be applied to other Feathers, Arduinos, or most any microcontroller): To use a switch like a normal toggle connect a wire from Feather GND pin to switch GND contact connect a wire from Feather Enable pin to switch + contact toggle the switch to from OFF to ON to close and open the circuit, sending the Enable pin LOW or HIGH to power the Feather off or on To use a switch as a toggle, with the built-in switch LED permanently lit connect Feather GND pin to switch GND contact connect Feather 3v3 pin to switch Headlamp contact connect a Feather input pin, such as pin 11, to switch + contact toggle the switch from OFF to ON to send digital pin reading from HIGH to LOW You will need to set the Feather pin mode to INPUT_PULLDOWN for this to work properly. This is possible on M0-based boards, for others you'll need to create a pulldown circuit with two resistors. Here's a simple example sketch to use when testing the switch in permanently lit mode. //Illuminated toggle switch //permanently lit mode //Connections: // Feather GND to switch GND // Feather 3v3 to switch Headlamp // Feather pin 11 to switch + //When switch is ON, digital pin will read LOW const int SWITCHPIN = 11; // the number of the toggle switch pin to read const int LEDPIN = 13; // the number of the LED pin (using the onboard LED) int switchstate = 0; // variable for storing the switch state Adafruit Industries Page 9 of 73
10 void setup() { // initialize the LED pin as an output pinmode(ledpin, OUTPUT); // initialize the switch pin as an input_pulldown pinmode(switchpin, INPUT_PULLDOWN); } void loop() { // read the state of the switch value switchstate = digitalread(switchpin); // check if the switch is flipped on // if it is, the switchstate is LOW if (switchstate == LOW) { // turn LED on digitalwrite(ledpin, HIGH); } else { // switchstate is HIGH, which is flipped to off // turn LED off digitalwrite(ledpin, LOW); } } To use the switch as a toggle, with the built-in switch LED going from unlit to lit as the switch is flipped from OFF to ON connect Feather GND pin to switch GND contact connect Feather 3v3 to switch + contact connect Feather digital pin, such as pin 11, to switch Headlamp contact toggle the switch to send digital pin reading from LOW to HIGH Here's a simple example sketch to use when testing the switch in LED toggle mode. //Illuminated toggle switch //toggle LED on/off mode //Connections: // Feather GND to switch GND // Feather 3v3 to switch + // Feather pin 11 to switch Headlamp //When switch is ON, digital pin will read HIGH const int SWITCHPIN = 11; // the number of the toggle switch pin to read const int LEDPIN = 13; // the number of the LED pin (using the onboard LED) int switchstate = 0; // variable for storing the switch state void setup() { // initialize the LED pin as an output pinmode(ledpin, OUTPUT); // initialize the switch pin as an input_pulldown pinmode(switchpin, INPUT_PULLDOWN); } void loop() { // read the state of the switch value switchstate = digitalread(switchpin); // check if the switch is flipped on // if it is, the switchstate is HIGH if (switchstate == HIGH) { // turn LED on Adafruit Industries Page 10 of 73

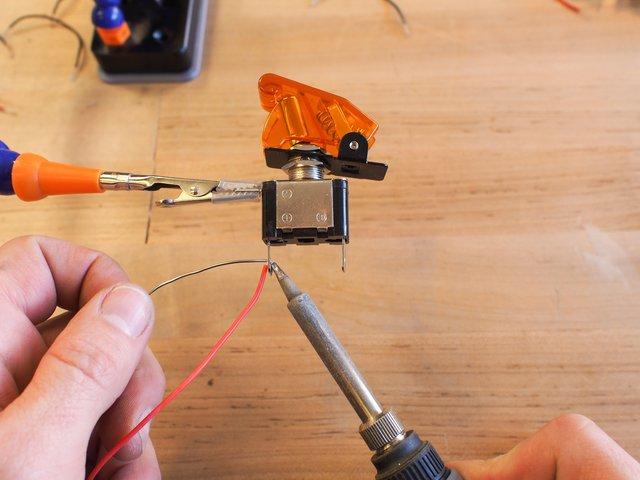
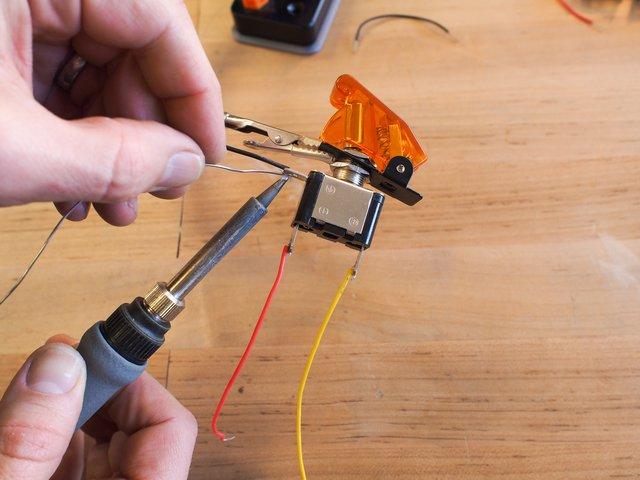
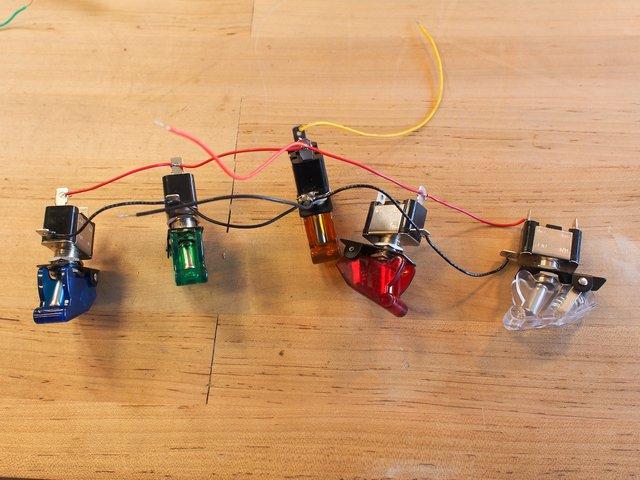
11 digitalwrite(ledpin, HIGH); } else { // switchstate is LOW, which is flipped to off // turn LED off digitalwrite(ledpin, LOW); } } Wire the Switches Using four 3" lengths of black and red wires, solder the five switches together so they can share a single power and ground connection on the Feather. Solder the black wires between the switches' ground terminals and the red wires between their + terminals. Solder a 6" length of color matched wire to each switches' headlamp terminal. Adafruit Industries Page 11 of 73

12 Adafruit Industries Page 12 of 73

13 Adafruit Industries Page 13 of 73

14 Adafruit Industries Page 14 of 73

15 ON/OFF Circuit On a typical project you can power the Feather on and off by connecting its En(able) pin to its GND pin through a latching switch. However, the Crypto Countdown Case is no typical project! You don't want players to be able to power it off once the countdown has begun. Transistor to the rescue. You can use a simple transistor and two resistors switching circuit to enable and disable the power switch in software. You'll connect the transistor's collector pin to the En(able) pin on the Feather, the transistor's emitter pin to GND and the transistor's base pin to two resistors -- a 10K resistor to the switch (which in turn is connected to the Feather's VBAT pin) and a 1K resistor which is connected to an output control pin on the Feather, in this case A5 set to OUTPUT mode in software. When everything is turned off, pressing the on/off button can open and close the Feather's En pin, thus allowing the button to power the Feather on and off. In the Arduino sketch's setup function you can command the A5 pin to go LOW immediately, which in effect disconnects the on/off button from the circuit, thwarting all cheaters who would try to turn it off! Later in the software, once the case has either been decoded or failed, the software sets the A5 pin back to HIGH, re-enabling the on/off button. Adafruit Industries Page 15 of 73

16 Place the transistor (an EBC pinout, PN2222 transistor in this case), the two resistors, and wires into the holes on the TerminalBlock breakout FeatherWing's prototyping area as shown, and solder them together on the back side. You can follow the breadboarded diagram as a guide. Adafruit Industries Page 16 of 73


17 To enable an easy connection between the power button and the switching circuit, solder in a 2-pin JST connector: on wire to the BAT pin solder point and the other wire to the 10K resistor. You'll solder the other side of the JST cable to the COMMON and N.O. terminals of the latching button. Adafruit Industries Page 17 of 73

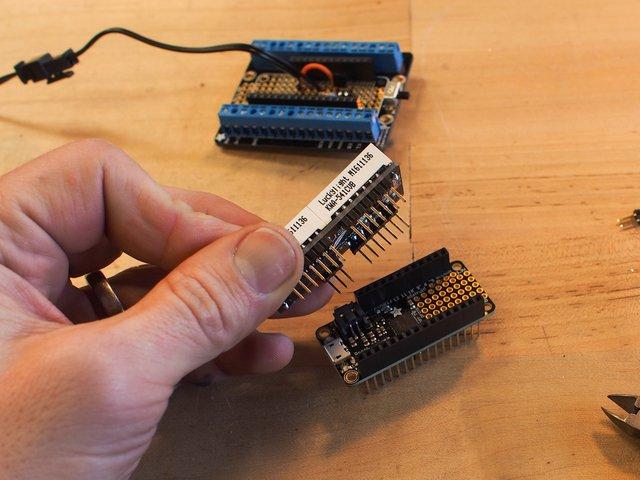
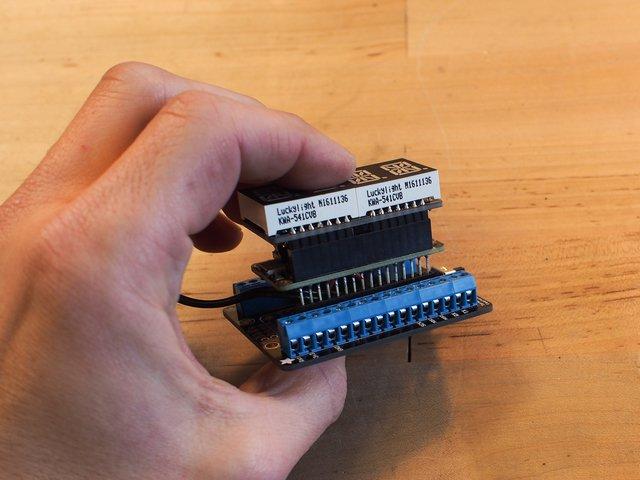
18 This photo shows the switching circuit with a CBE pinout transistor, so the black and orange wires are reversed from that of the diagram Display Solder in the stacking headers on the Feather M0 board instead of the normal headers. This way you'll be able to plug the Feather into the Terminal Block breakout FeatherWing and the display FeatherWing can go on top of the Feather. It's a delightful Feather sandwich! (Ptoo.) Assemble the 14-segment display shield as instructed here ( then stack it onto the Feather, and the stack the Feather onto the TerminalBlock breakout FeatherWing. Adafruit Industries Page 18 of 73

19 Adafruit Industries Page 19 of 73

20 Adafruit Industries Page 20 of 73

21 Power Button Lighting The latching power button has a built-in LED to give it its green glow. You'll run that LED from the Feather output pin 13. Solder an 8" length of red wire to the button's + terminal and black wire to its GND terminal. Adafruit Industries Page 21 of 73

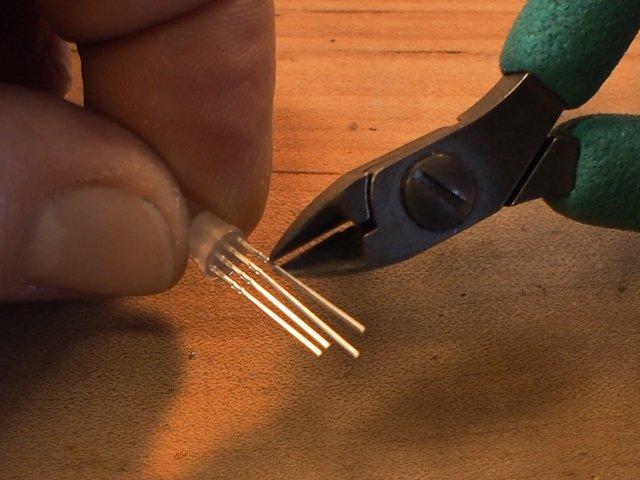
22 NeoPixel Indicator Lamp The 5mm NeoPixel has four legs, Data In, +, GND, and Data Out. We don't need the data out capability, so you can trim that leg. Then, prepare three female jumper wires to a 3-row wire housing by pushing their crimp connectors into the housing. Trim and strip the wires on the other side, these will be pulled into the screw terminals. Adafruit Industries Page 22 of 73

23 Adafruit Industries Page 23 of 73

24 Adafruit Industries Page 24 of 73

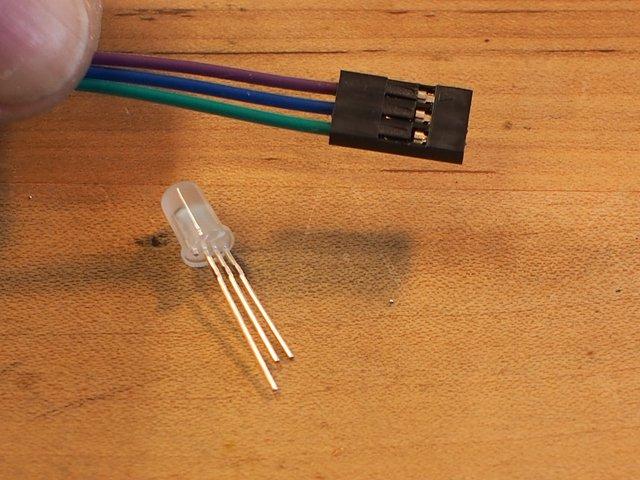
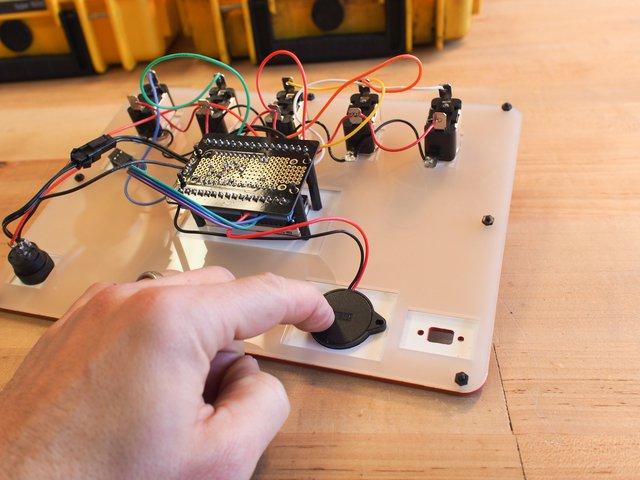
25 Note the position of the long leg of the NeoPixel -- this is GND. Make a black mark on one wire at both ends and plug the GND leg into this space on the connector to keep track of the wiring order. BEEEEEP You can now connect the piezo buzzer to the screw terminals. Strip a bit of insulation from the ends of each wire on the buzzer and then screw the red wire into A0 and the black wire into a GND terminal. Adafruit Industries Page 25 of 73

26 Wiring Make the remaining wiring connections as seen in the diagram. Since the on/off button will need to be threaded through the case panel later, that one will need to be disconnected and then reconnected, but for now it's good to connect everything for testing before everything is mounted. Connect the following from component to screw terminals: Switches Switch bundle's + to 3v3 Switch bundle's black wire to GND White switch's white wire (headlamp) to 12 Red switch's orange wire to 11 Yellow switch's yellow wire to 10 Green switch's green wire to 6 Blue switch's blue wire to 5 Power Button Power button red wire to pin 13 Power button black wire to GND Power button JST to switch transistor circuit JST NeoPixel NeoPixel GND to GND Adafruit Industries Page 26 of 73
27 NeoPixel + to 3v3 NeoPixel Data In to A2 Adafruit Industries Page 27 of 73
28 Adafruit Industries Page 28 of 73
29 Upload the Code With the system assembled, you can now upload the Arduino code to the Feather M0 for testing and configuration. If you are new to the Feather M0, start here ( to set up the board for use with the Arduino IDE. When you're comfortable uploading code, such as a basic Blink sketch, to your Feather, you can now install the libraries used in the Crypto Countdown Case. In the Arduino IDE, click on Sketch > Include LIbrary> Manage Libraries... to open up the Library Manager. From here, search for these three libraries and then click the Install button for each: Adafruit GFX Adafruit LED Backpack Adafruit NeoPixel Once those are installed, close the Library Manger and download the following sketch, uncompress it, and place it in your Arduino sketches directory. Open the sketch in the Arduino IDE and upload it to your Feather M0. CryptoCountdownCase.zip Now to test it out. Disconnect the Feather from the computer USB, then plug in the battery to the Feather. Make sure the TerminalBlock FeatherWing's on-board switch is in the ON position, then press the green power button. It will light up and sent the display and buzzer into a boot sequence, blink the time at "03.00" and then start the countdown. Flip the toggles in the proper order -- red, white, blue, green yellow -- and the display will freeze, scroll "Disarming", and give the secret coded message. Reset the board, and try it again, but enter an incorrect password this time. The display will quickly run down to and display the "X.X.X.X." and "Boom" messages, while beeping. There are a number of places in the code to customize things. You can: Change the allowreset variable from 1 to 0 in order to prevent players from turning off the box Use a different toggle switch order by changing the PASSWORD[] array Adjust the countdown duration with the gtimer variable (be sure to change the displayscroll message and blink text in the setup loop to match) Give the players a customized message after successfully entering the password in the section following the displayscroll(" Disarmed "); //Crypto Countdown Case //by John Park and Usman Muzaffar //for Adafruit Industries //MIT License, include above text in redistribution // // #include <Wire.h> #include <Adafruit_GFX.h> #include "Adafruit_LEDBackpack.h" Adafruit Industries Page 29 of 73
30 #include <Adafruit_NeoPixel.h> #define NEOPIN #define BUZZPIN const int LEDPIN = 13; A2 //NeoPixel attached to pin A2 of the Feather A0 //Piezo buzzer attached to Feather pin A0 //dev hack, set to A1 for quiet int allowreset = 1; //set to 0 to disable user reset with the power button once started //if set to 0, wait until end of game, turn off all toggles, then turn off power Adafruit_NeoPixel pixel = Adafruit_NeoPixel(1, NEOPIN, NEO_RGB + NEO_KHZ800); Adafruit_AlphaNum4 alpha4 = Adafruit_AlphaNum4(); // Password combo variables const int PASSWORD[5]={2,1,5,4,3}; //stores the password set int inputcode[5]; //stores the input code set int entered = 0; //indicates a full code set has been entered int over = 0; //state of game for escaping while loop int blinker = 0; //for decimal point blinking in updatedisplay function // Switch variables const int WHITESWITCHPIN = 12; // using illuminated toggle switch, Pin to Headlamp, 3v3 to +, GND to GND, use INPUT_PULLDOWN const int REDSWITCHPIN = 11; const int YELLOWSWITCHPIN = 10; const int GREENSWITCHPIN = 6; const int BLUESWITCHPIN = 5; int whiteswitchstate = 0; //variable to read switch state, off/0 or on/1 int redswitchstate = 0; int yellowswitchstate = 0; int greenswitchstate = 0; int blueswitchstate = 0; int whiteswitchpriorstate = 0; //variable to store switch last state int redswitchpriorstate = 0; int yellowswitchpriorstate = 0; int greenswitchpriorstate = 0; int blueswitchpriorstate = 0; int fail = 0; // if fail!= 0, the combination failed int success = 0; // counter for successfull entry of combination int count = 0; // number of switches flipped // thousand millis per second unsigned int gtimer; const unsigned long NORMAL = 1000; const unsigned long FAST = 30;//100 this is the rate for fast countdown when combo fails, smaller is faster unsigned int gduration = NORMAL; bool updateandchecktimer() { static unsigned long now, lastupdated = 0; now = millis(); if (gtimer && now - lastupdated > gduration) { gtimer--; lastupdated = now; return true; } return false; } void updatedisplay() { // Given gtimer, update the alpha4 display char minutesstr[10], secondsstr[10]; int minutes = gtimer / 60; Adafruit Industries Page 30 of 73
31 int seconds = gtimer - (minutes * 60); sprintf(minutesstr, "%02d", minutes); sprintf(secondsstr, "%02d", seconds); Serial.print(minutesStr[0]); Serial.print(minutesStr[1]); Serial.print('.'); Serial.print(secondsStr[0]); Serial.print(secondsStr[1]); Serial.println(); alpha4.writedigitascii(0, minutesstr[0], 0); //blinking the dot on second character if(blinker==0){ alpha4.writedigitascii(1, minutesstr[1], 0); blinker=1; notone(buzzpin); } else if (blinker==1){ alpha4.writedigitascii(1, minutesstr[1], 1); blinker=0; tone(buzzpin, 350); } alpha4.writedigitascii(2, secondsstr[0], 0); alpha4.writedigitascii(3, secondsstr[1], 0); } alpha4.writedisplay(); if (gduration==fast){ tone(buzzpin, 700); } if ((minutes==0)&&(seconds==0)){//time ran out fail=1; } void displayscroll(const char*s) { const int NUMCHARS = 4; int scrollrate = 400; //delay time in milis for character fill in rate } int len = strlen(s); for (int i=0; i < len - NUMCHARS; i++) { for (int j=0; j < NUMCHARS; j++) { alpha4.writedigitascii(j, s[i+j]); } alpha4.writedisplay(); tone(buzzpin, 100); delay(scrollrate); //notone(buzzpin); } void setup() { if (allowreset==0){ pinmode(a5, OUTPUT);//disables the on/off button digitalwrite(a5, LOW);//disables the on/off button } //gtimer = 180; //how much time the player has to enter the code gtimer = 180 ; //countdown time in seconds pixel.begin(); pixel.setbrightness(5); pixel.setpixelcolor(0, 200, 0, 0);//starts red Adafruit Industries Page 31 of 73
32 pixel.show(); pinmode(ledpin, OUTPUT); pinmode(whiteswitchpin, INPUT_PULLDOWN); //this is for M0 SAMD boards, on other boards use 10K resistor and INPUT mode pinmode(redswitchpin, INPUT_PULLDOWN); pinmode(yellowswitchpin, INPUT_PULLDOWN); pinmode(greenswitchpin, INPUT_PULLDOWN); pinmode(blueswitchpin, INPUT_PULLDOWN); Serial.begin(9600); //for debugging only alpha4.begin(0x70); // pass in the address //fill the characters with a flicker int b = 0; for(b==1; b<=16; b=b+5){ alpha4.clear(); alpha4.writedisplay(); delay(50); alpha4.setbrightness(b); alpha4.writedigitraw(0, 0xFFFF); alpha4.writedigitraw(1, 0xFFFF); alpha4.writedigitraw(2, 0xFFFF); alpha4.writedigitraw(3, 0xFFFF); alpha4.writedisplay(); delay(200); } delay(1500); int fillrate = 200; //delay time in millis for character fill-in rate //scroll "---Arming---" on display displayscroll("---arming----- **** 0300 "); delay(1000); alpha4.clear(); //wipe the display alpha4.writedisplay(); delay(500); //blink the time 3 times while beeping for (int i=0; i<3; i++) { alpha4.clear(); alpha4.writedisplay(); delay(300); alpha4.writedigitascii(0, '0', 0); alpha4.writedigitascii(1, '3', 1); alpha4.writedigitascii(2, '0', 0); alpha4.writedigitascii(3, '0', 0); alpha4.writedisplay(); tone(buzzpin, 240); delay(625); notone(buzzpin); } //hold time before countdown begins alpha4.clear(); alpha4.writedisplay(); delay(300); alpha4.writedigitascii(0, '0', 0); alpha4.writedigitascii(1, '3', 1); alpha4.writedigitascii(2, '0', 0); alpha4.writedigitascii(3, '0', 0); alpha4.writedisplay(); tone(buzzpin, 480); delay(2000); Adafruit Industries Page 32 of 73
33 notone(buzzpin); pixel.setbrightness(20); pixel.setpixelcolor(0, 255, 153, 0);//goes to yellow pixel.show(); } void loop() { if (updateandchecktimer()) { updatedisplay(); } //check the switches to see if they're toggled whiteswitchstate = digitalread(whiteswitchpin); redswitchstate = digitalread(redswitchpin); yellowswitchstate = digitalread(yellowswitchpin); greenswitchstate = digitalread(greenswitchpin); blueswitchstate = digitalread(blueswitchpin); if ((whiteswitchstate==high)&&(whiteswitchpriorstate==0)){ inputcode[(count)]=1; count=count+1; whiteswitchpriorstate=1; Serial.print("white flipped, count is "); Serial.println(count); pixel.setpixelcolor(0, 255, 255, 255);//white pixel.show(); tone(buzzpin, 260); delay(150); notone(buzzpin); } if ((redswitchstate==high)&&(redswitchpriorstate==0)){ inputcode[(count)]=2; count=count+1; redswitchpriorstate=1; Serial.print("red flipped, count is "); Serial.println(count); pixel.setpixelcolor(0, 255, 0, 0);//white pixel.show(); tone(buzzpin, 260); delay(150); notone(buzzpin); } if ((yellowswitchstate==high)&&(yellowswitchpriorstate==0)){ inputcode[(count)]=3; count=count+1; yellowswitchpriorstate=1; Serial.print("yellow flipped, count is "); Serial.println(count); Serial.println(success); pixel.setpixelcolor(0, 255, 255, 0);//white pixel.show(); tone(buzzpin, 260); delay(150); notone(buzzpin); } if ((greenswitchstate==high)&&(greenswitchpriorstate==0)){ inputcode[(count)]=4; count=count+1; greenswitchpriorstate=1; Serial.print("green flipped, count is "); Adafruit Industries Page 33 of 73
34 } Serial.println(count); pixel.setpixelcolor(0, 0, 255, 0);//white pixel.show(); tone(buzzpin, 260); delay(150); notone(buzzpin); if ((blueswitchstate==high)&&(blueswitchpriorstate==0)){ inputcode[(count)]=5; count=count+1; blueswitchpriorstate=1; Serial.print("blue flipped, count is "); Serial.println(count); pixel.setpixelcolor(0, 0, 0, 255);//white pixel.show(); tone(buzzpin, 260); delay(150); notone(buzzpin); } if (count==5){ entered=1; } while ((entered!=0)&&(over==0)) { if (inputcode[0]==password[0]&& inputcode[1]==password[1]&& inputcode[2]==password[2]&& inputcode[3]==password[3]&& inputcode[4]==password[4]) { success=1; //flash the final number for(int j=0;j<3;j++){ Serial.println("You Did It"); Serial.println(gTimer); tone(buzzpin, 349); updatedisplay(); delay(700); notone(buzzpin); alpha4.clear(); alpha4.writedisplay(); delay(700); } over=1; } else { fail=1; over=1; Serial.println("failed, fast timer now"); gduration = FAST; } } while (success==1){//after the correct code has been entered, do this //updatedisplay(); delay(2000); pixel.setbrightness(30); pixel.setpixelcolor(0, 0, 225, 0);//goes to green pixel.show(); alpha4.clear(); alpha4.writedisplay(); int fillrate = 200; //delay time in milis for character fill in rate Adafruit Industries Page 34 of 73
35 displayscroll(" Disarmed "); notone(buzzpin); alpha4.clear(); //wipe the display alpha4.writedisplay(); delay(500); //scroll L to R filled symbols while beeping with each landing // change each character for a different message, use writedigitascii for regular alphanumerics //scroll "ZHE" alpha4.writedigitraw(3, 0x0); alpha4.writedigitraw(0, 0x3F00); alpha4.writedisplay(); delay(500); alpha4.writedigitraw(0, 0x0); alpha4.writedigitraw(1, 0x3F00); alpha4.writedisplay(); delay(500); alpha4.writedigitraw(1, 0x0); alpha4.writedigitraw(2, 0x3F00); alpha4.writedisplay(); delay(500); alpha4.writedigitraw(2, 0x0); alpha4.writedigitraw(3, 0x7F00); //add decimal point alpha4.writedisplay(); tone(buzzpin, 400); delay(500); notone(buzzpin); delay(500); //scroll "B" alpha4.writedigitraw(0, 0xFD); alpha4.writedisplay(); delay(500); alpha4.writedigitraw(0, 0x0); alpha4.writedigitraw(1, 0xFD); alpha4.writedisplay(); delay(500); alpha4.writedigitraw(1, 0x0); alpha4.writedigitraw(2, 0x40FD);//add decimal point alpha4.writedisplay(); tone(buzzpin, 400); delay(500); notone(buzzpin); delay(500); //scroll "G" alpha4.writedigitraw(0, 0x31); alpha4.writedisplay(); delay(500); alpha4.writedigitraw(0, 0x0); alpha4.writedigitraw(1, 0x4031); alpha4.writedisplay(); tone(buzzpin, 400); delay(500); notone(buzzpin); delay(500); //"K" alpha4.writedigitascii(0, 'K', 1); alpha4.writedisplay(); tone(buzzpin, 400); delay(1000); notone(buzzpin); delay(4000); Adafruit Industries Page 35 of 73
36 //check the switches re-enable power switch to turn it off whiteswitchstate = digitalread(whiteswitchpin); redswitchstate = digitalread(redswitchpin); yellowswitchstate = digitalread(yellowswitchpin); greenswitchstate = digitalread(greenswitchpin); blueswitchstate = digitalread(blueswitchpin); } if ((whiteswitchstate==low)&&(redswitchstate==low)&& (yellowswitchstate==low)&&(greenswitchstate==low)&& (blueswitchstate==low)){ digitalwrite(a5, HIGH);//re-enable the on/off button } while (!gtimer && fail==1){ //after incorrect code is entered, do this pixel.setbrightness(50); pixel.setpixelcolor(0, 255, 0, 0);//set to red pixel.show(); Serial.println("failed"); alpha4.writedigitascii(0, 'X', 1); alpha4.writedigitascii(1, 'X', 1); alpha4.writedigitascii(2, 'X', 1); alpha4.writedigitascii(3, 'X', 1); alpha4.writedisplay(); tone(buzzpin, 900); delay(500); over=1; pixel.setbrightness(100); pixel.setpixelcolor(0, 255, 0, 0); pixel.show(); alpha4.writedigitascii(0,'b'); alpha4.writedigitascii(1,'o'); alpha4.writedigitascii(2,'o'); alpha4.writedigitascii(3,'m'); alpha4.writedisplay(); delay(200); pixel.setpixelcolor(0, 0, 0, 0); pixel.show(); alpha4.clear(); alpha4.writedisplay(); tone(buzzpin, 800); delay(500); notone(buzzpin); //check the switches re-enable power switch to turn it off whiteswitchstate = digitalread(whiteswitchpin); redswitchstate = digitalread(redswitchpin); yellowswitchstate = digitalread(yellowswitchpin); greenswitchstate = digitalread(greenswitchpin); blueswitchstate = digitalread(blueswitchpin); } } if ((whiteswitchstate==low)&&(redswitchstate==low)&& (yellowswitchstate==low)&&(greenswitchstate==low)&& (blueswitchstate==low)){ digitalwrite(a5, HIGH);//re-enable the on/off button } Next, let's put it all inside a suitably themed, Cold War-era style enclosure. Adafruit Industries Page 36 of 73
37 Adafruit Industries Page 37 of 73

38 Make the Case Distressing Your Crypto Countdown circuit deserves to live in a rugged-yet-age-worn case to give it that action thriller feel. You can find a vintage case that's ready to go, or start with a brand new case and distress it with watered-down paint. Adafruit Industries Page 38 of 73


39 With the case closed, apply a heavily watered down black acrylic craft paint wash with a brush and let it dry overnight. Adafruit Industries Page 39 of 73

40 You can wipe off paint in some areas, and leave it nice and dark in the recesses and crevices. To go with the Soviet KGB theme, you can spray paint a red star onto the case using a stencil. I've included a star template in the files linked to here, which you can print and cut out to trace onto mylar or cardboard stencil material. box4svg.zip Adafruit Industries Page 40 of 73


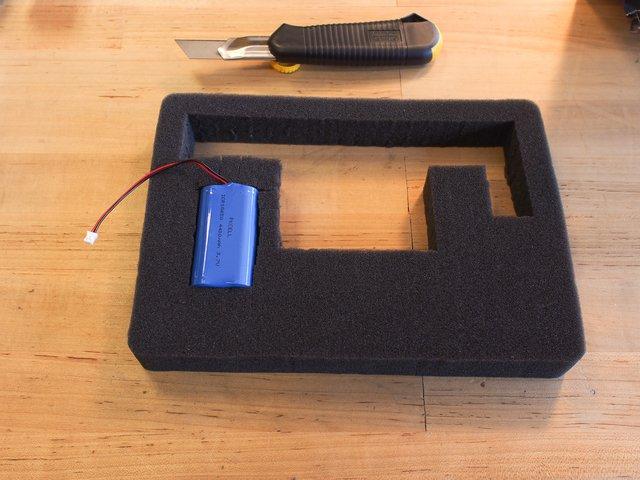
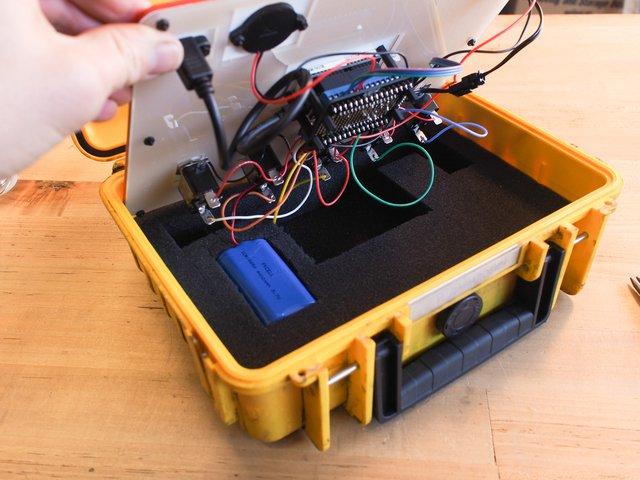
41 Recharge the lipoly battery by simply plugging a USB cable from the case port to a charger wall wart or computer. Foam Adafruit Industries Page 41 of 73


42 If your case came with pick-and-place foam, you can remove it entirely, or cut it out to fit the parts. Adafruit Industries Page 42 of 73

43 Adafruit Industries Page 43 of 73

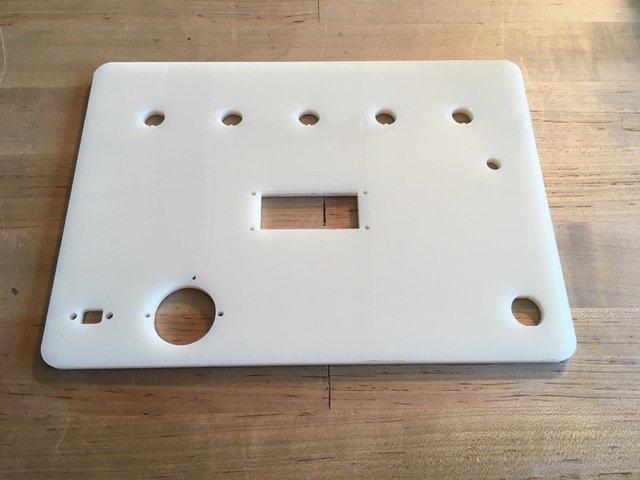
44 Mounting Panel The switches, display, buzzer, indicator LED, USB port, and power button all need to be mounted to a panel. You can do this in a variety of ways -- I started out with hand cut cardboard for prototyping, then laser cut cardboard, baltic birch plywood and finally acrylic for the final prop. There are a variety of ways to cut the panel, from hobby knives, to hand-held coping saws and drills, to bandsaw, CNC machines, and laser cutters. For highly professional pieces, you can have custom panels made by a service bureau or online panel maker. Download the files linked here and print them out as a template for cutting, or to drive a laser cutter or CNC. Or, use it as a guide to model a file for 3D printing. box4svg.zip Adafruit Industries Page 44 of 73

45 Adafruit Industries Page 45 of 73

46 Adafruit Industries Page 46 of 73

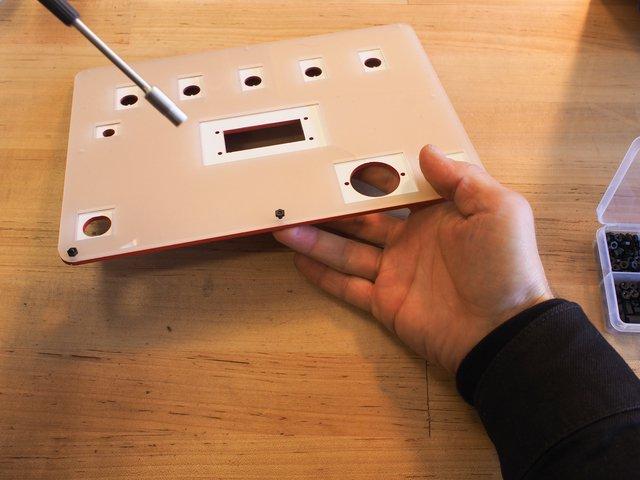
47 In order to add the graphics I ran a second etching pass on the laser cutter to lightly score the acrylic, then painted them with white acrylic craft paint and immediately wiped it off. The paint comes off of the smooth surface easily but stays in the rough etched portion of the graphics. I also ran a third, low speed and high power etching pass on the section that holds the missile switch safety covers in place. This prevents them from twisting around at all. Alternately you can add a bit of glue to hold them in place, or turn the nut hard enough to bite into a softer material such as wood or cardboard. For added support to keep the panel from flexing I added a second, inner panel with cutouts to clear all parts and screwed it to the top panel using the 2.5mm nylon screws and nuts. Adafruit Industries Page 47 of 73

48 Adafruit Industries Page 48 of 73


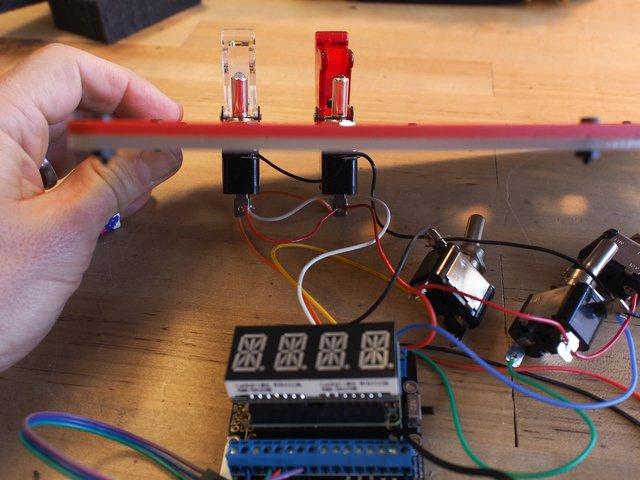
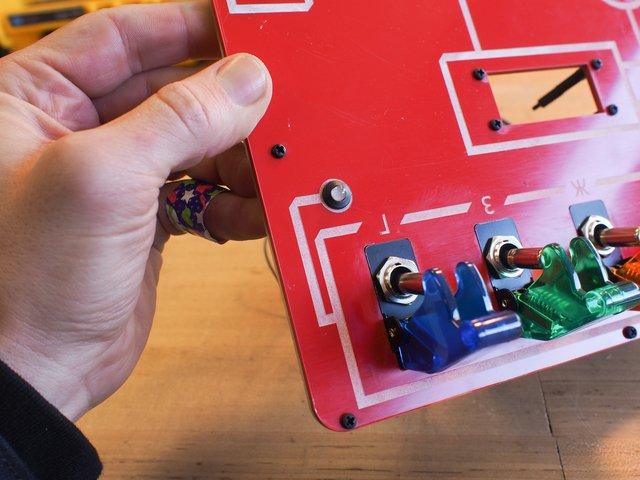
49 Mounting the Parts Now you can mount the parts in your panel. Remove the top nut and safety cover from each switch, turn the lower nut up to the midway point of the shaft and then push the each toggle switch through its respective panel Adafruit Industries Page 49 of 73


50 hole, lining up the thread groove with the panel hole tab. Then, place the safety cover over each switch shaft, and tighten the top nut into place. Adafruit Industries Page 50 of 73


51 Adafruit Industries Page 51 of 73

52 Adafruit Industries Page 52 of 73


53 Standoffs You'll mount the FeatherWing-Feather-FeatherWing sandwich to the panel using nylon standoffs. Make an appropriately sized standoff by screwing together as many as needed to mount the display flush with the panel. Adafruit Industries Page 53 of 73


54 Then, fasten them to the panel with screws from the top, leaving the threaded standoff ends to affix the FeatherWing. Adafruit Industries Page 54 of 73


55 Test the FeatherWing mounting position but don't screw the nuts into place yet, you'll still need it free to connect the power button wiring. Adafruit Industries Page 55 of 73


56 Power Button Unthread the the illuminated on/off power button's locking collar and then feed the wires and JST cable through its hole on the top-side of the panel. Adafruit Industries Page 56 of 73


57 Then, screw the collar back on, securing it in place. Adafruit Industries Page 57 of 73
 and")

58 Re-attach the power button's wires to the screw terminals (this is easier to do before the FeatherWing is mounted) and re-connect the JST connectors. Adafruit Industries Page 58 of 73

59 LED Indicator Place the NeoPixel LED into its holder, then push the holder into the panel from the top side. Then connect the 3-pin connector to the LED's legs, being sure to mind the color order. Remember, the long leg is the GND terminal. You can gently bend the legs to a 90 degree angle if you like for better clearance with the case foam. Adafruit Industries Page 59 of 73

60 Adafruit Industries Page 60 of 73


61 Piezo Mounting Mount the piezo buzzer to the case using two 2.5mm nylon screws and nuts. Adafruit Industries Page 61 of 73

62 Adafruit Industries Page 62 of 73
, you'll want to be able to still plug the Feather into USB")

63 USB Connector For re-programming and battery charging (the Feather has built-in charging circuitry), you'll want to be able to still plug the Feather into USB after the case is assembled. The panel mount USB connector allows us to do Adafruit Industries Page 63 of 73


64 just that! Fasten the USB panel mount using two 2.5mm nylon screws and nuts, then plug the male end into the Feather M0. Adafruit Industries Page 64 of 73

65 Final Steps Screw the FeatherWing sandwich onto the standoffs with the four nylon nuts. Then, connect the battery, and place the panel into the case. This will be secured by a nice, tight friction-fit -- just be sure escape room players know they aren't meant to disassemble props to solve them! You can also choose to more permanently seal the panel with glue or fasteners. Adafruit Industries Page 65 of 73

66 Adafruit Industries Page 66 of 73

67 Adafruit Industries Page 67 of 73

68 Adafruit Industries Page 68 of 73

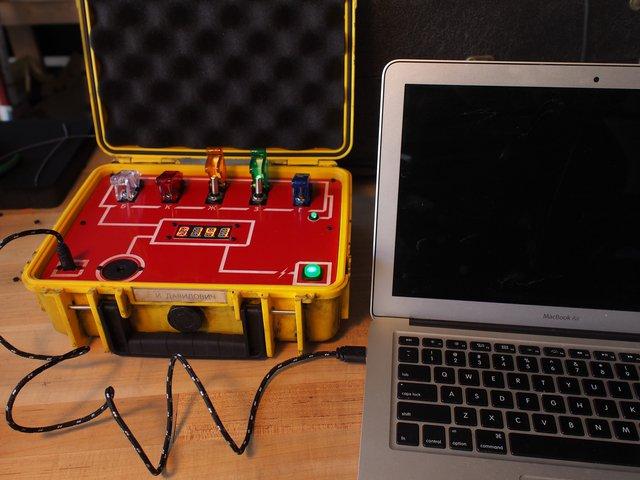
69 Deploy the Case Usage The moment has arrived, time to put the Crypto Countdown Case into action! Press the tempting green button to turn it on, watch the ominous boot sequence, begin to feel the sweat drip down your forehead as the timer counts relentlessly down, and begin to enter your disarm sequence of toggle switches! Adafruit Industries Page 69 of 73

70 Adafruit Industries Page 70 of 73
71 Adafruit Industries Page 71 of 73

72 Whew! You've saved the free world!! Write down the secret message, turn off the toggles, power down the case, and move on to your next assignement. Adafruit Industries Page 72 of 73


73 Adafruit Industries Last Updated: :45:00 AM UTC Page 73 of 73
Mad Science Test Tube Rack
 Mad Science Test Tube Rack Created by John Park Last updated on 2016-10-17 09:21:01 PM UTC Guide Contents Guide Contents Overview Lighted Test Tube Parts Materials and Tools Optional Test Tube Rack Parts
Guardian Shield+ Zelda Breath of the Wild
 Guardian Shield+ Zelda Breath of the Wild Created by Ruiz Brothers Last updated on 2018-08-22 04:01:50 PM UTC Guide Contents Guide Contents Overview Articulating Handle Rechargeable Prerequisite Guides
Adafruit TPL5110 Power Timer Breakout
 Adafruit TPL5110 Power Timer Breakout Created by lady ada Last updated on 2017-12-11 06:28:19 AM UTC Guide Contents Guide Contents Overview Pinouts Power Pins Control Pins Assembly Prepare the header strip:
Adabot Operation Game
 Adabot Operation Game Created by John Park Last updated on 2018-08-22 04:11:17 PM UTC Guide Contents Guide Contents Overview Parts Materials & Tools Build the Operating Table Print the Board and Pieces
3D Printed LED Knuckle Jewelry
 3D Printed LED Knuckle Jewelry Created by Ruiz Brothers Last updated on 2015-02-20 09:31:06 AM EST Guide Contents Guide Contents Overview Prerequisite Guides Parts Tools & Supplies 3D Printing Filament
Mystery Box: NeoMatrix Mk I
 Mystery Box: NeoMatrix Mk I Created by John Park Last updated on 2017-12-01 07:31:05 PM UTC Guide Contents Guide Contents Overview Make the Panels Build the NeoMatrix Keypad Display Modules Metro Mounting
Coffee Detonator: The TNT Plunger Grinder
 Coffee Detonator: The TNT Plunger Grinder Created by John Park Last updated on 2017-04-12 08:04:36 PM UTC Guide Contents Guide Contents Overview Materials Voltage Conversion AC/DC Voltage Divider Microcontroller
Magical Mistletoe. Created by Leslie Birch. Last updated on :45:29 PM UTC
 Magical Mistletoe Created by Leslie Birch Last updated on 2018-08-22 03:45:29 PM UTC Guide Contents Guide Contents Overview Tools & Supplies Circuit Diagram Test the Sensor Prepare Parts Attach LED Sequins
3D Printed Case for Adafruit Feather
 3D Printed Case for Adafruit Feather Created by Ruiz Brothers Last updated on 2018-08-22 03:59:38 PM UTC Guide Contents Guide Contents Overview Adafruit Feather Box New Update! Check out the TFT Feather
Neon LED Signs. Created by John Park. Last updated on :11:09 PM UTC
 Neon LED Signs Created by John Park Last updated on 2018-08-22 04:11:09 PM UTC Guide Contents Guide Contents Overview Parts Materials Tools Build the Sign Driver Preparation Solder the Circuit Solder the
Trinket NeoPixel LED Longboard
 Trinket NeoPixel LED Longboard Created by Ruiz Brothers Last updated on 2017-10-02 06:00:32 PM UTC Guide Contents Guide Contents Overview Parts Tools & Supplies Prerequisite Guides 3D Printing PLA Material
Adafruit TPL5111 Reset Enable Timer Breakout
 Adafruit TPL5111 Reset Enable Timer Breakout Created by lady ada Last updated on 2017-11-02 07:32:27 PM UTC Guide Contents Guide Contents Overview Pinouts Power Pins Control Pins Assembly Prepare the header
Toy Car Speed Timer. Created by Kirby Griese. Last updated on :13:49 PM UTC
 Toy Car Speed Timer Created by Kirby Griese Last updated on 2017-03-20 09:13:49 PM UTC Guide Contents Guide Contents Overview Parts needed Prerequisites 3D Printing Assembly Wiring Software Use It 2 3
3D Printed Camera LED Ring
 3D Printed Camera LED Ring Created by Ruiz Brothers Last updated on 2018-08-22 03:39:34 PM UTC Guide Contents Guide Contents Overview DIY LED Ring Light Prerequisite Guide: Parts List: Tools & Supplies
NeoPixel Bike Light. Created by Ruiz Brothers. Last updated on :43:46 PM UTC
 NeoPixel Bike Light Created by Ruiz Brothers Last updated on 2018-11-15 07:43:46 PM UTC Guide Contents Guide Contents Overview 3D Printed Headlight Adafruit's Feather Platform Circuit Python Powered Parts
Clockwork Goggles. Created by John Park. Last updated on :03:10 PM UTC
 Clockwork Goggles Created by John Park Last updated on 2018-08-22 04:03:10 PM UTC Guide Contents Guide Contents Overview Assemble Circuit and Goggles CircuitPython Setup and Code Rock the Goggles 2 3 6
LED Eyes. Created by Ruiz Brothers. Last updated on :50:55 AM UTC
 LED Eyes Created by Ruiz Brothers Last updated on 2018-01-13 05:50:55 AM UTC Guide Contents Guide Contents Overview Parts, Tools and Supplies Enameled Copper Magnet Wire 11 meters / 0.1mm diameter Adafruit
Feather Weather Lamp. Created by Ruiz Brothers. Last updated on :54:26 PM UTC
 Feather Weather Lamp Created by Ruiz Brothers Last updated on 2018-08-22 03:54:26 PM UTC Guide Contents Guide Contents Overview Weather Reactive Pixels Prerequisite Guides Parts Tools & Supplies Circuit
Trinket-Powered Conference Room Occupancy Display
 Trinket-Powered Conference Room Occupancy Display Created by Mike Barela Last updated on 2018-08-22 03:38:56 PM UTC Guide Contents Guide Contents Overview Build Wiring Diagrams Populating the Board Code
Portable Apple Watch Charger
 Portable Apple Watch Charger Created by Ruiz Brothers Last updated on 2017-10-22 09:58:04 PM UTC Guide Contents Guide Contents Overview Smart Charging Prerequisite Guides Parts, Tool & Supplies Circuit
Interior Purse Light. Created by Becky Stern. Last updated on :41:08 PM UTC
 Interior Purse Light Created by Becky Stern Last updated on 2018-08-22 03:41:08 PM UTC Guide Contents Guide Contents Overview Circuit Diagram Stitch Sequins Add Tape Arduino Code CircuitPython Code Use
Slider Crank Mechanism -- from Cardboard and Craft Sticks
 Slider Crank Mechanism -- from Cardboard and Craft Sticks Created by John Park Last updated on 2018-08-22 04:07:21 PM UTC Guide Contents Guide Contents Overview Materials Tools Build the Slider Crank Build
Bunny Ears with MakeCode
 Bunny Ears with MakeCode Created by Erin St Blaine Last updated on 2018-08-22 04:05:47 PM UTC Guide Contents Guide Contents Introduction Tools & Other Materials Programming with MakeCode Set Up the Light
Celebration Spectacles
 Celebration Spectacles Created by Becky Stern Last updated on 2018-08-22 03:45:59 PM UTC Guide Contents Guide Contents Overview Circuit Diagram Assemble Circuit Test and Glue Wear 'em! 2 3 6 7 10 14 Adafruit
i2c/spi LCD Backpack Created by lady ada Last updated on :11:04 PM UTC
 i2c/spi LCD Backpack Created by lady ada Last updated on 2017-08-16 05:11:04 PM UTC Guide Contents Guide Contents Overview Which LCD to Use? Wait - the backpack has 16 holes, but my LCD only has 14 pins!
NeoMatrix 8x8 Word Clock
 NeoMatrix 8x8 Word Clock Created by Andy Doro Last updated on 2017-10-10 04:10:51 AM UTC Guide Contents Guide Contents Overview Parts List Parts Tools Circuit Assembly Overview Uploading Code Understanding
Light-Up Angler Fish Embroidery
 Light-Up Angler Fish Embroidery Created by Becky Stern Last updated on 2018-08-22 03:35:36 PM UTC Guide Contents Guide Contents Overview Tools & Supplies Layout & Circuit Diagram Sew Circuit Code Hand
Adafruit 8x16 LED Matrix FeatherWing
 Adafruit 8x16 LED Matrix FeatherWing Created by lady ada Last updated on 2016-05-20 01:58:38 PM EDT Guide Contents Guide Contents Overview Pinouts Power Pins I2C pins Address Jumpers Changing Addresses
14-Segment Alpha-numeric LED FeatherWing
 14-Segment Alpha-numeric LED FeatherWing Created by lady ada Last updated on 2017-11-26 08:54:28 PM UTC Guide Contents Guide Contents Overview Pinouts Power Pins I2C pins Address Jumpers Changing Addresses
7 Portable Multitouch Raspberry Pi Tablet
 7 Portable Multitouch Raspberry Pi Tablet Created by Ruiz Brothers Last updated on 2017-02-27 04:13:53 PM UTC Guide Contents Guide Contents Overview Portable Raspberry Pi Tablet 7" Multitouch Display Parts
Tent Lantern. Created by Timothy Reese. Last updated on :17:25 AM UTC
 Tent Lantern Created by Timothy Reese Last updated on 2017-07-14 05:17:25 AM UTC Guide Contents Guide Contents Overview Things you'll need: What You'll Learn: 3D Printing Code Assembly Wiring Diagram Soldering
Android GBoard Morse Code Control with Circuit Playground Express
 Android GBoard Morse Code Control with Circuit Playground Express Created by Dave Astels Last updated on 2018-08-22 04:10:30 PM UTC Guide Contents Guide Contents Overview Parts Materials for the box Installing
Adafruit Capacitive Touch Sensor Breakouts
 Adafruit Capacitive Touch Sensor Breakouts Created by Bill Earl Last updated on 2018-08-22 03:36:13 PM UTC Guide Contents Guide Contents Overview Momentary Toggle 5-Pad Momentary Assembly and Wiring Installing
Milk Jug Glow Skull. Created by John Park. Last updated on :28:36 PM UTC
 Milk Jug Glow Skull Created by John Park Last updated on 2018-09-14 09:28:36 PM UTC Guide Contents Guide Contents Overview Parts Materials & Tools Optional Skull/Sculpting Stand Build the Skull Prep the
NeoPixel Ring Bangle Bracelet
 NeoPixel Ring Bangle Bracelet Created by Becky Stern Last updated on 2017-09-28 11:14:48 PM UTC Guide Contents Guide Contents Overview Circuit Diagram Build it! Arduino Code CircuitPython Code Planning
Crickit Carnival Bumper Bot
 Crickit Carnival Bumper Bot Created by John Park Last updated on 2018-08-22 04:08:52 PM UTC Guide Contents Guide Contents Overview Parts Materials and Tools Build the Bumper Bot Cut the Cardboard Chassis
Pushrod Garage. Created by John Park. Last updated on :07:30 PM UTC
 Pushrod Garage Created by John Park Last updated on 2018-08-22 04:07:30 PM UTC Guide Contents Guide Contents Overview Parts & Materials Tools Pushrod Mechanism Code it with MakeCode Functions On Start
Crickit Dancing Marionette Kit Created by Dano Wall. Last updated on :03:11 PM UTC
 Crickit Dancing Marionette Kit Created by Dano Wall Last updated on 2019-04-04 07:03:11 PM UTC Overview This project demonstrates how to build a robotic marionette that is controlled with four arcade-style
Infinity Mirror Valentine's Candy Box
 Infinity Mirror Valentine's Candy Box Created by Kathy Ceceri Last updated on 2019-02-07 09:44:54 PM UTC Guide Contents Guide Contents Overview Parts List -- Mini Box Version Chibitronics Color LEDs Add-On
Stumble-Bot. Created by Dano Wall. Last updated on :04:06 AM UTC
 Stumble-Bot Created by Dano Wall Last updated on 2018-09-06 05:04:06 AM UTC Guide Contents Guide Contents Overview Simply Stumbling We Have the Technology Other Supplies Leg Assembly Front Legs Back Legs
Interactive Gift Box. Created by codingpro. Last updated on :47:40 AM UTC
 Interactive Gift Box Created by codingpro Last updated on 2018-01-10 01:47:40 AM UTC Guide Contents Guide Contents Overview Adafruit GEMMA M0 - Miniature wearable electronic platform Lithium Ion Polymer
Alohamora Bottle. Created by Erin St Blaine. Last updated on :58:53 PM UTC
 Alohamora Bottle Created by Erin St Blaine Last updated on 2017-06-16 10:58:53 PM UTC Guide Contents Guide Contents Introduction Ingredients Tools Code 1. Arduino IDE 2. Teensyduino Installer 3. FastLED
Solar Boost Bag. Created by Becky Stern. Last updated on :44:55 PM UTC
 Solar Boost Bag Created by Becky Stern Last updated on 2018-08-22 03:44:55 PM UTC Guide Contents Guide Contents Overview 3D Design Files Customize Design Assemble Circuit Prepare Solar Panel Enclosure
Naughty or Nice Machine
 Naughty or Nice Machine Created by Brian Corteil Last updated on 2018-08-22 03:45:31 PM UTC Guide Contents Guide Contents Overview It knows if you have been Naughty or Nice! Make It! Parts The Case The
Sword & Wand Prop Effects with Circuit Playground
 Sword & Wand Prop Effects with Circuit Playground Created by John Park Last updated on 2018-01-13 05:32:54 AM UTC Guide Contents Guide Contents Overview Circuit Playground Express with MakeCode Lots of
Circuit Playground Express Laser Tag
 Circuit Playground Express Laser Tag Created by John Park Last updated on 2017-11-14 01:56:23 AM UTC Guide Contents Guide Contents Build a Laser Tag Game Code the Laser Tag Game MakeCode Transmitting IR
Crawling Animatronic Hand
 Crawling Animatronic Hand Created by Dano Wall Last updated on 2018-12-03 06:39:35 PM UTC Guide Contents Guide Contents Overview Parts Used Tools & Materials Prepare the Hand Your hand is now ready to
Adafruit PowerBoost 500 Shield
 Adafruit PowerBoost 500 Shield Created by lady ada Last updated on 2018-08-22 03:43:27 PM UTC Guide Contents Guide Contents Overview Pinouts DC/DC Boost section Indicator LEDs Charging section Power Switch
Con Badge with Circuit Playground Express
 Con Badge with Circuit Playground Express Created by Sophy Wong Last updated on 2018-04-11 05:00:16 PM UTC Guide Contents Guide Contents Overview Tools & Materials Laser Cutting Program the Circuit Playground
NeoPixie Dust Bag with Circuit Playground Express
 NeoPixie Dust Bag with Circuit Playground Express Created by John Park Last updated on 2017-12-20 10:00:29 PM UTC Guide Contents Guide Contents Overview Code It Setup Animation Color Touch Variable Color
Crawling Baby Sea Turtle Robot
 Crawling Baby Sea Turtle Robot Created by Dano Wall Last updated on 2018-08-22 04:10:26 PM UTC Guide Contents Guide Contents Overview Save the Wee Turtles Household Materials Adafruit Electronics Create
Jewel Hair Stick. Created by Leslie Birch. Last updated on :47:17 PM UTC
 Jewel Hair Stick Created by Leslie Birch Last updated on 2018-08-22 03:47:17 PM UTC Guide Contents Guide Contents Overview Tools & Supplies Prepare Chopstick Circuit Diagram Solder Circuit Arduino Code
Arduino Lesson 6. Digital Inputs
 Arduino Lesson 6. Digital Inputs Created by Simon Monk Last updated on 2018-02-27 10:20:04 PM UTC Guide Contents Guide Contents Overview Parts Part Qty Breadboard Layout Arduino Code Push Switches Other
FLORA TV-B-Gone. Created by Becky Stern. Last updated on :32:57 PM UTC
 FLORA TV-B-Gone Created by Becky Stern Last updated on 2018-08-22 03:32:57 PM UTC Guide Contents Guide Contents Overview Parts Tutorials Transistors Resistors LEDs Pushbutton Program it Power Fabric pinwheel
ISS Pin. Created by Leslie Birch. Last updated on :27:30 PM UTC
 ISS Pin Created by Leslie Birch Last updated on 2017-04-18 09:27:30 PM UTC Guide Contents Guide Contents Overview Tools & Supplies Solder Circuit Create Cover Code Set Up IFTTT Want a Test? Wear It! 2
Adafruit LED Sequins. Created by Becky Stern. Last updated on :02:00 AM UTC
 Adafruit LED Sequins Created by Becky Stern Last updated on 2018-03-02 04:02:00 AM UTC Guide Contents Guide Contents Overview Sewing with conductive thread Circuit Diagram GEMMA sequin hat Arduino Code
Getting Started with FLORA
 Getting Started with FLORA Created by Becky Stern Last updated on 2018-01-03 04:31:24 AM UTC Guide Contents Guide Contents Overview Windows Driver Installation Manual Driver Installation Download software
Circuit Playground Digital Input
 Circuit Playground Digital Input Created by Carter Nelson Last updated on 2017-02-27 03:36:50 AM UTC Guide Contents Guide Contents Overview Required Parts Before Starting Digital Signals 3V Logic Pocket
Chirping Plush Owl Toy
 Chirping Plush Owl Toy Created by Becky Stern Last updated on 2018-11-21 08:56:55 PM UTC Guide Contents Guide Contents Overview Tools & Supplies Solder Circuit Arduino Code CircuitPython Code Assemble
Getting Started with FLORA
 Getting Started with FLORA Created by Becky Stern Last updated on 2015-05-13 01:00:11 PM EDT Guide Contents Guide Contents Overview Download software Blink onboard LED Blink onboard NeoPixel Install the
Adafruit Mini TFT " 160x80
 Adafruit Mini TFT - 0.96" 160x80 Created by lady ada Last updated on 2017-11-17 05:56:10 PM UTC Guide Contents Guide Contents Overview Pinouts Assembly Prepare the header strip: Add the breakout board:
Wind Blowing Emoji Prop
 Wind Blowing Emoji Prop Created by John Park Last updated on 2018-08-22 04:05:17 PM UTC Guide Contents Guide Contents Overview Code it with MakeCode Start Up Variables On Loud Sound If - Else Iterate Debounce
Adafruit HUZZAH32 - ESP32 Feather
 Adafruit HUZZAH32 - ESP32 Feather Created by lady ada Last updated on 2017-07-14 02:14:00 AM UTC Guide Contents Guide Contents Overview Pinouts Power Pins Logic pins Serial pins I2C & SPI pins GPIO & Analog
Trellis 3D Printed Enclosure
 Trellis 3D Printed Enclosure Created by Ruiz Brothers Last updated on 2018-08-22 03:39:07 PM UTC Guide Contents Guide Contents Overview Parts Tools & Supplies Modeling 123D Design Customize Measuring Parts
Mystery Box: Haunted Radio
 Mystery Box: Haunted Radio Created by John Park Last updated on 2018-08-22 04:01:09 PM UTC Guide Contents Guide Contents Overview Parts & Materials Tools Radio Reuse Disassembly Tuning Mechanism On/Off
PyPortal View Master Created by Ruiz Brothers. Last updated on :51:28 AM UTC
 PyPortal View Master Created by Ruiz Brothers Last updated on 2019-03-13 11:51:28 AM UTC Overview In this project we re building a view master inspired device using Adafruit s PyPortal. The eyepiece makes
Ping Pong Ball Launcher
 Ping Pong Ball Launcher Created by Dano Wall Last updated on 2019-01-25 03:19:13 AM UTC Guide Contents Guide Contents Overview Electronic Parts Circuit Playground Express USB cable - USB A to Micro-B Alkaline
NeoPixel Basketball Hoop
 NeoPixel Basketball Hoop Created by Justin Cooper Last updated on 2018-08-27 12:19:58 AM UTC Guide Contents Guide Contents Overview Parts Needed Power choices! Parts for Option #1 Parts for Option #2 Tools
Adafruit VL53L0X Time of Flight Micro-LIDAR Distance Sensor Breakout
 Adafruit VL53L0X Time of Flight Micro-LIDAR Distance Sensor Breakout Created by lady ada Last updated on 2017-12-28 11:56:14 PM UTC Guide Contents Guide Contents Overview Sensing Capablities Pinouts Power
FLORA Pixel Brooch. Created by Becky Stern. Last updated on :19:07 PM EST
 FLORA Pixel Brooch Created by Becky Stern Last updated on 2015-02-20 01:19:07 PM EST Guide Contents Guide Contents Overview Connect first signal wire Connect power and ground wires Add more pixels Program
DIY Circuit Playground Shields
 DIY Circuit Playground Shields Created by Dave Astels Last updated on 2018-08-22 04:05:06 PM UTC Guide Contents Guide Contents Overview Small Alligator Clip Test Lead (set of 12) Small Alligator Clip to
Ultrasonic Ruler. Created by Ruiz Brothers. Last updated on :08:28 PM UTC
 Ultrasonic Ruler Created by Ruiz Brothers Last updated on 2016-12-22 03:08:28 PM UTC Guide Contents Guide Contents Overview Beast Rabban's Lost Pistol 3D Printing Movie Replicas Prerequisite Guides Parts
NeoPixel Manicure. Created by Sophy Wong. Last updated on :50:38 PM UTC
 NeoPixel Manicure Created by Sophy Wong Last updated on 2018-04-11 05:50:38 PM UTC Guide Contents Guide Contents Overview Parts & Supplies Tools Circuit Diagram Build the Circuit Measure Your Circuit Prepare
Reindeer Mask with Animated Eyes
 Reindeer Mask with Animated Eyes Created by Dano Wall Last updated on 2018-12-05 10:50:10 PM UTC Guide Contents Guide Contents Overview Parts Adafruit HalloWing M0 Express Convex Plastic Lens with Edge
3D Printed Google AIY Voice Kit
 3D Printed Google AIY Voice Kit Created by Ruiz Brothers Last updated on 2018-01-09 12:47:26 AM UTC Guide Contents Guide Contents Overview 3D Print a DIY AI enclosure for the Raspberry PI! Parts, Tools
Adafruit IO Basics: Digital Output
 Adafruit IO Basics: Digital Output Created by Todd Treece Last updated on 2017-09-12 03:10:33 PM UTC Guide Contents Guide Contents Overview Adafruit IO Setup Creating the Digital Feed Adding the Toggle
LED Lightbox. Created by Sam Clippinger. Last updated on :50:00 AM UTC
 LED Lightbox Created by Sam Clippinger Last updated on 2016-09-03 01:50:00 AM UTC Guide Contents Guide Contents Overview TL;DR Skill Level Parts List Yellow sticker reads: "Bad planning on your part does
Simple LED Unicorn Horn
 Simple LED Unicorn Horn Created by Ruiz Brothers Last updated on 2018-08-22 03:56:14 PM UTC Guide Contents Guide Contents Overview 3D Printed Unicorn Horn Want More Magic/Colors? Great For Beginners Parts
Paper Airplane Launcher
 Paper Airplane Launcher Created by Dano Wall Last updated on 2018-08-27 08:36:14 PM UTC Guide Contents Guide Contents Overview A Launching Platform The Electronics Materials Build the Launcher Attach Motors
Adafruit 8x16 LED Matrix FeatherWing
 Adafruit 8x16 LED Matrix FeatherWing Created by lady ada Last updated on 2019-01-28 05:47:44 PM UTC Guide Contents Guide Contents Overview Pinouts Power Pins I2C pins Address Jumpers Changing Addresses
Adafruit MCP9808 Precision I2C Temperature Sensor Guide
 Adafruit MCP9808 Precision I2C Temperature Sensor Guide Created by lady ada Last updated on 2017-11-12 06:09:49 PM UTC Guide Contents Guide Contents Overview Pinouts Power Pins I2C Data Pins Optional Pins
Hammer Time Mini Golf Hazard with Crickit
 Hammer Time Mini Golf Hazard with Crickit Created by John Park Last updated on 2018-07-09 06:47:53 AM UTC Guide Contents Guide Contents Overview Please Hammer, Don't Hurt Em Parts Materials & Tools Program
Adafruit 7-Segment LED FeatherWings
 Adafruit 7-Segment LED FeatherWings Created by lady ada Last updated on 2017-11-26 08:48:20 PM UTC Guide Contents Guide Contents Overview Pinouts Power Pins I2C pins Address Jumpers Changing Addresses
Adafruit LED Sequins. Created by Becky Stern. Last updated on :00:06 PM EST
 Adafruit LED Sequins Created by Becky Stern Last updated on 2015-02-19 05:00:06 PM EST Guide Contents Guide Contents Overview Sewing with conductive thread GEMMA sequin hat 2 3 8 15 Adafruit Industries
Bluetooth Controlled NeoPixel Headphones
 Bluetooth Controlled NeoPixel Headphones Created by Ruiz Brothers Last updated on 2017-03-09 07:38:05 PM UTC Guide Contents Guide Contents Overview Smart LED HeadPhones Prerequisite Guides Parts Tools
NeoPixel LED Cortana Costume
 NeoPixel LED Cortana Costume Created by Ruiz Brothers Last updated on 2018-08-22 03:43:43 PM UTC Guide Contents Guide Contents Overview How it Works Project Advisory Prerequisite Guides Parts & Components
No-Sew LED Wristband. Created by Kathy Ceceri. Last updated on :23:40 PM UTC
 No-Sew LED Wristband Created by Kathy Ceceri Last updated on 2018-11-13 09:23:40 PM UTC Guide Contents Guide Contents Overview Playing with LED Options Suggested Parts List -- Electronics Suggested Materials
Mystical LED Halloween Hood
 Mystical LED Halloween Hood Created by Becky Stern Last updated on 2017-09-28 11:13:20 PM UTC Guide Contents Guide Contents Overview NeoPixel GEMMA circuit Arduino Code NeoPixel Überguide: Arduino Library
Adafruit Mini TFT with Joystick Featherwing
 Adafruit Mini TFT with Joystick Featherwing Created by lady ada Last updated on 2018-08-24 04:45:05 AM UTC Guide Contents Guide Contents Overview Pinouts Color TFT Display Buttons and Joystick seesaw Chip
FeatherWing Proto, Doubler and Tripler
 FeatherWing Proto, Doubler and Tripler Created by lady ada Last updated on 2018-11-15 10:39:12 PM UTC Guide Contents Guide Contents Overview FeatherWing Proto FeatherWing Doubler FeatherWing Tripler Proto
PyPortal NeoPixel Color Picker Created by Kattni Rembor. Last updated on :42:41 PM UTC
 PyPortal NeoPixel Color Picker Created by Kattni Rembor Last updated on 2019-03-27 10:42:41 PM UTC Overview This simple project adds a little color to your life with CircuitPython, PyPortal and NeoPixels.
UFO Flying Saucer with Circuit Playground Express
 UFO Flying Saucer with Circuit Playground Express Created by John Park Last updated on 2018-08-31 08:42:17 PM UTC Guide Contents Guide Contents Overview Code the UFO with CircuitPython Build the Flying
NeoPixel Fairy Crown. Created by Erin St Blaine. Last updated on :22:47 AM UTC
 NeoPixel Fairy Crown Created by Erin St Blaine Last updated on 2018-12-31 02:22:47 AM UTC Guide Contents Guide Contents Overview Adafruit NeoPixel LED Dots Strand - 20 LEDs at 2" Pitch Adafruit GEMMA M0
FPV Mini Display. Created by Ruiz Brothers. Last updated on :00:18 PM UTC
 FPV Mini Display Created by Ruiz Brothers Last updated on 2017-07-19 01:00:18 PM UTC Guide Contents Guide Contents Overview Mini FPV monitor Adafruit Parts Tools and Supplies Circuit Diagram Electronics
Crickit Powered Holiday Diorama
 Crickit Powered Holiday Diorama Created by Isaac Wellish Last updated on 2018-12-04 12:49:07 AM UTC Guide Contents Guide Contents Overview Prerequisite Guides Adafruit Parts Tools and Materials Wiring
GPS Logging Dog Harness
 GPS Logging Dog Harness Created by Becky Stern Last updated on 2015-01-15 10:15:19 PM EST Guide Contents Guide Contents Overview Circuit Diagram Sew Circuit Use It! 2 3 5 6 15 Adafruit Industries https://learn.adafruit.com/gps-logging-dog-harness
Adafruit Color Sensors
 Adafruit Color Sensors Created by Bill Earl Last updated on 2018-11-05 03:48:12 PM UTC Guide Contents Guide Contents Overview Assembly and Wiring Assembly (breakout version only) Position the header Position
Circuit Playground Yoyo
 Circuit Playground Yoyo Created by Ruiz Brothers Last updated on 2018-01-13 05:56:02 AM UTC Guide Contents Guide Contents Overview 3D Printed NeoPixel Yoyo History of the Yo-Yo Expectations Parts Tools
Lady Ada's Bento Box. Created by lady ada. Last updated on :55:35 AM UTC
 Lady Ada's Bento Box Created by lady ada Last updated on 2017-07-14 05:55:35 AM UTC Guide Contents Guide Contents Overview Parts List Assembly 2 3 5 6 Adafruit Industries https://learn.adafruit.com/lady-adas-bento-box
Circuit Playground Express Head-Tilt Ears
 Circuit Playground Express Head-Tilt Ears Created by Dave Astels Last updated on 2018-10-09 04:07:03 PM UTC Guide Contents Guide Contents Overview Parts Circuit Playground Express Micro servo Lithium Ion