Pinball Controller for ipad
|
|
|
- Clement Bradford
- 6 years ago
- Views:
Transcription
1 Pinball Controller for ipad Created by John Park Last updated on :07:06 AM UTC
2 Guide Contents Guide Contents Overview icade Standard Parts Code the Teensy Keyboard Mapping Test Code Controller Code Full Code Duo Pinball Teardown Open it Up Identify the Parts Remove Old Board Prep the Wires Wire Common Ground USB Wiring Hole Teensy Transplant Be a Pinball Wizard Adafruit Industries Page 2 of 65

3 Overview Playing virtual pinball on an ipad is a whole lot of fun! Pinball Arcade is my personal favorite -- it runs a huge selection of classic tables reproduced down to the finest detail, and the physics are incredibly accurate and satisfying. Not so satisfying, however is the lack of tactile feedback when tapping the screen to trigger the flippers or sliding your finger down the screen to pull and release the plunger. So how about using real arcade buttons and a spring loaded plunger instead? Originally intending to build my own from scratch, I ran across an old accessory called the Duo Pinball controller, which is available online for less than $9 new! (it retailed for $60 when launched in 2012). It was designed for a different pinball game, Pinball HD Collection, and isn't compatible with the one I prefer, but it didn't take too much effort to transplant a new brain in it and make it work! This guide will show you how to mod your own controller, or use these techniques to build your own from scratch. Adafruit Industries Page 3 of 65

4 icade Standard The Duo Pinball controller was locked into a singel game, using a Bluetooth board to pair with the ipad and send proprietary commands. In order to free it from these shackles, we'll need to swap out the electronics for something that can use a different ios game controller standard. One such standard is the icade ( protocol, made by ION Audio for their line of ipad desktop arcade cabinets and controllers. It too requires the games you play to support the standard, but in the case of icade, there are many, many such games, including my beloved Pinball Arcade! Adafruit Industries Page 4 of 65
5 The icade standard interfaces with ios as an HID keyboard, and is typically paired over Bluetooth. However, plugging in a wired HID keyboard works just as well, which makes it very straightforward to build your own controller! Adafruit Industries Page 5 of 65

6 Parts You'll need just a few things to mod or build an icade-compatible controller for ipad or iphone: a microcontroller that can act as a USB HID keyboard, and draws less than 200 ma of current, such as the Teensy 3.2 an adapter for the ios device to connect USB to the Lightning port, such as the Apple USB to Lightning Camera Adapter. ( (If you have an older ipad or iphone you will need the 30-pin dock connector version of the camera kit) micro B to A USB cable arcade buttons and an enclosure (such as a shoebox), or the Duo Pinball controller to hack Adafruit Industries Page 6 of 65


7 1 x Teensy Teensy 3.2 microcontroller Add To Cart 3 x Arcade Button 30mm arcade button -- only needed if not using the Duo Pinball controller Add To Cart 1 x USB cable A/Micro B Add To Cart 1 x 4.7K resistor 4.7K resistor -- optional, for dimming the indicator LED Add To Cart Next, let's get the Teensy coded to act like an icade controller! Adafruit Industries Page 7 of 65

8 Code the Teensy Let's look a bit closer at the icade standard. If you head to the icade page on ION Audio's site ( you'll see a link to the spec ( In this.pdf it states: The ION Arcade family of products communicates through Bluetooth wireless technology, using a specific key map and protocol to talk with the applications. For each button pressed, the ION Arcade hardware device sends a Key Down character (when button is pressed or joystick is moved directionally) and a Key Up character (when the button is released, or the joystick is moved from its location). The application being made to work with the ION Arcade hardware device will need to be able to interpret these commands, as Key Up and Key Down characters are necessary for successful Application Submissions. Note, they say that it is a Bluetooth connected protocol, but in reality, a hard wired keyboard device works just as well. So, instead of dealing with the complexities, pairing, and power consumption of a Bluetooth device, we can instead program a Teensy to press the keys for us over a USB cable! The Teensy is going to act as a USB HID keyboard so that it can "type" the keystrokes that the icade standard uses. Here's what the button mapping looks like for the standard icade: Adafruit Industries Page 8 of 65

9 Keyboard Mapping The first test I performed was to figure out the key mappings needed. I did so by pairing a Bluetooth keyboard to the ipad, launching Pinball Arcade, and setting the controller type to icade in the game's settings. Then, I typed the key pairs seen in the diagram above until I knew which key combos did what. The mapping for pinball looks like this: Adafruit Industries Page 9 of 65

10 There are also additional key mappings for a few table tilt directions, so you could probably implement those with physical tilt or vibration sensors! Test Code The next test I did was to have the Teensy press the flipper buttons by telling it to "type" the "LVHR" combo over and over. Here's how you can make the Teensy type the keystrokes. First, make sure you've followed these basic guide to setting up the Arduino IDE ( and installing ( and using the Teensy board ( Once you've successfully uploaded the basic Blink sketch to your Teensy, move on to the next step. Adafruit Industries Page 10 of 65

11 Load the Simple.ino sketch found in the Arduino IDE under File > Examples > Teensy > USB_Keyboard > Simple Adafruit Industries Page 11 of 65


12 Make sure your Arduino IDE board settings are set up for the Teensy as seen here, including the USB type as Keyboard, plug in the Teensy over USB, launch the Teensy loader application, and then upload the sketch. Adafruit Industries Page 12 of 65


13 Once the program is uploaded, place your cursor in a text field and you'll see that the Teensy will type the words "Hello World" followed by in incrementing number. Let's adjust this program so that it types the keystrokes for the pinball flippers. Remember, in the icade standard it is a keystroke to press a button and a second, different keystroke to release the button. "hr" controls the left flipper, and "lv controls the right flipper. Despite the chart from the icade spec showing upper case letters, it actually recognizes lower case instead. //Pinball Arcade Controller Test //Uses Teensy 3.2 to act as icade interface to The Pinball Arcade on ipad //John Park for Adafruit /* Simple USB Keyboard Example Teensy becomes a USB keyboard and types characters You must select Keyboard from the "Tools > USB Type" menu Adafruit Industries Page 13 of 65
; delay(100); Keyboard.print(\"l\"); delay(100); Keyboard.print(\"r\"); delay(100); Keyboard.print(\"v\"); } Adafruit Industries https://learn.adafruit.")
14 */ void setup() { Serial.begin(9600); delay(1000); } void loop() { // Your computer will receive these characters from a USB keyboard. Keyboard.print("h"); delay(100); Keyboard.print("l"); delay(100); Keyboard.print("r"); delay(100); Keyboard.print("v"); } Adafruit Industries Page 14 of 65

15 OK, time to test it on the ipad or iphone! Open your notepad app on the ios device, and then plug the Teensy into it with a USB micro B/A cable and the USB to Lighting "camera adapter". It will start typing those letters furiously! rvhlrvhlrvhlrvhlrvhlrvhlrvhlrvhlrvhlrvhlrvhlrvhlrvh Unplug the Teensy before you proceed. Next, let's see it flip those flippers. Install The Pinball Arcade ( from the App Store, and then launch it. In the settings (gear icon on the main screen) tap the icade button so that it reads icade: ipad Now, launch a table, and press START. Before you pull the plunger, plug in the Teensy. After a moment you'll see the flippers start to go! Launch the ball and watch as the random flipper spamming manages to play a fairly decent game of pinball! Controller Code Now, let's program the Teensy to use the real button presses to send the keystrokes. Adafruit Industries Page 15 of 65
16 //Pinball Arcade Controller Test //Uses Teensy 3.2 to act as icade interface to The Pinball Arcade on ipad //John Park for Adafruit /* USB Keyboard button state example Teensy becomes a USB keyboard and types characters You must select Keyboard from the "Tools > USB Type" menu */ #define LED_PIN 13 #define RIGHTFLIPPER_PIN 12 int buttonstate = 0; //variable to store current state of button int laststate = 1; //variable to store state of last button press void setup() { pinmode(led_pin, OUTPUT); digitalwrite(led_pin, HIGH); //turn on LED so we know it's on pinmode(rightflipper_pin, INPUT_PULLUP); } void loop() { buttonstate = digitalread(rightflipper_pin); if(buttonstate==low && buttonstate!= laststate){ //it's been pressed Serial.println("Flipped "); Keyboard.print("l"); delay(100); digitalwrite(led_pin, LOW); //blink off the LED laststate=0; } else if(buttonstate==high && buttonstate!= laststate){ //it's been released Serial.println(" Not flipped"); Keyboard.print("v"); delay(100); digitalwrite(led_pin, HIGH); //turn back on the LED laststate=1; } } Copy and upload this to your Teensy, then use a jumper wire to short pin 12 to ground and release it. Each time you do, the LED will blink and it will send an "l" and a "v". Plug this in to your ipad and try it out as the right flipper button. Adafruit Industries Page 16 of 65

17 Adafruit Industries Page 17 of 65
18 Full Code In researching the icade standard I came across an excellent project by Allen C. Huffman ( that uses a Teensy as an icade gamepad controller. You can use that code and the pin mappings for this project, too! I made some small adjustments to the code, and included keyboard mapping comments in line. Copy the code seen here, and upload it to your Teensy. Here are the mappings: Plunger on pin 1 Left flipper on pin 8 Right flipper on pin 12 LED on pin 13 /* Teensy icade Input by Allen C. Huffman (alsplace@pobox.com) Adafruit Industries Page 18 of 65
19 Monitor digital inputs, then emit a USB keyboard character mapped to an icade button depending on the pin status. The character will be the "hold" character for pin connected (N.O. button push) and "release" character for pin disconnected (N.O. button released). Pin 13 is used for lighting the onboard LED as a "we are alive" indicator. This software was written to allow a Teensy 2.0/3.2 to interface between arcade buttons and an ipad via USB and Camera Connector Kit allenh - Initial version, based on my ArduinoAIDI code. minor adjustments by john park, July 2017 for Pinball Arcade */ #define VERSION "0.0" #define LED_OFF //#include <eeprom.h> //#include <avr/wdt.h> /* icade keyboard mappings. See developer doc at: WE YT UF IM OG AQ< -->DC XZ HR JN KP LV Atari joystick port, looking at the male DB9 on the Atari. See: / Up Dn Lt Rt PA / Bt +5 Gd PB */ /* The following I/O pins will be used as digital inputs for each specific icade function. */ #define UP_PIN 0 #define DOWN_PIN 1 //icade plunger #define LEFT_PIN 2 #define RIGHT_PIN 3 #define BTN1_PIN 4 #define BTN2_PIN 5 #define BTN3_PIN 6 #define BTN4_PIN 7 #define BTN5_PIN 8 // icade left flipper #define BTN6_PIN 9 #define BTN7_PIN 10 #define BTN8_PIN 12 // icade right flipper /* Adafruit Industries Page 19 of 65
20 The following keys are the icade sequence (hold, release) for each function. Send "W" to indicate UP, and "E" when UP is released. */ #define UP_KEYS "we" #define DOWN_KEYS "xz" //icade plunger original key order "xz" //#define DOWN_KEYS "zx" //icade plunger flipped order for NC switch wiring #define LEFT_KEYS "aq" #define RIGHT_KEYS "dc" #define BTN1_KEYS "yt" #define BTN2_KEYS "uf" #define BTN3_KEYS "im" #define BTN4_KEYS "og" #define BTN5_KEYS "hr" // icade left flipper #define BTN6_KEYS "jn" #define BTN7_KEYS "kp" #define BTN8_KEYS "lv" // icade right flipper #define DI_PIN_COUNT 12 // 12 pins used. #define DI_PIN_START 1 // First I/O pin. #define DI_PIN_END 20 // Last I/O pin. byte mypins[di_pin_count] = {UP_PIN, DOWN_PIN, LEFT_PIN, RIGHT_PIN, BTN1_PIN, BTN2_PIN, BTN3_PIN, BTN4_PIN, BTN5_PIN, BTN6_PIN, BTN7_PIN, BTN8_PIN}; char icadekeymap[][di_pin_count] = {UP_KEYS, DOWN_KEYS, LEFT_KEYS, RIGHT_KEYS, BTN1_KEYS, BTN2_KEYS, BTN3_KEYS, BTN4_KEYS, BTN5_KEYS, BTN6_KEYS, BTN7_KEYS, BTN8_KEYS}; char icadedesc[][di_pin_count] = {"Up", "Down", "Left", "Right", "Btn1", "Btn2", "Btn3", "Btn4", "Btn5", "Btn6", "Btn7", "Btn8"}; /* We want a very short debounce delay for an arcade controller. */ #define DI_DEBOUNCE_MS 10 // 100ms (1/10th second) #define LED_PIN 11 #define POWER_LED 13 //to show power on #define LEDBLINK_MS 1000 /* */ /* For I/O pin status and debounce. */ unsigned int digitalstatus[di_pin_count]; // Last set PIN mode. unsigned long digitaldebouncetime[di_pin_count]; // Debounce time. //unsigned long digitalcounter[di_pin_count]; // Times button pressed. unsigned int digitaldebouncerate = DI_DEBOUNCE_MS; // Debounce rate. /* For the blinking LED (heartbeat). */ unsigned int ledstatus = LOW; // Last set LED mode. Adafruit Industries Page 20 of 65
21 unsigned long ledblinktime = 0; // LED blink time. unsigned int ledblinkrate = LEDBLINK_MS; // LED blink rate. unsigned int pinson = 0; /* */ void setup() { // Just in case it was left on... //wdt_disable(); // Initialize the serial port. Serial.begin(9600); // Docs say this isn't necessary for Uno. //while(!serial) { } showheader(); // Initialize watchdog timer for 2 seconds. //wdt_enable(wdto_4s); // LOW POWER MODE! // Pins default to INPUT mode. To save power, turn them all to OUTPUT // initially, so only those being used will be turn on. See: // for (int thispin=0; thispin < DI_PIN_COUNT; thispin++ ) { pinmode(thispin, OUTPUT); } // Disable Unused Peripherals // ADCSRA = 0; // Initialize the pins and digitalpin array. for (int thispin=0; thispin < DI_PIN_COUNT; thispin++ ) { // Set pin to be digital input using pullup resistor. pinmode(mypins[thispin], INPUT_PULLUP); // Set the current initial pin status. digitalstatus[thispin] = HIGH; //digitalread(thispin+di_pin_start); // Clear debounce time. digitaldebouncetime[thispin] = 0; //digitalcounter[thispin] = 0; } // Set LED pin to output, since it has an LED we can use. pinmode(led_pin, OUTPUT); pinmode(power_led, OUTPUT); digitalwrite(power_led, HIGH); Serial.println("Ready."); Adafruit Industries Page 21 of 65
22 } /* */ void loop() { // Tell the watchdog timer we are still alive. //wdt_reset(); #ifndef LED_OFF // LED blinking heartbeat. Yes, we are alive. if ( (long)(millis()-ledblinktime) >= 0 ) { // Toggle LED. if (ledstatus==low) // If LED is LOW... { ledstatus = HIGH; //...make it HIGH. } else { ledstatus = LOW; //...else, make it LOW. } // Set LED pin status. if (pinson==0) digitalwrite(led_pin, ledstatus); // Reset "next time to toggle" time. ledblinktime = millis()+ledblinkrate; } #endif // Check for serial data. if (Serial.available() > 0) { // If data ready, read a byte. int incomingbyte = Serial.read(); // Parse the byte we read. switch(incomingbyte) { case '?': showstatus(); break; default: break; } } /* */ // Loop through each Digital Input pin. for (int thispin=0; thispin < DI_PIN_COUNT; thispin++ ) { // Read the pin's current status. unsigned int status = digitalread(mypins[thispin]); // In pin status has changed from our last toggle... if (status!= digitalstatus[thispin]) { Adafruit Industries Page 22 of 65
23 // Remember when it changed, starting debounce mode. // If not currently in debounce mode, if (digitaldebouncetime[thispin]==0) { // Set when we can accept this as valid (debounce is considered // done if the time gets to this point with the status still the same). digitaldebouncetime[thispin] = millis()+digitaldebouncerate; } // Check to see if we are in debounce detect mode. if (digitaldebouncetime[thispin]>0) { // Yes we are. Have we delayed long enough yet? if ( (long)(millis()-digitaldebouncetime[thispin]) >= 0 ) { // Yes, so consider it switched. // If pin is Active LOW, if (status==low) { // Emit BUTTON PRESSED string. Serial.print(iCadeDesc[thisPin]); Serial.print(" pressed (sending "); Serial.print(iCadeKeymap[thisPin][0]); Serial.println(" to icade)."); Keyboard.print(iCadeKeymap[thisPin][0]); //digitalcounter[thispin]++; pinson++; #ifndef LED_OFF digitalwrite(led_pin, HIGH); #endif } else { // Emit BUTTON RELEASED string. Serial.print(iCadeDesc[thisPin]); Serial.print(" released (sending "); Serial.print(iCadeKeymap[thisPin][1]); Serial.println(" to icade)."); Keyboard.print(iCadeKeymap[thisPin][1]); if (pinson>0) pinson--; if (pinson==0) digitalwrite(led_pin, LOW); } // Remember current (last set) status for this pin. digitalstatus[thispin] = status; // Reset debounce time (disable, not looking any more). digitaldebouncetime[thispin] = 0; } // End of if ( (long)(millis()-digitaldebouncetime[thispin]) >= 0 ) } // End of if (digitaldebouncetime[thispin]>0) } else // No change? Flag no change. { // If we were debouncing, we are no longer debouncing. digitaldebouncetime[thispin] = 0; } } // End of (int thispin=0; thispin < DI_PIN_COUNT; thispin++ ) Adafruit Industries Page 23 of 65
24 } /* */ void showheader() { int i; // Emit some startup stuff to the serial port. Serial.print("iCadeTeensy "); Serial.print(VERSION); Serial.println(" by Allen C. Huffman (alsplace@pobox.com)"); Serial.print(DI_PIN_COUNT); Serial.print(" DI Pins ("); for (i=0; i<di_pin_count; i++) { Serial.print(myPins[i]); Serial.print("="); Serial.print(iCadeDesc[i]); Serial.print(" "); } Serial.print("), "); Serial.print(digitalDebounceRate); Serial.println("ms Debounce."); } /* */ void showstatus() { showdigitalinputstatus(); } /* */ void showdigitalinputstatus() { Serial.print("DI: "); for (int thispin=0; thispin < DI_PIN_COUNT; thispin++ ) { // Read the pin's current status. Serial.print(iCadeDesc[thisPin]); Serial.print("="); Serial.print(digitalRead(myPins[thisPin])); Serial.print(" "); //Serial.print(" ("); //Serial.print(digitalCounter[thisPin]); //Serial.print(") "); } Serial.println(""); } /* */ Adafruit Industries Page 24 of 65

 and wire up three arcade buttons instead,")

25 // End of file. If you don't have the Duo Pinball controller you can skip to the last page of the guide ( and wire up three arcade buttons instead, put them in a cardboard enclosure, and you'll be ready to play! Adafruit Industries Page 25 of 65
26 To modify the Duo Pinball controller and transplant the Teensy into it, move on to the next page. Adafruit Industries Page 26 of 65

27 Duo Pinball Teardown Let's take apart the Duo Pinball controller and have a look inside. Adafruit Industries Page 27 of 65

28 Open it Up Adafruit Industries Page 28 of 65


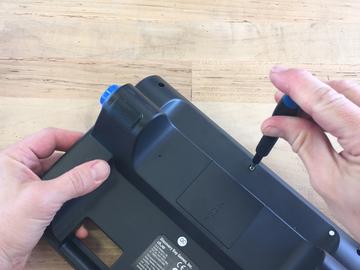
29 Using a #1 Philips screwdriver, remove the seven screws that hold together the case. Note, two of the screws are hiding under the rubber feet, so go ahead and peel them off and save them for later. Now, pry open the case using a spudger or slotted screwdriver. Be careful not to pull to hard on the wire that connects the LED to the board -- you can remove the piece of tape that holds it in Adafruit Industries Page 29 of 65


30 place so you can lay both halves side by side. Now, pry open the case using a spudger or slotted screwdriver. Be careful not to pull to hard on the wire that connects the LED to the board -- you can remove the piece of tape that holds it in place so you can lay both halves side by side. Adafruit Industries Page 30 of 65

31 Adafruit Industries Page 31 of 65

32 Adafruit Industries Page 32 of 65


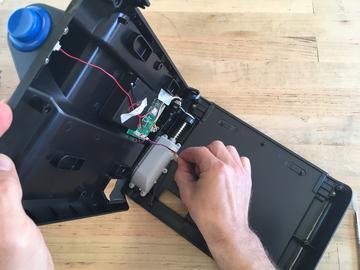
33 Identify the Parts Inside you'll see a few key elements: Controller board Left flipper button momentary switch Right flipper button momentary switch Plunger momentary switch and IR sensor Plunger/spring assembly Battery box Indicator LED Adafruit Industries Page 33 of 65

34 Remove Old Board Adafruit Industries Page 34 of 65


35 You can unplug each of the cables from the main board now, and then unscrew it. We won't be using it, so you can set it aside in your old electronic junk pile. One curiosity is the reset button on the back. Mysterious! Adafruit Industries Page 35 of 65

36 Prep the Wires To prep the wires, first remove the battery box wires, we won't use them. Adafruit Industries Page 36 of 65

37 Next, snip the connectors off of the remaining wires running from both buttons, the plunger sensor, and the LED indicator. Adafruit Industries Page 37 of 65

38 Adafruit Industries Page 38 of 65

39 Adafruit Industries Page 39 of 65

40 The plunger sensor board is pretty darned nifty! It's got a momentary snap action switch on it to detect the plunger "closed/opened" state, as well as an IR distance sensor to determine the position of the plunger! We'll only use the switch, since the icade standard doesn't have a way to express the analog value of plunger position to the game. Adafruit Industries Page 40 of 65
41 You can test the button wiring with the continuity testing mode on your multimeter -- the plunger switch actually has two modes you can use depending on which wires you connect. The white wire, labeled SIN on the board, is a constant, so connect your first lead to it. If you connect the other lead to the red VCC wire the switch is normally closed (NC) as seen here. Adafruit Industries Page 41 of 65

42 Adafruit Industries Page 42 of 65
43 Instead, if you connect the second lead to the black GND wire, it is is normally open (NO). Adafruit Industries Page 43 of 65
44 Adafruit Industries Page 44 of 65
45 You could pick either one and then make an adaptation in software (I chose red originally when I built one on the video live stream and then reversed the key commands in the Arduino sketch to make it work) but let's look at the way the plunger works to decide the best method. The plunger resting position keeps the switch pushed down. So, when the software checks it, we don't want it to react to the resting state. By choosing the black wire, we can have the software see that switch as open (what we'd colloquially call "unpressed" even though it is physically pushed in). Then, when the plunger is pulled back it will register the switch as closed (what we'd called "pressed" again, even though the button is now no longer pushed in), and send the keystroke to the game. So, the black wire is the one we'll go with when it's time so solder! Wire Common Ground Adafruit Industries Page 45 of 65


46 To simplify the wiring runs back to the board later, we can solder all of the black ground wires to each other, and then make a single connection to the Teensy board. This is good if you want to keep things small, since the Teensy 3.2 only has a single GND pin exposed, and this allows us to avoid adding perf board with an extra ground rail. Cut and strip a short length of black wire to add to the bundle. Twist and solder them all together, or use a wire Adafruit Industries Page 46 of 65


47 splice tap to connect them, leaving the free end of the added wire to solder to the Teensy later. You can add a bit of heat shrink tubing to insulate the connection. USB Wiring Hole Adafruit Industries Page 47 of 65

48 One other bit of prep to do here is to create a hole in the case for the USB cable. I made mine in the back of the battery box using a 5/8" Forstner bit in a power drill, but you can use a Dremel, saw, hand drill, or any other method you like so long as you can fit the small end of the cable through. Adafruit Industries Page 48 of 65

49 Adafruit Industries Page 49 of 65

50 Adafruit Industries Page 50 of 65

51 Adafruit Industries Page 51 of 65

52 Adafruit Industries Page 52 of 65

53 Now it's time to transplant the Teensy! Adafruit Industries Page 53 of 65
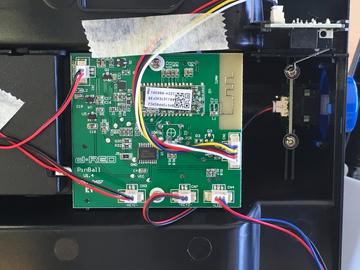
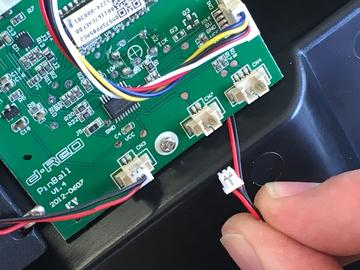
54 Teensy Transplant Your controller is now ready for its new brain! You'll wire and solder these connections: Switch common ground black wires to Teensy GND Plunger white wire to Teensy pin 1 Left flipper red wire to Teensy pin 8 Right flipper red wire toteensy pin 12 LED anode red wire (or blue if you prefer the blue glow) to Teensy pin 13 LED cathode black wire to a 4.7K resistor and then to common GND The resistor isn't strictly required -- the LED is just very bright without it! Adafruit Industries Page 54 of 65

55 When you solder the resistor in line with the LED, you can add heat shrink tubing over the resistor to insulate it. Adafruit Industries Page 55 of 65

56 Adafruit Industries Page 56 of 65

57 Adafruit Industries Page 57 of 65

58 After you've soldered the wires, test it out to make sure everything works as planned. Be a Pinball Wizard You're just about ready to play! Carefully close up the controller case, being careful not to pinch any of the wires. You can use some hot glue or tape to keep the USB wire in place. Then, screw in the case screws and reapply the rubber feet. If the original adhesive isn't enough to keep them in place, you can use some double stick tape. Adafruit Industries Page 58 of 65

59 Adafruit Industries Page 59 of 65

60 Adafruit Industries Page 60 of 65

61 Adafruit Industries Page 61 of 65

62 Adafruit Industries Page 62 of 65

63 Now, turn on your ipad or iphone, launch the game, and plug in the controller USB cable to the Lightning connector and into the ipad. The LED will light up, and you're all set. Have fun playing virtual pinball with physical controls! Adafruit Industries Page 63 of 65

64 Adafruit Industries Page 64 of 65

65 Adafruit Industries Last Updated: :07:05 AM UTC Page 65 of 65
Interior Purse Light. Created by Becky Stern. Last updated on :41:08 PM UTC
 Interior Purse Light Created by Becky Stern Last updated on 2018-08-22 03:41:08 PM UTC Guide Contents Guide Contents Overview Circuit Diagram Stitch Sequins Add Tape Arduino Code CircuitPython Code Use
Arduino Lesson 6. Digital Inputs
 Arduino Lesson 6. Digital Inputs Created by Simon Monk Last updated on 2018-02-27 10:20:04 PM UTC Guide Contents Guide Contents Overview Parts Part Qty Breadboard Layout Arduino Code Push Switches Other
Coffee Detonator: The TNT Plunger Grinder
 Coffee Detonator: The TNT Plunger Grinder Created by John Park Last updated on 2017-04-12 08:04:36 PM UTC Guide Contents Guide Contents Overview Materials Voltage Conversion AC/DC Voltage Divider Microcontroller
Mad Science Test Tube Rack
 Mad Science Test Tube Rack Created by John Park Last updated on 2016-10-17 09:21:01 PM UTC Guide Contents Guide Contents Overview Lighted Test Tube Parts Materials and Tools Optional Test Tube Rack Parts
Android GBoard Morse Code Control with Circuit Playground Express
 Android GBoard Morse Code Control with Circuit Playground Express Created by Dave Astels Last updated on 2018-08-22 04:10:30 PM UTC Guide Contents Guide Contents Overview Parts Materials for the box Installing
Neon LED Signs. Created by John Park. Last updated on :11:09 PM UTC
 Neon LED Signs Created by John Park Last updated on 2018-08-22 04:11:09 PM UTC Guide Contents Guide Contents Overview Parts Materials Tools Build the Sign Driver Preparation Solder the Circuit Solder the
i2c/spi LCD Backpack Created by lady ada Last updated on :11:04 PM UTC
 i2c/spi LCD Backpack Created by lady ada Last updated on 2017-08-16 05:11:04 PM UTC Guide Contents Guide Contents Overview Which LCD to Use? Wait - the backpack has 16 holes, but my LCD only has 14 pins!
Magical Mistletoe. Created by Leslie Birch. Last updated on :45:29 PM UTC
 Magical Mistletoe Created by Leslie Birch Last updated on 2018-08-22 03:45:29 PM UTC Guide Contents Guide Contents Overview Tools & Supplies Circuit Diagram Test the Sensor Prepare Parts Attach LED Sequins
Interactive Gift Box. Created by codingpro. Last updated on :47:40 AM UTC
 Interactive Gift Box Created by codingpro Last updated on 2018-01-10 01:47:40 AM UTC Guide Contents Guide Contents Overview Adafruit GEMMA M0 - Miniature wearable electronic platform Lithium Ion Polymer
Adafruit Capacitive Touch Sensor Breakouts
 Adafruit Capacitive Touch Sensor Breakouts Created by Bill Earl Last updated on 2018-08-22 03:36:13 PM UTC Guide Contents Guide Contents Overview Momentary Toggle 5-Pad Momentary Assembly and Wiring Installing
Adafruit IO Basics: Digital Output
 Adafruit IO Basics: Digital Output Created by Todd Treece Last updated on 2017-09-12 03:10:33 PM UTC Guide Contents Guide Contents Overview Adafruit IO Setup Creating the Digital Feed Adding the Toggle
NeoPixie Dust Bag with Circuit Playground Express
 NeoPixie Dust Bag with Circuit Playground Express Created by John Park Last updated on 2017-12-20 10:00:29 PM UTC Guide Contents Guide Contents Overview Code It Setup Animation Color Touch Variable Color
Circuit Playground Digital Input
 Circuit Playground Digital Input Created by Carter Nelson Last updated on 2017-02-27 03:36:50 AM UTC Guide Contents Guide Contents Overview Required Parts Before Starting Digital Signals 3V Logic Pocket
Chirping Plush Owl Toy
 Chirping Plush Owl Toy Created by Becky Stern Last updated on 2018-11-21 08:56:55 PM UTC Guide Contents Guide Contents Overview Tools & Supplies Solder Circuit Arduino Code CircuitPython Code Assemble
Bunny Ears with MakeCode
 Bunny Ears with MakeCode Created by Erin St Blaine Last updated on 2018-08-22 04:05:47 PM UTC Guide Contents Guide Contents Introduction Tools & Other Materials Programming with MakeCode Set Up the Light
Clockwork Goggles. Created by John Park. Last updated on :03:10 PM UTC
 Clockwork Goggles Created by John Park Last updated on 2018-08-22 04:03:10 PM UTC Guide Contents Guide Contents Overview Assemble Circuit and Goggles CircuitPython Setup and Code Rock the Goggles 2 3 6
Portable Apple Watch Charger
 Portable Apple Watch Charger Created by Ruiz Brothers Last updated on 2017-10-22 09:58:04 PM UTC Guide Contents Guide Contents Overview Smart Charging Prerequisite Guides Parts, Tool & Supplies Circuit
Feather Weather Lamp. Created by Ruiz Brothers. Last updated on :54:26 PM UTC
 Feather Weather Lamp Created by Ruiz Brothers Last updated on 2018-08-22 03:54:26 PM UTC Guide Contents Guide Contents Overview Weather Reactive Pixels Prerequisite Guides Parts Tools & Supplies Circuit
LED Lightbox. Created by Sam Clippinger. Last updated on :50:00 AM UTC
 LED Lightbox Created by Sam Clippinger Last updated on 2016-09-03 01:50:00 AM UTC Guide Contents Guide Contents Overview TL;DR Skill Level Parts List Yellow sticker reads: "Bad planning on your part does
Crawling Baby Sea Turtle Robot
 Crawling Baby Sea Turtle Robot Created by Dano Wall Last updated on 2018-08-22 04:10:26 PM UTC Guide Contents Guide Contents Overview Save the Wee Turtles Household Materials Adafruit Electronics Create
Mystery Box: Haunted Radio
 Mystery Box: Haunted Radio Created by John Park Last updated on 2018-08-22 04:01:09 PM UTC Guide Contents Guide Contents Overview Parts & Materials Tools Radio Reuse Disassembly Tuning Mechanism On/Off
Trinket-Powered Conference Room Occupancy Display
 Trinket-Powered Conference Room Occupancy Display Created by Mike Barela Last updated on 2018-08-22 03:38:56 PM UTC Guide Contents Guide Contents Overview Build Wiring Diagrams Populating the Board Code
Audio Prank Gift Box. Created by Becky Stern. Last updated on :46:15 PM UTC
 Audio Prank Gift Box Created by Becky Stern Last updated on 2018-08-22 03:46:15 PM UTC Guide Contents Guide Contents Overview Circuit Diagram Prepare Components Build Circuit Wrap and Give 2 3 5 6 12 14
FLORA TV-B-Gone. Created by Becky Stern. Last updated on :32:57 PM UTC
 FLORA TV-B-Gone Created by Becky Stern Last updated on 2018-08-22 03:32:57 PM UTC Guide Contents Guide Contents Overview Parts Tutorials Transistors Resistors LEDs Pushbutton Program it Power Fabric pinwheel
Wind Blowing Emoji Prop
 Wind Blowing Emoji Prop Created by John Park Last updated on 2018-08-22 04:05:17 PM UTC Guide Contents Guide Contents Overview Code it with MakeCode Start Up Variables On Loud Sound If - Else Iterate Debounce
'Sup Brows. Created by Kate Hartman. Last updated on :52:04 PM UTC
 'Sup Brows Created by Kate Hartman Last updated on 2018-08-22 03:52:04 PM UTC Guide Contents Guide Contents Overview Circuit Bluetooth Test Upload the Code Place the Sensor View Sensor Values Via Bluetooth
Adafruit DRV2605 Haptic Controller Breakout
 Adafruit DRV2605 Haptic Controller Breakout Created by lady ada Last updated on 2018-08-20 03:28:51 PM UTC Guide Contents Guide Contents Overview Pinouts Power Pins I2C Pins Other! Assembly Prepare the
Adafruit PowerBoost 500 Shield
 Adafruit PowerBoost 500 Shield Created by lady ada Last updated on 2018-08-22 03:43:27 PM UTC Guide Contents Guide Contents Overview Pinouts DC/DC Boost section Indicator LEDs Charging section Power Switch
Trinket NeoPixel LED Longboard
 Trinket NeoPixel LED Longboard Created by Ruiz Brothers Last updated on 2017-10-02 06:00:32 PM UTC Guide Contents Guide Contents Overview Parts Tools & Supplies Prerequisite Guides 3D Printing PLA Material
TSL2561 Luminosity Sensor
 TSL2561 Luminosity Sensor Created by lady ada Last updated on 2018-01-27 12:17:52 AM UTC Guide Contents Guide Contents Overview Wiring the TSL2561 Sensor Breakout Board Prep Wiring up the sensor Arduino
NeoPixel Ring Bangle Bracelet
 NeoPixel Ring Bangle Bracelet Created by Becky Stern Last updated on 2017-09-28 11:14:48 PM UTC Guide Contents Guide Contents Overview Circuit Diagram Build it! Arduino Code CircuitPython Code Planning
Circuit Playground Express Laser Tag
 Circuit Playground Express Laser Tag Created by John Park Last updated on 2017-11-14 01:56:23 AM UTC Guide Contents Guide Contents Build a Laser Tag Game Code the Laser Tag Game MakeCode Transmitting IR
Trellis 3D Printed Enclosure
 Trellis 3D Printed Enclosure Created by Ruiz Brothers Last updated on 2018-08-22 03:39:07 PM UTC Guide Contents Guide Contents Overview Parts Tools & Supplies Modeling 123D Design Customize Measuring Parts
Reindeer Mask with Animated Eyes
 Reindeer Mask with Animated Eyes Created by Dano Wall Last updated on 2018-12-05 10:50:10 PM UTC Guide Contents Guide Contents Overview Parts Adafruit HalloWing M0 Express Convex Plastic Lens with Edge
Adafruit TPL5110 Power Timer Breakout
 Adafruit TPL5110 Power Timer Breakout Created by lady ada Last updated on 2017-12-11 06:28:19 AM UTC Guide Contents Guide Contents Overview Pinouts Power Pins Control Pins Assembly Prepare the header strip:
Toy Car Speed Timer. Created by Kirby Griese. Last updated on :13:49 PM UTC
 Toy Car Speed Timer Created by Kirby Griese Last updated on 2017-03-20 09:13:49 PM UTC Guide Contents Guide Contents Overview Parts needed Prerequisites 3D Printing Assembly Wiring Software Use It 2 3
Adafruit Color Sensors
 Adafruit Color Sensors Created by Bill Earl Last updated on 2018-11-05 03:48:12 PM UTC Guide Contents Guide Contents Overview Assembly and Wiring Assembly (breakout version only) Position the header Position
Bluetooth Controlled NeoPixel Headphones
 Bluetooth Controlled NeoPixel Headphones Created by Ruiz Brothers Last updated on 2017-03-09 07:38:05 PM UTC Guide Contents Guide Contents Overview Smart LED HeadPhones Prerequisite Guides Parts Tools
Adafruit VL53L0X Time of Flight Micro-LIDAR Distance Sensor Breakout
 Adafruit VL53L0X Time of Flight Micro-LIDAR Distance Sensor Breakout Created by lady ada Last updated on 2017-12-28 11:56:14 PM UTC Guide Contents Guide Contents Overview Sensing Capablities Pinouts Power
ISS Pin. Created by Leslie Birch. Last updated on :27:30 PM UTC
 ISS Pin Created by Leslie Birch Last updated on 2017-04-18 09:27:30 PM UTC Guide Contents Guide Contents Overview Tools & Supplies Solder Circuit Create Cover Code Set Up IFTTT Want a Test? Wear It! 2
Monochrome OLED Breakouts
 Monochrome OLED Breakouts Created by lady ada Last updated on 2018-01-02 08:35:47 PM UTC Guide Contents Guide Contents Overview Power Requirements OLED Power Requirements 5V- ready 128x64 and 128x32 OLEDs
Adafruit IO Basics: Digital Input
 Adafruit IO Basics: Digital Input Created by Todd Treece Last updated on 2017-07-14 11:49:29 PM UTC Guide Contents Guide Contents Overview Adafruit IO Setup Creating the Digital Feed Adding the Gauge Block
Adafruit APDS9960 breakout
 Adafruit APDS9960 breakout Created by Dean Miller Last updated on 2018-01-19 11:18:59 PM UTC Guide Contents Guide Contents Overview Pinouts Power Pins: Logic pins: Assembly Prepare the header strip: Add
Alohamora Bottle. Created by Erin St Blaine. Last updated on :58:53 PM UTC
 Alohamora Bottle Created by Erin St Blaine Last updated on 2017-06-16 10:58:53 PM UTC Guide Contents Guide Contents Introduction Ingredients Tools Code 1. Arduino IDE 2. Teensyduino Installer 3. FastLED
Adabot Operation Game
 Adabot Operation Game Created by John Park Last updated on 2018-08-22 04:11:17 PM UTC Guide Contents Guide Contents Overview Parts Materials & Tools Build the Operating Table Print the Board and Pieces
Adafruit MPRLS Ported Pressure Sensor Breakout
 Adafruit MPRLS Ported Pressure Sensor Breakout Created by lady ada Last updated on 2018-09-26 08:51:24 PM UTC Guide Contents Guide Contents Overview Pinouts Power Pins: I2C Logic pins: Other pins: Arduino
Mystery Box: NeoMatrix Mk I
 Mystery Box: NeoMatrix Mk I Created by John Park Last updated on 2017-12-01 07:31:05 PM UTC Guide Contents Guide Contents Overview Make the Panels Build the NeoMatrix Keypad Display Modules Metro Mounting
Adafruit LED Sequins. Created by Becky Stern. Last updated on :02:00 AM UTC
 Adafruit LED Sequins Created by Becky Stern Last updated on 2018-03-02 04:02:00 AM UTC Guide Contents Guide Contents Overview Sewing with conductive thread Circuit Diagram GEMMA sequin hat Arduino Code
Sino:bit with Arduino
 Sino:bit with Arduino Created by Dave Astels Last updated on 2017-12-04 02:22:05 PM UTC Guide Contents Guide Contents Accelerometer and Magnetometer Magnetometer Accelerometer Adafruit Libraries Download
Circuit Playground Yoyo
 Circuit Playground Yoyo Created by Ruiz Brothers Last updated on 2018-01-13 05:56:02 AM UTC Guide Contents Guide Contents Overview 3D Printed NeoPixel Yoyo History of the Yo-Yo Expectations Parts Tools
Crickit Dancing Marionette Kit Created by Dano Wall. Last updated on :03:11 PM UTC
 Crickit Dancing Marionette Kit Created by Dano Wall Last updated on 2019-04-04 07:03:11 PM UTC Overview This project demonstrates how to build a robotic marionette that is controlled with four arcade-style
FLORA and GEMMA ICSP. Created by Becky Stern. Last updated on :42:16 PM UTC
 FLORA and GEMMA ICSP Created by Becky Stern Last updated on 2018-08-22 03:42:16 PM UTC Guide Contents Guide Contents Overview Reprogram FLORA over ICSP Reprogram GEMMA over ICSP 2 3 4 9 Adafruit Industries
Ping Pong Ball Launcher
 Ping Pong Ball Launcher Created by Dano Wall Last updated on 2019-01-25 03:19:13 AM UTC Guide Contents Guide Contents Overview Electronic Parts Circuit Playground Express USB cable - USB A to Micro-B Alkaline
Pushrod Garage. Created by John Park. Last updated on :07:30 PM UTC
 Pushrod Garage Created by John Park Last updated on 2018-08-22 04:07:30 PM UTC Guide Contents Guide Contents Overview Parts & Materials Tools Pushrod Mechanism Code it with MakeCode Functions On Start
Adafruit IO Basics: Analog Input
 Adafruit IO Basics: Analog Input Created by Todd Treece Last updated on 2018-08-22 03:47:38 PM UTC Guide Contents Guide Contents Overview Adafruit IO Setup Creating the Analog Feed Adding the Gauge Block
Adafruit TPL5111 Reset Enable Timer Breakout
 Adafruit TPL5111 Reset Enable Timer Breakout Created by lady ada Last updated on 2017-11-02 07:32:27 PM UTC Guide Contents Guide Contents Overview Pinouts Power Pins Control Pins Assembly Prepare the header
Celebration Spectacles
 Celebration Spectacles Created by Becky Stern Last updated on 2018-08-22 03:45:59 PM UTC Guide Contents Guide Contents Overview Circuit Diagram Assemble Circuit Test and Glue Wear 'em! 2 3 6 7 10 14 Adafruit
NeoMatrix 8x8 Word Clock
 NeoMatrix 8x8 Word Clock Created by Andy Doro Last updated on 2017-10-10 04:10:51 AM UTC Guide Contents Guide Contents Overview Parts List Parts Tools Circuit Assembly Overview Uploading Code Understanding
Paper Airplane Launcher
 Paper Airplane Launcher Created by Dano Wall Last updated on 2018-08-27 08:36:14 PM UTC Guide Contents Guide Contents Overview A Launching Platform The Electronics Materials Build the Launcher Attach Motors
Stumble-Bot. Created by Dano Wall. Last updated on :04:06 AM UTC
 Stumble-Bot Created by Dano Wall Last updated on 2018-09-06 05:04:06 AM UTC Guide Contents Guide Contents Overview Simply Stumbling We Have the Technology Other Supplies Leg Assembly Front Legs Back Legs
Using IFTTT with Adafruit IO to Make an IoT Door Detector
 Using IFTTT with Adafruit IO to Make an IoT Door Detector Created by Todd Treece Last updated on 2017-09-12 03:10:35 PM UTC Guide Contents Guide Contents Overview Adafruit.io + IFTTT Wiring Low Power Usage
Adafruit LED Sequins. Created by Becky Stern. Last updated on :00:06 PM EST
 Adafruit LED Sequins Created by Becky Stern Last updated on 2015-02-19 05:00:06 PM EST Guide Contents Guide Contents Overview Sewing with conductive thread GEMMA sequin hat 2 3 8 15 Adafruit Industries
Naughty or Nice Machine
 Naughty or Nice Machine Created by Brian Corteil Last updated on 2018-08-22 03:45:31 PM UTC Guide Contents Guide Contents Overview It knows if you have been Naughty or Nice! Make It! Parts The Case The
PyPortal NeoPixel Color Picker Created by Kattni Rembor. Last updated on :42:41 PM UTC
 PyPortal NeoPixel Color Picker Created by Kattni Rembor Last updated on 2019-03-27 10:42:41 PM UTC Overview This simple project adds a little color to your life with CircuitPython, PyPortal and NeoPixels.
Infinity Mirror Valentine's Candy Box
 Infinity Mirror Valentine's Candy Box Created by Kathy Ceceri Last updated on 2019-02-07 09:44:54 PM UTC Guide Contents Guide Contents Overview Parts List -- Mini Box Version Chibitronics Color LEDs Add-On
LED Eyes. Created by Ruiz Brothers. Last updated on :50:55 AM UTC
 LED Eyes Created by Ruiz Brothers Last updated on 2018-01-13 05:50:55 AM UTC Guide Contents Guide Contents Overview Parts, Tools and Supplies Enameled Copper Magnet Wire 11 meters / 0.1mm diameter Adafruit
Slider Crank Mechanism -- from Cardboard and Craft Sticks
 Slider Crank Mechanism -- from Cardboard and Craft Sticks Created by John Park Last updated on 2018-08-22 04:07:21 PM UTC Guide Contents Guide Contents Overview Materials Tools Build the Slider Crank Build
GPS Logging Dog Harness
 GPS Logging Dog Harness Created by Becky Stern Last updated on 2015-01-15 10:15:19 PM EST Guide Contents Guide Contents Overview Circuit Diagram Sew Circuit Use It! 2 3 5 6 15 Adafruit Industries https://learn.adafruit.com/gps-logging-dog-harness
Adafruit ATWINC1500 WiFi Breakout
 Adafruit ATWINC1500 WiFi Breakout Created by lady ada Last updated on 2018-01-29 08:25:04 PM UTC Guide Contents Guide Contents Overview Pinouts Power Pins SPI Pins Other SPI Interface Pins Assembly Prepare
Adafruit Mini TFT " 160x80
 Adafruit Mini TFT - 0.96" 160x80 Created by lady ada Last updated on 2017-11-17 05:56:10 PM UTC Guide Contents Guide Contents Overview Pinouts Assembly Prepare the header strip: Add the breakout board:
Adafruit GPIO Expander Bonnet for Raspberry Pi Created by Kattni Rembor. Last updated on :12:47 PM UTC
 Adafruit GPIO Expander Bonnet for Raspberry Pi Created by Kattni Rembor Last updated on 2019-03-09 11:12:47 PM UTC Overview The Raspberry Pi is an amazing single board computer - and one of the best parts
Circuit Playground Express Head-Tilt Ears
 Circuit Playground Express Head-Tilt Ears Created by Dave Astels Last updated on 2018-10-09 04:07:03 PM UTC Guide Contents Guide Contents Overview Parts Circuit Playground Express Micro servo Lithium Ion
Prophet 600 GliGli mod
 Prophet 600 GliGli mod Created by Collin Cunningham Last updated on 2018-08-22 04:04:56 PM UTC Guide Contents Guide Contents Overview What you'll need Program the Teensy++ Modify the Teensy++ Prep header
Light-Up Angler Fish Embroidery
 Light-Up Angler Fish Embroidery Created by Becky Stern Last updated on 2018-08-22 03:35:36 PM UTC Guide Contents Guide Contents Overview Tools & Supplies Layout & Circuit Diagram Sew Circuit Code Hand
Solar Boost Bag. Created by Becky Stern. Last updated on :44:55 PM UTC
 Solar Boost Bag Created by Becky Stern Last updated on 2018-08-22 03:44:55 PM UTC Guide Contents Guide Contents Overview 3D Design Files Customize Design Assemble Circuit Prepare Solar Panel Enclosure
Snake Charmer Box. Created by Dano Wall. Last updated on :07:25 PM UTC
 Snake Charmer Box Created by Dano Wall Last updated on 2018-08-22 04:07:25 PM UTC Guide Contents Guide Contents Overview Materials Circuit Playground Express Standard servo - TowerPro SG-5010 Small Alligator
Ring Doorbell is 4.98 x 2.43 x 0.87 inches, x 6.17 x 2.21 cm.
 Ring Q&A HOW DOES RING VIDEO DOORBELL WORK? Ring Video Doorbell connects to your home Wi-Fi network and sends real-time notifications to your smart phone or tablet when someone is at your door. Using our
Crickit Carnival Bumper Bot
 Crickit Carnival Bumper Bot Created by John Park Last updated on 2018-08-22 04:08:52 PM UTC Guide Contents Guide Contents Overview Parts Materials and Tools Build the Bumper Bot Cut the Cardboard Chassis
Tent Lantern. Created by Timothy Reese. Last updated on :17:25 AM UTC
 Tent Lantern Created by Timothy Reese Last updated on 2017-07-14 05:17:25 AM UTC Guide Contents Guide Contents Overview Things you'll need: What You'll Learn: 3D Printing Code Assembly Wiring Diagram Soldering
Sword & Wand Prop Effects with Circuit Playground
 Sword & Wand Prop Effects with Circuit Playground Created by John Park Last updated on 2018-01-13 05:32:54 AM UTC Guide Contents Guide Contents Overview Circuit Playground Express with MakeCode Lots of
Guardian Shield+ Zelda Breath of the Wild
 Guardian Shield+ Zelda Breath of the Wild Created by Ruiz Brothers Last updated on 2018-08-22 04:01:50 PM UTC Guide Contents Guide Contents Overview Articulating Handle Rechargeable Prerequisite Guides
Joy Featherwing. Created by Dean Miller. Last updated on :03:07 PM UTC
 Joy Featherwing Created by Dean Miller Last updated on 2018-08-22 04:03:07 PM UTC Guide Contents Guide Contents Overview Pinouts Power and Reset Pins I2C Data Pins I2C Addressing Optional Interrupt Pin
Adafruit IO Basics: Color
 Adafruit IO Basics: Color Created by Todd Treece Last updated on 2017-02-20 04:33:33 PM UTC Guide Contents Guide Contents Overview Adafruit IO Setup Creating the Color Feed Adding the Color Block Wiring
DIY Wireless DDR Dance Pad with Bluefruit EZ-Key
 DIY Wireless DDR Dance Pad with Bluefruit EZ-Key Created by Paul Beaudet Last updated on 2018-08-22 03:40:07 PM UTC Guide Contents Guide Contents Overview What's DDR? Materials Cheapo method - As Shown
1.8" TFT Display Breakout and Shield
 1.8" TFT Display Breakout and Shield Created by lady ada Last updated on 2017-11-17 05:51:22 PM UTC Guide Contents Guide Contents Overview Breakout Pinouts Breakout Assembly Prepare the header strip: Add
Crawling Animatronic Hand
 Crawling Animatronic Hand Created by Dano Wall Last updated on 2018-12-03 06:39:35 PM UTC Guide Contents Guide Contents Overview Parts Used Tools & Materials Prepare the Hand Your hand is now ready to
3D Printed Google AIY Voice Kit
 3D Printed Google AIY Voice Kit Created by Ruiz Brothers Last updated on 2018-01-09 12:47:26 AM UTC Guide Contents Guide Contents Overview 3D Print a DIY AI enclosure for the Raspberry PI! Parts, Tools
Adafruit IO Basics: ESP Arduino
 Adafruit IO Basics: ESP8266 + Arduino Created by Todd Treece Last updated on 2017-03-27 10:31:41 PM UTC Guide Contents Guide Contents Overview Adafruit Feather HUZZAH with ESP8266 WiFi Pros/Cons of the
Bike Wheel POV Display
 Bike Wheel POV Display Created by Becky Stern Last updated on 2017-09-12 03:10:38 PM UTC Guide Contents Guide Contents Overview Parts and Tools Circuit Diagram Prep LEDs & Breadboard Code Solder Circuit
FLORA and GEMMA ICSP. Created by Becky Stern. Last updated on :30:55 PM EST
 FLORA and GEMMA ICSP Created by Becky Stern Last updated on 2015-02-19 02:30:55 PM EST Guide Contents Guide Contents Overview Reprogram FLORA over ICSP Reprogram GEMMA over ICSP 2 3 5 10 Adafruit Industries
Raspberry Pi Selfie Bot
 Raspberry Pi Selfie Bot Created by Sophy Wong Last updated on 2018-08-22 04:03:16 PM UTC Guide Contents Guide Contents Overview Parts & Supplies The Circuit Power Circuit Other Connections Laser Cutting
CircuitPython Media Dial
 CircuitPython Media Dial Created by Ruiz Brothers Last updated on 2018-02-07 05:00:25 AM UTC Guide Contents Guide Contents Overview Prerequisite Guides Adafruit Trinket M0 - for use with CircuitPython
Lie Ren's Stormflower Gun Blade
 Lie Ren's Stormflower Gun Blade Created by Ruiz Brothers Last updated on 2017-04-02 05:39:24 PM UTC Guide Contents Guide Contents Overview Cosplay Props with NeoPixels Triggered Lighting Effects DIY Electronics
Adafruit Mini TFT with Joystick Featherwing
 Adafruit Mini TFT with Joystick Featherwing Created by lady ada Last updated on 2018-08-24 04:45:05 AM UTC Guide Contents Guide Contents Overview Pinouts Color TFT Display Buttons and Joystick seesaw Chip
3D Printed 20w Amplifier Box
 3D Printed 20w Amplifier Box Created by Ruiz Brothers Last updated on 2018-02-26 06:48:02 PM UTC Guide Contents Guide Contents Overview Prerequisite Guide Tools & Supplies Parts 3D Printing Print in your
Hammer Time Mini Golf Hazard with Crickit
 Hammer Time Mini Golf Hazard with Crickit Created by John Park Last updated on 2018-07-09 06:47:53 AM UTC Guide Contents Guide Contents Overview Please Hammer, Don't Hurt Em Parts Materials & Tools Program
MCP Bit DAC Tutorial
 MCP4725 12-Bit DAC Tutorial Created by lady ada Last updated on 2018-03-05 10:51:16 PM UTC Guide Contents Guide Contents Overview Wiring Arduino Code Using the library Increasing the speed CircuitPython
CPX Mystery Dreidel. Created by Kathy Ceceri. Last updated on :51:40 PM UTC
 CPX Mystery Dreidel Created by Kathy Ceceri Last updated on 2018-12-04 02:51:40 PM UTC Guide Contents Guide Contents Overview Parts List -- Electronics Circuit Playground Express USB cable - USB A to Micro-B
DIY Bluetooth Gamepad
 DIY Bluetooth Gamepad Created by Ruiz Brothers Last updated on 2016-09-03 02:23:21 AM UTC Guide Contents Guide Contents Overview Prerequisite Guides Expectations Parts Tools & Supplies Circuit Diagram
Adafruit AMG8833 8x8 Thermal Camera Sensor
 Adafruit AMG8833 8x8 Thermal Camera Sensor Created by Justin Cooper Last updated on 2017-11-27 10:00:27 PM UTC Guide Contents Guide Contents Overview Pinouts Power Pins: Logic pins: Assembly Prepare the