Sword & Wand Prop Effects with Circuit Playground
|
|
|
- Brooke Norman
- 6 years ago
- Views:
Transcription

1 Sword & Wand Prop Effects with Circuit Playground Created by John Park Last updated on :32:54 AM UTC
2 Guide Contents Guide Contents Overview Circuit Playground Express with MakeCode Lots of Coding Options Wand Lights and Sound Rainbow Test User Input Setup Alternate Input Shake It Picking Themes Slide Switch Input Variables Conditionals Sound Code Cleanup Prep the Circuit Playground Upgrade a Prop Sword 3D Printed Magic Wand Adafruit Industries Page 2 of 61


3 Overview Want to upgrade your prop sword/battle axe/light saber/magic wand with motion reactive light animation and sound effects? You can do just that with this simple project! All you'll need is a Circuit Playground or Circuit Playground Express, a battery pack, and zip ties to attach it all to any prop or toy. Adafruit Industries Page 3 of 61

4 Or, you can go a bit further and fabricate your own wand with embedded Circuit Playground from scratch using a 3D printer. This more advanced build will require a LiPoly battery and JST switch cable, plus a LiPoly charger, and the use of a 3D printer. Adafruit Industries Page 4 of 61
5 To program the lights and sounds, there are a couple of options. You'll learn to program the Circuit Playground Express using Microsoft Make:Code's drag-and-drop web interface. Then, you'll program either the Circuit Playground Express or Circuit Playground with the Arduino IDE. Adafruit Industries Page 5 of 61

6 Circuit Playground Express with MakeCode Lots of Coding Options There are many options for programming the Circuit Playground Express! You can hand-code it with the traditional, text-based Arduino IDE, you can try your hand at the exciting new CircuitPython methods, or you can harness the incredibly user-friendly, yet powerful block-based interface of Microsoft's MakeCode web app!! (You can even go full circle and hand type code inside the MakeCode interface with Javascript!) By simply dragging and dropping elemental code blocks, you can create Circuit Playground Express software in no time, and even test it out with the virtual Circuit Playground Express simulator built into the page. Be sure you've gone through the tutorial here on the basics of MakeCode for Circuit Playground Express. Adafruit Industries Page 6 of 61


7 Wand Lights and Sound You're now ready to begin coding your own program with the MakeCode interface to use thecircuit Playground Express as a magic wand prop. Click the Projects button so you can start a new project. Click the New Project... button to create the new empty project. Adafruit Industries Page 7 of 61


8 The new project should have only a single block in the layout area, the forever block. Any block of code you place inside the forever block will run over and over and over and over and over and over and over again. FOREVER! (Unless you create other inputs in your code that can change that, later.) Rainbow Test Try it out now. Click the LIGHT category. A collection of new blocks appears, all related to lighting up LEDs. Adafruit Industries Page 8 of 61


9 Click the block called show frame of _rainbow_ animation then drag and drop it inside the forever loop. The animation block will snap inside the forever loop, and then after a moment, the Circuit Playground Express simulator will begin to play the rainbow animation. In case the simulator doesn't play, click the play/stop button. Adafruit Industries Page 9 of 61


10 Notice what is happening here -- even though the show frame of _rainbow_ animation block only tells the Circuit Playground Express to play one frame, since it is inside the forever loop, it plays back a full animation over and over again. Give your file a name in the name field, such as cpe_wand. As you did before, you'll Download the UF2 file, put Circuit Playground Express into bootloader mode by clicking the reset button, and then drag the UF2 file onto the CPLAYBOOT drive. Now, the rainbow animation plays on your Circuit Playground Express! User Input What would happen if you required user input to initiate the show frame of _rainbow_ animation code? Let's find out! Click the INPUT category, then pick the on _button A click_ block. Adafruit Industries Page 10 of 61


11 This adds the new input block to your layout. Drag and drop the show frame of _rainbow_ animation block out of the forever block and into the on _button A click_ block. Try this out on the simulator by clicking the left button a few times. Each time you do so, the rainbow animation progresses by one frame. Adafruit Industries Page 11 of 61


12 Download the UF2 file, put your Circuit Playground Express into booloader mode, and drag UF2 file to the CPLAYBOOT drive. Then, click the left button on your real world Circuit Playground Express to see the rainbow animation play back frameby-frame! NeoPixel LEDs can go from very dim to super bonkers bright! You can control them with a range of levels of brightness. Adjust the overall brightness of all of the NeoPixels with the set brightness block. Click on the LIGHT category, then pick the set brightness block to add it to your layout area. Adafruit Industries Page 12 of 61
13 Setup Notice how the new block is greyed out. This means that it isn't currently enabled. It needs to be part of a process that can run during some part of the program. Right now, this can either be any code blocks in the forever loop or any code blocks in the on _button A click_ loop. Neither of these is what we want in the case of setting overall NeoPixel brightness. Sorry guys! For this, we'll use an on start loop. Any code blocks inside of on start will only be run once when the Circuit Playground Express first starts up. Think of it like an initialization phase. Click on the LOOPS category, then chose the on start loop. Adafruit Industries Page 13 of 61


14 Rearrange the on start loop to the top of the layout graph, just to keep things logically and spatially organized. Then, drag the set brightness block into the on start loop. Try adjusting the brightness value by typing 140 into the set brightness number value block. Then, upload the UF2 file to your Circuit Playground Express. Adafruit Industries Page 14 of 61

15 When you press the left button the frame of animation will display as before, only this time it'll be much brighter! Alternate Input You can make your Circuit Playground Express do something while it waits to get instructions to do something else. What if we want to have the rainbow animation running unless the button is pressed, and then it'll play a sparkle animation for a moment? You can do this by moving the show frame of _rainbow_ animation block into the forever loop, and then putting some new blocks into the on _buttona click_ loop. First, move the show frame of _rainbow_ animation block into the forever loop. If the LEDs are too bright, you can lower the set brightness value to something like 40 as seen here Adafruit Industries Page 15 of 61


16 Duplicate the show frame of _rainbow_ animation block by right-clicking on it and choosing the duplicate dropdown menu item. Then, drag the new block into the on _buttona click_ loop. Change the animation pattern by clicking on _rainbow_ and selecting sparkle instead. Adafruit Industries Page 16 of 61

17 Try uploading this UF2 code to your Circuit Playground Express. Notice that the rainbow animation plays constantly, until you press the left button. Then, there is a momentary flash as a single frame of the sparkle animation plays. It then returns to playing the rainbow animation, since that's in the forever loop. Well, that's not very fun! Let's use a different kind of loop to play a bit more of the sparkle animation upon each button press. From the LOOPS category, create a repeat _4_ times/do loop. This is a really useful loop that will execute any contained code blocks x many times, with x being the integer number you fill in. In more traditional Arduino programming this might be represented as: for(int i = 0; i<4; i++){ //code to be repeated goes here } So you can see how convenient this loop block is! Drag the show frame of _sparkle_ animation block into the repeat _4_ times/do loop. Adafruit Industries Page 17 of 61


18 The repeat/do and animation blocks are greyed out, since they don't sit inside of any loops that will be executed by the Circuit Playground Express. Move them as a unit into the on _buttona click_ loop. Increase the number of repetitions from 4 to 24, then upload the program to the Circuit Playground Express and test it out by pressing the left button. That's more like it! Now the rainbow animation plays until you click the left button, and you then get a moment of sparkle. Shake It To use our magic wand and sword props, it'll be much more fun to trigger the lights and sounds with motion instead of a button press. The Circuit Playground Express has a built in accelerometer that can be used to detect different types of motion. Lets swat out the button push input for a shake input. Chose the shake loop from the INPUT category. Adafruit Industries Page 18 of 61

19 Drag the repeat/do loop (including it's contained show frame of animation block) into the shake loop. Get rid of the empty on _buttona click_ loop by clicking on it and pressing delete on you keyboard. Adafruit Industries Page 19 of 61

20 Test the code on your board. Now, when you give it a good shake, the Circuit Playground Express will play back a bit of the sparkle animation, and then return to the rainbow! Let's make the sparkles even more magical by setting them to maximum brightness!! Make two duplicates of the set brightness block from the on start loop. Place one above the repeat _24_ times/do block, and one below it. Then, change tie value of the first one to 255. Test it on your board -- now, when you shake the Circuit Playground Express the sparkle animation will be super bright! Don't look directly at the NeoPixels at full brightness, they're massively bright! Picking Themes Adafruit Industries Page 20 of 61

21 For versatility, you can make your Circuit Playground Express work in different modes, depending on the prop with which you want to use it. Here's how you can use the selector switch on board to pick between two different color and animation themes, one for the wand and the second for the sword. Slide Switch Input Add an on switch moved _left_ loop. This is an input block, just like a button press or shake input, but uses the two position slide switch that's built onto the Circuit Playground Express. Duplicate the block and change the dropdown to make the on switch moved _right_ loop. Adafruit Industries Page 21 of 61


22 Variables Next, we'll create a variable to help us check the state of the switch in other parts of the code. The variable is a named object that can store a value, in this case a number. Pick the set _item_ to block from the Make A Variable selections. This block not only declares the variable, but can be used to change the value of the variable. Duplicate the set _item_ to block, and then place one inside each of the on switch moved loops. Also, set the value of the one in the on switch moved _right_ loop to 1 instead of 0. Adafruit Industries Page 22 of 61


23 A nice thing about variables is that we can give them descriptive names that help you out. Let's rename the item variable to theme. That way you'll know whenever you see it in you code that this variable is used to store the value of which theme we're using: a 0 means Wand, and a 1 means Sword. Adafruit Industries Page 23 of 61


24 Conditionals You'll want to have the program logic react differently depending on the state of the slide switch. If the switch is on the left, then it will play lights and sounds for the Wand when shaken If the switch is on the right, then it will play lights and sounds for the Sword when shaken To do this, you'll use a conditional operator called an if/then loop. Add an if/then loop from the LOGIC category. Adafruit Industries Page 24 of 61

25 We now need to create a block that lets the if/then loop know what condition needs to be met for it to evaluate as true or false. In our case, one loop will be true if theme equals 0, and the other will be true if theme equals 1. From the LOGIC category, click on the 0 = 0 block. Also, from the VARIABLES category, click on the theme block. This will allow you to compare the variable to a number (0 or 1). Adafruit Industries Page 25 of 61


26 Drag the theme variable onto the first 0 in the 0 = 0 comparison block -- it'll replace the first 0. Then, drag the theme = 0 block on top of the true segment of the if/then loop. This loop is now set so that whenever the theme is set to 0 (the left position of the slide switch) it will run whatever code blocks are inside of the then section of the loop. Move the set of blocks out of the shake loop and into the if/then loop. Adafruit Industries Page 26 of 61

27 Then, put the whole thing back into the shake loop. So, here's what this section of your code now does: 1. Checks the slide switch 2. Sets the variable called theme to a 0 or 1 depending on switch position 3. Checks the accelerometer to feel for a shake 4. Compares the value of theme to the number 0 5. If the theme does equal 0, then it will bump up the brightness, play 24 frames of the sparkle animation, and then set the brightness back down Adafruit Industries Page 27 of 61

28 Try this out on your board now. You'll see that with the selector switch in the left position, it behaves the same as before, running the rainbow animation until shaken, at which point it plays the sparkle animation for a moment. With the switch in the right position, however, the shake has no effect. Now that that's working, let's create a loop to play a different animation when the switch is in the right position. Duplicate the entire if _theme_ = 0 loop, and then move the copy inside of the shake loop. Then, change the if statement value to 1, this means it will execute all code blocks inside of the if statement when the switch is to the right. In this right switch loop, change the repeats to 300 and the animation to comet. Adafruit Industries Page 28 of 61


29 Test it out on the board -- you now get two different shake animations depending on the position of the switch! Let's use the same method to change the animation inside of the forever loop. This way, if you're using the Circuit Playground Express for the magic wand, you can set the switch to the left for rainbows and sparkles, or, set the switch to the right for sword mode which includes comets and color wipes! Adafruit Industries Page 29 of 61


30 Match your block layout to the one shown here, then test it out on your board. Sound Now that you've gotten lights and action happening, it's time to add sound! To begin with, click the MUSIC category, then click on the MORE button, then chose the set speaker volume button. Add this block to the on start loop, so that the speaker volume is initialized on startup. To avoid bothering your neighbors, you can pick a low volume, such as 20 as seen here, or really blast it up to 255! Next, create a block that makes some sound. Let's chose the play melody _power up_ block. Place this inside the "if Adafruit Industries Page 30 of 61

31 left switch" loop of the shake loop. This means that if the condition "shake" is met, and the condition "switch is in the left position" is met, the sound will play. You can select from a list of pre-made melodys, and then try them out by clicking the "shake" button on the Circuit Playground Express simulator. If you don't hear anything, try flipping the virtual selector switch to the other side. Adafruit Industries Page 31 of 61


32 Duplicate the play melody block, insert the copy into the right switch if loop, and then choose a different melody to play during sword swing maneuvers! Adafruit Industries Page 32 of 61

33 Code Cleanup It works! You're almost ready to attach your Circuit Playground Express to a wand or sword prop! But before you do so, let's clean up the code a little bit. Often, when you are first creating a program, you'll copy and paste whole chunks of code that are meant to do similar things, and then change them slightly. This works great, but you can then optimizing things by removing redundant code blocks. Let's have a look at the shake loop. Adafruit Industries Page 33 of 61
34 Since we built the first if/then loop and then duplicated it, we've got more copies of the set brightness 255 and set brightness 40 blocks than we need. Since we want to up the brightness whenever we shake, regardless of the position of the switch, that block can live outside of the if/then loops. The same is true of the block lowering the brightness once the shake is finished. Move one set brightness 255 block above and outside of the if/then loops, and one set brightness 40 below and outside, as seen here. Then, delete the extras. Adafruit Industries Page 34 of 61

35 That's looking cleaner already! Next, let's consider the two if/then loops. Since our switch only has two states -- left and right -- we know that if the switch isn't to the left, then it must be to the right. This is a great place to switch from two if/then loops to a single if/then else loop. Adafruit Industries Page 35 of 61


36 The if/then else loop will replace both if/then loops. Drag the first condition -- theme = 0 -- over to the condition block of the if/then else loop. Then, move the play melody, repeat times, and show frame of animation, blocks from the first if/then loop to the then section of the if/then else loop. Do the same with the blocks in the second if/then loop, moving them to the else section of the if/then else loop. Adafruit Industries Page 36 of 61


37 Replace the two empty if/then loops with the if/then else loop. Your code is more streamlined now! You can also optimize the forever loop in the same fashion, to look like this. Adafruit Industries Page 37 of 61

38 Upload this code to your Circuit Playground Express and test it out. It should work identically, but it's good to know how you can optimize your code, especially if you start to create longer, more complex programs. Here's what the final program looks like. Feel free to experiment now by changing things around, or making a whole new program from scratch!! Adafruit Industries Page 38 of 61

39 Prep the Circuit Playground Using the Circuit Playground to make lights and sounds when shaken is pretty straightforward. If this is your first Circuit Playground project, you'll first need to make sure you've installed the Arduino IDE, added the Circuit Playground library to the Arduino software, and and been through the basic tutorials on its use. This excellent guide, Introducing Circuit Playground and Circuit Playground lesson #0 will show you how to do all of that and get you going. Plug your Circuit Playground into your computer now, and launch the Arduino IDE. Double check that you've selected the board and port as in the Lesson #0 tutorial and are ready to upload code. The Arduino sketch Circuit Playground Make Believe sketch does the following: Plays one light pattern and sound file while the Circuit Playground (and the prop weapon to which it has been affixed) is idle Plays a second light pattern and sounds file when swung Plays a third light pattern and sound file when tapped Download the file below, then unzip it and place it in your Arduino sketch directory. Adafruit Industries Page 39 of 61
40 CircuitPlaygroundMakeBelieve.zip Open the CircuitPlaygroundMakeBelieve sketch in Arduino, you'll notice that there are also three other tabs that open - - knight.h, laser.h, and wand.h. These are three different theme sets, which are combinations of light animations and sound files that are triggered at different motion thresholds on the Circuit Playground's accelerometer. Upload the sketch to your Circuit Playground and then try it out. The NeoPixels will play their idle animation and you'll hear the idle sound coming from the piezo speaker. Swing the Circuit Playground around a bit to trigger the swing animation and sounds. This works because the code is checking the built-in accelerometer for sudden changes above a certain threshold. When the change is great enough, the swing is triggered. The code also checks for even larger changes in acceleration, which indicates that there has been a tap on the Circuit Playground, or that your prop foam sword has hit its target! In this case, it will play the tap animation and sound. The sketch uses pre-made theme sets of effects for use with different props. You can try them out to see which one works best for you. If you look at the top of the Arduino sketch you'll see the theme choices. By uncommenting one (and commenting out the other -- there can only be one uncommented at a time) that theme set of lights and sounds will be used the next time you upload the sketch to your Circuit Playground. For example: // Enable ONE of these lines to select a theme: //#include "knight.h" // Swoosh & clank metal sword #include "laser.h" // MWAAAW! "laser" sword //#include "wand.h" // Magic wand will use the laser.h theme set. To switch to the wand.h theme set, do this: // Enable ONE of these lines to select a theme: //#include "knight.h" // Swoosh & clank metal sword //#include "laser.h" // MWAAAW! "laser" sword #include "wand.h" // Magic wand Adafruit Industries Page 40 of 61

41 Upgrade a Prop Sword Here we have a very nice, off the shelf foam sword. It sure looks like it could use some light and sound effects! There's a flat part on the sword guard that looks perfect for attaching the Circuit Playground. Adafruit Industries Page 41 of 61


42 Once you've uploaded your code to the Circuit Playground, it's time to connect it to the AAA battery pack and attach it all to your prop weapon. Depending on your prop, you can choose different methods to attach it. Small zip ties are great because the are sturdy, fit through the holes on the Circuit Playground, and can be customized to different lengths by adding one zip tie to the end of another. Adafruit Industries Page 42 of 61

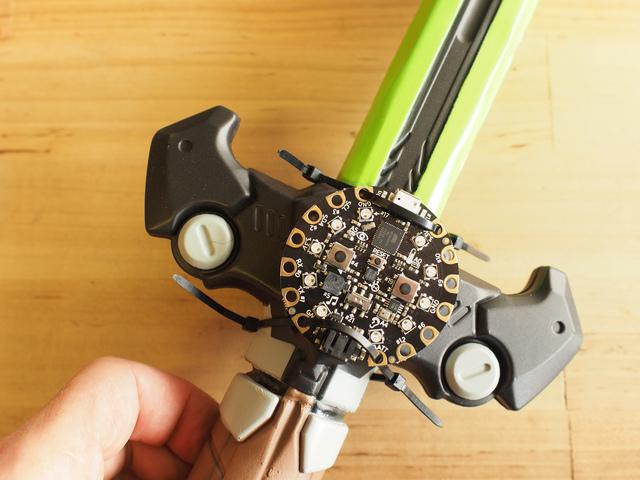
43 Here, you can see the Circuit Playground zip tied to a foam sword. Adafruit Industries Page 43 of 61

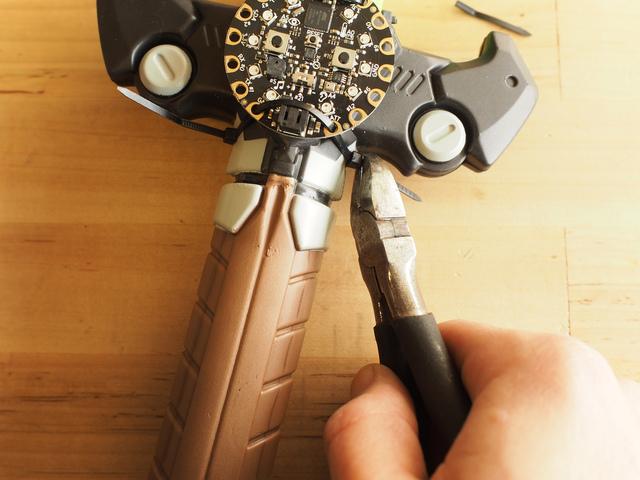
44 After pulling the zip ties tight, use diagonal cutters or scissors to clip the exess length from the ends. Adafruit Industries Page 44 of 61


45 Those little zip tie ends can be sharp after cutting -- use nail clippers to round them down and avoid a scratch! Next, feed the battery cable under the backside of the Circuit Playground, under the zip ties, then plug it in. Adafruit Industries Page 45 of 61


46 The battery pack fits nicely on the backside of the sword guard, also using zip ties. Create a zip tie harness for the battery pack by threading two through the back of the existing ones, double them with two more zip ties, then secure the battery pack. You can create an additional point of security with a set of three zip ties running around the battery pack horizontally. Adafruit Industries Page 46 of 61

47 Adafruit Industries Page 47 of 61

48 Tighten the zip ties and clip the excess ends. Adafruit Industries Page 48 of 61

49 Swing it to try it out! Next, we'll look at a more customized approch to building a prop magic wand from scratch to fit the Circuit Playground. Adafruit Industries Page 49 of 61


50 3D Printed Magic Wand This magic wand was designed specially to use the Circuit Playground as its centerpiece effect. It is 3D printed with a mix of translucent and opaque materials, has a mounting plate onto which you can secure the Circuit Playground, as well as an integrated LiPoly battery and on/off switch. Adafruit Industries Page 50 of 61
51 In addition to the Circuit Playground, LiPoly battery, and switch, you'll also need four M3 x 6mm screws and nuts, two M3 x 16mm screws and nuts, and four M2 x 6mm screws and nuts. Adafruit Industries Page 51 of 61

52 Here are the files you'll use to print it. starwand_stl.zip Print the star parts in a translucent material, such as a natural PLA. The rest of the parts can be printed in any material you choose, and even painted for a more finished look. Adafruit Industries Page 52 of 61

53 The piezo speaker on the Circuit Playground isn't terribly loud, so there are small start cutouts in the shell to help the sound escape. The top star can also be used to access the reset button, should you need it. Next you'll assemble the wand. Make sure you've uploaded the Make Believe sketch to the Circuit Playground, then mount it to the mount plate using 2.5mm screws and nuts. Adafruit Industries Page 53 of 61


54 Next, place the switch into the handle cutout, feeding the plug ends through their respective holes for the battery and the Circuit Playground board. Plug the battery into the switch and the switch into the Circuit Playground's JST connector. Test the switch to make sure the Circuit Playground turns on. Adafruit Industries Page 54 of 61


55 Place the battery in its place inside the lower handle bottom, then fasten the bottom with an M3 x 16mm screw and nut. Adafruit Industries Page 55 of 61

56 Adafruit Industries Page 56 of 61

57 Note how the lower switch wire and battery wire are tucked into the handle with the connectors accessiblye through the handle opening. This is so you can pull them out and dissconnect them for battery charging without unscrewing the wand. Adafruit Industries Page 57 of 61


58 Sandwich the Circuit Playground and mount between the two star halves, feeding the switch wire through the wire channel at the base of the star top half. Adafruit Industries Page 58 of 61
59 Begin the assembly in this order: Top half of handle Trim piece Star top Circuit Playground and mount Star bottom Bottom half of handle Adafruit Industries Page 59 of 61

60 Screw the handle top parts together with the other M3 x 16mm screw, placing the nut on the opposite side. Add the remaining trim pieces on the top and bottom of the stars and screw them together with M2 x 8mm screws and nuts. Now, you can turn on the wand and wave and flick it to maximum magical effect. Should the battery ever require Adafruit Industries Page 60 of 61

61 charging, you can pull the charging plug through the port in the handle and plug it into a LiPoly USB charger. Remember, this guide is just a leaping off point for using the Circuit Playground to add motion triggered effects to any prop you like! Adafruit Industries Last Updated: :32:53 AM UTC Page 61 of 61
NeoPixie Dust Bag with Circuit Playground Express
 NeoPixie Dust Bag with Circuit Playground Express Created by John Park Last updated on 2017-12-20 10:00:29 PM UTC Guide Contents Guide Contents Overview Code It Setup Animation Color Touch Variable Color
Circuit Playground Express Laser Tag
 Circuit Playground Express Laser Tag Created by John Park Last updated on 2017-11-14 01:56:23 AM UTC Guide Contents Guide Contents Build a Laser Tag Game Code the Laser Tag Game MakeCode Transmitting IR
Wind Blowing Emoji Prop
 Wind Blowing Emoji Prop Created by John Park Last updated on 2018-08-22 04:05:17 PM UTC Guide Contents Guide Contents Overview Code it with MakeCode Start Up Variables On Loud Sound If - Else Iterate Debounce
Bunny Ears with MakeCode
 Bunny Ears with MakeCode Created by Erin St Blaine Last updated on 2018-08-22 04:05:47 PM UTC Guide Contents Guide Contents Introduction Tools & Other Materials Programming with MakeCode Set Up the Light
Adabot Operation Game
 Adabot Operation Game Created by John Park Last updated on 2018-08-22 04:11:17 PM UTC Guide Contents Guide Contents Overview Parts Materials & Tools Build the Operating Table Print the Board and Pieces
Crickit Carnival Bumper Bot
 Crickit Carnival Bumper Bot Created by John Park Last updated on 2018-08-22 04:08:52 PM UTC Guide Contents Guide Contents Overview Parts Materials and Tools Build the Bumper Bot Cut the Cardboard Chassis
Slider Crank Mechanism -- from Cardboard and Craft Sticks
 Slider Crank Mechanism -- from Cardboard and Craft Sticks Created by John Park Last updated on 2018-08-22 04:07:21 PM UTC Guide Contents Guide Contents Overview Materials Tools Build the Slider Crank Build
Steven Universe Cosplay Shirt & Gem Created by Erin St Blaine. Last updated on :54:25 PM UTC
 Steven Universe Cosplay Shirt & Gem Created by Erin St Blaine Last updated on 2019-04-04 06:54:25 PM UTC Overview Make yourself a Steven Universe costume that will light up the world. This guide will show
Snake Charmer Box. Created by Dano Wall. Last updated on :07:25 PM UTC
 Snake Charmer Box Created by Dano Wall Last updated on 2018-08-22 04:07:25 PM UTC Guide Contents Guide Contents Overview Materials Circuit Playground Express Standard servo - TowerPro SG-5010 Small Alligator
Crawling Baby Sea Turtle Robot
 Crawling Baby Sea Turtle Robot Created by Dano Wall Last updated on 2018-08-22 04:10:26 PM UTC Guide Contents Guide Contents Overview Save the Wee Turtles Household Materials Adafruit Electronics Create
Pushrod Garage. Created by John Park. Last updated on :07:30 PM UTC
 Pushrod Garage Created by John Park Last updated on 2018-08-22 04:07:30 PM UTC Guide Contents Guide Contents Overview Parts & Materials Tools Pushrod Mechanism Code it with MakeCode Functions On Start
Crawling Animatronic Hand
 Crawling Animatronic Hand Created by Dano Wall Last updated on 2018-12-03 06:39:35 PM UTC Guide Contents Guide Contents Overview Parts Used Tools & Materials Prepare the Hand Your hand is now ready to
Portable Apple Watch Charger
 Portable Apple Watch Charger Created by Ruiz Brothers Last updated on 2017-10-22 09:58:04 PM UTC Guide Contents Guide Contents Overview Smart Charging Prerequisite Guides Parts, Tool & Supplies Circuit
Ping Pong Ball Launcher
 Ping Pong Ball Launcher Created by Dano Wall Last updated on 2019-01-25 03:19:13 AM UTC Guide Contents Guide Contents Overview Electronic Parts Circuit Playground Express USB cable - USB A to Micro-B Alkaline
Con Badge with Circuit Playground Express
 Con Badge with Circuit Playground Express Created by Sophy Wong Last updated on 2018-04-11 05:00:16 PM UTC Guide Contents Guide Contents Overview Tools & Materials Laser Cutting Program the Circuit Playground
Infinity Mirror Valentine's Candy Box
 Infinity Mirror Valentine's Candy Box Created by Kathy Ceceri Last updated on 2019-02-07 09:44:54 PM UTC Guide Contents Guide Contents Overview Parts List -- Mini Box Version Chibitronics Color LEDs Add-On
Hammer Time Mini Golf Hazard with Crickit
 Hammer Time Mini Golf Hazard with Crickit Created by John Park Last updated on 2018-07-09 06:47:53 AM UTC Guide Contents Guide Contents Overview Please Hammer, Don't Hurt Em Parts Materials & Tools Program
Easy Sparkle Pocket T-Shirt
 Easy Sparkle Pocket T-Shirt Created by Erin St Blaine Last updated on 2018-10-18 06:45:05 PM UTC Guide Contents Guide Contents Overview Parts Materials Needed Code with MakeCode Vinyl Cutting Sizing and
Crickit Dancing Marionette Kit Created by Dano Wall. Last updated on :03:11 PM UTC
 Crickit Dancing Marionette Kit Created by Dano Wall Last updated on 2019-04-04 07:03:11 PM UTC Overview This project demonstrates how to build a robotic marionette that is controlled with four arcade-style
Feather Weather Lamp. Created by Ruiz Brothers. Last updated on :54:26 PM UTC
 Feather Weather Lamp Created by Ruiz Brothers Last updated on 2018-08-22 03:54:26 PM UTC Guide Contents Guide Contents Overview Weather Reactive Pixels Prerequisite Guides Parts Tools & Supplies Circuit
UFO Flying Saucer with Circuit Playground Express
 UFO Flying Saucer with Circuit Playground Express Created by John Park Last updated on 2018-08-31 08:42:17 PM UTC Guide Contents Guide Contents Overview Code the UFO with CircuitPython Build the Flying
NeoMatrix 8x8 Word Clock
 NeoMatrix 8x8 Word Clock Created by Andy Doro Last updated on 2017-10-10 04:10:51 AM UTC Guide Contents Guide Contents Overview Parts List Parts Tools Circuit Assembly Overview Uploading Code Understanding
Neon LED Signs. Created by John Park. Last updated on :11:09 PM UTC
 Neon LED Signs Created by John Park Last updated on 2018-08-22 04:11:09 PM UTC Guide Contents Guide Contents Overview Parts Materials Tools Build the Sign Driver Preparation Solder the Circuit Solder the
Paper Airplane Launcher
 Paper Airplane Launcher Created by Dano Wall Last updated on 2018-08-27 08:36:14 PM UTC Guide Contents Guide Contents Overview A Launching Platform The Electronics Materials Build the Launcher Attach Motors
Circuit Playground Combadge
 Circuit Playground Combadge Created by Ruiz Brothers Last updated on 2017-10-22 10:42:02 PM UTC Guide Contents Guide Contents Overview What's a Combadge? DIY Combadge How Does It Work? Make It How You
Crickit Powered Holiday Diorama
 Crickit Powered Holiday Diorama Created by Isaac Wellish Last updated on 2018-12-04 12:49:07 AM UTC Guide Contents Guide Contents Overview Prerequisite Guides Adafruit Parts Tools and Materials Wiring
NeoPixel Fairy Crown. Created by Erin St Blaine. Last updated on :22:47 AM UTC
 NeoPixel Fairy Crown Created by Erin St Blaine Last updated on 2018-12-31 02:22:47 AM UTC Guide Contents Guide Contents Overview Adafruit NeoPixel LED Dots Strand - 20 LEDs at 2" Pitch Adafruit GEMMA M0
Android GBoard Morse Code Control with Circuit Playground Express
 Android GBoard Morse Code Control with Circuit Playground Express Created by Dave Astels Last updated on 2018-08-22 04:10:30 PM UTC Guide Contents Guide Contents Overview Parts Materials for the box Installing
Secret Hollow Book Intrusion Detector
 Secret Hollow Book Intrusion Detector Created by John Park Last updated on 2018-08-22 04:05:48 PM UTC Guide Contents Guide Contents Overview Materials & Tools Optional Android Hollowing the Book Preparation
FLORA TV-B-Gone. Created by Becky Stern. Last updated on :32:57 PM UTC
 FLORA TV-B-Gone Created by Becky Stern Last updated on 2018-08-22 03:32:57 PM UTC Guide Contents Guide Contents Overview Parts Tutorials Transistors Resistors LEDs Pushbutton Program it Power Fabric pinwheel
PyPortal NeoPixel Color Picker Created by Kattni Rembor. Last updated on :42:41 PM UTC
 PyPortal NeoPixel Color Picker Created by Kattni Rembor Last updated on 2019-03-27 10:42:41 PM UTC Overview This simple project adds a little color to your life with CircuitPython, PyPortal and NeoPixels.
Circuit Playground Digital Input
 Circuit Playground Digital Input Created by Carter Nelson Last updated on 2017-02-27 03:36:50 AM UTC Guide Contents Guide Contents Overview Required Parts Before Starting Digital Signals 3V Logic Pocket
3D Printed Case for Adafruit Feather
 3D Printed Case for Adafruit Feather Created by Ruiz Brothers Last updated on 2018-08-22 03:59:38 PM UTC Guide Contents Guide Contents Overview Adafruit Feather Box New Update! Check out the TFT Feather
Solar Boost Bag. Created by Becky Stern. Last updated on :44:55 PM UTC
 Solar Boost Bag Created by Becky Stern Last updated on 2018-08-22 03:44:55 PM UTC Guide Contents Guide Contents Overview 3D Design Files Customize Design Assemble Circuit Prepare Solar Panel Enclosure
CPX Mystery Dreidel. Created by Kathy Ceceri. Last updated on :51:40 PM UTC
 CPX Mystery Dreidel Created by Kathy Ceceri Last updated on 2018-12-04 02:51:40 PM UTC Guide Contents Guide Contents Overview Parts List -- Electronics Circuit Playground Express USB cable - USB A to Micro-B
CircuitPython Snow Globe
 CircuitPython Snow Globe Created by John Park Last updated on 2018-08-22 04:04:24 PM UTC Guide Contents Guide Contents Overview Materials and Parts Code with CircuitPython Get Ready! Download the Snow
Milk Jug Glow Skull. Created by John Park. Last updated on :28:36 PM UTC
 Milk Jug Glow Skull Created by John Park Last updated on 2018-09-14 09:28:36 PM UTC Guide Contents Guide Contents Overview Parts Materials & Tools Optional Skull/Sculpting Stand Build the Skull Prep the
Mini Golf Course with Circuit Playground and Crickit
 Mini Golf Course with Circuit Playground and Crickit Created by Dano Wall Last updated on 2018-08-22 04:09:31 PM UTC Guide Contents Guide Contents Overview Materials & Tools Adafruit Parts CRICKIT Assembly
Trellis 3D Printed Enclosure
 Trellis 3D Printed Enclosure Created by Ruiz Brothers Last updated on 2018-08-22 03:39:07 PM UTC Guide Contents Guide Contents Overview Parts Tools & Supplies Modeling 123D Design Customize Measuring Parts
Circuit Playground Yoyo
 Circuit Playground Yoyo Created by Ruiz Brothers Last updated on 2018-01-13 05:56:02 AM UTC Guide Contents Guide Contents Overview 3D Printed NeoPixel Yoyo History of the Yo-Yo Expectations Parts Tools
NeoPixel Bike Light. Created by Ruiz Brothers. Last updated on :43:46 PM UTC
 NeoPixel Bike Light Created by Ruiz Brothers Last updated on 2018-11-15 07:43:46 PM UTC Guide Contents Guide Contents Overview 3D Printed Headlight Adafruit's Feather Platform Circuit Python Powered Parts
'Sup Brows. Created by Kate Hartman. Last updated on :52:04 PM UTC
 'Sup Brows Created by Kate Hartman Last updated on 2018-08-22 03:52:04 PM UTC Guide Contents Guide Contents Overview Circuit Bluetooth Test Upload the Code Place the Sensor View Sensor Values Via Bluetooth
Guardian Shield+ Zelda Breath of the Wild
 Guardian Shield+ Zelda Breath of the Wild Created by Ruiz Brothers Last updated on 2018-08-22 04:01:50 PM UTC Guide Contents Guide Contents Overview Articulating Handle Rechargeable Prerequisite Guides
i2c/spi LCD Backpack Created by lady ada Last updated on :11:04 PM UTC
 i2c/spi LCD Backpack Created by lady ada Last updated on 2017-08-16 05:11:04 PM UTC Guide Contents Guide Contents Overview Which LCD to Use? Wait - the backpack has 16 holes, but my LCD only has 14 pins!
Clockwork Goggles. Created by John Park. Last updated on :03:10 PM UTC
 Clockwork Goggles Created by John Park Last updated on 2018-08-22 04:03:10 PM UTC Guide Contents Guide Contents Overview Assemble Circuit and Goggles CircuitPython Setup and Code Rock the Goggles 2 3 6
Overwatch Prop Gun: Lucio's Blaster Pt. 3
 Overwatch Prop Gun: Lucio's Blaster Pt. 3 Created by John Park Last updated on 2017-11-24 09:48:21 PM UTC Guide Contents Guide Contents 3D Printing Circuit Building Assembly Front Assembly Rear Assembly
Glowing Smokey Skull. Created by Ruiz Brothers. Last updated on :03:40 PM UTC
 Glowing Smokey Skull Created by Ruiz Brothers Last updated on 2018-08-22 04:03:40 PM UTC Guide Contents Guide Contents Overview Easy DIY Halloween Props Electronic Halloween! Circuit Playground NeoPixels
GPS Logging Dog Harness
 GPS Logging Dog Harness Created by Becky Stern Last updated on 2015-01-15 10:15:19 PM EST Guide Contents Guide Contents Overview Circuit Diagram Sew Circuit Use It! 2 3 5 6 15 Adafruit Industries https://learn.adafruit.com/gps-logging-dog-harness
Reindeer Mask with Animated Eyes
 Reindeer Mask with Animated Eyes Created by Dano Wall Last updated on 2018-12-05 10:50:10 PM UTC Guide Contents Guide Contents Overview Parts Adafruit HalloWing M0 Express Convex Plastic Lens with Edge
LED Eyes. Created by Ruiz Brothers. Last updated on :50:55 AM UTC
 LED Eyes Created by Ruiz Brothers Last updated on 2018-01-13 05:50:55 AM UTC Guide Contents Guide Contents Overview Parts, Tools and Supplies Enameled Copper Magnet Wire 11 meters / 0.1mm diameter Adafruit
Sewable NeoPixels. Created by Becky Stern. Last updated on :50:14 PM EDT
 Sewable NeoPixels Created by Becky Stern Last updated on 2015-08-25 07:50:14 PM EDT Guide Contents Guide Contents Overview Prerequisite guides Lots of Pixels? Hook up alligator clips Run pixel test code
Crickit Powered Mini Chair Swing Ride!
 Crickit Powered Mini Chair Swing Ride! Created by Isaac Wellish Last updated on 2018-11-05 09:18:17 PM UTC Guide Contents Guide Contents Overview Adafruit Parts Materials and Tools Swing Structure First
Bluetooth Controlled NeoPixel Headphones
 Bluetooth Controlled NeoPixel Headphones Created by Ruiz Brothers Last updated on 2017-03-09 07:38:05 PM UTC Guide Contents Guide Contents Overview Smart LED HeadPhones Prerequisite Guides Parts Tools
3D Printed Google AIY Voice Kit
 3D Printed Google AIY Voice Kit Created by Ruiz Brothers Last updated on 2018-01-09 12:47:26 AM UTC Guide Contents Guide Contents Overview 3D Print a DIY AI enclosure for the Raspberry PI! Parts, Tools
FLORA and GEMMA ICSP. Created by Becky Stern. Last updated on :42:16 PM UTC
 FLORA and GEMMA ICSP Created by Becky Stern Last updated on 2018-08-22 03:42:16 PM UTC Guide Contents Guide Contents Overview Reprogram FLORA over ICSP Reprogram GEMMA over ICSP 2 3 4 9 Adafruit Industries
Trinket NeoPixel LED Longboard
 Trinket NeoPixel LED Longboard Created by Ruiz Brothers Last updated on 2017-10-02 06:00:32 PM UTC Guide Contents Guide Contents Overview Parts Tools & Supplies Prerequisite Guides 3D Printing PLA Material
Audio Prank Gift Box. Created by Becky Stern. Last updated on :46:15 PM UTC
 Audio Prank Gift Box Created by Becky Stern Last updated on 2018-08-22 03:46:15 PM UTC Guide Contents Guide Contents Overview Circuit Diagram Prepare Components Build Circuit Wrap and Give 2 3 5 6 12 14
Light-Up Angler Fish Embroidery
 Light-Up Angler Fish Embroidery Created by Becky Stern Last updated on 2018-08-22 03:35:36 PM UTC Guide Contents Guide Contents Overview Tools & Supplies Layout & Circuit Diagram Sew Circuit Code Hand
Bike Wheel POV Display
 Bike Wheel POV Display Created by Becky Stern Last updated on 2017-09-12 03:10:38 PM UTC Guide Contents Guide Contents Overview Parts and Tools Circuit Diagram Prep LEDs & Breadboard Code Solder Circuit
Stumble-Bot. Created by Dano Wall. Last updated on :04:06 AM UTC
 Stumble-Bot Created by Dano Wall Last updated on 2018-09-06 05:04:06 AM UTC Guide Contents Guide Contents Overview Simply Stumbling We Have the Technology Other Supplies Leg Assembly Front Legs Back Legs
Adafruit Mini TFT " 160x80
 Adafruit Mini TFT - 0.96" 160x80 Created by lady ada Last updated on 2017-11-17 05:56:10 PM UTC Guide Contents Guide Contents Overview Pinouts Assembly Prepare the header strip: Add the breakout board:
Zelda Thunder Helm. Created by Ruiz Brothers. Last updated on :46:52 PM UTC
 Zelda Thunder Helm Created by Ruiz Brothers Last updated on 2017-08-23 02:46:52 PM UTC Guide Contents Guide Contents Overview Zelda: Breath Of The Wild Parts, Tools and Supplies Proto-Pasta - Aromatic
Coffee Detonator: The TNT Plunger Grinder
 Coffee Detonator: The TNT Plunger Grinder Created by John Park Last updated on 2017-04-12 08:04:36 PM UTC Guide Contents Guide Contents Overview Materials Voltage Conversion AC/DC Voltage Divider Microcontroller
Adafruit LED Sequins. Created by Becky Stern. Last updated on :02:00 AM UTC
 Adafruit LED Sequins Created by Becky Stern Last updated on 2018-03-02 04:02:00 AM UTC Guide Contents Guide Contents Overview Sewing with conductive thread Circuit Diagram GEMMA sequin hat Arduino Code
BLE Light Switch with Feather nrf52840 and Crickit
 BLE Light Switch with Feather nrf52840 and Crickit Created by John Park Last updated on 2019-02-15 07:06:19 PM UTC Guide Contents Guide Contents Overview Parts Adafruit Feather nrf52840 Express Adafruit
Simple LED Unicorn Horn
 Simple LED Unicorn Horn Created by Ruiz Brothers Last updated on 2018-08-22 03:56:14 PM UTC Guide Contents Guide Contents Overview 3D Printed Unicorn Horn Want More Magic/Colors? Great For Beginners Parts
ISS Pin. Created by Leslie Birch. Last updated on :27:30 PM UTC
 ISS Pin Created by Leslie Birch Last updated on 2017-04-18 09:27:30 PM UTC Guide Contents Guide Contents Overview Tools & Supplies Solder Circuit Create Cover Code Set Up IFTTT Want a Test? Wear It! 2
Celebration Spectacles
 Celebration Spectacles Created by Becky Stern Last updated on 2018-08-22 03:45:59 PM UTC Guide Contents Guide Contents Overview Circuit Diagram Assemble Circuit Test and Glue Wear 'em! 2 3 6 7 10 14 Adafruit
Interior Purse Light. Created by Becky Stern. Last updated on :41:08 PM UTC
 Interior Purse Light Created by Becky Stern Last updated on 2018-08-22 03:41:08 PM UTC Guide Contents Guide Contents Overview Circuit Diagram Stitch Sequins Add Tape Arduino Code CircuitPython Code Use
Tent Lantern. Created by Timothy Reese. Last updated on :17:25 AM UTC
 Tent Lantern Created by Timothy Reese Last updated on 2017-07-14 05:17:25 AM UTC Guide Contents Guide Contents Overview Things you'll need: What You'll Learn: 3D Printing Code Assembly Wiring Diagram Soldering
Introducing Circuit Playground
 Introducing Circuit Playground Created by lady ada Last updated on 2016-08-27 02:46:58 AM UTC Guide Contents Guide Contents Overview Pinouts GPIO + Capacitive Touch Pads NeoPixels Pushbuttons Slide Switch
NeoPixel Ring Bangle Bracelet
 NeoPixel Ring Bangle Bracelet Created by Becky Stern Last updated on 2017-09-28 11:14:48 PM UTC Guide Contents Guide Contents Overview Circuit Diagram Build it! Arduino Code CircuitPython Code Planning
Chirping Plush Owl Toy
 Chirping Plush Owl Toy Created by Becky Stern Last updated on 2018-11-21 08:56:55 PM UTC Guide Contents Guide Contents Overview Tools & Supplies Solder Circuit Arduino Code CircuitPython Code Assemble
3D Printed Camera LED Ring
 3D Printed Camera LED Ring Created by Ruiz Brothers Last updated on 2018-08-22 03:39:34 PM UTC Guide Contents Guide Contents Overview DIY LED Ring Light Prerequisite Guide: Parts List: Tools & Supplies
Adafruit GPS Hat in Windows IoT Core
 Adafruit GPS Hat in Windows IoT Core Created by Rick Lesniak Last updated on 2017-01-01 08:17:19 PM UTC Guide Contents Guide Contents Overview Assembly GPSDemoApp Adafruit Class Library 2 3 4 6 13 Adafruit
Getting Started with FLORA
 Getting Started with FLORA Created by Becky Stern Last updated on 2015-05-13 01:00:11 PM EDT Guide Contents Guide Contents Overview Download software Blink onboard LED Blink onboard NeoPixel Install the
3D Printed LED Goggles
 3D Printed LED Goggles Created by Rick Winscot Last updated on 2016-01-04 12:05:18 PM EST Guide Contents Guide Contents Overview Tools / Materials 3D Printing Bridge Assembly NeoPixel Rings Lenses Wire,
FLORA and GEMMA ICSP. Created by Becky Stern. Last updated on :30:55 PM EST
 FLORA and GEMMA ICSP Created by Becky Stern Last updated on 2015-02-19 02:30:55 PM EST Guide Contents Guide Contents Overview Reprogram FLORA over ICSP Reprogram GEMMA over ICSP 2 3 5 10 Adafruit Industries
Lie Ren's Stormflower Gun Blade
 Lie Ren's Stormflower Gun Blade Created by Ruiz Brothers Last updated on 2017-04-02 05:39:24 PM UTC Guide Contents Guide Contents Overview Cosplay Props with NeoPixels Triggered Lighting Effects DIY Electronics
Adafruit TPL5110 Power Timer Breakout
 Adafruit TPL5110 Power Timer Breakout Created by lady ada Last updated on 2017-12-11 06:28:19 AM UTC Guide Contents Guide Contents Overview Pinouts Power Pins Control Pins Assembly Prepare the header strip:
3D Printed 20w Amplifier Box
 3D Printed 20w Amplifier Box Created by Ruiz Brothers Last updated on 2018-02-26 06:48:02 PM UTC Guide Contents Guide Contents Overview Prerequisite Guide Tools & Supplies Parts 3D Printing Print in your
Getting Started with FLORA
 Getting Started with FLORA Created by Becky Stern Last updated on 2018-01-03 04:31:24 AM UTC Guide Contents Guide Contents Overview Windows Driver Installation Manual Driver Installation Download software
Raspberry Pi Selfie Bot
 Raspberry Pi Selfie Bot Created by Sophy Wong Last updated on 2018-08-22 04:03:16 PM UTC Guide Contents Guide Contents Overview Parts & Supplies The Circuit Power Circuit Other Connections Laser Cutting
7" Portable HDMI Monitor
 7" Portable HDMI Monitor Created by Ruiz Brothers Last updated on 2017-05-29 05:47:14 PM UTC Guide Contents Guide Contents Overview DIY Monitor Connect to a Raspberry pi Use as a second monitor Camera
Mad Science Test Tube Rack
 Mad Science Test Tube Rack Created by John Park Last updated on 2016-10-17 09:21:01 PM UTC Guide Contents Guide Contents Overview Lighted Test Tube Parts Materials and Tools Optional Test Tube Rack Parts
NeoPixel Basketball Hoop
 NeoPixel Basketball Hoop Created by Justin Cooper Last updated on 2018-08-27 12:19:58 AM UTC Guide Contents Guide Contents Overview Parts Needed Power choices! Parts for Option #1 Parts for Option #2 Tools
PyPortal View Master Created by Ruiz Brothers. Last updated on :51:28 AM UTC
 PyPortal View Master Created by Ruiz Brothers Last updated on 2019-03-13 11:51:28 AM UTC Overview In this project we re building a view master inspired device using Adafruit s PyPortal. The eyepiece makes
MiniPOV4 - DIY Full-Color Persistence of Vision & Light-Painting Kit
 MiniPOV4 - DIY Full-Color Persistence of Vision & Light-Painting Kit Created by lady ada Last updated on 2018-08-22 03:41:06 PM UTC Guide Contents Guide Contents Overview Make it! Testing Upload Images
NeoPixel LED Cortana Costume
 NeoPixel LED Cortana Costume Created by Ruiz Brothers Last updated on 2018-08-22 03:43:43 PM UTC Guide Contents Guide Contents Overview How it Works Project Advisory Prerequisite Guides Parts & Components
Adafruit LED Sequins. Created by Becky Stern. Last updated on :00:06 PM EST
 Adafruit LED Sequins Created by Becky Stern Last updated on 2015-02-19 05:00:06 PM EST Guide Contents Guide Contents Overview Sewing with conductive thread GEMMA sequin hat 2 3 8 15 Adafruit Industries
Datalogging Hat with FLORA BLE
 Datalogging Hat with FLORA BLE Created by Becky Stern Last updated on 2018-08-22 03:50:19 PM UTC Guide Contents Guide Contents Overview Circuit and Arduino code Bluefruit LE Connect settings Adafruit IO
Adafruit VL53L0X Time of Flight Micro-LIDAR Distance Sensor Breakout
 Adafruit VL53L0X Time of Flight Micro-LIDAR Distance Sensor Breakout Created by lady ada Last updated on 2017-12-28 11:56:14 PM UTC Guide Contents Guide Contents Overview Sensing Capablities Pinouts Power
Magical Mistletoe. Created by Leslie Birch. Last updated on :45:29 PM UTC
 Magical Mistletoe Created by Leslie Birch Last updated on 2018-08-22 03:45:29 PM UTC Guide Contents Guide Contents Overview Tools & Supplies Circuit Diagram Test the Sensor Prepare Parts Attach LED Sequins
7 Portable Multitouch Raspberry Pi Tablet
 7 Portable Multitouch Raspberry Pi Tablet Created by Ruiz Brothers Last updated on 2017-02-27 04:13:53 PM UTC Guide Contents Guide Contents Overview Portable Raspberry Pi Tablet 7" Multitouch Display Parts
Sino:bit with Arduino
 Sino:bit with Arduino Created by Dave Astels Last updated on 2017-12-04 02:22:05 PM UTC Guide Contents Guide Contents Accelerometer and Magnetometer Magnetometer Accelerometer Adafruit Libraries Download
Adafruit MCP9808 Precision I2C Temperature Sensor Guide
 Adafruit MCP9808 Precision I2C Temperature Sensor Guide Created by lady ada Last updated on 2017-11-12 06:09:49 PM UTC Guide Contents Guide Contents Overview Pinouts Power Pins I2C Data Pins Optional Pins
Mini Mac Pi. Created by Ruiz Brothers. Last updated on :43:27 PM UTC
 Mini Mac Pi Created by Ruiz Brothers Last updated on 2018-08-22 03:43:27 PM UTC Guide Contents Guide Contents Overview Build Your Own Mac Pi How it Works Project Advisory Challenges and Expectations Prerequisite
Mystical LED Halloween Hood
 Mystical LED Halloween Hood Created by Becky Stern Last updated on 2017-09-28 11:13:20 PM UTC Guide Contents Guide Contents Overview NeoPixel GEMMA circuit Arduino Code NeoPixel Überguide: Arduino Library
Mystery Box: NeoMatrix Mk I
 Mystery Box: NeoMatrix Mk I Created by John Park Last updated on 2017-12-01 07:31:05 PM UTC Guide Contents Guide Contents Overview Make the Panels Build the NeoMatrix Keypad Display Modules Metro Mounting
0.96" mini Color OLED
 0.96" mini Color OLED Created by lady ada Last updated on 2016-09-08 03:41:52 PM UTC Guide Contents Guide Contents Overview Power Wiring New Model Older Model Wiring the OLDER design (two rows of pins