Crystal Glow Knuckles
|
|
|
- Gavin Gallagher
- 5 years ago
- Views:
Transcription

1 Crystal Glow Knuckles Created by Matthew Borgatti Last updated on :30:07 PM EDT
2 Guide Contents Guide Contents What you're getting Crystal Glow Knuckles Prerequisite Guides 3D Printers Can Make Things That Make Things Design overview Basic Assembly Wiring Overview Gather your materials Collect Your Supplies Cast your crystals Cleanup Mold Assembly Collect Casting Materials Measure and Mix Fill Mold Cure and Demold Wire LiPo Backpack Cut and Solder Wire Neopixels together Solder Neopixels Wire Neopixels to Trinket Connecting Everything to the Board Wire switch Switch Wiring Program Trinket and test code Program and Test Trim wires and install electronics Lay Out Components Insert Trinket Place LED Holder Insert crystals into ring cover Assemble Cap Snap ring together Snap Cap to Base Adafruit Industries Page 2 of 37
3 Wear and admire You've Got It Adafruit Industries Page 3 of 37
4 What you're getting Crystal Glow Knuckles This wearable LED glow ring is a great way to get started with the Pro Trinket. It has a LiPo power source, 3 NeoPixel LED's, and a power backpack to charge passively via USB. All the printed components can be generated in a single build without support material. Prerequisite Guides Before getting started you should take a look at the Adafruit guides that cover the tech we'll be putting inside this ring. Introducing Pro Trinket ( Adafruit Pro Trinket LiPoly/LiIon Backpack ( Adafruit NeoPixel Überguide ( Adafruit Industries Page 4 of 37
5 3D Printers Can Make Things That Make Things This is also an intro to mold making and casting using a 3d printer, as the silicone glow crystals are cast out of a mold that prints right along with the ring components. Adafruit Industries Page 5 of 37
6 Adafruit Industries Page 6 of 37

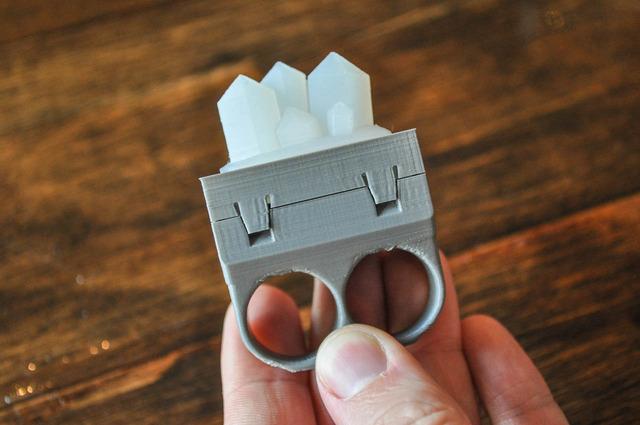
7 Design overview Basic Assembly This design stars 3d printed parts. The printed components are designed to fit together pretty closely. They also hug the circuitry pretty tightly. Depending on your printer, infill, material, Adafruit Industries Page 7 of 37

8 astrological sign, etc. you may have to file off a little here and there to get everything to snap together. Hopefully the tolerances designed into the components will be enough to equal smooth sailing. The ring is built like a sandwich, with all the components mounting into the ring body layer by layer except for the cast crystals, which get pushed up into a retaining chanel in the ring cap. To manage wires, you'll want to do a test of the whole circuit with wires that are a little long and then trim them to length and re-solder once you have a sense for where everything should fit. Wiring Overview Here is how you hook up the electronics that power the ring. If you get confused during assembly, refer back to this diagram. If you're new to electronics, it helps to assemble and program everything leaving the wires long so you can easily resolder and troubleshoot. When you get an understanding of the design and where things fit in the ring, trim the wire down for the final assembly. Adafruit Industries Page 8 of 37
 - I used 00-50) Tongue depressors or stirring sticks Nitrile gloves Mixing cup 3d printed components (http://adafru.")
9 Gather your materials Collect Your Supplies The first step is to get all of the required components together. This project will require: Silicone (I recommend getting a pint of EcoFlex ( - I used 00-50) Tongue depressors or stirring sticks Nitrile gloves Mixing cup 3d printed components ( 5in each silicone coated wire (red, white, and black) Hot glue 1x Pro Trinket ( 3x Neopixels ( 1x Pro Trinket LiPo Backpack ( 1x LiPo 3.7v 100mah ( 1x USB microb cable ( 1x Breadboard-friendly SDPT slide switch ( Adafruit Industries Page 9 of 37
10 Scale Solder You'll need these tools: Soldering Iron Hot glue gun Xacto Nail file Optional stuff that I used to make the process easier: 1x USB LiPo charger ( Vacuum chamber Multimeter Adafruit Industries Page 10 of 37

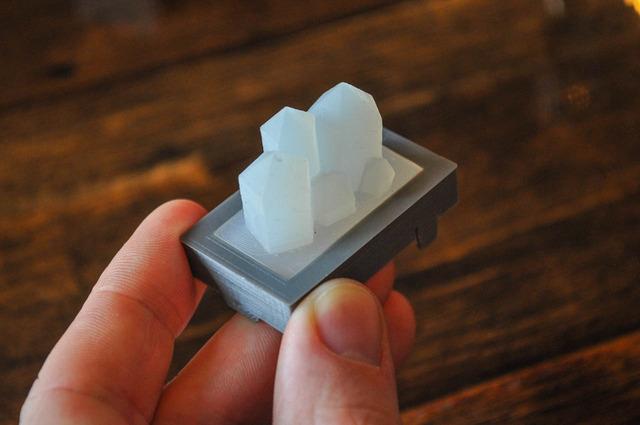
11 Cast your crystals Cleanup You should start by cleaning up your prints. Whiskers hanging off your parts or overflowing blobs of material should be trimmed off with an Xacto or matte knife. Adafruit Industries Page 11 of 37

12 Mold Assembly Assemble the crystal mold according to this diagram. The top portion should simply snap onto the bottom with just a little bit of force. Getting it back off after everything's cast should be easily done by hand. If you're having trouble, slip a flathead screwdriver underneath one of the arms of the top half to pry it up. Adafruit Industries Page 12 of 37

13 Collect Casting Materials Gather everything you'll need to cast the silicone in one place. This means finding your silicone, gloves, stirring sticks, measuring cup, scale, and mold. Adafruit Industries Page 13 of 37

14 Measure and Mix Measure and mix your silicone. Any two-part RTV silicone will work here, but I'm using a 50/50 ratio rubber called EcoFlex because I happen to have it on hand. The mold only requires about 15g of material to fill, but you should mix up 20 to 30 grams of material just to make sure you have a little to spare in case you spill or a lot sticks to the side of your cup. I use a vacuum chamber to degas my silicone to make it extra clear and bubble-free. This isn't an essential step, but it adds an extra bit of polish that helps the ring look professional. If you've never cast anything in silicone before, this ( is an excellent tutorial on mixing, degassing, and pouring rubber. Adafruit Industries Page 14 of 37

15 Fill Mold Pour your silicone through the holes in the top of the mold. When it's filled to the top rotate the mold around and tap it gently against your work table to make sure you work out any trapped bubbles. If you accidentally overfill the mold and silicone is flowing down the sides just wipe it down until the silicone's flush with the top. Don't worry about a little bit of over or under filling. You can always trim bits away if they're preventing your ring from snapping together during final assembly. Adafruit Industries Page 15 of 37

16 Cure and Demold Let your silicone cure overnight. I keep the cup everything was mixed in around to poke at the bottom and tell when everything's cured so I can cheat and pop parts out ASAP. Some brands of silicone will cure much faster, but everything's guaranteed to be cured and safe to demold in 24 hours. All you have to do to get the silicone out of the mold is pop off the top and gently pull the silicone by a corner. It should gradually come away from the mold. Now's your chance to clean up any dangling bits or thin sheets of material that crept between the two mold halves (this skin is called mold flash). If your silicone is tacky and you're worried about it picking up dust from the environment you can dust the part with talc, but if your part is fully cured any dust that settles on it should be easily removed with a damp paper towel. Adafruit Industries Page 16 of 37

17 Wire LiPo Backpack Cut and Solder The process of soldering the Power Backpack to the Trinket Pro is thoroughly coverd in this tutorial ( I'd just like to remind you that you've got to cut the trace indicated in the image above to be able to turn the ring on and off using the slide switch. Once your backpack is soldered to your board, cut the pins sticking up out of the board with some wire cutters to keep everything neat. Adafruit Industries Page 17 of 37

18 Adafruit Industries Page 18 of 37

19 Wire Neopixels together Solder Neopixels Wiring the NeoPixels is simple. Just set each one in a cavity on the LED holder and wire them according to the diagram on the back. Just remember to keep your wire colors consistant. I used red for power, white for ground, and black for digital signal. You can find a thorough guide on wiring and troubleshooting NeoPixels here ( Adafruit Industries Page 19 of 37

20 Wire Neopixels to Trinket Connecting Everything to the Board Now it's time to wire the NeoPixels to your board. I left about 3cm of wire on the LED's so the holder could rotate around without snagging the wires or leaving loose coils hanging out of the ring. Solder the LED ground to the Pro Trinket ground. Solder the LED 5V pad to the Bat+ connection. Remember that you're soldering these to the flat side of the Pro Trinket, so everything's going to be soldered with the board upside-down. You're also connecting these wires to the pins you trimmed off from the Power Backpack. It's not going to be a bulletproof connection, but since these components aren't going to be moving around inside the ring the wires fatiguing and snapping shouldn't be a problem. The LED data line (black wire) goes to Pin 0 on the Trinket. It's labeled RX on the board. This one's just a standard through hole soldering job so it should be no problem. If you're confused, this diagram ( should help. Adafruit Industries Page 20 of 37
.")
21 Wire switch Switch Wiring Wiring the switch is simple. All you have to do is solder wires to any two taps on the switch and then solder the other two ends to the through holes in the power backpack (the same holes you cut the trace between before). I also added a little bit of heat shrink tubing to the wires on the switch end to keep anything from shorting out. Adafruit Industries Page 21 of 37
22 Program Trinket and test code Program and Test Now, you should be able to plug in the Pro Trinket to your computer viat the USB A/Micro B cable and get some code on it. The code below is modified from the LED Longboard tutorial ( I found that it was easiest to get Arduino open and get the code all set before plugging the Pro Trinket in, as it's only available for downloading code for a few seconds before it goes into a different mode that doesn't speak to the USB port. Now, when you unplug the USB port and flip the switch the Trinket should boot for about five seconds and you'll see a rainbow wave of color across the NeoPixels. #include <Adafruit_NeoPixel.h> #define PIN 0 // Parameter 1 = number of pixels in strip // Parameter 2 = pin number (most are valid) // Parameter 3 = pixel type flags, add together as needed: Adafruit Industries Page 22 of 37
23 // Parameter 3 = pixel type flags, add together as needed: // NEO_KHZ KHz bitstream (most NeoPixel products w/ws2812 LEDs) // NEO_KHZ KHz (classic 'v1' (not v2) FLORA pixels, WS2811 drivers) // NEO_GRB Pixels are wired for GRB bitstream (most NeoPixel products) // NEO_RGB Pixels are wired for RGB bitstream (v1 FLORA pixels, not v2) Adafruit_NeoPixel strip = Adafruit_NeoPixel(20, PIN, NEO_GRB + NEO_KHZ800); // Here is where you can put in your favorite colors that will appear! // just add new {nnn, nnn, nnn}, lines. They will be picked out randomly // R G B uint8_t mycolors[][3] = {{232, 100, 255}, // purple {200, 200, 20}, // yellow {30, 200, 200}, // blue }; // don't edit the line below #define FAVCOLORS sizeof(mycolors) / 3 void setup() { strip.begin(); strip.setbrightness(40); strip.show(); // Initialize all pixels to 'off' } void loop() { //flashrandom(5, 8); // first number is 'wait' delay, shorter num == shorter twinkle //flashrandom(5, 5); // second number is how many neopixels to simultaneously light up //flashrandom(5, 11); //colorwipe(strip.color(232, 100, 255), 50); // Red //colorwipe(strip.color(200, 200, 20), 50); // Green //colorwipe(strip.color(30, 200, 200), 50); // Blue rainbowcycle(20); } // Fill the dots one after the other with a color void colorwipe(uint32_t c, uint8_t wait) { for(uint16_t i=0; i<strip.numpixels(); i++) { strip.setpixelcolor(i, c); strip.show(); delay(wait); } } void rainbow(uint8_t wait) { uint16_t i, j; for(j=0; j<256; j++) { Adafruit Industries Page 23 of 37
24 for(j=0; j<256; j++) { for(i=0; i<strip.numpixels(); i++) { strip.setpixelcolor(i, Wheel((i+j) & 255)); } strip.show(); delay(wait); } } // Slightly different, this makes the rainbow equally distributed throughout void rainbowcycle(uint8_t wait) { uint16_t i, j; for(j=0; j<256*5; j++) { // 5 cycles of all colors on wheel for(i=0; i< strip.numpixels(); i++) { strip.setpixelcolor(i, Wheel(((i * 256 / strip.numpixels()) + j) & 255)); } strip.show(); delay(wait); } } // Input a value 0 to 255 to get a color value. // The colours are a transition r - g - b - back to r. uint32_t Wheel(byte WheelPos) { if(wheelpos < 85) { return strip.color(wheelpos * 3, WheelPos * 3, 0); } else if(wheelpos < 170) { WheelPos -= 85; return strip.color(255 - WheelPos * 3, 0, WheelPos * 3); } else { WheelPos -= 170; return strip.color(0, WheelPos * 3, WheelPos * 3); } } void flashrandom(int wait, uint8_t howmany) { for(uint16_t i=0; i<howmany; i++) { // pick a random favorite color! int c = random(favcolors); int red = mycolors[c][0]; int green = mycolors[c][1]; int blue = mycolors[c][2]; // get a random pixel from the list int j = random(strip.numpixels()); Adafruit Industries Page 24 of 37
25 // now we will 'fade' it in 5 steps for (int x=0; x < 5; x++) { int r = red * (x+1); r /= 5; int g = green * (x+1); g /= 5; int b = blue * (x+1); b /= 5; strip.setpixelcolor(j, strip.color(r, g, b)); strip.show(); delay(wait); } // & fade out in 5 steps for (int x=5; x >= 0; x--) { int r = red * x; r /= 5; int g = green * x; g /= 5; int b = blue * x; b /= 5; strip.setpixelcolor(j, strip.color(r, g, b)); strip.show(); delay(wait); } } // LEDs will be off when done (they are faded to 0) } Adafruit Industries Page 25 of 37

26 Trim wires and install electronics Lay Out Components Start assembling everything into the ring base by putting a dot of hot glue down where the switch rests. You should be able to push the switch into this recess, feeling just a bit of friction as it goes in. Adafruit Industries Page 26 of 37

27 Insert Trinket Next, place the Trinket face down so that the small plastic pin protruding up from the center of the ring base fits into the screw hole of the trinket. The wires from the battery should slip into the little notch next to the switch. To keep everything together, use a tiny dot of hot glue to hold the LiPo to the Trinket. Adafruit Industries Page 27 of 37

28 Place LED Holder Now, rotate the LED holder into place and make sure you don't have too much wire around keeping the ring from fitting together cleanly. I ended up having to trim down the switch and LiPo wires to save space, but your mileage may vary. Adafruit Industries Page 28 of 37

29 Insert crystals into ring cover Assemble Cap You're almost done. Take your cast crystals and pop them into the ring cover. You should be able to feel when the gasket around the crystals lines up with the recess printed into the cap. You may have to work everything together by squeezing along the seam between the cap and the crystals with a finger, but it should work itself out. Adafruit Industries Page 29 of 37

30 Adafruit Industries Page 30 of 37
31 Adafruit Industries Page 31 of 37

32 Snap ring together Snap Cap to Base Tuck the LED holder up into the cavity in the silicone line it up for snapping the cap onto the base. Angle the cap to get the snaps on one side aligned and then press down to let the other set slide home. If you don't feel a click, it might be because some material slumped on the overhangs of the cap while it was printing. You can adjust this with a small file or emery board. Adafruit Industries Page 32 of 37

33 Adafruit Industries Page 33 of 37
34 Adafruit Industries Page 34 of 37
35 Wear and admire You've Got It If you've gotten this far you should have a glowy LED crystal ring on your hands. Remember to charge it by plugging in the USB every so often and it should give you hours of irridescent fun at a time. Adafruit Industries Page 35 of 37

36 Adafruit Industries Page 36 of 37
37 Adafruit Industries Last Updated: :30:08 PM EDT Page 37 of 37
Celebration Spectacles
 Celebration Spectacles Created by Becky Stern Last updated on 2018-08-22 03:45:59 PM UTC Guide Contents Guide Contents Overview Circuit Diagram Assemble Circuit Test and Glue Wear 'em! 2 3 6 7 10 14 Adafruit
LED Stego Flex Spike Hoodie
 LED Stego Flex Spike Hoodie Created by Becky Stern Last updated on 2015-02-19 04:45:44 PM EST Guide Contents Guide Contents Overview Like this project? 3D Print Spikes NinjaFlex Assemble Circuit Layout
Cyberpunk Spikes. Created by Becky Stern. Last updated on :07:06 PM UTC
 Cyberpunk Spikes Created by Becky Stern Last updated on 2017-10-20 09:07:06 PM UTC Guide Contents Guide Contents Overview Download and 3D Print Prepare NeoPixel Strip Assemble Circuit Arduino Code CircuitPython
3D Printed Camera LED Ring
 3D Printed Camera LED Ring Created by Ruiz Brothers Last updated on 2018-08-22 03:39:34 PM UTC Guide Contents Guide Contents Overview DIY LED Ring Light Prerequisite Guide: Parts List: Tools & Supplies
NeoPixel Punk Collar. Created by Becky Stern. Last updated on :41:18 PM UTC
 NeoPixel Punk Collar Created by Becky Stern Last updated on 2018-08-22 03:41:18 PM UTC Guide Contents Guide Contents Overview Circuit Diagram Prototype Circuit Arduino Code CircuitPython Code Build Collar
Getting Started with FLORA
 Getting Started with FLORA Created by Becky Stern Last updated on 2015-05-13 01:00:11 PM EDT Guide Contents Guide Contents Overview Download software Blink onboard LED Blink onboard NeoPixel Install the
Adafruit TPL5111 Reset Enable Timer Breakout
 Adafruit TPL5111 Reset Enable Timer Breakout Created by lady ada Last updated on 2017-11-02 07:32:27 PM UTC Guide Contents Guide Contents Overview Pinouts Power Pins Control Pins Assembly Prepare the header
Adafruit TPL5110 Power Timer Breakout
 Adafruit TPL5110 Power Timer Breakout Created by lady ada Last updated on 2017-12-11 06:28:19 AM UTC Guide Contents Guide Contents Overview Pinouts Power Pins Control Pins Assembly Prepare the header strip:
Getting Started with FLORA
 Getting Started with FLORA Created by Becky Stern Last updated on 2018-01-03 04:31:24 AM UTC Guide Contents Guide Contents Overview Windows Driver Installation Manual Driver Installation Download software
NeoPixel LED Cortana Costume
 NeoPixel LED Cortana Costume Created by Ruiz Brothers Last updated on 2018-08-22 03:43:43 PM UTC Guide Contents Guide Contents Overview How it Works Project Advisory Prerequisite Guides Parts & Components
NeoPixel Basketball Hoop
 NeoPixel Basketball Hoop Created by Justin Cooper Last updated on 2018-08-27 12:19:58 AM UTC Guide Contents Guide Contents Overview Parts Needed Power choices! Parts for Option #1 Parts for Option #2 Tools
Sparkle Skirt. Created by Becky Stern. Last updated on :48:58 PM UTC
 Sparkle Skirt Created by Becky Stern Last updated on 2017-12-13 03:48:58 PM UTC Guide Contents Guide Contents Overview Tools & Supplies Layout & Circuit Diagram Sew Circuit Code & Battery Wear it! 2 3
Jewel Hair Stick. Created by Leslie Birch. Last updated on :47:17 PM UTC
 Jewel Hair Stick Created by Leslie Birch Last updated on 2018-08-22 03:47:17 PM UTC Guide Contents Guide Contents Overview Tools & Supplies Prepare Chopstick Circuit Diagram Solder Circuit Arduino Code
Light-Up Angler Fish Embroidery
 Light-Up Angler Fish Embroidery Created by Becky Stern Last updated on 2018-08-22 03:35:36 PM UTC Guide Contents Guide Contents Overview Tools & Supplies Layout & Circuit Diagram Sew Circuit Code Hand
Guardian Shield+ Zelda Breath of the Wild
 Guardian Shield+ Zelda Breath of the Wild Created by Ruiz Brothers Last updated on 2018-08-22 04:01:50 PM UTC Guide Contents Guide Contents Overview Articulating Handle Rechargeable Prerequisite Guides
Portable Apple Watch Charger
 Portable Apple Watch Charger Created by Ruiz Brothers Last updated on 2017-10-22 09:58:04 PM UTC Guide Contents Guide Contents Overview Smart Charging Prerequisite Guides Parts, Tool & Supplies Circuit
Trinket NeoPixel LED Longboard
 Trinket NeoPixel LED Longboard Created by Ruiz Brothers Last updated on 2017-10-02 06:00:32 PM UTC Guide Contents Guide Contents Overview Parts Tools & Supplies Prerequisite Guides 3D Printing PLA Material
Tent Lantern. Created by Timothy Reese. Last updated on :17:25 AM UTC
 Tent Lantern Created by Timothy Reese Last updated on 2017-07-14 05:17:25 AM UTC Guide Contents Guide Contents Overview Things you'll need: What You'll Learn: 3D Printing Code Assembly Wiring Diagram Soldering
NeoPixel Ring Bangle Bracelet
 NeoPixel Ring Bangle Bracelet Created by Becky Stern Last updated on 2017-09-28 11:14:48 PM UTC Guide Contents Guide Contents Overview Circuit Diagram Build it! Arduino Code CircuitPython Code Planning
ISS Pin. Created by Leslie Birch. Last updated on :27:30 PM UTC
 ISS Pin Created by Leslie Birch Last updated on 2017-04-18 09:27:30 PM UTC Guide Contents Guide Contents Overview Tools & Supplies Solder Circuit Create Cover Code Set Up IFTTT Want a Test? Wear It! 2
Camera LED Ring Light
 Camera LED Ring Light Created by Ruiz Brothers Last updated on 2017-05-09 06:07:12 PM UTC Guide Contents Guide Contents Overview NeoPixel Ring Light Dedicated white LED Prerequisite Guides Parts Tools
Feather Weather Lamp. Created by Ruiz Brothers. Last updated on :54:26 PM UTC
 Feather Weather Lamp Created by Ruiz Brothers Last updated on 2018-08-22 03:54:26 PM UTC Guide Contents Guide Contents Overview Weather Reactive Pixels Prerequisite Guides Parts Tools & Supplies Circuit
3D Printed Daft Punk Helmet with Bluetooth
 3D Printed Daft Punk Helmet with Bluetooth Created by Ruiz Brothers Last updated on 2017-10-20 01:47:59 PM UTC Guide Contents Guide Contents Overview Parts List Tools & Supplies Light Painting with Daftpunk
Lie Ren's Stormflower Gun Blade
 Lie Ren's Stormflower Gun Blade Created by Ruiz Brothers Last updated on 2017-04-02 05:39:24 PM UTC Guide Contents Guide Contents Overview Cosplay Props with NeoPixels Triggered Lighting Effects DIY Electronics
NeoPixie Dust Bag with Circuit Playground Express
 NeoPixie Dust Bag with Circuit Playground Express Created by John Park Last updated on 2017-12-20 10:00:29 PM UTC Guide Contents Guide Contents Overview Code It Setup Animation Color Touch Variable Color
Clockwork Goggles. Created by John Park. Last updated on :03:10 PM UTC
 Clockwork Goggles Created by John Park Last updated on 2018-08-22 04:03:10 PM UTC Guide Contents Guide Contents Overview Assemble Circuit and Goggles CircuitPython Setup and Code Rock the Goggles 2 3 6
3D Printed 20w Amplifier Box
 3D Printed 20w Amplifier Box Created by Noe & Pedro Ruiz Last updated on 2014-04-22 03:01:38 PM EDT Guide Contents Guide Contents Overview Prerequisite Guide Tools & Supplies Parts 3D Printing Print in
3D Printed LED Buckle
 3D Printed LED Buckle Created by Ruiz Brothers Last updated on 2018-08-22 03:38:02 PM UTC Guide Contents Guide Contents Overview Customize the Buckle Artwork, Design and Text Scale, Adjust and Combine
3D Printed 20w Amplifier Box
 3D Printed 20w Amplifier Box Created by Ruiz Brothers Last updated on 2018-02-26 06:48:02 PM UTC Guide Contents Guide Contents Overview Prerequisite Guide Tools & Supplies Parts 3D Printing Print in your
Bunny Ears with MakeCode
 Bunny Ears with MakeCode Created by Erin St Blaine Last updated on 2018-08-22 04:05:47 PM UTC Guide Contents Guide Contents Introduction Tools & Other Materials Programming with MakeCode Set Up the Light
FLORA TV-B-Gone. Created by Becky Stern. Last updated on :32:57 PM UTC
 FLORA TV-B-Gone Created by Becky Stern Last updated on 2018-08-22 03:32:57 PM UTC Guide Contents Guide Contents Overview Parts Tutorials Transistors Resistors LEDs Pushbutton Program it Power Fabric pinwheel
Solar Boost Bag. Created by Becky Stern. Last updated on :44:55 PM UTC
 Solar Boost Bag Created by Becky Stern Last updated on 2018-08-22 03:44:55 PM UTC Guide Contents Guide Contents Overview 3D Design Files Customize Design Assemble Circuit Prepare Solar Panel Enclosure
3D Printed LED Knuckle Jewelry
 3D Printed LED Knuckle Jewelry Created by Ruiz Brothers Last updated on 2015-02-20 09:31:06 AM EST Guide Contents Guide Contents Overview Prerequisite Guides Parts Tools & Supplies 3D Printing Filament
NeoMatrix 8x8 Word Clock
 NeoMatrix 8x8 Word Clock Created by Andy Doro Last updated on 2017-10-10 04:10:51 AM UTC Guide Contents Guide Contents Overview Parts List Parts Tools Circuit Assembly Overview Uploading Code Understanding
FLORA Pixel Brooch. Created by Becky Stern. Last updated on :19:07 PM EST
 FLORA Pixel Brooch Created by Becky Stern Last updated on 2015-02-20 01:19:07 PM EST Guide Contents Guide Contents Overview Connect first signal wire Connect power and ground wires Add more pixels Program
Sewable NeoPixels. Created by Becky Stern. Last updated on :50:14 PM EDT
 Sewable NeoPixels Created by Becky Stern Last updated on 2015-08-25 07:50:14 PM EDT Guide Contents Guide Contents Overview Prerequisite guides Lots of Pixels? Hook up alligator clips Run pixel test code
Mad Science Test Tube Rack
 Mad Science Test Tube Rack Created by John Park Last updated on 2016-10-17 09:21:01 PM UTC Guide Contents Guide Contents Overview Lighted Test Tube Parts Materials and Tools Optional Test Tube Rack Parts
NeoPixel Manicure. Created by Sophy Wong. Last updated on :50:38 PM UTC
 NeoPixel Manicure Created by Sophy Wong Last updated on 2018-04-11 05:50:38 PM UTC Guide Contents Guide Contents Overview Parts & Supplies Tools Circuit Diagram Build the Circuit Measure Your Circuit Prepare
Trellis 3D Printed Enclosure
 Trellis 3D Printed Enclosure Created by Ruiz Brothers Last updated on 2018-08-22 03:39:07 PM UTC Guide Contents Guide Contents Overview Parts Tools & Supplies Modeling 123D Design Customize Measuring Parts
Glowing Smokey Skull. Created by Ruiz Brothers. Last updated on :03:40 PM UTC
 Glowing Smokey Skull Created by Ruiz Brothers Last updated on 2018-08-22 04:03:40 PM UTC Guide Contents Guide Contents Overview Easy DIY Halloween Props Electronic Halloween! Circuit Playground NeoPixels
Galaxy Pendant. Created by Erin St Blaine. Last updated on :44:15 PM UTC
 Galaxy Pendant Created by Erin St Blaine Last updated on 2016-08-06 04:44:15 PM UTC Guide Contents Guide Contents Introduction Electronic Guts Crafty Stuff Tools The Code Software Setup Libraries? Why?
No-Sew LED Wristband. Created by Kathy Ceceri. Last updated on :23:40 PM UTC
 No-Sew LED Wristband Created by Kathy Ceceri Last updated on 2018-11-13 09:23:40 PM UTC Guide Contents Guide Contents Overview Playing with LED Options Suggested Parts List -- Electronics Suggested Materials
3D Printed Case for Adafruit Feather
 3D Printed Case for Adafruit Feather Created by Ruiz Brothers Last updated on 2018-08-22 03:59:38 PM UTC Guide Contents Guide Contents Overview Adafruit Feather Box New Update! Check out the TFT Feather
7" Portable HDMI Monitor
 7" Portable HDMI Monitor Created by Ruiz Brothers Last updated on 2017-05-29 05:47:14 PM UTC Guide Contents Guide Contents Overview DIY Monitor Connect to a Raspberry pi Use as a second monitor Camera
Circuit Playground Yoyo
 Circuit Playground Yoyo Created by Ruiz Brothers Last updated on 2018-01-13 05:56:02 AM UTC Guide Contents Guide Contents Overview 3D Printed NeoPixel Yoyo History of the Yo-Yo Expectations Parts Tools
Bluetooth Controlled NeoPixel Headphones
 Bluetooth Controlled NeoPixel Headphones Created by Ruiz Brothers Last updated on 2017-03-09 07:38:05 PM UTC Guide Contents Guide Contents Overview Smart LED HeadPhones Prerequisite Guides Parts Tools
Mystical LED Halloween Hood
 Mystical LED Halloween Hood Created by Becky Stern Last updated on 2017-09-28 11:13:20 PM UTC Guide Contents Guide Contents Overview NeoPixel GEMMA circuit Arduino Code NeoPixel Überguide: Arduino Library
Adafruit LED Sequins. Created by Becky Stern. Last updated on :02:00 AM UTC
 Adafruit LED Sequins Created by Becky Stern Last updated on 2018-03-02 04:02:00 AM UTC Guide Contents Guide Contents Overview Sewing with conductive thread Circuit Diagram GEMMA sequin hat Arduino Code
Adafruit LED Sequins. Created by Becky Stern. Last updated on :00:06 PM EST
 Adafruit LED Sequins Created by Becky Stern Last updated on 2015-02-19 05:00:06 PM EST Guide Contents Guide Contents Overview Sewing with conductive thread GEMMA sequin hat 2 3 8 15 Adafruit Industries
NeoPixel Fairy Crown. Created by Erin St Blaine. Last updated on :22:47 AM UTC
 NeoPixel Fairy Crown Created by Erin St Blaine Last updated on 2018-12-31 02:22:47 AM UTC Guide Contents Guide Contents Overview Adafruit NeoPixel LED Dots Strand - 20 LEDs at 2" Pitch Adafruit GEMMA M0
LED Lightbox. Created by Sam Clippinger. Last updated on :50:00 AM UTC
 LED Lightbox Created by Sam Clippinger Last updated on 2016-09-03 01:50:00 AM UTC Guide Contents Guide Contents Overview TL;DR Skill Level Parts List Yellow sticker reads: "Bad planning on your part does
Pushrod Garage. Created by John Park. Last updated on :07:30 PM UTC
 Pushrod Garage Created by John Park Last updated on 2018-08-22 04:07:30 PM UTC Guide Contents Guide Contents Overview Parts & Materials Tools Pushrod Mechanism Code it with MakeCode Functions On Start
Easy Sparkle Pocket T-Shirt
 Easy Sparkle Pocket T-Shirt Created by Erin St Blaine Last updated on 2018-10-18 06:45:05 PM UTC Guide Contents Guide Contents Overview Parts Materials Needed Code with MakeCode Vinyl Cutting Sizing and
Fiddy - the FTDI Clip
 Fiddy - the FTDI Clip Created by Timothy Reese Last updated on 2016-11-22 09:18:04 PM UTC Guide Contents Guide Contents Overview FTDI is Great! Things you'll need: What You'll Learn: 3D Printing Assembly
Simple LED Unicorn Horn
 Simple LED Unicorn Horn Created by Ruiz Brothers Last updated on 2018-08-22 03:56:14 PM UTC Guide Contents Guide Contents Overview 3D Printed Unicorn Horn Want More Magic/Colors? Great For Beginners Parts
Hammer Time Mini Golf Hazard with Crickit
 Hammer Time Mini Golf Hazard with Crickit Created by John Park Last updated on 2018-07-09 06:47:53 AM UTC Guide Contents Guide Contents Overview Please Hammer, Don't Hurt Em Parts Materials & Tools Program
Ping Pong Ball Launcher
 Ping Pong Ball Launcher Created by Dano Wall Last updated on 2019-01-25 03:19:13 AM UTC Guide Contents Guide Contents Overview Electronic Parts Circuit Playground Express USB cable - USB A to Micro-B Alkaline
Crickit Carnival Bumper Bot
 Crickit Carnival Bumper Bot Created by John Park Last updated on 2018-08-22 04:08:52 PM UTC Guide Contents Guide Contents Overview Parts Materials and Tools Build the Bumper Bot Cut the Cardboard Chassis
FPV Mini Display. Created by Ruiz Brothers. Last updated on :00:18 PM UTC
 FPV Mini Display Created by Ruiz Brothers Last updated on 2017-07-19 01:00:18 PM UTC Guide Contents Guide Contents Overview Mini FPV monitor Adafruit Parts Tools and Supplies Circuit Diagram Electronics
NeoPixel Bike Light. Created by Ruiz Brothers. Last updated on :43:46 PM UTC
 NeoPixel Bike Light Created by Ruiz Brothers Last updated on 2018-11-15 07:43:46 PM UTC Guide Contents Guide Contents Overview 3D Printed Headlight Adafruit's Feather Platform Circuit Python Powered Parts
Milk Jug Glow Skull. Created by John Park. Last updated on :28:36 PM UTC
 Milk Jug Glow Skull Created by John Park Last updated on 2018-09-14 09:28:36 PM UTC Guide Contents Guide Contents Overview Parts Materials & Tools Optional Skull/Sculpting Stand Build the Skull Prep the
Adafruit Prototyping Pi Plate. Created by Ladyada
 Adafruit Prototyping Pi Plate Created by Ladyada Guide Contents Guide Contents Overview Solder it! User Manual Buy Adafruit Prototyping Pi Plate 2 3 4 14 17 Adafruit Industries http://learn.adafruit.com/adafruit-prototyping-pi-plate
Fiddy - the FTDI Clip
 Fiddy - the FTDI Clip Created by Timothy Reese Last updated on 2018-08-22 03:57:42 PM UTC Guide Contents Guide Contents Overview FTDI is Great! Things you'll need: What You'll Learn: 3D Printing Assembly
7 Portable Multitouch Raspberry Pi Tablet
 7 Portable Multitouch Raspberry Pi Tablet Created by Ruiz Brothers Last updated on 2017-02-27 04:13:53 PM UTC Guide Contents Guide Contents Overview Portable Raspberry Pi Tablet 7" Multitouch Display Parts
Chirping Plush Owl Toy
 Chirping Plush Owl Toy Created by Becky Stern Last updated on 2018-11-21 08:56:55 PM UTC Guide Contents Guide Contents Overview Tools & Supplies Solder Circuit Arduino Code CircuitPython Code Assemble
Audio Prank Gift Box. Created by Becky Stern. Last updated on :46:15 PM UTC
 Audio Prank Gift Box Created by Becky Stern Last updated on 2018-08-22 03:46:15 PM UTC Guide Contents Guide Contents Overview Circuit Diagram Prepare Components Build Circuit Wrap and Give 2 3 5 6 12 14
Infinity Mirror Valentine's Candy Box
 Infinity Mirror Valentine's Candy Box Created by Kathy Ceceri Last updated on 2019-02-07 09:44:54 PM UTC Guide Contents Guide Contents Overview Parts List -- Mini Box Version Chibitronics Color LEDs Add-On
3D Printed Glow-Spike Bracelet
 3D Printed Glow-Spike Bracelet Created by Rick Winscot Last updated on 2014-08-13 12:00:11 PM EDT Guide Contents Guide Contents 3D Printing Battery Compartments LED Spikes Wiring / Soldering 2 3 4 11 17
Neon LED Signs. Created by John Park. Last updated on :11:09 PM UTC
 Neon LED Signs Created by John Park Last updated on 2018-08-22 04:11:09 PM UTC Guide Contents Guide Contents Overview Parts Materials Tools Build the Sign Driver Preparation Solder the Circuit Solder the
Cup o' Sound. Created by Becky Stern. Last updated on :30:06 PM EST
 Cup o' Sound Created by Becky Stern Last updated on 2015-02-18 01:30:06 PM EST Guide Contents Guide Contents Overview Circuit Diagram Load Sound and Prepare Components Solder Circuit and Assemble Use it!
Interior Purse Light. Created by Becky Stern. Last updated on :41:08 PM UTC
 Interior Purse Light Created by Becky Stern Last updated on 2018-08-22 03:41:08 PM UTC Guide Contents Guide Contents Overview Circuit Diagram Stitch Sequins Add Tape Arduino Code CircuitPython Code Use
Bike Wheel POV Display
 Bike Wheel POV Display Created by Becky Stern Last updated on 2017-09-12 03:10:38 PM UTC Guide Contents Guide Contents Overview Parts and Tools Circuit Diagram Prep LEDs & Breadboard Code Solder Circuit
Steven Universe Cosplay Shirt & Gem Created by Erin St Blaine. Last updated on :54:25 PM UTC
 Steven Universe Cosplay Shirt & Gem Created by Erin St Blaine Last updated on 2019-04-04 06:54:25 PM UTC Overview Make yourself a Steven Universe costume that will light up the world. This guide will show
Adafruit Pi Cobbler Kit
 Adafruit Pi Cobbler Kit Created by lady ada Last updated on 2018-08-22 03:30:27 PM UTC Guide Contents Guide Contents Overview Solder it! Buy a Pi Cobbler Kit! Downloads 2 3 5 15 16 Adafruit Industries
LED Eyes. Created by Ruiz Brothers. Last updated on :50:55 AM UTC
 LED Eyes Created by Ruiz Brothers Last updated on 2018-01-13 05:50:55 AM UTC Guide Contents Guide Contents Overview Parts, Tools and Supplies Enameled Copper Magnet Wire 11 meters / 0.1mm diameter Adafruit
Con Badge with Circuit Playground Express
 Con Badge with Circuit Playground Express Created by Sophy Wong Last updated on 2018-04-11 05:00:16 PM UTC Guide Contents Guide Contents Overview Tools & Materials Laser Cutting Program the Circuit Playground
Adabot Operation Game
 Adabot Operation Game Created by John Park Last updated on 2018-08-22 04:11:17 PM UTC Guide Contents Guide Contents Overview Parts Materials & Tools Build the Operating Table Print the Board and Pieces
PyPortal View Master Created by Ruiz Brothers. Last updated on :51:28 AM UTC
 PyPortal View Master Created by Ruiz Brothers Last updated on 2019-03-13 11:51:28 AM UTC Overview In this project we re building a view master inspired device using Adafruit s PyPortal. The eyepiece makes
Toy Car Speed Timer. Created by Kirby Griese. Last updated on :13:49 PM UTC
 Toy Car Speed Timer Created by Kirby Griese Last updated on 2017-03-20 09:13:49 PM UTC Guide Contents Guide Contents Overview Parts needed Prerequisites 3D Printing Assembly Wiring Software Use It 2 3
Crawling Baby Sea Turtle Robot
 Crawling Baby Sea Turtle Robot Created by Dano Wall Last updated on 2018-08-22 04:10:26 PM UTC Guide Contents Guide Contents Overview Save the Wee Turtles Household Materials Adafruit Electronics Create
'Sup Brows. Created by Kate Hartman. Last updated on :52:04 PM UTC
 'Sup Brows Created by Kate Hartman Last updated on 2018-08-22 03:52:04 PM UTC Guide Contents Guide Contents Overview Circuit Bluetooth Test Upload the Code Place the Sensor View Sensor Values Via Bluetooth
Bandolier of Light. Created by Becky Stern. Last updated on :16:17 PM EST
 Bandolier of Light Created by Becky Stern Last updated on 2015-02-19 02:16:17 PM EST Guide Contents Guide Contents Overview 3D Design File Ninjaflex STLs Slicer Settings Clean Up Modify Design Solder Circuit
Alohamora Bottle. Created by Erin St Blaine. Last updated on :58:53 PM UTC
 Alohamora Bottle Created by Erin St Blaine Last updated on 2017-06-16 10:58:53 PM UTC Guide Contents Guide Contents Introduction Ingredients Tools Code 1. Arduino IDE 2. Teensyduino Installer 3. FastLED
DIY Bluetooth Gamepad
 DIY Bluetooth Gamepad Created by Ruiz Brothers Last updated on 2016-09-03 02:23:21 AM UTC Guide Contents Guide Contents Overview Prerequisite Guides Expectations Parts Tools & Supplies Circuit Diagram
Crawling Animatronic Hand
 Crawling Animatronic Hand Created by Dano Wall Last updated on 2018-12-03 06:39:35 PM UTC Guide Contents Guide Contents Overview Parts Used Tools & Materials Prepare the Hand Your hand is now ready to
Phone-Activated Talking Dog Collar
 Phone-Activated Talking Dog Collar Created by Phillip Burgess Last updated on 2017-01-24 08:28:00 PM UTC Guide Contents Guide Contents Overview Circuit Diagram & Code Leather Collar & Greebles Assemble
Circuit Playground Express Head-Tilt Ears
 Circuit Playground Express Head-Tilt Ears Created by Dave Astels Last updated on 2018-10-09 04:07:03 PM UTC Guide Contents Guide Contents Overview Parts Circuit Playground Express Micro servo Lithium Ion
Modifying Servos for Continuous Rotation
 Modifying Servos for Continuous Rotation Created by Rick Winscot Last updated on 2018-01-13 05:46:39 AM UTC Guide Contents Guide Contents Overview Tools / Materials Void the Warranty Breaking Bad Barriers
Magical Mistletoe. Created by Leslie Birch. Last updated on :45:29 PM UTC
 Magical Mistletoe Created by Leslie Birch Last updated on 2018-08-22 03:45:29 PM UTC Guide Contents Guide Contents Overview Tools & Supplies Circuit Diagram Test the Sensor Prepare Parts Attach LED Sequins
3D Printed LED Goggles
 3D Printed LED Goggles Created by Rick Winscot Last updated on 2016-01-04 12:05:18 PM EST Guide Contents Guide Contents Overview Tools / Materials 3D Printing Bridge Assembly NeoPixel Rings Lenses Wire,
Stumble-Bot. Created by Dano Wall. Last updated on :04:06 AM UTC
 Stumble-Bot Created by Dano Wall Last updated on 2018-09-06 05:04:06 AM UTC Guide Contents Guide Contents Overview Simply Stumbling We Have the Technology Other Supplies Leg Assembly Front Legs Back Legs
Paper Airplane Launcher
 Paper Airplane Launcher Created by Dano Wall Last updated on 2018-08-27 08:36:14 PM UTC Guide Contents Guide Contents Overview A Launching Platform The Electronics Materials Build the Launcher Attach Motors
Crickit Powered Holiday Diorama
 Crickit Powered Holiday Diorama Created by Isaac Wellish Last updated on 2018-12-04 12:49:07 AM UTC Guide Contents Guide Contents Overview Prerequisite Guides Adafruit Parts Tools and Materials Wiring
Morning Star POV Double Staffs
 Morning Star POV Double Staffs Created by Erin St Blaine Last updated on 2015-08-25 03:20:11 PM EDT Guide Contents Guide Contents Introduction Code Wiring Layout & Sizing LED Wiring Pro Trinket & Charger
Adafruit Capacitive Touch Sensor Breakouts
 Adafruit Capacitive Touch Sensor Breakouts Created by Bill Earl Last updated on 2018-08-22 03:36:13 PM UTC Guide Contents Guide Contents Overview Momentary Toggle 5-Pad Momentary Assembly and Wiring Installing
Webcam Cover-Up Lego brick with Adabot Mini Fig
 Webcam Cover-Up Lego brick with Adabot Mini Fig Created by Ruiz Brothers Last updated on 2018-08-22 04:06:44 PM UTC Guide Contents Guide Contents Overview 3D Printing What If I Don't Have A 3D Printer?
Flora Brake Light Backpack
 Flora Brake Light Backpack Created by Becky Stern Last updated on 2018-02-14 02:47:42 PM UTC Guide Contents Guide Contents Overview Tools & Supplies Circuit Diagram Control Circuit LED Pixels The Code
Coffee Detonator: The TNT Plunger Grinder
 Coffee Detonator: The TNT Plunger Grinder Created by John Park Last updated on 2017-04-12 08:04:36 PM UTC Guide Contents Guide Contents Overview Materials Voltage Conversion AC/DC Voltage Divider Microcontroller
3D Printed Bone Conduction Transducer Box
 3D Printed Bone Conduction Transducer Box Created by Ruiz Brothers Last updated on 2018-08-22 03:40:25 PM UTC Guide Contents Guide Contents Overview Tools & Supplies Parts 3D Printing Circuit Diagram Stereo
3D Printed Google AIY Voice Kit
 3D Printed Google AIY Voice Kit Created by Ruiz Brothers Last updated on 2018-01-09 12:47:26 AM UTC Guide Contents Guide Contents Overview 3D Print a DIY AI enclosure for the Raspberry PI! Parts, Tools