3 L 1 J K R I M N O 1 H 2 F 3 G E D P C B S A Q
|
|
|
- Kristina Wilkins
- 5 years ago
- Views:
Transcription
1 HP6578
2 x 10 2x
3 3 L 1 J K I R M N O 1 H 2 F E G 3 D P C B A Q S
4 4
5 English 6 Dansk 18 Deutsch 30 Suomi 43 Français 54 Italiano 66 Nederlands 78 Norsk 91 Svenska 103 HP6578
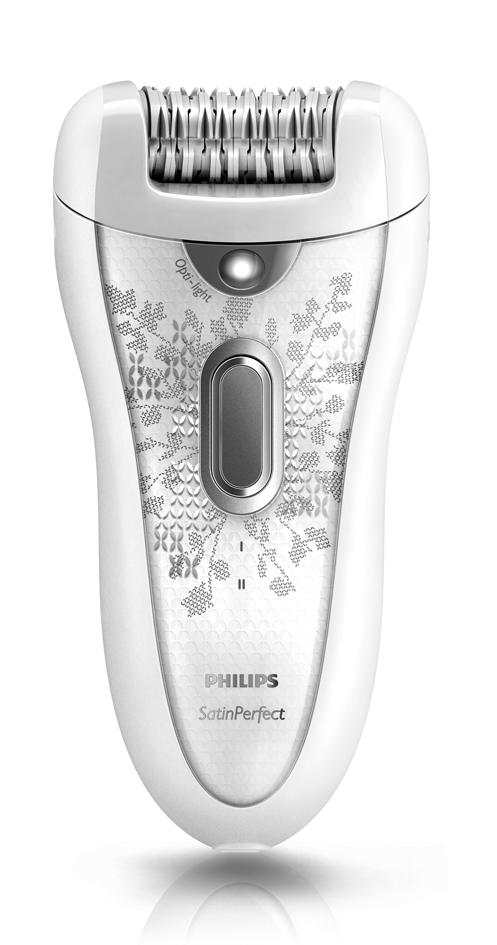
6 6 English Introduction Congratulations on your purchase and welcome to Philips! To fully benefit from the support that Philips offers, register your product at This Philips SatinPerfect epilator has been designed around the needs of today s women and has been produced in Europe according to the highest engineering standards. We involve many women worldwide in our development and production process to give us feedback on our concepts and products to give you the best quality possible. Your new SatinPerfect epilator gives you the best performance in epilation, providing you with perfect and long-lasting smoothness in a pleasant way. The epilator has a premium design and clever features. The epilating head covers a maximum area of the skin and its discs are made of ceramic material, which ensures a proper grip on even the finest hairs for easy hair removal. Hairs are removed by the root and grow back thinner and less visible. The SatinPerfect has a body-contouring epilating head that is subtly curved to ensure that the epilator follows every contour of your body. Its pressure control ensures that the epilator always maintains a consistent epilating speed for consistent results. The Opti-light is a built-in light that reveals even finest hairs clearly so that you do not miss a hair. The active hairlifter on the front of the active hairlifter with active massage gently vibrates and lifts flat-lying hairs so that they can be easily removed. The active massaging roller on the back of the active hairlifter with active massage vibrates to give the skin a pleasant sensation that soothes the effect of epilation. The optimal performance cap that pivots to follow your body contours for optimal skin contact gives you optimal performance in hair removal and perfect, long-lasting smooth legs. The hair primer on the optimal performance cap gently stretches the skin and primes the hairs for removal. Enjoy perfect long-lasting smooth skin with the cordless precision epilator - even in sensitive or hard-to-reach areas. General description (Fig. 1) A Epilator B Charging light C Speed setting indications D On/off button Press once for speed II Press twice for speed I E Opti-light F Epilating head G Release button H Basic epilation cap I Shave, trim and style attachment J Trimming comb K Optimal performance cap L Hair primer M Active hairlifter with active massage N Active massaging roller O Active hairlifter P Cleaning brush Q Adapter R Precision epilator 1 On/off slide 2 Non-rechargeable batteries 3 Lid of battery compartment
7 English 7 S Smart Tweezers 1 Light of Smart Tweezers 2 On/off button for light 3 Battery and light compartment 4 Storage case of Smart Tweezers 5 Button batteries T Luxury pouch (not shown) Important Read this user manual carefully before you use the appliances and the Smart Tweezers and save it for future reference. Danger Keep the appliances and the adapter dry. Do not use the appliances near or over a washbasin or bath filled with water (Fig. 2). Do not use the appliances in the bath or in the shower (Fig. 3). If you use the epilator in the bathroom, do not use an extension cord (Fig. 4). Warning Only charge the epilator with the adapter supplied. Do not use an appliance, an attachment or the adapter if it is damaged or broken to avoid injuries. Do not use the Smart Tweezers if they are damaged or broken to avoid injuries. If the adapter is damaged, always have it replaced with one of the original type in order to avoid a hazard. The adapter contains a transformer. Do not cut off the adapter to replace it with another plug, as this causes a hazardous situation. Check if the voltage indicated on the adapter corresponds to the local mains voltage before you connect the appliance. These appliances are not intended for use by persons (including children) with reduced physical, sensory or mental capabilities, or lack of experience and knowledge, unless they have been given supervision or instruction concerning use of the appliances by a person responsible for their safety. Children should be supervised to ensure that they do not play with the appliances. The Smart Tweezers are not a toy. Keep them out of the reach of children. Caution The epilator is only intended for removing women s body hair on areas below the neck by epilating (legs) and shaving (underarms and bikini area). The precision epilator is intended for epilating women s body hair in the bikini and underarm area, on hard-to-reach areas such as knee and ankle, and for removing hairs on the upper lip and the chin. Do not use the appliances for any other purpose. For hygienic reasons, the appliances and the Smart Tweezers should only be used by one person. To prevent damage and injuries, keep running appliances (with or without attachment) away from scalp hair, eyebrows, eyelashes, clothes, threads, cords, brushes etc. Do not use the appliances and the Smart Tweezers on irritated skin or skin with varicose veins, rashes, spots, moles (with hairs) or wounds without consulting your doctor first. People with a reduced immune response or people who suffer from diabetes mellitus, haemophilia or immunodeficiency should also consult their doctor first. Your skin may become a little red and irritated the first few times you use the appliances. This phenomenon is absolutely normal and quickly disappears. As you use the appliances more often, your skin gets used to epilation, skin irritation decreases and regrowth becomes thinner and softer. If the irritation has not disappeared within three days, we advise you to consult a doctor. Epilation in sensitive areas may cause bleeding points which disappear quickly. Do not look directly into the Opti-light to avoid being dazzled by the light.
8 8 English Do not use the epilating head of the epilator without attachment. Do not expose the appliances to temperatures lower than 5 C or higher than 35 C. Only use the precision epilator on non-rechargeable AA 1.5V alkaline batteries. Only use the Smart Tweezers on alkaline button batteries type L763H or AG3 (dia. 7.8 x 3.4mm). Electromagnetic fields (EMF) These Philips appliances comply with all standards regarding electromagnetic fields (EMF). If handled properly and according to the instructions in this user manual, the appliances are safe to use based on scientific evidence available today. Charging Charging the epilator Charging the epilator takes approximately 1 hour. When the epilator is fully charged, it has a cordless operating time of up to 40 minutes. 1 Switch off the appliance before you charge it. 2 Insert the appliance plug into the inlet socket and put the adapter in the wall socket (Fig. 5). The charging light pulsates white to indicate that the epilator is charging (Fig. 6). When the battery is fully charged, the charging light lights up white continuously for 20 minutes and then goes out (Fig. 7). Battery-low indication 1 When the batteries are almost empty, the charging light starts to flash red. When the charging light starts to flash red, the batteries still contain enough energy for a few minutes of operation. 2 When the batteries are completely empty, the charging light lights up red continuously. To charge the epilator, follow steps 1 and 2 in section Charging the epilator above. You can also run the appliance directly from the mains by inserting the appliance plug in the socket of the appliance and the adapter in a wall socket. Epilation tips Before you start epilating Note: Always clean the epilating head of the epilator and the precision epilator before first use. When you use the appliances for the first time, we advise you to try them out on an area with only light hair growth to get accustomed to the epilation process. We advise you to epilate before going to bed at night, as skin irritation usually disappears overnight. Epilation is easier just after taking a bath or shower. Make sure your skin is completely dry when you start epilating. Make sure your skin is clean, entirely dry and free from grease. Do not use any cream before you start epilating. Epilation is easier and more comfortable when the hair has the optimum length of 3 4 mm. If the hairs are longer, we recommend that you either shave first and epilate the shorter regrowing hairs after 1 or 2 weeks or that you use the shave, trim and style attachment with the trimming comb to pretrim hairs to this ideal length. As your hair grows in different cycles, it is best to epilate a few days in a row when you start epilating. This will help you to remain stubble-free longer because your hairs will start regrowing in the same cycle and pace. The epilator is delivered with the basic epilation cap attached. If you want to use it with the optimal performance cap or the active hairlifter with active massage, detach the basic epilation
9 English 9 cap by pulling it off the appliance and attach the optimal performance cap or the active hairlifter with active massage (see chapter Using the epilator, section Epilating the legs with the epilator ). During epilation The epilator can be used cordlessly on rechargeable batteries, but it can also be used with the adapter on mains power. While epilating, stretch your skin with your free hand. This lifts up the hairs and helps to minimise the pulling sensation. For optimal performance, place the epilating head on the skin at an angle of 90 with the on/off button pointing in the direction in which you are going to move the appliance. Guide the appliance across the skin against the direction of hair growth in a slow, continuous movement without exerting any pressure. On some areas, hair may grow in different directions. In this case, it may be helpful to move the appliance in different directions to achieve optimal results. If you sweat during epilation, dab your skin dry with a soft cloth. When you use the optimal performance cap, make sure that both rollers of the hair primer always stay in contact with the skin to ensure an optimal result. When you use the active hairlifter with active massage, make sure the active massaging roller and the active hairlifter always stay in contact with the skin. The massaging roller stimulates and relaxes the skin for gentler epilation. After epilation To relax the skin, we advise you to apply a moisturising cream immediately after epilation or a few hours after epilation, depending on what is better for your skin. Use a soft deodorant without alcohol or a special deodorising cream for epilated skin after epilating the underarms. Regular use of an exfoliating sponge or cream (e.g. during showering) 24 hours after epilation helps to prevent ingrowing hair, as the gentle scrubbing action removes the upper skin layer and fine hair can get through to the skin surface. Using the epilator Epilating the legs with the epilator If you already have some experience with epilation, you can simply use the epilating head with the basic epilation cap. If you are not used to epilation, we advise you to start epilating with the optimal performance cap. This cap ensures optimal skin contact and its pivoting head stretches the skin and prepares the hairs for epilation. If your hairs lie flat on your skin, we advise you to use the active hairlifter with active massage. The active hairlifter with active massage not only lifts up the hairs but its active massaging roller also minimises the pulling sensation of epilation. Note: Remove the basic epilation cap before you attach the optimal performance cap or the active hairlifter with active massage. 1 Squeeze both sides of the basic epilation cap (1) and pull it off the appliance (2) (Fig. 8). 2 Put the desired attachment on the epilating head (Fig. 9). Note: The procedure for placing the attachments onto the appliance is the same for all attachments. 3 Press the on/off button once to switch on the epilator. The epilator starts running at speed II, which is the most efficient speed for epilation. The bottom speed setting indication II lights up (Fig. 10). If you want to use speed I, press the on/off button a second time. The top speed setting indication I lights up (Fig. 11).
10 10 English Tip: Speed I is suitable for areas with little hair growth, for hard-to-reach areas and for areas where bones are located directly beneath the skin, such as knees and ankles. When you press the on/off button a third time, the epilator switches off. 4 Stretch the skin with your free hand to make the hairs stand upright. 5 Place the epilating head at an angle of 90 onto the skin with the on/off button pointing in the direction in which you are going to move the appliance (Fig. 12). 6 Move the appliance slowly over the skin against the direction of hair growth. When you use the optimal performance cap, make sure that both rollers of the hair primer always stay in contact with the skin to ensure an optimal result. When you use the active hairlifter with active massage, make sure the active massaging roller and the active hairlifter always stay in contact with the skin. The massaging roller stimulates and relaxes the skin for gentler epilation. Shaving the underarms and bikini line Use the shave, trim and style attachment to shave sensitive areas such as the underarms and the bikini line. 1 Press the release button (1) and remove the epilating head from the epilator (2) (Fig. 13). Note: The shave, trim and style attachment can be removed in the same way. 2 Put the shave, trim and style attachment on the appliance and press it until it snaps home ( click ). (Fig. 14) 3 Switch on the appliance. Note: Use speed II when you shave with the shave, trim and style attachment. 4 Stretch the skin with your free hand. When shaving the underarms, raise your arm to stretch the skin. 5 Place the shave, trim and style attachment at an angle of 90 onto your skin with the on/off button pointing in the direction in which you are going to move the appliance. 6 Move the appliance slowly against the direction of hair growth. Note: Make sure that the shaving unit with integrated trimmer is always fully in contact with the skin. Shave your bikini line as shown in the figure (Fig. 15). Shave your underarms as shown in the figure. Move the appliance in different directions. (Fig. 16) 7 When you have finished shaving, switch off the appliance and clean the shave, trim and style attachment (see chapter Cleaning and maintenance ). 8 Put the trimming comb on the shave, trim and style attachment when you store the appliance. Trimming with the trimming comb Use the shave, trim and style attachment with the trimming comb attached to trim your bikini line to a length of 3mm. You can also use the trimming comb to pretrim long hairs (longer than 10mm) on the underarms or bikini line as a preparation for using the precision epilator. 1 Press the release button (1) and remove the epilating head from the epilator (2) (Fig. 13). 2 Put the shave, trim and style attachment on the appliance and press it until it snaps home ( click ) (Fig. 14).
11 English 11 3 Put the trimming comb on the shave, trim and style attachment (Fig. 17). 4 Follow steps 3 to 6 in section Shaving the underarms and bikini line. Note: Make sure the surface of the trimming comb always stays fully in contact with the skin to ensure an even trimming result. 5 When you have finished trimming, switch off the appliance and clean the shave, trim and style attachment and the trimming comb (see chapter Cleaning and maintenance ). 6 Leave the trimming comb on the shave, trim and style attachment when you store the appliance. Corded use To run the epilator from the mains, switch off the appliance and connect it to the mains. Overheat protection The epilator has an integrated overheat protection, which prevents overheating of the appliance. Note: To avoid overheating of the epilator, do not press the appliance too hard onto your skin. The epilator works best when you move it over your skin without exerting any pressure. 1 If the overheat protection is activated, the appliance switches off automatically, the speed setting indications and the charging light flash red. 2 Let the appliance cool down. The lights stop flashing after 30 seconds. 3 When the appliance has cooled down, you can switch it on again. If the lights start to flash red again, the appliance has not yet cooled down completely. Overload protection If you press the epilating head too hard onto your skin or when the rotating discs of the epilating head get blocked (e.g. by clothes etc.), the appliance stops and the speed setting indications start to flash red for 5 seconds. 1 Check if the rotating discs of the epilating head are blocked by turning the discs with your thumb until you can remove whatever is blocking the rotating discs. 2 Switch on the appliance again. Do not press the appliance too hard onto the skin. Using the precision epilator Inserting the batteries 1 Remove the lid of the battery compartment by sliding it down until it comes off the appliance (Fig. 18). 2 Insert two AA 1.5V alkaline batteries into the battery compartment (Fig. 19). Note: Make sure the + and - poles of the batteries point in the direction indicated in the battery compartment. Note: New batteries offer an operating time of up to 40 minutes. 3 Slide the lid of the battery compartment back onto the appliance. Do not let metal objects come into contact with the battery terminals and do not short-circuit the batteries.
12 12 English Epilating with the precision epilator Use the precision epilator to epilate the underarms, the bikini line, the upper lip, the chin and hard-to-reach areas. 1 Thoroughly clean the area to be epilated. Remove any residues of deodorant, makeup, cream etc. Then dab the skin dry. 2 Switch on the appliance. 3 Stretch the skin with your free hand. When epilating the underarms, raise your arm to stretch the skin. 4 Place the epilating head at an angle of 90 onto the skin with the on/off slide pointing in the direction in which you are going to move the appliance. 5 Move the appliance slowly over the skin, against the direction of the hair growth. Epilate your bikini line as shown in the figure (Fig. 20). Epilate your underarms as shown in the figure. Move the appliance in different directions to catch all hairs (Fig. 21). Epilate your upper lip as shown in the figure (Fig. 22). Do not use this appliance to epilate eyebrows or eyelashes. Do not use this appliance to remove hairs that grow out of moles. Using the Smart Tweezers Your epilator comes with Smart Tweezers with integrated light for the easy removal of facial hair such as your eyebrows. The Smart Tweezers are protected by a case with integrated mirror which allows you to depilate wherever and whenever you want. The Smart Tweezers are supplied ready for use with 3 button batteries in the battery compartment. Using the Smart tweezers 1 Clean your eyebrows with skin tonic or alcohol to prevent eyebrow hair from slipping away between the tweezer arms. 2 Use a warm face cloth to soften the skin before tweezing. This makes hair removal easier. 3 Brush your eyebrows in the direction of hair growth. 4 Use an eye pencil to mark the desired shape of your eyebrows. Remove any hairs outside the marked shape. 5 Switch on the light by pressing the on/off button once. 6 Always pull out the hair in the direction of hair growth. Note: Pull out the hairs one by one. Do not use the Smart Tweezers to remove hairs that grow out of moles. Do not point the light of the Smart Tweezers directly at your or somebody else s eyes. Replacing the batteries 1 Open the battery and light compartment by turning the bottom anticlockwise with a coin (Fig. 23). 2 Remove the old button batteries.
13 English 13 Keep the button batteries out of the reach of children and pets. Button batteries present a potential choking hazard. 3 Insert the new button batteries with the negative side pointing forward into the battery and light compartment (Fig. 24). Note: The Smart Tweezers work on three alkaline button batteries type L736H or AG3 (dia. 7.8 x 3.4mm). 4 Screw the bottom back onto the battery and light compartment by turning it clockwise with a coin (Fig. 25). Cleaning and maintenance Note: Make sure the epilator is switched off and unplugged and the precision epilator is switched off before you start to clean these appliances. Never use scouring pads, abrasive cleaning agents or aggressive liquids such as petrol or acetone to clean the appliances. Clean the appliances after each use to ensure better performance. Never rinse the appliances or the adapter under the tap (Fig. 26). Keep the appliances and the adapter dry (Fig. 27). Cleaning the attachments 1 Remove the attachment from the epilating head (Fig. 8). 2 Remove loose hairs from the attachments with the cleaning brush (Fig. 28). 3 Rinse the attachments with lukewarm water while turning them (Fig. 29). 4 Dry the attachments before you use or store them. Cleaning the epilating head of the epilator 1 Press the release knob (1) and remove the epilating head from the appliance (2) (Fig. 13). 2 Remove loose hairs with the cleaning brush (Fig. 30). 3 Rinse the epilating head under the tap for 5-10 seconds while turning the discs with your thumb (Fig. 31). Note: Never try to detach the epilating discs from the epilating head. 4 Shake the epilating head firmly (Fig. 32). 5 Dry the epilating head thoroughly with a tea towel. Note: Make sure the epilating head is completely dry before you place it back onto the appliance. 6 To reattach the epilating head, place it on the appliance and press it onto the appliance until it snaps home ( click ) (Fig. 33). Cleaning the shave, trim and style attachment and the trimming comb 1 Remove the trimming comb, if attached, by pulling it off the shave, trim and style attachment (Fig. 34). 2 Press the release knob (1) and remove the shave, trim and style attachment from the appliance (2) (Fig. 35). 3 Remove the shaving unit from the shave, trim and style attachment (Fig. 36).
14 14 English 4 Rinse the shaving unit, the shave, trim and style attachment and the trimming comb under a lukewarm tap for 5 to 10 seconds while turning them a little (Fig. 37). 5 Shake the shaving unit, the shave, trim and style attachment and the trimming comb firmly (Fig. 38). 6 Dry the shave, trim and style attachment and the trimming comb thoroughly with a tea towel and let the shaving unit dry. Note: Do not exert any pressure on the shaving unit to avoid damage. 7 Reattach the shaving unit to the shave, trim and style attachment. Place the shave, trim and style attachment on the appliance and press it onto the appliance until it snaps home ( click ). Note: Make sure the shaving unit is dry before you attach it to the shave, trim and style attachment and the shave, trim and style attachment is completely dry before you place it back onto the appliance. 8 Put the trimming comb on the shave, trim and style attachment. Tip: Rub a drop of sewing machine oil onto the shaving unit twice a year to extend the lifetime of the cutting element. Cleaning the precision epilator Never immerse the precision epilator in water or any other liquid, nor rinse it under the tap (Fig. 39). 1 Clean the precision epilator regularly by removing loose hairs with the cleaning brush. Do not switch the appliance on while brushing (Fig. 40). 2 Clean the appliance with a dry cloth. Storage Put the trimming comb on the shave, trim and style attachment to prevent damage. Put the Smart Tweezers in their storage case after use. Store the appliances and the accessories in the luxury pouch. Travel lock The epilator has an integrated travel lock which prevents the appliance from accidentally being switched on during travel. 1 To activate the travel lock, press and hold the on/off button for 3 seconds until the speed setting indications flash white 2 times (Fig. 41). The epilator starts running and stops immediately when the travel lock becomes active. 2 To deactivate the travel lock, press and hold the on/off button for 3 seconds until the speed setting indications flash white 2 times (Fig. 42). Note: You can also insert the appliance plug into the inlet socket and the adapter into a wall socket to deactivate the travel lock. The travel lock is now deactivated and you can switch on the epilator again by pressing the on/off button. Replacement All parts of the appliances can be replaced. If you need to replace one or more parts, go to your Philips dealer or an authorised Philips service centre.
15 English 15 Shave, trim and style attachment If you use the shave, trim and style attachment two or more times a week, we advise you to replace the shaving unit after one or two years or when it is damaged. Environment Do not throw away the appliances with the normal household waste at the end of their life, but hand them in at an official collection point for recycling. By doing this, you help to preserve the environment (Fig. 43). Epilator The built-in rechargeable batteries of the epilator contain substances that may pollute the environment. Always remove the batteries before you discard and hand in the epilator at an official collection point. Dispose of the batteries at an official collection point for batteries. If you have trouble removing the batteries, you can also take the appliance to a Philips service centre. The staff of this centre will remove the batteries for you and will dispose of them in an environmentally safe way (Fig. 44). Removing the rechargeable batteries 1 Remove the adapter from the wall socket and let the appliance run until it stops. 2 Repeat this step until you can no longer switch on the epilator. 3 Remove the epilating head. 4 Remove the side panels of the epilator with a screwdriver (Fig. 45). 5 Insert a screwdriver into the groove next to the socket for the appliance plug in the bottom of the appliance.turn the screwdriver to separate the two housing halves (Fig. 46). 6 Remove the battery holder with the batteries from the appliance. Remove the batteries from the battery holder with a screwdriver (Fig. 47). 7 Cut the wires with a pair of household scissors and dispose of the batteries properly (Fig. 48). Do not allow metal objects to contact the rechargeable battery terminals or short-circuit the batteries. Do not try to reassemble the appliance in order to connect it to the mains. This is dangerous. Precision epilator and Smart Tweezers Non-rechargeable batteries contain substances that may pollute the environment. Do not throw away non-rechargeable batteries with the normal household waste, but dispose of them at an official collection point for batteries. Always remove the non-rechargeable batteries before you discard and hand in the appliance at an official collection point (precision epilator) or dispose of it with the normal household waste (Smart Tweezers). Guarantee and service If you need service or information or if you have a problem, please visit the Philips website at or contact the Philips Consumer Care Centre in your country (you find its phone number in the worldwide guarantee leaflet). If there is no Consumer Care Centre in your country, go to your local Philips dealer.
16 16 English Troubleshooting This chapter summarises the most common problems you could encounter with the appliances. If you are unable to solve the problem with the information below, contact the Consumer Care Centre in your country. Problem Cause Solution Poor epilating results The epilator does not work. You move the epilator in the wrong direction. You place the epilating head on the skin at the wrong angle. You have used a cream or depilatory cream prior to epilation. The hairs are too short. The socket to which the appliance is connected does not work. The overheat protection has been activated. The rechargeable batteries are empty. The travel lock is active. Move the appliance against the direction of hair growth, with the on/off button pointing in the direction in which you move the epilator. Make sure that you place the epilating head on the skin at an angle of 90 (see chapter Using the epilator ). Make sure your skin is clean, entirely dry and free from grease. Do not use any cream before you start epilating. Sometimes the hairs are too short to be caught. The optimal length for easy removal of the hairs is 3-4mm. The hairs that are not caught during this session will be long enough to be removed when you epilate the next time. You can also try to catch the hairs by moving the appliance across the skin a few more times. Make sure the socket is live. If you connect the epilator to a socket in a bathroom cabinet, you may need to switch on the light in the bathroom to make sure the socket is live. You could also use a working socket outside the bathroom. When the epilator stops working and the speed setting indications and the charging light start flashing red, the overheat protection has been activated. Let the appliance cool down. The lights stop flashing after 30 seconds. When the appliance has cooled down, switch on the epilator again. If the lights start flashing again, the epilator has not yet cooled down sufficiently. When the charging light lights up red continuously, the batteries are empty and you need to charge the appliance (see chapter Charging ). You can also run the appliance from the mains when the batteries are empty. Press and hold the on/off button for 3 seconds until the speed setting indications flash white 2 times. The travel lock has been deactivated and you can press the on/off button to switch on the appliance. You can also insert the appliance plug into the inlet socket and the adapter into a wall socket to deactivate the travel lock.
17 English 17 Problem Cause Solution The precision epilator does not work. The overload protection is activated because something got caught between the rotating discs or because you pressed the appliance too hard onto your skin. The batteries are empty or have been inserted incorrectly. When the overload protection has been activated, the speed setting indications flash red. Turn the discs with your thumb until you can easily remove the item that is blocking the rotating discs. Then switch on the appliance again. Do not press the appliance too hard onto your skin. Replace the batteries or insert them correctly (see Inserting the batteries in chapter Using the precision epilator ).
18 18 Dansk Introduktion Tillykke med dit køb og velkommen til Philips! For at få fuldt udbytte af den support, Philips tilbyder, skal du registrere dit produkt på Denne Philips SatinPerfect Epilator er designet til kvinders behov i dag og fremstillet i Europa i overensstemmelse med de højeste tekniske standarder. Vi involverer mange kvinder over hele verden i vores udviklings- og produktionsproces for at få feedback om vores koncepter og produkter, så vi kan levere den bedst mulige kvalitet. Din nye SatinPerfect Epilator giver dig den bedste ydeevne inden for epilering, og du opnår perfekt og langtidsholdbar blødhed på en behagelig måde. Epilatoren har et lækkert design og smarte funktioner. Epilatorhovedet dækker et stort hudområde, og skiverne er lavet af keramisk materiale, der sikrer et ordentligt greb om selv de fineste hår til nem hårfjerning. Hårene fjernes ved roden og er derfor tyndere og mindre synlige, når de vokser ud igen. SatinPerfects epilatorhoved er formet elegant, så det følger alle kroppens kurver og former. Trykreguleringen sikrer, at epilatoren altid fastholder en konstant hastighed, så du opnår et ensartet resultat. Opti-light er et indbygget lys, der afslører selv de tyndeste hår, så du får det hele med. Den aktive hårløfter med aktiv massage foran vibrerer nænsomt og løfter de hår, der ligger ned, så de nemt kan fjernes. Den aktive massagerulle med aktiv massage bagved vibrerer for at give huden en behagelig fornemmelse, der lindrer effekten af epileringen. Kappen til optimal ydeevne, der drejer for at følge kroppens kurver og give optimal kontakt med huden, giver dig den optimale ydeevne inden for hårfjerning, så du får et perfekt og blødt resultat, der holder i lang tid. Hårforberederen på kappen til optimal ydeevne strækker nænsomt huden ud og gør hårene klar til at blive fjernet. Få perfekt og blød hud i lang tid med den trådløse præcisionsepilator - selv på følsomme områder eller områder, der er svære at nå. Generel beskrivelse (fig. 1) A Epilator B Opladeindikator med lys C Indikatorer for hastighedsindstilling D On/off-knap Tryk en gang for hastighed II Tryk to gange for hastighed I E Opti-light F Epilatorhoved G Udløserknap H Basisepileringskappe I Tilbehør til barbering, trimning og styling J Trimmekam K Kappe til optimal ydeevne L Hårforbereder M Aktiv hårløfter med aktiv massage N Aktiv massagerulle O Aktiv hårløfter P Rensebørste Q Adapter R Præcisionsepilator 1 On/off-skydekontakt 2 Ikke-genopladelige batterier 3 Låg til batterirum S Smart Tweezers 1 Lys på Smart Tweezers
19 Dansk 19 2 On/off-knap til lys 3 Batteri- og lysrum 4 Opbevaringsboks til Smart Tweezers 5 Knapcellebatterier T Luksusetui (vises ikke) Vigtigt Læs denne brugervejledning nøje, før du bruger apparaterne og Smart Tweezers, og gem den, da du kan få brug for den senere. Fare Både apparaterne og adapteren skal holdes tørre. Brug ikke apparaterne nær eller over en håndvask eller et badekar med vand (fig. 2). Brug ikke apparaterne i badet eller under bruseren (fig. 3). Hvis du bruger epilatoren på badeværelset, må du ikke bruge en forlængerledning (fig. 4). Advarsel Brug kun den medfølgende adapter ved opladning af epilatoren. Brug ikke et apparat, en tilbehørsdel eller adapteren, hvis den er beskadiget eller i stykker, da dette kan medføre skader. Brug ikke Smart Tweezers, hvis de er beskadigede eller i stykker, da dette kan medføre skader. Hvis adapteren beskadiges, skal den altid udskiftes med en original adapter af samme type for at undgå enhver risiko. Adapteren indeholder en transformer og må ikke klippes af og udskiftes med et andet stik, da dette kan være meget risikabelt. Før der sluttes strøm til apparatet, skal du kontrollere, om spændingsangivelsen på adapteren svarer til den lokale netspænding. Disse apparater er ikke beregnet til at blive brugt af personer (herunder børn) med nedsatte fysiske og mentale evner, nedsat følesans eller manglende erfaring og viden, medmindre de er blevet vejledt eller instrueret i apparaternes anvendelse af en person, der er ansvarlig for deres sikkerhed. Hold apparaterne uden for børns rækkevidde for at sikre, at de ikke kan komme til at lege med dem. Smart Tweezers er ikke legetøj. Hold dem uden for børns rækkevidde. Forsigtig Epilatoren er kun beregnet til at fjerne kvinders kropsbehåring på områder fra halsen og ned via epilering (ben) og barbering (armhuler og bikiniområdet). Præcisionsepilatoren er beregnet til at epilere kvinders kropsbehåring i bikiniområdet og armhulerne, svært tilgængelige områder som knæ og ankler, samt til at fjerne hår på overlæben og hagen. Brug ikke apparatet til andre formål. Af hygiejniske årsager bør apparaterne og Smart Tweezers kun bruges af én person. For at undgå skader og uheld skal de tændte apparater (med og uden tilbehør) altid holdes i sikker afstand fra hovedhår, øjenbryn, øjenvipper, tøj, snore, ledninger, børster o.l. Brug ikke apparaterne og Smart Tweezers på irriteret hud eller hud med åreknuder, udslæt, knopper, modermærker (med hår) eller sår uden at konsultere din læge først. Personer med svækket immunforsvar eller personer, der lider af diabetes mellitus, hæmofili eller nedsat immunforsvar, skal altid først konsultere lægen. Huden bliver måske lidt rød og irriteret de første par gange, apparaterne anvendes. Dette er helt normalt og vil hurtigt gå over. Efterhånden som huden vænner sig til behandlingen, bliver den mindre irriteret og hårene, der gror ud igen, vil være blødere og tyndere. Hvis en eventuel hudirritation ikke er forsvundet efter tre dage, bør du søge læge. Epilering på følsomme områder kan forårsage mindre blødninger, der hurtigt forsvinder. Kig ikke direkte på Opti-light, da du kan blive blændet af lyset. Brug ikke epilatorhovedet uden tilbehørsdelene.
20 20 Dansk Udsæt ikke apparaterne for temperaturer under 5 C eller over 35 C. Brug kun præcisionsepilatoren sammen med ikke-genopladelige AA 1,5 V alkalinebatterier. Brug kun Smart Tweezers sammen med alkaline-knapcellebatterier type L736H eller AG3 (dia. 7,8 x 3,4 mm). Elektromagnetiske felter (EMF) Disse Philips-apparater overholder alle standarder for elektromagnetiske felter (EMF). Ved korrekt anvendelse i overensstemmelse med instruktionerne i denne brugsvejleding, er apparaterne sikre at anvende, ifølge den videnskabelige viden, der er tilgængelig i dag. Opladning Opladning af epilatoren Opladning af epilatoren tager ca. 1 time. Når epilatoren er fuldt opladet, har den en trådløs brugstid på op til 40 minutter. 1 Sluk for apparatet, før du oplader det. 2 Sæt apparatstikket ind i indgangsstikket, og slut adapteren til en stikkontakt (fig. 5). Opladningsindikatoren blinker hvidt for at indikere, at epilatoren er under opladning (fig. 6). Når batteriet er fuldt opladet, lyser indikatoren i 20 minutter, hvorefter den går ud (fig. 7). Indikator for lavt batteriniveau 1 Når batterierne er ved at være brugt op, begynder opladningsindikatoren at blinke rødt. Når opladningsindikatoren begynder at blinke rødt, er der stadig strøm nok til et par minutters brug. 2 Når batterierne er helt tomme, lyser opladeindikatoren konstant rødt. Følg trin 1 og 2 i afsnittet Opladning af epilatoren ovenfor for at oplade epilatoren. Du kan også bruge apparatet direkte via stikkontakten ved at sætte apparatstikket i apparatet og slutte adapteren til en stikkontakt. Tips til epilering Før du starter epileringen Bemærk: Rengør altid epilatorhovedet og præcisionsepilatoren før første brug. Første gang apparaterne bruges, anbefales det at begynde et sted med let hårvækst, så du gradvist vænner dig til fremgangsmåden ved epilering. Vi anbefaler, at du bruger epilatoren, før du går i seng om aftenen, da hudirritation for det meste forsvinder i løbet af natten. Det er nemmest at bruge epilatoren lige efter et kar- eller brusebad, men huden skal være helt tør, inden du starter. Sørg for at huden er ren, helt tør og fri for fedtstoffer. Undlad at bruge nogen former for creme umiddelbart før epilering. Det er nemmere og mere behageligt at bruge epilatoren, når håret har den optimale længde på 3 4 mm. Hvis hårene er længere, anbefaler vi, at du enten barberer først og derefter bruger epilatoren efter 1 eller 2 uger, eller at du bruger tilbehøret til barbering, trimning og styling sammen med trimmekammen til at fortrimme håret til den perfekte længde. Da håret vokser med forskellige hastigheder, er det bedst at bruge epilatoren et par dage i træk, når du begynder epileringen. Dermed slipper du for stubbe i længere tid, eftersom hårene begynder at vokse tilbage i det samme tempo. Epilatoren leveres med påsat basisepileringskappe. Når du skal bruge den med kappen til optimal ydeevne eller den aktive hårløfter med aktiv massage, skal basisepileringskappen trækkes af apparatet og den ønskede kappe sættes på (se Epilering af benene med epilatoren i afsnittet Brug af epilatoren ).
21 Dansk 21 Under epilering Epilatoren kan bruges trådløst med genopladelige batterier, men den kan også bruges med adapteren via lysnettet. Stræk huden ud med den frie hånd, når du epilerer. Det løfter hårene og er med til at reducere smertefornemmelsen. Epilatorhovedet fungerer bedst, hvis du anbringer det i en ret vinkel på huden (90 ), og on/ off-kontakten vender i den retning, som apparatet skal bevæges i. Før apparatet hen over huden imod hårenes vækstretning i en langsom og konstant bevægelse uden at presse. I nogle områder vokser håret muligvis i forskellige retninger. I så fald kan det være en god ide at bevæge apparatet rundt i forskellige retninger for at opnå det bedste resultat. Hvis du sveder under epileringen, skal du tørre huden forsigtigt med en blød klud. Når du bruger kappen til optimal ydeevne, skal du sørge for, at begge ruller på hårforberederen hele tiden er i kontakt med huden for at opnå det optimale resultat. Når du bruger den aktive hårløfter med aktiv massage, skal du sørge for, at den aktive massagerulle og den aktive hårløfter hele tiden er i kontakt med huden. Massagerullen stimulerer og afslapper huden og giver en mere nænsom epilering. Efter epilering Vi anbefaler, at du smører huden med fugtighedscreme umiddelbart efter brug af epilatoren eller et par timer senere, afhængigt af hvad der er bedst for din hud. Brug en mild deodorant uden alkohol eller en speciel deodorantcreme til epileret hud efter epilering i armhulerne. Hvis du regelmæssigt bruger en eksfolierende svamp eller creme 24 timer efter epileringen (f. eks. når du er i bad), er det med til at forebygge indgroede hår, da den blide skrubbebevægelse fjerner det øverste hudlag, så de bløde hår kan komme igennem til hudens overflade. Brug af epilatoren Epilering af benene med epilatoren Hvis du allerede har erfaring med epilering, kan du nøjes med at bruge epilatorhovedet med basisepileringskappen. Hvis du ikke har erfaring med epilering, anbefaler vi, at du starter med kappen til optimal ydeevne. Kappen sikrer optimal kontakt med huden, og det bevægelige hoved strækker huden ud og forbereder hårene til epilering. Hvis hårene ligger ned, anbefaler vi, at du bruger den aktive hårløfter med aktiv massage. Den løfter ikke blot hårene - den aktive massagerulle minimerer også fornemmelsen af, at der hives i hårene under epileringen. Bemærk: Fjern basisepileringskappen, inden du påsætter kappen til optimal ydeevne eller den aktive hårløfter med aktiv massage. 1 Klem sammen på begge sider af basisepileringskappen (1), og træk den af apparatet (2) (fig. 8). 2 Sæt det ønskede tilbehør på epilatorhovedet (fig. 9). Bemærk: Påsætningsproceduren er den samme for alt tilbehør. 3 Tryk en gang på on/off-knappen for at tænde for epilatoren. Epilatoren starter ved hastighed II, der er den mest effektive hastighed for epilering. Den nederste hastighedsindikator (II) begynder at lyse (fig. 10). Hvis du vil bruge hastighed I, skal du trykke på on/off-knappen igen. Den øverste hastighedsindikator (I) begynder at lyse (fig. 11). Tip: Hastighed I er velegnet til områder med mindre hårvækst, til svært tilgængelige områder og til områder, hvor der er knogler lige under huden, f.eks. knæ og ankler. Epilatoren slukker, når du trykker på on/off-knappen tredje gang.
22 22 Dansk 4 Stræk huden ud med den frie hånd, så hårene rejser sig. 5 Placer epilatorhovedet i en vinkel på 90 på huden med on/off-knappen i den retning, som apparatet skal bevæges i (fig. 12). 6 Bevæg apparatet langsomt hen over huden imod hårenes vækstretning. Når du bruger kappen til optimal ydeevne, skal du sørge for, at begge ruller på hårforberederen hele tiden er i kontakt med huden for at opnå det optimale resultat. Når du bruger den aktive hårløfter med aktiv massage, skal du sørge for, at både massagerullen og hårløfteren hele tiden er i kontakt med huden. Massagerullen stimulerer og afslapper huden og giver en mere nænsom epilering. Barbering af armhuler og bikinilinje Brug tilbehøret til barbering, trimning og styling til at barbere følsomme områder som f.eks. armhuler og bikinilinje. 1 Tryk på udløserknappen (1), og tag epilatorhovedet af epilatoren (2) (fig. 13). Bemærk: Tilbehøret til barbering, trimning og styling kan tages af på samme måde. 2 Fastgør tilbehøret til barbering, trimning og styling, og tryk på det, indtil det klikker på plads. (fig. 14) 3 Tænd for apparatet. Bemærk: Vælg hastighed II, når du anvender tilbehørsdelene til barbering, trimning og styling. 4 Stræk huden ud med din frie hånd. Løft armen for at strække huden ud, når du barberer området under armene. 5 Placer tilbehøret til barbering, trimning og styling i en vinkel på 90 på huden med on/ off-knappen i den retning, som apparatet skal bevæges i. 6 Bevæg apparatet imod hårenes vækstretning med langsomme bevægelser. Bemærk: Sørg for, at skærenheden med den integrerede trimmer altid er i fuld kontakt med huden. Bikinilinjen barberes som vist på illustrationen (fig. 15). Armhulerne barberes som vist på illustrationen. Bevæg apparatet i forskellige retninger. (fig. 16) 7 Efter barberingen skal du slukke for apparatet og rengøre tilbehøret til barbering, trimning og styling (se afsnittet Rengøring og vedligeholdelse ). 8 Fastgør trimmekammen på tilbehøret til barbering, trimning og styling, når du opbevarer apparatet. Trimning med trimmekammen Brug tilbehøret til barbering, trimning og styling sammen med trimmekammen for at trimme bikinilinjen til en længde på 3 mm. Du kan også bruge trimmekammen til at fortrimme lange hår (længere end 10 mm) i armhulerne eller bikinilinjen som forberedelse til at bruge præcisionsepilatoren. 1 Tryk på udløserknappen (1), og tag epilatorhovedet af epilatoren (2) (fig. 13). 2 Fastgør tilbehøret til barbering, trimning og styling på apparatet, og tryk på det, indtil det klikker på plads (fig. 14). 3 Fastgør trimmekammen på tilbehøret til barbering, trimning og styling (fig. 17). 4 Følg trin 3 til 6 i afsnittet Barbering af armhuler og bikinilinje. Bemærk: Sørg for, at trimmekammen hele tiden er i kontakt med huden for at opnå et ensartet resultat.
23 Dansk 23 5 Når du er færdig med at trimme, skal du slukke apparatet og rengøre tilbehøret til barbering, trimning og styling samt trimmekammen (se afsnittet Rengøring og vedligeholdelse ). 6 Lad trimmekammen sidde på tilbehøret til barbering, trimning og styling, når du opbevarer apparatet. Brug med ledning Hvis du vil bruge epilatoren via lysnettet, skal du slukke apparatet og sætte det i stikkontakten. Beskyttelse mod overophedning Epilatoren har en integreret sikring mod overophedning, der forhindrer apparatet i at overophede. Bemærk: Pres ikke apparatet for hårdt mod huden, da det kan medføre overophedning. Epilatoren fungerer bedst, når du bevæger den over huden uden at presse. 1 Hvis sikringen mod overophedning aktiveres, slukker apparatet automatisk, og indikatorerne for hastighedsindstilling og opladning blinker rødt. 2 Lad apparatet afkøle. Indikatorerne holder op med at blinke efter 30 sekunder. 3 Når apparatet er kølet ned, kan du tænde det igen. Hvis indikatorerne begynder at blinke rødt igen, er apparatet ikke kølet helt ned. Overbelastningssikring Hvis du presser epilatorhovedet for hårdt mod huden, eller hvis de roterende skiver i epilatorhovedet blokeres (f.eks. af tøj), stopper apparatet, og indikatorerne for hastighedsindstilling blinker rødt i 5 sekunder. 1 Kontroller, om de roterende skiver i epilatorhovedet er blokeret, ved at dreje skiverne med tommelfingeren, indtil du kan fjerne det, der eventuelt måtte blokere dem. 2 Tænd for apparatet igen. Tryk aldrig apparatet for hårdt mod huden. Sådan bruger du præcisionsepilatoren Isætning af batterier 1 Fjern låget til batterirummet ved at skubbe det ned, indtil det slipper apparatet (fig. 18). 2 Indsæt to AA 1,5 V alkalinebatterier i batterirummet (fig. 19). Bemærk: Sørg for, at batteripolerne + og - peger i den retning, der er indikeret i batterirummet. Bemærk: Nye batterier har en brugstid på op til 40 minutter. 3 Skub dækslet til batterirummet på apparatet igen. Undgå, at metalgenstande kommer i kontakt med batteripolerne, og kortslut ikke batterierne. Epilering med præcisionsepilatoren Brug præcisionsepilatoren til at epilere armhulerne, bikinilinjen, overlæben, hagen og svært tilgængelige områder. 1 Rengør området, som skal epileres, grundigt. Fjern rester af deodorant, makeup, creme osv. Dup derefter området tørt. 2 Tænd for apparatet.
24 24 Dansk 3 Stræk huden ud med din frie hånd. Løft armen for at strække huden ud, når du epilerer området under armene. 4 Placer epilatorhovedet i en vinkel på 90 på huden med on/off-knappen i den retning, som apparatet skal bevæges i. 5 Bevæg apparatet langsomt hen over huden, i modsat retning af hårets vækstretning. Epilér bikinilinjen som vist på illustrationen (fig. 20). Armhulerne epileres som vist på illustrationen. Bevæg apparatet i forskellige retninger for at få alle hårene med (fig. 21). Epiler overlæben som vist på illustrationen (fig. 22). Brug ikke apparatet til at epilere øjenbryn eller øjenvipper. Brug ikke dette apparat til at fjerne hår, der vokser på modermærker. Sådan bruger du Smart Tweezers Din epilator leveres med Smart Tweezers med indbygget lys, der gør det nemt at fjerne ansigtshår som f.eks. øjenbryn. Smart Tweezers er beskyttet af et etui med integreret spejl, der gør det muligt at fjerne hår, hvor og når du vil. Smart Tweezers bliver leveret klar til brug med 3 knapcellebatterier i batterirummet. Sådan bruger du Smart Tweezers 1 Rens dine øjenbryn med skintonic eller sprit for at undgå, at dine øjenbryn smutter væk mellem pincetarmene. 2 Brug en varm klud til at blødgøre huden, inden du bruger pincet. Det gør det nemmere at fjerne hårene. 3 Red øjenbrynene i hårenes vækstretning. 4 Brug en øjenblyant til at optegne den ønskede form på dine øjenbryn. Fjern alle hår uden for omridset. 5 Lyset tændes ved et enkelt tryk på on/off-knappen. 6 Træk altid håret ud i vækstretningen. Bemærk: Træk hårene ud enkeltvis. Brug ikke Smart Tweezers til at fjerne hår, der vokser på modermærker. Ret aldrig lyset i Smart Tweezers direkte mod dine egne eller andres øjne. Udskiftning af batterierne 1 Åbn batteri- og lysrummet ved at dreje bunden mod uret med en mønt (fig. 23). 2 Fjern de gamle knapcellebatterier. Sørg for, at knapcellebatterierne holdes uden for børns og kæledyrs rækkevidde. Knapcellebatterier udgør en potentiel risiko for kvælning. 3 Indsæt de nye knapcellebatterier med den negative pol rettet ind mod batteri- og lysrummet (fig. 24). Bemærk: Smart Tweezers bruger tre alkaline-knapcellebatterier type L736H eller AG3 (dia. 7,8 x 3,4 mm).
EnglisH introduction general description (Fig. 1) Preparing for use Charging
 Preparing for use Charging") User manual HP6581 1 4 English Introduction Congratulations on your purchase and welcome to Philips! To fully benefit from the support that Philips offers, register your product at www.philips.com/welcome.
User manual HP6581 1 4 English Introduction Congratulations on your purchase and welcome to Philips! To fully benefit from the support that Philips offers, register your product at www.philips.com/welcome.
 Register your product and get support at www.philips.com/welcome HP6522 1 HP6522 EnglisH 6 6 English Introduction Congratulations on your purchase and welcome to Philips! To fully benefit from the support
 1 2 3 4 5 6 7 8 9 10 11 12 HQ904 Japanese 1 1 2 3-4 5-6 7 8-9 10 11-12 12 14-25 28 29 30 31 2 3 4 5 6 7 8 9 10 11 12 13 English HQ904 14 English Introduction Congratulations on your purchase and welcome
HQ6990, HQ6970, HQ6950, HQ6920 CHARGE
 HQ6990, HQ6970, HQ6950, HQ690 3 4 5 6 7 CHARGE 8 9 0 3 4 5 6 7 8 9 0 ENGLISH Introduction Congratulations on your purchase and welcome to Philips! To fully benefit from the support that Philips offers,
 1 2 3 4 5 6 7 8 9 10 11 12 1 2 3 4 5 6 7 8 9 10 11 12 English HQ914,HQ912 13 14 English English -- The shaver complies with the internationally approved Introduction IEC safety regulations and can be safely
AT940, AT893, AT890, AT753, AT752, AT750
 AT940, AT893, AT890, AT753, AT752, AT750 I 1 ENGLISH 6 FRANÇAIS (CANADA) 23 AT940, AT893, AT890, AT753, AT752, AT750 6 ENGLISH Introduction Congratulations on your purchase and welcome to offers, register
4-in-1 EPILATOR. 10,000 prize draw. PLUS Free Rewards Gallery. Register online now to collect your reward See back for details EP7020
 4-in-1 EPILATOR EP7020 10,000 prize draw PLUS Free Rewards Gallery Register online now to collect your reward See back for details 1 2 3 7 4 8 5 11 9 10 6 2 Do not use this appliance with a damaged or
BodyBare AquaSmooth. Instruction Booklet. wet & dry epilator AP17SR. Please read these instructions carefully and retain for future reference.
 BodyBare AquaSmooth wet & dry epilator Instruction Booklet AP17SR Please read these instructions carefully and retain for future reference. Contents Emjoi s Safety Precautions 4 Features of your BodyBare
Silk épil. EverSmooth. Silk épil EverSmooth. Type 5316
 Silk épil EverSmooth 2165 Silk épil EverSmooth Type 5316 www.braun.com/register English 6 13 Internet: www.braun.com www.service.braun.com Braun GmbH Frankfurter Straße 145 61476 Kronberg/Germany 5-399-393/00/IX-07/M
BodyBare Perfection. Instruction Booklet. cordless epilator & shaver with manual precission tweezers AP17LTR
 BodyBare Perfection cordless epilator & shaver with manual precission tweezers Instruction Booklet AP17LTR Please read these instructions carefully and retain for future reference. Contents Sunbeam s Safety
Smart Edge / Smart Edge Pro
 Smart Edge / Smart Edge Pro XF8500 XF8700 Register online for 10,000 prize draw EXTRA year guarantee FREE rewards gallery Visit www.productregister.co.uk/remington. You must register within 28 days of
RQ1290, RQ1280, RQ1260, RQ1250
 RQ1290, RQ1280, RQ1260, RQ1250 2 2 3 4 5 6 7 8 9 10 11 12 13 14 15 16 17 3 sec 18 19 20 21 3 A C 1 1 2 8 9 10 11 4 3 12 AUTO ECO INTENSIVE 5 6 7 D E 13 F B G 4 English 6 Български 13 Čeština 20 Dansk 27
Duoflex 770. Cordless Epilator. Model B770A
 Duoflex 770 Cordless Epilator Model B770A CONGRATULATIONS & THANKS FOR PURCHASING BABYLISS PARIS Our products are engineered to meet the highest standards of quality, functionality & design. We hope you
EPILATOR LE 8820 ENGLISH WITH INTERCHANGEABLE SHAVING HEAD
 EPILATOR WITH INTERCHANGEABLE SHAVING HEAD LE 8820 ENGLISH A B C D E F G H I J 2 SAFETY Please note the following instructions when using the appliance: 7 This appliance is designed for domestic use. 7
BodyBare Instruction Booklet
 BodyBare Instruction Booklet This book covers the use and care of the following Emjoi epilators: AP9G BodyBareLuxe AP9GA BodyBareSpa AP9GAR BodyBareGo AP98R BodyBareUltimate Please read these instructions
HyperFlex Aqua. 10,000 prize draw. Register online for XR1430 XR1450 XR1470. EXTRA year guarantee FREE rewards gallery
 HyperFlex Aqua XR1430 XR1450 XR1470 Register online for 10,000 prize draw EXTRA year guarantee FREE rewards gallery Visit www.remington.co.uk/productregister. You must register within 28 days of purchase.
CoolTec. CT6cc CT5cc CT4cc CT4s CT3cc CT2cc CT2s. Type 5676
 CoolTec CT6cc CT5cc CT4cc CT4s CT3cc CT2cc CT2s Type 5676 www.braun.com/jp 2 3 4 5 6 CoolTec CoolTec CoolTec CT6cc STOP 7 8 + CoolTec 2 CoolTec 2 1 1 9 10 12 CoolTec CoolTec 2 1 new 14 2 1 15 16 new
Series 5. Series 5 Series s s-4
 Series 5 Series 5 Series 5 + - 570 s-4 530 s-4 2 3 4 5 6 7 Series 5 + + - - 8 + - Series Series 5 5 STOP 9 Series 5 + - STOP 10 11 Series 5 + - 90 12 1 2 3 1 2 sensitiv 3 sensitiv 13 low clean low clean
Series 7. trimmer. Type
 Series 7 trimmer Type 5694 www.braun.com/jp 720s-6 1 2 3 4 5 6 7 on Series 7 trimmer trimmer off 8 Series 7 trimmer trimmer trimmer STOP 9 Series 7 trimmer STOP 10 11 on on on tr off release off off off
PowerSeries Aqua. 10,000 prize draw. Register online for PR1350 PR1370. EXTRA year guarantee FREE rewards gallery
 PowerSeries Aqua PR1350 PR1370 Register online for 10,000 prize draw EXTRA year guarantee FREE rewards gallery Visit www.remington.co.uk/productregister You must register within 28 days of purchase. Thank
DualTrack-X. 10,000 prize draw. Register online for R4150. EXTRA year guarantee FREE rewards gallery
 DualTrack-X R4150 Register online for 10,000 prize draw EXTRA year guarantee FREE rewards gallery Visit www.productregister.co.uk/remington. You must register within 28 days of purchase. Thank you for
Sonic Skincare Cleansing System
 by Sonic Skincare Cleansing System Model 9950U Sonic Skincare Cleansing System A professional skincare cleansing system with gentle sonic technology to thoroughly remove daily impurities without irritation
Charging base. Trimming head (30mm) on charging stand. Main body unit. On/Off switch. Indicated light. Connecting jack Connecting jack
 on charging stand. Main body unit. On/Off switch. Indicated light. Connecting jack Connecting jack") X Thank you for your purchase. In order to make you more comfortable by using the product, please read this user manual carefully and keep it for future reference. www.dixix.com 1 Trimming head (30mm)
X Thank you for your purchase. In order to make you more comfortable by using the product, please read this user manual carefully and keep it for future reference. www.dixix.com 1 Trimming head (30mm)
Series 1 190s-1 190s-1
 Series 1 190s-1 190s-1 2 3 4 5 6 7 Series 1 190s-1 8 190s-1 Series 1 9 10 2 1 90 90 11 12 oil 13 14 15 16 17 1 2 2 3 1 4 Series 1 6 190s-1 90 5 7 90 18 English Our products are designed to meet the highest
LADY SHAVER WASHABLE LS 7140
 LADY SHAVER WASHABLE LS 7140 DE EN ES FR IT SV NO NL PL PT TR EL A B C D G H I E F J K 3 SAFETY Please note the following instructions when using the appliance: 7 This appliance is designed for domestic
POWERGLIDE TITANIUM FEATURES
 Model 7448TU POWERGLIDE TITANIUM The BaByliss for Men PowerGlide Titanium offers precision honed titanium cutting blades and mains operation for continuous high power to deliver an ultra smooth hair cut
PrecisionCut Hair Clipper
 PrecisionCut Hair Clipper HC5900 Register online for 10,000 prize draw EXTRA year guarantee FREE rewards gallery Visit www.remington.co.uk/productregister You must register within 28 days of purchase.
Series7. Series 7. trimmer. Series 7. off. sensitive. intensive. clean. high. low. empty. reset
 on Series7-3 & dry fast sensitive off intensive reset www.braun.co.jp 2 3 4 5 6 7 on on sensitive off off intensive reset 8 off Series Series & dry fast sensitive on on reset intensive 9 on sensitive off
5 in1. Hair & Beard Trimmer. with accessories. Instruction Manual V
 5 in1 Hair & Beard Trimmer with accessories Instruction Manual V6-160404 Thank you for purchasing your LloydsPharmacy 5 in 1 Hair & Beard Trimmer. Please read the instruction manual carefully before use.
10,000 prize draw. Register online for FC2000. EXTRA year guarantee FREE rewards gallery
 FC2000 Register online for 10,000 prize draw EXTRA year guarantee FREE rewards gallery Visit www.remington.co.uk/productregister You must register within 28 days of purchase. NORMAL Everyday deep cleansing
Sonic Facial Cleanser
 Sonic Facial Cleanser Professional Dermal Cleansing Instruction Manual SSPA01 Thank you for purchasing the Sonic Facial Cleanser. The Sonic Facial Cleanser is a splashproof unit which is ideal for use
2
 Series 3 on off charge low 330 2 3 4 5 6 7 Series 3 washable on off charge low 330 8 STOP Series 3 on off 9 Series 3 on off charge low 330 STOP 10 11 on off charge 90 washable 12 full on off on off click!
Series7. Series 7. trimmer. Series cc. off. sensitive. intensive. clean. high. low. empty. reset
 on Series7 Series 7 Series 7 760 cc start trimmer sensitive off intensive reset www.braun.co.jp 2 3 4 5 6 reset off on reset on on Series 7 760 cc Series Series Series 7 3 4 Series 7 8 9 start ing 10 5
i-twin Trim Dual Blade Rechargeable Trimmer
 i-twin Trim Dual Blade Rechargeable Trimmer Model VSM2A SAFETY CAUTIONS WARNING! Polythene bags over the product or packaging may be dangerous. To avoid danger of suffocation, keep away from babies and
MPT4000C. 10,000 prize draw. Register online for BEAUTY TRIMMER. EXTRA year guarantee FREE rewards gallery
 BEAUTY TRIMMER MPT4000C Register online for 10,000 prize draw EXTRA year guarantee FREE rewards gallery Visit www.remington.co.uk/productregister You must register within 28 days of purchase. Thank you
Beard Trimmer. 10,000 prize draw. Register online for MB4130. EXTRA year guarantee FREE rewards gallery
 Beard Trimmer MB4130 Register online for 10,000 prize draw EXTRA year guarantee FREE rewards gallery Visit www.remington.co.uk/productregister You must register within 28 days of purchase. Thank you for
Cordless Ceramic Hair Cutting Set
 Cordless Ceramic Hair Cutting Set Instruction Booklet HC4900 Please read these instructions carefully and retain for future reference. Contents Sunbeam s Safety Precautions 3 Features of your Cordless
Vacuum 5 in 1 Grooming Kit
 Vacuum 5 in 1 Grooming Kit PG6070 Register online for 10,000 prize draw EXTRA year guarantee FREE rewards gallery Visit www.productregister.co.uk/remington. You must register within 28 days of purchase.
Series cc. Series 7. Type Series 7. trimmer. Series cc. off. sensitive. intensive. clean. high. low. empty.
 on Series 5 790 cc 790 cc ing sensitive intensive reset Type 5692 on on Ser Ser 3 4 4a 8 9 ing 10 2 1 5 6 790 cc 11 sensitive reset intensive 12 13 14 15 7 16 17 20 18 19 sensitive on on reset intensive
Series 7. Series7. trimmer. Series 7. off. sensitive. intensive. clean. high. low. empty. reset
 on Series7-3 start ing sensitive intensive reset www.braun.co.jp 2 3 4 5 6 7 on on sensitive intensive reset 8 S start ing sensitive on on reset intensive 9 on sensitive intensive reset 10 charge mid charge
THEFAMILYCLIP TOOL TIPS. for the essential clipping kit for professional family hair cuts VS704A
 THEFAMILYCLIP TOOL TIPS for the essential clipping kit for professional family hair cuts 1 VS704A HEY YOU! TAKE A BOW FINE SIR. THINGS ARE LOOKING UP & YOU VE JUST MADE A QUALITY PURCHASE WITH THIS NEW
Guide the appliance in a slow, continuous movement without pressure against the hair growth, in the direction of the switch. As hair can grow in diffe
 Guide the appliance in a slow, continuous movement without pressure against the hair growth, in the direction of the switch. As hair can grow in different directions, it may also be helpful to guide the
Series 5. Series cc. Type Series 7. trimmer. Series 7. off. 760 cc. sensitive. intensive. clean. reset
 on Series 5 760 cc 760 cc ing sensitive intensive reset Type 5693 on Series 3 4 8 9 ing 10 2 1 5 6 760 cc 11 sensitive intensive 12 13 14 reset 15 7 16 17 20 18 19 760 cc sensitive on on reset intensive
Series cc 570 cc. Type on off. min. clean
 Series5 590 cc 570 cc Series 5 sensitive sensitive start cleaning on off low clean Type 5751 www.braun.com/register 3 4 5 7 aning start cle 8 9 2 10 11 Series 5 se ns iti ve washable 1 12 on off 13 low
Body & Face Epilator 2 YEAR WARRANTY EP7040AU USE & CARE MANUAL. To register your product go to
 Body & Face Epilator USE & CARE MANUAL PLEASE READ PRIOR TO USE To register your product go to www.remington-products.com.au www.remington.co.nz 2 YEAR WARRANTY EP7040AU IMPORTANT SAFETY INSTRUCTIONS When
QuickCut Clipper. 10,000 prize draw. Register online for HC4250. EXTRA year guarantee FREE rewards gallery
 QuickCut Clipper HC4250 Register online for 10,000 prize draw EXTRA year guarantee FREE rewards gallery Visit www.remington.co.uk/productregister You must register within 28 days of purchase. Thank you
Hair Clipper. User's manual
 Hair Clipper User's manual EN SHP 3301BL / SHP 3302RD SHP 4301BL / SHP 4302RD Prior to using this appliance, please read the user's manual thoroughly, even in cases, when one has already familiarised themselves
Prosonic BS washable clean. trimmer. off. eco. normal. intensive. high. auto select. low. empty. reset
 on ActivePower Prosonic 9795 ing 9795 off reset BS 9795 www.braun.co.jp 2 3 STOP 4 5 6 7 8 9000 Series reset reset on off on off ing 3 4 6 5 1 2 4a 9 8 10 11 12 13 14 15 16 17 7 18 9795 9 10 11 on tr reset
Type Syncro System Smart Logic
 + Type 5493 Syncro System Smart Logic Internet: www.braun.com 5-493-464/01/XII-02 KOR/GB Printed in Germany Syncro A 1 Clean & Charge B 13 14 2 3 4 5 No. 7000 4 15 16 17 18 6 12 7 8 9 10 19 11 2 1 0 4
Operating Instructions
 Operating Instructions (Household) Rechargeable Shaver Model No. ES LF71 Before operating this unit, please read these instructions completely and save them for future use. ES-LF71_AUS.indb 1 2011/02/25
washable start stop washable Contour 5897 charge
 washable start stop charge Contour 5897 washable www.braun.co.jp 2 3 4 5 6 1 2 3 4 washable start stop 6 5 11 charge Contour 5897 washable 7 8 9 10 7 7 washable washable start stop ble 8 9 clean charge
Prosonic TM. 790 cc. Type trimmer. off. eco. normal. clean. intensive. high. auto select. low. empty. reset
 on Prosonic TM Prosonic TM 790 cc off reset Type 5671 Braun GmbH Frankfurter Straße 145 61476 Kronberg/Germany 5-671-363/00/IV-07/M China/GB on reset 3 4 4a 8 5 9 10 2 1 6 11 12 off reset 13 7 14 15 18
USE & CARE INSTRUCTION MANUAL PLEASE READ PRIOR TO USE EP6022AU PATENTED TECHNOLOGY FOR GENTLE EPILATION AND LONG LASTING SILKY SMOOTH SKIN.
 USE & CARE INSTRUCTION MANUAL PLEASE READ PRIOR TO USE EP6022AU PATENTED TECHNOLOGY FOR GENTLE EPILATION AND LONG LASTING SILKY SMOOTH SKIN. EP6022AU SMOOTH & SILKY EPILATOR USE & CARE INSTRUCTION MANUAL
GENTLE SKINCARE & HAIR REMOVAL SYSTEM
 YOUR SAFETY & INSTRUCTION MANUAL PLEASE READ CAREFULLY GENTLE SKINCARE & HAIR REMOVAL SYSTEM MODEL C85010 TECHNICAL DATA Description: Skin Care and Hair Removal System Model: C85010 Power Supply: DC 6V
washable start stop washable Contour 5888
 washable start stop Contour 5888 washable www.braun.co.jp 2 3 4 5 6 6 1 replace reset 7 replace reset 5887 5888 6 2 3 P O W E R replace reset 5886 5885 7 charge empty replace replace reset reset 5884 washable
SW9700. Tripleheader shaver. & Lucasfilm Ltd. Disney BC
 SW9700 Tripleheader shaver & Lucasfilm Ltd. Disney BC English 4 4 English IMPORTANT SAFETY INSTRUCTIONS When using an electrical product, basic precautions should always be followed, including the following:
8-in-1 All Over Grooming Kit
 8-in-1 All Over Grooming Kit Model 7056CU 8-in-1 All Over Grooming Kit The BaByliss For Men 8-in-1 All Over Grooming Kit is a professional grade rechargeable trimmer with 4 interchangeable cutting heads
Philips Sonicare 2 series Plaque control plus
 Philips Sonicare 2 series Plaque control plus 1 Sonicare 2 series Plaque control plus ENGLISH 6 6 ENGLISH Introduction Congratulations on your purchase and welcome to Philips! To fully benefit from the
/XI-17. Silk épil 3 II I. Type 5320 Modèle 5320 Modelo
 Silk épil 3 91508068/X-17 0 Silk épil 3 Type 5320 Modèle 5320 Modelo 5320 www.braun.com 3-410 3-270 3-170 Braun nfolines English 6 Français 12 Español 17 Thank you for purchasing a Braun product. We hope
SW6700. Tripleheader shaver. & Lucasfilm Ltd. Disney
 SW6700 Tripleheader shaver & Lucasfilm Ltd. Disney BC English 4 4 English IMPORTANT SAFETY INSTRUCTIONS DANGER When using an electrical product, basic precautions should always be followed, including
Comfort Series Plus/Pro Foil Shaver
 Comfort Series Plus/Pro Foil Shaver PF7400 PF7500 Register online for 10,000 prize draw EXTRA year guarantee FREE rewards gallery Visit www.productregister.co.uk/remington. You must register within 28
Metro Cordless haircut
 Metro Cordless haircut Model VS704A IMPORTANT SAFETY INSTRUCTIONS When using electrical appliances, especially when children are present, basic safety instructions should always be followed, including
Beard Trimmer. 10,000 prize draw. Register online for MB4850. EXTRA year guarantee FREE rewards gallery
 Beard Trimmer 5 MB4850 Register online for 10,000 prize draw EXTRA year guarantee FREE rewards gallery Visit www.productregister.co.uk/remington. You must register within 28 days of purchase. Thank you
Operating Instructions. Model No. ES-LF70. (Household) AC/Rechargeable Shaver. English 17
 AC/Rechargeable Shaver. English 17") Operating Instructions (Household) AC/Rechargeable Shaver Model No. ES-LF70 2 English 17 Before operating this unit, please read these instructions completely and save them for future use. 2 3 4 1 2 3
Operating Instructions (Household) AC/Rechargeable Shaver Model No. ES-LF70 2 English 17 Before operating this unit, please read these instructions completely and save them for future use. 2 3 4 1 2 3
10,000 prize draw. Register online for HC5800 HC5600 HC5400. EXTRA year guarantee FREE rewards gallery
 3 HC5800 HC5600 HC5400 Register online for 10,000 prize draw EXTRA year guarantee FREE rewards gallery Visit www.productregister.co.uk/remington. You must register within 28 days of purchase. Thank you
S5280 S5210 S5205. Always here to help you. Rechargeable Cordless Tripleheader Shaver.
 S5280 S5210 S5205 Rechargeable Cordless Tripleheader Shaver Always here to help you Register your product and get support at www.norelco.com/register Question? Contact Philips Norelco 2 4 Congratulations
Prosonic TM. trimmer. off. eco. normal. clean. intensive. high. auto select. low. empty. reset
 on Prosonic TM Prosonic TM ing off reset Braun GmbH Frankfurter Straße 145 61476 Kronberg / Germany 5-673-363/00/IV-07/M China/GB on reset 3 4 8 9 ing 10 2 1 5 6 11 12 off reset 13 7 14 15 18 16 17 4 STOP
shave care HP 6337/6336 rechargeable cordless wet/dry razors instructions for use
 rechargeable cordless wet/dry razors instructions for use If you need help, answers or service, please call us at 1-800-243-7884. shave care HP 6337/6336 IMPORTANT SAFETY INSTRUCTIONS When using an electric
THEBEARDTRIM TOOL TIPS. for the precision beard & stubble trimmer for perfect facial grooming. VSM7840A
 THEBEARDTRIM TOOL TIPS for the precision beard & stubble trimmer for perfect facial grooming. VSM7840A HEY YOU! TAKE A BOW FINE SIR. THINGS ARE LOOKING UP & YOU VE JUST MADE A QUALITY PURCHASE WITH THIS
Operating Instructions
 Operating Instructions (Household) Rechargeable Beard Trimmer Model No. ER GB37 ER-GB37_ME.indb 1 2013/07/16 13:30:50 2 ER-GB37_ME.indb 2 2013/07/16 13:30:50 Operating Instructions (Household) Rechargeable
Beard Trimmer. 10,000 prize draw. Register online for MB4120. EXTRA year guarantee FREE rewards gallery
 Beard Trimmer MB4120 Register online for 10,000 prize draw EXTRA year guarantee FREE rewards gallery Visit www.remington.co.uk/productregister You must register within 28 days of purchase. Thank you for
SHAVER 7300 S7370. Always here to help you. Rechargeable Cordless Tripleheader Shaver.
 SERIES 700 0 7300 SHAVER 7300 S7370 Rechargeable Cordless Tripleheader Shaver Always here to help you Register your product and get support at www.norelco.com/register Question? Contact Philips Norelco
on off full low /00/VIII-03/G2 D/GB/F/E/P/I/NL/DK/N/S/FIN/TR Type 5751
 5 560 550 Series 5 low 5-726-450/00/VIII-03/G2 D/GB/F/E/P/I/NL/DK/N/S/FIN/TR Type 5751 1 2 3 4 5 Series 5 se ns iti ve washable 6 7 7 8 9 8 9 10 11 10 560 550 12 nto Co urpro on off sens itiv e 2 98579917_CP_560_China.indd
7310XL 7315XL 7325XL 7340XL 7345XL 7349XL 7350XL. Rechargeable Tripleheader Cordless/Cord Razor
 Rechargeable Tripleheader Cordless/Cord Razor 7310XL 7315XL 7325XL 7340XL 7345XL 7349XL 7350XL Register your product and get support at www.philips.com/norelco 2 ENGLISH 4 7310XL/7315XL/7325XL/7340XL 7345XL/7349XL/7350XL
Wet/Dry/Rechargeable Shaver Operating Instructions. Model No. ES8044. B424166_ES8044_AU_Torisetsu
 Wet/Dry/Reable Shaver Operating nstructions Model No. ES8044 Panasonic Electric Works Wanbao (Guangzhou) Co., Ltd. Wanbao Base Shiguang Road, Panyu District, Guangzhou, Guangdong, 511495 CHNA Before operating
CORDLESS WET/DRY EPILATOR 2 YEAR WARRANTY EP7030AU USE & CARE MANUAL. To register your product go to
 CORDLESS WET/DRY EPILATOR USE & CARE MANUAL PLEASE READ PRIOR TO USE To register your product go to www.remington-products.com.au 2 YEAR WARRANTY EP7030AU IMPORTANT SAFETY INSTRUCTIONS When using electrical
S series S8860 BC
 S8860 BC 2 IMPORTANT SAFETY INSTRUCTIONS DANGER WARNING When using an electrical product, basic precautions should always be followed, including the following: Read all instructions before using this product.
SyncroPro. Type 5492 Type
 7790 7785 7765 3 2 1 automatic lock SyncroPro Type 5492 Type 5493 www.braun.com/register Synchro Pro 7790 Syncro Pro 7790 Syncro Pro 7785 Syncro Pro 7765 7000 3 2 1 automatic lock 3 2 1 automatic lock
Nose & Ear Trimmer. 10,000 prize draw. Register online for NE3155. EXTRA year guarantee FREE rewards gallery
 Nose & Ear Trimmer NE3155 Register online for 10,000 prize draw EXTRA year guarantee FREE rewards gallery Visit www.remington.co.uk/productregister You must register within 28 days of purchase. Thank you
clean off auto select eco normal intensive cartridge full empty
 8795 8795 3 2 1 off start ing 8795 8795 2 STOP 3 4 5 6 7 3 9 1 10 2 3 4 11 12 12 start ing 5 6 off 13 14 7 2 1 15 16 17 8 8795 18 19 8 off 3 2 1 auto sel 1 2 a b c start ing a b c d 9 2 1 off start ing
Rechargeable Tripleheader Cordless/Cord Razor 8240XL 8250XL 8251XL. Model 8240XL. Register your product and get support at
 Rechargeable Tripleheader Cordless/Cord Razor 8240XL 8250XL 8251XL Register your product and get support at www.philips.com/norelco Model 8240XL 2 4 Congratulations on your purchase and welcome to Philips
Satin Ice. HP6475 Epilator
 Satin Ice HP6475 Epilator 7001327 4203 000 31971 ENGLISH IMPORTANT SAFETY INSTRUCTIONS When using an electrical appliance, basic precautions should always be followed, including the following: Read all
Rotary Shaver. 10,000 prize draw. Register online for PR1330. EXTRA year guarantee FREE rewards gallery
 Rotary Shaver PR1330 Register online for 10,000 prize draw EXTRA year guarantee FREE rewards gallery Visit www.remington.co.uk/productregister You must register within 28 days of purchase. Thank you for
BodyBare Diva. Instruction Booklet. facial & delicate area epilator AP14D. Please read these instructions carefully and retain for future reference.
 BodyBare Diva facial & delicate area epilator Instruction Booklet AP14D Please read these instructions carefully and retain for future reference. Emjoi s Safety Precautions Safety Precautions for your
Men's Shaver (Battery / Mains)
") Men's Shaver (Battery / Mains) Instructions for Use English...1 00800-36 4636 00 MODEL: 9113956 PRODUCT CODE: 91628 11/2014 Congratulations! Contents You have made an excellent choice with the purchase
Men's Shaver (Battery / Mains) Instructions for Use English...1 00800-36 4636 00 MODEL: 9113956 PRODUCT CODE: 91628 11/2014 Congratulations! Contents You have made an excellent choice with the purchase
Stubble Trim. Model: 7848U
 Stubble Trim Model: 7848U 7848U IB-17/041.indd 1 Stubble Trim The BaByliss For Men Stubble Trim has been designed to give you every day stubble control. The trimmer has 30 ultra precise length settings,
S5620, S5600, S5420, S5400, S5380, S5230
 S5620, S5600, S5420, S5400, S5380, S5230 2_002_5832_1_FrontCover_A6_bl.indd 1 11-09-15 11:42 15 1 14 2 3 4 5 6 13 12 11 10 9 8 7 16 18 17 English 5 Introduction Congratulations on your purchase and welcome
PROFESSIONAL 6-IN-1 GROOMING KIT
 PROFESSIONAL 6-IN-1 GROOMING KIT Model 7057U PROFESSIONAL 6-IN-1 GROOMING KIT The BaByliss For Men Professional 6-in-1 Grooming Kit is a mains or cordless trimmer with 2 interchangeable cutting heads with
AT850. Always here to help you. Rechargeable Cordless/Cord Tripleheader Shaver. Register your product and get support at
 AT850 Rechargeable Cordless/Cord Tripleheader Shaver Always here to help you Register your product and get support at www.norelco.com/register Question? Contact Philips Norelco 2 4 Congratulations on your
EC ,000 prize draw. Register online for HEATED EYELASH CURLER. EXTRA year guarantee FREE rewards gallery
 HEATED EYELASH CURLER EC300 Register online for 10,000 prize draw EXTRA year guarantee FREE rewards gallery Visit www.remington.co.uk/productregister You must register within 28 days of purchase. Thank
BEARD TRIMMER FOR PROFESSIONAL CUTTING AND SHAPING
 All technical modifications reserved. 10/08. TSC 08.0696 BEARD TRIMMER FOR PROFESSIONAL CUTTING AND SHAPING 6. 5. 3. 1. 2. 7. 4. Model No. MB320C / UK /MB320C Version Part No. T22-2627 0 REMINGTON is a
Rechargeable Cordless Tripleheader Razor 8060X
 Rechargeable Cordless Tripleheader Razor 8060X Register your product and get support at www.philips.com/norelco 2 4 Congratulations on your purchase and welcome to Philips Norelco! To fully benefit from
THECREWCUT TOOL TIPS. for the supreme self-cut clipper to maintain a short or crew cut look.
 THECREWCUT TOOL TIPS for the supreme self-cut clipper to maintain a short or crew cut look. HEY YOU! TAKE A BOW FINE SIR. THINGS ARE LOOKING UP & YOU VE JUST MADE A QUALITY PURCHASE WITH THIS NEW GROOMING
THEGROOMBUDDY TOOL TIPS. for the multi-purpose face & body trimmer VSM7056A
 THEGROOMBUDDY TOOL TIPS for the multi-purpose face & body trimmer 1 VSM7056A HEY YOU! TAKE A BOW FINE SIR. THINGS ARE LOOKING UP & YOU VE JUST MADE A QUALITY PURCHASE WITH THIS NEW GROOMING TOOL. WE KNOW
MN250/251 MODELS BEARD/MUSTACHE TRIMMER
 MN250/251 MODELS BEARD/MUSTACHE TRIMMER 1. 2. 3. 11. 4. 6. 9. 1. 3/4" Trimmer Attachment 2. On/Off Switch on Body 3. Battery Compartment 4. Comb Attachment 5. Eyebrow Comb Attachment 6. Comb Attachment
i-stubble Contouring Facial trimmer
 i-stubble Contouring Facial trimmer Model VS7863A IMPORTANT SAFETY INSTRUCTIONS When using electrical appliances, especially when children are present, basic safety instructions should always be followed,
S5390 S5370. Always here to help you. Rechargeable Cordless Tripleheader Shaver. Register your product and get support at
 S5390 S5370 Rechargeable Cordless Tripleheader Shaver Always here to help you Register your product and get support at www.norelco.com/register Question? Contact Philips Norelco 2 4 Congratulations on
cruzer r3ezruc Type 5733
 2865 cruzer3 cruzer 3 Type 5733 5-733-499/00/V-07 Japan/GB 3 4 5 6 7 1 2 3 7 4a 4 4b 6 8 5 9 8 9 a 1 1 2 2 1 6 4a 4 4b b 90 90 c 2 1 10 d 180 7 2 8 e 2 1 11 f g h oil 12 1 2 3 4 5 6 13 14 15 16 English
Professional Manicure & Pedicure Kit
 ELM-MAN200-0214-01_Layout 1 28/02/2014 15:17 Page 1 Professional Manicure & Pedicure Kit 2 Year Guarantee Instruction Manual By ELM-MAN200- ELM-MAN200-0214-01_Layout 1 28/02/2014 15:17 Page 2 Thank you
GMT180WTPBCSC BEARD/MUSTACHE TRIMMER
 GMT180WTPBCSC BEARD/MUSTACHE TRIMMER Cutter Blades Blade Set TURBO SWITCH ON/OFF SWITCH with lock button Charging Light Indicator Line Cord TWO YEAR LIMITED WARRANTY Conair will repair or replace (at our