Instructions for Use COLD RUSH COMPACT
|
|
|
- Roy Bridges
- 5 years ago
- Views:
Transcription

1 Instructions for Use COLD RUSH COMPACT
2 FIGURES 3 EN Instructions for Use 5 FR Notice d utilisation 12 ES Instrucciones para el uso 20


3

4 10 EN - Caution: This product has been designed and tested based on single patient usage and is not recommended for multiple patient use. If any problems occur with the use of this product, immediately contact your medical professional. FR- Attention: Ce produit a été conçu et testé pour être utilisé par un patient unique et n'est pas préconisé pour être utilisé par plusieurs patients. En cas de problème lors de l'utilisation de ce produit, contactez immédiatement un professionnel de santé. ES- Precaución: Este producto se ha diseñado y probado para su uso en un paciente único y no se recomienda para el uso de varios pacientes. En caso de que surja algún problema con el uso este producto, póngase inmediatamente en contacto con su profesional médico. attention - See operating instructions Meets IEC type BF leakage current requirements IP21 Protected against solid foreign objects of 12.5mmØ and greater. Protected against vertically falling water drops. Class II Device attention Voir les instructions d'utilisation Conforme aux exigences de courant de fuite IEC de type BF IP21 Protégé contre les corps solides étrangers de diamètre supérieur ou égal à 12.5mm. Protégé contre les chutes verticales de gouttes d'eau. Appareil de classe II atención - Consulte las instrucciones de funcionamiento Cumple requisitos de con los fuga de corriente de equipos de tipo BF según el IEC IP21 Protegido contra objetos sólidos mayores o iguales a 12,5 mm de diámetro. Protegido contra la caída vertical de gotas de agua. Dispositivo de clase II 4
5 ENGLISH INSTRUCTIONS FOR PATIENTS AND MEDICAL PROFESSIONALS Patients and Medical Professionals should carefully read all of the following instructions and warnings before operating the Cold Rush Compact Cold Therapy System. INDICATION FOR USE The Cold Rush Compact Cold Therapy System is designed to reduce localized pain and swelling following surgical procedures or trauma. The Cold Rush Compact Cold Therapy System is intended for single patient use only. WARNING: RX ONLY This device should only be used with a prescription from a physician that includes the following treatment information: (1) the number of days or weeks that the treatment should last and (2) the length and frequency of product use (and breaks) during treatment. DO NOT USE THIS DEVICE IF YOU DO NOT HAVE A PRESCRIPTION FROM YOUR PHYSICIAN THAT INCLUDES ALL SUCH TREATMENT INFORMATION. A blank treatment protocol to be filled out by your healthcare provider is provided on top of the Cold Rush Compact Cold Therapy Device. WARNING: POSSIBLE COLD-RELATED INJURIES This device reduces the temperature of the skin and tissue. If not used properly and in accordance with the prescribed instructions from your physician, this device can cause serious injury, including frostbite, tissue necrosis and nerve damage. WARNING: SKIN INSPECTION AND ADVERSE REACTIONS You or your healthcare provider must check your skin at least every 1 2 hours during use of this device, regardless of whether you are asleep or awake, for any change in skin condition, including for any increase in pain, burning, blistering, itching, increased swelling, discoloration of the skin, increased redness, welts or any other changes in the appearance of the skin. If you experience any of these reactions, you should immediately discontinue use of your Cold Rush Compact Cold Therapy Device and contact your healthcare provider. Any dressing, casting, bracing or wrapping must not interfere with your ability to check your skin condition. If you are unable to check your skin condition for any reason, do not use the Cold Rush Compact Cold Therapy Device. WARNING: NO DIRECT CONTACT WITH SKIN; INSULATION BARRIER REQUIRED The Cold Rush Pad should never make direct contact with the skin. The Cold Rush pad operating temperature is too cold to be placed directly on the skin. An insulation barrier between the pad and the skin should be used at all times without exception so as to prevent the skin from becoming too cold. Failure to use an insulation barrier between the pad and the skin can lead to a cold-related injury. WARNING: USE ONLY ÖSSUR COLD RUSH PADS Competitive brand cold therapy pads should not be used with the Cold Rush Compact Cold Therapy Device as the temperature may become too cold when using competitive pad and the pads may not otherwise 5
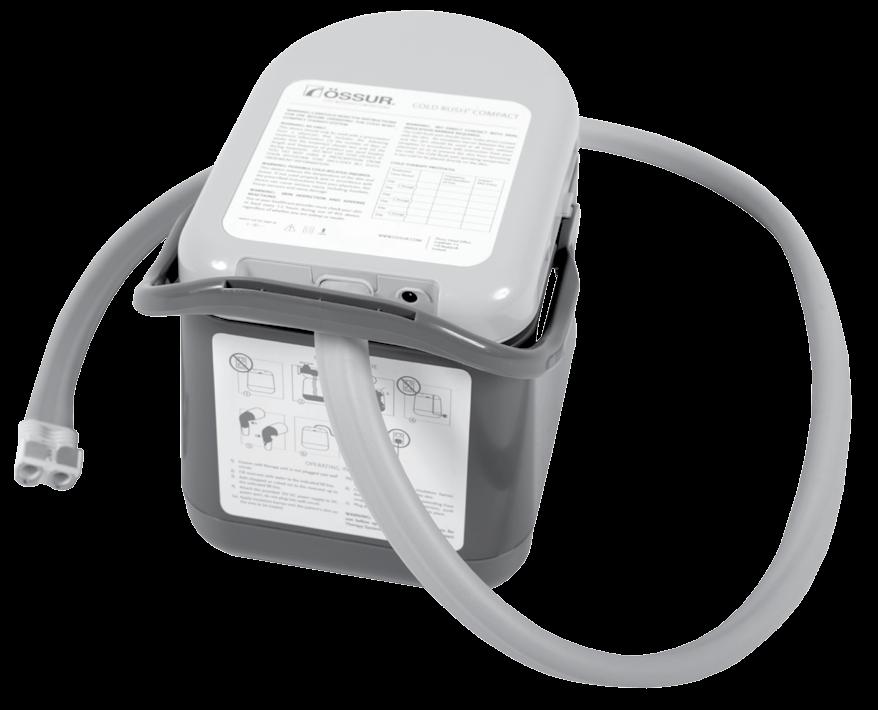
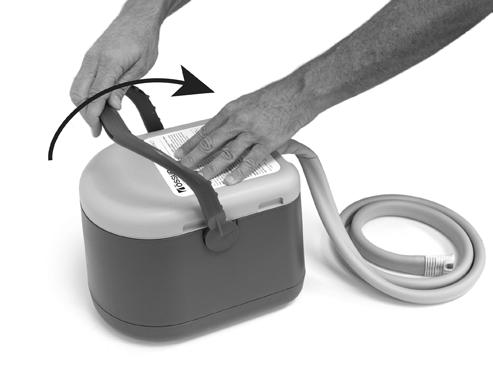
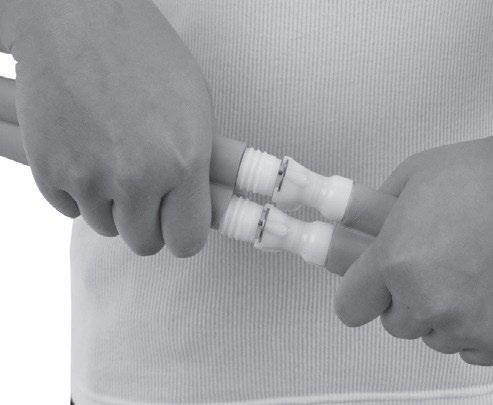
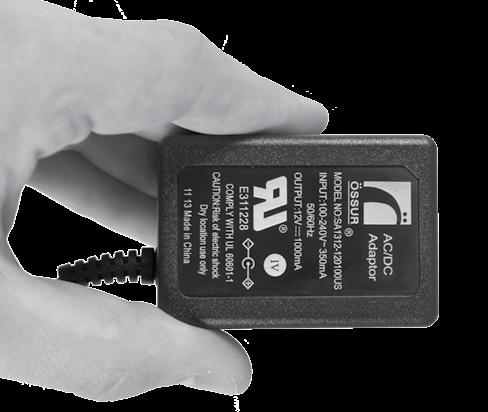
6 function properly, causing injury. Only Össur Cold Rush Pads should be used with the Cold Rush Compact Cold Therapy Device. WARNING: NO MOISTURE IN INSULATION BARRIER If the moisture is present in the insulation barrier, the skin may become colder than intended. The insulation barrier should be inspected regularly to check for moisture caused by bleeding, sweating or condensation. If moisture is found on the insulation barrier between the pad and the skin, immediately discontinue use of the Cold Rush until the moisture is removed and a fresh barrier is placed between the pad and the skin. CONTRAINDICATIONS The Cold Rush Compact Cold Therapy Device should not be used on patients with the following conditions: History of cold-related injury or adverse reactions to cold therapy; Unconsciousness or incoherence due to general anesthesia, sedation or coma; Impairment of circulation or potential impairment of healing in the treatment area, including infection; Circulatory disease, including Reynaud s disease, Burger s disease, peripheral vascular disease, vasospastic disorders, sickle cell anemia, or hypercoagulable clotting disorders; or Polyneuropathy or other nerve damage. RISK FACTORS Physicians should carefully consider the following conditions or factors before before prescribing the Cold Rush Compact Cold Therapy Device: Sensitivity to cold; General impaired circulation; Use of medications that may negatively affect peripheral vascular circulation, including beta adrenergic blockers and local epinephrine use (such as local anesthetics); Poor nutrition, smoking, tobacco use, excessive use of caffeine or alcohol and any other behavior negatively affecting circulation; Desensitization of the treatment area due to local anesthesia or regional nerve blockers; Cognitive impairment and use of medications that have a negative effect upon mental capacity or judgment; Moisture at the application site due to excessive bleeding, sweating or condensation; Diabetes; Use of product on hand, wrist, foot or ankle; and Young children and elderly. DEVICE PARTS IDENTIFICATION (Figure 1) 1. Cold Rush Compact Cold Therapy System 2. Hose 3. Couplings 4. DC Connector 12V Power Supply 5. 12V Power Supply 6. Cold Rush Pad (Sold Separately) APPLICATION/OPERATION 1. Do NOT plug unit into wall socket until steps 2 7 are completed. 2. Fill reservoir with water to the indicated fill line (Figure 2). Warning: water level should not exceed the reference mark on the 6
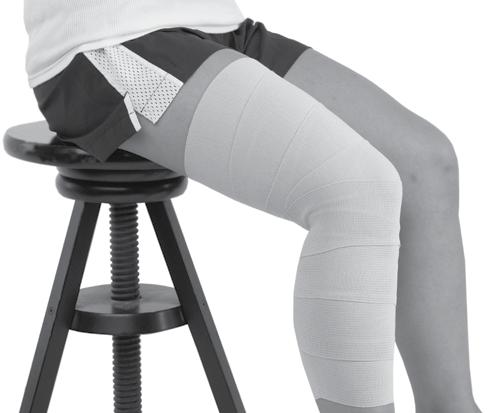
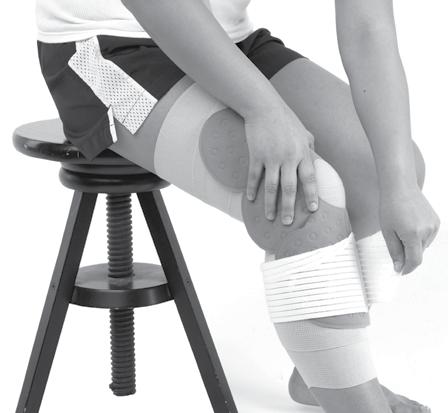
7 sticker inside the bucket to avoid risk of overflow when closing the cover. 3. Add chopped or cubed ice to the reservoir up to the indicated fill line (Figure 3). Warning: Make sure the ice level does not exceed the reference mark on the sticker. Failure to comply will cause device overflow when closing the lid. 4. Close the reservoir. With handle in the open position, press lid firmly onto unit making certain that the lid is in full contact with the vessel and the seal is engaged, then pull handle into the locked position (Figure 4) 5. Attach the provided 12V power supply to DC power port, but do not plug into wall (Figure 5). 6. Apply insulation barrier over the patient s skin in the area to be treated (Figure 6). 7. Connect Cold Rush pad to hose extending from the device. To ensure proper connection, push couplings together until they snap into place (Figure 7). 8. Apply Cold Rush Pad over insulation barrier. The Cold Rush Pad should never be applied directly over the patient s skin (Figure 8). 9. Plug the provided 12V power supply to wall socket (Figure 9). 10. To turn off the cold therapy device, unplug the power supply unit from wall socket. 11. Always turn the cold therapy device off before disconnecting the Cold Rush Pad or any hoses. To disconnect the hoses, press the release tabs on the coupling and pull the connectors apart. 12. To open lid, press handle down to disengage lid seal, then lift to remove (Figure 10) 13. Drain all of the water out of the cold therapy device after each use. 14. Follow directions 2 8 before each use. TROUBLESHOOTING Pump will not turn on Ensure that the power supply connector properly inserted in to port on unit and that the wall plug has power. Pad will not get cold Visually inspect pad to see if water is flowing. If water is flowing: check pad for pockets of trapped air. Gently massage the pad to help remove the trapped air. Once water flow appears to moving freely through the pad, resume usage If no water is flowing, make certain the unit is properly filled. Refer to filling instructions. Check the hose connection to ensure that the coupling is fully engaged. Check to ensure that the hose is not kinked or pinched by any object. Water leaking at connector Unplug device, disconnect hose, visually inspect to ensure coupling connectors are in the open position and then reconnect hose. Snap or clicking sound indicates proper connection (Figure 4 & 7). Leaking Note: certain conditions such as hot or humid climates may cause condensation to develop on unit and or pads. Leaking Pad -Remove pad, towel dry and then visually inspect pad. If a 7
8 leak is detected, then the pad will need to be replaced. See warranty regarding pad replacement. Leaking Unit visually inspect to determine the location of the leak. Refer to limited warranty for damaged replacement requirements. If no leak is detected, it may be condensation. HEALTHCARE PROVIDER RESPONSIBILITIES The prescribing physician must determine (1) the number of days or weeks that the treatment should last and (2) the length and frequency of product use (and breaks) during treatment. All such information should be included in the patient's prescription. Appropriate training must be provided by the healthcare provider, in the proper application, use and operation and care of the Cold Rush Compact Cold Therapy System. The healthcare provider must monitor the patient s use of the device to assure compliance with the prescribed protocol, appropriate use, proper application and operation of the Cold Rush Compact Cold Therapy System, including but not limited to application and maintenance of an insulation barrier between the patient s skin and the Cold Rush Pad. Treatment Time Period Frequency and Duration of Use Inspect Skin Every Day Day Through Day Day Through Day Day Through ADDITIONAL WARNINGS The Cold Rush Compact Cold Therapy Device should never be left unattended when plugged in. Do not place the tubes or the power cord where your or other s feet can get entangled, causing a fall. Never drop or insert any object into any opening or hose. Do not operate where aerosol (spray) products are being used or where oxygen is being administered. Do not attempt to drag or reposition the Cold Rush Compact Cold Therapy Device by pulling or tugging on the insulated hoses, as this may cause damage to the device and/or cause the hoses to disconnect. Use handle when moving the Cold Rush Compact Cold Therapy Device. Do not place the tubes or the power cord by the top of your bed where they could twist around your neck while you are sleeping. The pump in Cold Rush Compact Cold Therapy Device is designed to run with water. Running the device without water will cause permanent damage to the pump. 8
9 A wireless communications equipment such as wireless home network devices, mobile phones, cordless telephones and their base stations, walkie-talkies can affect the Cold Rush Compact Cold Therapy Device and should be kept at least a distance 3.3 m away from the Cold Rush Compact Device. SAFETY STANDARDS Cold Rush Compact Cold Therapy System is tested and certified to comply with the IEC standard of electrical safety of medical devices and IEC/EN , electromagnetic compatibility for medical electrical devices. IEC , requirements for medical electrical equipment and medical electrical systems used in the home healthcare environment. The company fulfills the requirements of ISO ELECTRIC SHOCK HAZARD To create the safest operating conditions possible, Össur has designed the Cold Rush Compact Cold Therapy System to operate on a 12 volt power supply, significantly reducing the chance of dangerous electric shock. Avoid use near any water source. Only use the power supply provided with the device. Unplug device before filling it with ice and water. To avoid danger of electric shock be certain that hands are dry before inserting or removing the power supply from wall socket. Avoid getting water or ice on the power adapter. Always unplug this product immediately after each use. Never use Cold Rush Compact Cold Therapy device while bathing. Do not place or store product where it can fall or be pulled into a tub or sink. Do not place in or drop into water or other liquid. Do not reach for a product that has fallen into water. Unplug immediately. Keep cord & device away from heated surfaces. Never operate this product if: The device has a damaged electrical cord or plug; The device has been dropped or damaged; The has been dropped into water; or The device is not working properly. If any of the above have occurred, immediately discontinue use of the Cold Rush Compact Cold Therapy Device and return the product to your healthcare provider for examination and repair. TECHNICAL SPECIFICATION: ELECTRICAL - POWER SUPPLY Model no: SA US Input: 120V US Input frequency: 60 Hz US Output power: 12W Output Voltage: 12V Output Current: 1A MAINTENANCE Do not attempt to repair your Cold Rush Compact Device as this may create a user hazard and will automatically void the warranty. CLEANING AND PROLONGED STORAGE When you have finished all of your cold therapy treatments, prior to 9
10 prolonged storage, fill the device so the water level is at the ice fill line. Add 2 tablespoons of liquid bleach or 3 ounces of 3% hydrogen peroxide to the water and mix. Connect hoses to the Cold Rush Pad, plug in the device to start. Allow water mixture to circulate for 5 minutes. To turn device off, unplug power supply. Carefully drain the water mixture out of the device and store in a dry, cool, and dark place leaving the lid slightly open. (Exposure to sunlight and extreme heat may damage hoses and device.) When reusing the device after storage, fill the reservoir with clean water and turn the pump on to circulate the water through the hoses and flush the remaining water mixture out of the system (use old pad for this procedure, discard the pad after cleaning is completed). Dispose water and refill the reservoir with fresh ice and water combination to begin cold therapy treatment. Follow operating instructions 2 9 before each use. Before you use the device, inspect hoses and new pad for any tears or breaks. Contact your healthcare provider to purchase new Cold Rush Pad. Clean or replace insulation barrier as recommended by your healthcare practitioner. ENVIRONMENTAL Environmental Operating Temperature: +10 C (+50 F) to 40 C (104 F) Operating Humidity: 30% - 75% Relative Humidity Atmosphere Pressure: h Pa Shipping and Storage Temperature: -20 C (-4 F) to 70 C (158 F) Shipping and Storage Humidity: 10% - 90% Relative Humidity, non- condensing Atmosphere Pressure: h Pa DISPOSAL Follow local ordinance or regulations for proper disposal of device, accessories, and packaging. ACCESSORIES The following accessories are available for your Cold Rush Compact Cold Therapy System at an additional charge. To order, contact your healthcare provider. Cold Rush Ankle Pad Cold Rush Hip Pad Left Cold Rush Hip Pad Right Cold Rush Knee Pad Cold Rush Lumbar Pad Cold Rush Rectangular Pad Small Cold Rush Shoulder Pad Small Cold Rush Shoulder Pad Large Cold Rush Universal Pad Insulation barrier used for testing thermal properties of the system is a single layer of 3-ply Seal-In Sock, Össur product numbers (K , K , K , K ). 10
11 LIMITED WARRANTY Össur warrants, to the original purchaser, that this product is free from defects in materials and workmanship for 6 months from initial purchase. This warranty does not apply if this product: 1 was not purchased from Össur or its authorized dealer 2 has been altered in any way; or 3 has not been used in accordance with Össur s Instructions For Use (IFU). This Limited Warranty does not cover damage due to accidents, neglect, misuse, or operation beyond capacity, parts damaged by improper installation, substitution of parts not approved by Össur, or any other alteration or repair by others that, in Össur s judgment, materially or adversely affects the product or part. This product expected service life is 6 months from the date of first use. For complete warranty guidelines please visit SAVE THESE INSTRUCTION 11
12 FRANÇAIS INSTRUCTIONS DESTINÉES AUX PATIENTS ET AUX PROFESSIONNELS DE SANT Il est important que les patients et les professionnels de santé lisent attentivement les instructions et les avertissements suivants avant de commencer à utiliser le système de cryothérapie Cold Rush Compact. MODE D'EMPLOI L'usage du système de cryothérapie Cold Rush Compact est conçu pour réduire la douleur localisée et les gonflements suite à une intervention chirurgicale ou à un traumatisme. L'utilisation du système de cryothérapie Cold Rush Compact est destinée à un patient unique. AVERTISSEMENT : SUR PRESCRIPTION MEDICALE UNIQUEMENT Ce dispositif ne doit être utilisé qu'en cas de prescription médicale comprenant les renseignements suivants : (1) nombre de jours ou de semaines de durée du traitement et (2) longueur et fréquence d'utilisation du produit (pauses incluses) lors du traitement. NE PAS UTILISER CE DISPOSITIF SI VOUS N'AVEZ PAS D'ORDONNANCE DE VOTRE MÉDECIN INCLUANT TOUTES LES INFORMATIONS RELATIVES AU TRAITEMENT. Un formulaire vierge de protocole de traitement à remplir par votre professionnel de santé est à votre disposition sur le dessus du dispositif de système de cryothérapie Cold Rush Compact. AVERTISSEMENT : POSSIBILITÉ DE BLESSURES LIÉES AU FROID Ce dispositif réduit la température de la peau et des tissus. En cas de mauvaise utilisation et de non-respect des instructions prescrites par votre médecin, ce dispositif peut causer des blessures graves, y compris des engelures, de la nécrose tissulaire et de graves affections nerveuses. AVERTISSEMENT : SURVEILLANCE DE LA PEAU ET RÉACTIONS INDESIRABLES Vous ou votre professionnel de santé devez vérifier votre peau au moins toutes les 1 à 2 heures au cours de l'utilisation de ce dispositif, que vous soyez endormi ou réveillé, pour vérifier tout changement cutané incluant toute augmentation de la douleur, brûlure, boursouflure, démangeaison, gonflement important, décoloration de la peau, rougeur accrue, éruption ou toute autre modification cutanée. Si vous présentez l'une de ces réactions, vous devez immédiatement cesser l'utilisation de votre dispositif de cryothérapie Cold Rush Compact et contacter votre professionnel de santé. Aucun pansement, moulage, attelle ou bandage ne doit vous empêcher de vérifier l'aspect de votre peau. Si vous n'êtes pas en mesure de vérifier l'état de votre peau pour quelque raison que ce soit, alors n'utilisez pas le dispositif de cryothérapie Cold Rush Compact. AVERTISSEMENT : PAS DE CONTACT DIRECT AVEC LA PEAU; PAROI ISOLANTE OBLIGATOIRE Le coussinet Cold Rush ne doit jamais être en contact direct avec la peau. La température de fonctionnement du coussinet Cold Rush est trop froide pour qu'il soit posé directement sur la peau. Il est impératif d'utiliser en tout temps et sans exception une paroi isolante entre le coussinet et la peau afin d'empêcher que la peau ne devienne trop froide. 12
13 La non-utilisation d'une paroi isolante entre le coussinet et la peau pourrait provoquer des blessures liées au froid. AVERTISSEMENT : UTILISEZ UNIQUEMENT DES COUSSINETS COLD RUSH D'ÖSSUR Les coussinets de cryothérapie vendus par d'autres marques concurrentes du dispositif Cold Rush Compact ne doivent pas être utilisés car la température des coussinets d'une autre marque peut s'avérer trop froide et entraîner un dysfonctionnement des coussinets,provoquant ainsi des blessures. Seuls les coussinets Cold Rush d'össur doivent être utilisés avec le dispositif de cryothérapie Cold Rush Compact. AVERTISSEMENT : AUCUNE HUMIDITÉ DANS LA PAROI ISOLANTE La peau pourrait devenir plus froide que prévu en cas d'humidité dans la paroi isolante. La paroi isolante doit être contrôlée régulièrement contre l'humidité pouvant être causée par des saignements, de la transpiration ou de la condensation. En cas de présence d'humidité sur la paroi isolante entre le coussinet et la peau, il est impératif de cesser immédiatement l'utilisation du Cold Rush jusqu'à la disparition de l'humidité et qu'une nouvelle paroi soit placée entre le coussinet et la peau. CONTRE-INDICATIONS Le dispositif de cryothérapie Cold Rush Compact ne doit pas être utilisé chez les patients atteints des affections suivantes : Antécédents de blessure liée au froid ou de réactions indésirables à la cryothérapie ; Inconscience ou incohérence dues à une anesthésie générale, à une sédation ou à un coma ; Troubles de la circulation ou trouble potentiel de la cicatrisation dans la zone de traitement, y compris l'infection; Troubles circulatoires, y compris la maladie de Reynaud, la maladie de Burger, acrosyndrome, troubles vasculaires, drépanocytose ou troubles de la coagulation hypercoagulable; ou Polyneuropathie ou tout autre trouble nerveux. FACTEURS DE RISQUE Les médecins doivent tenir compte avec prudence des affections ou des facteurs suivants avant de prescrire le dispositif de cryothérapie Cold Rush Compact : Sensibilité au froid ; Troubles de la circulation sanguine en général ; Prise de médicaments pouvant affecter de façon négative la circulation sanguine périphérique, y compris les bêta-bloquants et l'utilisation locale d'épinéphrine (tels que les anesthésiques locaux) ; Mauvaise alimentation, tabagisme, consommation de tabac, usage excessif de caféine ou d'alcool et tout autre comportement affectant de manière négative la circulation ; Désensibilisation de la zone de traitement en raison d'une anesthésie locale ou de bloquants nerveux régionaux ; Anomalie cognitive et prise de médicaments ayant un effet négatif sur la capacité mentale ou le jugement ; Humidité au niveau du site d'application liée à un saignement excessif, à de la transpiration ou de la condensation ; Diabète; 13
14 Utilisation d'un produit sur la main, le poignet, le pied ou la cheville; et Jeunes enfants et personnes âgées. IDENTIFICATION DES PIÈCES DU DISPOSITIF (Figure 1) 1. Système de cryothérapie Cold Rush Compact 2. Tuyau 3. Raccords 4. Bloc d'alimentation 12V Connecteur CC 5. Bloc d'alimentation 12V 6. Coussinet Cold Rush (Vendu séparément) UTILISATION / FONCTIONNEMENT 1. Ne PAS brancher l unité dans une prise murale avant que les étapes 2 à 7 n aient été terminées. 2. Remplir le réservoir d eau jusqu à la ligne de remplissage indiquée (Figure 2). Avertissement : le niveau de l eau ne doit pas dépasser la marque de référence sur l autocollant à l intérieur du seau pour éviter tout risque de débordement lors de la fermeture du couvercle. 3. Ajouter de la glace pilée ou en cube dans le réservoir jusqu à la ligne de remplissage indiquée (Figure 3). Avertissement : Assurez-vous que le niveau de la glace ne dépasse pas la marque de référence sur l autocollant. Le non-respect de ces consignes entraînera un débordement de l appareil lors de la fermeture du couvercle. 4. Fermer le réservoir. Avec la poignée en position ouverte, appuyez fermement sur le couvercle contre l'unité afin d'être certain que le couvercle est entièrement à plat sur le réservoir et que le joint est engagé, puis tirez sur la poignée en position verrouillée (Figure 4) 5. Fixez le bloc d'alimentation de 12V fourni au port d'alimentation CC, sans le brancher dans la prise murale (Figure 5). 6. Appliquer la paroi isolante sur la peau du patient dans la zone à traiter (Figure 6). 7. Raccorder le coussinet Cold Rush au tuyau provenant du dispositif. Afin d assurer un bon raccord, rapprochez les raccords entre eux jusqu à ce qu ils se mettent en place (Figure 7). 8. Poser le coussinet Cold Rush sur la paroi isolante. Le coussinet Cold Rush ne doit jamais être posé directement sur la peau du patient (Figure 8). 9. Brancher le bloc d alimentation de 12V fourni à la prise murale (Figure 9). 10. Débrancher le bloc d alimentation de la prise murale pour éteindre le dispositif de cryothérapie. 11. Toujours éteindre le dispositif de cryothérapie avant de débrancher le coussinet Cold Rush ou n importe quel tuyau. Pour débrancher les tuyaux, appuyer sur les languettes situées sur le raccord et séparer les connecteurs. 12. Pour ouvrir le couvercle, appuyez sur la poignée vers le bas pour desserrer le joint du couvercle, puis soulevez pour le retirer (Figure 10) 13. Vider toute l eau du dispositif de cryothérapie après chaque utilisation. 14. Suivre les indications 2 8 avant chaque utilisation. 14
15 DEPANNAGE La pompe ne s'allume pas Assurez-vous que le connecteur d'alimentation soit correctement inséré dans le port de l'unité et que la prise murale est sous tension. Le coussinet ne refroidit pas Inspectez visuellement le coussinet pour voir si de l'eau coule. Si l'eau coule: vérifiez que le coussinet ne contient pas de poches d'air. Massez doucement le coussinet pour éliminer l'air emprisonné. Vous pouvez reprendre une fois que l'eau semble circuler librement à travers le coussinet Si l'eau ne circule pas, assurez-vous que l'unité est correctement remplie. Reportez-vous aux instructions de remplissage. Vérifiez la connexion du tuyau pour être certain que l'accouplement est entièrement engagé. Vérifiez que le tuyau ne soit pas plié ou pincé par un objet quelconque. Il y a une fuite d'eau au niveau du connecteur Débranchez le dispositif, débranchez le tuyau, inspectez visuellement pour vous assurer que les connecteurs de couplage sont en position ouverte, puis rebranchez le tuyau. Un son court ou bien un claquement indique une bonne connexion (Figure 4 & 7). Fuite Remarque: certaines conditions telles que les climats chauds ou humides peuvent provoquer un développement de condensation sur l'unité ou sur les coussinets. Fuite au niveau du coussinet: retirez le coussinet, séchez-le à l'aide d'un linge puis inspectez-le visuellement. Si vous trouvez une fuite, vous devrez alors remplacer le coussinet. Voir la garantie concernant le remplacement d'un coussinet. Fuite au niveau de l'unité: inspectez visuellement pour déterminer l'emplacement de la fuite. Reportez-vous à la garantie limitée pour les conditions de remplacement de produits endommagés. Si aucune fuite n'est détectée, il peut s'agir de condensation. RESPONSABILITÉS DU PROFESSIONNEL DE SANTÉ Le médecin prescripteur doit déterminer (1) le nombre de jours ou de semaines de durée du traitement et (2) la longueur et la fréquence de l'utilisation du produit (pauses incluses) lors du traitement. Toutes ces informations doivent êtes incluses dans la prescription du patient. Le professionnel de santé doit recevoir une formation appropriée afin d'assurer la bonne application, la bonne utilisation, le bon fonctionnement et l'entretien du système de cryothérapie Cold Rush Compact. 15
16 Le professionnel de santé doit surveiller l'utilisation du dispositif faite par le patient pour s'assurer du respect du protocole prescrit, de la bonne utilisation, d'une bonne application et du bon fonctionnement du système de cryothérapie Cold Rush Compact, notamment l'application et l'entretien de la paroi isolante entre la peau du patient et le coussinet Cold Rush. Durée du traitement Fréquence et durée d'utilisation Surveiller la peau tous les jours Jour Jour Jour Jour Jour Jour Du Du Du 16 AVERTISSEMENTS COMPLÉMENTAIRES Le dispositif de cryothérapie Cold Rush Compact ne doit jamais rester sans surveillance lorsqu'il est branché. Ne pas placer les tubes ou le cordon d'alimentation électrique près de votre pied ou de celui de quelqu'un d'autre sous peine de vous y emmêler et de tomber. Ne jamais lâcher ou insérer d'objet dans un orifice ou un tuyau. Ne pas utiliser dans des lieux où des produits en aérosol sont utilisés ou dans des endroits où l'on administre de l'oxygène. Ne pas essayer de traîner ou de repositionner le dispositif de cryothérapie Cold Rush Compact en tirant sur les tuyaux isolés car cela pourrait endommager le dispositif et/ou entraîner le débranchement des tuyaux. Utiliser la poignée pour déplacer le dispositif de cryothérapie Cold Rush Compact. Ne pas placer les tubes ou le cordon d'alimentation électrique vers le haut de votre lit où ils pourraient s'enrouler autour de votre cou pendant que vous dormez. La pompe du dispositif de cryothérapie Cold Rush Compact est conçue pour fonctionner avec de l'eau. Faire fonctionner le dispositif sans eau endommage la pompe de façon permanente. Tout matériel de communication sans fil tels que les appareils de réseau sans fil domestiques, les téléphones mobiles, les téléphones sans fil et leurs stations et les talkies-walkies peuvent endommager le dispositif de cryothérapie Cold Rush Compact et doivent être disposés à une distance d'au moins 3,3 m du dispositif. NORMES DE SÉCURITÉ Le système de cryothérapie Cold Rush Compact est testé et certifié afin de respecter la norme de sécurité électrique des dispositifs médicaux IEC ainsi que la norme IEC/EN , la compatibilité électromagnétique pour les dispositifs médicaux électriques. IEC , les exigences du matériel médical électrique et des systèmes médicaux électriques utilisés dans les milieux de santé domestiques.
17 L'entreprise est conforme à la norme ISO DANGER D'ÉLECTROCUTION Afin de créer les conditions de fonctionnement les plus sécurisées possible, Össur a conçu le système de cryothérapie Cold Rush Compact qui fonctionne grâce à un bloc d'alimentation de 12 volts, réduisant nettement la possibilité d'une électrocution dangereuse. Éviter d'utiliser près d'une source d'eau. Utiliser uniquement le bloc d'alimentation fourni avec le dispositif. Débrancher le dispositif avant de le remplir avec de la glace et de l'eau. Assurez-vous de bien avoir les mains sèches avant d'insérer ou de retirer le bloc d'alimentation de la prise murale pour éviter tout danger d'électrocution. Éviter que l'adaptateur d'alimentation ne reçoive de l'eau ou de la glace. Toujours débrancher ce produit immédiatement après chaque utilisation. Ne jamais utiliser le dispositif de cryothérapie Cold Rush Compact pendant votre toilette. Ne pas placer ou ranger le produit dans un endroit où il est susceptible de tomber ou d'être entraîné dans une baignoire ou un évier. Ne pas placer ou jeter dans l'eau ou dans tout autre liquide. Ne pas récupérer un produit qui est tombé dans l'eau. Débrancher immédiatement. Garder le cordon et le dispositif/appareil loin des surfaces chaudes. Ne jamais utiliser ce produit si : Le cordon ou la prise électrique du dispositif est endommagé ; Le dispositif est tombé ou est endommagé ; Le produit est tombé dans l'eau ; ou Le dispositif ne fonctionne pas correctement. Si l'une des situations ci-dessus est survenue, cessez immédiatement l'utilisation du dispositif de cryothérapie Cold Rush Compact et renvoyez le produit à votre professionnel de santé pour examen ou réparation. CARACTÉRISTIQUES TECHNIQUES : BLOC D'ALIMENTATION ÉLECTRIQU Modèle no. : SA US Entrée : 120V USA Fréquence d'entrée : 60 Hz USA Puissance de sortie : 12W Tension de sortie : 12V Courant de sortie : 1A ENTRETIE Ne pas essayer de réparer le dispositif Cold Rush Compact soi-même ; cela pourrait provoquer un danger d'utilisation et annulera automatiquement la garantie. NETTOYAGE ET STOCKAGE PROLONG Une fois tous vos traitements de cryothérapie terminés et avant de ranger le produit pour une durée prolongée, remplir le dispositif de sorte que le niveau d'eau se situe à la ligne de remplissage de 17
18 18 la glace. Ajouter 2 cuillères à café de détergent liquide ou 85 grammes (3 onces) de 3% de peroxyde d'hydrogène à l'eau puis mélanger. Raccorder les tuyaux au coussinet Cold Rush et brancher le dispositif pour commencer. Laisser le mélange circuler pendant 5 minutes. Débrancher le bloc d'alimentation pour éteindre le dispositif. Vider avec prudence l'eau du dispositif puis le ranger dans un endroit sec, frais et sombre en laissant le capuchon légèrement ouvert. (L'exposition aux rayons du soleil et aux fortes chaleurs peut endommager les tuyaux et le dispositif) Lors de la réutilisation du dispositif après entreposage, remplir le réservoir avec de l'eau propre et allumer la pompe pour faire circuler l'eau à travers les tuyaux puis vidanger le reste du mélange du système (utiliser le vieux coussinet pour cette procédure et le jeter une fois le nettoyage terminé). Jeter l'eau et remplir le réservoir avec de la glace et de l'eau fraîche pour débuter le traitement de cryothérapie. Suivre les indications 2 9 avant chaque utilisation. En cas de déchirures ou de perforations, examiner les tuyaux et le nouveau coussinet avant d'utiliser le dispositif. Contacter votre professionnel de santé pour acheter un nouveau coussinet Cold Rush. Nettoyer ou remplacer la paroi isolante tel que recommandé par votre médecin. ENVIRONNEMEN Température de fonctionnement : de +10 C à 40 C Humidité de fonctionnement : de 30% à 75% d'humidité relative Pression de l'air : h Pa Température de livraison et de stockage : de -20 C à 70 C Humidité de livraison et de stockage : 10% - 90% d'humidité relative, sans condensation Pression atmosphérique : h Pa ÉLIMINATIO Suivre le décret ou la réglementation locale afin de jeter le dispositif, les accessoires et l'emballage correctement. ACCESSOIRE Les accessoires suivants pour le système de cryothérapie Cold Rush Compact sont disponibles avec un coût supplémentaire. Pour commander, contacter votre professionnel de santé. Chevillère Cold Rush Coussinet de hanche gauche Cold Rush Coussinet de hanche droite Cold Rush Genouillère Cold Rush Coussin lombaire Cold Rush Petit coussinet rectangulaire Cold Rush Petit coussinet d'épaule Cold Rush Grand coussinet d'épaule Cold Rush Coussinet universel Cold Rush La paroi isolante utilisée pour tester les propriétés thermiques du système est composée d'une couche unique constituée d'une chaussette scellée à 3 plis, numéros de produit Össur (K , K , K , K ).
19 GARANTIE LIMITÉ Össur garantit à l'acheteur original que ce produit est garanti contre tout défaut matériel et de main-d'oeuvre pour une durée de 6 mois à compter de la date d'achat initiale. Cette garantie ne s'applique pas si ce produit : 1 n'a pas été acheté auprès d'össur ou son revendeur officiel, 2 a subi quelque modification que ce soit; ou 3 n'a pas été utilisé conformément aux instructions d'utilisation d'össur. La garantie limitée ne couvre pas les dommages causés par des accidents, la négligence, la mauvaise utilisation ou une utilisation au-delà des capacités, les pièces endommagées pour mauvaise installation, la substitution des pièces non approuvées par Össur ou toute autre modification ou réparation faite par une tierce partie qui, selon Össur, affecte matériellement tout ou partie du produit ou lui cause préjudice. La durée de vie prévue de ce produit est de 6 mois à compter de la date de la première utilisation. Pour les directives de garantie complètes merci de consulter le site CONSERVER CES INSTRUCTION 19
20 ESPAÑOL INSTRUCCIONES PARA PACIENTES Y PROFESIONALES MÉDICO Los pacientes y los profesionales médicos deben leer con atención todas las instrucciones y advertencias contenidas en este manual antes de utilizar el sistema de terapia de frío Cold Rush Compact. 20 INDICACIONES PARA EL US El uso del sistema de terapia de frío Cold Rush Compact ha sido diseñado para reducir el dolor localizado y la hinchazón después de procedimientos quirúrgicos o traumatismos. El sistema de terapia de frío Cold Rush Compact está indicado para su uso en un solo paciente. ADVERTENCIA: SOLO CON PRESCRIPCIÓN MÉDICA Este dispositivo solo debe utilizarse con una prescripción médica que incluya la siguiente información sobre el tratamiento: (1) el número de días o semanas que debe durar el tratamiento y (2) la duración y frecuencia de uso del producto (y los descansos) durante el tratamiento. NO USE ESTE DISPOSITIVO SI NO TIENE UNA PRESCRIPCIÓN DE SU MÉDICO QUE INCLUYA DICHA INFORMACIÓN SOBRE EL TRATAMIENTO. En la parte superior del dispositivo de terapia de frío Cold Rush Compact se proporciona un protocolo de tratamiento en blanco que debe rellenar su proveedor de servicios de salud. ADVERTENCIA: POSIBLES LESIONES RELACIONADAS CON TERAPIA DE FRÍO Este dispositivo reduce la temperatura de la piel y los tejidos. Si no se utiliza correctamente y de acuerdo con las instrucciones prescritas por su médico, este dispositivo puede causar lesiones graves, incluida la congelación, la necrosis tisular y daños en los nervios. ADVERTENCIA: INSPECCIÓN DE LA PIEL Y REACCIONES ADVERSAS Usted o su proveedor de servicios de salud debe revisar su piel por lo menos cada 1 o 2 horas durante el uso de este dispositivo, independientemente de si está dormido o despierto, para comprobar si se produce algún cambio en el estado de la piel, incluyendo todo aumento de dolor, ardor, ampollas, picazón, aumento de hinchazón, decoloración de la piel, aumento de enrojecimiento, ronchas o cualquier otro cambio en la apariencia de la piel. Si experimenta alguna de estas reacciones, debe interrumpir el uso del dispositivo de terapia de frío Cold Rush Compact y ponerse en contacto con su proveedor de servicios de salud. Ningún vendaje, yeso sintético, soporte o envoltura debe impedir la capacidad para revisar el estado de la piel. Si por algún motivo no puede revisar el estado de la piel, no utilice el dispositivo de terapia de frío Cold Rush Compact. ADVERTENCIA: EVITE EL CONTACTO DIRECTO CON LA PIEL; SE REQUIERE BARRERA DE AISLAMIENTO La almohadilla Cold Rush nunca debe estar en contacto directo con la piel. La temperatura de funcionamiento de la almohadilla Cold Rush es demasiado baja como para aplicarse directamente sobre la piel. Es necesario el uso de una barrera de aislamiento entre la almohadilla y la piel en todo momento y sin excepción con el fin de evitar que la piel se enfríe en exceso. En caso de no usar una barrera de aislamiento entre la
21 almohadilla y la piel pueden producirse lesiones relacionadas con el frío excesivo. ADVERTENCIA: UTILICE ÚNICAMENTE LAS ALMOHADILLAS COLD RUSH DE ÖSSUR No deben usarse almohadillas de terapia de frío de otras marcas competidoras con el dispositivo de terapia de frío Cold Rush Compact, ya que la temperatura alcanzada por las almohadillas de otra marca competidora puede ser demasiado baja y, en consecuencia, no obtener los efectos requeridos y causar lesiones. Con el dispositivo de terapia de frío Cold Rush Compact solo deben usarse las almohadillas Cold Rush de Össur. ADVERTENCIA: LA BARRERA DE AISLAMIENTO NO DEBE ESTAR HÚMEDA Si la barrera de aislamiento presenta humedad, la piel puede alcanzar una temperatura más baja de lo previsto. La barrera de aislamiento debe revisarse de forma regular para comprobar la humedad proveniente de sangrado, sudoración o condensación. Si la barrera de aislamiento entre la almohadilla y la piel se humedece, interrumpa el uso de la almohadilla Cold Rush inmediatamente hasta eliminar la humedad y reemplazar la barrera de aislamiento entre la almohadilla y la piel. CONTRAINDICACIONE El dispositivo de terapia de frío Cold Rush Compact no debe utilizarse en pacientes que presenten las siguientes condiciones: Historial de lesiones relacionadas con el frío o reacciones adversas a la terapia de frío; Inconsciencia o incoherencia debido a anestesia general, sedación o coma; Disfunción de la circulación sanguínea o disfunción potencial del proceso de curación en la zona de tratamiento, incluidas las infecciones; Enfermedades circulatorias, incluidas las enfermedades de Reynaud, de Buerger o periférica vascular, trastornos vasospásticos, anemia de células falciformes y trastornos por hipercoagulabilidad; o Polineuropatía u otros daños en los nervios. FACTORES DE RIESG Los médicos deben tener especial consideración con las siguientes condiciones o factores antes de prescribir el dispositivo de terapia de frío Cold Rush Compact: Sensibilidad al frío; Disfunción circulatoria general; Uso de medicamentos que puedan afectar negativamente a la circulación vascular periférica, incluidos los bloqueadores betaadrenérgicos y la epinefrina local (por ejemplo, anestésicos locales); Nutrición deficiente, tabaquismo, consumo de tabaco, consumo excesivo de cafeína o alcohol y cualquier otro comportamiento que afecte negativamente a la circulación; Insensibilización de la zona de tratamiento debido a anestesias locales o bloqueadores de nervios regionales; Deterioro cognitivo y uso de medicamentos que tienen efectos negativos sobre la capacidad mental o el raciocinio; Humedad en la zona de aplicación debido a sangrado, sudoración o condensación excesivos; 21
22 Diabetes; Uso del producto en la mano, muñeca, pie o tobillo; y Niños pequeños y personas de avanzada edad. IDENTIFICACIÓN DE LOS COMPONENTES DEL DISPOSITIVO (Figura 1): 1. Sistema de terapia de frío Cold Rush Compact 2. Manguera 3. Conexiones 4. Conector de CC para adaptador de alimentación de 12 V 5. Adaptador de alimentación de 12 V 6. Almohadilla Cold Rush (se vende por separado) APLICACIÓN/ FUNCIONAMIENT 1. NO lo enchufe a la pared hasta que se hayan completado los pasos Llene el depósito con agua hasta la línea de llenado indicada (Figura 2). Advertencia: el nivel de agua no debe superar la marca de referencia de la etiqueta dentro del cubo para evitar el riesgo de desbordamiento al cerrar la cubierta. 3. Añada hielo picado o en cubos al depósito hasta la línea de llenado indicada (Figura 3). Advertencia: Asegúrese de que el nivel de hielo no supera la marca de referencia de la etiqueta. El incumplimiento de estas advertencias provocará que el dispositivo se desborde al poner la tapa. 4. Cierre el depósito. Con el asa en la posición abierta, presione la tapa firmemente sobre la unidad asegurándose de que queda en pleno contacto con el contenedor y con la junta bien encajada. A continuación, sitúe el asa en la posición cerrada (figura 4). 5. Conecte la fuente de alimentación de 12 V proporcionada al puerto de CC, pero no la conecte al circuito de la pared (figura 5). 6. Aplique la barrera de aislamiento sobre la zona de la piel del paciente que se va a tratar (Figura 6). 7. Conecte la almohadilla Cold Rush a la manguera extendiéndola desde el dispositivo. Para asegurar una conexión correcta, presione ambas conexiones hasta que encajen en su lugar (Figura 7). 8. Coloque la almohadilla Cold Rush sobre la barrera de aislamiento. La almohadilla Cold Rush nunca debe aplicarse directamente sobre la piel del paciente (Figura 8). 9. Conecte el adaptador de alimentacion de 12V suministrado en la toma de corriente de pared (Figura 9). 10. Para apagar el dispositivo de terapia de frío, desenchufe el adaptador de alimentación de la toma de corriente de pared. 11. Siempre apague el dispositivo de terapia de frío antes de desconectar la almohadilla Cold Rush o cualquiera de las mangueras. Para desconectar las mangueras, presione las lengüetas de liberación en las conexiones y sepárelas. 12. Para abrir la tapa, presione el asa hacia abajo para desencajar la junta de la tapa, a continuación, levántela y retírela (Figura 10). 13. Vacíe todo el agua del dispositivo de terapia de frío después de cada uso. 14. Siga las instrucciones indicadas desde el punto 2 al 8 antes de cada uso. 22
23 SOLUCIÓN DE PROBLEMAS La bomba no se activa Asegúrese de que el conector de alimentación está correctamente insertado en el puerto de la unidad y que el circuito de pared tiene corriente eléctrica. La almohadilla no se enfría Inspeccione visualmente la almohadilla para ver si el agua fluye. Si el agua está fluyendo, compruebe que la almohadilla no tenga bolsas o aire atrapado en su interior. Frote suavemente la almohadilla para eliminar el aire atrapado. Una vez que el agua parezca fluir bien a través de la almohadilla, reanude el uso. Si el agua no fluye, asegúrese de que la unidad se ha llenado correctamente. Consulte las instrucciones de llenado. Compruebe la conexión de la manguera para asegurar que está bien conectada. Compruebe que la manguera no esté doblada o presionada por algún objeto. El conector presenta fugas de agua Apague el dispositivo, desconecte la manguera, inspeccione visualmente los conectores de la manguera para asegurarse de que están en la posición abierta y vuelva a conectar la manguera. La conexión correcta se indica con un sonido de acoplamiento (Figuras 4 & 7). Fugas Nota: ciertas condiciones, como climas calurosos o húmedos, pueden causar la formación de condensación en la unidad y las almohadillas. Fuga en la almohadilla: retire la almohadilla, séquela con una toalla e inspecciónela visualmente. Si se detecta una fuga, sustituya la almohadilla. Consulte la garantía en lo referente a la sustitución de almohadillas. Fuga en la unidad: inspeccione visualmente la unidad para localizar la ubicación de la fuga. Consulte en la garantía limitada los requisitos de sustitución en caso de daños. Si no se detecta ninguna fuga, podría tratarse de condensación. RESPONSABILIDADES DEL PROVEEDOR DE SERVICIOS DE SALU El médico responsable de la prescripción debe determinar (1) el número de días o semanas de duración del tratamiento y (2) la duración y frecuencia de uso del producto (y los descansos) durante el tratamiento. Toda esta información debe incluirse en la prescripción del paciente. El proveedor de servicios de salud debe proporcionar las instrucciones adecuadas para la colocación, el uso, la operación y el cuidado correctos del sistema de terapia de frío Cold Rush Compact. 23
24 El proveedor de servicios de salud debe vigilar el uso del dispositivo por parte del paciente para asegurar la conformidad con el protocolo prescrito, el uso, la aplicación y la operación apropiados del sistema de terapia de frío Cold Rush Compact, incluyendo, entre otros, la aplicación y el mantenimiento de una barrera de aislamiento entre la piel del paciente y la almohadilla Cold Rush. Periodo de tiempo de tratamiento Frecuencia y duración de uso Revisar la piel cada Día Día Día Día Día Día Hasta Hasta Hasta 24 ADVERTENCIAS ADICIONALE El dispositivo de terapia de frío Cold Rush Compact no debe dejarse desatendido cuando está enchufado a la corriente eléctrica. No coloque las mangueras ni el cable de alimentación en lugares donde otras personas puedan tropezar y caerse. Nunca deje caer ni inserte ningún objeto en las aperturas o las mangueras. No opere el dispositvio en lugares donde se estén usando aerosoles (sprays) o donde se esté administrando oxígeno. No intente arrastrar o cambiar la posición del dispositivo de terapia de frío Cold Rush Compact tirando de las mangueras aisladas, ya que esto podría causar daños al dispositivo y/o desconectar las mangueras. Use el asa cuando mueva el dispositivo de terapia de frío Cold Rush Compact. No coloque los tubos ni el cable de alimentación en la parte superior de la cama, ya que podrían enroscarse en el cuello mientras duerme. La bomba incorporada en el dispositivo de terapia de frío Cold Rush Compact está diseñada para funcionar con agua. Operar el dispositivo sin agua puede causar daños permanentes a la bomba. Los equipos de comunicación inalámbrica, como dispositivos de red inalámbrica doméstica, teléfonos móviles, teléfonos inalámbricos y sus estaciones base o radioteléfonos pueden afectar al funcionamiento del dispositivo de terapia de frío Cold Rush Compact, por lo que deben mantenerse a una distancia mínima de 3,3 m. NORMAS DE SEGURIDA El dispositivo de terapia de frío Cold Rush Compact ha sido probado y certificado para cumplir con la norma IEC sobre seguridad eléctrica de dispositivos médicos y IEC/EN , compatibilidad electromagnética para dispositivos electromédicos. IEC , requisitos para los equipos y sistemas eléctromédicos utilizados en entornos de cuidado médico en el domicilio. La empresa cumple los
25 requisitos de ISO PELIGRO DE DESCARGA ELÉCTRIC Para propiciar las condiciones de funcionamiento más seguras posibles, Össur ha diseñado el sistema de terapia de frío Cold Rush Compact para funcionar con un adaptador de alimentación de 12 voltios, lo que reduce significativamente el riesgo de descargas eléctricas peligrosas. Evite su uso cerca de cualquier fuente de agua. Utilice exclusivamente el adaptador de alimentación incluido con la unidad. Desenchufe el dispositivo antes de llenarlo con hielo y agua. Para evitar el peligro de descarga eléctrica, asegúrese de tener las manos completamente secas antes de insertar o retirar el adaptador de alimentación de la toma de corriente de pared. Evite que el adaptador de alimentación se moje con agua o hielo. Siempre desconecte este producto inmediatamente después de cada uso. Nunca use el dispositivo de terapia de frío Cold Rush Compact mientras se baña. No coloque ni guarde el producto en un lugar donde se se pueda caer o empujarse a una bañera o un lavabo. No lo meta ni lo deje caer al agua u otro líquido. No toque el producto si se ha caído al agua. Desenchúfelo inmediatamente. Mantenga el cable y el dispositivo alejados de superficies calientes. Nunca utilice este producto si: El dispositivo presenta un cable eléctrico o conector dañado; El dispositivo se ha caído y se ha dañado; El dispositivo se ha caído al agua; o El dispositivo no funciona correctamente. Si se ha producido alguna de las situaciones anteriores, suspenda inmediatamente uso del dispositivo de terapia de frío Cold Rush Compact y devuelva el producto a su proveedor de servicios de salud para su examen y reparación. ESPECIFICACIONES TÉCNICAS: ALIMENTACIÓN ELÉCTRIC Referencia de modelo: SA US Entrada: 120 V EE. UU. Frecuencia de entrada: 60 Hz EE. UU. Potencia de salida: 12 W Voltaje de salida: 12 V Corriente de salida: 1 A MANTENIMIENT No intente reparar el dispositivo Cold Rush Compact ya que esto podría crear un riesgo para el usuario y anulará la garantía automáticamente. LIMPIEZA Y ALMACENAMIENTO PROLONGAD Cuando haya terminado todos los tratamientos de terapia de frío, antes de proceder al almacenamiento del dispositivo, llénelo con agua hasta la línea de llenado de hielo. Añada dos cucharadas de lejía líquida o 90 ml de agua oxigenada al 3% y mezcle. Conecte las mangueras a la almohadilla Cold Rush y enchufe el dispositivo a la corriente eléctrica para ponerlo en marcha. 25
LA COLLECTION THE COLLECTION
 LA COLLECTION THE COLLECTION 322 323 324 325 326 327 ATTENTION La sûreté de l'appareil n'est garantie qu'en suivant scrupuleusement les instructions. Il est donc nécessaire de les conserver. Isoler l'appareil
2-YEAR LIMITED WARRANTY PLEASE TAKE A MOMENT NOW REGISTER YOUR PRODUCT AT: INSTRUCTION MANUAL AND WARRANTY INFORMATION SP-129HJ #1 BRAND IN MASSAGE*
 #1 BRAND IN MASSAGE* PLEASE TAKE A MOMENT NOW REGISTER YOUR PRODUCT AT: www.homedics.com/register Your valuable input regarding this product will help us create the products you will want in the future.
Facial Sauna 2YEAR GUARANTEE. Instruction Manual and Warranty Information FAC-2B-CA / FAC-2BSDM-CA
 Facial Sauna Instruction Manual and Warranty Information FAC-2B-CA / FAC-2BSDM-CA 2YEAR GUARANTEE CAUTION: ALL SERVICING OF THIS UNIT MUST BE PERFORMED BY AUTHORIZED HOMEDICS SERVICE PERSONNEL ONLY. Simple,
empty page before TOC
 S3510, S3120, S3110 1 7 8 2 3 4 9 5 6 empty page before TOC English 6 Français (Canada) 21 6 English Introduction Congratulations on your purchase and welcome to Philips! To fully benefit from the support
SILICONE BODY CLEANSER
 THE LEADERS IN HEALTH & WELLBEING SILICONE BODY CLEANSER REMOVES DIRT AND IMPURITIES PLEASE TAKE A MOMENT NOW... REGISTER YOUR PRODUCT AT: www.homedics.com/register YOUR VALUABLE INPUT REGARDING THIS PRODUCT
BUTTERFLY KISSES SUMMERTIME WISHES. start smart CELEBRATIONS SUITE 2019 OUR MISSION
 celebrations suite 2019 CELEBRATIONS SUITE 2019 SUMMERTIME WISHES BUTTERFLY KISSES Create your beautiful life with the hippest trend in high-end DIY home décor. It s that time of year along with sunshine,
Immigration Studying. Studying - University. Je voudrais m'inscrire à l'université. Stating that you want to enroll
 - University Je voudrais m'inscrire à l'université. Stating that you want to enroll Je voudrais m'inscrire à. Stating that you want to apply for a course une formation du premier cycle une formation du
MARKSCHEME BARÈME DE NOTATION ESQUEMA DE CALIFICACION
 M09/2/ABENG/HP1/ENG/TZ0/XX/M+ MARKSCHEME BARÈME DE NOTATION ESQUEMA DE CALIFICACION May / mai / mayo 2009 ENGLISH / ANGLAIS / INGLÉS B Higher Level Niveau Supérieur Nivel Superior Paper / Épreuve / Prueba
/XI-17. Silk épil 3 II I. Type 5320 Modèle 5320 Modelo
 Silk épil 3 91508068/X-17 0 Silk épil 3 Type 5320 Modèle 5320 Modelo 5320 www.braun.com 3-410 3-270 3-170 Braun nfolines English 6 Français 12 Español 17 Thank you for purchasing a Braun product. We hope
5V 800mA. Laser Class 1M. 808 nm. 0.4 sec. 1mm² < 0.5 W. Max. 50 J/ cm2. 30 min
 5V 800mA Laser Class 1M 808 nm 0.4 sec. 1mm² < 0.5 W Max. 50 J/ cm2 1 2 3 ٧ 30 min FR EN DE ES IT NL Puissance Power Leistung Potencia Potenza Capaciteit Source d énergie: par le biais de 3 diodes laser
User manual SC1982 SC1981
 User manual SC1982 SC1981 1 ENGLISH 8 ESPAÑOL 37 SC1982, SC1981 8 ENGLISH Table of contents Introduction 8 What is Philips Lumea Comfort? 9 Intended use of Philips Lumea Comfort 9 Safety with Philips
PreShave Power Cleanser
 PreShave Power Cleanser Lift, Exfoliate and Cleanse Instructions for Use & Warranty Information Model ST247 Limited 90 Day Warranty Your Pretika product is warranted to be free from defect in material
TWO YEAR LIMITED WARRANTY MOMENT NOW PLEASE TAKE A INSTRUCTION MANUAL AND WARRANTY INFORMATION MCS-380H
 #1 BRAND IN MASSAGE* PLEASE TAKE A MOMENT NOW REGISTER YOUR PRODUCT AT: www.homedics.com/register Your valuable input regarding this product will help us create the products you will want in the future.
S9321/89 ENGLISH 4 ESPAÑOL 38. Congratulations on your purchase and welcome to Philips Norelco!
 ENGLISH 4 ESPAÑOL 38 Congratulations on your purchase and welcome to Philips Norelco! To fully benefit from the support that Philips Norelco offers, register your product at www.norelco.com/register S9321/89
WARNING TO REDUCE THE RISK OF INJURY, USER MUST READ INSTRUCTION MANUAL. FOR HOUSEHOLD USE ONLY. KEEP CHILDREN AWAY FROM WORKING AREA.
 PLEASE READ AND SAVE THIS INSTRUCTION MANUAL ENGLISH ESPAÑOL FRANÇAIS ElectroLight Hot Air Fire Starter WARNING TO REDUCE THE RISK OF INJURY, USER MUST READ INSTRUCTION MANUAL. FOR HOUSEHOLD USE ONLY.
Installation Guide. Français, Page 6 Español, Página 10
 Installation Guide ÇÇÇÇÇÇÇÇÇ ÇÇÇÇÇÇÇÇÇ K-3322, K-3323, K-3324, K-3357, K-3384, K-3386, ÇÇÇÇÇÇÇÇÇ K-3466, K-3467, K-14257, ÇÇÇÇÇÇÇÇÇ K-14258, K-14290, K-14291 Français, Page 6 Español, Página 10 1013211-2-B
S5620, S5600, S5420, S5400, S5380, S5230
 S5620, S5600, S5420, S5400, S5380, S5230 2_002_5832_1_FrontCover_A6_bl.indd 1 11-09-15 11:42 15 1 14 2 3 4 5 6 13 12 11 10 9 8 7 16 18 17 English 5 Introduction Congratulations on your purchase and welcome
1" DRIVE IMPACT WRENCH WITH 6" EXTENDED ANVIL LLAVE DE IMPACTO ENCAJE 1" CON YUNQUE EXTENDIDO 6" CLÉ À CHOCS 1 PO AVEC ENCLUME ALONGÉE 6 PO
 SX556 1" DRIVE IMPACT WRENCH WITH 6" EXTENDED ANVIL LLAVE DE IMPACTO ENCAJE 1" CON YUNQUE EXTENDIDO 6" CLÉ À CHOCS 1 PO AVEC ENCLUME ALONGÉE 6 PO Product Safety Information Información de seguridad del
Hot Air Fire Starter
 PLEASE READ AND SAVE THIS INSTRUCTION MANUAL ENGLISH ESPAÑOL FRANÇAIS Electro-Torch Hot Air Fire Starter WARNING TO REDUCE THE RISK OF INJURY, USER MUST READ INSTRUCTION MANUAL. FOR HOUSEHOLD USE ONLY.
Installation instructions Notice de montage Instrucciones de montaje y uso
 Installation instructions Notice de montage Instrucciones de montaje y uso Shower tray with integrated tile flange Receveur de douche avec bride de carrelage intégrée Plato de ducha con cinta selladora
SANS FIL DOUBLE LAME AVEC/ RASOIR MÉTALLIQUE HOJA CON/SIN CABLE METÁLICA DE DOBLE AFEITADORA
 Modelos/Modèles FXFS2/FXFS2G Directives d'utilisation RASOIR MÉTALLIQUE DOUBLE LAME AVEC/ SANS FIL AFEITADORA METÁLICA DE DOBLE HOJA CON/SIN CABLE Para su seguridad y para disfrutar plenamente de este
SP9820. Tripleheader shaver.
 SP9820 Tripleheader shaver BC www.philips.com/support/ifu-lux 1 2 3 19 SP9820/88 4 18 5 17 16 6 10 11 15 13 9 14 12 8 7 empty page before TOC English 6 Español 33 6 English IMPORTANT SAFETY INSTRUCTIONS
Roku Player. Important Product Information
 Roku Player Important Product Information The License Agreement The Roku and third-party software license terms can be found at: www.roku.com/license. Use of the Roku player constitutes acceptance of as
1900 PSI ELECTRIC PRESSURE WASHER
 900 PSI ELECTRIC PRESSURE WASHER ASSEMBLY, CARE AND USE INSTRUCTIONS Model SHP 900 IMPORTANT: RETAIN THESE INSTRUCTIONS AND ATTACH RECEIPT TO MANUAL FOR FUTURE REFERENCE. READ CAREFULLY ALWAYS WEAR EYE
Series3. Type 5737 Modèle 5737 Modelo washable. washable. start stop POWER
 re Series3 370 washable start stop washable POWER res Type 5737 Modèle 5737 Modelo 5737 www.braun.com/register English 4 Français 9 Español 14 Thank you for purchasing a Braun product. We hope you are
OPERATING INSTRUCTIONS FOR NOTICE D INSTRUCTIONS POUR
 LCS150NA OPERATING INSTRUCTIONS FOR LMB150NA PLEASE READ THESE INSTRUCTIONS CAREFULLY BEFORE USE Thank you for purchasing an Earlex Steam Wallpaper Stripper. In order to obtain the best results please
Operating Instructions Instrucciones de operación
 2 R Epilator Depiladora Eléctrica Operating Instructions Instrucciones de operación Model No./Modelo No. ES2025/ES2029 ServiceAAssistanceAAccessories 800-338-0552(In USA) www.panasonic.com/beauty IN USA
Professional Manicure & Pedicure Kit
 ELM-MAN200-0214-01_Layout 1 28/02/2014 15:17 Page 1 Professional Manicure & Pedicure Kit 2 Year Guarantee Instruction Manual By ELM-MAN200- ELM-MAN200-0214-01_Layout 1 28/02/2014 15:17 Page 2 Thank you
Diesel Oxidation Catalyst Installation Instructions
 LA990009-2907.2 Diesel Oxidation Catalyst Installation Instructions Professional installation is recommended. WARNING: Prior to the installation of this POWEREDGE Diesel Oxidation Catalyst (DOC), you must
SW9700. & Lucasfilm Ltd. Disney
 SW9700 & Lucasfilm Ltd. Disney 1 2 15 3 4 6 8 9 10 11 5 7 14 13 12 empty page before TOC English 6 Français (Canada) 27 6 English Introduction Congratulations on your purchase and welcome to Philips!
Cleaning Instructions and Warranty
 User Manual DEALER: These instructions MUST be given to the user of the product. USER: BEFORE using this product, read this manual and save for future reference. Cleaning Instructions and Warranty Invacare
Wall-Mount Bracket SU-WL100. To Customers and Sony Dealers. Instructions. Mode d emploi. Instrucciones. Gebrauchsanweisung. Instructies.
 3-100-610-12(1) To Customers and Sony Dealers Wall-Mount Bracket Instructions Mode d emploi Instrucciones Gebrauchsanweisung Instructies Istruzioni Instruções Vejledning Bruksanvisning GB FR ES DE NL IT
Este símbolo en la placa de características del producto significa que está registrado por Underwriters Laboratories, Inc.
 BRE648, BRE640, BRE635, BRE625, BRE615 BC In US manufactured for: Philips Personal Health, A division of Philips North America LLC, P.O. Box 10313, Stamford, CT 06904 In Canada manufactured for: Philips
Bathtub with integrated tile flange Baignoire avec bride de carrelage intégrée Bañera con cinta selladora para juntas de azulejos
 Installation instructions Notice de montage Instrucciones de montaje y uso Bathtub with integrated tile flange Baignoire avec bride de carrelage intégrée Bañera con cinta selladora para juntas de azulejos
Includes: Cloueuse de finition angulaire, bloc-piles, chargeur, et sac à outils TABLE DES MATIÈRES ****************
 OPERATOR S MANUAL MANUEL D UTILISATION MANUAL DEL OPERADOR ANGLED FINISH NAILER CLOUEUSE DE FINITION ANGULAIRE CLAVADORA DE ACABADO ANGULAR R250AF18 To register your RIDGID product, please visit: http://register.ridgid.com
Level 2 French, 2014
 91118 911180 2SUPERVISOR S Level 2 French, 2014 91118 Demonstrate understanding of a variety of spoken French texts on familiar matters 9.30 am Wednesday 26 November 2014 Credits: Five Achievement Achievement
1/4" DRIVE MINI IMPACT WRENCH ENCAJE 1/4" JUEGO DE LLAVES DE IMPACTO ENSEMBLE DE CLÉS À CHOC À CARRÉ D ENTRAÎNEMENT ¼ PO
 Quiet has a new name SX4325 1/4" DRIVE MINI IMPACT WRENCH ENCAJE 1/4" JUEGO DE LLAVES DE IMPACTO ENSEMBLE DE CLÉS À CHOC À CARRÉ D ENTRAÎNEMENT ¼ PO Product Safety Information Información de seguridad
Important Safety WARNING
 Important Safety instructions When using electrical appliances, especially when children are present, basic safety precautions should always be followed, including the following: READ ALL INSTRUCTIONS
LED Energy Lamp Lampe énergétique DEL. Model: VT32
 LED Energy Lamp Lampe énergétique DEL Model: VT32 1 Setup Remove Stand The stand is affixed to the back of the HappyLight To remove stand, slide stand upward to remove from keyhole 2 Setup Affix Stand
Operation Manual RANGE HOOD
 Operation Manual RANGE HOOD MODEL: BUF-06W TABLE OF CONTENTS Safety Instructions... 2 Name of Parts... 4 Operating the Range Hood... 4 How to Use... 5 Care and Maintenance... 6 Disassembling... 7 Cleaning...
Medlight TM 630PRO. Pain Therapy Device. Instructions for Use. Effective Pain Therapy for the Temporary Relief from Minor Pain
 Medlight TM 630PRO Pain Therapy Device Instructions for Use Effective Pain Therapy for the Temporary Relief from Minor Pain To ensure To ensure the the best best results and and long long term term satisfaction
DERMA UVB. Narrowband UVB Phototherapy Device USER GUIDE MANUEL D'UTILISATION / GUÍA DEL USUARIO / BENUTZERHANDBUCH / MANUALE DELL'UTENTE
 DERMA UVB Narrowband UVB Phototherapy Device USER GUIDE MANUEL D'UTILISATION / GUÍA DEL USUARIO / BENUTZERHANDBUCH / MANUALE DELL'UTENTE Care Lamps 2017. All rights reserved ENGLISH TABLE OF CONTENTS Introduction
Model/Modèle/Modelo SSHS1
 Professional Dermal Cleansing Technology Système de nettoyage de la peau professionnel Sistema profesional de limpieza de la piel 2014 Professional Products Division Division des produits professionnels
/XI-17. Silk épil. Type 5378 Modèle 5378 Modelo 5378 SES 7/880.
 Silk épil 7 91392808/XI-17 Type 5378 Modèle 5378 Modelo 5378 www.braun.com SES 7/880 Braun Infolines English 6 Français 14 Español 21 Thank you for purchasing a Braun product. We hope you are completely
Operating Instructions Instrucciones de operación
 2 R Epilator Depiladora Eléctrica Operating Instructions Instrucciones de operación Model No./Modelo No. ES2025/ES2029 ServiceAAssistanceAAccessories 800-338-0552(In USA) www.panasonic.com/beauty ONTACT:
28145_HKVAC_IB 9/1/05 10:14 AM Page 1 VACUUM TRIM. Use and Care Guide HKVAC-2000
 28145_HKVAC_IB 9/1/05 10:14 AM Page 1 VACUUM TRIM REVOLUTIONARY TRIMMING TECHNOLOGY Use and Care Guide HKVAC-2000 28145_HKVAC_IB 9/1/05 10:14 AM Page 2 IMPORTANT SAFETY INSTRUCTIONS Read all instructions
MUSTACHE GROWING A BEARD AND. the manufacturer-to trim your beard and. For the best trimming results, your beard
 ON/OFF SWITCH To operate, simply push slide toward blade; to stop, push slide away from blade. On/Off Switch Turbo Switch Battery Cover TURBO FEATURE This product is equipped with a turbo boost button.
Operating Instructions. (Household) Rechargeable Shaver Model No. ES RT77/ES RT67/ES RT47/ES RT37. English... 3
 Rechargeable Shaver Model No. ES RT77/ES RT67/ES RT47/ES RT37. English... 3") BC Operating Instructions (Household) Rechargeable Shaver Model No. ES RT77/ES RT67/ES RT47/ES RT37... 3 2 Operating Instructions (Household) Rechargeable Shaver Model No. ES RT77/ES RT67/ES RT47/ES RT37
BC Operating Instructions (Household) Rechargeable Shaver Model No. ES RT77/ES RT67/ES RT47/ES RT37... 3 2 Operating Instructions (Household) Rechargeable Shaver Model No. ES RT77/ES RT67/ES RT47/ES RT37
Wrinkle Reducer. Attachment USER MANUAL
 Wrinkle Reducer Attachment USER MANUAL TABLE OF CONTENTS 01 Introduction 02 Ideal User 02 Getting to Know Your Device 02 Before Using Your Attachment 03 Usage Instructions 03 Indications for Use 03 Contraindications
Charging base. Trimming head (30mm) on charging stand. Main body unit. On/Off switch. Indicated light. Connecting jack Connecting jack
 on charging stand. Main body unit. On/Off switch. Indicated light. Connecting jack Connecting jack") X Thank you for your purchase. In order to make you more comfortable by using the product, please read this user manual carefully and keep it for future reference. www.dixix.com 1 Trimming head (30mm)
X Thank you for your purchase. In order to make you more comfortable by using the product, please read this user manual carefully and keep it for future reference. www.dixix.com 1 Trimming head (30mm)
Waterpik Water Flosser Model WP-500 Series
 Waterpik Water Flosser Model WP-500 Series MODE HIGH LOW Hydropropulseur Waterpik Modèle WP-500 Séries 2 IMPORTANT SAFEGUARDS IMPORTANT SAFEGUARDS When using electrical products, especially when children
Cordless Recipro Saw Scie Recipro sans Fil Sierra Recíproca Inalámbrica
 INSTRUCTION MANUAL MANUEL D'INSTRUCTION MANUAL DE INSTRUCCIONES Cordless Recipro Saw Scie Recipro sans Fil Sierra Recíproca Inalámbrica XRJ06 IMPORTANT: Read Before Using. IMPORTANT : Lire avant usage.
Use, Care, and Installation Guide
 www.zephyronline.com Use, Care, and Installation Guide PRW15C01AG Presrv Wine Cooler SEP18.0101 Zephyr Corporation Important Safety Informa on Improper handling can cause serious damage to the Zephyr wine
Operating Instructions ES LT3N. English Français Español (Household) Rechargeable Shaver. Model No. ES LT5N
 Rechargeable Shaver. Model No. ES LT5N") BC Operating Instructions (Household) Rechargeable Shaver Model No. ES LT5N ES LT3N... 3 Français... 19 Español... 37 ES-LT5N_3N_US.indb 1 2015/04/17 17:38:32 Operating Instructions (Household) Rechargeable
BC Operating Instructions (Household) Rechargeable Shaver Model No. ES LT5N ES LT3N... 3 Français... 19 Español... 37 ES-LT5N_3N_US.indb 1 2015/04/17 17:38:32 Operating Instructions (Household) Rechargeable
Cordless Impact Wrench Boulonneuse sans Fil Llave de Impacto Inalámbrica
 INSTRUCTION MANUAL MANUEL D'INSTRUCTION MANUAL DE INSTRUCCIONES Cordless Impact Wrench Boulonneuse sans Fil Llave de Impacto Inalámbrica XWT05 007450 IMPORTANT: Read Before Using. IMPORTANT: Lire avant
Exfoliate, Enhance and Smooth. User Manual & Warranty Information Model ST257
 Exfoliate, Enhance and Smooth User Manual & Warranty Information Model ST257 Exfoliate, Enhance and Smooth Congratulations and thank you for being a Pretika customer! Before you start, please take a moment
Manuel d Instruction. Instruction Manual PONCEUSE DE CLOISONS SÈCHES À MAIN DE 225 MM. 225mm HAND-HELD DRYWALL SANDER.
 UK P2 225mm HAND-HELD DRYWALL SANDER FR P18 PONCEUSE DE CLOISONS SÈCHES À MAIN DE 225 MM Instruction Manual Read instructions before operating this tool. Manuel d Instruction Merci de lire ces instructions
ReNu. Diamond Microdermabrasion Facial Tool User Manual
 ReNu Diamond Microdermabrasion Facial Tool User Manual Table of Contents Read all the instructions outlined in this manual before using Pulsaderm Re-Nu. Table of Contents...3 What is Pulsaderm ReNu?...4
Hair Clipper. User's manual
 Hair Clipper User's manual EN SHP 3301BL / SHP 3302RD SHP 4301BL / SHP 4302RD Prior to using this appliance, please read the user's manual thoroughly, even in cases, when one has already familiarised themselves
Operator s Manual SAVE THESE INSTRUCTIONS. 2-Cycle Handheld Blower SERVICE TABLE OF CONTENTS
 Operator s Manual 2-Cycle Handheld Blower TABLE OF CONTENTS Service...............................................1 Safety...............................................2 Know Your Unit........................................6
A V A T A R O L E B Y F M
 AVATAR A V A T A R O L E B Y F M AVATAR 28010/4 28010/6 28010/8 COLGANTE Perfil de aluminio tensado de pared a pared con tira de LED 24V. Luminaria lineal sin cortes y difusor de pantalla de lino/algodón.
10,000 prize draw. Register online for FC2000. EXTRA year guarantee FREE rewards gallery
 FC2000 Register online for 10,000 prize draw EXTRA year guarantee FREE rewards gallery Visit www.remington.co.uk/productregister You must register within 28 days of purchase. NORMAL Everyday deep cleansing
LADY SHAVER WASHABLE LS 7140
 LADY SHAVER WASHABLE LS 7140 DE EN ES FR IT SV NO NL PL PT TR EL A B C D G H I E F J K 3 SAFETY Please note the following instructions when using the appliance: 7 This appliance is designed for domestic
Priomat 1K Elastic Polyolefin Adhesion Promoter 3304
 Priomat 1K Elastic Polyolefin Adhesion Promoter 3304 GENERAL DESCRIPTION A universal, one component adhesion promoter for all normal plastic vehicle parts conveniently packaged in an aerosol can. The products
Operating Instructions & Warranty Information
 Exfoliate and Cleanse Operating Instructions & Warranty Information Model ST255A Congratulations and thank you for being a Pretika customer. Before you start, please take a moment to get to know your SonicDermabrasion
DESCRIPTION OPERATION CARE SAFETY INSTRUCTIONS
 EN DESCRIPTION OPERATION A y t T C CARE SAFETY INSTRUCTIONS O 1 2 3 4 5 6 2 SAFETY INSTRUCTIONS EN WARNING: THIS AIRGUN CAN CAUSE SERIOUS INJURY OR DEATH. READ AND FOLLOW THE INSTRUCTIONS CAREFULLY. DO
HR-2420GH HR-2610GM Cold Water Pressure Washer
 HR-2420GH HR-2610GM Cold Water Pressure Washer Operator's Manual 1 TABLE OF CONTENTS INTRODUCTION... 3 IMPORTANT SAFETY WARNINGS...4-7 FIRE & VENTILATION PRECAUTIONS...4 SPRAY PRECAUTIONS...5 DETERGENT
10,000 prize draw. Register online for HC5800 HC5600 HC5400. EXTRA year guarantee FREE rewards gallery
 3 HC5800 HC5600 HC5400 Register online for 10,000 prize draw EXTRA year guarantee FREE rewards gallery Visit www.productregister.co.uk/remington. You must register within 28 days of purchase. Thank you
Le Cou de Lee Miller/ Lee Miller s Neck
 BELLADONNA* 13 Le Cou de Lee Miller/ Lee Miller s Neck by Nicole Brossard *deadly nightshade, a cardiac and respiratory stimulant, having purplish-red flowers and black berries BELLADONNA BOOKS/BOOG LITERATURE
Cordless Auto Feed Screwdriver Visseuse Automatique sans Fil Atornillador Autoalimentado Inalámbrico
 INSTRUCTION MANUAL MANUEL D'INSTRUCTION MANUAL DE INSTRUCCIONES Cordless Auto Feed Screwdriver Visseuse Automatique sans Fil Atornillador Autoalimentado Inalámbrico XRF0 XRF0 0406 IMPORTANT: Read Before
Operator s Manual. Tube. Nozzle. Bump. Slot 4 Insert bump on other end of blower tube into slot on nozzle. Nozzle. Choke Lever
 YM2BV 2-Cycle Blower / Vacuum Operator s Manual Removing Unit From Carton Assemble The Unit Outlet Outlet No Tools Required! 1 2 Remove all contents from carton. Assemble The Unit Twist nozzle clockwise
INSTRUCTION MANUAL. DeVilbiss Automotive Refinishing AIR PURIFYING RESPIRATOR DCR SERIES HALF MASK FACEPIECES
 INSTRUCTION MANUAL DeVilbiss Automotive Refinishing AIR PURIFYING RESPIRATOR DCR SERIES HALF MASK FACEPIECES WARNING DO NOT USE your respirator until you read and understand this instruction manual. You
Cordless Driver Drill Perceuse-Visseuse sans Fil Atornillador Taladro Inalámbrico
 INSTRUCTION MANUAL MANUEL D'INSTRUCTION MANUAL DE INSTRUCCIONES Cordless Driver Drill Perceuse-Visseuse sans Fil Atornillador Taladro Inalámbrico DDF483 DDF083 IMPORTANT: Read Before Using. IMPORTANT :
Operating Instructions. Model No. ES-LF70. (Household) AC/Rechargeable Shaver. English 17
 AC/Rechargeable Shaver. English 17") Operating Instructions (Household) AC/Rechargeable Shaver Model No. ES-LF70 2 English 17 Before operating this unit, please read these instructions completely and save them for future use. 2 3 4 1 2 3
Operating Instructions (Household) AC/Rechargeable Shaver Model No. ES-LF70 2 English 17 Before operating this unit, please read these instructions completely and save them for future use. 2 3 4 1 2 3
OXY-200 PULSE OXIMETER
 PROFESSIONAL MEDICAL PRODUCTS Gima S.p.A. - Via Marconi, 1-20060 Gessate (MI) Italy Italia: tel. 199 400 401 - fax 199 400 403 Export: tel. +39 02 953854209/221/225 - fax +39 02 95380056 gima@gimaitaly.com
SE405 6" Dual Action Quiet Sander
 SE405 6" Dual Action Quiet Sander Operating Instructions Warning Information Parts Breakdown SPECIFICATIONS Free Speed......................... 10,000 RPM Min. Hose Size.........................3/8" I.D.
SAFETY MEETING Topic: Punctures & Cuts
 Date SAFETY MEETING Topic: Punctures Cuts Presenter Accidents Reviewed: Changes in Safety Policies/Procedures Reviewed: _ Attendance (Signatures Required): _ Next Safety Meeting: Punctures and cuts are
Haircut kit IMPORTANT SAFETY INSTRUCTIONS. DANGER Any appliance is. WARNING To reduce the risk PIECE
 Instructions for Care and Use MODEL HC220DCSC 20 PIECE Haircut kit IMPORTANT SAFETY INSTRUCTIONS When using electrical appliances, especially basic precautions should always be followed, including the
Cordless Driver Drill Perceuse-Visseuse sans Fil Atornillador Taladro Inalámbrico
 INSTRUCTION MANUAL MANUEL D'INSTRUCTION MANUAL DE INSTRUCCIONES Cordless Driver Drill Perceuse-Visseuse sans Fil Atornillador Taladro Inalámbrico DF33D DF03D IMPORTANT: Read Before Using. IMPORTANT : Lire
BRE612. In US only manufactured for: Philips Personal Health A division of Philips North America LLC P.O. Box 10313, Stamford, CT 06904
 BRE612 BC In US only manufactured for: Philips Personal Health A division of Philips North America LLC P.O. Box 10313, Stamford, CT 06904 In Canada only manufactured for:philips Electronics Ltd. 281 Hillmount
Drill Perceuse Taladro
 INSTRUCTION MANUAL MANUEL D'INSTRUCTION MANUAL DE INSTRUCCIONES Drill Perceuse Taladro 6510LVR 003003 DOUBLE INSULATION DOUBLE ISOLATION DOBLE AISLAMIENTO IMPORTANT: Read Before Using. IMPORTANT: Lire
Head Lice Treatment. Treat the infested person(s): Requires using an Over-the-counter (OTC) or prescription medication. Follow these treatment steps:
: Requires using an Over-the-counter (OTC) or prescription medication. Follow these treatment steps:") Head Lice Treatment General Guidelines Treatment for head lice is recommended for persons diagnosed with an active infestation. All household members and other close contacts should be checked; those persons
Head Lice Treatment General Guidelines Treatment for head lice is recommended for persons diagnosed with an active infestation. All household members and other close contacts should be checked; those persons
CoolTec. CT6cc CT5cc CT4cc CT4s CT3cc CT2cc CT2s. Type 5676
 CoolTec CT6cc CT5cc CT4cc CT4s CT3cc CT2cc CT2s Type 5676 www.braun.com/jp 2 3 4 5 6 CoolTec CoolTec CoolTec CT6cc STOP 7 8 + CoolTec 2 CoolTec 2 1 1 9 10 12 CoolTec CoolTec 2 1 new 14 2 1 15 16 new
Professional Hair Removal System
 pearl PRO Professional Hair Removal System Carefully read this manual before using this appliance. Ensure that you know how the appliance functions and how to operate it. Instructions for Use 1 Safety
Heat Tool. Model Owner s Manual. MHT Products, Inc. by Wagner Spray Tech 1770 Fernbrook Lane Plymouth, MN
 0283787D.qxd 6/11/03 1:33 PM Page 1 Heat Tool Model 1400 Owner s Manual Read all instructions and product labels. When using electrical tools, follow all precautions to reduce the risk of fire, electric
HOT AIR STYLER PROFESSIONAL 2 YEAR WARRANTY AD355 USE & CARE MANUAL. To register your product go to
 PROFESSIONAL HOT AIR STYLER USE & CARE MANUAL PLEASE READ PRIOR TO USE To register your product go to www.remington-products.com.au 2 YEAR WARRANTY AD355 IMPORTANT SAFEGUARDS Warning: When the hot air
OPERATOR'S MANUAL MANUEL de L'UTILISATEUR MANUAL del OPERADOR. Cat. No. No de Cat DE 2715-DE
 OPERATOR'S MANUAL MANUEL de L'UTILISATEUR MANUAL del OPERADOR Cat. No. No de Cat. 2712-DE 2715-DE M18 AND M18 /M28 HAMMERVAC DEDICATED DUST EXTRACTORS M18 ET M18 /M28 HAMMERVAC DÉPOUSSIÉREUR DÉDIÉ EXTRACTOR
HAIRCUT KIT. 2 YEAR WARRANTY HC1090 Series USE & CARE MANUAL. To register your product go to PLEASE READ PRIOR TO USE
 HAIRCUT KIT USE & CARE MANUAL PLEASE READ PRIOR TO USE To register your product go to www.remington-products.com.au 2 YEAR WARRANTY HC1090 Series IMPORTANT SAFETY INSTRUCTIONS When using electrical appliances,
SINGLE BODY AIR RATCHET
 MT1837S TRINQUETE NEUMÁTICO DE CUERPO ÚNICO 1/4" CLIQUET PNEUMATIQUE MONOBLOC 1/4 PO 1 " 4 SINGLE BODY AIR RATCHET Operating Instructions Warning Information Parts Breakdown SPECIFICATIONS MT1837S Max.
BR400MP SW400MP ORIGINAL INSTRUCTION MANUAL MANUEL D INSTRUCTIONS ORIGINAL MANUAL DE INSTRUCCIONES ORIGINALES
 ORIGINAL INSTRUCTION MANUAL MANUEL D INSTRUCTIONS ORIGINAL MANUAL DE INSTRUCCIONES ORIGINALES Power Brush Attachment / Power Sweep Attachment Outil Balai Brosse / Outil Balai Racleur Accesorio de Cepillado
EasyClean 500 series
 EasyClean 500 series 1 EasyClean 500 series English 4 4 English Introduction Congratulations on your purchase and welcome to Philips! To fully benefit from the support that Philips offers, register your
Men's Shaver (Battery / Mains)
") Men's Shaver (Battery / Mains) Instructions for Use English...1 00800-36 4636 00 MODEL: 9113956 PRODUCT CODE: 91628 11/2014 Congratulations! Contents You have made an excellent choice with the purchase
Men's Shaver (Battery / Mains) Instructions for Use English...1 00800-36 4636 00 MODEL: 9113956 PRODUCT CODE: 91628 11/2014 Congratulations! Contents You have made an excellent choice with the purchase
COOL SKIN 8020X. Moisturizing shaving system. Rechargeable Cordless Tripleheader Razor
 Moisturizing shaving system Rechargeable Cordless Tripleheader Razor COOL SKIN 8020X Register your product and get support at www.philips.com/norelco 4 ESPAÑOL 26 Congratulations on your purchase and welcome
PrecisionCut Hair Clipper
 PrecisionCut Hair Clipper HC5900 Register online for 10,000 prize draw EXTRA year guarantee FREE rewards gallery Visit www.remington.co.uk/productregister You must register within 28 days of purchase.
FishGuard. Operating instructions Notice d emploi Instrucciones de uso
 FishGuard EN FR ES Operating instructions Notice d emploi Instrucciones de uso A FHG0001 2 FishGuard B 1. 2. FDG0005 3 C 2. 3. 1. 1. max. 2 in. (50 mm) FGD0006 4 FishGuard D 2. 1. + - - + - + + 3. FDG0002
Philips Sonicare 2 series Plaque control plus
 Philips Sonicare 2 series Plaque control plus 1 Sonicare 2 series Plaque control plus ENGLISH 6 6 ENGLISH Introduction Congratulations on your purchase and welcome to Philips! To fully benefit from the
Instructions for Use & Warranty Information
 PLUS FOR FULLER, SOFTER SHINY HAIR Model HS262 Instructions for Use & Warranty Information Congratulations and thank you for being a customer of Pretika! Before you start, please take a moment to get to
Cordless Jig Saw Scie sauteuse sans fil Sierra Caladora Inalámbrica
 INSTRUCTION MANUAL MANUEL D'INSTRUCTION MANUAL DE INSTRUCCIONES Cordless Jig Saw Scie sauteuse sans fil Sierra Caladora Inalámbrica DJV8 0404 IMPORTANT: Read Before Using. IMPORTANT: Lire avant usage.
Angle Grinder Meuleuse d Angle Esmeriladora de Disco
 INSTRUCTION MANUAL MANUEL D'INSTRUCTION MANUAL DE INSTRUCCIONES Angle Grinder Meuleuse d Angle Esmeriladora de Disco GA7040S GA9040S 0067 DOUBLE INSULATION DOUBLE ISOLATION DOBLE AISLAMIENTO WARNING: For
GENTLE SKINCARE & HAIR REMOVAL SYSTEM
 YOUR SAFETY & INSTRUCTION MANUAL PLEASE READ CAREFULLY GENTLE SKINCARE & HAIR REMOVAL SYSTEM MODEL C85010 TECHNICAL DATA Description: Skin Care and Hair Removal System Model: C85010 Power Supply: DC 6V