Guardian Shield+ Zelda Breath of the Wild
|
|
|
- Henry Robbins
- 5 years ago
- Views:
Transcription
1 Guardian Shield+ Zelda Breath of the Wild Created by Ruiz Brothers Last updated on :01:50 PM UTC
2 Guide Contents Guide Contents Overview Articulating Handle Rechargeable Prerequisite Guides Parts, Tools and Supplies Adafruit Feather M0 Basic Proto - ATSAMD21 Cortex M0 Adafruit Mini Skinny NeoPixel Digital RGB LED Strip LED/m Breadboard-friendly RGB Smart NeoPixel - Pack of 4 NeoPixel Jewel - 7 x 5050 RGB LED with Integrated Drivers Lithium Ion Battery Pack - 3.7V 6600mAh Mini Panel Mount DPDT Toggle Switch Type A Machines Series 1 Pro 3D Printer 3D Printing Slice Settings CAD Model Circuit Diagram NeoPixel Strip Connections NeoPixel Jewel Connections DPDT Toggle Switch Prototyping Area Battery Power Code Setup Adafruit Feather M0 for Arduino IDE Install Adafruit NeoPixel Library Uploading Code to Board Connect USB Data Cable to Feather M0 Assemble Prepare NeoPixel Strip Prepare Jewel Jewel wire Breadboard NeoPixel Measure wires Solder Pixel to Jewel Slide Switch Solder Strip and Jewel and Slide Switch to Feather Solder the Jewel to Feather Slide Switch Mounting Feather Mount Slide Switch Mount Tri BTM part Thread circuit Battery mount Thread Jewel Attaching the battery Mounting the battery holder Mount NeoPixel Strip Handle assembly Attach handle Adafruit Industries Page 2 of 33
3 Cut NeoPixel Strip ends off Blade assembly Connect Top Masking detail Complete! Adafruit Industries Page 3 of 33

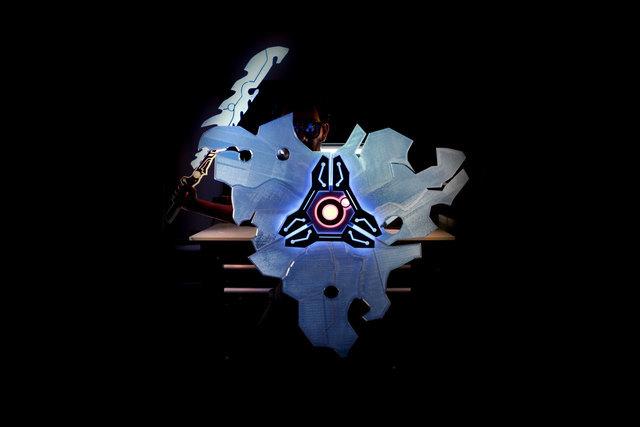
4 Overview In this project we'll build the Guardian Shield + from Zelda Breath of the Wild! This shield measures 700 millimeters wide by 600 millimeters tall. We used a 1 meter long high density mini NeoPixel Strip to illuminate the "blades" of the shield. To make the center and side gems glow, we used a NeoPixel Jewel and a single breadboard friendly NeoPixel. The main body is printed in clear translucent PLA to allow the lights from the LEDs to shine through. The blades are printed with a blue translucent PLA which is uv fluorescent and glows bright under black lights! We used gray PLA for the back circular attachment and the handles. Gray PLA is used to mask details on the front of the shield. The masks help to block out light to define the details on the front of the shield. Adafruit Industries Page 4 of 33

5 Articulating Handle The shield is held up by the articulating handle attached to the back side of the main assembly. You can adjust the angle to better suit your style of battle. Rechargeable The USB port on the side allows you to quickly reprogram colors and animations. You can even recharge the beefy 6600mAh battery! We recessed the slide switch on the back part of the main body to allow easy access to power on the shield when an enemy appears! Adafruit Industries Page 5 of 33
 NeoPixel Uber Guide (https://adafru.")
 1m mini Skinny NeoPixel Strip 144 (https://adafru.it/lxa) Mini Panel Mount DPDT Toggle Switch (https://adafru.it/ycq) 6600mAh Battery (https://adafru.it/dtj) 3D Printer (https://adafru.")
6 Prerequisite Guides If your new to electronics and working with NeoPixel LEDs, I suggest you walk through the following guides to get basics of wiring and soldering. The following guides will walk you through setting up Arduino IDE and Adafruit libraries. Collin's Lab Soldering ( NeoPixel Uber Guide ( Adafruit Feather M0 ( Parts, Tools and Supplies Here's a list of the parts needed to make this project. Feather M0 ( NeoPixel Jewel ( 1m mini Skinny NeoPixel Strip 144 ( Mini Panel Mount DPDT Toggle Switch ( 6600mAh Battery ( 3D Printer ( Silicone wires ( Adafruit Feather M0 Basic Proto - ATSAMD21 Cortex M0 $19.95 IN STOCK ADD TO CART Adafruit Industries Page 6 of 33


7 Your browser does not support the video tag. Adafruit Mini Skinny NeoPixel Digital RGB LED Strip LED/m $64.95 IN STOCK ADD TO CART Breadboard-friendly RGB Smart NeoPixel - Pack of 4 $7.95 OUT OF STOCK OUT OF STOCK NeoPixel Jewel - 7 x 5050 RGB LED with Integrated Drivers $5.95 IN STOCK ADD TO CART Lithium Ion Battery Pack - 3.7V 6600mAh $29.50 IN STOCK ADD TO CART Adafruit Industries Page 7 of 33


8 Mini Panel Mount DPDT Toggle Switch $1.25 IN STOCK ADD TO CART Type A Machines Series 1 Pro 3D Printer $4, OUT OF STOCK OUT OF STOCK Adafruit Industries Page 8 of 33

 No Raft or Supports Adafruit Industries https://learn.adafruit.")
9 3D Printing Slice Settings Download the STL file and import it into your 3D printing slicing software. You'll need to adjust your settings accordingly if you're using material different than PLA. 230C Extruder Temp No heated bed (65C for heated) 100% Extrusion Multiplier.6mm Nozzle 0.72 Extrusion Width.4mm Layer Height 20% infill 4 to 6 skirt outlines (brim) No Raft or Supports Adafruit Industries Page 9 of 33

10 CAD Model The deck was designed in Autodesk Fusion 360. You can download the source file and modify the design to make a custom board. The STL file is available to download if you want to print "as is" without any modifications Adafruit Industries Page 10 of 33

11 Adafruit Industries Page 11 of 33
 connects to one of the pins on the GND rail. NeoPixel Jewel Connections Data In on the Jewel connects to pin 5 on the Feather.")
12 Circuit Diagram NeoPixel Strip Connections D IN (white) on the NeoPixel Strip connects to pin 6 on the Feather board. + (5V) on the strip connects to one of the pins connecting to the BAT pin. - (GND) connects to one of the pins on the GND rail. NeoPixel Jewel Connections Data In on the Jewel connects to pin 5 on the Feather. GND on the Jewel connects to one of the GND pins on the ground rail on the Feather. 5V wire on the Jewel connects to one of the pins connecting to the BAT pin. DPDT Toggle Switch Top middle pin connects to the BAT pin. Top right pin connects to a pin on the prototyping area. Bottom left connects to the EN pin. Bottom middle connects to the GND pins on the ground rail on Feather. Prototyping Area We'll use several pins in the prototyping area to add more BAT pins to the circuit. This allows us power several NeoPixels to the BAT pin. You will have to bridge these pins using a good amount of solder in order to "tie" them together. Adafruit Industries Page 12 of 33
13 Battery Power The lipo battery features a male JST-PH2 connector that plugs into the female JST-PH2 connector on the Adafruit Feather. When the switch is toggled "On" it will power the Feather and NeoPixels. When it is switched to the "Off" position, the EN pin will activate, allowing the battery to be recharged via the microusb port. Use a 5V power supply (like from your computer's USB hub) to recharge the battery through the microusb port on the Adafruit Feather. Adafruit Industries Page 13 of 33
 We'll walk you through the whole process.")
14 Code Setup Adafruit Feather M0 for Arduino IDE Before we start disassembling or building the circuit, it's a good idea to get code uploaded to the micro-controller first. If you don't write / understand code, don't to worry! You don't need to be a programmer to be able to upload prewritten code :-) We'll walk you through the whole process. First, visit the Adafruit M0 tutorial page by clicking the button below. Follow the instructions to download & setup the Arduino IDE and install drivers. Make sure you are able to get sketches compiled and uploaded, especially the blink example in the tutorial. Once you are comfortable with using the Adafruit Feather, you can continue! Install Adafruit NeoPixel Library Next, we need to add support for NeoPixels. Visit the Adafruit NeoPixel tutorial ( to install the NeoPixel library! Uploading Code to Board Now that we have the Adafruit boards & NeoPixel library installed, we can get our code ready to upload onto the board. Select all of the code listed below in the black box and copy it to your clip board. Then, in Arduino IDE, paste it in the sketch window (making sure to overwrite anything currently there). Next, goto the Tools menu > Board and select Adafruit Feather M0 (Native USB Port) Now you can click on the "check mark" icon to verify the code. If it's all good, we can continue to upload the code to the board. Connect USB Data Cable to Feather M0 Be sure to use a micro USB cable that can transfer data - A USB cable that ONLY charges devices will simply not work. Plug it into the microusb port on the Adafruit Feather M0 board and the USB port on your computer (try to avoid connecting to a USB hub). As soon as you plug it in, you'll see a red LED blink on the Adaruit Feather M0 - This let's you know the board is ready to except code. While the LED is blinking, click on the Upload button (It's a right arrow Adafruit Industries Page 14 of 33
15 icon, next to the check mark). The Arduino IDE will notify you if the upload is successful and completed. // Original Code by Shae Erisson // released under the GPLv3 license to match the rest of the AdaFruit NeoPixel library #include <Adafruit_NeoPixel.h> // Strip goes to pin 6, jewel goes to pin 5 on Adafruit Feather #define STRIPPIN 6 #define JEWELPIN 5 // Setting up the two neopixel objects Adafruit_NeoPixel strip = Adafruit_NeoPixel(144, STRIPPIN, NEO_GRB + NEO_KHZ800); Adafruit_NeoPixel jewel = Adafruit_NeoPixel(8, JEWELPIN, NEO_GRB + NEO_KHZ800); int delayval = 10; // super quick delay, increase this value to make the wipe go slower void setup() { strip.setbrightness(80); // increase value to increase brightness, 255 is max jewel.setbrightness(80); // increase value to increase brightness, 255 is max strip.begin(); jewel.begin(); } void loop() { for(int i=0;i<8;i++){ // pixels.color takes RGB values, from 0,0,0 up to 255,255,255 jewel.setpixelcolor(i, jewel.color(255, 60, 0)); // Orange color. jewel.show(); // This sends the updated pixel color to the hardware. delay(delayval); // Delay for a period of time (in milliseconds). } } for(int i=0;i<144;i++){ // pixels.color takes RGB values, from 0,0,0 up to 255,255,255 strip.setpixelcolor(i, strip.color(0,100, 255)); // blue color. strip.show(); // This sends the updated pixel color to the hardware. delay(delayval); // Delay for a period of time (in milliseconds). } Adafruit Industries Page 15 of 33
. Find the small arrow that points away from the beginning of the strip.")


16 Assemble Prepare NeoPixel Strip First we'll need to look for the the start of the LED strip. Look on the back side of the strip (the opposite side of the LEDs). Find the small arrow that points away from the beginning of the strip. Now we can prepare the NeoPixel strip by trimming off the connector. Leave the wire long by cutting as close as you can to the connector. Use flush cutters to trim off the connector. Next we'll need to strip the wires and then tin each end with solder. Use the 22 gauge setting on the wire stripper and remove the ends of the the ground (black), power (red) and data (white). Now we can apply solder to each end of the wires to prevent them from fraying. You can set the LED strip aside while we prepare the NeoPixel Jewel. Adafruit Industries Page 16 of 33
, Data input, Data out and 5V pins.")

17 Prepare Jewel To make soldering the NeoPixel Jewel easier, we'll use third helping hands to hold it in place. Place the Jewel with the back side facing you and apply solder to both of the ground pins (GND), Data input, Data out and 5V pins. Jewel wire Measure three wires 140mm long to connect the Jewel to the Feather board. Strip and tin the wires to make it easier to solder to the Jewel. The pins on the Jewel are small, so it will make it easier to use a tweezer to hold wires while soldering. You can set the Jewel aside while we move on to preparing the single breadboard NeoPixel. Adafruit Industries Page 17 of 33


18 Breadboard NeoPixel We like to use a tweezer to hold the NeoPixel and then use a third helping hand to hold the tweezer. Tin the side that has "In" "G" and "+" pins. Measure wires The single NeoPixel will illuminate the small gem on the front side of the shield. We'll need to add wires to connect it the Jewel. Cut and measure three 75mm long wires and strip and solder them to In, G and + pins. Solder Pixel to Jewel Attach the Jewel and NeoPixel to thrid helping hands and bring them close to each other. Solder the wires for G on the single NeoPixel to one of the G pins on the Jewel. Solder the In wire on the NeoPixel to the Data Out pin on the Jewel. The + wire on the single NeoPixel will share power on the 5V pin. With the single NeoPixel soldered to the Jewel we can move on to solder the Jewel and NeoPixel strip to the Feather board. Please follow the circuit diagram closely to properly connect the switch and the power to the NeoPixels. The assembly instructions below are for a different switch. Adafruit Industries Page 18 of 33

 on the Strip connects to one of the pins on the 3V rail. The - wire (Black) connects to one of the pins on the GND rail.")

19 Slide Switch Now we can tin two of the pins on the slide switch. Solder the wires next to each other, don't leave the middle pin empty. Reference the connections shown in the picture. Cut two wires 60mm long for the slide switch so they can reach the port opening for the slide switch to fit into. Solder Strip and Jewel and Slide Switch to Feather Next we can start to attach all of the components to the Feather board. D IN (white) on the NeoPixel Strip connects to pin 6 on the Feather board. + (Red) on the Strip connects to one of the pins on the 3V rail. The - wire (Black) connects to one of the pins on the GND rail. Solder the Jewel to Feather Now we can connect the wires for the Jewel to the Feather board. Data In on the Jewel connects to pin 5 on the Feather. GND on the Jewel connects to one of the GND pins on the ground rail on the Feather. The 5V wire on the Jewel connects to one of the pins on the 3V rail. Slide Switch Finally we can complete the circuit by soldering the slide switch to the Feather. Solder one of the pins to the EN pin on the Feather. Solder the last remaining pin on the slide switch to on of the available pins on the GND rail. Adafruit Industries Page 19 of 33


20 Mounting Feather Now we can mount the Feather to the "handle circle" part. We'll use M2.5x6mm long screws to secure the Feather to the standoffs on the part. You can pre drill the screws to make it easier to mount the board. Position the Feather board so the USB port is aligned with port opening on the side of the part. Align the holes on the Feather to the standoffs on the part and fasten the screws to secure the board to the part. Adafruit Industries Page 20 of 33


21 Mount Slide Switch Next we'll need to secure the slide switch to the port opening on the handle circle part. Fit the slide switch at an angle and then push it into place. The tolerances should fit tight but we'll use a dab of hot glue to secure the it place. Carefully apply about two small squeezes worth of glue between the pins. Make sure to spread the glue around the walls of the port opening. Adafruit Industries Page 21 of 33


22 Mount Tri BTM part Now we can start to mount the parts that make up the shield triangle pieces. Position the "tri btm" part over the circle handle part so the standoffs for both are aligned. Thread circuit Now we can pass the NeoPixel strip, Jewel and single NeoPixel through the cut out on the tri btm part. Set the NeoPixel strip aside so we can assemble the battery mount. To keep the Strip from pulling on the Feather, we tapped the end of the Strip to the side of the table. Battery mount The 6600mAh battery attaches to the battery mount part. The battery is held in place with zip ties, or like shown here, gaffers tape. The battery mount part also has a circular wall that allows you to mount the NeoPixel Jewel. Thread Jewel First we'll need to mount the NeoPixel Jewel to the battery mount part. Look for the slit on the circular wall mount and pass the Jewel wires through the slit. Once the wires are through the slit, we can pass the single breadboard NeoPixel through the center of the circular wall mount. Adafruit Industries Page 22 of 33


23 Finally we can press fit the Jewel into the circular wall mount. Attaching the battery We can attach the battery to the battery holder part with zip ties or a piece of tape. Thread the the zip ties or tape in between the slits on Adafruit Industries Page 23 of 33


24 the battery holder like shown in the pictures. Position the battery so the wire sticks out of the longer side of the battery holder part. Lay the 6600mAh battery on opposite side of the Jewel and secure the battery to the battery holder. Adafruit Industries Page 24 of 33

25 Adafruit Industries Page 25 of 33


26 Mounting the battery holder Now we can take the whole battery holder assembly and secure it to the tri btm part and the handle circle part. Position the wires for the battery and Jewel so they don't block the USB port opening. Keep the single breadboard NeoPixel with the Jewel. Use M2x12mm screws to attach the battery holder to tri btm part. Continue screwing through until you fasten the into the handle circle part. Adafruit Industries Page 26 of 33


27 Mount NeoPixel Strip Now we can fit the NeoPixel strip inside the walls of the tri btm part. Begin by aligning the strip to the closest wall with the LEDs pointing out and away from the center of the body. We don't what any blue light spilling into the center were the Jewel and the breadboard NeoPixel will light the center gems orange. Handle assembly Now we can start to assemble the handle that holds the shield. The handle uses two M4.5x9mm tall screws that connects to the two side bars. The side bar then connects to the sides of the handle circle part with M3x12mm tall screws. Adafruit Industries Page 27 of 33


28 Attach handle With the handle assembled we can move on to attaching it to the rest of the shield. The handle circle has two counter sink holes to fit nuts for the M3x12mm screws. We can use tweezers to insert a nut and then screw the side handle bars into place. Hold the nut with one hand while screwing the side handle bars into place. Screw the other side and then position the handle so it will twist into place when you fold it straight out. Cut NeoPixel Strip ends off Before we close up the shield, we'll need to remove the wires on the end of the NeoPixel strip. Cut the wires as close as you can to the silicone ends to prevent the wires from touching and shorting out the circuit. Adafruit Industries Page 28 of 33


29 Blade assembly Finally we can move on to assembling the "blades" that make up the shield. Reference the diagram when laying out the blades, the pieces are not symmetrical. Make sure to place the blades so the handle is vertical when holding the shield. Use twelve M2x12mm tall screws to secure the blades to the standoff on the edges of the tri btm part. We'll only need to use two screws for each blade. Use one screws for each end of the blade. The blades will be held in place in the next step when we add the tri top part. Adafruit Industries Page 29 of 33


30 Connect Top Final Stretch! Now we can move on to attaching the tri top part to the rest of the assembly. We recommend screwing in all of the standoff on the tri top first. This will create the threads for each standoff, making it easier to attach both parts together. Align the tri top part by referencing were the smaller gem on the front will go. Now we can align standoffs on both parts and secure the parts with nine M2x12mm tall screws. Start by screwing in from the bottom, just enough to poke through the tri btm part and through the blade part. Then align it to the top standoff and fasten each side. Adafruit Industries Page 30 of 33


31 Masking detail Now we can add detail to the front of the shield by attaching the masking pieces. You can use an adhesive like E6000 to secure the pieces. We used a couple pieces of blue tac. Press down on the mask pieces and allow them to dry. Complete! Now we can power on the LEDs, ready for battle! Adafruit Industries Page 31 of 33
32 Adafruit Industries Page 32 of 33
Feather Weather Lamp. Created by Ruiz Brothers. Last updated on :54:26 PM UTC
 Feather Weather Lamp Created by Ruiz Brothers Last updated on 2018-08-22 03:54:26 PM UTC Guide Contents Guide Contents Overview Weather Reactive Pixels Prerequisite Guides Parts Tools & Supplies Circuit
Zelda Thunder Helm. Created by Ruiz Brothers. Last updated on :46:52 PM UTC
 Zelda Thunder Helm Created by Ruiz Brothers Last updated on 2017-08-23 02:46:52 PM UTC Guide Contents Guide Contents Overview Zelda: Breath Of The Wild Parts, Tools and Supplies Proto-Pasta - Aromatic
3D Printed Camera LED Ring
 3D Printed Camera LED Ring Created by Ruiz Brothers Last updated on 2018-08-22 03:39:34 PM UTC Guide Contents Guide Contents Overview DIY LED Ring Light Prerequisite Guide: Parts List: Tools & Supplies
LED Eyes. Created by Ruiz Brothers. Last updated on :50:55 AM UTC
 LED Eyes Created by Ruiz Brothers Last updated on 2018-01-13 05:50:55 AM UTC Guide Contents Guide Contents Overview Parts, Tools and Supplies Enameled Copper Magnet Wire 11 meters / 0.1mm diameter Adafruit
3D Printed Google AIY Voice Kit
 3D Printed Google AIY Voice Kit Created by Ruiz Brothers Last updated on 2018-01-09 12:47:26 AM UTC Guide Contents Guide Contents Overview 3D Print a DIY AI enclosure for the Raspberry PI! Parts, Tools
Portable Apple Watch Charger
 Portable Apple Watch Charger Created by Ruiz Brothers Last updated on 2017-10-22 09:58:04 PM UTC Guide Contents Guide Contents Overview Smart Charging Prerequisite Guides Parts, Tool & Supplies Circuit
7 Portable Multitouch Raspberry Pi Tablet
 7 Portable Multitouch Raspberry Pi Tablet Created by Ruiz Brothers Last updated on 2017-02-27 04:13:53 PM UTC Guide Contents Guide Contents Overview Portable Raspberry Pi Tablet 7" Multitouch Display Parts
NeoPixel Bike Light. Created by Ruiz Brothers. Last updated on :43:46 PM UTC
 NeoPixel Bike Light Created by Ruiz Brothers Last updated on 2018-11-15 07:43:46 PM UTC Guide Contents Guide Contents Overview 3D Printed Headlight Adafruit's Feather Platform Circuit Python Powered Parts
Camera LED Ring Light
 Camera LED Ring Light Created by Ruiz Brothers Last updated on 2017-05-09 06:07:12 PM UTC Guide Contents Guide Contents Overview NeoPixel Ring Light Dedicated white LED Prerequisite Guides Parts Tools
Lie Ren's Stormflower Gun Blade
 Lie Ren's Stormflower Gun Blade Created by Ruiz Brothers Last updated on 2017-04-02 05:39:24 PM UTC Guide Contents Guide Contents Overview Cosplay Props with NeoPixels Triggered Lighting Effects DIY Electronics
Trellis 3D Printed Enclosure
 Trellis 3D Printed Enclosure Created by Ruiz Brothers Last updated on 2018-08-22 03:39:07 PM UTC Guide Contents Guide Contents Overview Parts Tools & Supplies Modeling 123D Design Customize Measuring Parts
3D Printed Case for Adafruit Feather
 3D Printed Case for Adafruit Feather Created by Ruiz Brothers Last updated on 2018-08-22 03:59:38 PM UTC Guide Contents Guide Contents Overview Adafruit Feather Box New Update! Check out the TFT Feather
Trinket NeoPixel LED Longboard
 Trinket NeoPixel LED Longboard Created by Ruiz Brothers Last updated on 2017-10-02 06:00:32 PM UTC Guide Contents Guide Contents Overview Parts Tools & Supplies Prerequisite Guides 3D Printing PLA Material
FPV Mini Display. Created by Ruiz Brothers. Last updated on :00:18 PM UTC
 FPV Mini Display Created by Ruiz Brothers Last updated on 2017-07-19 01:00:18 PM UTC Guide Contents Guide Contents Overview Mini FPV monitor Adafruit Parts Tools and Supplies Circuit Diagram Electronics
Light-Up Angler Fish Embroidery
 Light-Up Angler Fish Embroidery Created by Becky Stern Last updated on 2018-08-22 03:35:36 PM UTC Guide Contents Guide Contents Overview Tools & Supplies Layout & Circuit Diagram Sew Circuit Code Hand
Bluetooth Controlled NeoPixel Headphones
 Bluetooth Controlled NeoPixel Headphones Created by Ruiz Brothers Last updated on 2017-03-09 07:38:05 PM UTC Guide Contents Guide Contents Overview Smart LED HeadPhones Prerequisite Guides Parts Tools
Simple LED Unicorn Horn
 Simple LED Unicorn Horn Created by Ruiz Brothers Last updated on 2018-08-22 03:56:14 PM UTC Guide Contents Guide Contents Overview 3D Printed Unicorn Horn Want More Magic/Colors? Great For Beginners Parts
Solar Boost Bag. Created by Becky Stern. Last updated on :44:55 PM UTC
 Solar Boost Bag Created by Becky Stern Last updated on 2018-08-22 03:44:55 PM UTC Guide Contents Guide Contents Overview 3D Design Files Customize Design Assemble Circuit Prepare Solar Panel Enclosure
7" Portable HDMI Monitor
 7" Portable HDMI Monitor Created by Ruiz Brothers Last updated on 2017-05-29 05:47:14 PM UTC Guide Contents Guide Contents Overview DIY Monitor Connect to a Raspberry pi Use as a second monitor Camera
Celebration Spectacles
 Celebration Spectacles Created by Becky Stern Last updated on 2018-08-22 03:45:59 PM UTC Guide Contents Guide Contents Overview Circuit Diagram Assemble Circuit Test and Glue Wear 'em! 2 3 6 7 10 14 Adafruit
NeoPixel LED Cortana Costume
 NeoPixel LED Cortana Costume Created by Ruiz Brothers Last updated on 2018-08-22 03:43:43 PM UTC Guide Contents Guide Contents Overview How it Works Project Advisory Prerequisite Guides Parts & Components
Circuit Playground Yoyo
 Circuit Playground Yoyo Created by Ruiz Brothers Last updated on 2018-01-13 05:56:02 AM UTC Guide Contents Guide Contents Overview 3D Printed NeoPixel Yoyo History of the Yo-Yo Expectations Parts Tools
Infinity Mirror Valentine's Candy Box
 Infinity Mirror Valentine's Candy Box Created by Kathy Ceceri Last updated on 2019-02-07 09:44:54 PM UTC Guide Contents Guide Contents Overview Parts List -- Mini Box Version Chibitronics Color LEDs Add-On
Adafruit TPL5110 Power Timer Breakout
 Adafruit TPL5110 Power Timer Breakout Created by lady ada Last updated on 2017-12-11 06:28:19 AM UTC Guide Contents Guide Contents Overview Pinouts Power Pins Control Pins Assembly Prepare the header strip:
Jewel Hair Stick. Created by Leslie Birch. Last updated on :47:17 PM UTC
 Jewel Hair Stick Created by Leslie Birch Last updated on 2018-08-22 03:47:17 PM UTC Guide Contents Guide Contents Overview Tools & Supplies Prepare Chopstick Circuit Diagram Solder Circuit Arduino Code
Boomy The Boombox. Created by Ruiz Brothers. Last updated on :52:13 PM UTC
 Boomy The Boombox Created by Ruiz Brothers Last updated on 2017-09-05 08:52:13 PM UTC Guide Contents Guide Contents Overview Boomy The Boombox AdaBox 004 Parts 3D Printing 3D Printed Parts Enclosure Design
3D Printed LED Knuckle Jewelry
 3D Printed LED Knuckle Jewelry Created by Ruiz Brothers Last updated on 2015-02-20 09:31:06 AM EST Guide Contents Guide Contents Overview Prerequisite Guides Parts Tools & Supplies 3D Printing Filament
PyPortal View Master Created by Ruiz Brothers. Last updated on :51:28 AM UTC
 PyPortal View Master Created by Ruiz Brothers Last updated on 2019-03-13 11:51:28 AM UTC Overview In this project we re building a view master inspired device using Adafruit s PyPortal. The eyepiece makes
Circuit Playground Combadge
 Circuit Playground Combadge Created by Ruiz Brothers Last updated on 2017-10-22 10:42:02 PM UTC Guide Contents Guide Contents Overview What's a Combadge? DIY Combadge How Does It Work? Make It How You
Neon LED Signs. Created by John Park. Last updated on :11:09 PM UTC
 Neon LED Signs Created by John Park Last updated on 2018-08-22 04:11:09 PM UTC Guide Contents Guide Contents Overview Parts Materials Tools Build the Sign Driver Preparation Solder the Circuit Solder the
CircuitPython Media Dial
 CircuitPython Media Dial Created by Ruiz Brothers Last updated on 2018-02-07 05:00:25 AM UTC Guide Contents Guide Contents Overview Prerequisite Guides Adafruit Trinket M0 - for use with CircuitPython
NeoPixel Manicure. Created by Sophy Wong. Last updated on :50:38 PM UTC
 NeoPixel Manicure Created by Sophy Wong Last updated on 2018-04-11 05:50:38 PM UTC Guide Contents Guide Contents Overview Parts & Supplies Tools Circuit Diagram Build the Circuit Measure Your Circuit Prepare
FLORA Pixel Brooch. Created by Becky Stern. Last updated on :19:07 PM EST
 FLORA Pixel Brooch Created by Becky Stern Last updated on 2015-02-20 01:19:07 PM EST Guide Contents Guide Contents Overview Connect first signal wire Connect power and ground wires Add more pixels Program
Reindeer Mask with Animated Eyes
 Reindeer Mask with Animated Eyes Created by Dano Wall Last updated on 2018-12-05 10:50:10 PM UTC Guide Contents Guide Contents Overview Parts Adafruit HalloWing M0 Express Convex Plastic Lens with Edge
Getting Started with FLORA
 Getting Started with FLORA Created by Becky Stern Last updated on 2018-01-03 04:31:24 AM UTC Guide Contents Guide Contents Overview Windows Driver Installation Manual Driver Installation Download software
Clockwork Goggles. Created by John Park. Last updated on :03:10 PM UTC
 Clockwork Goggles Created by John Park Last updated on 2018-08-22 04:03:10 PM UTC Guide Contents Guide Contents Overview Assemble Circuit and Goggles CircuitPython Setup and Code Rock the Goggles 2 3 6
Toy Car Speed Timer. Created by Kirby Griese. Last updated on :13:49 PM UTC
 Toy Car Speed Timer Created by Kirby Griese Last updated on 2017-03-20 09:13:49 PM UTC Guide Contents Guide Contents Overview Parts needed Prerequisites 3D Printing Assembly Wiring Software Use It 2 3
3D Printed Daft Punk Helmet with Bluetooth
 3D Printed Daft Punk Helmet with Bluetooth Created by Ruiz Brothers Last updated on 2017-10-20 01:47:59 PM UTC Guide Contents Guide Contents Overview Parts List Tools & Supplies Light Painting with Daftpunk
3D Printed 20w Amplifier Box
 3D Printed 20w Amplifier Box Created by Ruiz Brothers Last updated on 2018-02-26 06:48:02 PM UTC Guide Contents Guide Contents Overview Prerequisite Guide Tools & Supplies Parts 3D Printing Print in your
Mystical LED Halloween Hood
 Mystical LED Halloween Hood Created by Becky Stern Last updated on 2017-09-28 11:13:20 PM UTC Guide Contents Guide Contents Overview NeoPixel GEMMA circuit Arduino Code NeoPixel Überguide: Arduino Library
Solder Dispenser Adabot Head
 Solder Dispenser Adabot Head Created by Ruiz Brothers Last updated on 2017-01-04 02:15:15 PM UTC Guide Contents Guide Contents Overview Solder Dispenser Parts Solder Spool - 1/4 lb SAC305 RoHS lead-free
3D Printed LED Buckle
 3D Printed LED Buckle Created by Ruiz Brothers Last updated on 2018-08-22 03:38:02 PM UTC Guide Contents Guide Contents Overview Customize the Buckle Artwork, Design and Text Scale, Adjust and Combine
Tent Lantern. Created by Timothy Reese. Last updated on :17:25 AM UTC
 Tent Lantern Created by Timothy Reese Last updated on 2017-07-14 05:17:25 AM UTC Guide Contents Guide Contents Overview Things you'll need: What You'll Learn: 3D Printing Code Assembly Wiring Diagram Soldering
Con Badge with Circuit Playground Express
 Con Badge with Circuit Playground Express Created by Sophy Wong Last updated on 2018-04-11 05:00:16 PM UTC Guide Contents Guide Contents Overview Tools & Materials Laser Cutting Program the Circuit Playground
NeoMatrix 8x8 Word Clock
 NeoMatrix 8x8 Word Clock Created by Andy Doro Last updated on 2017-10-10 04:10:51 AM UTC Guide Contents Guide Contents Overview Parts List Parts Tools Circuit Assembly Overview Uploading Code Understanding
Adabot Operation Game
 Adabot Operation Game Created by John Park Last updated on 2018-08-22 04:11:17 PM UTC Guide Contents Guide Contents Overview Parts Materials & Tools Build the Operating Table Print the Board and Pieces
Bike Wheel POV Display
 Bike Wheel POV Display Created by Becky Stern Last updated on 2017-09-12 03:10:38 PM UTC Guide Contents Guide Contents Overview Parts and Tools Circuit Diagram Prep LEDs & Breadboard Code Solder Circuit
Bunny Ears with MakeCode
 Bunny Ears with MakeCode Created by Erin St Blaine Last updated on 2018-08-22 04:05:47 PM UTC Guide Contents Guide Contents Introduction Tools & Other Materials Programming with MakeCode Set Up the Light
Getting Started with FLORA
 Getting Started with FLORA Created by Becky Stern Last updated on 2015-05-13 01:00:11 PM EDT Guide Contents Guide Contents Overview Download software Blink onboard LED Blink onboard NeoPixel Install the
Hammer Time Mini Golf Hazard with Crickit
 Hammer Time Mini Golf Hazard with Crickit Created by John Park Last updated on 2018-07-09 06:47:53 AM UTC Guide Contents Guide Contents Overview Please Hammer, Don't Hurt Em Parts Materials & Tools Program
MP3 Feather - Gordon Cole
 MP3 Feather - Gordon Cole Created by Ruiz Brothers Last updated on 2017-11-13 11:05:06 PM UTC Guide Contents Guide Contents Overview Parametric Design Wearable Prerequisite Guides Parts, Tool & Supplies
NeoPixel Basketball Hoop
 NeoPixel Basketball Hoop Created by Justin Cooper Last updated on 2018-08-27 12:19:58 AM UTC Guide Contents Guide Contents Overview Parts Needed Power choices! Parts for Option #1 Parts for Option #2 Tools
Webcam Cover-Up Lego brick with Adabot Mini Fig
 Webcam Cover-Up Lego brick with Adabot Mini Fig Created by Ruiz Brothers Last updated on 2018-08-22 04:06:44 PM UTC Guide Contents Guide Contents Overview 3D Printing What If I Don't Have A 3D Printer?
FLORA TV-B-Gone. Created by Becky Stern. Last updated on :32:57 PM UTC
 FLORA TV-B-Gone Created by Becky Stern Last updated on 2018-08-22 03:32:57 PM UTC Guide Contents Guide Contents Overview Parts Tutorials Transistors Resistors LEDs Pushbutton Program it Power Fabric pinwheel
NeoPixel Punk Collar. Created by Becky Stern. Last updated on :41:18 PM UTC
 NeoPixel Punk Collar Created by Becky Stern Last updated on 2018-08-22 03:41:18 PM UTC Guide Contents Guide Contents Overview Circuit Diagram Prototype Circuit Arduino Code CircuitPython Code Build Collar
Ping Pong Ball Launcher
 Ping Pong Ball Launcher Created by Dano Wall Last updated on 2019-01-25 03:19:13 AM UTC Guide Contents Guide Contents Overview Electronic Parts Circuit Playground Express USB cable - USB A to Micro-B Alkaline
Crawling Animatronic Hand
 Crawling Animatronic Hand Created by Dano Wall Last updated on 2018-12-03 06:39:35 PM UTC Guide Contents Guide Contents Overview Parts Used Tools & Materials Prepare the Hand Your hand is now ready to
Circuit Cookie Roller
 Circuit Cookie Roller Created by Ruiz Brothers Last updated on 2018-01-23 08:50:41 PM UTC Guide Contents Guide Contents Overview Filament for 3D Printers in Various Colors and Types Ultimaker 2+ 3D Printer
Adafruit TPL5111 Reset Enable Timer Breakout
 Adafruit TPL5111 Reset Enable Timer Breakout Created by lady ada Last updated on 2017-11-02 07:32:27 PM UTC Guide Contents Guide Contents Overview Pinouts Power Pins Control Pins Assembly Prepare the header
Overwatch Prop Gun: Lucio's Blaster Pt. 3
 Overwatch Prop Gun: Lucio's Blaster Pt. 3 Created by John Park Last updated on 2017-11-24 09:48:21 PM UTC Guide Contents Guide Contents 3D Printing Circuit Building Assembly Front Assembly Rear Assembly
3D Printed Bone Conduction Transducer Box
 3D Printed Bone Conduction Transducer Box Created by Ruiz Brothers Last updated on 2018-08-22 03:40:25 PM UTC Guide Contents Guide Contents Overview Tools & Supplies Parts 3D Printing Circuit Diagram Stereo
3D Printed 20w Amplifier Box
 3D Printed 20w Amplifier Box Created by Noe & Pedro Ruiz Last updated on 2014-04-22 03:01:38 PM EDT Guide Contents Guide Contents Overview Prerequisite Guide Tools & Supplies Parts 3D Printing Print in
Magical Mistletoe. Created by Leslie Birch. Last updated on :45:29 PM UTC
 Magical Mistletoe Created by Leslie Birch Last updated on 2018-08-22 03:45:29 PM UTC Guide Contents Guide Contents Overview Tools & Supplies Circuit Diagram Test the Sensor Prepare Parts Attach LED Sequins
Crickit Dancing Marionette Kit Created by Dano Wall. Last updated on :03:11 PM UTC
 Crickit Dancing Marionette Kit Created by Dano Wall Last updated on 2019-04-04 07:03:11 PM UTC Overview This project demonstrates how to build a robotic marionette that is controlled with four arcade-style
'Sup Brows. Created by Kate Hartman. Last updated on :52:04 PM UTC
 'Sup Brows Created by Kate Hartman Last updated on 2018-08-22 03:52:04 PM UTC Guide Contents Guide Contents Overview Circuit Bluetooth Test Upload the Code Place the Sensor View Sensor Values Via Bluetooth
Mad Science Test Tube Rack
 Mad Science Test Tube Rack Created by John Park Last updated on 2016-10-17 09:21:01 PM UTC Guide Contents Guide Contents Overview Lighted Test Tube Parts Materials and Tools Optional Test Tube Rack Parts
NeoPixel Ring Bangle Bracelet
 NeoPixel Ring Bangle Bracelet Created by Becky Stern Last updated on 2017-09-28 11:14:48 PM UTC Guide Contents Guide Contents Overview Circuit Diagram Build it! Arduino Code CircuitPython Code Planning
Snake Charmer Box. Created by Dano Wall. Last updated on :07:25 PM UTC
 Snake Charmer Box Created by Dano Wall Last updated on 2018-08-22 04:07:25 PM UTC Guide Contents Guide Contents Overview Materials Circuit Playground Express Standard servo - TowerPro SG-5010 Small Alligator
Circuit Playground Express Head-Tilt Ears
 Circuit Playground Express Head-Tilt Ears Created by Dave Astels Last updated on 2018-10-09 04:07:03 PM UTC Guide Contents Guide Contents Overview Parts Circuit Playground Express Micro servo Lithium Ion
Milk Jug Glow Skull. Created by John Park. Last updated on :28:36 PM UTC
 Milk Jug Glow Skull Created by John Park Last updated on 2018-09-14 09:28:36 PM UTC Guide Contents Guide Contents Overview Parts Materials & Tools Optional Skull/Sculpting Stand Build the Skull Prep the
No-Sew LED Wristband. Created by Kathy Ceceri. Last updated on :23:40 PM UTC
 No-Sew LED Wristband Created by Kathy Ceceri Last updated on 2018-11-13 09:23:40 PM UTC Guide Contents Guide Contents Overview Playing with LED Options Suggested Parts List -- Electronics Suggested Materials
DIY Bluetooth Gamepad
 DIY Bluetooth Gamepad Created by Ruiz Brothers Last updated on 2016-09-03 02:23:21 AM UTC Guide Contents Guide Contents Overview Prerequisite Guides Expectations Parts Tools & Supplies Circuit Diagram
Bluetooth LE MIDI Controller
 Bluetooth LE MIDI Controller Created by Ruiz Brothers Last updated on 2017-03-01 08:40:08 PM UTC Guide Contents Guide Contents Overview A Different Looking MIDI Controller BLE MIDI Drum Machine How Does
Slider Crank Mechanism -- from Cardboard and Craft Sticks
 Slider Crank Mechanism -- from Cardboard and Craft Sticks Created by John Park Last updated on 2018-08-22 04:07:21 PM UTC Guide Contents Guide Contents Overview Materials Tools Build the Slider Crank Build
Adafruit Capacitive Touch Sensor Breakouts
 Adafruit Capacitive Touch Sensor Breakouts Created by Bill Earl Last updated on 2018-08-22 03:36:13 PM UTC Guide Contents Guide Contents Overview Momentary Toggle 5-Pad Momentary Assembly and Wiring Installing
Trinket-Powered Conference Room Occupancy Display
 Trinket-Powered Conference Room Occupancy Display Created by Mike Barela Last updated on 2018-08-22 03:38:56 PM UTC Guide Contents Guide Contents Overview Build Wiring Diagrams Populating the Board Code
Stumble-Bot. Created by Dano Wall. Last updated on :04:06 AM UTC
 Stumble-Bot Created by Dano Wall Last updated on 2018-09-06 05:04:06 AM UTC Guide Contents Guide Contents Overview Simply Stumbling We Have the Technology Other Supplies Leg Assembly Front Legs Back Legs
BLE Light Switch with Feather nrf52840 and Crickit
 BLE Light Switch with Feather nrf52840 and Crickit Created by John Park Last updated on 2019-02-15 07:06:19 PM UTC Guide Contents Guide Contents Overview Parts Adafruit Feather nrf52840 Express Adafruit
DIY Circuit Playground Shields
 DIY Circuit Playground Shields Created by Dave Astels Last updated on 2018-08-22 04:05:06 PM UTC Guide Contents Guide Contents Overview Small Alligator Clip Test Lead (set of 12) Small Alligator Clip to
i2c/spi LCD Backpack Created by lady ada Last updated on :11:04 PM UTC
 i2c/spi LCD Backpack Created by lady ada Last updated on 2017-08-16 05:11:04 PM UTC Guide Contents Guide Contents Overview Which LCD to Use? Wait - the backpack has 16 holes, but my LCD only has 14 pins!
ISS Pin. Created by Leslie Birch. Last updated on :27:30 PM UTC
 ISS Pin Created by Leslie Birch Last updated on 2017-04-18 09:27:30 PM UTC Guide Contents Guide Contents Overview Tools & Supplies Solder Circuit Create Cover Code Set Up IFTTT Want a Test? Wear It! 2
Crawling Baby Sea Turtle Robot
 Crawling Baby Sea Turtle Robot Created by Dano Wall Last updated on 2018-08-22 04:10:26 PM UTC Guide Contents Guide Contents Overview Save the Wee Turtles Household Materials Adafruit Electronics Create
Glowing Smokey Skull. Created by Ruiz Brothers. Last updated on :03:40 PM UTC
 Glowing Smokey Skull Created by Ruiz Brothers Last updated on 2018-08-22 04:03:40 PM UTC Guide Contents Guide Contents Overview Easy DIY Halloween Props Electronic Halloween! Circuit Playground NeoPixels
Sewable NeoPixels. Created by Becky Stern. Last updated on :50:14 PM EDT
 Sewable NeoPixels Created by Becky Stern Last updated on 2015-08-25 07:50:14 PM EDT Guide Contents Guide Contents Overview Prerequisite guides Lots of Pixels? Hook up alligator clips Run pixel test code
NeoPixie Dust Bag with Circuit Playground Express
 NeoPixie Dust Bag with Circuit Playground Express Created by John Park Last updated on 2017-12-20 10:00:29 PM UTC Guide Contents Guide Contents Overview Code It Setup Animation Color Touch Variable Color
Interactive Gift Box. Created by codingpro. Last updated on :47:40 AM UTC
 Interactive Gift Box Created by codingpro Last updated on 2018-01-10 01:47:40 AM UTC Guide Contents Guide Contents Overview Adafruit GEMMA M0 - Miniature wearable electronic platform Lithium Ion Polymer
Cyberpunk Spikes. Created by Becky Stern. Last updated on :07:06 PM UTC
 Cyberpunk Spikes Created by Becky Stern Last updated on 2017-10-20 09:07:06 PM UTC Guide Contents Guide Contents Overview Download and 3D Print Prepare NeoPixel Strip Assemble Circuit Arduino Code CircuitPython
Circuit Playground Express Laser Tag
 Circuit Playground Express Laser Tag Created by John Park Last updated on 2017-11-14 01:56:23 AM UTC Guide Contents Guide Contents Build a Laser Tag Game Code the Laser Tag Game MakeCode Transmitting IR
Adafruit PowerBoost 500 Shield
 Adafruit PowerBoost 500 Shield Created by lady ada Last updated on 2018-08-22 03:43:27 PM UTC Guide Contents Guide Contents Overview Pinouts DC/DC Boost section Indicator LEDs Charging section Power Switch
CPX Mystery Dreidel. Created by Kathy Ceceri. Last updated on :51:40 PM UTC
 CPX Mystery Dreidel Created by Kathy Ceceri Last updated on 2018-12-04 02:51:40 PM UTC Guide Contents Guide Contents Overview Parts List -- Electronics Circuit Playground Express USB cable - USB A to Micro-B
Interior Purse Light. Created by Becky Stern. Last updated on :41:08 PM UTC
 Interior Purse Light Created by Becky Stern Last updated on 2018-08-22 03:41:08 PM UTC Guide Contents Guide Contents Overview Circuit Diagram Stitch Sequins Add Tape Arduino Code CircuitPython Code Use
Paper Airplane Launcher
 Paper Airplane Launcher Created by Dano Wall Last updated on 2018-08-27 08:36:14 PM UTC Guide Contents Guide Contents Overview A Launching Platform The Electronics Materials Build the Launcher Attach Motors
Pushrod Garage. Created by John Park. Last updated on :07:30 PM UTC
 Pushrod Garage Created by John Park Last updated on 2018-08-22 04:07:30 PM UTC Guide Contents Guide Contents Overview Parts & Materials Tools Pushrod Mechanism Code it with MakeCode Functions On Start
DIY Custom American Girl Doll Prosthetics
 DIY Custom American Girl Doll Prosthetics Created by Ruiz Brothers Last updated on 2017-11-15 08:53:16 PM UTC Guide Contents Guide Contents Overview Parts Tools and Supplies 3D Printing 3D Printed Parts
Wind Blowing Emoji Prop
 Wind Blowing Emoji Prop Created by John Park Last updated on 2018-08-22 04:05:17 PM UTC Guide Contents Guide Contents Overview Code it with MakeCode Start Up Variables On Loud Sound If - Else Iterate Debounce
Mini Mac Pi. Created by Ruiz Brothers. Last updated on :43:27 PM UTC
 Mini Mac Pi Created by Ruiz Brothers Last updated on 2018-08-22 03:43:27 PM UTC Guide Contents Guide Contents Overview Build Your Own Mac Pi How it Works Project Advisory Challenges and Expectations Prerequisite
Audio Prank Gift Box. Created by Becky Stern. Last updated on :46:15 PM UTC
 Audio Prank Gift Box Created by Becky Stern Last updated on 2018-08-22 03:46:15 PM UTC Guide Contents Guide Contents Overview Circuit Diagram Prepare Components Build Circuit Wrap and Give 2 3 5 6 12 14
LED Stego Flex Spike Hoodie
 LED Stego Flex Spike Hoodie Created by Becky Stern Last updated on 2015-02-19 04:45:44 PM EST Guide Contents Guide Contents Overview Like this project? 3D Print Spikes NinjaFlex Assemble Circuit Layout
Android GBoard Morse Code Control with Circuit Playground Express
 Android GBoard Morse Code Control with Circuit Playground Express Created by Dave Astels Last updated on 2018-08-22 04:10:30 PM UTC Guide Contents Guide Contents Overview Parts Materials for the box Installing
FLORA and GEMMA ICSP. Created by Becky Stern. Last updated on :42:16 PM UTC
 FLORA and GEMMA ICSP Created by Becky Stern Last updated on 2018-08-22 03:42:16 PM UTC Guide Contents Guide Contents Overview Reprogram FLORA over ICSP Reprogram GEMMA over ICSP 2 3 4 9 Adafruit Industries