Crickit Powered Holiday Diorama
|
|
|
- Karen Pearson
- 5 years ago
- Views:
Transcription

1 Crickit Powered Holiday Diorama Created by Isaac Wellish Last updated on :49:07 AM UTC
2 Guide Contents Guide Contents Overview Prerequisite Guides Adafruit Parts Tools and Materials Wiring Electronics Wiring up the main electronic components This is the main circuit we will be using. We'll add the rest of the LEDs later. Programming with MakeCode What is MakeCode? Install the MakeCode CRICKIT Extension Create a New Project with MakeCode What's going on the code above? Uploading the Code Power up CRICKIT Build the Rotation Rig Making the Wheels Prepping the box to mount the motor Mounting the motor Placing the circles and skewer Making Attachments The pipe cleaner guide Creating the wheel guiders Adabot and the Reindeer Making the reindeer! Making Adabot and his sleigh! Attaching to pipe cleaners Adding LEDs Mapping out the circuit and adding copper tape Add the LEDs! Rudolph's red nose Adding power and ground Troubleshooting the LEDs Capacitive touch moon Crafting the Scene The houses Finish up the decorations and let it snow! Happy Holidays! Adafruit Industries Page 2 of 59

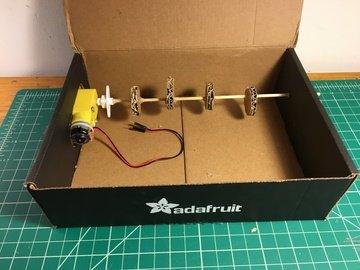
3 Overview Time to build a holiday diorama ( This isn't any old stagnant diorama. This one moves. That's right Rudolf and his crew hop up and down through the night sky thanks to our friend CRICKIT! Along with CRICKIT and a Circuit Playground Express, we'll use some cardboard, leds, pipe cleaners and a DC motor to bring this festive diorama to life. Prerequisite Guides Reading or at least skimming through these guides before beginning will save you a lot of headache in the future. You can always refer back to them if you need help! Cardboard Fundamentals ( Guide to CRICKIT ( Guide to Circuit Playground Express ( Adafruit Parts 1 x Circuit Playground Express Circuit Playground Express is a great introduction to electronics and programming ADD TO CART 1 x Adafruit CRICKIT for Circuit Playground Express Crickit: Creative Robotics and Interactive Construction Kit is an add-on to Circuit Playground Express ADD TO CART 1 x TT Motor DC Gearbox 200 RPM 3 to 6VDC ADD TO CART Adafruit Industries Page 3 of 59
4 1 x USB cable USB A to Micro-B ADD TO CART 1 x Small Alligator Clip Test Lead (set of 12) For powering LEDs and capacitive touch moon ADD TO CART 1 x 5V 2A (2000mA) switching power supply - UL Listed For powering CRICKIT ADD TO CART 1 x Snap-on Hub for TT Motor For attaching turning mechanism to motor ADD TO CART 2 x M3 Screws - 25mm long For mounting the motor to the box BUY NOW 2 x M3 Hex Nuts For mounting motor to box BUY NOW 1 x Premium Male/Male Jumper Wires - 20 x 3" (75mm) For wiring red LED nose ADD TO CART 1 x Silicone Cover Stranded-Core Ribbon Cable For wiring red LED nose discretely ADD TO CART 1 x Copper Foil Tape with Conductive Adhesive For connecting LEDs ADD TO CART 1 x Diffused Red 3mm LED For Rudolph's nose! ADD TO CART 5 x Diffused White 3mm LED For stars ADD TO CART 1 x 470 ohm Through-Hole Resistor For LEDs ADD TO CART Tools and Materials Adafruit Industries Page 4 of 59
5 Medium to large width corrugated cardboard - need at least 1 sheet sized 10 cm X 24 cm with the same thickness Adafruit shipping box Scrap pieces of cardboard (to make character cutouts and various smaller parts) Pencil Ruler Hobby knife Scissors Hot glue gun sticks of glue Aluminum foil Assorted colored construction paper Glue stick Mini bamboo skewers Fake spider web (for Adabot's hat and beard) White paint String or twine Black pipe cleaners Optional but recommended: Cutting mat (for cutting cardboard) Wire cutter (for cutting pipe cleaners) Black plastic straws (instead of pipe cleaners for holding up characters) Adafruit Industries Page 5 of 59

 lead of the white LED.")
6 Wiring Electronics Attach the Circuit Playground Express to the Crickit following this guide ( Wiring up the main electronic components Plug in the DC motor to motor input 1 on CRICKIT with the red 5V lead going in the outer input of the motor terminal block. Use a small screwdriver to screw in the leads into the terminal blocks. Attach an alligator clip to a 3.3V output from the CPX to one leg of the 470 ohm resistor. Then attach the other leg of the resistor to a new alligator clip. Connect the new alligator clip to the positive (the longer) lead of the white LED. Lastly attach one more alligator clip from the negative lead of the LED to GND on the CPX.* Attach an alligator clip to capacitive touch input A3 on the CPX (Circuit Playground Express). Attach the other end to some tin foil. For power use a 5V 2A (2000mA) switching power supply ( plugged into the 5V DC jack. *To learn more about why we'd need a resistor and LEDs in general check out the guide, All About LEDs ( Adafruit Industries Page 6 of 59
7 This is the main circuit we will be using. We'll add the rest of the LEDs later. Adafruit Industries Page 7 of 59

8 Programming with MakeCode What is MakeCode? MakeCode is a web-based code editor for physical computing made by Microsoft. What does that mean for you? It means you can program your Circuit Playground Express to do almost anything you can dream up right from a website! You can code with blocks similar to the language Scratch, or you can do more advanced coding with Javascript. We'll be sticking to the block-based programming for this project. More on MakeCode for Adafruit boards here ( Install the MakeCode CRICKIT Extension Before we start programming, let's make sure you have the CRICKIT extension installed in MakeCode. Detailed instructions on how to do that can be found in this guide ( Create a New Project with MakeCode Head over to ( and create a new project. Click the button below to access the code for this project. What's going on the code above? Adafruit Industries Page 8 of 59


9 In a forever loop, we call play the "Jingle Bells" tune by calling the jingle functions. As it's a forever loop, this code block loops forever regardless of other events that happen in the code! When capacitive touch input A3 on the CPX is touched, we want to move the DC motor at 25% speed for 5 seconds, then stop. The "Jingle Bells" tune can be separated into 3 parts. The song starts with part 1, then goes to part 2, then back to part 1 then ends with part 3 before repeating again. Creating functions for these song parts then "calling" the functions later allows us to have much cleaner looking and more organized code. It also allows us to reduce the amount of code needed for the project making the program more efficient! Uploading the Code Now that we have the code for the project, we need to upload it to the CPX. Let's name our file and download it. Adafruit Industries Page 9 of 59
. In some cases, you may need to press the reset button twice to get into programming mode.")
10 Choose a name at the bottom of the page. Then click the pink Download button. Follow the directions and connect your CPX to your computer via the USB cable. Click the CPX Reset button once to go into programming mode (all NeoPixels will turn green). In some cases, you may need to press the reset button twice to get into programming mode. Next, look for the file in your downloads folder and drag it onto your CPLAYBOOT drive that should have showed up in your file manager/finder when you plugged in your board and entered programming mode. You should now see the CPLAYBOOT drive disappear. Power up CRICKIT Connect CRICKIT to power with the 5V DC power cable and be sure the tiny on/off switch next to the black power input jack is on. The code should now be running so try it out! When the board is powered up, the LED should turn and and "Jingle Bells" should start playing. When the tin foil is touched, the DC motor should move for five seconds. If you are having issues getting things to work check out this extended guide here ( Adafruit Industries Page 10 of 59


11 Build the Rotation Rig First we'll build the structure for for the rotating wheels which will push Adabot and the reindeer up and down. On both sides of the box, use a pencil and a ruler to mark a point 4.3 cm from the back of the box and 3.3 cm from the bottom of the box. Use a hobby knife to poke holes at the points. Take a skewer and push through holes. Adafruit Industries Page 11 of 59


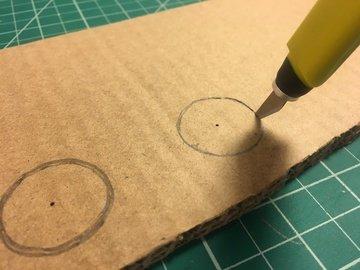
12 Making the Wheels Tie some twine around a push pin. Then tie the other side of the twine around a pencil tip with the length between the twine and the pencil tip being Adafruit Industries Page 12 of 59


13 3 cm. Stick the push pin into thick width cardboard.* Use the pin and twine to guide the pencil around a circle. Repeat 3 more times. Make sure circles are close to 3 cm. Cut out circles with hobby knife. *You may need to add a layer of cardboard underneath for the push pin to be stable. Adafruit Industries Page 13 of 59


14 Adafruit Industries Page 14 of 59


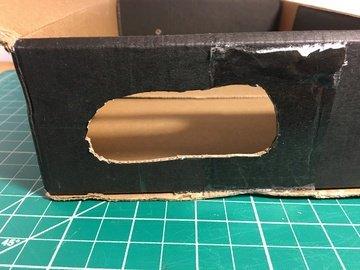
15 Prepping the box to mount the motor Take out the skewer and use a hobby knife to enlarge the hole on the left side of the box until the motor extension fits inside.* Holding the motor parallel to the bottom of the box, use a pencil to trace the outside of the motor. Repeat on the outside of the box. Unfold the left side of the box pulling out the middle piece of cardboard. Cut out the motor tracing from the inner and outer walls of the box. Fold the middle piece back in place. Adafruit Industries Page 15 of 59
 wires are coming out away from the box wall.")


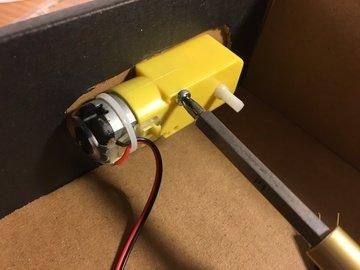
16 *Orient the motor such that the black and red (GND and 5V) wires are coming out away from the box wall. Also the zip tie holding the wires has a piece that may be sticking up so make sure that is not touching the wall. Adafruit Industries Page 16 of 59


17 Adafruit Industries Page 17 of 59

 Put the motor in place")

18 Mounting the motor Place the motor inside it's mounting spot and firmly press onto wall to create an imprint with the small circular plastic piece. Create a hole with a hobby knife where the imprint is. (This is to make the motor mounted more parallel and sturdy) Put the motor in place and screw in an M3 screw until the screw end comes out the other side of the box. Twist on a M3 nut. Repeat with the other screw and nut. Adafruit Industries Page 18 of 59


19 Adafruit Industries Page 19 of 59


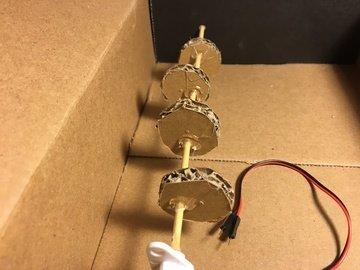
20 Placing the circles and skewer Draw a point in between the center and the edge of each cardboard circle. Adafruit Industries Page 20 of 59


21 Poke a skewer through all the drawn points. Stick skewer through the pre-made hole on the right side of the box. Once the skewer is through the right side hole, place the circles onto the skewer. Attach the TT-motor hub to the motor. Drop some hot glue inside of the motor hub and stick skewer end inside holding until dry. Orient each circle to be 90 degrees of rotation from each other. One way to do this: starting with the right most circle, orient such that the skewer is going through at 12 o'clock. Then the next one over at 3 o'clock etc. Make sure each circle has an equidistant space from the next and hot glue circles in place. Cut the excess skewer on the right side of the box if desired. Adafruit Industries Page 21 of 59


22 Adafruit Industries Page 22 of 59

23 Adafruit Industries Page 23 of 59

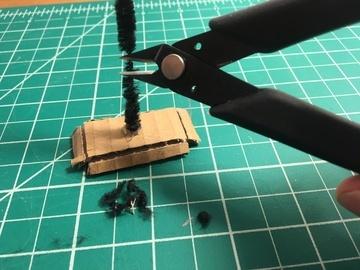
 14 cm long black pipe cleaners.")
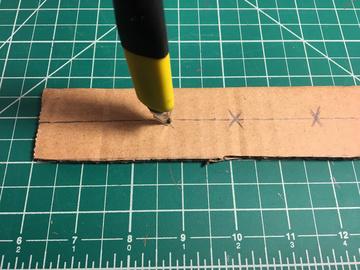
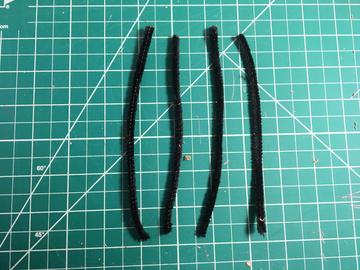
24 Making Attachments Next we'll add some pipe cleaners which will be moved up and down by the circles on the skewer as the motor turns. In order for the reindeer and Adabot to stay upright and facing forward, they need some guides which we'll make next. The pipe cleaner guide With some thick width cardboard, cut out rectangle that is 4cm by 24cm. Draw a line through the center at 2 cm. Place the cardboard over the wheels and mark an x directly above each circle. Use a hobby knife to poke holes where each x is. Cut (4) 14 cm long black pipe cleaners. * Make sure holes in cardboard are large enough for pipe cleaners to fit easily through. *If you have clear or black straws feel free to use those instead of the pipe cleaners. They have less friction and move through the cardboard easier. Adafruit Industries Page 24 of 59


25 Adafruit Industries Page 25 of 59


26 Adafruit Industries Page 26 of 59


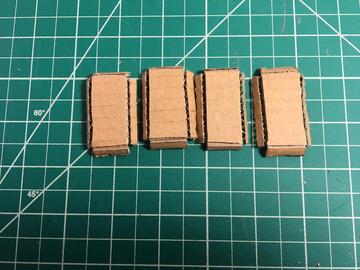
27 Creating the wheel guiders Measure (4) 3cm x 5cm rectangles. Draw lines inside the rectangles on the heights and widths at 0.5cm from the outside. Cut out the 3 cm x 5 cm rectangles. Score the inside lines and cut out the corner boxes. Fold the sides in. Draw a point in the center of each guider. Poke a small hole through each point. Adafruit Industries Page 27 of 59


28 Adafruit Industries Page 28 of 59


29 Stick a pipe cleaner through a guider with roughly 2cm coming out. Bend the end in. Glue the top of the pipe cleaner onto the guider and hold the pipe cleaner perpendicular to the guider as it dries. Adafruit Industries Page 29 of 59


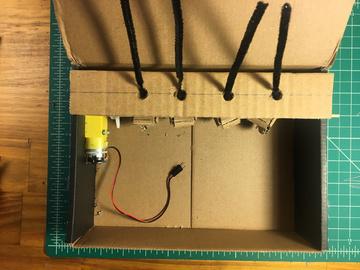
30 Cut off the excess pipe cleaner on the bottom of the guider. Repeat with other 3 pipe cleaners and guiders. To reduce the amount of friction from the pipe cleaners moving through the cardboard, add some hot glue to the inside of the hole made in the long rectangular cardboard piece. Reduce the friction even more by shaving away the pipe cleaner hair on the bottom with scissors or a wire cutter. Place the pipe cleaners through the long rectangular cardboard piece. Rest each guider over it's corresponding wheel. Push the long rectangular piece towards the back of the back of the box such that the pipe cleaners slightly lean back. (This will help Adabot and the reindeer stay facing forward later). Glue the long rectangular piece in place. Adafruit Industries Page 30 of 59


31 Adafruit Industries Page 31 of 59

32 Adafruit Industries Page 32 of 59


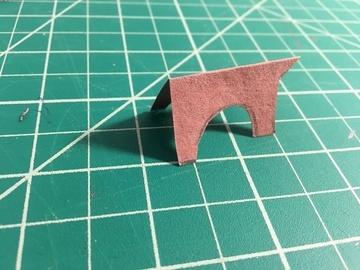
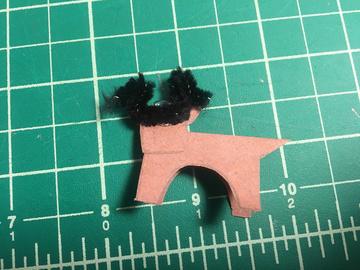
33 Adabot and the Reindeer Making the reindeer! Take a piece of brown construction paper and fold it in half. Draw the 3 reindeer bodies and heads. Each body should be about 3 cm long. Cut out the bodies and heads. Glue the heads onto the bodies. Cut (3) 5 cm long black or brown pieces of pipe cleaner. Bend the ends of the pipe cleaners to form antlers. Glue onto heads. Adafruit Industries Page 33 of 59


34 Adafruit Industries Page 34 of 59


35 Adafruit Industries Page 35 of 59
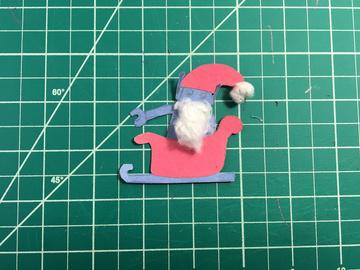
 construction paper, draw the sleigh top, the sleigh bottom, Adabot and his hat.")


36 Making Adabot and his sleigh! On some red and blue (or whatever colors you want!) construction paper, draw the sleigh top, the sleigh bottom, Adabot and his hat. Cut out the pieces and glue them onto each other accordingly. With some fake spider web or cotton balls, roll a small piece into a ball for the hat. Take another piece and form into a beard shape. Glue pieces onto Adabot. Cut a small piece of skewer and glue to back of Adabot's arm for stability. (Those reindeer can really pull!) Adafruit Industries Page 36 of 59


37 Adafruit Industries Page 37 of 59


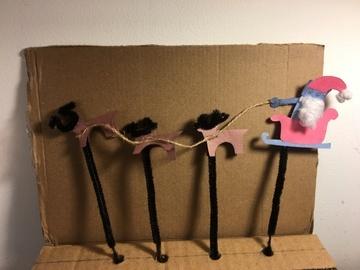
38 Attaching to pipe cleaners Cut the top folded section of the box off. Glue on reindeer and Adabot to the pipe cleaners so they have enough room between each other. It helps to glue the reindeer on their front legs to counterbalance the weight of their antlers. Cut a piece of twine that is roughly 20 cm long. Glue to Adabot's hand and reindeer. Adafruit Industries Page 38 of 59

39 Adafruit Industries Page 39 of 59

40 Adding LEDs To create the LED stars and Rudolph's nose, we will use copper tape and make a parallel circuit ( A parallel circuit allows all leds to have the same voltage applied across but current will be different. A series circuit would work too, but a parallel circuit works better for the layout of the LEDs and the copper tape. If you're curious about the science behind circuits and want to explore further, check out the guide: Circuits from Scratch ( Adafruit Industries Page 40 of 59
. Draw a line for POWER (3.")

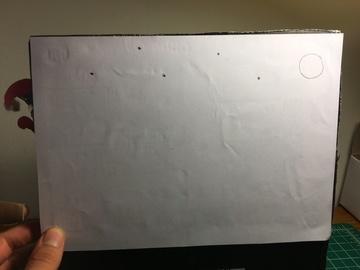
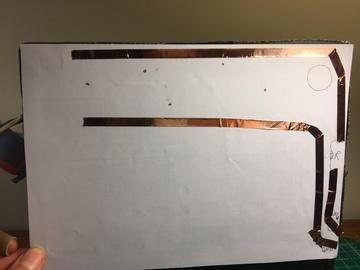
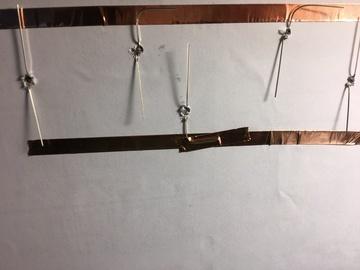
41 Mapping out the circuit and adding copper tape Cut out a 17 cm x 24 cm sized piece of black construction paper. Glue it to front of diorama. Draw with pencil where stars and moon should be placed. Make the marks in the same locations on the back of the diorama. (I glued a piece of white paper to the back to make it easier to see the circuit). Draw a line for POWER (3.3V) from the bottom right to the top left. Mark space for the resistor shortly after line begins. Draw a line for GND from the bottom right to under the bottom side of the LED marks. With copper tape, place down along lines leaving space for the resistor. The less you cut the tape, the more conductive it will be. When reaching a Adafruit Industries Page 41 of 59


42 corner, instead of cutting then starting the tape again, try folding. Cut out the moon. Adafruit Industries Page 42 of 59

43 Adafruit Industries Page 43 of 59


44 Add the LEDs! Stick the white LEDs through the holes from the front of the diorama. Orient the LEDs such that the longer leg (the positive lead) is facing up. Use more copper tape to tape down the LEDs with legs that reach the tape. Bend the legs of the LEDs that are sticking over the tape such that they align with the tape. Tape LEDs down. For the legs that don't reach tape, add some tape to an existing line of tape, tape down the LEDs. Tape down the resistor. *The LED legs need to be sandwiched in between copper tape in order to access power from the CPX. Adafruit Industries Page 44 of 59

45 Adafruit Industries Page 45 of 59


46 Rudolph's red nose Poke a hole for Rudolph's nose. Stick a red LED through hole. Adafruit Industries Page 46 of 59
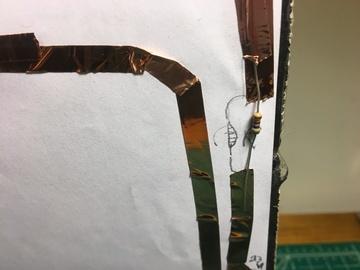
 is aligned with upper back tape and")


47 Add copper tape to back of the front leg and the upper back. Bend LED legs so the longer (positive lead) is aligned with upper back tape and negative lead aligned with front leg tape. Using two black jumper wires or black ribbon cables, tape down one end of one wire to each LED leg. Pull the other ends of the cables through the moon hole and tape the positive lead to positive line of tape and negative to negative line. Adafruit Industries Page 47 of 59


48 Adafruit Industries Page 48 of 59


49 Adding power and ground With black and red alligator clips, attach to GND and 3.3v on CPX then tape down the other ends to back of diorama in designated areas. Plug in power to CRICKIT and, hopefully, watch the lights turn on! Adafruit Industries Page 49 of 59


50 Troubleshooting the LEDs If some lights are on and others are not: Double check the orientation of the LED legs. The longer legs should be connected to power. Adafruit Industries Page 50 of 59


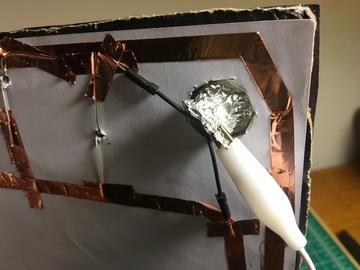
51 If the white LEDs turn on but the red one doesn't (or vice versa): Try removing the resistor and putting copper tape down in its place. Not all LEDs may be getting enough current. If all else fails, the more copper tape you add to meager looking areas, the more conductivity you will have. Capacitive touch moon Take some aluminum foil and the moon we cut out earlier. Wrap the moon in the foil. Glue the moon in place with the extra foil coming out of the back. Attach an alligator clip to the foil and the other end to A3 on the CPX. Screw in the DC motor to the CPX. Adafruit Industries Page 51 of 59


52 Adafruit Industries Page 52 of 59


53 Glue a skewer to the back to hold the diorama upright. Power up CRICKIT, touch the moon, and watch them ride! Adafruit Industries Page 53 of 59
54 Adafruit Industries Page 54 of 59


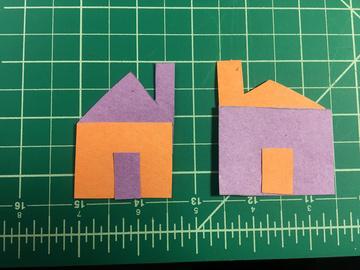
55 Crafting the Scene The houses Fold a piece of black construction paper so it fits in the front of an Adafruit (or other) box. Mark where the box ends. Cut out the folds and trim the top. Draw and cut out snowy hills with white paper. Draw and cut out houses with two different colored construction paper. Glue pieces together with glue stick. Add some cotton ball or fake spider web to chimneys. Adafruit Industries Page 55 of 59


56 Adafruit Industries Page 56 of 59


57 Adafruit Industries Page 57 of 59


58 Finish up the decorations and let it snow! Glue snowy hill and houses in place. Use a skewer and white pain to dot some snow on both backgrounds. Glue front drop in place. Adafruit Industries Page 58 of 59


59 Happy Holidays! Adafruit Industries Last Updated: :49:07 AM UTC Page 59 of 59
Hammer Time Mini Golf Hazard with Crickit
 Hammer Time Mini Golf Hazard with Crickit Created by John Park Last updated on 2018-07-09 06:47:53 AM UTC Guide Contents Guide Contents Overview Please Hammer, Don't Hurt Em Parts Materials & Tools Program
Crickit Powered Mini Chair Swing Ride!
 Crickit Powered Mini Chair Swing Ride! Created by Isaac Wellish Last updated on 2018-11-05 09:18:17 PM UTC Guide Contents Guide Contents Overview Adafruit Parts Materials and Tools Swing Structure First
Crawling Baby Sea Turtle Robot
 Crawling Baby Sea Turtle Robot Created by Dano Wall Last updated on 2018-08-22 04:10:26 PM UTC Guide Contents Guide Contents Overview Save the Wee Turtles Household Materials Adafruit Electronics Create
Ping Pong Ball Launcher
 Ping Pong Ball Launcher Created by Dano Wall Last updated on 2019-01-25 03:19:13 AM UTC Guide Contents Guide Contents Overview Electronic Parts Circuit Playground Express USB cable - USB A to Micro-B Alkaline
Crickit Dancing Marionette Kit Created by Dano Wall. Last updated on :03:11 PM UTC
 Crickit Dancing Marionette Kit Created by Dano Wall Last updated on 2019-04-04 07:03:11 PM UTC Overview This project demonstrates how to build a robotic marionette that is controlled with four arcade-style
Crawling Animatronic Hand
 Crawling Animatronic Hand Created by Dano Wall Last updated on 2018-12-03 06:39:35 PM UTC Guide Contents Guide Contents Overview Parts Used Tools & Materials Prepare the Hand Your hand is now ready to
Paper Airplane Launcher
 Paper Airplane Launcher Created by Dano Wall Last updated on 2018-08-27 08:36:14 PM UTC Guide Contents Guide Contents Overview A Launching Platform The Electronics Materials Build the Launcher Attach Motors
Crickit Carnival Bumper Bot
 Crickit Carnival Bumper Bot Created by John Park Last updated on 2018-08-22 04:08:52 PM UTC Guide Contents Guide Contents Overview Parts Materials and Tools Build the Bumper Bot Cut the Cardboard Chassis
Slider Crank Mechanism -- from Cardboard and Craft Sticks
 Slider Crank Mechanism -- from Cardboard and Craft Sticks Created by John Park Last updated on 2018-08-22 04:07:21 PM UTC Guide Contents Guide Contents Overview Materials Tools Build the Slider Crank Build
Mini Golf Course with Circuit Playground and Crickit
 Mini Golf Course with Circuit Playground and Crickit Created by Dano Wall Last updated on 2018-08-22 04:09:31 PM UTC Guide Contents Guide Contents Overview Materials & Tools Adafruit Parts CRICKIT Assembly
Pushrod Garage. Created by John Park. Last updated on :07:30 PM UTC
 Pushrod Garage Created by John Park Last updated on 2018-08-22 04:07:30 PM UTC Guide Contents Guide Contents Overview Parts & Materials Tools Pushrod Mechanism Code it with MakeCode Functions On Start
Adabot Operation Game
 Adabot Operation Game Created by John Park Last updated on 2018-08-22 04:11:17 PM UTC Guide Contents Guide Contents Overview Parts Materials & Tools Build the Operating Table Print the Board and Pieces
Snake Charmer Box. Created by Dano Wall. Last updated on :07:25 PM UTC
 Snake Charmer Box Created by Dano Wall Last updated on 2018-08-22 04:07:25 PM UTC Guide Contents Guide Contents Overview Materials Circuit Playground Express Standard servo - TowerPro SG-5010 Small Alligator
Infinity Mirror Valentine's Candy Box
 Infinity Mirror Valentine's Candy Box Created by Kathy Ceceri Last updated on 2019-02-07 09:44:54 PM UTC Guide Contents Guide Contents Overview Parts List -- Mini Box Version Chibitronics Color LEDs Add-On
Neon LED Signs. Created by John Park. Last updated on :11:09 PM UTC
 Neon LED Signs Created by John Park Last updated on 2018-08-22 04:11:09 PM UTC Guide Contents Guide Contents Overview Parts Materials Tools Build the Sign Driver Preparation Solder the Circuit Solder the
Stumble-Bot. Created by Dano Wall. Last updated on :04:06 AM UTC
 Stumble-Bot Created by Dano Wall Last updated on 2018-09-06 05:04:06 AM UTC Guide Contents Guide Contents Overview Simply Stumbling We Have the Technology Other Supplies Leg Assembly Front Legs Back Legs
Reindeer Mask with Animated Eyes
 Reindeer Mask with Animated Eyes Created by Dano Wall Last updated on 2018-12-05 10:50:10 PM UTC Guide Contents Guide Contents Overview Parts Adafruit HalloWing M0 Express Convex Plastic Lens with Edge
CPX Mystery Dreidel. Created by Kathy Ceceri. Last updated on :51:40 PM UTC
 CPX Mystery Dreidel Created by Kathy Ceceri Last updated on 2018-12-04 02:51:40 PM UTC Guide Contents Guide Contents Overview Parts List -- Electronics Circuit Playground Express USB cable - USB A to Micro-B
Trash Panda. Created by Dano Wall. Last updated on :30:46 AM UTC
 Trash Panda Created by Dano Wall Last updated on 2018-06-06 02:30:46 AM UTC Guide Contents Guide Contents Overview Amazon's playful boxes We have the technology Other supplies you will need Create your
Bunny Ears with MakeCode
 Bunny Ears with MakeCode Created by Erin St Blaine Last updated on 2018-08-22 04:05:47 PM UTC Guide Contents Guide Contents Introduction Tools & Other Materials Programming with MakeCode Set Up the Light
The Scream: Interactive Screaming Painting
 The Scream: Interactive Screaming Painting Created by John Park Last updated on 2018-08-22 04:10:47 PM UTC Guide Contents Guide Contents Overview Parts & Materials Optional Build the Interactive Painting
No-Sew LED Wristband. Created by Kathy Ceceri. Last updated on :23:40 PM UTC
 No-Sew LED Wristband Created by Kathy Ceceri Last updated on 2018-11-13 09:23:40 PM UTC Guide Contents Guide Contents Overview Playing with LED Options Suggested Parts List -- Electronics Suggested Materials
Con Badge with Circuit Playground Express
 Con Badge with Circuit Playground Express Created by Sophy Wong Last updated on 2018-04-11 05:00:16 PM UTC Guide Contents Guide Contents Overview Tools & Materials Laser Cutting Program the Circuit Playground
3D Printed 20w Amplifier Box
 3D Printed 20w Amplifier Box Created by Ruiz Brothers Last updated on 2018-02-26 06:48:02 PM UTC Guide Contents Guide Contents Overview Prerequisite Guide Tools & Supplies Parts 3D Printing Print in your
Adafruit Capacitive Touch Sensor Breakouts
 Adafruit Capacitive Touch Sensor Breakouts Created by Bill Earl Last updated on 2018-08-22 03:36:13 PM UTC Guide Contents Guide Contents Overview Momentary Toggle 5-Pad Momentary Assembly and Wiring Installing
Android GBoard Morse Code Control with Circuit Playground Express
 Android GBoard Morse Code Control with Circuit Playground Express Created by Dave Astels Last updated on 2018-08-22 04:10:30 PM UTC Guide Contents Guide Contents Overview Parts Materials for the box Installing
3D Printed 20w Amplifier Box
 3D Printed 20w Amplifier Box Created by Noe & Pedro Ruiz Last updated on 2014-04-22 03:01:38 PM EDT Guide Contents Guide Contents Overview Prerequisite Guide Tools & Supplies Parts 3D Printing Print in
Solar Boost Bag. Created by Becky Stern. Last updated on :44:55 PM UTC
 Solar Boost Bag Created by Becky Stern Last updated on 2018-08-22 03:44:55 PM UTC Guide Contents Guide Contents Overview 3D Design Files Customize Design Assemble Circuit Prepare Solar Panel Enclosure
Feather Weather Lamp. Created by Ruiz Brothers. Last updated on :54:26 PM UTC
 Feather Weather Lamp Created by Ruiz Brothers Last updated on 2018-08-22 03:54:26 PM UTC Guide Contents Guide Contents Overview Weather Reactive Pixels Prerequisite Guides Parts Tools & Supplies Circuit
Circuit Playground Express Head-Tilt Ears
 Circuit Playground Express Head-Tilt Ears Created by Dave Astels Last updated on 2018-10-09 04:07:03 PM UTC Guide Contents Guide Contents Overview Parts Circuit Playground Express Micro servo Lithium Ion
Wind Blowing Emoji Prop
 Wind Blowing Emoji Prop Created by John Park Last updated on 2018-08-22 04:05:17 PM UTC Guide Contents Guide Contents Overview Code it with MakeCode Start Up Variables On Loud Sound If - Else Iterate Debounce
Easy Sparkle Pocket T-Shirt
 Easy Sparkle Pocket T-Shirt Created by Erin St Blaine Last updated on 2018-10-18 06:45:05 PM UTC Guide Contents Guide Contents Overview Parts Materials Needed Code with MakeCode Vinyl Cutting Sizing and
Steven Universe Cosplay Shirt & Gem Created by Erin St Blaine. Last updated on :54:25 PM UTC
 Steven Universe Cosplay Shirt & Gem Created by Erin St Blaine Last updated on 2019-04-04 06:54:25 PM UTC Overview Make yourself a Steven Universe costume that will light up the world. This guide will show
Prophet 600 GliGli mod
 Prophet 600 GliGli mod Created by Collin Cunningham Last updated on 2018-08-22 04:04:56 PM UTC Guide Contents Guide Contents Overview What you'll need Program the Teensy++ Modify the Teensy++ Prep header
Tent Lantern. Created by Timothy Reese. Last updated on :17:25 AM UTC
 Tent Lantern Created by Timothy Reese Last updated on 2017-07-14 05:17:25 AM UTC Guide Contents Guide Contents Overview Things you'll need: What You'll Learn: 3D Printing Code Assembly Wiring Diagram Soldering
Milk Jug Glow Skull. Created by John Park. Last updated on :28:36 PM UTC
 Milk Jug Glow Skull Created by John Park Last updated on 2018-09-14 09:28:36 PM UTC Guide Contents Guide Contents Overview Parts Materials & Tools Optional Skull/Sculpting Stand Build the Skull Prep the
Portable Apple Watch Charger
 Portable Apple Watch Charger Created by Ruiz Brothers Last updated on 2017-10-22 09:58:04 PM UTC Guide Contents Guide Contents Overview Smart Charging Prerequisite Guides Parts, Tool & Supplies Circuit
CircuitPython Snow Globe
 CircuitPython Snow Globe Created by John Park Last updated on 2018-08-22 04:04:24 PM UTC Guide Contents Guide Contents Overview Materials and Parts Code with CircuitPython Get Ready! Download the Snow
Sword & Wand Prop Effects with Circuit Playground
 Sword & Wand Prop Effects with Circuit Playground Created by John Park Last updated on 2018-01-13 05:32:54 AM UTC Guide Contents Guide Contents Overview Circuit Playground Express with MakeCode Lots of
FPV Mini Display. Created by Ruiz Brothers. Last updated on :00:18 PM UTC
 FPV Mini Display Created by Ruiz Brothers Last updated on 2017-07-19 01:00:18 PM UTC Guide Contents Guide Contents Overview Mini FPV monitor Adafruit Parts Tools and Supplies Circuit Diagram Electronics
Making Adabot: Part 1
 Making Adabot: Part 1 Created by Rick Winscot Last updated on 2018-08-22 03:37:47 PM UTC Guide Contents Guide Contents Overview Tools / Materials Chassis Fantastic Easy Hardware Classic Connectors Magnificent
FLORA TV-B-Gone. Created by Becky Stern. Last updated on :32:57 PM UTC
 FLORA TV-B-Gone Created by Becky Stern Last updated on 2018-08-22 03:32:57 PM UTC Guide Contents Guide Contents Overview Parts Tutorials Transistors Resistors LEDs Pushbutton Program it Power Fabric pinwheel
NeoPixel Ring Bangle Bracelet
 NeoPixel Ring Bangle Bracelet Created by Becky Stern Last updated on 2017-09-28 11:14:48 PM UTC Guide Contents Guide Contents Overview Circuit Diagram Build it! Arduino Code CircuitPython Code Planning
DIY Circuit Playground Shields
 DIY Circuit Playground Shields Created by Dave Astels Last updated on 2018-08-22 04:05:06 PM UTC Guide Contents Guide Contents Overview Small Alligator Clip Test Lead (set of 12) Small Alligator Clip to
Circuit Playground Express Laser Tag
 Circuit Playground Express Laser Tag Created by John Park Last updated on 2017-11-14 01:56:23 AM UTC Guide Contents Guide Contents Build a Laser Tag Game Code the Laser Tag Game MakeCode Transmitting IR
UFO Flying Saucer with Circuit Playground Express
 UFO Flying Saucer with Circuit Playground Express Created by John Park Last updated on 2018-08-31 08:42:17 PM UTC Guide Contents Guide Contents Overview Code the UFO with CircuitPython Build the Flying
Mad Science Test Tube Rack
 Mad Science Test Tube Rack Created by John Park Last updated on 2016-10-17 09:21:01 PM UTC Guide Contents Guide Contents Overview Lighted Test Tube Parts Materials and Tools Optional Test Tube Rack Parts
Trellis 3D Printed Enclosure
 Trellis 3D Printed Enclosure Created by Ruiz Brothers Last updated on 2018-08-22 03:39:07 PM UTC Guide Contents Guide Contents Overview Parts Tools & Supplies Modeling 123D Design Customize Measuring Parts
Fiddy - the FTDI Clip
 Fiddy - the FTDI Clip Created by Timothy Reese Last updated on 2016-11-22 09:18:04 PM UTC Guide Contents Guide Contents Overview FTDI is Great! Things you'll need: What You'll Learn: 3D Printing Assembly
Interactive Gift Box. Created by codingpro. Last updated on :47:40 AM UTC
 Interactive Gift Box Created by codingpro Last updated on 2018-01-10 01:47:40 AM UTC Guide Contents Guide Contents Overview Adafruit GEMMA M0 - Miniature wearable electronic platform Lithium Ion Polymer
BLE Light Switch with Feather nrf52840 and Crickit
 BLE Light Switch with Feather nrf52840 and Crickit Created by John Park Last updated on 2019-02-15 07:06:19 PM UTC Guide Contents Guide Contents Overview Parts Adafruit Feather nrf52840 Express Adafruit
NeoPixie Dust Bag with Circuit Playground Express
 NeoPixie Dust Bag with Circuit Playground Express Created by John Park Last updated on 2017-12-20 10:00:29 PM UTC Guide Contents Guide Contents Overview Code It Setup Animation Color Touch Variable Color
NeoMatrix 8x8 Word Clock
 NeoMatrix 8x8 Word Clock Created by Andy Doro Last updated on 2017-10-10 04:10:51 AM UTC Guide Contents Guide Contents Overview Parts List Parts Tools Circuit Assembly Overview Uploading Code Understanding
7 Portable Multitouch Raspberry Pi Tablet
 7 Portable Multitouch Raspberry Pi Tablet Created by Ruiz Brothers Last updated on 2017-02-27 04:13:53 PM UTC Guide Contents Guide Contents Overview Portable Raspberry Pi Tablet 7" Multitouch Display Parts
Trinket NeoPixel LED Longboard
 Trinket NeoPixel LED Longboard Created by Ruiz Brothers Last updated on 2017-10-02 06:00:32 PM UTC Guide Contents Guide Contents Overview Parts Tools & Supplies Prerequisite Guides 3D Printing PLA Material
3D Printed Google AIY Voice Kit
 3D Printed Google AIY Voice Kit Created by Ruiz Brothers Last updated on 2018-01-09 12:47:26 AM UTC Guide Contents Guide Contents Overview 3D Print a DIY AI enclosure for the Raspberry PI! Parts, Tools
Fiddy - the FTDI Clip
 Fiddy - the FTDI Clip Created by Timothy Reese Last updated on 2018-08-22 03:57:42 PM UTC Guide Contents Guide Contents Overview FTDI is Great! Things you'll need: What You'll Learn: 3D Printing Assembly
Adafruit TPL5110 Power Timer Breakout
 Adafruit TPL5110 Power Timer Breakout Created by lady ada Last updated on 2017-12-11 06:28:19 AM UTC Guide Contents Guide Contents Overview Pinouts Power Pins Control Pins Assembly Prepare the header strip:
Celebration Spectacles
 Celebration Spectacles Created by Becky Stern Last updated on 2018-08-22 03:45:59 PM UTC Guide Contents Guide Contents Overview Circuit Diagram Assemble Circuit Test and Glue Wear 'em! 2 3 6 7 10 14 Adafruit
FLORA and GEMMA ICSP. Created by Becky Stern. Last updated on :42:16 PM UTC
 FLORA and GEMMA ICSP Created by Becky Stern Last updated on 2018-08-22 03:42:16 PM UTC Guide Contents Guide Contents Overview Reprogram FLORA over ICSP Reprogram GEMMA over ICSP 2 3 4 9 Adafruit Industries
LED Eyes. Created by Ruiz Brothers. Last updated on :50:55 AM UTC
 LED Eyes Created by Ruiz Brothers Last updated on 2018-01-13 05:50:55 AM UTC Guide Contents Guide Contents Overview Parts, Tools and Supplies Enameled Copper Magnet Wire 11 meters / 0.1mm diameter Adafruit
Circuit Playground Yoyo
 Circuit Playground Yoyo Created by Ruiz Brothers Last updated on 2018-01-13 05:56:02 AM UTC Guide Contents Guide Contents Overview 3D Printed NeoPixel Yoyo History of the Yo-Yo Expectations Parts Tools
NeoPixel Fairy Crown. Created by Erin St Blaine. Last updated on :22:47 AM UTC
 NeoPixel Fairy Crown Created by Erin St Blaine Last updated on 2018-12-31 02:22:47 AM UTC Guide Contents Guide Contents Overview Adafruit NeoPixel LED Dots Strand - 20 LEDs at 2" Pitch Adafruit GEMMA M0
Adafruit PowerBoost 500 Shield
 Adafruit PowerBoost 500 Shield Created by lady ada Last updated on 2018-08-22 03:43:27 PM UTC Guide Contents Guide Contents Overview Pinouts DC/DC Boost section Indicator LEDs Charging section Power Switch
Glowing Smokey Skull. Created by Ruiz Brothers. Last updated on :03:40 PM UTC
 Glowing Smokey Skull Created by Ruiz Brothers Last updated on 2018-08-22 04:03:40 PM UTC Guide Contents Guide Contents Overview Easy DIY Halloween Props Electronic Halloween! Circuit Playground NeoPixels
Sewable NeoPixels. Created by Becky Stern. Last updated on :50:14 PM EDT
 Sewable NeoPixels Created by Becky Stern Last updated on 2015-08-25 07:50:14 PM EDT Guide Contents Guide Contents Overview Prerequisite guides Lots of Pixels? Hook up alligator clips Run pixel test code
Guardian Shield+ Zelda Breath of the Wild
 Guardian Shield+ Zelda Breath of the Wild Created by Ruiz Brothers Last updated on 2018-08-22 04:01:50 PM UTC Guide Contents Guide Contents Overview Articulating Handle Rechargeable Prerequisite Guides
LED Lightbox. Created by Sam Clippinger. Last updated on :50:00 AM UTC
 LED Lightbox Created by Sam Clippinger Last updated on 2016-09-03 01:50:00 AM UTC Guide Contents Guide Contents Overview TL;DR Skill Level Parts List Yellow sticker reads: "Bad planning on your part does
Secret Hollow Book Intrusion Detector
 Secret Hollow Book Intrusion Detector Created by John Park Last updated on 2018-08-22 04:05:48 PM UTC Guide Contents Guide Contents Overview Materials & Tools Optional Android Hollowing the Book Preparation
Interior Purse Light. Created by Becky Stern. Last updated on :41:08 PM UTC
 Interior Purse Light Created by Becky Stern Last updated on 2018-08-22 03:41:08 PM UTC Guide Contents Guide Contents Overview Circuit Diagram Stitch Sequins Add Tape Arduino Code CircuitPython Code Use
Boomy The Boombox. Created by Ruiz Brothers. Last updated on :52:13 PM UTC
 Boomy The Boombox Created by Ruiz Brothers Last updated on 2017-09-05 08:52:13 PM UTC Guide Contents Guide Contents Overview Boomy The Boombox AdaBox 004 Parts 3D Printing 3D Printed Parts Enclosure Design
FLORA and GEMMA ICSP. Created by Becky Stern. Last updated on :30:55 PM EST
 FLORA and GEMMA ICSP Created by Becky Stern Last updated on 2015-02-19 02:30:55 PM EST Guide Contents Guide Contents Overview Reprogram FLORA over ICSP Reprogram GEMMA over ICSP 2 3 5 10 Adafruit Industries
Audio Prank Gift Box. Created by Becky Stern. Last updated on :46:15 PM UTC
 Audio Prank Gift Box Created by Becky Stern Last updated on 2018-08-22 03:46:15 PM UTC Guide Contents Guide Contents Overview Circuit Diagram Prepare Components Build Circuit Wrap and Give 2 3 5 6 12 14
3D Printed Camera LED Ring
 3D Printed Camera LED Ring Created by Ruiz Brothers Last updated on 2018-08-22 03:39:34 PM UTC Guide Contents Guide Contents Overview DIY LED Ring Light Prerequisite Guide: Parts List: Tools & Supplies
Data Logging with Feather and CircuitPython
 Data Logging with Feather and CircuitPython Created by Kattni Rembor Last updated on 2018-04-30 09:58:20 PM UTC Guide Contents Guide Contents Overview Things You'll Need Adafruit Feather M0 Express - Designed
3D Printed LED Buckle
 3D Printed LED Buckle Created by Ruiz Brothers Last updated on 2018-08-22 03:38:02 PM UTC Guide Contents Guide Contents Overview Customize the Buckle Artwork, Design and Text Scale, Adjust and Combine
Simple LED Unicorn Horn
 Simple LED Unicorn Horn Created by Ruiz Brothers Last updated on 2018-08-22 03:56:14 PM UTC Guide Contents Guide Contents Overview 3D Printed Unicorn Horn Want More Magic/Colors? Great For Beginners Parts
Adafruit TPL5111 Reset Enable Timer Breakout
 Adafruit TPL5111 Reset Enable Timer Breakout Created by lady ada Last updated on 2017-11-02 07:32:27 PM UTC Guide Contents Guide Contents Overview Pinouts Power Pins Control Pins Assembly Prepare the header
NeoPixel Bike Light. Created by Ruiz Brothers. Last updated on :43:46 PM UTC
 NeoPixel Bike Light Created by Ruiz Brothers Last updated on 2018-11-15 07:43:46 PM UTC Guide Contents Guide Contents Overview 3D Printed Headlight Adafruit's Feather Platform Circuit Python Powered Parts
Magical Mistletoe. Created by Leslie Birch. Last updated on :45:29 PM UTC
 Magical Mistletoe Created by Leslie Birch Last updated on 2018-08-22 03:45:29 PM UTC Guide Contents Guide Contents Overview Tools & Supplies Circuit Diagram Test the Sensor Prepare Parts Attach LED Sequins
Cup o' Sound. Created by Becky Stern. Last updated on :30:06 PM EST
 Cup o' Sound Created by Becky Stern Last updated on 2015-02-18 01:30:06 PM EST Guide Contents Guide Contents Overview Circuit Diagram Load Sound and Prepare Components Solder Circuit and Assemble Use it!
Big Cat Costumes. Dress like a lion, lynx, or cheetah this Halloween and Trick-or-Treat for Big Cats!
 Big Cat Costumes Dress like a lion, lynx, or cheetah this Halloween and Trick-or-Treat for Big Cats! It s easy to make these simple costumes. You just need some easy-to-use tools, a few materials, and
Punk LED Collar. Created by Becky Stern. Last updated on :02:45 PM EST
 Punk LED Collar Created by Becky Stern Last updated on 2015-02-20 01:02:45 PM EST Guide Contents Guide Contents Overview Tools & Supplies Circuit Diagram Install LEDs Solder Components Test & Finish Wear
Webcam Cover-Up Lego brick with Adabot Mini Fig
 Webcam Cover-Up Lego brick with Adabot Mini Fig Created by Ruiz Brothers Last updated on 2018-08-22 04:06:44 PM UTC Guide Contents Guide Contents Overview 3D Printing What If I Don't Have A 3D Printer?
Clockwork Goggles. Created by John Park. Last updated on :03:10 PM UTC
 Clockwork Goggles Created by John Park Last updated on 2018-08-22 04:03:10 PM UTC Guide Contents Guide Contents Overview Assemble Circuit and Goggles CircuitPython Setup and Code Rock the Goggles 2 3 6
Naughty or Nice Machine
 Naughty or Nice Machine Created by Brian Corteil Last updated on 2018-08-22 03:45:31 PM UTC Guide Contents Guide Contents Overview It knows if you have been Naughty or Nice! Make It! Parts The Case The
i2c/spi LCD Backpack Created by lady ada Last updated on :11:04 PM UTC
 i2c/spi LCD Backpack Created by lady ada Last updated on 2017-08-16 05:11:04 PM UTC Guide Contents Guide Contents Overview Which LCD to Use? Wait - the backpack has 16 holes, but my LCD only has 14 pins!
Bike Wheel POV Display
 Bike Wheel POV Display Created by Becky Stern Last updated on 2017-09-12 03:10:38 PM UTC Guide Contents Guide Contents Overview Parts and Tools Circuit Diagram Prep LEDs & Breadboard Code Solder Circuit
Light-Up Angler Fish Embroidery
 Light-Up Angler Fish Embroidery Created by Becky Stern Last updated on 2018-08-22 03:35:36 PM UTC Guide Contents Guide Contents Overview Tools & Supplies Layout & Circuit Diagram Sew Circuit Code Hand
PDOB-II-GRM-NSF Ice Shaver. Specially designed for making shaved snow! User s Manual. Brought to you by SAC Food Supplies
 GLOBAL BEAR CORP. PDOB-II-GRM-NSF Ice Shaver Specially designed for making shaved snow! User s Manual Brought to you by SAC Food Supplies Telephone: +1.714.261.6389 Email: sacfoodsupplies@gmail.com Website:
Adafruit LED Sequins. Created by Becky Stern. Last updated on :02:00 AM UTC
 Adafruit LED Sequins Created by Becky Stern Last updated on 2018-03-02 04:02:00 AM UTC Guide Contents Guide Contents Overview Sewing with conductive thread Circuit Diagram GEMMA sequin hat Arduino Code
Paper Ball Ornaments. Materials: Directions:
 Paper Ball Ornaments Circle paper punch Colored construction paper Scissors Elmer s extra strength glue stick Hole puncher Twine 1. Punch or cut 20 circles out of colored paper. 2. Consider using 10 each
CircuitPython Media Dial
 CircuitPython Media Dial Created by Ruiz Brothers Last updated on 2018-02-07 05:00:25 AM UTC Guide Contents Guide Contents Overview Prerequisite Guides Adafruit Trinket M0 - for use with CircuitPython
NeoLoch. Inquisitor Core. Assembly Instructions (9/3/2015)
") NeoLoch Inquisitor Core Assembly Instructions (9/3/2015) Your kit should contain the following items. If you find a part missing, please contact NeoLoch for a replacement. Kit contents: 1 PCB 1 2.1mm DC
NeoLoch Inquisitor Core Assembly Instructions (9/3/2015) Your kit should contain the following items. If you find a part missing, please contact NeoLoch for a replacement. Kit contents: 1 PCB 1 2.1mm DC
DIY Wireless DDR Dance Pad with Bluefruit EZ-Key
 DIY Wireless DDR Dance Pad with Bluefruit EZ-Key Created by Paul Beaudet Last updated on 2018-08-22 03:40:07 PM UTC Guide Contents Guide Contents Overview What's DDR? Materials Cheapo method - As Shown
Adafruit MCP9808 Precision I2C Temperature Sensor Guide
 Adafruit MCP9808 Precision I2C Temperature Sensor Guide Created by lady ada Last updated on 2017-11-12 06:09:49 PM UTC Guide Contents Guide Contents Overview Pinouts Power Pins I2C Data Pins Optional Pins
Coffee Detonator: The TNT Plunger Grinder
 Coffee Detonator: The TNT Plunger Grinder Created by John Park Last updated on 2017-04-12 08:04:36 PM UTC Guide Contents Guide Contents Overview Materials Voltage Conversion AC/DC Voltage Divider Microcontroller
Mystical LED Halloween Hood
 Mystical LED Halloween Hood Created by Becky Stern Last updated on 2017-09-28 11:13:20 PM UTC Guide Contents Guide Contents Overview NeoPixel GEMMA circuit Arduino Code NeoPixel Überguide: Arduino Library
GPS Logging Dog Harness
 GPS Logging Dog Harness Created by Becky Stern Last updated on 2015-01-15 10:15:19 PM EST Guide Contents Guide Contents Overview Circuit Diagram Sew Circuit Use It! 2 3 5 6 15 Adafruit Industries https://learn.adafruit.com/gps-logging-dog-harness
Introducing Adafruit Trellis
 Introducing Adafruit Trellis Created by lady ada Last updated on 2016-09-16 09:12:22 PM UTC Guide Contents Guide Contents Overview Adding LEDs Connecting Library reference Creating the objects Controlling