Bluetooth Controlled NeoPixel Headphones
|
|
|
- Griffin Davidson
- 6 years ago
- Views:
Transcription

1 Bluetooth Controlled NeoPixel Headphones Created by Ruiz Brothers Last updated on :38:05 PM UTC
2 Guide Contents Guide Contents Overview Smart LED HeadPhones Prerequisite Guides Parts Tools and Supplies Headphone Design Matters Project Expectations Software Arduino Libraries Adafruit AVR Boards Uploading Sketch to Adafruit Feather BLE Connect Adafruit BLE Mobile App to Adafruit Feather BLE Uploaded Code Circuit Diagram Reference Connections Build a Prototype 3D Printing Filament Options Slice Settings Download, Modify, Remix Design Dual Extrusion Setting Up Parts in Simplify3D for Dual Extrusion Assembly Measure Headband Prep Jumper Cables Remove Connectors from Cable Prep Extension Wires Strip & Tin Jumper Cable Connect Extension Wires to Jumper Cable Extended Jumper Cable Thread Extension Wires Create Extra Wires for NeoPixel Ring Connect Extra wires to Adafruit Feature 32u4 Bluefruit LE Prep 500mAh Lipo Battery Prep JST Connector From Lipo Battery Adafruit Industries Page 2 of 40
3 Connect Jumpers to JST Connector from Battery Plug JST connector to Adafruit Feather 32u4 Bluefruit LE Mount Adafruit Feather 32u4 Bluefruit LE to case. Connect Wires to First NeoPixel Ring Install First NeoPixel Ring into Case Prep Slide Switch Test Fit Slide Switch Thread Wires from Jumper to Battery Case Connect Slide Switch to Battery Connect Jumper Cable to Slide Switch Connect Ground from Jumper Cable to Battery Connect Second NeoPixel Ring Install Slide Switch to Battery Case Mount Battery to Case Install Second NeoPixel Ring into Battery Case Mount Cover to Battery Case Completed Circuit Assembly Test Fit Assembly onto Headphones Mount Cases to Headphones Mount Cases to Headphones Mounted Cases on Headphones Finished NeoPixel Ring Headphones Adafruit Industries Page 3 of 40

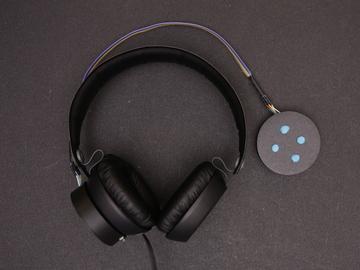
4 Overview Smart LED HeadPhones Headphones are incredibly ubiquitous. They can range from different sizes to styles, comfort to noise cancelling and now even wireless bluetooth. Here's an upgrade you won't find on even the biggest brands. RGB LEDs. This DIY upgrade uses NeoPixel LED rings and an Adafruit Feather Bluefruit LE module to make slick lighting effects. With The Adafruit Bluefruit LE connect app for ios ( or Android ( you can change the colors of the LEDs using a color picker and even trigger dope animations with the tap of a button. The 3D printed enclosures keep everything together and doesn't add too much weight or bulk to your pair of headphones. Adafruit Industries Page 4 of 40
 Adafruit Bluefruit Connect LE (http://adafru.it/ici) Adafruit NeoPixel Uber Guide (http://adafru.it/dhw) Adafruit Industries https://learn.adafruit.")
5 Prerequisite Guides We recommend reading through the following guides to get familiar with the components used in this project. Adafruit Feather 32u4 Bluefruit LE ( Adafruit Bluefruit Connect LE ( Adafruit NeoPixel Uber Guide ( Adafruit Industries Page 5 of 40
 2 16x NeoPixel Rings (http://adafru.it/1463) Slide Switch (http://adafru.it/805) Tools and Supplies You'll need the following tools to complete this project.")
6 Parts The following parts were used in this project. Adafruit Feather 32u4 Bluefruit LE ( 500mAh Lithium Polymer Battery ( 2 16x NeoPixel Rings ( Slide Switch ( Tools and Supplies You'll need the following tools to complete this project. If you don't have access to a 3D print, you can use a service like 3DHubs.com to print and ship the parts to you. 3D Printer ( w/ Filament Soldering Iron ( w/ Solder Jumper Wires ( (300mm in length) Silicone Cover Stranded Wire ( (30AWG) Panavise Jr. ( Helping Third Hand ( Wire Strippers ( Heat Shrink ( Headphones ( Adafruit Industries Page 6 of 40
 headphones by Nokia. They re about $25 bucks on amazon.")

7 Headphone Design Matters This project will not fit every style of headphones. In this project, we're using a pair of Coloud Boom ( headphones by Nokia. They re about $25 bucks on amazon. The enclosure is ideally for headphones with flat ear cups that are not covered by the headband. If you're looking to upgrade your favorite pair of headphones, be sure to carefully inspect the design and take measurements to see if the 3D printed case will fit. The case has a diameter of 58mm (2.28 inches). Adafruit Industries Page 7 of 40

8 Project Expectations If you haven't done any 3D Printing + Electronics projects before, this is an intermediate project and slightly ambitious for a first time DIY project. It requires beginner level soldering skills. The 3D printed parts are relatively easy to print and will fit most build volumes. The most time consuming / challenging part of the project might be splicing some wires. Adafruit Industries Page 8 of 40
9 Software Arduino Libraries To use the Adafruit Feather 32u4 BLE sketch you'll want to make sure you're using the latest version of the Arduino IDE ( (1.6.5 at the time of this writing). If you're totally new to Arduino take a little time to go through some introductory tutorials like how to make a LED blink ( This will help you understand how to use the IDE, load a sketch, and upload code. Next you'll need to make sure the libraries used by the sketch are installed. With the latest Arduino IDE you can use its library manager ( to easily install libraries, or check out this guide on how to manually install a library ( You'll want to install the following libraries: Adafruit BluefruitLE nrf51 Adafruit NeoPixel Search for the libraries in the library manager and they should be easy to find and install. Adafruit AVR Boards Next, you'll need to install the Adafruit AVR boards package from the Boards Manager. Open the Boards Manager and search for Adafruit AVR. This includes all of the boards from Adafruit and will make Arduino compatabile with them. The Daftpunk BLE sketch was tested with version Uploading Sketch to Adafruit Feather BLE This sketch will run the Bluetooth controlled LED program to the NeoPixel strips that are mounted to the front of the visor. To load the sketch make sure the libraries above are installed, and the Arduino is connected to the computer through a USB cable. Under the Tools -> Board menu make sure the Adafruit Feather 32u4 is selected, and under the Tools -> Port menu the serial port for the Adafruit Feather is selected. Then press the upload button or click the Sketch -> Upload item to send the code to the Arduino. Woo-hoo the sketch should be running. feather_bluefruit_neopixel_animation_controller.zip Adafruit Industries Page 9 of 40
10 Connect Adafruit BLE Mobile App to Adafruit Feather BLE Download the Adafruit BLE Connect app for ios or Android. Under the peripherals list, tap the connect button on the Adafruit Bluefruit LE item. Make sure the Feather board is powered on. Select "Controller" and choose either Control Pad or the Color Picker. Adafruit Bluefruit LE Connect for ios ( Adafruit Bluefruit LE Connect for Android ( Control Pad Buttons 1-4 will trigger an animation. 1. larsonscanner 2. color wipe 3. rainbow gradient 4. rainbow cycle Color Picker Here you can change the brightness or RGB value of the leds. Uploaded Code With the Arduino sketch uploaded to the Adafruit Feather 32u4 Bluefruit LE, proceede to the circuit digram page for prototyping the circuit. Adafruit Industries Page 10 of 40
 NeoPixel Ring (Right) PIN 6 Data In Data In Ground Ground Ground Adafruit Industries https://learn.adafruit.")
11 Circuit Diagram Reference Connections Use the circuit diagram to reference for connecting the components together. The diagram does not depict exact wire lengths or size of components. Adafruit Feather 32u4 NeoPixel Ring (Left) NeoPixel Ring (Right) PIN 6 Data In Data In Ground Ground Ground Adafruit Industries Page 11 of 40
12 BAT PWR PWR Build a Prototype If this is your first electronics project, it's a good idea make a prototype before mounting the components to the enclosure. You can use alligator clips to make quick connections without having to solder any wires. The idea here is to test the code and components to see if everything works as expected. You can ommit wiring the slide switch to the 500mAh battery in the prototype - Plugging the male JST connector from the battery to the Adafruit Feather board will prompty power the micro-controller on, unplug to power it off. Alternatively, a breadboard is meant for prototyping, but soldering headers and desoldering headers can be a bit of a challenge. Once you have uploaded the Arduino sketch to the Adafruit Feather 32u4 Bluefruit LE and test connected the NeoPixel Rings and 500mAh battery, verify everything works. With that, you can proceede to the 3D printing and assembly. Adafruit Industries Page 12 of 40

13 3D Printing Filament Options We recommend using PLA material for this project. You can use ABS or other type of filaments but may require a heated bed. PLA prints with minimal warping and doesn't necessary require a heated bed. Slice Settings The table below is a general reference for slice settings. Every 3D printer is slightly different, so you might want to use settings you're familiar with. File Name Settings Details neohp c PLA 90/150 mm/s Case for the Adafruit Feather 32u4 Bluefruit LE and 16x NeoPixel Adafruit Industries Page 13 of 40
14 fcase.stl.15 layer ring height No raft/support c PLA 90/150 mm/s Case for the battery, 16x NeoPixel ring and slide switch.15 layer height No raft/support 190c PLA Cover for the battery and Adafruit Feather 32u4 Bluefruit LE 60/80 mms neohpbcase.stl neohpcover.stl neohp-coverdiffuser.stl 190c PLA The diffuser piece for the cover. Should be printed in white, 60/80 mms transparent or glow-in-the-dark colored filament. Download STLs Download, Modify, Remix Design The parts were modeled in Autodesk Fusion 360 and available to download, modify and remix. The parts can be exported in several file formats - great if you're using a different CAD package. Download Source Dual Extrusion We used a 3D printer (Flashforge Creator Pro) and Simplify3D (slicing software) to achieve a dual extruded printed cover. This allows two colored filaments to be printed in the same job. It's ideal for joining the cover with the diffuser. We used black filament for the outter part of the cover and glow-in-the-dark for the diffuser. If the 3D printer you have access to doesn't have a dual extruder, you an alternative glue the pieces together. The tolerances might be too tight, so a filing tool or sandpaper can help. Adafruit Industries Page 14 of 40
15 Setting Up Parts in Simplify3D for Dual Extrusion Since this requires a handfull of steps, we put together a "Layer by Layer" tutorial video on how to setup the parts in Simplify3D. Adafruit Industries Page 15 of 40

16 Assembly Measure Headband First up, we need to take some measurements of the length of our headphone band using a tape measurer. This will vary depending on your head size. Mine needs to be 44cm. Our jumper cables are only 30cm long so we need to extend them. We can do that by splicing new wires to the existing ones. Prep Jumper Cables We'll need to tare off five wires from the bundle of jumper wires. Remove these as a grouped cable and try to pick a variant of colors that matches the photos. Adafruit Industries Page 16 of 40


17 Remove Connectors from Cable Next, we need to remove the plastic connector parts from the jumper cable using a hobby knife. Remove the plastic protector by inserting the tip of the blade into the flap, pull it out and slide it off. Then chop the metal connector pieces off. Repeat this process for the other end. Adafruit Industries Page 17 of 40


18 Prep Extension Wires We ll need to measure and cut 10 new pieces of 30AWG silicone coated stranded wires to about 7cm in length. Try using colored wires that match the jumper cable. Using wire strippers, remove about 5mm of insulation and apply a bit of solder to tin them. Do this to both ends of each wire. Adafruit Industries Page 18 of 40


19 Strip & Tin Jumper Cable Using wire strippers, remove about 5mm of insulation for each wire from both ends of the jumper cable. Use a helping third hand to hold wires in place while soldering. Apply solder to each wire to tin them. Cut two pieces of heat shrink tubbing to about 3cm in length. These should match the length of the jumper cable wires that are separated like in the photo. Adafruit Industries Page 19 of 40


20 Connect Extension Wires to Jumper Cable Solder the extension wires to the jumper cable by heating up the tinned wires together. Try to match up the colors. Use a helping third hand to hold wires in place while you solder. Cut pieces of heat shrink tubing to insulate the exposed wires. Use tip of soldering iron to shrink tubing. Add a larger second piece of heat shrink tubing to group the bundle of extension wires. Repeat for the other side of cable. Adafruit Industries Page 20 of 40


21 Extended Jumper Cable You now have a jumper cable thats long enough to wrap around the entire headphone band. Measure the length and place it over your pair of headphones to see if it s long enough. It should go a bit past the headphone ear cups. Mine measures out to be 44cm in length. Adafruit Industries Page 21 of 40


22 Thread Extension Wires Next up, grab the case for the Adafruit Feather 32u4 Bluefruit LE. Insert and thread one side of the extension wires from the jumper cable through the little opening on the side of the case. Make sure to pull the wires through until you reach the heat shrink tubbing. Adafruit Industries Page 22 of 40


23 Create Extra Wires for NeoPixel Ring Now we need to make three new pieces of 30 AWG silicone coated stranded wires - These will be connected to first NeoPixel ring to the Adafruit Feather 32u4 Bluefrit LE. They need to measure about 7cm in length. Use wire stripper to remove 5mm of insulation and apply solder to the tips to tin both sides for each wire. Connect Extra wires to Adafruit Feature 32u4 Bluefruit LE Next we need connect these extra wires to the Adafruit Feather board. Secure the Adafruit Feather board to a Adafruit Industries Page 23 of 40


24 pair of helping third hands and position the case with wires in close proximity. Apply solder to the following pins on the Adafruit Feather - Pin #6, BAT and GND. Now solder the extra wires into these tinned pins. Also, solder the green wire from the jumper cable to pin #6 on the Adafruit Feather. Prep 500mAh Lipo Battery Adafruit Industries Page 24 of 40


25 Now we need to prep the 500mAh lipo battery. Start by cutting the wire from battery. Be sure to cut one wire at a time! DO NOT cut both positive and negative wires at same time - Doing that could short the battery out, which is very dangerous. Add a piece of electrical/gaffer tape to one of the wires as a safety precaution. Prep JST Connector From Lipo Battery Next up, we need to remove 5mm of insulation of the positive and negative wires from the wires of JST connector Adafruit Industries Page 25 of 40


26 we cut away from the lipo battery. Apply solder to tin each wire. Use a pair of helping third hands to assist you while soldering. Connect Jumpers to JST Connector from Battery Now we can wire up the jumper cable to the wires of the JST connector. Add some pieces of heat shrink to insulate exposed connections before soldering. Secure to pair of helping third hands to make soldering easier. Then, solder the red and blue extension wires from the jumper cable that s threaded through the case of the Adafruit Feather case. Lastly, slide heat shrink over exposed connetions and apply heat to insulate them. Plug JST connector to Adafruit Feather 32u4 Bluefruit LE Go ahead and plug in the male JST connector into the female JST connector on the Adafruit Feather 32u4 Adafruit Industries Page 26 of 40
.")

27 Bluefruit LE. Mount Adafruit Feather 32u4 Bluefruit LE to case. Position the Adafruit Feather 32u4 Bluefruit LE board into the case with the USB port facing the port opening (inserting at an angle may help). Carefully push the board all the way into the case, making sure not to kink any wires. Position the wires from the JST connector so that they're nestled into the channel. Connect Wires to First NeoPixel Ring Next up, let s secure our first 16x NeoPixel ring to a pair of helping third hands. Apply solder to all of the pins (except the data out). Now we can Adafruit Industries Page 27 of 40


28 solder in extra wires from the Adafruit Feather Bluefruit LE to the pins on the NeoPixel Ring. Yellow to PWR, green to DATA IN and white to GND. Also, connect the yellow and white wires from the jumper cable to the secondary PWR and GND pins. Install First NeoPixel Ring into Case Now we can mount the NeoPixel ring to the Adafruit Feather case. Carefully position the wires so they re not being kinked. Lay the NeoPixel ring over the circular riser and route the wires so Adafruit Industries Page 28 of 40


29 they re in a position where they re not being kinked. The PCB of the NeoPixel ring should nestle nicely into the circular riser. It ll have slightly loose tolerance. Then, position the cover over the case and twist it until it s tightly secured to the case. If the cover doesn't fully close all the way, the wires are probably in the way - try to route them into the available channels. Prep Slide Switch Secure the slide switch to the helping third hands. Remove one of the leads thats on the far side, like shown in the photo. Apply solder to the two remaining leads to tin them. Adafruit Industries Page 29 of 40


30 Test Fit Slide Switch Next up we need to see if the slide switch can fit into the opening of the battery case. You need to use a hobby knife or filing tool to remove material from the overhang - this will loosen up the opening so the slide switch can freely fit through. Insert the Slide Switch through the opening, pushing it all the way through the other side. It should be a slightly loose fit. Remove slide switch from opening when test fit is achieved. Thread Wires from Jumper to Battery Case Insert the extension wires from the other end of the jumper cable through the hole in the side of the battery case. Adafruit Industries Page 30 of 40


31 Be sure to pull them all the way through, until you reach the heat shrink tubbing. Connect Slide Switch to Battery Grab the 500mAh lipo battery and remove 5mm of insulation from the positive wire. Apply solder to tin the wire, using third helping hands for assistance. Add a piece of heat shrink tubbing to the positive wire. Solder this wire to one of the leads on the slide switch. Slide the heat shrink over the exposed connection and apply heat for insulation. Adafruit Industries Page 31 of 40


32 Connect Jumper Cable to Slide Switch Solder the red extension wire from the jumper cable to the remaining lead of the slide switch. Add a piece of heat shrink tubbing before soldering wire to slide switch. Apply heat to heat shrink to insulate the exposed connection. Connect Ground from Adafruit Industries Page 32 of 40


33 Jumper Cable to Battery Strip the end of the negative wire from the 500mAh lipo battery and apply solder to tin the wire. Solder the negative wire from the battery to the blue extension wire from the jumper cable. Add heat shrink tubbing and apply heat to insulate the exposed connection. Connect Second NeoPixel Ring Now we can wire up the second NeoPixel Ring. Secure the PCB to the third helping hands and apply solder to all of the pins (except for the DATA OUT pin). Solder in the extension wires from the jumper cable to the NeoPixel ring - green to DATA IN, yellow to PWR, and white to Ground. Adafruit Industries Page 33 of 40


34 Install Slide Switch to Battery Case Carefully insert the slide switch into the battery case from the inside - Use a hobby knife or filing tool to help you guide the switch through the opening - It should go through the other side with enough room to access the switch. Mount Battery to Case Carefully place the 500mAh battery into the cavity of the battery case, follow the photo for best position and orientation. Position the positive wire so that it s nestled in the channel. Install Second NeoPixel Ring into Battery Case Just like the first NeoPixel Ring, carefully position the PCB into the case making sure not to kink any wires. Adafruit Industries Page 34 of 40


35 Position and route the wires so they re nicely nestled into the channels. Mount Cover to Battery Case Now we can screw on the second twisty top cover to the battery case. Secure it tightly. If it doesn t close all the way, you ll need to remove the cover and ensure the wires are nicely tucked into the channels and out of the way. Adafruit Industries Page 35 of 40

36 Completed Circuit Assembly Congratulations! You have completed the circuit and mounted it to the enclosures. It s pretty much stand alone ready to test at this point - Flip the slide switch and watch for the NeoPixel rings to flash the starting initiation. If they don t, you ll need to double check your wiring. Next up, we need to mount the cases to the ear cups of the headphones! Adafruit Industries Page 36 of 40

37 Test Fit Assembly onto Headphones Position the two cases onto the ear cups of the headphones - Does the length of wire fit? If it does, it s safe to mount the cases to the side of the ear cups. Mount Cases to Adafruit Industries Page 37 of 40

38 Headphones The most non-destructive way to mount the cases to the side of the headphone is to use mounting tack. This will give a pretty decent hold to the cases. If you d like a more permanent hold, you can alternatively use adhesives such as hot glue or E6000. Mount Cases to Headphones The most non-destructive way to mount the cases to the side of the headphone is to use mounting tack. This will give a pretty decent hold to the cases. If you d like a more permanent hold, you can alternatively use adhesives such as hot glue or E6000. Mounted Cases on Headphones Adafruit Industries Page 38 of 40


39 I recommend positioning the headphones so the slide switch from the battery case is easily accessible. The opening for the USB port of the Adafruit Feather 32u4 Bluefruit LE should be pointing down so it matches the orientation of the headphone cable. Finished NeoPixel Ring Headphones Now you re ready to rock the spectrum with your NeoPixel LED Headphones Upgrade! When the battery runs low, you can plug in a microusb cable to the USB port on the Adafruit Feather Bluefruit LE. Use a 5V power source such as your computer s USB ports or wall adapter. Enjoy your upgrade and post a MAKE on the project Thingiverse page to let us know you've made one - We LOVE to see what you've made!! Adafruit Industries Page 39 of 40

40 Adafruit Industries Last Updated: :38:04 PM UTC Page 40 of 40
Feather Weather Lamp. Created by Ruiz Brothers. Last updated on :54:26 PM UTC
 Feather Weather Lamp Created by Ruiz Brothers Last updated on 2018-08-22 03:54:26 PM UTC Guide Contents Guide Contents Overview Weather Reactive Pixels Prerequisite Guides Parts Tools & Supplies Circuit
Portable Apple Watch Charger
 Portable Apple Watch Charger Created by Ruiz Brothers Last updated on 2017-10-22 09:58:04 PM UTC Guide Contents Guide Contents Overview Smart Charging Prerequisite Guides Parts, Tool & Supplies Circuit
7 Portable Multitouch Raspberry Pi Tablet
 7 Portable Multitouch Raspberry Pi Tablet Created by Ruiz Brothers Last updated on 2017-02-27 04:13:53 PM UTC Guide Contents Guide Contents Overview Portable Raspberry Pi Tablet 7" Multitouch Display Parts
Trinket NeoPixel LED Longboard
 Trinket NeoPixel LED Longboard Created by Ruiz Brothers Last updated on 2017-10-02 06:00:32 PM UTC Guide Contents Guide Contents Overview Parts Tools & Supplies Prerequisite Guides 3D Printing PLA Material
3D Printed Camera LED Ring
 3D Printed Camera LED Ring Created by Ruiz Brothers Last updated on 2018-08-22 03:39:34 PM UTC Guide Contents Guide Contents Overview DIY LED Ring Light Prerequisite Guide: Parts List: Tools & Supplies
Simple LED Unicorn Horn
 Simple LED Unicorn Horn Created by Ruiz Brothers Last updated on 2018-08-22 03:56:14 PM UTC Guide Contents Guide Contents Overview 3D Printed Unicorn Horn Want More Magic/Colors? Great For Beginners Parts
Lie Ren's Stormflower Gun Blade
 Lie Ren's Stormflower Gun Blade Created by Ruiz Brothers Last updated on 2017-04-02 05:39:24 PM UTC Guide Contents Guide Contents Overview Cosplay Props with NeoPixels Triggered Lighting Effects DIY Electronics
LED Eyes. Created by Ruiz Brothers. Last updated on :50:55 AM UTC
 LED Eyes Created by Ruiz Brothers Last updated on 2018-01-13 05:50:55 AM UTC Guide Contents Guide Contents Overview Parts, Tools and Supplies Enameled Copper Magnet Wire 11 meters / 0.1mm diameter Adafruit
NeoPixel Bike Light. Created by Ruiz Brothers. Last updated on :43:46 PM UTC
 NeoPixel Bike Light Created by Ruiz Brothers Last updated on 2018-11-15 07:43:46 PM UTC Guide Contents Guide Contents Overview 3D Printed Headlight Adafruit's Feather Platform Circuit Python Powered Parts
Guardian Shield+ Zelda Breath of the Wild
 Guardian Shield+ Zelda Breath of the Wild Created by Ruiz Brothers Last updated on 2018-08-22 04:01:50 PM UTC Guide Contents Guide Contents Overview Articulating Handle Rechargeable Prerequisite Guides
Circuit Playground Yoyo
 Circuit Playground Yoyo Created by Ruiz Brothers Last updated on 2018-01-13 05:56:02 AM UTC Guide Contents Guide Contents Overview 3D Printed NeoPixel Yoyo History of the Yo-Yo Expectations Parts Tools
Trellis 3D Printed Enclosure
 Trellis 3D Printed Enclosure Created by Ruiz Brothers Last updated on 2018-08-22 03:39:07 PM UTC Guide Contents Guide Contents Overview Parts Tools & Supplies Modeling 123D Design Customize Measuring Parts
FPV Mini Display. Created by Ruiz Brothers. Last updated on :00:18 PM UTC
 FPV Mini Display Created by Ruiz Brothers Last updated on 2017-07-19 01:00:18 PM UTC Guide Contents Guide Contents Overview Mini FPV monitor Adafruit Parts Tools and Supplies Circuit Diagram Electronics
3D Printed Daft Punk Helmet with Bluetooth
 3D Printed Daft Punk Helmet with Bluetooth Created by Ruiz Brothers Last updated on 2017-10-20 01:47:59 PM UTC Guide Contents Guide Contents Overview Parts List Tools & Supplies Light Painting with Daftpunk
3D Printed Case for Adafruit Feather
 3D Printed Case for Adafruit Feather Created by Ruiz Brothers Last updated on 2018-08-22 03:59:38 PM UTC Guide Contents Guide Contents Overview Adafruit Feather Box New Update! Check out the TFT Feather
Mystical LED Halloween Hood
 Mystical LED Halloween Hood Created by Becky Stern Last updated on 2017-09-28 11:13:20 PM UTC Guide Contents Guide Contents Overview NeoPixel GEMMA circuit Arduino Code NeoPixel Überguide: Arduino Library
Solar Boost Bag. Created by Becky Stern. Last updated on :44:55 PM UTC
 Solar Boost Bag Created by Becky Stern Last updated on 2018-08-22 03:44:55 PM UTC Guide Contents Guide Contents Overview 3D Design Files Customize Design Assemble Circuit Prepare Solar Panel Enclosure
DIY Bluetooth Gamepad
 DIY Bluetooth Gamepad Created by Ruiz Brothers Last updated on 2016-09-03 02:23:21 AM UTC Guide Contents Guide Contents Overview Prerequisite Guides Expectations Parts Tools & Supplies Circuit Diagram
3D Printed LED Knuckle Jewelry
 3D Printed LED Knuckle Jewelry Created by Ruiz Brothers Last updated on 2015-02-20 09:31:06 AM EST Guide Contents Guide Contents Overview Prerequisite Guides Parts Tools & Supplies 3D Printing Filament
7" Portable HDMI Monitor
 7" Portable HDMI Monitor Created by Ruiz Brothers Last updated on 2017-05-29 05:47:14 PM UTC Guide Contents Guide Contents Overview DIY Monitor Connect to a Raspberry pi Use as a second monitor Camera
Phone-Activated Talking Dog Collar
 Phone-Activated Talking Dog Collar Created by Phillip Burgess Last updated on 2017-01-24 08:28:00 PM UTC Guide Contents Guide Contents Overview Circuit Diagram & Code Leather Collar & Greebles Assemble
Bluetooth LE MIDI Controller
 Bluetooth LE MIDI Controller Created by Ruiz Brothers Last updated on 2017-03-01 08:40:08 PM UTC Guide Contents Guide Contents Overview A Different Looking MIDI Controller BLE MIDI Drum Machine How Does
Camera LED Ring Light
 Camera LED Ring Light Created by Ruiz Brothers Last updated on 2017-05-09 06:07:12 PM UTC Guide Contents Guide Contents Overview NeoPixel Ring Light Dedicated white LED Prerequisite Guides Parts Tools
BLE Light Switch with Feather nrf52840 and Crickit
 BLE Light Switch with Feather nrf52840 and Crickit Created by John Park Last updated on 2019-02-15 07:06:19 PM UTC Guide Contents Guide Contents Overview Parts Adafruit Feather nrf52840 Express Adafruit
3D Printed 20w Amplifier Box
 3D Printed 20w Amplifier Box Created by Ruiz Brothers Last updated on 2018-02-26 06:48:02 PM UTC Guide Contents Guide Contents Overview Prerequisite Guide Tools & Supplies Parts 3D Printing Print in your
3D Printed Google AIY Voice Kit
 3D Printed Google AIY Voice Kit Created by Ruiz Brothers Last updated on 2018-01-09 12:47:26 AM UTC Guide Contents Guide Contents Overview 3D Print a DIY AI enclosure for the Raspberry PI! Parts, Tools
NeoPixel Manicure. Created by Sophy Wong. Last updated on :50:38 PM UTC
 NeoPixel Manicure Created by Sophy Wong Last updated on 2018-04-11 05:50:38 PM UTC Guide Contents Guide Contents Overview Parts & Supplies Tools Circuit Diagram Build the Circuit Measure Your Circuit Prepare
3D Printed Bone Conduction Transducer Box
 3D Printed Bone Conduction Transducer Box Created by Ruiz Brothers Last updated on 2018-08-22 03:40:25 PM UTC Guide Contents Guide Contents Overview Tools & Supplies Parts 3D Printing Circuit Diagram Stereo
FLORA TV-B-Gone. Created by Becky Stern. Last updated on :32:57 PM UTC
 FLORA TV-B-Gone Created by Becky Stern Last updated on 2018-08-22 03:32:57 PM UTC Guide Contents Guide Contents Overview Parts Tutorials Transistors Resistors LEDs Pushbutton Program it Power Fabric pinwheel
3D Printed 20w Amplifier Box
 3D Printed 20w Amplifier Box Created by Noe & Pedro Ruiz Last updated on 2014-04-22 03:01:38 PM EDT Guide Contents Guide Contents Overview Prerequisite Guide Tools & Supplies Parts 3D Printing Print in
Neon LED Signs. Created by John Park. Last updated on :11:09 PM UTC
 Neon LED Signs Created by John Park Last updated on 2018-08-22 04:11:09 PM UTC Guide Contents Guide Contents Overview Parts Materials Tools Build the Sign Driver Preparation Solder the Circuit Solder the
NeoPixel Ring Bangle Bracelet
 NeoPixel Ring Bangle Bracelet Created by Becky Stern Last updated on 2017-09-28 11:14:48 PM UTC Guide Contents Guide Contents Overview Circuit Diagram Build it! Arduino Code CircuitPython Code Planning
'Sup Brows. Created by Kate Hartman. Last updated on :52:04 PM UTC
 'Sup Brows Created by Kate Hartman Last updated on 2018-08-22 03:52:04 PM UTC Guide Contents Guide Contents Overview Circuit Bluetooth Test Upload the Code Place the Sensor View Sensor Values Via Bluetooth
3D Printed LED Buckle
 3D Printed LED Buckle Created by Ruiz Brothers Last updated on 2018-08-22 03:38:02 PM UTC Guide Contents Guide Contents Overview Customize the Buckle Artwork, Design and Text Scale, Adjust and Combine
Mini Mac Pi. Created by Ruiz Brothers. Last updated on :43:27 PM UTC
 Mini Mac Pi Created by Ruiz Brothers Last updated on 2018-08-22 03:43:27 PM UTC Guide Contents Guide Contents Overview Build Your Own Mac Pi How it Works Project Advisory Challenges and Expectations Prerequisite
Clockwork Goggles. Created by John Park. Last updated on :03:10 PM UTC
 Clockwork Goggles Created by John Park Last updated on 2018-08-22 04:03:10 PM UTC Guide Contents Guide Contents Overview Assemble Circuit and Goggles CircuitPython Setup and Code Rock the Goggles 2 3 6
Boomy The Boombox. Created by Ruiz Brothers. Last updated on :52:13 PM UTC
 Boomy The Boombox Created by Ruiz Brothers Last updated on 2017-09-05 08:52:13 PM UTC Guide Contents Guide Contents Overview Boomy The Boombox AdaBox 004 Parts 3D Printing 3D Printed Parts Enclosure Design
Bike Wheel POV Display
 Bike Wheel POV Display Created by Becky Stern Last updated on 2017-09-12 03:10:38 PM UTC Guide Contents Guide Contents Overview Parts and Tools Circuit Diagram Prep LEDs & Breadboard Code Solder Circuit
Circuit Playground Combadge
 Circuit Playground Combadge Created by Ruiz Brothers Last updated on 2017-10-22 10:42:02 PM UTC Guide Contents Guide Contents Overview What's a Combadge? DIY Combadge How Does It Work? Make It How You
PyPortal View Master Created by Ruiz Brothers. Last updated on :51:28 AM UTC
 PyPortal View Master Created by Ruiz Brothers Last updated on 2019-03-13 11:51:28 AM UTC Overview In this project we re building a view master inspired device using Adafruit s PyPortal. The eyepiece makes
FLORA and GEMMA ICSP. Created by Becky Stern. Last updated on :42:16 PM UTC
 FLORA and GEMMA ICSP Created by Becky Stern Last updated on 2018-08-22 03:42:16 PM UTC Guide Contents Guide Contents Overview Reprogram FLORA over ICSP Reprogram GEMMA over ICSP 2 3 4 9 Adafruit Industries
Glowing Smokey Skull. Created by Ruiz Brothers. Last updated on :03:40 PM UTC
 Glowing Smokey Skull Created by Ruiz Brothers Last updated on 2018-08-22 04:03:40 PM UTC Guide Contents Guide Contents Overview Easy DIY Halloween Props Electronic Halloween! Circuit Playground NeoPixels
Reindeer Mask with Animated Eyes
 Reindeer Mask with Animated Eyes Created by Dano Wall Last updated on 2018-12-05 10:50:10 PM UTC Guide Contents Guide Contents Overview Parts Adafruit HalloWing M0 Express Convex Plastic Lens with Edge
Fiddy - the FTDI Clip
 Fiddy - the FTDI Clip Created by Timothy Reese Last updated on 2016-11-22 09:18:04 PM UTC Guide Contents Guide Contents Overview FTDI is Great! Things you'll need: What You'll Learn: 3D Printing Assembly
Webcam Cover-Up Lego brick with Adabot Mini Fig
 Webcam Cover-Up Lego brick with Adabot Mini Fig Created by Ruiz Brothers Last updated on 2018-08-22 04:06:44 PM UTC Guide Contents Guide Contents Overview 3D Printing What If I Don't Have A 3D Printer?
Solder Dispenser Adabot Head
 Solder Dispenser Adabot Head Created by Ruiz Brothers Last updated on 2017-01-04 02:15:15 PM UTC Guide Contents Guide Contents Overview Solder Dispenser Parts Solder Spool - 1/4 lb SAC305 RoHS lead-free
Tent Lantern. Created by Timothy Reese. Last updated on :17:25 AM UTC
 Tent Lantern Created by Timothy Reese Last updated on 2017-07-14 05:17:25 AM UTC Guide Contents Guide Contents Overview Things you'll need: What You'll Learn: 3D Printing Code Assembly Wiring Diagram Soldering
Audio Prank Gift Box. Created by Becky Stern. Last updated on :46:15 PM UTC
 Audio Prank Gift Box Created by Becky Stern Last updated on 2018-08-22 03:46:15 PM UTC Guide Contents Guide Contents Overview Circuit Diagram Prepare Components Build Circuit Wrap and Give 2 3 5 6 12 14
Bunny Ears with MakeCode
 Bunny Ears with MakeCode Created by Erin St Blaine Last updated on 2018-08-22 04:05:47 PM UTC Guide Contents Guide Contents Introduction Tools & Other Materials Programming with MakeCode Set Up the Light
Celebration Spectacles
 Celebration Spectacles Created by Becky Stern Last updated on 2018-08-22 03:45:59 PM UTC Guide Contents Guide Contents Overview Circuit Diagram Assemble Circuit Test and Glue Wear 'em! 2 3 6 7 10 14 Adafruit
Zelda Thunder Helm. Created by Ruiz Brothers. Last updated on :46:52 PM UTC
 Zelda Thunder Helm Created by Ruiz Brothers Last updated on 2017-08-23 02:46:52 PM UTC Guide Contents Guide Contents Overview Zelda: Breath Of The Wild Parts, Tools and Supplies Proto-Pasta - Aromatic
NeoPixel LED Cortana Costume
 NeoPixel LED Cortana Costume Created by Ruiz Brothers Last updated on 2018-08-22 03:43:43 PM UTC Guide Contents Guide Contents Overview How it Works Project Advisory Prerequisite Guides Parts & Components
Jewel Hair Stick. Created by Leslie Birch. Last updated on :47:17 PM UTC
 Jewel Hair Stick Created by Leslie Birch Last updated on 2018-08-22 03:47:17 PM UTC Guide Contents Guide Contents Overview Tools & Supplies Prepare Chopstick Circuit Diagram Solder Circuit Arduino Code
FLORA and GEMMA ICSP. Created by Becky Stern. Last updated on :30:55 PM EST
 FLORA and GEMMA ICSP Created by Becky Stern Last updated on 2015-02-19 02:30:55 PM EST Guide Contents Guide Contents Overview Reprogram FLORA over ICSP Reprogram GEMMA over ICSP 2 3 5 10 Adafruit Industries
Fiddy - the FTDI Clip
 Fiddy - the FTDI Clip Created by Timothy Reese Last updated on 2018-08-22 03:57:42 PM UTC Guide Contents Guide Contents Overview FTDI is Great! Things you'll need: What You'll Learn: 3D Printing Assembly
Desktop Fume Extractor
 Desktop Fume Extractor Created by Ruiz Brothers Last updated on 2018-06-18 02:20:04 PM UTC Guide Contents Guide Contents Overview Fumey The Fume Extrator Air Clean Friendly 3D Printing What If I Don't
CircuitPython Media Dial
 CircuitPython Media Dial Created by Ruiz Brothers Last updated on 2018-02-07 05:00:25 AM UTC Guide Contents Guide Contents Overview Prerequisite Guides Adafruit Trinket M0 - for use with CircuitPython
Infinity Mirror Valentine's Candy Box
 Infinity Mirror Valentine's Candy Box Created by Kathy Ceceri Last updated on 2019-02-07 09:44:54 PM UTC Guide Contents Guide Contents Overview Parts List -- Mini Box Version Chibitronics Color LEDs Add-On
Raspberry Pi Pipboy 3000
 Raspberry Pi Pipboy 3000 Created by Ruiz Brothers Last updated on 2017-08-09 01:44:21 AM UTC Guide Contents Guide Contents Overview Functional Cosplay Props Electronic Parts & Components Tools & Supplies
Sewable NeoPixels. Created by Becky Stern. Last updated on :50:14 PM EDT
 Sewable NeoPixels Created by Becky Stern Last updated on 2015-08-25 07:50:14 PM EDT Guide Contents Guide Contents Overview Prerequisite guides Lots of Pixels? Hook up alligator clips Run pixel test code
DIY Custom American Girl Doll Prosthetics
 DIY Custom American Girl Doll Prosthetics Created by Ruiz Brothers Last updated on 2017-11-15 08:53:16 PM UTC Guide Contents Guide Contents Overview Parts Tools and Supplies 3D Printing 3D Printed Parts
Paper Airplane Launcher
 Paper Airplane Launcher Created by Dano Wall Last updated on 2018-08-27 08:36:14 PM UTC Guide Contents Guide Contents Overview A Launching Platform The Electronics Materials Build the Launcher Attach Motors
Crawling Animatronic Hand
 Crawling Animatronic Hand Created by Dano Wall Last updated on 2018-12-03 06:39:35 PM UTC Guide Contents Guide Contents Overview Parts Used Tools & Materials Prepare the Hand Your hand is now ready to
Bandolier of Light. Created by Becky Stern. Last updated on :16:17 PM EST
 Bandolier of Light Created by Becky Stern Last updated on 2015-02-19 02:16:17 PM EST Guide Contents Guide Contents Overview 3D Design File Ninjaflex STLs Slicer Settings Clean Up Modify Design Solder Circuit
FLORA Pixel Brooch. Created by Becky Stern. Last updated on :19:07 PM EST
 FLORA Pixel Brooch Created by Becky Stern Last updated on 2015-02-20 01:19:07 PM EST Guide Contents Guide Contents Overview Connect first signal wire Connect power and ground wires Add more pixels Program
i2c/spi LCD Backpack Created by lady ada Last updated on :11:04 PM UTC
 i2c/spi LCD Backpack Created by lady ada Last updated on 2017-08-16 05:11:04 PM UTC Guide Contents Guide Contents Overview Which LCD to Use? Wait - the backpack has 16 holes, but my LCD only has 14 pins!
Adafruit LED Sequins. Created by Becky Stern. Last updated on :02:00 AM UTC
 Adafruit LED Sequins Created by Becky Stern Last updated on 2018-03-02 04:02:00 AM UTC Guide Contents Guide Contents Overview Sewing with conductive thread Circuit Diagram GEMMA sequin hat Arduino Code
Adafruit PowerBoost 500 Shield
 Adafruit PowerBoost 500 Shield Created by lady ada Last updated on 2018-08-22 03:43:27 PM UTC Guide Contents Guide Contents Overview Pinouts DC/DC Boost section Indicator LEDs Charging section Power Switch
NeoMatrix 8x8 Word Clock
 NeoMatrix 8x8 Word Clock Created by Andy Doro Last updated on 2017-10-10 04:10:51 AM UTC Guide Contents Guide Contents Overview Parts List Parts Tools Circuit Assembly Overview Uploading Code Understanding
Circuit Playground Express Head-Tilt Ears
 Circuit Playground Express Head-Tilt Ears Created by Dave Astels Last updated on 2018-10-09 04:07:03 PM UTC Guide Contents Guide Contents Overview Parts Circuit Playground Express Micro servo Lithium Ion
3D Printed LED Goggles
 3D Printed LED Goggles Created by Rick Winscot Last updated on 2016-01-04 12:05:18 PM EST Guide Contents Guide Contents Overview Tools / Materials 3D Printing Bridge Assembly NeoPixel Rings Lenses Wire,
Interior Purse Light. Created by Becky Stern. Last updated on :41:08 PM UTC
 Interior Purse Light Created by Becky Stern Last updated on 2018-08-22 03:41:08 PM UTC Guide Contents Guide Contents Overview Circuit Diagram Stitch Sequins Add Tape Arduino Code CircuitPython Code Use
Adabot Operation Game
 Adabot Operation Game Created by John Park Last updated on 2018-08-22 04:11:17 PM UTC Guide Contents Guide Contents Overview Parts Materials & Tools Build the Operating Table Print the Board and Pieces
DIY Circuit Playground Shields
 DIY Circuit Playground Shields Created by Dave Astels Last updated on 2018-08-22 04:05:06 PM UTC Guide Contents Guide Contents Overview Small Alligator Clip Test Lead (set of 12) Small Alligator Clip to
Cup o' Sound. Created by Becky Stern. Last updated on :30:06 PM EST
 Cup o' Sound Created by Becky Stern Last updated on 2015-02-18 01:30:06 PM EST Guide Contents Guide Contents Overview Circuit Diagram Load Sound and Prepare Components Solder Circuit and Assemble Use it!
Light-Up Angler Fish Embroidery
 Light-Up Angler Fish Embroidery Created by Becky Stern Last updated on 2018-08-22 03:35:36 PM UTC Guide Contents Guide Contents Overview Tools & Supplies Layout & Circuit Diagram Sew Circuit Code Hand
Slider Crank Mechanism -- from Cardboard and Craft Sticks
 Slider Crank Mechanism -- from Cardboard and Craft Sticks Created by John Park Last updated on 2018-08-22 04:07:21 PM UTC Guide Contents Guide Contents Overview Materials Tools Build the Slider Crank Build
Milk Jug Glow Skull. Created by John Park. Last updated on :28:36 PM UTC
 Milk Jug Glow Skull Created by John Park Last updated on 2018-09-14 09:28:36 PM UTC Guide Contents Guide Contents Overview Parts Materials & Tools Optional Skull/Sculpting Stand Build the Skull Prep the
NeoPixie Dust Bag with Circuit Playground Express
 NeoPixie Dust Bag with Circuit Playground Express Created by John Park Last updated on 2017-12-20 10:00:29 PM UTC Guide Contents Guide Contents Overview Code It Setup Animation Color Touch Variable Color
Toy Car Speed Timer. Created by Kirby Griese. Last updated on :13:49 PM UTC
 Toy Car Speed Timer Created by Kirby Griese Last updated on 2017-03-20 09:13:49 PM UTC Guide Contents Guide Contents Overview Parts needed Prerequisites 3D Printing Assembly Wiring Software Use It 2 3
Android GBoard Morse Code Control with Circuit Playground Express
 Android GBoard Morse Code Control with Circuit Playground Express Created by Dave Astels Last updated on 2018-08-22 04:10:30 PM UTC Guide Contents Guide Contents Overview Parts Materials for the box Installing
Glowing LED Chair. Created by Ruiz Brothers. Last updated on :01:47 AM UTC
 Glowing LED Chair Created by Ruiz Brothers Last updated on 2016-11-03 05:01:47 AM UTC Guide Contents Guide Contents Overview Prerequisite Guides Parts, Tools and Supplies Circuit Diagram Wired Connections
Crickit Dancing Marionette Kit Created by Dano Wall. Last updated on :03:11 PM UTC
 Crickit Dancing Marionette Kit Created by Dano Wall Last updated on 2019-04-04 07:03:11 PM UTC Overview This project demonstrates how to build a robotic marionette that is controlled with four arcade-style
Adafruit 8x16 LED Matrix FeatherWing
 Adafruit 8x16 LED Matrix FeatherWing Created by lady ada Last updated on 2016-05-20 01:58:38 PM EDT Guide Contents Guide Contents Overview Pinouts Power Pins I2C pins Address Jumpers Changing Addresses
3D Printed Camera Tripod Adapter for Telescope
 3D Printed Camera Tripod Adapter for Telescope Created by Ruiz Brothers Last updated on 2017-11-16 03:29:25 AM UTC Guide Contents Guide Contents Overview Designed for Mobile Phones 3D Printing Support
Magnetic shoelaces. Created by Ruiz Brothers. Last updated on :31:02 PM UTC
 Magnetic shoelaces Created by Ruiz Brothers Last updated on 2016-12-29 04:31:02 PM UTC Guide Contents Guide Contents Overview Parts, Tools and Supplies 3D Printing Download and 3D Print Slice Settings
Snake Charmer Box. Created by Dano Wall. Last updated on :07:25 PM UTC
 Snake Charmer Box Created by Dano Wall Last updated on 2018-08-22 04:07:25 PM UTC Guide Contents Guide Contents Overview Materials Circuit Playground Express Standard servo - TowerPro SG-5010 Small Alligator
Luminous LED Flowers. Created by Becky Stern. Last updated on :47:44 PM UTC
 Luminous LED Flowers Created by Becky Stern Last updated on 2018-08-22 03:47:44 PM UTC Guide Contents Guide Contents Overview Circuit Diagram Prepare LED Sequins Affix Inside Bouquet Connect Battery &
Adafruit VL53L0X Time of Flight Micro-LIDAR Distance Sensor Breakout
 Adafruit VL53L0X Time of Flight Micro-LIDAR Distance Sensor Breakout Created by lady ada Last updated on 2017-12-28 11:56:14 PM UTC Guide Contents Guide Contents Overview Sensing Capablities Pinouts Power
Pushrod Garage. Created by John Park. Last updated on :07:30 PM UTC
 Pushrod Garage Created by John Park Last updated on 2018-08-22 04:07:30 PM UTC Guide Contents Guide Contents Overview Parts & Materials Tools Pushrod Mechanism Code it with MakeCode Functions On Start
Chirping Plush Owl Toy
 Chirping Plush Owl Toy Created by Becky Stern Last updated on 2018-11-21 08:56:55 PM UTC Guide Contents Guide Contents Overview Tools & Supplies Solder Circuit Arduino Code CircuitPython Code Assemble
Adafruit Prototyping Pi Plate. Created by Ladyada
 Adafruit Prototyping Pi Plate Created by Ladyada Guide Contents Guide Contents Overview Solder it! User Manual Buy Adafruit Prototyping Pi Plate 2 3 4 14 17 Adafruit Industries http://learn.adafruit.com/adafruit-prototyping-pi-plate
LED Lightbox. Created by Sam Clippinger. Last updated on :50:00 AM UTC
 LED Lightbox Created by Sam Clippinger Last updated on 2016-09-03 01:50:00 AM UTC Guide Contents Guide Contents Overview TL;DR Skill Level Parts List Yellow sticker reads: "Bad planning on your part does
Ultrasonic Ruler. Created by Ruiz Brothers. Last updated on :08:28 PM UTC
 Ultrasonic Ruler Created by Ruiz Brothers Last updated on 2016-12-22 03:08:28 PM UTC Guide Contents Guide Contents Overview Beast Rabban's Lost Pistol 3D Printing Movie Replicas Prerequisite Guides Parts
No-Sew LED Wristband. Created by Kathy Ceceri. Last updated on :23:40 PM UTC
 No-Sew LED Wristband Created by Kathy Ceceri Last updated on 2018-11-13 09:23:40 PM UTC Guide Contents Guide Contents Overview Playing with LED Options Suggested Parts List -- Electronics Suggested Materials
Adafruit APDS9960 breakout
 Adafruit APDS9960 breakout Created by Dean Miller Last updated on 2018-01-19 11:18:59 PM UTC Guide Contents Guide Contents Overview Pinouts Power Pins: Logic pins: Assembly Prepare the header strip: Add
Ping Pong Ball Launcher
 Ping Pong Ball Launcher Created by Dano Wall Last updated on 2019-01-25 03:19:13 AM UTC Guide Contents Guide Contents Overview Electronic Parts Circuit Playground Express USB cable - USB A to Micro-B Alkaline
Remote Controlled LED Tea Light Sconce
 Remote Controlled LED Tea Light Sconce Created by Erin St Blaine Last updated on 2017-08-17 02:05:23 AM UTC Guide Contents Guide Contents Introduction Materials Needed Also Used in this Project Planning
Magical Mistletoe. Created by Leslie Birch. Last updated on :45:29 PM UTC
 Magical Mistletoe Created by Leslie Birch Last updated on 2018-08-22 03:45:29 PM UTC Guide Contents Guide Contents Overview Tools & Supplies Circuit Diagram Test the Sensor Prepare Parts Attach LED Sequins
Alohamora Bottle. Created by Erin St Blaine. Last updated on :58:53 PM UTC
 Alohamora Bottle Created by Erin St Blaine Last updated on 2017-06-16 10:58:53 PM UTC Guide Contents Guide Contents Introduction Ingredients Tools Code 1. Arduino IDE 2. Teensyduino Installer 3. FastLED