Slider Crank Mechanism -- from Cardboard and Craft Sticks
|
|
|
- Martha Riley
- 5 years ago
- Views:
Transcription
1 Slider Crank Mechanism -- from Cardboard and Craft Sticks Created by John Park Last updated on :07:21 PM UTC
2 Guide Contents Guide Contents Overview Materials Tools Build the Slider Crank Build the Linkage Prep the Linkages Fasten the Pivots Servo Horn Connection Wire the Servo Code it with MakeCode Servo Control Back and Forth Angle Variables Pulse Timing Use the Angle Variables Add Lights Mode Switch Conditions Switch Reading Button Clicking Mount the Slider Crank Servo Attachment Guide Block Connect the Circuit Playground Express Fire it Up! Adafruit Industries Page 2 of 38

3 Overview A slider crank mechanism is a simple, effective way to convert rotation to linear motion. You can make one very easily out of craft sticks or cardboard, a hole punch, and some paper fasteners. By attaching the crank shaft stick to a servo motor horn, we can drive our slider crank using a Circuit Playground Express programmed with MakeCode! Adafruit Industries Page 3 of 38

4 1 x Circuit Playground Express Incredibly awesome microcontroller board ADD TO CART 1 x Standard servo TowerPro SG-5010 ADD TO CART 1 x Small Alligator Clip to Male Jumper Wire Bundle 6 pieces ADD TO CART 1 x 3 x AA Battery Holder with On/Off Switch, JST, and Belt Clip OUT OF STOCK 1 x Alkaline AA batteries 3 pack ADD TO CART Adafruit Industries Page 4 of 38

5 Materials In addition to the parts above, you'll need: corrugated cardboard box three craft sticks brass paper fasteners Tools You could build this entire project using only a pair of scissors, but here are some additional tools that can make things a bit easier: single hole punch hobby knife metal ruler hot melt glue gun and hot melt glue -- either low or high temperature is fine pencil or marker small screwdriver Adafruit Industries Page 5 of 38
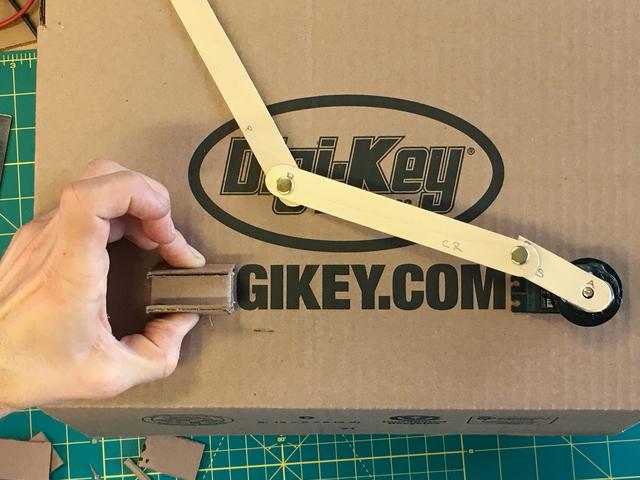
 We'll drive the crank shaft with the servo motor, and the slider will")
6 Build the Slider Crank You'll build the slider crank assembly from three craft sticks. The mechanism consists of these key parts: Crank shaft Connecting rod Slider (also known as a piston in some mechanisms) We'll drive the crank shaft with the servo motor, and the slider will translate back and forth along a guide block made of cardboard. Build the Linkage Start by getting the three craft sticks. Adafruit Industries Page 6 of 38
.")

7 Prep the Linkages Here, they've been marked 'CS' for crank shaft, 'CR' for connecting rod, and 'P' for piston (this is the same piece as the slider). Mark a point 'A' near one end of the crank shaft Measure and mark a line 2-1/4" from the A pivot end of the crank shaft Cut the crank shaft to length Punch a hole at each end of the crank shaft Punch a hole at each end of the connecting rod Punch a hole at one end of the pivot or slider Adafruit Industries Page 7 of 38
8 Adafruit Industries Page 8 of 38


9 Next, we'll join the linkages using the brass paper fasteners. Adafruit Industries Page 9 of 38


10 Fasten the Pivots Overlap the connecting rod on top of the B pivot end of the crank shaft, then join them with a paper fastener Spread the fastener tabs wide on the other side, then fold them in Repeat this process, overlapping the connecting rod D pivot with the E pivot of the piston/slider and then fastening it as shown Servo Horn Connection Adafruit Industries Page 10 of 38


11 Use hot melt glue to adhere the A pivot end of the crank shaft to the large, round servo horn. Once it cools, press it onto the servo's splined shaft. Use the horn to rotate the servo shaft to the far left and then remove, rotate, and reattach the horn to the shaft so the linkages are in a straight line to the left as shown. Adafruit Industries Page 11 of 38


12 You can secure the servo horn to the servo shaft with the small screw and a screwdriver. Wire the Servo You'll power and control the servo with the Circuit Playground Express. Plug the three alligator clip jumper wires into Adafruit Industries Page 12 of 38
 Black to GND Yellow to A1 Adafruit Industries https://learn.adafruit.")
13 the servo cable housing: Black to Brown Red to Orange Yellow to Yellow Connect the alligator clips to the Circuit Playground Express pads: Red to 3.3V (or, you can connect to VOUT for more power!) Black to GND Yellow to A1 Adafruit Industries Page 13 of 38


14 Next, we'll program the Circuit Playground Express using MakeCode. Adafruit Industries Page 14 of 38
15 Code it with MakeCode Using MakeCode, we'll create a program to control the slider crank. We'll give it two modes -- automatic and manual. In automatic mode, the servo will oscillate back and forth between extended and retracted positions on the slider In manual mode, you will be able to press the A and B buttons on the Circuit Playground Express to extend or retract the slider. If you're new to MakeCode, start by going through the introductory guide here ( Then, return to this guide to continue. Servo Control First, let's have a look at controlling a servo with MakeCode. Start a new program by going to makecode.adafruit.com ( and clicking New Project. In the MakeCode editor, click on the ADVANCED button to reveal additional categories. Then, click on PINS and from the Servo section, drag a servo write pin A1 to 180 block onto the program canvas area and into the forever block. Adafruit Industries Page 15 of 38

16 Adafruit Industries Page 16 of 38
17 With the servo attached to power, ground, and pad A1 on your Circuit Playground Express, download the program, connect the CPX to your computer over USB, press the reset button to enter bootloader mode. Then drag the downloaded.uf2 file to the CIRCUITPY drive. When the program finishes uploading, the servo will quickly rotate to 180 degrees. Back and Forth We can make the servo move back and forth with a pause in between by duplicating the servo write A1 to 180 block, changing its value to 0, and then adding a pair of pause blocks. Adafruit Industries Page 17 of 38


18 Angle Variables Now, these angles are a bit extreme for our slider crank mechanism. Let's make the maximum angle 170 and the minimum 95. Since we'll use these values in a number of places throughout our code, and we may want to fine tune them, we can create variables to represent each. Then we only need to change the variables' values in one place. Adafruit Industries Page 18 of 38


19 In the VARIABLES category, click on Make a Variable... and create a variable called maxangle and another called minangle. Also, create one called servoon which we'll use later. We'll want to set the values of the servo angle variables when the program begins. Drag an on start block from the LOOPS category. Then, put into it a pair of set maxangle to blocks into the on start. You'll used the drop down menu to pick the variables in each block, change one of them to minangle. You can then set the values as shown. Pulse Timing Different servos expect different timing for their command pulses. If you need to change this value, you can add a servo set pulse pin A1 to block to the on start as shown here. Adafruit Industries Page 19 of 38


20 Complete the on start block by adding one more set maxangle to block, and change the dropdown to the servoon variable with a value of 0. We'll use this a little bit later. Use the Angle Variables Let's put those variables to use. From the VARIABLES category, drag a minangle and maxangle into the servo write pin A1 blocks in your forever loop. Adafruit Industries Page 20 of 38

21 Add Lights We'll add some NeoPixel lighting now. We can make the CPX LEDs light up to indicate the direction of travel. From the LIGHT category, add a couple of show ring blocks as shown here. You can click the circles twice to "blank" them into these patterns. Adafruit Industries Page 21 of 38

22 Mode Switch You may get tired of the servo swinging back and forth, so next you can set up a mode switch. This will read the small selector switch on the CPX. If it is moved to the right, the servo swings back and forth, if not, it won't! Get an if true then else block from the LOGIC category. Transfer the contents of the forever block into the if section as shown. Adafruit Industries Page 22 of 38

23 Conditions We now need some condition to be met that will be tested by if statement. From the LOGIC category get a 0 = 0 comparison block and move it onto the true block. Adafruit Industries Page 23 of 38

24 Drag in a servoon variable from VARIABLES and set the value to 1. Adafruit Industries Page 24 of 38

25 Switch Reading We will now set up blocks to read the switch position, and change the servoon value accordingly. From INPUT, drag in two on switch moved left blocks. Change one of them to right. Add from the VARIABLES category a set servoon to block to each switch block, setting the right one's value to 1. Adafruit Industries Page 25 of 38

26 Now, when you flip the switch left and right you'll toggle the value of the servoon variable! To give visual feedback when the mode switch if flipped, add show ring blocks as seen here, as well as resetting the servos to their minimum angles. Button Clicking The final element is to add button control. from INPUT get a couple of on button A click blocks. Change one to button B. Add to these a servo write pin A1 each, and a show ring as seen here. Adafruit Industries Page 26 of 38

27 The program is complete! Here's the final code, you can now download it to your computer and then reset the CPX and drag the.uf2 program file onto the CIRCUITPY drive: Now, we'll build the base and guide to secure the mechanism onto our cardboard box. Adafruit Industries Page 27 of 38
 -- we'll use cardboard to build the structure. Start with a corrugated cardboard box, such as a medium shipping box. Servo Attachment Mark the servo base onto the box using a pencil or pen.")
28 Mount the Slider Crank There are two fixed points in this mechanism -- the servo crank, and the guide block that will constrain the slider (otherwise it could flop all around!) -- we'll use cardboard to build the structure. Start with a corrugated cardboard box, such as a medium shipping box. Servo Attachment Mark the servo base onto the box using a pencil or pen. Keep the markings very close to the true dimensions of the servo, so that you can cut a snug opening for it to press fit. Adafruit Industries Page 28 of 38


29 Use a hobby knife to cut out the servo opening. It's best to use a metal ruler or straight edge to guide the knife edge. Adafruit Industries Page 29 of 38


30 Insert the alligator clip wires into the opening, then press the servo body in. Adafruit Industries Page 30 of 38

 extend and straighten Adafruit Industries")
31 Guide Block Now that the servo is fixed in place, we can determine the best position for the guide block. With the crank rotated fully counterclockwise to its stopping point (180 degrees on the servo) extend and straighten Adafruit Industries Page 31 of 38


32 the linkage as shown. Mark the top and bottom of the slider onto the box using a pencil or pen. These two marks are where you will build up a small cardboard platform the rest the slider, and then two walls of cardboard for the upper and lower guides. Adafruit Industries Page 32 of 38


33 Cut four or five small pieces of cardboard to fit the markings Rest the slider on them to make sure it is level with the servo horn -- this is necessary because of the offset of the servo from the box, as well as the slack in the system at the joints Glue down the cardboard pieces in a stack Adafruit Industries Page 33 of 38


34 Place two more piece of cardboard like guide rails on the upper and lower "walls" of the stack. These should guide the slider, but not impede its motion. Adafruit Industries Page 34 of 38

35 Adafruit Industries Page 35 of 38

36 Connect the Circuit Playground Express Now, you can reconnect the alligator clips to the CPX as shown, by running the wires up from inside the box to the edge. Or you can poke a hole in the cardboard wherever you like -- that's one of the great features of cardboard! Connect the battery pack to the CPX as well, using the JST connector. You can mount the battery pack inside the box with some tape. Adafruit Industries Page 36 of 38


37 Fire it Up! Turn on the battery pack's power switch and away we go! Move the slider to chose between automatic or manual mode, where you can press the A and B buttons to actuate the slider. Adafruit Industries Page 37 of 38

38 If your motor struggles to turn check that all of the pivots can move freely and consider hooking the red alligator clip to VOUT on the Circuit Playground Express instead of 3.3V You can mount the Circuit Playground Express to the box with a loop of masking tape, as I've done here, or get more creative using bamboo skewers as rivets, pipe cleaners, or double stick foam tape! With the slider crank mechanism under your control you can now find some creative uses for it! You could attach a puppet, make a primitive train, or perhaps a lumbering box robot! Now that you have the power to convert rotation to linear motion, what will you make? Adafruit Industries Last Updated: :07:16 PM UTC Page 38 of 38
Pushrod Garage. Created by John Park. Last updated on :07:30 PM UTC
 Pushrod Garage Created by John Park Last updated on 2018-08-22 04:07:30 PM UTC Guide Contents Guide Contents Overview Parts & Materials Tools Pushrod Mechanism Code it with MakeCode Functions On Start
Snake Charmer Box. Created by Dano Wall. Last updated on :07:25 PM UTC
 Snake Charmer Box Created by Dano Wall Last updated on 2018-08-22 04:07:25 PM UTC Guide Contents Guide Contents Overview Materials Circuit Playground Express Standard servo - TowerPro SG-5010 Small Alligator
Ping Pong Ball Launcher
 Ping Pong Ball Launcher Created by Dano Wall Last updated on 2019-01-25 03:19:13 AM UTC Guide Contents Guide Contents Overview Electronic Parts Circuit Playground Express USB cable - USB A to Micro-B Alkaline
Crawling Animatronic Hand
 Crawling Animatronic Hand Created by Dano Wall Last updated on 2018-12-03 06:39:35 PM UTC Guide Contents Guide Contents Overview Parts Used Tools & Materials Prepare the Hand Your hand is now ready to
Paper Airplane Launcher
 Paper Airplane Launcher Created by Dano Wall Last updated on 2018-08-27 08:36:14 PM UTC Guide Contents Guide Contents Overview A Launching Platform The Electronics Materials Build the Launcher Attach Motors
Crickit Carnival Bumper Bot
 Crickit Carnival Bumper Bot Created by John Park Last updated on 2018-08-22 04:08:52 PM UTC Guide Contents Guide Contents Overview Parts Materials and Tools Build the Bumper Bot Cut the Cardboard Chassis
Hammer Time Mini Golf Hazard with Crickit
 Hammer Time Mini Golf Hazard with Crickit Created by John Park Last updated on 2018-07-09 06:47:53 AM UTC Guide Contents Guide Contents Overview Please Hammer, Don't Hurt Em Parts Materials & Tools Program
Stumble-Bot. Created by Dano Wall. Last updated on :04:06 AM UTC
 Stumble-Bot Created by Dano Wall Last updated on 2018-09-06 05:04:06 AM UTC Guide Contents Guide Contents Overview Simply Stumbling We Have the Technology Other Supplies Leg Assembly Front Legs Back Legs
Crawling Baby Sea Turtle Robot
 Crawling Baby Sea Turtle Robot Created by Dano Wall Last updated on 2018-08-22 04:10:26 PM UTC Guide Contents Guide Contents Overview Save the Wee Turtles Household Materials Adafruit Electronics Create
Crickit Dancing Marionette Kit Created by Dano Wall. Last updated on :03:11 PM UTC
 Crickit Dancing Marionette Kit Created by Dano Wall Last updated on 2019-04-04 07:03:11 PM UTC Overview This project demonstrates how to build a robotic marionette that is controlled with four arcade-style
Adabot Operation Game
 Adabot Operation Game Created by John Park Last updated on 2018-08-22 04:11:17 PM UTC Guide Contents Guide Contents Overview Parts Materials & Tools Build the Operating Table Print the Board and Pieces
Crickit Powered Holiday Diorama
 Crickit Powered Holiday Diorama Created by Isaac Wellish Last updated on 2018-12-04 12:49:07 AM UTC Guide Contents Guide Contents Overview Prerequisite Guides Adafruit Parts Tools and Materials Wiring
Infinity Mirror Valentine's Candy Box
 Infinity Mirror Valentine's Candy Box Created by Kathy Ceceri Last updated on 2019-02-07 09:44:54 PM UTC Guide Contents Guide Contents Overview Parts List -- Mini Box Version Chibitronics Color LEDs Add-On
Mini Golf Course with Circuit Playground and Crickit
 Mini Golf Course with Circuit Playground and Crickit Created by Dano Wall Last updated on 2018-08-22 04:09:31 PM UTC Guide Contents Guide Contents Overview Materials & Tools Adafruit Parts CRICKIT Assembly
Wind Blowing Emoji Prop
 Wind Blowing Emoji Prop Created by John Park Last updated on 2018-08-22 04:05:17 PM UTC Guide Contents Guide Contents Overview Code it with MakeCode Start Up Variables On Loud Sound If - Else Iterate Debounce
The Scream: Interactive Screaming Painting
 The Scream: Interactive Screaming Painting Created by John Park Last updated on 2018-08-22 04:10:47 PM UTC Guide Contents Guide Contents Overview Parts & Materials Optional Build the Interactive Painting
Circuit Playground Express Head-Tilt Ears
 Circuit Playground Express Head-Tilt Ears Created by Dave Astels Last updated on 2018-10-09 04:07:03 PM UTC Guide Contents Guide Contents Overview Parts Circuit Playground Express Micro servo Lithium Ion
Circuit Playground Express Laser Tag
 Circuit Playground Express Laser Tag Created by John Park Last updated on 2017-11-14 01:56:23 AM UTC Guide Contents Guide Contents Build a Laser Tag Game Code the Laser Tag Game MakeCode Transmitting IR
Bunny Ears with MakeCode
 Bunny Ears with MakeCode Created by Erin St Blaine Last updated on 2018-08-22 04:05:47 PM UTC Guide Contents Guide Contents Introduction Tools & Other Materials Programming with MakeCode Set Up the Light
CPX Mystery Dreidel. Created by Kathy Ceceri. Last updated on :51:40 PM UTC
 CPX Mystery Dreidel Created by Kathy Ceceri Last updated on 2018-12-04 02:51:40 PM UTC Guide Contents Guide Contents Overview Parts List -- Electronics Circuit Playground Express USB cable - USB A to Micro-B
Neon LED Signs. Created by John Park. Last updated on :11:09 PM UTC
 Neon LED Signs Created by John Park Last updated on 2018-08-22 04:11:09 PM UTC Guide Contents Guide Contents Overview Parts Materials Tools Build the Sign Driver Preparation Solder the Circuit Solder the
Trash Panda. Created by Dano Wall. Last updated on :30:46 AM UTC
 Trash Panda Created by Dano Wall Last updated on 2018-06-06 02:30:46 AM UTC Guide Contents Guide Contents Overview Amazon's playful boxes We have the technology Other supplies you will need Create your
Con Badge with Circuit Playground Express
 Con Badge with Circuit Playground Express Created by Sophy Wong Last updated on 2018-04-11 05:00:16 PM UTC Guide Contents Guide Contents Overview Tools & Materials Laser Cutting Program the Circuit Playground
NeoPixie Dust Bag with Circuit Playground Express
 NeoPixie Dust Bag with Circuit Playground Express Created by John Park Last updated on 2017-12-20 10:00:29 PM UTC Guide Contents Guide Contents Overview Code It Setup Animation Color Touch Variable Color
UFO Flying Saucer with Circuit Playground Express
 UFO Flying Saucer with Circuit Playground Express Created by John Park Last updated on 2018-08-31 08:42:17 PM UTC Guide Contents Guide Contents Overview Code the UFO with CircuitPython Build the Flying
Crickit Powered Mini Chair Swing Ride!
 Crickit Powered Mini Chair Swing Ride! Created by Isaac Wellish Last updated on 2018-11-05 09:18:17 PM UTC Guide Contents Guide Contents Overview Adafruit Parts Materials and Tools Swing Structure First
BLE Light Switch with Feather nrf52840 and Crickit
 BLE Light Switch with Feather nrf52840 and Crickit Created by John Park Last updated on 2019-02-15 07:06:19 PM UTC Guide Contents Guide Contents Overview Parts Adafruit Feather nrf52840 Express Adafruit
Sword & Wand Prop Effects with Circuit Playground
 Sword & Wand Prop Effects with Circuit Playground Created by John Park Last updated on 2018-01-13 05:32:54 AM UTC Guide Contents Guide Contents Overview Circuit Playground Express with MakeCode Lots of
Steven Universe Cosplay Shirt & Gem Created by Erin St Blaine. Last updated on :54:25 PM UTC
 Steven Universe Cosplay Shirt & Gem Created by Erin St Blaine Last updated on 2019-04-04 06:54:25 PM UTC Overview Make yourself a Steven Universe costume that will light up the world. This guide will show
LED Eyes. Created by Ruiz Brothers. Last updated on :50:55 AM UTC
 LED Eyes Created by Ruiz Brothers Last updated on 2018-01-13 05:50:55 AM UTC Guide Contents Guide Contents Overview Parts, Tools and Supplies Enameled Copper Magnet Wire 11 meters / 0.1mm diameter Adafruit
FLORA and GEMMA ICSP. Created by Becky Stern. Last updated on :42:16 PM UTC
 FLORA and GEMMA ICSP Created by Becky Stern Last updated on 2018-08-22 03:42:16 PM UTC Guide Contents Guide Contents Overview Reprogram FLORA over ICSP Reprogram GEMMA over ICSP 2 3 4 9 Adafruit Industries
Clockwork Goggles. Created by John Park. Last updated on :03:10 PM UTC
 Clockwork Goggles Created by John Park Last updated on 2018-08-22 04:03:10 PM UTC Guide Contents Guide Contents Overview Assemble Circuit and Goggles CircuitPython Setup and Code Rock the Goggles 2 3 6
NeoPixel Fairy Crown. Created by Erin St Blaine. Last updated on :22:47 AM UTC
 NeoPixel Fairy Crown Created by Erin St Blaine Last updated on 2018-12-31 02:22:47 AM UTC Guide Contents Guide Contents Overview Adafruit NeoPixel LED Dots Strand - 20 LEDs at 2" Pitch Adafruit GEMMA M0
Milk Jug Glow Skull. Created by John Park. Last updated on :28:36 PM UTC
 Milk Jug Glow Skull Created by John Park Last updated on 2018-09-14 09:28:36 PM UTC Guide Contents Guide Contents Overview Parts Materials & Tools Optional Skull/Sculpting Stand Build the Skull Prep the
Easy Sparkle Pocket T-Shirt
 Easy Sparkle Pocket T-Shirt Created by Erin St Blaine Last updated on 2018-10-18 06:45:05 PM UTC Guide Contents Guide Contents Overview Parts Materials Needed Code with MakeCode Vinyl Cutting Sizing and
FLORA and GEMMA ICSP. Created by Becky Stern. Last updated on :30:55 PM EST
 FLORA and GEMMA ICSP Created by Becky Stern Last updated on 2015-02-19 02:30:55 PM EST Guide Contents Guide Contents Overview Reprogram FLORA over ICSP Reprogram GEMMA over ICSP 2 3 5 10 Adafruit Industries
Secret Hollow Book Intrusion Detector
 Secret Hollow Book Intrusion Detector Created by John Park Last updated on 2018-08-22 04:05:48 PM UTC Guide Contents Guide Contents Overview Materials & Tools Optional Android Hollowing the Book Preparation
HalloWing Jump Scare Trap
 HalloWing Jump Scare Trap Created by John Park Last updated on 2018-10-16 04:38:42 PM UTC Guide Contents Guide Contents Overview Parts Materials Build the Jump Scare Trap Circuit Mounting Sensor Lens Blocker
Making Adabot: Part 1
 Making Adabot: Part 1 Created by Rick Winscot Last updated on 2018-08-22 03:37:47 PM UTC Guide Contents Guide Contents Overview Tools / Materials Chassis Fantastic Easy Hardware Classic Connectors Magnificent
Reindeer Mask with Animated Eyes
 Reindeer Mask with Animated Eyes Created by Dano Wall Last updated on 2018-12-05 10:50:10 PM UTC Guide Contents Guide Contents Overview Parts Adafruit HalloWing M0 Express Convex Plastic Lens with Edge
DIY Circuit Playground Shields
 DIY Circuit Playground Shields Created by Dave Astels Last updated on 2018-08-22 04:05:06 PM UTC Guide Contents Guide Contents Overview Small Alligator Clip Test Lead (set of 12) Small Alligator Clip to
NeoPixel Ring Bangle Bracelet
 NeoPixel Ring Bangle Bracelet Created by Becky Stern Last updated on 2017-09-28 11:14:48 PM UTC Guide Contents Guide Contents Overview Circuit Diagram Build it! Arduino Code CircuitPython Code Planning
Interactive Gift Box. Created by codingpro. Last updated on :47:40 AM UTC
 Interactive Gift Box Created by codingpro Last updated on 2018-01-10 01:47:40 AM UTC Guide Contents Guide Contents Overview Adafruit GEMMA M0 - Miniature wearable electronic platform Lithium Ion Polymer
Android GBoard Morse Code Control with Circuit Playground Express
 Android GBoard Morse Code Control with Circuit Playground Express Created by Dave Astels Last updated on 2018-08-22 04:10:30 PM UTC Guide Contents Guide Contents Overview Parts Materials for the box Installing
Trinket NeoPixel LED Longboard
 Trinket NeoPixel LED Longboard Created by Ruiz Brothers Last updated on 2017-10-02 06:00:32 PM UTC Guide Contents Guide Contents Overview Parts Tools & Supplies Prerequisite Guides 3D Printing PLA Material
CircuitPython Snow Globe
 CircuitPython Snow Globe Created by John Park Last updated on 2018-08-22 04:04:24 PM UTC Guide Contents Guide Contents Overview Materials and Parts Code with CircuitPython Get Ready! Download the Snow
Interior Purse Light. Created by Becky Stern. Last updated on :41:08 PM UTC
 Interior Purse Light Created by Becky Stern Last updated on 2018-08-22 03:41:08 PM UTC Guide Contents Guide Contents Overview Circuit Diagram Stitch Sequins Add Tape Arduino Code CircuitPython Code Use
Unicorn Hat with Moving Ears
 Unicorn Hat with Moving Ears Created by Erin St Blaine Last updated on 2017-06-15 09:53:10 PM UTC Guide Contents Guide Contents Introduction Other Materials Tools Code Before You Start TiCo Servo Library
Audio Prank Gift Box. Created by Becky Stern. Last updated on :46:15 PM UTC
 Audio Prank Gift Box Created by Becky Stern Last updated on 2018-08-22 03:46:15 PM UTC Guide Contents Guide Contents Overview Circuit Diagram Prepare Components Build Circuit Wrap and Give 2 3 5 6 12 14
PyPortal NeoPixel Color Picker Created by Kattni Rembor. Last updated on :42:41 PM UTC
 PyPortal NeoPixel Color Picker Created by Kattni Rembor Last updated on 2019-03-27 10:42:41 PM UTC Overview This simple project adds a little color to your life with CircuitPython, PyPortal and NeoPixels.
Solar Boost Bag. Created by Becky Stern. Last updated on :44:55 PM UTC
 Solar Boost Bag Created by Becky Stern Last updated on 2018-08-22 03:44:55 PM UTC Guide Contents Guide Contents Overview 3D Design Files Customize Design Assemble Circuit Prepare Solar Panel Enclosure
Glowing Smokey Skull. Created by Ruiz Brothers. Last updated on :03:40 PM UTC
 Glowing Smokey Skull Created by Ruiz Brothers Last updated on 2018-08-22 04:03:40 PM UTC Guide Contents Guide Contents Overview Easy DIY Halloween Props Electronic Halloween! Circuit Playground NeoPixels
NeoPixel Manicure. Created by Sophy Wong. Last updated on :50:38 PM UTC
 NeoPixel Manicure Created by Sophy Wong Last updated on 2018-04-11 05:50:38 PM UTC Guide Contents Guide Contents Overview Parts & Supplies Tools Circuit Diagram Build the Circuit Measure Your Circuit Prepare
LED NeoPixel Corset with Circuit Playground Express and
 LED NeoPixel Corset with Circuit Playground Express and MakeCode Created by Erin St Blaine Last updated on 2019-03-19 04:23:28 PM UTC Overview Create your own bespoke glowing NeoPixel corset and smile
Adafruit PowerBoost 500 Shield
 Adafruit PowerBoost 500 Shield Created by lady ada Last updated on 2018-08-22 03:43:27 PM UTC Guide Contents Guide Contents Overview Pinouts DC/DC Boost section Indicator LEDs Charging section Power Switch
Portable Apple Watch Charger
 Portable Apple Watch Charger Created by Ruiz Brothers Last updated on 2017-10-22 09:58:04 PM UTC Guide Contents Guide Contents Overview Smart Charging Prerequisite Guides Parts, Tool & Supplies Circuit
NeoMatrix 8x8 Word Clock
 NeoMatrix 8x8 Word Clock Created by Andy Doro Last updated on 2017-10-10 04:10:51 AM UTC Guide Contents Guide Contents Overview Parts List Parts Tools Circuit Assembly Overview Uploading Code Understanding
NeoPixel Bike Light. Created by Ruiz Brothers. Last updated on :43:46 PM UTC
 NeoPixel Bike Light Created by Ruiz Brothers Last updated on 2018-11-15 07:43:46 PM UTC Guide Contents Guide Contents Overview 3D Printed Headlight Adafruit's Feather Platform Circuit Python Powered Parts
Joy Featherwing. Created by Dean Miller. Last updated on :03:07 PM UTC
 Joy Featherwing Created by Dean Miller Last updated on 2018-08-22 04:03:07 PM UTC Guide Contents Guide Contents Overview Pinouts Power and Reset Pins I2C Data Pins I2C Addressing Optional Interrupt Pin
7" Portable HDMI Monitor
 7" Portable HDMI Monitor Created by Ruiz Brothers Last updated on 2017-05-29 05:47:14 PM UTC Guide Contents Guide Contents Overview DIY Monitor Connect to a Raspberry pi Use as a second monitor Camera
Data Logging with Feather and CircuitPython
 Data Logging with Feather and CircuitPython Created by Kattni Rembor Last updated on 2018-04-30 09:58:20 PM UTC Guide Contents Guide Contents Overview Things You'll Need Adafruit Feather M0 Express - Designed
Guardian Shield+ Zelda Breath of the Wild
 Guardian Shield+ Zelda Breath of the Wild Created by Ruiz Brothers Last updated on 2018-08-22 04:01:50 PM UTC Guide Contents Guide Contents Overview Articulating Handle Rechargeable Prerequisite Guides
Adafruit Capacitive Touch Sensor Breakouts
 Adafruit Capacitive Touch Sensor Breakouts Created by Bill Earl Last updated on 2018-08-22 03:36:13 PM UTC Guide Contents Guide Contents Overview Momentary Toggle 5-Pad Momentary Assembly and Wiring Installing
Adafruit LED Sequins. Created by Becky Stern. Last updated on :02:00 AM UTC
 Adafruit LED Sequins Created by Becky Stern Last updated on 2018-03-02 04:02:00 AM UTC Guide Contents Guide Contents Overview Sewing with conductive thread Circuit Diagram GEMMA sequin hat Arduino Code
Modifying Servos for Continuous Rotation
 Modifying Servos for Continuous Rotation Created by Rick Winscot Last updated on 2018-01-13 05:46:39 AM UTC Guide Contents Guide Contents Overview Tools / Materials Void the Warranty Breaking Bad Barriers
Boomy The Boombox. Created by Ruiz Brothers. Last updated on :52:13 PM UTC
 Boomy The Boombox Created by Ruiz Brothers Last updated on 2017-09-05 08:52:13 PM UTC Guide Contents Guide Contents Overview Boomy The Boombox AdaBox 004 Parts 3D Printing 3D Printed Parts Enclosure Design
Mystical LED Halloween Hood
 Mystical LED Halloween Hood Created by Becky Stern Last updated on 2017-09-28 11:13:20 PM UTC Guide Contents Guide Contents Overview NeoPixel GEMMA circuit Arduino Code NeoPixel Überguide: Arduino Library
Prophet 600 GliGli mod
 Prophet 600 GliGli mod Created by Collin Cunningham Last updated on 2018-08-22 04:04:56 PM UTC Guide Contents Guide Contents Overview What you'll need Program the Teensy++ Modify the Teensy++ Prep header
Mad Science Test Tube Rack
 Mad Science Test Tube Rack Created by John Park Last updated on 2016-10-17 09:21:01 PM UTC Guide Contents Guide Contents Overview Lighted Test Tube Parts Materials and Tools Optional Test Tube Rack Parts
Zelda Thunder Helm. Created by Ruiz Brothers. Last updated on :46:52 PM UTC
 Zelda Thunder Helm Created by Ruiz Brothers Last updated on 2017-08-23 02:46:52 PM UTC Guide Contents Guide Contents Overview Zelda: Breath Of The Wild Parts, Tools and Supplies Proto-Pasta - Aromatic
Adafruit TPL5110 Power Timer Breakout
 Adafruit TPL5110 Power Timer Breakout Created by lady ada Last updated on 2017-12-11 06:28:19 AM UTC Guide Contents Guide Contents Overview Pinouts Power Pins Control Pins Assembly Prepare the header strip:
Adafruit DRV2605 Haptic Controller Breakout
 Adafruit DRV2605 Haptic Controller Breakout Created by lady ada Last updated on 2018-08-20 03:28:51 PM UTC Guide Contents Guide Contents Overview Pinouts Power Pins I2C Pins Other! Assembly Prepare the
Jewel Hair Stick. Created by Leslie Birch. Last updated on :47:17 PM UTC
 Jewel Hair Stick Created by Leslie Birch Last updated on 2018-08-22 03:47:17 PM UTC Guide Contents Guide Contents Overview Tools & Supplies Prepare Chopstick Circuit Diagram Solder Circuit Arduino Code
Adafruit APDS9960 breakout
 Adafruit APDS9960 breakout Created by Dean Miller Last updated on 2018-01-19 11:18:59 PM UTC Guide Contents Guide Contents Overview Pinouts Power Pins: Logic pins: Assembly Prepare the header strip: Add
Simple LED Unicorn Horn
 Simple LED Unicorn Horn Created by Ruiz Brothers Last updated on 2018-08-22 03:56:14 PM UTC Guide Contents Guide Contents Overview 3D Printed Unicorn Horn Want More Magic/Colors? Great For Beginners Parts
Sewable NeoPixels. Created by Becky Stern. Last updated on :50:14 PM EDT
 Sewable NeoPixels Created by Becky Stern Last updated on 2015-08-25 07:50:14 PM EDT Guide Contents Guide Contents Overview Prerequisite guides Lots of Pixels? Hook up alligator clips Run pixel test code
Circuit Playground Yoyo
 Circuit Playground Yoyo Created by Ruiz Brothers Last updated on 2018-01-13 05:56:02 AM UTC Guide Contents Guide Contents Overview 3D Printed NeoPixel Yoyo History of the Yo-Yo Expectations Parts Tools
3D Printed Case for Adafruit Feather
 3D Printed Case for Adafruit Feather Created by Ruiz Brothers Last updated on 2018-08-22 03:59:38 PM UTC Guide Contents Guide Contents Overview Adafruit Feather Box New Update! Check out the TFT Feather
FLORA TV-B-Gone. Created by Becky Stern. Last updated on :32:57 PM UTC
 FLORA TV-B-Gone Created by Becky Stern Last updated on 2018-08-22 03:32:57 PM UTC Guide Contents Guide Contents Overview Parts Tutorials Transistors Resistors LEDs Pushbutton Program it Power Fabric pinwheel
No-Sew LED Wristband. Created by Kathy Ceceri. Last updated on :23:40 PM UTC
 No-Sew LED Wristband Created by Kathy Ceceri Last updated on 2018-11-13 09:23:40 PM UTC Guide Contents Guide Contents Overview Playing with LED Options Suggested Parts List -- Electronics Suggested Materials
7 Portable Multitouch Raspberry Pi Tablet
 7 Portable Multitouch Raspberry Pi Tablet Created by Ruiz Brothers Last updated on 2017-02-27 04:13:53 PM UTC Guide Contents Guide Contents Overview Portable Raspberry Pi Tablet 7" Multitouch Display Parts
Bike Wheel POV Display
 Bike Wheel POV Display Created by Becky Stern Last updated on 2017-09-12 03:10:38 PM UTC Guide Contents Guide Contents Overview Parts and Tools Circuit Diagram Prep LEDs & Breadboard Code Solder Circuit
Tent Lantern. Created by Timothy Reese. Last updated on :17:25 AM UTC
 Tent Lantern Created by Timothy Reese Last updated on 2017-07-14 05:17:25 AM UTC Guide Contents Guide Contents Overview Things you'll need: What You'll Learn: 3D Printing Code Assembly Wiring Diagram Soldering
i2c/spi LCD Backpack Created by lady ada Last updated on :11:04 PM UTC
 i2c/spi LCD Backpack Created by lady ada Last updated on 2017-08-16 05:11:04 PM UTC Guide Contents Guide Contents Overview Which LCD to Use? Wait - the backpack has 16 holes, but my LCD only has 14 pins!
3D Printed Google AIY Voice Kit
 3D Printed Google AIY Voice Kit Created by Ruiz Brothers Last updated on 2018-01-09 12:47:26 AM UTC Guide Contents Guide Contents Overview 3D Print a DIY AI enclosure for the Raspberry PI! Parts, Tools
PyPortal View Master Created by Ruiz Brothers. Last updated on :51:28 AM UTC
 PyPortal View Master Created by Ruiz Brothers Last updated on 2019-03-13 11:51:28 AM UTC Overview In this project we re building a view master inspired device using Adafruit s PyPortal. The eyepiece makes
Feather Weather Lamp. Created by Ruiz Brothers. Last updated on :54:26 PM UTC
 Feather Weather Lamp Created by Ruiz Brothers Last updated on 2018-08-22 03:54:26 PM UTC Guide Contents Guide Contents Overview Weather Reactive Pixels Prerequisite Guides Parts Tools & Supplies Circuit
Adafruit Mini TFT " 160x80
 Adafruit Mini TFT - 0.96" 160x80 Created by lady ada Last updated on 2017-11-17 05:56:10 PM UTC Guide Contents Guide Contents Overview Pinouts Assembly Prepare the header strip: Add the breakout board:
ISS Pin. Created by Leslie Birch. Last updated on :27:30 PM UTC
 ISS Pin Created by Leslie Birch Last updated on 2017-04-18 09:27:30 PM UTC Guide Contents Guide Contents Overview Tools & Supplies Solder Circuit Create Cover Code Set Up IFTTT Want a Test? Wear It! 2
3D Printed Camera LED Ring
 3D Printed Camera LED Ring Created by Ruiz Brothers Last updated on 2018-08-22 03:39:34 PM UTC Guide Contents Guide Contents Overview DIY LED Ring Light Prerequisite Guide: Parts List: Tools & Supplies
Overwatch Prop Gun: Lucio's Blaster Pt. 3
 Overwatch Prop Gun: Lucio's Blaster Pt. 3 Created by John Park Last updated on 2017-11-24 09:48:21 PM UTC Guide Contents Guide Contents 3D Printing Circuit Building Assembly Front Assembly Rear Assembly
Coffee Detonator: The TNT Plunger Grinder
 Coffee Detonator: The TNT Plunger Grinder Created by John Park Last updated on 2017-04-12 08:04:36 PM UTC Guide Contents Guide Contents Overview Materials Voltage Conversion AC/DC Voltage Divider Microcontroller
Adafruit Pi Cobbler Kit
 Adafruit Pi Cobbler Kit Created by lady ada Last updated on 2018-08-22 03:30:27 PM UTC Guide Contents Guide Contents Overview Solder it! Buy a Pi Cobbler Kit! Downloads 2 3 5 15 16 Adafruit Industries
Celebration Spectacles
 Celebration Spectacles Created by Becky Stern Last updated on 2018-08-22 03:45:59 PM UTC Guide Contents Guide Contents Overview Circuit Diagram Assemble Circuit Test and Glue Wear 'em! 2 3 6 7 10 14 Adafruit
FPV Mini Display. Created by Ruiz Brothers. Last updated on :00:18 PM UTC
 FPV Mini Display Created by Ruiz Brothers Last updated on 2017-07-19 01:00:18 PM UTC Guide Contents Guide Contents Overview Mini FPV monitor Adafruit Parts Tools and Supplies Circuit Diagram Electronics
Light-Up Angler Fish Embroidery
 Light-Up Angler Fish Embroidery Created by Becky Stern Last updated on 2018-08-22 03:35:36 PM UTC Guide Contents Guide Contents Overview Tools & Supplies Layout & Circuit Diagram Sew Circuit Code Hand
MCP Bit DAC Tutorial
 MCP4725 12-Bit DAC Tutorial Created by lady ada Last updated on 2018-03-05 10:51:16 PM UTC Guide Contents Guide Contents Overview Wiring Arduino Code Using the library Increasing the speed CircuitPython
Luminous LED Flowers. Created by Becky Stern. Last updated on :47:44 PM UTC
 Luminous LED Flowers Created by Becky Stern Last updated on 2018-08-22 03:47:44 PM UTC Guide Contents Guide Contents Overview Circuit Diagram Prepare LED Sequins Affix Inside Bouquet Connect Battery &
Adafruit LED Sequins. Created by Becky Stern. Last updated on :00:06 PM EST
 Adafruit LED Sequins Created by Becky Stern Last updated on 2015-02-19 05:00:06 PM EST Guide Contents Guide Contents Overview Sewing with conductive thread GEMMA sequin hat 2 3 8 15 Adafruit Industries
Bluetooth Controlled NeoPixel Headphones
 Bluetooth Controlled NeoPixel Headphones Created by Ruiz Brothers Last updated on 2017-03-09 07:38:05 PM UTC Guide Contents Guide Contents Overview Smart LED HeadPhones Prerequisite Guides Parts Tools