iblot 2 Dry Blotting System
|
|
|
- Lawrence Hopkins
- 6 years ago
- Views:
Transcription

1 iblot 2 Dry Blotting System USER GUIDE For dry, electroblotting of proteins from mini-, midi-, and E PAGE gels Catalog Number IB21001 Publication Number MAN Revision D.0 For Research Use Only. Not for use in diagnostic procedures.
2 Information in this document is subject to change without notice. DISCLAIMER: TO THE EXTENT ALLOWED BY LAW, LIFE TECHNOLOGIES AND/OR ITS AFFILIATE(S) WILL NOT BE LIABLE FOR SPECIAL, INCIDENTAL, INDIRECT, PUNITIVE, MULTIPLE OR CONSEQUENTIAL DAMAGES IN CONNECTION WITH OR ARISING FROM THIS DOCUMENT, INCLUDING YOUR USE OF IT. Revision history: Revision history of Pub. no. MAN Revision Date Description D.0 15 March 2017 Addition of detailed information on proper method of closing device lid IMPORTANT LICENSING INFORMATION: This product may be covered by one or more Limited Use Label Licenses. By use of these products, you accept the terms and conditions of all applicable Limited Use Label Licenses. TRADEMARKS: All trademarks are the property of Thermo Fisher Scientific and its subsidiaries unless otherwise specified Thermo Fisher Scientific Inc. All rights reserved. 2 iblot 2 Dry Blotting System User Guide
3 Contents Product information... 4 Product contents... 4 Unpacking instructions... 4 iblot 2 Gel Transfer Device... 5 About the System... 6 Description of Parts... 8 Operating the iblot 2 Gel Transfer Device...13 Description of Methods...17 Protein Transfer Protocol...18 Experimental Overview...18 General Guidelines...18 Using the iblot 2 Gel Transfer Device...19 Disassembling the iblot 2 Transfer Stack...25 Custom Methods...26 Creating Custom Methods...26 Creating Custom Methods from a Template...28 Appendix A...32 Troubleshooting...32 Appendix B...35 Post Transfer Analysis...35 Appendix C...36 Optimizing Blotting...36 Appendix D...37 Maintenance...37 Appendix E...40 Product Specifications...40 Appendix F...41 Accessory products...41 Appendix G...42 Documentation and support...42 Appendix H...43 Safety...43 Product regulatory compliance...46 Electromagnetic compatibility (EMC) standards...46 Explanation of symbols and warnings...47 Instructions Générales Relatives à la Sécurité de l Appareil...48 Conformité Réglementaire du Produit...51 Normes de Compatibilité Électromagnétique (CEM)...51 Explication des Symboles et des Avertissements...52 iblot 2 Dry Blotting System User Guide 3
4 Product information Product contents Types of products This manual is supplied with the iblot 2 Gel Transfer Device (Cat. no. IB21001). iblot 2 Gel Transfer Device contents The contents of the iblot 2 Gel Transfer Device are listed below. See page 40 for specifications and description of the iblot 2 Gel Transfer Device. Component Quantity iblot 2 Gel Transfer Device 1 Blotting Roller 1 Stylus 1 Power Cord 1 Power Adapters (North America/Japan, Europe, UK) 1 set Unpacking instructions Upon receiving the instrument Unpacking the iblot 2 Gel Transfer Device Examine the unit carefully for any damage incurred during transit. File any damage claims with the carrier. The warranty does not cover in-transit damage. Remove the roller and stylus from the Styrofoam packaging. Remove the device from the Styrofoam packaging. Remove the protective film from the touch screen. 4 iblot 2 Dry Blotting System User Guide

")
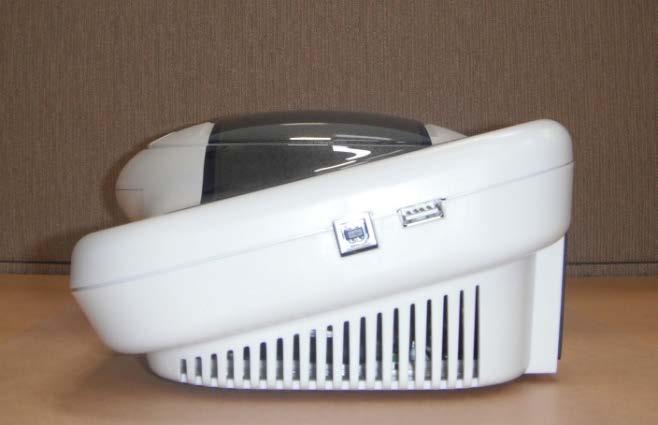
5 iblot 2 Gel Transfer Device Front view The front-top view showing various parts of the iblot 2 Gel Transfer Device is shown below. Control Panel Lid Latch Rear view A rear view showing various parts of the iblot 2 Gel Transfer Device is shown below. Power Switch AC inlet Side view A side view showing various parts of the iblot 2 Gel Transfer Device is shown below. USB port (Type A) USB port (Type B) iblot 2 Dry Blotting System User Guide 5
6 About the System iblot 2 Dry Blotting System The iblot 2 Dry Blotting System consists of the iblot 2 Gel Transfer Device and associated iblot 2 Transfer Stacks (sold separately). The iblot 2 Gel Transfer Device has a unique design, which, in conjunction with the patented gel matrix technology of the iblot 2 Transfer Stacks, results in a shortened distance between electrodes, high field strength, and high currents to reduce transfer times when blotting proteins onto membranes. Western blotting of proteins from midi- or mini-sized polyacrylamide gels onto nitrocellulose or PVDF membranes within 7 minutes can be performed with iblot 2 Transfer Stacks. See the next page to understand how the iblot 2 Dry Blotting System works and page 8 for details on various parts of the system. Features Pre-programmed (iblot 2 Gel Transfer Device) with six Methods for transfer of proteins from various gel types in 7 8 minutes Built-in safety features in the device enhance user safety User-friendly iblot 2 Gel Transfer Device design with an integrated power supply to avoid inconsistencies associated with the use of an external power supply Fast, reliable protein transfer using iblot 2 Transfer Stacks with integrated nitrocellulose or PVDF transfer membranes for blotting without the need to prepare buffers Compatible for use with Bolt Bis-Tris Plus, NuPAGE Bis-Tris and Tris- Acetate, Tris-Glycine, Tricine (in mini- and midi gel formats), and E-PAGE gels System components iblot 2 Gel Transfer Device The iblot 2 Gel Transfer Device is a self-contained blotting unit with integrated power supply used for fast, dry blotting of proteins. See page 8 for details. iblot 2 Transfer Stacks The iblot 2 Transfer Stacks are disposable stacks that have integrated PVDF or nitrocellulose transfer membranes to perform dry blotting of proteins. Each iblot 2 Transfer Stack contains a copper electrode and appropriate cathode and anode buffers in the gel matrix to allow fast, reliable transfer of proteins. See page 10 for details. 6 iblot 2 Dry Blotting System User Guide
 or PVDF (0.2 µm) membrane.")
7 System overview The iblot 2 Dry Blotting System is based on the dry blotting concept, utilizing the unique, patented gel matrix technology developed for E-Gel and E-PAGE gels for the iblot 2 Transfer Stacks. The iblot 2 Transfer Stack consists of a Bottom Stack and a Top Stack sandwiching a pre-run gel and a nitrocellulose (0.2 µm) or PVDF (0.2 µm) membrane. The iblot 2 Transfer Stack is assembled with the blotting membrane on the anode side, and a pre-run gel on the cathode side. Schematic of iblot 2 Transfer Stack showing the flow of current After the stack is assembled on the iblot 2 Gel Transfer Device, and the appropriate Method is selected, the run is initiated. Complete transfer of proteins from the gel to the blotting membrane is accomplished in approximately 7 8 minutes. The rapid transfer without the need for external power supply or premade buffers is possible due to the following features of the iblot 2 Dry Blotting System: The gel matrix of the Bottom and Top Stack incorporate the appropriate anode and cathode buffers to act as ion reservoirs. This format eliminates the need for premade buffers or soaked filter paper, and minimizes handling that can lead to inconsistent performance. The copper anode does not generate oxygen gas as a result of water electrolysis, resulting in increased transfer consistency. Conventional inert electrodes present in other blotting systems result in oxygen generation, which can result in blotting distortion. The design of the iblot 2 Gel Transfer Device reduces the distance between the electrodes and the integrated power supply. This unique design combined with the gel matrix technology of iblot 2 Transfer Stacks allows the system to generate high field strength and increase the transfer speed. iblot 2 Dry Blotting System User Guide 7

8 Description of Parts iblot 2 Gel Transfer Device The iblot 2 Gel Transfer Device is a protein transfer device with an integrated power supply capable of producing currents up to 6.3 amp, and supplying voltage up to 25 V. Four printed circuit boards hold the electronic components required to process the systems logic unit, modify voltage and currents for display, and power the blotting process. A pre-installed firmware controls the parameters such as voltage and time, and allows selection of Methods (see page 17 for details on each Method). IMPORTANT! When installing the iblot 2 Gel Transfer Device, make sure it is placed on a level surface. Keep the area around the device clear to ensure proper ventilation of the unit. For your safety: Position the device properly such that the Power switch and the AC inlet located at the rear of the unit (page 5) are easily accessible. A top view of an open iblot 2 Gel Transfer Device identifying various parts is shown below. See page 5 for side and rear views of the device. Electrical Contact Electrical Contact Pressure Plate Blotting Surface Mini Stack Touch Screen Control Panel Normal Stack Blotting Surface The blotting surface is the area where the iblot 2 Transfer Stacks containing the gel are placed to perform blotting. Alignment guides are used for proper orientation of normal and mini transfer stacks. Lid The lid of the iblot 2 Gel Transfer Device contains ventilation holes to allow for proper ventilation of the unit during the run. The pressure plate exerts even pressure on the stack surface when the lid is closed. Control Panel The Touch Screen Control Panel is a LCD display allowing the user to select Methods and control the device. See page 13 for control panel details. 8 iblot 2 Dry Blotting System User Guide


 before attaching the power cord.")

9 Blotting Roller The Blotting Roller is a plastic roller attached to a stainless steel handle (8.6 cm wide). The Blotting Roller is used to remove any air bubbles between the gel and blotting membrane during the assembly of the stacks and gel. Stylus A stylus is provided for use with the touch screen of the iblot 2 Gel Transfer Device. Power Cord The Power Cord connects to the iblot 2 Gel Transfer Device on one end, and to a power adapter (for plugging into an AC electrical outlet) on the other. End for Power Adapter End for iblot 2 Gel Transfer Device IMPORTANT! Be sure that the AC power switch is in the Off position (page 5) before attaching the power cord. Attach the power cord to the AC inlet of the device first, and then to the electrical outlet. Use only properly grounded AC outlets and power cords. Power Adapters Power Adapters (North America/Japan, Europe, UK) are used to connect the power cord to an AC electrical outlet. Use the appropriate adapter for your geographical region. North America/ Japan Europe UK iblot 2 Dry Blotting System User Guide 9
10 iblot 2 Transfer Stacks Guidelines for iblot 2 Transfer Stacks The iblot 2 Transfer Stacks are used to transfer proteins from gels onto nitrocellulose or PVDF membranes, and are available in Standard size for blotting E-PAGE, midi-, or two mini gels, and Mini size for blotting one mini gel. See page 40 for iblot 2 Transfer Stack specifications. Store the iblot 2 Transfer Stacks at room temperature. For best results, use the transfer stack before the expiration date printed on the package for each stack. Do not remove transfer stacks from bottom plastic tray. The plastic tray is a central part of the consumable. It maintains the current within the stacks and separates it from the rest of the device. The plastic tray also contains any liquid to allow easy clean-up. Discard the iblot 2 Transfer Stack after every use. Do not reuse the iblot 2 Transfer Stack. Do not use iblot Transfer Stacks in the iblot 2 Gel Transfer Device, or mix components between iblot Transfer Stacks and iblot 2 Transfer Stacks. Use iblot 2 Transfer Stacks only for their designated application. Note: The maximum voltage and current of the output to the gel stacks is 25 VDC and 6.3 Amp. The following iblot 2 Transfer Stacks are available at thermofisher.com/iblot2 (see page 41 for ordering information). Product Transfer Membrane Cat. No. Nitrocellulose IB23001 iblot 2 Regular Transfer Stacks PVDF IB24001 Nitrocellulose IB23002 iblot 2 Mini Transfer Stacks PVDF IB24002 Regular or Mini iblot 2 Transfer Stacks come with the following components: Component Mini Regular iblot 2 Transfer Stack iblot 2 Absorbent Pad, Regular 10 iblot 2 Absorbent Pad, Mini 10 iblot Filter Paper, Regular 10 iblot Filter Paper, Mini iblot 2 Dry Blotting System User Guide

 membrane for protein transfer. The transparent plastic tray in which the iblot 2 Transfer Stack is packaged serves as the support for assembling the transfer stacks with the gel.")
11 Top Stack The Top Stack is separated from the Bottom Stack by a white plastic separator, and contains a copper electrode and a transfer gel layer. The transfer gel layer acts as an ion reservoir and is composed of an optimized, proprietary gel composition. Copper electrode Transfer gel layer Plastic separator Bottom Stack The Bottom Stack contains a copper electrode, transfer gel layer, and a nitrocellulose (0.2 µm) or PVDF (0.2 µm) membrane for protein transfer. The transfer gel layer acts as an ion reservoir and is composed of an optimized, proprietary gel composition. The transparent plastic tray in which the iblot 2 Transfer Stack is packaged serves as the support for assembling the transfer stacks with the gel. The nitrocellulose (0.2 µm), and PVDF (0.2 µm) membranes do not require any pretreatment before use and minimize protein blow-through during the iblot 2 blotting process. Always use the Bottom Stack with the tray in the iblot 2 Gel Transfer Device. Transfer membrane Transfer gel layer Copper electrode Plastic tray Transfer membrane The iblot 2 Transfer Stacks are assembled with the transfer membrane and are available with: Nitrocellulose membrane (0.2 µm) The nitrocellulose membrane is composed of 100% pure nitrocellulose to provide high-quality transfer. The membrane is compatible with commonly used detection methods such as staining, immunodetection, fluorescence, or radiolabeling. The proteins bind to the membrane due to hydrophobic and electrostatic interactions. The protein binding capacity is 209 µg/cm 2. PVDF membrane (0.2 µm, low fluorescence) The PVDF membrane has higher binding capacity than nitrocellulose. The PVDF membrane is preactivated and ready for use without any pretreatment with alcohol. The membrane is compatible with commonly used detection methods such as staining, immunodetection, fluorescence, or radiolabeling. The proteins bind to the membrane due to hydrophobic interactions. The protein binding capacity is 240 µg/cm 2. iblot 2 Dry Blotting System User Guide 11


12 iblot Filter Paper The iblot Filter Paper is used for blotting mini- or midi gels. The iblot Filter Paper is placed on top of the pre-run gel before placing the Top Stack to protect the gel integrity during the blotting process. The iblot Filter Paper is supplied in two sizes (see page 40 for dimensions) for efficient blotting of miniand midi gels. Do not use the iblot Filter Paper for blotting E-PAGE gels. Note: Failure to use the iblot Filter Paper during blotting of mini- or midi gels may result in high currents exceeding the current limit leading to a High Current Error during the run. iblot 2 Absorbent Pad The iblot 2 Absorbent Pad absorbs any excess liquid on the stacks formed during blotting and generates even pressure on the stack assembly. It is placed on top of the assembled iblot 2 stack prior to transfer. iblot 2 Absorbent Pad (Regular) iblot 2 Absorbent Pad (Mini) Electrical contact When properly assembled, the electrical contact of the iblot 2 Absorbent Pad is aligned with the corresponding electrical contacts on the blotting surface of the iblot 2 Gel Transfer Device to allow completion of the electrical circuit. See page 40 for dimensions of the iblot 2 Absorbent Pad. Discard the iblot 2 Absorbent Pad after every use. Do not reuse the iblot 2 Absorbent Pad. 12 iblot 2 Dry Blotting System User Guide

13 Operating the iblot 2 Gel Transfer Device First time usage of the iblot 2 Gel Transfer Device The first time the iblot 2 Gel Transfer Device is turned on, you will need to perform the following actions: 1. Configure the clock by touching the appropriate fields and entering the values. Touch Enter when done. Then Touch Done on the Date & Time screen. 2. The Tutorial screen is displayed. Take the tutorial if desired (the tutorial guides the user to assemble a stack and allows you to run the P0 Method if a stack is in the device. Otherwise hit Cancel to go to the Home Screen). 3. OR skip the tutorial to go to the Home Screen. Control panel of iblot 2 Gel Transfer Device The control panel is a touch screen display allowing: 1. Running the Method that was last used on the device* 2. Running Preset Templates (Default Methods) 3. Programming Custom Methods** 4. Running Custom Methods * 5. Accessing the Options screen * This icon will not appear until after the first time the function is used. ** For details on creating Methods, refer to page iblot 2 Dry Blotting System User Guide 13


14 iblot 2 Gel Transfer Device Options screen The Options screen allows the user to perform the following actions: Set date and time View a step-by-step tutorial for the iblot 2 Gel Transfer Device Write logs to a USB device View application notes Upgrade firmware Reset the iblot 2 Gel Transfer Device to factory settings Setting date and time Touch Date & Time to access the Date & Time screen. 1. Touch the Date or Time field to access a keyboard for entering values. 2. Touch the fields that you want to change, and enter the appropriate value with the keyboard. Touch Enter when done. 3. After entering the Date and Time, touch Done on the Date & Time screen to return to the Options screen. 14 iblot 2 Dry Blotting System User Guide


15 iblot 2 Gel Transfer Device tutorial The Tutorial button provides step-by-step instructions for assembling and running a transfer stack on the iblot 2 Gel Transfer Device. If following the tutorial to assemble a stack in real time, you can perform a run using the default P0 Method at step 10. Touch Cancel to return to the Options screen if you do not wish to perform a run. Writing logs to a USB storage device A record of each run is kept by the iblot 2 Gel Transfer Device, with voltage being tracked at 10 second intervals. This information can be downloaded to a USB storage device in.csv format. 1. Insert a USB storage device into the USB port (Type A) of the iblot 2 Gel Transfer Device. 2. Touch Write Logs to USB Device on the Options screen. Note: If you do not have a USB storage device in place, a prompt to insert a USB storage device will appear. Touch OK to start the transfer after inserting the USB storage device. 3. Do not remove the USB storage device until the Options screen is displayed again. 4. The files are saved to folders titled iblot2_logs and iblot2_errorlogs on the USB storage device. iblot 2 Gel Transfer Device application notes The App Notes button provides access to application notes for improving transfer under various conditions when using the iblot 2 Gel Transfer Device. iblot 2 Dry Blotting System User Guide 15
16 Upgrading iblot 2 Gel Transfer Device firmware The current firmware version on the iblot 2 Gel Transfer Device is displayed on the Firmware Version button. 1. To update firmware, visit thermofisher.com/iblot2, and follow the instructions to download the latest firmware version to a USB storage device. 2. Insert the USB storage device with the new firmware version (.ib2 file) to be installed into the USB port (Type A) of the iblot 2 Gel Transfer Device. 3. Turn on the iblot 2 Gel Transfer Device and go to the Options screen. 4. Touch Firmware Version. Note: If you do not have a USB storage device in place, a prompt to insert a USB storage device will appear. 5. Touch OK to start the update. Do not remove the USB storage device until the Options screen is displayed again, showing the new firmware version. Resetting the iblot 2 Gel Transfer Device to factory settings The Reset to Factory Settings button allows the iblot 2 Gel Transfer Device to be restored to its original factory settings. If this option is selected, all logs and custom methods will be deleted. If you do not wish to reset the iblot 2 Gel Transfer Device, touch the cancel icon to return to the Options screen. 16 iblot 2 Dry Blotting System User Guide
17 Description of Methods Methods Recommended running parameters The iblot 2 Gel Transfer Device is pre-programmed with six voltage Methods that allow blotting using different combinations of volts and time. Method Voltage Default Run Time Run Time Limit P0 20 V for 1 minute 23 V for 4 minutes 25 V for 2 minutes 7 minutes 13 minutes P1 25 V 6 minutes 10 minutes P2 23 V 6 minutes 11 minutes P3 20 V 7 minutes 13 minutes P4 15 V 7 minutes 16 minutes P5 10 V 7 minutes 25 minutes The Default Run Time is the default time setting for a selected Method. The Run Time Limit is the maximum recommended run time for a selected Method. The following parameters are recommended for transfer of proteins with molecular weights ranging from kda. Transfer Stack Method Volts Run Time Regular transfer stack (1 midi gel or two mini gels) Regular transfer stack (E-PAGE 48 or 96 gel) Mini transfer stack (one mini gel) P minutes P minutes P minutes The following parameters are recommended for transfer of proteins with molecular weights >150 kda. Transfer Stack Method Volts Run Time Regular transfer stack (1 midi gel or two mini gels) P0, P minutes Regular transfer stack (E-PAGE 48 or 96 gel) P0, P minutes Mini transfer stack (one mini gel) P0, P minutes You may need to optimize the blotting parameters (volts or time) based on your initial results (See page 36 for details). This may include: Increasing or decreasing the transfer time. Performing an ethanol equilibration step prior to transfer can improve overall efficiency of protein transfer. iblot 2 Dry Blotting System User Guide 17
18 Protein Transfer Protocol Experimental Overview Experimental outline The table below outlines the experimental steps necessary to perform western blotting using the iblot 2 Gel Transfer Device. For more details on each step, see indicated pages. Step Action Page 1 Select Method for performing transfer Remove the gel from the gel cassette Assemble the iblot 2 Transfer Stack with your protein gel for transfer using the iblot 2 Gel Transfer Device Perform protein transfer using the selected Method Disassemble the iblot 2 Transfer Stack. 25 General Guidelines To obtain the best results, follow these recommendations: Wear gloves at all times during the entire blotting procedure to prevent contamination of gels and membranes. Do not touch the membrane or gel with bare or gloved hands. This may contaminate the gel or membrane and interfere with further analysis. If you need to adjust the membrane, always use forceps. Avoid using expired iblot 2 Transfer Stacks. Always use the transfer stacks before the specified expiration date printed on the package. Remove air bubbles as indicated in the protocol using the Blotting Roller supplied with the device. Do not trim the membrane or iblot 2 Transfer Stacks to fit your gel size. See previous page for gel sizes that are compatible with iblot 2 Gel Transfer Device. Note that iblot 2 Mini Transfer Stacks are available for blotting mini gels (page 41). Maintain the membrane size identical to the transfer stacks to avoid direct contact between the top and bottom transfer stacks. Gently close lid after assembling transfer stacks to ensure metal contacts and transfer stacks do not shift out of position. Wipe down instrument and contacts after every use. Recommended gel types The gel types compatible for use with iblot 2 Gel Transfer Device and iblot 2 Transfer Stacks are listed below. Gel Type Size iblot 2 Transfer Stack Midi gels (Novex Tris-Glycine Plus, NuPAGE Novex Bis-Tris, Tris-Acetate, or Tris-Glycine Midi gels, or equivalent) Mini gels (Bolt Bis-Tris Plus, NuPAGE Bis-Tris or Tris-Acetate, Tricine, Tris-Glycine Gels, or equivalent) E-PAGE 48 or 96 Gels 13 cm (l) 8.3 cm (w) 1.0 mm thick 8 cm (l) 8 cm (w) 1.0 or 1.5 mm thick 13.5 cm (l) 10.8 cm (w) 3.7 mm thick iblot 2 Regular Transfer Stack iblot 2 Regular Transfer Stack, or iblot 2 Mini Transfer Stack iblot 2 Regular Transfer Stack 18 iblot 2 Dry Blotting System User Guide

 to turn ON the iblot 2 Gel Transfer Device.")
19 Using the iblot 2 Gel Transfer Device Introduction Instructions are provided in this section to assemble the iblot 2 Gel Transfer Device for blotting mini-, midi-, or other gels. Materials needed Selecting a Method You will need the following items: Pre-run mini- or midi gel containing your protein samples and standards iblot 2 Regular Transfer Stack for blotting one midi gel, two mini gels, or one E-PAGE gel OR iblot 2 Mini Transfer Stack for blotting one mini gel Blotting Roller supplied with the device Select the appropriate Method for your application on the iblot 2 Gel Transfer Device prior to assembling an iblot 2 Transfer Stack with your gel. 1. Touch the power switch at the rear of the device (page 5) to turn ON the iblot 2 Gel Transfer Device. The fan in the device begins to run and the digital display turns on. 2. Select the Method by touching: Templates to access the desired Method (see page 13) Saved Methods to select a Custom Method (page) Start Last Run to use the Method from the last run iblot 2 Dry Blotting System User Guide 19
20 Removing the gel Remove the gel from the cassette for transfer after completion of electrophoresis as described below. Open the mini- or midi gel cassette using the Gel Knife by inserting the knife into the narrow gap between the two plates of the cassette. Push up and down gently on the handle of the knife to separate the plates. Upon opening the cassette, discard the plate without the gel and slowly remove the gel adhered to the other plate. For details on removing the gel, refer to the manual supplied with the mini- or midi gel. For other gel types, refer to the manufacturer recommendations to remove the gel from the cassette. General guidelines There is generally no need for any pretreatment of the gel after electrophoresis, however, under certain circumstances, an equilibration step can improve results: o Equilibration of the gel in 20% ethanol (prepared in deionized water) for 5 10 minutes prior to performing blotting can improve the overall efficiency of transfer for high molecular weight proteins. o For Novex Tris-Glycine Plus Gels, equilibration in 100 ml of deionized water or transfer buffer for 5 minutes prior to transfer may improve transfer of mid to small molecular weight proteins. This equilibration step can be omitted for optimal transfer of higher molecular weight proteins (>150kDa). The transfer membrane is supplied in a ready-to-use format in the stacks without any need for pretreatment. Do not treat the PVDF membrane with methanol as the PVDF membrane is preactivated prior to assembly with the transfer stack. You may blot E-PAGE gels using the blotting protocol with the Blotting Roller. If you wish to use the Blotting Roller for blotting E-PAGE gels be sure to: o Wash the E-PAGE gel briefly in deionized water prior to blotting to remove any small gel pieces attached to the gel. o Use the Blotting Roller all over the gel including all well areas to flatten any protrusions to ensure even transfer and efficient blotting. When placing an E-PAGE gel on the membrane, make sure the open wells face upwards, and that the bottom of the gel is in contact with the membrane. Use the appropriate iblot 2 Transfer Stacks based on the gel that you are blotting. Do not trim the membrane or transfer stacks to fit the size of your gel, as the transfer quality is not affected if the pre-run gel is smaller than the transfer stack. Always maintain the membrane size identical to the transfer stacks to avoid accidental contact between the Bottom and Top Stacks. See page 18 for gel types compatible with the iblot 2 Gel Transfer Device. Use the iblot 2 Regular Transfer Stacks for blotting two mini gels or one midi gel Use the iblot 2 Mini Transfer Stacks for blotting one mini gel. 20 iblot 2 Dry Blotting System User Guide


21 Assembling the iblot 2 Transfer Stack 1. Open the lid of the device using the latch. Ensure the blotting surface is clean. 2. Unseal the iblot 2 Transfer Stack. 3. Separate the Top Stack and set it to one side of the bench with the transfer gel layer facing up. Keep the Bottom Stack in the transparent plastic tray. Note: In some instances, the membrane may adhere to the separator. Make sure that the membrane is not stuck to the separator before proceeding to the next step. If the membrane is stuck on the separator, use forceps to remove the membrane and place it on top of the Bottom Stack. Top Stack Bottom Stack Top Stack Separator Bottom Stack Separator iblot 2 Dry Blotting System User Guide 21


. 7. Shake off excess water, and place the pre-run gel on the transfer membrane of the Bottom stack as described: 8.")
22 Assembling the iblot 2 Transfer Stack, continued 4. Place the Bottom Stack with the plastic tray directly on the blotting surface. Align the tray in the center of the blotting surface according to the type of iblot 2 Transfer Stack being used. Do not push trays fully to the top (Mini) or fully to the left (Regular) as this may elevate and twist the tray or interfere with the contacts. The electrical contacts on the tray should be aligned with the corresponding electrical contacts on the blotting surface of the iblot 2 Gel Transfer Device. Orientation for iblot 2 Regular Transfer Stack Electrical contacts Orientation for iblot 2 Mini Transfer Stack Electrical contacts 5. Ensure there are no bubbles between the membrane and the transfer stack. Remove any trapped air bubbles using the Blotting Roller. 6. Open the gel cassette and immerse the pre-run gel briefly in deionized water (1 10 seconds) to facilitate easy positioning of the gel on top of the transfer membrane. Note: For Novex Tris-Glycine Plus gels, rinse in 100 ml of deionized water for 5 minutes to improve transfer of mid to low molecular weight proteins (< 150 kda). 7. Shake off excess water, and place the pre-run gel on the transfer membrane of the Bottom stack as described: 8. 1 midi gel on an iblot 2 Regular Transfer Stack 9. 2 mini gels (head-to-head) on an iblot 2 Regular Transfer Stack mini gel on an iblot 2 Mini Transfer Stack Transferring two mini gels Transferring one mini gel 22 iblot 2 Dry Blotting System User Guide


23 Assembling the iblot 2 Transfer Stack, continued 11. Use the Blotting Roller to remove any air bubbles between the gel and the membrane. 12. Soak the iblot Filter Paper (use the appropriate filter paper for the size of the gel) in a clean container of deionized water. iblot Filter Paper is included with each iblot 2 Transfer Stacks. Note: For E-PAGE gels, there is no need to use a filter paper. 13. Place the presoaked iblot Filter Paper on the pre-run gel. Use the Blotting Roller to remove any air bubbles between the filter paper and gel. 14. Remove and discard the white plastic separator from the Top stack. 15. Take the Top Stack from the bench and place it on top of the presoaked filter paper with the copper electrode facing up (and transfer gel layer facing down). Remove any air-bubbles using the Blotting Roller. iblot 2 Dry Blotting System User Guide 23


24 Assembling the iblot 2 Transfer Stack, continued 16. Place the iblot 2 Absorbent Pad on top of the iblot 2 Transfer Stack such that the electrical contacts are aligned with the corresponding electrical contacts on the blotting surface of the iblot 2 Gel Transfer Device. Orientation for iblot 2 Absorbent Pad, Regular Orientation for iblot 2 Absorbent Pad, Mini Electrical contacts Electrical contacts 17. Use the Blotting Roller to flatten any protrusions in the transfer stack. Performing blotting After assembling the iblot 2 Gel Transfer Stack, perform blotting as described below. Perform blotting within minutes of assembling the stacks with the gel. 1. Gently close the iblot 2 Gel Transfer Device lid by pressing down with two hands on the sides of the lid. Make sure the latch is secure. Do not forcibly push the lid when closing, because it can cause the transfer stack or metal contacts to shift out of position 2. Ensure that the correct Method is selected (page 17). 3. Touch the Start icon on the screen to begin the transfer. 4. At the end of the transfer, the current automatically shuts off and the iblot 2 Gel Transfer Device signals the end of transfer with repeated beeping sounds, and a message on the digital display. 5. Touch the Done icon to stop the beeping. 6. Proceed to Disassembling the iblot 2 Transfer Stack, page iblot 2 Dry Blotting System User Guide

25 Disassembling the iblot 2 Transfer Stack Introduction Procedure Refer to the instructions below to disassemble the iblot 2 Transfer Stack. To obtain good transfer and detection results, open the device and disassemble the stack within 30 minutes of ending the blotting procedure. 1. Open the lid of the iblot 2 Gel Transfer Device. 2. Discard the iblot 2 Absorbent Pad and Top Stack. 3. Carefully remove and discard the gel and filter paper (if used) as shown below. Remove the transfer membrane from the stack and proceed with the blocking procedure or stain the membrane (see next page for details). Note: If you are using PVDF membranes, place the membrane immediately into water, as PVDF membranes dry quickly. If the PVDF membrane is dried, re-wet the membrane with methanol and rinse with deionized water a few times before use. Transfer the membrane to your blocking or staining solution only after you are sure that is completely wet, as reactivating after the membrane is exposed to the blocking solution may be problematic. 4. Remove and discard the plastic tray containing the Bottom stack. 5. Wipe down instrument and metal contacts with a damp cloth or paper tissue to remove any excess liquid that may have not been absorbed by the iblot 2 Absorbent Pad. 6. At this point, the iblot 2 Gel Transfer Device is ready for another run (no cooling period is required). If you are not using the device, turn off the power switch located on the back of the iblot 2 Gel Transfer Device. IMPORTANT! Do not reuse the iblot 2 Absorbent Pad, iblot Filter Paper, or Top and Bottom Stacks after blotting. Discard after each use. iblot 2 Dry Blotting System User Guide 25
 buttons. Up to 10 steps can be added to each Method. 3.")
26 Custom Methods Creating Custom Methods Introduction Programming a custom method Custom methods can be created and saved on the iblot 2 Gel Transfer Device for specific applications, or fine-tuning transfer conditions. 1. Select New Method. 2. Select the number of steps to be included in the new Method using the ( /+) buttons. Up to 10 steps can be added to each Method. 3. Select the voltage and time (minutes and seconds) for each step by touching the desired field and using the keyboard to enter the appropriate value. Do not exceed the recommended time limit for voltage. 4. Select Next to go to the next step and repeat the procedure as necessary. 5. Select Done after programming the final step, and the entire Method is displayed. Select Next and proceed to to Save a Custom Method (page 27). Note: The Edit button can be used at this point (see page 28, Creating Custom Methods from a Template ), but do not select Cancel without saving the Method or you will lose all of the information. 26 iblot 2 Dry Blotting System User Guide

27 Save a custom method 6. Select the Name field, and use the keyboard to enter a name for the new Method. 7. Save the method. 8. The new Method will appear in the list of Saved Methods. iblot 2 Dry Blotting System User Guide 27

28 Creating Custom Methods from a Template Introduction Select a Template Custom methods can be created and saved on the iblot 2 Gel Transfer Device for specific applications, or fine-tuning transfer conditions using a pre-set template or previously saved Method as a starting point. 1. Select Templates. 2. Select a Method from the list on the Preset Templates or Saved Methods screen. 3. Select Edit from the Edit Method screen to enter Edit Mode (all voltage and time fields become enabled for editing). 4. Continue to Change voltage/time (page 29), or Add/remove steps (page 30). 28 iblot 2 Dry Blotting System User Guide


29 Change voltage/time 1. Select voltage or time fields in any given step while in Edit Mode and a keyboard will appear. 2. Enter desired values for voltage or time and select Done. 3. After editing, the Edit Method screen is shown again. 4. Select Edit to continue editing additional fields, OR 5. Select Done when editing has been completed and proceed to to Save a Custom Method (page 31). iblot 2 Dry Blotting System User Guide 29

30 Add/remove steps 1. Select Manage Steps while in Edit Mode. 2. Select either Add Steps or Remove Steps. 3. Select the + icon located at the location where you want to insert a step, or the icon to remove a step. 4. If a step is added, a screen appears to enter the desired voltage and time for that step. After the values are added, select Done to return to the Edit Method screen. 5. Select Done on the Edit Method screen and proceed to to Save a Custom Method (page 31) 30 iblot 2 Dry Blotting System User Guide
31 Save a Custom Method 1. Click Save to save the method. 2. Touch the name field on the Name Display screen and use the keyboard to enter in the characters. Touch OK when done. 3. The new Method will now appear under Saved Methods icon button. iblot 2 Dry Blotting System User Guide 31
32 Appendix A Troubleshooting Introduction Review the information below to troubleshoot your experiments using the iblot 2 Gel Transfer Device and iblot 2 Transfer Stacks. To troubleshoot the immunodetection process, refer to the instructions supplied by the manufacturer of the immunodetection reagents. Observation Cause Solution No current Difficulty closing lid. Note: do not press forcibly on lid as it can cause damage to the unit. Incomplete electric circuit due to: Incorrect placement of the plastic tray leading to interference with contacts. Incorrect placement of iblot 2 Absorbent Pad contact. Plastic separator was not removed when assembling stack. The metal safety contacts in the lid hinge may be dirty and do not make contact. One or more metal contacts are bent and unable to make good contact with the base unit. For Mini stacks (contact in center position), slide tray down slightly towards the front of the unit. For Regular stacks (contact on the side position) slide tray slightly towards the right. Make sure the electrical contact of the iblot 2 Absorbent Pad is aligned with the corresponding electrical contacts on the blotting surface of the iblot 2 Gel Transfer Device. Make sure that the plastic separator is removed from the stack (see page 21). Clean the metal safety contacts in the lid hinge with a cotton swab and water. Inspect metal safety contacts, contacts may need to be replaced ((Cat. No. IB28001)) as part of routine maintenance. Gently pull down on the contacts to extend the length. Note: Do not press forcibly on lid in an attempt to engage the contacts. Excessive force can cause the contacts to shift out of position and damage the unit. Contacts may need to be replaced ((Cat. No. IB28001)) as part of routine maintenance. Pressure plate malfunction. Ensure the pressure plate in the lid pushes up and is not bound in any way. Top Stack placed on the Make sure the Top Stack is assembled with device upside-down. the copper electrode facing up. Transfer stack is too thick. The iblot 2 Gel Transfer Device can only support gels of 1.5mm thickness. Ensure the proper gel is being used. Ensure that additional filter pads have not been added. Only use the supplied filter paper with the iblot 2 Transfer Stacks. Ensure the stack tray is properly aligned. Do not remove the transfer stack from the plastic sample tray. 32 iblot 2 Dry Blotting System User Guide
33 Observation Cause Solution No proteins transferred to the membrane Empty spots on the membrane High molecular weight proteins remain in the gel indicated by staining of the gel after transfer Protein blowthrough Protein bands distorted on membrane Protein not binding/transferrin g to membrane (PVDF) No current or incorrect Method used. Presence of air bubbles between the gel and the membrane preventing the transfer of proteins. Expired or creased membranes used. Incorrect Method or transfer conditions used. Note: It is normal for some proteins to remain in the gel because some high molecular weight proteins do not transfer completely using the iblot 2 Gel Transfer Device, compared to semi-wet transfer apparatus. Transfer time is too long. Non-uniform electric field created around wells. PVDF membrane is dry/partially dry. See previous page to ensure the electrical circuit is complete and current is flowing through the device. Be sure to use the correct Method (page 17). Be sure to remove all air bubbles between the gel and membrane using the Blotting Roller. Use the iblot 2 Transfer Stacks before the expiration date printed on the package. Use the appropriate Method and run time based on the gel type as described on page 17. For mini- or midi gels: o Perform ethanol equilibration step as described on page 36 to improve transfer. o Use a Tris-acetate gel to separate the high molecular weight proteins. o Increase the transfer time in 30-second increments. For E-PAGE gels: o Increase the transfer time in 30-second increments. o Use Method P3 for 8 minutes. Reduce transfer time by 30 second increments. Note: pre-stained markers are charged, so tend to blow-through more than regular proteins. Ensure that the gel is properly flattened using the Blotting Roller. Follow the recommendations on page 20 to obtain good results. Regions where PVDF membranes are dry appear whiter than places where the membrane is wet. Remove the membrane and reactivate in 100% methanol, and rinse in water before reapplying to the transfer stack. High background Use of TBST buffers for washing. Use PBST or WesternBreeze wash solutions. Signal intensity is similar for different protein loads after detection High protein load (detection is not within the linear range). Since the immunodetection sensitivity is higher for dry blotting with the iblot 2 Gel Transfer Device than for semi-dry or wet blotting, we recommend that you decrease the protein load, use more diluted antibody, or perform detection for shorter time. You may need to perform some optimization based on your initial results. iblot 2 Dry Blotting System User Guide 33
34 Observation Cause Solution Corrosion of the Top Stack Membrane and the gel turns blue Green discoloration of membrane edges Bottom Stack transfer gel melts to a viscous blue solution Incorrect placement of the top stack. Longer transfer times result in the deposition of copper ions. Copper ions carried with liquids reach the membrane. Membrane is trimmed to fit the gel size resulting in direct contact between the Top and Bottom Bottom stacks. Be sure the Top Stack is placed correctly with the copper electrode facing up. Avoid placing the top stack in the inverted position. Be sure to perform the transfer for the recommended time for each gel type. These deposits do not interfere with downstream processes. The stained regions can be cut away, but membrane washing typically results in their removal. Always maintain the membrane size identical to the transfer stack. Transfer quality is not affected by smaller gel size compared to the membrane. 34 iblot 2 Dry Blotting System User Guide
35 Appendix B Post Transfer Analysis Post transfer analysis After the transfer, proceed to immunodetection, store the membrane for future use, or stain the membrane. For immunodetection of proteins, use the WesternBreeze Chromogenic or Chemiluminescent Immunodetection Kits available at thermofisher.com (see page 41 41), or any other immunodetection kit. Note: When using the iblot 2 Dry Blotting System to transfer proteins from SDS-PAGE gels, the applied field strength can result in the partial depletion of negative ions bound to the proteins. This may result in a slight decrease in the amount of protein migrating from the gel, but it also results in improved binding of the transferred proteins to the membrane. Since the membrane maintains the protein load better, higher sensitivity can be achieved for subsequent immunodetection procedures. To store nitrocellulose membranes, air-dry the membrane and store the membrane in an air-tight plastic bag at room temperature or 4 C. Avoid storing nitrocellulose at temperatures below 20 C. Low temperatures cause the nitrocellulose to turn brittle. To store PVDF membranes, air-dry the membrane and store the membrane in an air-tight plastic bag at room temperature, 4 C, or 80 C. When you are ready to use the membrane, re-wet the membrane with methanol for a few seconds, then rinse the membrane thoroughly with deionized water to remove methanol. To stain membranes after blotting, use any method of staining for total protein visualization, such as Coomassie Blue R-250, Ponceau S, Amido Black, Novex Reversible Membrane Protein Stain Kit, or SYPRO Ruby Blot Stain (page 41). The iblot 2 Gel Transfer Device blotting protocol is compatible with most of the staining methods listed above. Note: The sensitivity of total protein membrane staining after blotting with the iblot 2 Gel Transfer Device is slightly lower than the total membrane protein staining obtained with the semi-wet transfer protocol. However, due to the nature of dry blotting, lower transfer does not affect the immunodetection sensitivity. If you do not detect any proteins on the membrane after immunodetection or staining, refer to Troubleshooting on page 32. Refer to the manufacturer recommendations for optimizing immunodetection. The immunodetection profile of proteins transferred using the iblot 2 Dry Blotting System may differ from what is observed when using other transfer methods, such as traditional semi-dry or wet blotting systems. It is recommended to optimize parameters such as gel protein load, primary and secondary antibody dilution, and exposure time (see page 36 for details) when using the iblot 2 Dry Blotting System for the first time with any new combination of antigen and detection reagents. iblot 2 Dry Blotting System User Guide 35
36 Appendix C Optimizing Blotting Optimizing blotting When using the iblot 2 Gel Transfer Device, most proteins transfer efficiently using the protocol in this manual. Based on specific properties of a protein or a set of proteins, some optimization of the blotting protocol may be necessary. Optimize blotting as follows: Perform an ethanol equilibration step prior to transfer To improve the transfer of high-molecular weight proteins from mini- or midi- NuPAGE or Tris-Glycine gels, submerge the gel in 20% ethanol (prepared in deionized water), and equilibrate for 5 10 minutes at room temperature on a shaker prior to transfer. Do not equilibrate for longer than 10 minutes, or sensitivity may be reduced. After equilibration, perform transfer using the iblot 2 Gel Transfer Device as described in this manual. Increase or decrease transfer time Based on the initial results, you can increase or decrease the transfer time for the Method used to perform the transfer (refer to page 26 for details on customizing a Method). Do not perform transfer for more than the recommended run time limit indicated for each Method (page 17). Proteins >150 kda migrate more slowly, and require more time to transfer. If your protein of interest is in this size range, it may be necessary to use a Run Time of 8 10 minutes for your transfer. Small proteins <30 kda migrate more rapidly during electrophoretic separation, and consequently require less time to transfer from the gel matrix to the membrane. If your protein of interest is in this size range, you may need to reduce the Run Time to 5 6 minutes for your transfer. It is normal for some proteins to remain in the gel, because some high molecular weight proteins do not transfer completely using the iblot 2 Gel Transfer Device as compared to wet transfer apparatus. Since the sensitivity of detection using the iblot 2 Gel Transfer Device is higher than that of semi-wet and semi-dry blotting, complete transfer of proteins is not required. Near-complete transfer of prestained standard protein bands is observed with the iblot 2 Gel Transfer Device. However, note that the complete transfer of prestained protein standards does not indicate complete transfer of other proteins or blow-through of other proteins. 36 iblot 2 Dry Blotting System User Guide


37 Appendix D Maintenance Cleaning General maintenance Replacing the fuse Before cleaning the iblot 2 Gel Transfer Device, make sure the device is turned off. Wipe off the blotting surface and electrodes with a damp cloth or paper tissue. Allow the parts to dry before use. To avoid damaging the iblot 2 Gel Transfer Device, do not perform any repairs or service other than general maintenance on the iblot 2 Gel Transfer Device. Instructions are provided below for replacing fuses and electrical contacts. Disconnect the unit from the power supply by removing the power cord before performing either of these maintenance procedures. For any other repairs and service, contact Technical Support (page 42). The fuses for the device are located at the rear of the device. To replace a fuse: Make sure the device power is OFF. Disengage the fuse holder by depressing the tabs via the release slots. Remove the fuse holder and change the fuse (see page 40 for fuse specifications). Replace the fuse holder (with the bottom tab down). Release Slot Release Slot Fuse Fuse Holder Fuse Holder Tabs Bottom Tab iblot 2 Dry Blotting System User Guide 37


38 Replacing electrical contacts Electrical contacts should be inspected and replaced regularly as part of routine maintenance. Overtime, electrical contacts can become depressed and worn out. To ensure optimal life of the electrical contacts, wipe down the instrument and contacts with a damp cloth after each use. To replace an electrical contact, a #1 Phillips Screwdriver is required. 1. Make sure the device power is OFF, then open the lid of the iblot 2 Gel Transfer Device. Round Bumper Contact 1 Contact 2 2. Hold the Lid with one hand, and remove the screw holding Contact 1. Discard both the screw and the contact. Contact 1 3. Remove the screw holding Contact 2. Discard both the screw and the contact. Contact 2 Screw Screw 4. Hold the Lid with one hand, and unpeel the Round Bumper from the Lid. Discard the Round Bumper. Round Bumper 38 iblot 2 Dry Blotting System User Guide


39 Replacing electrical contacts, continued 5. Open the bag of the Electrode Replacement Kit (Cat. no. IB28001), and remove all of the parts. 6. Peel off the backing from the Round Bumper and place the bumper into the recess. Hold the Lid with one hand and press down on the bumper for five seconds to ensure proper adhesion. Apply Pressure 7. Place a screw through the hole in one of the contacts. Position the contact/screw onto the Contact 1 location. Note: the contact has a small orientation notch which matches a bump in the Lid. This is to ensure proper orientation of the contact when assembled. Turn the screw with a screwdriver until it is hand-tight. 8. Place a screw through the hole in one of the contacts. Position the contact/screw onto the Contact 2 location. Turn the screw with a screwdriver until it is hand-tight. iblot 2 Dry Blotting System User Guide 39
40 Appendix E Product Specifications iblot 2 Gel Transfer Device specifications iblot 2 Transfer Stack specifications Dimensions: Weight: Electrical Parameters: Built-in Features: Compatibility: iblot 2 Materials: Operating Temperature: Blotting Roller: Replacement Fuse: 37 cm (l) 20 cm (w) 11 cm (h) 2.3 kg V, 50/60 Hz, 6.3 A Digital display, alarm Suitable for transfer of mini- (8 8 cm), midi- (8 13 cm), and E-PAGE Gels Polycarbonate, Cycoloy, Acrylic, Gold plated copper, Stainless steel, Plasticized silicone, Aluminum 5 40 C Delrin roller (8.6-cm wide) attached to a stainless steel handle 6.3A Slo-Blo, 5x20, 250V (Littelfuse HXP) The iblot 2 Gel Transfer Device is impervious to alcohol, acid (HCl), alkali (NaOH) but not compatible with acetone, dimethyl sulfoxide, and acetic acid. Specifications for the iblot 2 Transfer Stacks are listed below. For a more detailed description of the iblot 2 Transfer Stacks, see page 10. Top Stack Regular Top Stack Gel Layer: Mini Top Stack Gel Layer: Top Stack Gel Layer Composition: Electrode: Bottom Stack Regular Bottom Stack Gel Layer: Mini Bottom Stack Gel Layer: Bottom Stack Gel Layer Composition: Electrode: Transfer Membrane: Plastic Tray: iblot 2 Absorbent Pad Dimensions: Material: Metal Contact: iblot Filter Paper Regular Filter Paper: Mini Filter Paper: 13.6 cm (l) 8.5 cm (w) 0.19 cm (thick) 8.5 cm (l) 8.5 cm (w) 0.19 cm (thick) Proprietary Copper-coated mesh 14.1 cm (l) 8.5 cm (w) 0.32 cm (thick) 8.5 cm (l) 8.5 cm (w) 0.32 cm (thick) Proprietary Copper-coated mesh Nitrocellulose (0.2 µm) or PVDF (0.2 µm, low fluorescence) 16.8 cm 10.3 cm (1.7-cm wide copper contact) 15 cm (l) 9.5 cm (w) 1.1 cm (thick) Gray Melamine Aluminum 13.5 cm (l) 8 cm (l) 0.04 cm (thick) 8 cm (l) 8 cm (w) 0.04 cm (thick) 40 iblot 2 Dry Blotting System User Guide
41 Appendix F Accessory products iblot 2 Transfer Stacks iblot 2 Transfer Stacks are available at thermofisher.com. Ordering information is provided below. Product Quantity Cat. No. iblot 2 Regular Transfer Stack, Nitrocellulose 1 pack of 10 IB23001 iblot 2 Regular Transfer Stack, PVDF 1 pack of 10 IB24001 iblot 2 Mini Transfer Stack, Nitrocellulose 1 pack of 10 IB23002 iblot 2 Mini Transfer Stack, PVDF 1 pack of 10 IB24002 Blotting Roller 1 unit LC2100 Additional products Additional reagents that may be used for electrophoresis of proteins are available at thermofisher.com. Ordering information is provided below. For more information, visit thermofisher.com or call Technical Support (page 42). Product Quantity Cat. No. ibind Flex Western Device 1 SLF2000 Device ibind Flex Cards 10 SFL2010 Cards ibind Flex Solution Kit 1 Kit SLF2020 SuperBlock (PBS) Blocking Buffer 1 L SuperBlock T20 (PBS) Blocking Buffer 1 L SuperSignal West Pico PLUS Chemiluminescent 200 ml Substrate SuperSignal West Dura Extended Duration 100 ml Substrate SuperSignal West Femto Maximum Sensitivity 100 ml Substrate SeeBlue Plus2 Pre-Stained Standard 500 µl LC5925 MagicMark XP Western Protein Standard 250 µl LC5602 Novex Reversible Membrane Protein Stain Kit 1 kit IB7710 SYPRO Ruby Protein Blot Stain 200 ml S Precast gels and premade buffers A large variety of precast gels including Bolt, NuPAGE Novex, Tris- Glycine mini- and midi gels, and E-PAGE gels, as well as premade buffers are available at thermofisher.com. iblot 2 Dry Blotting System User Guide 41
42 Appendix G Documentation and support Obtaining support For the latest services and support information for all locations, go to thermofisher.com At the website, you can: Access worldwide telephone and fax numbers to contact Technical Support and Sales facilities Search through frequently asked questions (FAQs) Submit a question directly to Technical Support (techsupport@lifetech.com) Search for user documents, SDSs, vector maps and sequences, application notes, formulations, handbooks, certificates of analysis, citations, and other product support documents Obtain information about customer training Download software updates and patches 42 iblot 2 Dry Blotting System User Guide
43 Appendix H Safety Before starting Before you begin using this product, or any installation or service operation, please read the following safety information. Attention to these warnings will help prevent personal injuries and damage to the products. It is your responsibility to use the product in an appropriate manner. This product is designed for use solely in laboratory environments, and must not be used in any way that may cause personal injury or property damage. You are responsible if the product is used for any intention other than its designated purpose or in disregard of Life Technologies instructions. Life Technologies shall assume no responsibility for such use of the product. The product is used for its designated purpose if it is used in accordance with its product documentation and within its performance limits. Using the product requires technical skills and a basic knowledge of English. It is therefore essential that only skilled and specialized staff or thoroughly trained personnel with the required skills be allowed to use the product. Keep the basic safety instructions and the product documentation in a safe place and pass them on to the subsequent users. Applicable local or national safety regulations and rules for the prevention of accidents must be observed in all work performed. The iblot 2 Gel Transfer Device complies with the TUV Rhineland North America Inc. safety requirements, part 15 of the FCC rules, and the European Community Safety requirements. Operation of the iblot 2 Gel Transfer Device is subject to the conditions described in this manual. Operation of the iblot 2 Gel Transfer Device is subject to the following conditions: Indoor use Altitude below 2000 meters Temperature range: 5 to 40ºC Maximum relative humidity: 80% (maxiumum relative humidity 80% for temperatures up to 31ºC, decreasing linearly to 50% relative humidity at 40ºC) Installation categories (over voltage categories) II; Pollution degree 2 Mains supply voltage fluctuations not to exceed 10% of the nominal voltage ( V, 50/60 Hz, 6.3 A). Mains plug is a disconnect device and must be easily accessible. Do not attempt to open the iblot 2 Gel Transfer Device. To honor the warranty, iblot 2 Gel Transfer Device can only be opened and serviced by Life Technologies. The protection provided by the equipment may be impaired if the equipment is used in a manner not specified by Life Technologies. The device must be connected to a mains socket outlet with protective earthing connections. Ventilation requirements: room ventilation Do not use if device becomes cracked or broken in any area. iblot 2 Dry Blotting System User Guide 43
44 Installing the instrument The product may be installed only under the conditions and in the positions specified by Life Technologies. Following are the required operating position and conditions: Do not place the product in an area where it will be subject to vibration. Do not place the product on surfaces, vehicles, cabinets or tables that for reasons of weight or stability are unsuitable for this purpose. Do not place the product on heat-generating surface or near heat emitting devices such equipment racks or heaters. Verify that there is sufficient clearance between the product and any other system that may exhaust warm air. The product's ventilation should not be obstructed. If proper ventilation is not provided it can result in electric shock, fire and/or serious personal injury or death. The product is for indoor use only Use only with suitably rated mains supply cord (having 3 conductors min. 16 AWG or 1.5 mm 2, min. 300V, Harmonized Type for Europe and UL Listed/CSA Certified for North America, with molded plug rated min. 10A). A tolerance of ±10 % shall apply to the nominal input voltage and ±3 % to the nominal frequency, overvoltage category 2. Maximum operating altitude 2000 m asl, Maximum transport altitude 4500 m asl. Service operation requirements In the event of an equipment malfunction, it is the responsibility of the customer to report the need for service to Life Technologies or to one of the authorized agents. For service information, contact Technical Support (page 42). Servicing of this device is to be performed by trained service personnel only. 44 iblot 2 Dry Blotting System User Guide
45 Electrical safety The following information on electrical safety must be observed, failing to follow these instruction may result in electric shock, fire and/or serious personal injury or death. Prior to switching on the product, ensure that the nominal voltage setting on the product matches the nominal voltage of the AC supply network. This product should be connected to the power mains using a 3-wire (two conductors and ground) power cable and plug. Use this power cable with a properly grounded electrical outlet to avoid electrical shock. If extension cords or connector strips are implemented, they must be checked on a regular basis to ensure that they are safe to use. The appliance coupler of the connecting cable is regarded as the disconnecting device. In such cases, always ensure that the power plug is easily reachable and accessible at all times (corresponding to the length of connecting cable, approx. 2 m). Never use the product if the power cable is damaged. Check the power cable on a regular basis to ensure that it is in proper operating condition. By taking appropriate safety measures and carefully laying the power cable, you can ensure that the cable will not be damaged and that no one can be hurt by, for example, tripping over the cable or suffering an electric shock. Do not insert the plug into sockets that are dusty or dirty. Insert the plug firmly and all the way into the socket. Otherwise, sparks that result in fire and/or injuries may occur. Do not overload any sockets, extension cords or connector strips; doing so can cause fire or electric shocks. Ensure that the connections with information technology equipment, e.g. PCs or other industrial computers, comply with the IEC /EN or IEC /EN standards that apply in each case. Unless expressly permitted, never remove the cover or any part of the housing while the product is in operation. Doing so will expose circuits and components and can lead to injuries, fire or damage to the product. The device contains an internal battery. The battery should not be replaced by the user. Use suitable overvoltage protection to ensure that no overvoltage (such as that caused by a bolt of lightning) can reach the product. Otherwise, the person operating the product will be exposed to the danger of an electric shock. The overvoltage protection should limit the magnitude of the overvoltage surge to 1kV between the any of the power line and ground. Any object that is not designed to be placed in the openings of the housing must not be used for this purpose. Doing so can cause short circuits inside the product and/or electric shocks, fire or injuries. Prior to cleaning the product, disconnect it completely from the power supply. Use a soft, non-linting cloth to clean the product. Never use chemical cleaning agents such as alcohol, acetone or diluents for cellulose lacquers. iblot 2 Dry Blotting System User Guide 45
46 Product regulatory compliance Product safety compliance This device complies with the following safety standards: EN :2010 (3 rd Edition), Safety Requirements for Electrical Equipment for Measurement, Control and Laboratory Use, Part 1: General Requirements. Product EMC compliance - Class A compliance This device has been tested and verified to comply with the following electromagnetic compatibility (EMC) regulations: EN :2006, Electrical equipment for measurement, control and laboratory use Part 1 General EMC requirements. (Group 1, Class A) AS/NZS 2064, Limits and Methods Measurement of Electromagnetic Disturbance Characteristics of Industrial, Scientific, and Medical (ISM) Radio-frequency Equipment. ICES-001, Issue 3, Industrial, Scientific and Medical Radio Frequency Generator. FCC Part 15 sub-part B, Class A Certification/ registrations/ declarations TUV Listing (US/Canada) Life Technologies Israel Ltd., is the manufacturer and owner of the TUV file. For more information, contact: Life Technologies Israel Ltd. 12 Hamada St. P.O. Box 4035 Rehovot, Israel Electromagnetic compatibility (EMC) standards Class A notice WARNING: This is a class A product. In a domestic environment this product may cause radio interference in which case the user may be required to take adequate measures. Europe (CE declaration of conformity) This product has been tested in accordance to, and complies with, the Low Voltage Equipment Directive (2006/95/EC) and EMC Directive (2004/108/EC). The product has been marked with the CE Mark to illustrate its compliance. 46 iblot 2 Dry Blotting System User Guide
47 Explanation of symbols and warnings Symbols on instrument Informational symbols Caution WEEE The following table describes the symbols displayed on the instrument. The symbols used on the iblot 2 Gel Transfer Device are explained below: The CE mark symbolizes that the product conforms to all applicable European Community provisions for which this marking is required. The iblot 2 Gel Transfer Device complies with the TUV Rhineland North America Inc. safety requirements. The indicators "C" and "US" means that the product is certified for both the U.S. and Canadian markets, to the applicable U.S. and Canadian standards. The Caution symbol denotes a risk of safety hazard. Refer to accompanying documentation to avoid possible personal injury or instrument damage. The Electrical Warning symbol denotes a risk of electrical shock hazards. To avoid risk of injury from electric shock, do not open enclosures marked with this symbol. The WEEE (Waste Electrical and Electronic Equipment) symbol indicates that this product should not be disposed of in unsorted municipal waste. Follow local municipal waste ordinances for proper disposal provisions to reduce the environmental impact of WEEE. Visit for collection and recycling options. The C-Tick symbol denotes that the device is compliant with the electromagnetic compatibility (EMC) of the Australian Communications Authority (ACA). Consult instructions for use Product catalog number. Site of manufacture. iblot 2 Dry Blotting System User Guide 47
48 Instructions Générales Relatives à la Sécurité de l Appareil Avant de commencer Avant d utiliser ce produit, une installation ou un service, veuillez lire les consignes de sécurité suivantes. Lire attentivement ces avertissements permettra d éviter toute lésion corporelle et tout endommagement des produits. Il vous incombe d utiliser le produit d une manière appropriée. Ce produit est conçu pour être utilisé uniquement dans des environnements de laboratoire et ne doit pas être utilisé de manière à causer des dommages corporels ou matériels. Vous assumez la responsabilité en cas d utilisation du produit à une tout autre fin que celle prévue ou en cas de non-respect des consignes de Life Technologies. Life Technologies décline toute responsabilité pour un tel usage du produit. Le produit est utilisé aux fins prévues s il est utilisé conformément à sa documentation et dans la limite de ses performances. L utilisation du produit exige des compétences techniques et une connaissance de base de la langue anglaise. Par conséquent, il est essentiel que seul le personnel compétent et spécialisé ou le personnel soigneusement formé ayant les compétences requises soit autorisé à utiliser le produit. Conserver les instructions de sécurité de base et la documentation du produit dans un endroit sûr et les transmettre aux utilisateurs futurs. Les règles de sécurité locales ou nationales en vigueur relatives à la prévention des accidents doivent être respectées dans le cadre de tout travail effectué. L iblot MD 2 Gel Transfer Device respecte les exigences de sécurité de TÜV Rheinland North America Inc., la partie 15 des règles de la FCC et les exigences de la Communauté européenne en matière de sécurité. L utilisation d iblot MD 2 Gel Transfer Device est soumise aux conditions décrites dans le présent manuel. L utilisation d iblot MD 2 Gel Transfer Device est soumise aux conditions suivantes : Utilisation en intérieur Altitude inférieure à mètres Plage de température : 5 à 40 C Humidité relative maximum : 80 % (humidité relative maximum de 80 % pour des températures allant jusqu à 31 C, diminuant de façon linéaire jusqu à 50 % d humidité relative à 40 C) Catégories d installation (catégories de surtension) II; degré de pollution 2 Les fluctuations de tension de l alimentation secteur ne doivent pas dépasser 10 % de la tension nominale ( V, 50/60 Hz, 6,3 A). La fiche secteur est un dispositif de déconnexion et doit être facilement accessible. N essayez pas d ouvrir l iblot MD 2 Gel Transfer Device. Pour honorer la garantie, le dispositif iblot MD 2 ne peut être ouvert et entretenu que par Life Technologies. La protection fournie par l équipement risque d être altérée si l équipement est utilisé d une manière non spécifiée par Life Technologies. L appareil doit être connecté à une prise de courant secteur dotée d une protection par mise à la terre. Exigences en matière de ventilation : ventilation de la salle 48 iblot 2 Dry Blotting System User Guide
49 Installation de l appareil Le produit ne peut être installé que dans les conditions et aux emplacements prévus par Life Technologies. L emplacement et les conditions d utilisation requises sont les suivantes : Ne pas placer le produit dans une zone où il sera soumis à des vibrations. Ne pas placer le produit sur des surfaces, des véhicules, des meubles ou des tables qui, pour des raisons de poids ou de stabilité, ne conviennent pas à cette fin. Ne pas placer le produit sur une surface générant de la chaleur ou près de dispositifs émettant de la chaleur, tels que des bâtis d équipement ou des appareils de chauffage. Vérifier qu il y a suffisamment d espace entre le produit et tout autre système pouvant évacuer de l air chaud. La ventilation du produit ne doit pas être obstruée. Une ventilation inadéquate peut entraîner un choc électrique, un incendie et/ou des lésions graves ou la mort. Le produit est destiné à une utilisation en intérieur uniquement Utiliser uniquement avec un cordon d alimentation secteur adapté (avec 3 fils conducteurs minimum 16 AWG ou 1,5 mm 2, 300 V minimum, type harmonisé pour l Europe et homologué UL/certifié CSA pour l Amérique du Nord, avec une fiche moulée à valeur nominale de 10 A mininimum). Une tolérance de ± 10 % s applique à la tension d entrée nominale et de ± 3 % à la fréquence nominale, catégorie de surtension 2. Altitude maximale d utilisation de m asl., altitude maximale de transport de m asl. Exigences concernant l exploitation des services En cas de dysfonctionnement de l équipement, il incombe au client de signaler le besoin d entretien à Life Technologies ou à l un des agents autorisés. Pour obtenir des renseignements sur l entretien, communiquez avec l assistance technique (page 42). L entretien de cet appareil doit être effectué seulement par un technicien qualifié. iblot 2 Dry Blotting System User Guide 49
50 Sécurité électrique Les renseignements suivants sur la sécurité électrique doivent être respectés; ne pas suivre ces instructions peut entraîner un choc électrique, un incendie et/ou des blessures graves ou la mort. Avant de mettre le produit sous tension, s assurer que le réglage de la tension nominale sur le produit correspond à la tension nominale du réseau d alimentation c.a. Ce produit doit être raccordé à l alimentation sur le secteur à l aide d un câble d alimentation à 3 fils (deux conducteurs et mise à la terre) et d une fiche. Utiliser ce câble d alimentation avec une prise de courant correctement mise à la terre pour éviter tout choc électrique. Si des rallonges ou une barre d alimentation sont mises en place, elles doivent être régulièrement contrôlées pour s assurer qu elles peuvent être utilisées en toute sécurité. Le coupleur du câble de raccordement est considéré comme le dispositif de déconnexion. Dans ce cas, assurez-vous toujours que la prise d alimentation est facilement accessible à tout moment (correspondant à la longueur du câble de raccordement, 2 m environ). Ne jamais utiliser le produit si le câble d alimentation est endommagé. Vérifier régulièrement le câble d alimentation pour s assurer qu il est en bon état de fonctionnement. En prenant les mesures de sécurité appropriées et en installant délicatement le câble d alimentation, vous pouvez garantir que le câble ne sera pas endommagé et que personne ne peut être blessé, par exemple, en trébuchant sur le câble ou en subissant un choc électrique. Ne pas insérer la fiche dans des prises femelles qui sont sales ou poussiéreuses. Insérer la fiche fermement et entièrement dans la prise femelle. Dans le cas contraire, il peut y avoir des étincelles pouvant entraîner un incendie et/ou des blessures. Ne pas surcharger les prises femelles, les rallonges ou les barres d alimentation; cela peut provoquer un incendie ou des chocs électriques. S assurer que les connexions avec le matériel informatique, par exemple des PC ou d autres ordinateurs industriels, respectent les normes IEC / EN ou IEC /EN s appliquant dans chaque cas. Sauf autorisation expresse, ne jamais retirer le couvercle ou toute partie du boîtier lorsque le produit est en marche. Cela exposera les circuits et les composants et peut entraîner des blessures, un incendie ou un endommagement du produit. L appareil contient une batterie interne. La batterie ne doit pas être remplacée par l utilisateur. Utiliser une protection adaptée contre les surtensions permet de s assurer qu aucune surtension (comme celle causée par un éclair) ne peut atteindre le produit. Dans le cas contraire, la personne utilisant le produit sera exposée à un danger de choc électrique. La protection contre les surtensions devrait limiter l ampleur de la pointe de surtension à 1 kv entre l une des lignes électriques et la mise à la terre. Tout objet qui n est pas conçu pour être placé dans les ouvertures du boîtier ne doit pas servir à cette fin. Cela peut provoquer des courts-circuits à l intérieur du produit et/ou des chocs électriques, un incendie ou des blessures. Avant de nettoyer le produit, le débrancher complètement de l alimentation. Pour nettoyer le produit, utiliser un chiffon doux et non pelucheux. Ne jamais utiliser de produits de nettoyage chimiques tels que l alcool, l acétone ou des diluants pour vernis cellulosique. 50 iblot 2 Dry Blotting System User Guide
51 Conformité Réglementaire du Produit Conformité du produit en matière de sécurité Cet appareil est conforme aux normes de sécurité suivantes : EN :2010 (3 e édition), «Safety Requirements for Electrical Equipment for Measurement, Control and Laboratory Use, Part 1: General Requirements» (Règles de sécurité pour appareils électriques de mesurage, de régulation et de laboratoire, Partie 1 : exigences générales). Conformité du produit en matière de CEM Conformité de classe A Ce dispositif a été testé et vérifié pour se conformer aux règlements suivants en matière de compatibilité électromagnétique (CEM) : EN :2006, «Electrical equipment for measurement, control and laboratory use Part 1 General EMC requirements» (Matériels électriques de mesure, de commande et de laboratoire, Partie 1 : exigences relatives à la CEM). (Groupe 1, classe A) AS/NZS 2064, «Limits and Methods Measurement of Electromagnetic Disturbance Characteristics of Industrial, Scientific, and Medical (ISM) Radio-frequency Equipment» (Limites et méthodes de mesure des caractéristiques de perturbation électromagnétique de l équipement radiofréquence industriel, scientifique et médical [ISM]). NMB-001, Volume 3, «Industrial, Scientific and Medical Radio Frequency Generator» (Générateurs de fréquence radio industriels, scientifiques et médicaux). Partie 15, sous-partie B, classe A de la réglementation FCC Certification/ enregistrements/ déclarations Liste TÜV (États-Unis/Canada) Life Technologies Israel Ltd., est le créateur et le propriétaire du fichier TÜV. Pour plus de renseignements, communiquer avec : Life Technologies Israel Ltd. 12 Hamada St. P.O. Box 4035 Rehovot, Israël Normes de Compatibilité Électromagnétique (CEM) Avis de classe A AVERTISSEMENT : il s agit d un produit de classe A. Dans un environnement domestique, ce produit peut causer des interférences radio, auquel cas l utilisateur devra prendre les mesures adéquates. Europe (déclaration de conformité de la CE) Ce produit a été testé conformément à et dans le respect de la Directive relative au matériel électrique de basse tension (2006/95/CE) et la Directive sur la CEM (2004/108/CE). Le produit porte le marquage CE pour certifier sa conformité. iblot 2 Dry Blotting System User Guide 51

52 Explication des Symboles et des Avertissements Symboles sur l instrument Symboles informatifs Mise en garde WEEE Le tableau suivant décrit les symboles affichés sur l instrument. Les symboles utilisés sur l iblot MD 2 Gel Transfer Device sont expliqués cidessous : Le marquage CE symbolise que le produit est conforme à toutes les dispositions applicables de la Communauté européenne pour lesquels ce marquage est requis. L iblot MD 2 Gel Transfer Device est conforme aux exigences de sécurité de TÜV Rheinland North America Inc. Les indicateurs «C» et «US» signifient que le produit est certifié pour les marchés aux États-Unis et au Canada selon les normes américaines et canadiennes. Le symbole de mise en garde indique un risque d accident. Consulter la documentation jointe afin d éviter de possibles dommages corporels ou matériels. Le symbole d avertissement électrique correspond à un risque de choc électrique. Pour éviter tout risque de blessure causée par un choc électrique, ne pas ouvrir les boîtiers portant ce symbole. Le symbole WEEE (déchet d équipements électrique et électronique, DEEE) indique que ce produit ne devrait pas être jeté dans les ordures ménagères. Respecter les décrets municipaux locaux relatifs à la mise au rebut appropriée des déchets afin de réduire l impact environnemental des DEEE. Visiter la page pour connaître les options de collecte et de recyclage existantes. Le symbole C-Tick signifie que l appareil est conforme à la norme de compatibilité électromagnétique (CEM) de la Direction australienne des communications (ACA). Consulter le mode d emploi. Numéro de référence du produit. Site de fabrication. 52 iblot 2 Dry Blotting System User Guide
iblot Dry Blotting System
 iblot Dry Blotting System For dry, electroblotting of proteins from mini, midi, and E-PAGE gels Version C 7 February 2007 25-0911 User Manual ii Table of Contents Table of Contents... iii Product Contents...
Mini Blot Module. For transfer of proteins using the Mini Gel Tank USER GUIDE. Online Specials. Catalog Number B1000
 USER GUIDE Mini Blot Module Online Specials For transfer of proteins using the Mini Gel Tank Catalog Number B1000 Publication Number MAN0007710 Revision A.0 For Research Use Only. Not for use in diagnostic
SureCast Handcast System For preparation of handcast mini gels for use with the Mini Gel Tank and XCell Surelock systems
 Handcast System For preparation of handcast mini gels for use with the Mini Gel Tank and XCell Surelock systems USER GUIDE Catalog Numbers HC1000, HC1000S, and HC1000SR Publication Number MAN0014073 Revision
Wet/ Tank Blotting System
 A Geno Technology, Inc. (USA) brand name Wet/ Tank Blotting System Cat. No. BT301 1-800-628-7730 1-314-991-6034 info@btlabsystems.com SPECIAL NOTE: Thanks for choosing BT Lab Systems BT301 Wet/ Tank Blotting
Western Blotting Systems CAT NO:EPS-B0015 & EPS-B0016
 Western Blotting Systems CAT NO:EPS-B0015 & EPS-B0016 TABLE OF CONTENTS Important User Information Section 1 General Information 1.1 Introduction 1.2 Standard supply 1.3 Specifications Section 2 Instructions
CosmoPage Dual Run & Blot System
 CosmoPage Dual Run & Blot System I N S T R U C T I O N M A N U A L Nacalai USA, Inc. 6640 Lusk Blvd. Suite A200 San Diego, California 92121 USA TEL (858) 404-0403 Fax (858) 404-0408 Email: info@nacalaiusa.com
Optiblot Non-Reducing Electrophoresis Kit
 Optiblot Non-Reducing Electrophoresis Kit Instructions for Use For the use in non-reducing SDS-PAGE with precast gels This product is for research use only and is not intended for diagnostic use. 1 Table
E-Blotter Operation. Technical Bulletin E-03 MATERIAL PROCEDURE
 E-Blotter Operation MATERIAL BSA (1 mg/ml; 0.05 g BSA (Sigma-Aldrich Ltd., St Louis, MO; U.S.A.) dissolve in 50 ml ddh 2 O, aliquot to 1 ml in micro-centrifuge tubes and freeze in -20 C) NK92 cell lysate
Optiblot SDS-PAGE Gel
 Optiblot SDS-PAGE Gel Instructions for Use For the use in SDS-PAGE with precast gels This product is for research use only and is not intended for diagnostic use. 1 Table of Contents 1. Introduction 3
i-twin Trim Dual Blade Rechargeable Trimmer
 i-twin Trim Dual Blade Rechargeable Trimmer Model VSM2A SAFETY CAUTIONS WARNING! Polythene bags over the product or packaging may be dangerous. To avoid danger of suffocation, keep away from babies and
Optiblot SDS-PAGE Gel
 Instructions for Use For the use in SDS-PAGE with precast gels This product is for research use only and is not intended for diagnostic use. www.abcam.com 1 Table of Contents Optiblot SDS-PAGE Gel 1. Introduction
PrecisionCut Hair Clipper
 PrecisionCut Hair Clipper HC5900 Register online for 10,000 prize draw EXTRA year guarantee FREE rewards gallery Visit www.remington.co.uk/productregister You must register within 28 days of purchase.
Comparative Proteomics Kit II: Western Blot Module Quick Guide
 Comparative Proteomics Kit II: Western Blot Module Quick Guide Lesson 1 1 Label one 1.5 ml fliptop micro tube for each of five fish samples. Also label one screw-cap micro tube for each fish sample. 2.
WHAT IS GEL ELECTROPHORESIS?
 Getting Started With Gel Electrophoresis a world of learning Presented by Peter J Ball, Southern Biological. For further information, please contact the author by phone (03) 9877-4597 or by email peterjball@southernbiological.com.
KERATIN CONTAMINATION
 KERATIN CONTAMINATION Keratin contamination is almost always observed as a background protein. Wear only nitrile gloves and rinse with HPLC grade water all trays, containers and surfaces that contact the
StainEase Gel Staining Tray
 USER GUIDE StainEase Gel Staining Tray Catalog Number NI2400 Revision date 19 March 2012 Publication Part number IM-2400 MAN0000731 For Research Use Only. Not intended for any animal or human therapeutic
EXERCISE 8C - Lab Procedures
 EXERCISE 8C - Lab Procedures SAFETY WARNING: Acrylamide in the unpolymerized form is a skin irritant and a potential neurotoxin. Fortunately, the acrylamide in your gels is polymerized, so it should not
Optiblot SDS-PAGE Gel
 Optiblot SDS-PAGE Gel Instructions for Use For the use in SDS-PAGE with precast gels This product is for research use only and is not intended for diagnostic use. 1 Table of Contents 1. Introduction 3
VisPRO 5 Minutes Protein Stain Kit
 Manual VisPRO 5 Minutes Protein Stain Kit VP01-125/VP01-500/VP05-125/VP05-500 V2.0 Store at room temperature For Research Use Only Introduction VisPRO 5 Minutes Protein Stain Kit (1 nanogram grade) provides
10,000 prize draw. Register online for HC5800 HC5600 HC5400. EXTRA year guarantee FREE rewards gallery
 3 HC5800 HC5600 HC5400 Register online for 10,000 prize draw EXTRA year guarantee FREE rewards gallery Visit www.productregister.co.uk/remington. You must register within 28 days of purchase. Thank you
ROBOT PIN TOOL CLEANING AND LIQUID SAMPLE TRANSFER
 OVERVIEW TECHNICAL NOTE 67B ROBOT PIN TOOL CLEANING AND LIQUID SAMPLE TRANSFER There are several key steps in the successful use of pin tools: 1. The first and most important step is to start with clean
Professional Hair Removal System
 pearl PRO Professional Hair Removal System Carefully read this manual before using this appliance. Ensure that you know how the appliance functions and how to operate it. Instructions for Use 1 Safety
GMT180WTPBCSC BEARD/MUSTACHE TRIMMER
 GMT180WTPBCSC BEARD/MUSTACHE TRIMMER Cutter Blades Blade Set TURBO SWITCH ON/OFF SWITCH with lock button Charging Light Indicator Line Cord TWO YEAR LIMITED WARRANTY Conair will repair or replace (at our
EasyClean 500 series
 EasyClean 500 series 1 EasyClean 500 series English 4 4 English Introduction Congratulations on your purchase and welcome to Philips! To fully benefit from the support that Philips offers, register your
Operating Instructions
 Operating Instructions (Household) Rechargeable Shaver Model No. ES LF71 Before operating this unit, please read these instructions completely and save them for future use. ES-LF71_AUS.indb 1 2011/02/25
Operating Instructions. Model No. ES-LF70. (Household) AC/Rechargeable Shaver. English 17
 AC/Rechargeable Shaver. English 17") Operating Instructions (Household) AC/Rechargeable Shaver Model No. ES-LF70 2 English 17 Before operating this unit, please read these instructions completely and save them for future use. 2 3 4 1 2 3
Operating Instructions (Household) AC/Rechargeable Shaver Model No. ES-LF70 2 English 17 Before operating this unit, please read these instructions completely and save them for future use. 2 3 4 1 2 3
Copper Stain & Destain Kit for Electrophoresis Instruction Manual. Catalog Number
 Copper Stain & Destain Kit for Electrophoresis Instruction Manual Catalog Number 161-0470 Table of Contents Page Section 1 Introduction 1 1.1 Introduction and Principle 1 1.2 Product Description 2 1.3
Lenis Needle-free Safety Syringe Device User Manual
 Lenis Needle-free Safety Syringe Device User Manual 1 Table of Contents Welcome.3 Lenis Kit Components.4 Instructions 5-9 Maintenance and Care..10 Troubleshooting. 11 Warranty.12 Precautions 13 Return
Vacuum 5 in 1 Grooming Kit
 Vacuum 5 in 1 Grooming Kit PG6070 Register online for 10,000 prize draw EXTRA year guarantee FREE rewards gallery Visit www.productregister.co.uk/remington. You must register within 28 days of purchase.
EasyClean 500 series
 EasyClean 500 series 1 EasyClean 500 series ENGLISH 4 4 ENGLISH Introduction Congratulations on your purchase and welcome to Philips! To fully benefit from the support that Philips offers, register your
5 in1. Hair & Beard Trimmer. with accessories. Instruction Manual V
 5 in1 Hair & Beard Trimmer with accessories Instruction Manual V6-160404 Thank you for purchasing your LloydsPharmacy 5 in 1 Hair & Beard Trimmer. Please read the instruction manual carefully before use.
TITANIUM TURBO PRO HAIRCUT KIT
 TITANIUM TURBO PRO HAIRCUT KIT USE & CARE MANUAL PLEASE READ PRIOR TO USE To register your product go to www.remington-products.com.au www.remington.co.nz 2 YEAR WARRANTY HC5800AU IMPORTANT SAFETY INSTRUCTIONS
PDOB-II-GRM-NSF Ice Shaver. Specially designed for making shaved snow! User s Manual. Brought to you by SAC Food Supplies
 GLOBAL BEAR CORP. PDOB-II-GRM-NSF Ice Shaver Specially designed for making shaved snow! User s Manual Brought to you by SAC Food Supplies Telephone: +1.714.261.6389 Email: sacfoodsupplies@gmail.com Website:
3D Printing Guide: MakerBot Replicator 2X
 SOUTHERN POLYTECHNIC STATE UNIVERSITY 3D Printing Guide: MakerBot Replicator 2X Operating and Troubleshooting Guide Architecture Department 8/13/2014 Revision Table Version Dated Description By 1.00 06/25/2014
MUSTACHE GROWING A BEARD AND. the manufacturer-to trim your beard and. For the best trimming results, your beard
 ON/OFF SWITCH To operate, simply push slide toward blade; to stop, push slide away from blade. On/Off Switch Turbo Switch Battery Cover TURBO FEATURE This product is equipped with a turbo boost button.
Home Security Begins at the Front Door
 Video Doorbell Pro Home Security Begins at the Front Door Your new Ring Video Doorbell Pro is the start of a Ring of Security around your entire property. Now, you re always connected, so you can watch
Service Manual _ (YY_MM_DD) Philips Consumer Lifestyle. SERVICE POLICY Product will be serviced for 3 years after End of Life.
 Philips Consumer Lifestyle. SERVICE POLICY Product will be serviced for 3 years after End of Life.") Sonicare toothbrush HX6160, Sanitizer HX6921, FlexCare+ (low end) HX6942,FlexCare+ Pro Trial HX6950, (handle, FlexCare+) HX6972, FlexCare+ Retail with Sanitizer HX6992, FlexCare+ ProDispense with Sanitizer
Sonicare toothbrush HX6160, Sanitizer HX6921, FlexCare+ (low end) HX6942,FlexCare+ Pro Trial HX6950, (handle, FlexCare+) HX6972, FlexCare+ Retail with Sanitizer HX6992, FlexCare+ ProDispense with Sanitizer
POWERGLIDE TITANIUM FEATURES
 Model 7448TU POWERGLIDE TITANIUM The BaByliss for Men PowerGlide Titanium offers precision honed titanium cutting blades and mains operation for continuous high power to deliver an ultra smooth hair cut
Charging base. Trimming head (30mm) on charging stand. Main body unit. On/Off switch. Indicated light. Connecting jack Connecting jack
 on charging stand. Main body unit. On/Off switch. Indicated light. Connecting jack Connecting jack") X Thank you for your purchase. In order to make you more comfortable by using the product, please read this user manual carefully and keep it for future reference. www.dixix.com 1 Trimming head (30mm)
X Thank you for your purchase. In order to make you more comfortable by using the product, please read this user manual carefully and keep it for future reference. www.dixix.com 1 Trimming head (30mm)
Clare Video Doorbell Version 2 User Manual
 Clare Video Doorbell Version 2 User Manual Index Doorbell buttons and features...3 What s included in the box...4 Clare Video Doorbell power requirements...5 Wi-Fi signal strength requirements...6 Getting
 Register your product and get support at www.philips.com/welcome HP6522 1 HP6522 EnglisH 6 6 English Introduction Congratulations on your purchase and welcome to Philips! To fully benefit from the support
Haircut kit IMPORTANT SAFETY INSTRUCTIONS. DANGER Any appliance is. WARNING To reduce the risk PIECE
 Instructions for Care and Use MODEL HC220DCSC 20 PIECE Haircut kit IMPORTANT SAFETY INSTRUCTIONS When using electrical appliances, especially basic precautions should always be followed, including the
Series7. Series 7. trimmer. Series 7. off. sensitive. intensive. clean. high. low. empty. reset
 on Series7-3 & dry fast sensitive off intensive reset www.braun.co.jp 2 3 4 5 6 7 on on sensitive off off intensive reset 8 off Series Series & dry fast sensitive on on reset intensive 9 on sensitive off
Home Security Begins at the Front Door
 Video Doorbell Pro Home Security Begins at the Front Door Your new Ring Video Doorbell Pro is the start of a Ring of Security around your entire property. Now, you re always connected, so you can watch
28145_HKVAC_IB 9/1/05 10:14 AM Page 1 VACUUM TRIM. Use and Care Guide HKVAC-2000
 28145_HKVAC_IB 9/1/05 10:14 AM Page 1 VACUUM TRIM REVOLUTIONARY TRIMMING TECHNOLOGY Use and Care Guide HKVAC-2000 28145_HKVAC_IB 9/1/05 10:14 AM Page 2 IMPORTANT SAFETY INSTRUCTIONS Read all instructions
Alarm.com Wi-Fi Doorbell Camera and Slim Line
 Alarm.com Wi-Fi Doorbell Camera and Slim Line INSTALLATION GUIDE INTRODUCTION Your customers will always know who is at the front door with an Alarm.com Doorbell Camera. Now with two options tochoose from
Series 7. Series7. trimmer. Series 7. off. sensitive. intensive. clean. high. low. empty. reset
 on Series7-3 start ing sensitive intensive reset www.braun.co.jp 2 3 4 5 6 7 on on sensitive intensive reset 8 S start ing sensitive on on reset intensive 9 on sensitive intensive reset 10 charge mid charge
Series cc. Series 7. Type Series 7. trimmer. Series cc. off. sensitive. intensive. clean. high. low. empty.
 on Series 5 790 cc 790 cc ing sensitive intensive reset Type 5692 on on Ser Ser 3 4 4a 8 9 ing 10 2 1 5 6 790 cc 11 sensitive reset intensive 12 13 14 15 7 16 17 20 18 19 sensitive on on reset intensive
Series7. Series 7. trimmer. Series cc. off. sensitive. intensive. clean. high. low. empty. reset
 on Series7 Series 7 Series 7 760 cc start trimmer sensitive off intensive reset www.braun.co.jp 2 3 4 5 6 reset off on reset on on Series 7 760 cc Series Series Series 7 3 4 Series 7 8 9 start ing 10 5
Cartridge Machine USER MANUAL
 Cartridge Machine USER MANUAL 2018 INDEX Machine Overview 3 The Grip 4 The Body 5 The GiveKnob 6 Adjust the Give 7 Replacing the GiveKnob 8 The MotorBolt System 9 Changing the Stroke Wheel 10 Detaching
Video Doorbell Pro 1
 Video Doorbell Pro 1 Home Security Begins at the Front Door Your new Ring Video Doorbell Pro is the start of a Ring of Security around your entire property. Now, you re always connected, so you can watch
NeoLoch. Inquisitor Core. Assembly Instructions (9/3/2015)
") NeoLoch Inquisitor Core Assembly Instructions (9/3/2015) Your kit should contain the following items. If you find a part missing, please contact NeoLoch for a replacement. Kit contents: 1 PCB 1 2.1mm DC
NeoLoch Inquisitor Core Assembly Instructions (9/3/2015) Your kit should contain the following items. If you find a part missing, please contact NeoLoch for a replacement. Kit contents: 1 PCB 1 2.1mm DC
Prosonic BS washable clean. trimmer. off. eco. normal. intensive. high. auto select. low. empty. reset
 on ActivePower Prosonic 9795 ing 9795 off reset BS 9795 www.braun.co.jp 2 3 STOP 4 5 6 7 8 9000 Series reset reset on off on off ing 3 4 6 5 1 2 4a 9 8 10 11 12 13 14 15 16 17 7 18 9795 9 10 11 on tr reset
Beard Trimmer. 10,000 prize draw. Register online for MB4850. EXTRA year guarantee FREE rewards gallery
 Beard Trimmer 5 MB4850 Register online for 10,000 prize draw EXTRA year guarantee FREE rewards gallery Visit www.productregister.co.uk/remington. You must register within 28 days of purchase. Thank you
Comfort Series Plus/Pro Foil Shaver
 Comfort Series Plus/Pro Foil Shaver PF7400 PF7500 Register online for 10,000 prize draw EXTRA year guarantee FREE rewards gallery Visit www.productregister.co.uk/remington. You must register within 28
PowerSeries Aqua. 10,000 prize draw. Register online for PR1350 PR1370. EXTRA year guarantee FREE rewards gallery
 PowerSeries Aqua PR1350 PR1370 Register online for 10,000 prize draw EXTRA year guarantee FREE rewards gallery Visit www.remington.co.uk/productregister You must register within 28 days of purchase. Thank
QuickCut Clipper. 10,000 prize draw. Register online for HC4250. EXTRA year guarantee FREE rewards gallery
 QuickCut Clipper HC4250 Register online for 10,000 prize draw EXTRA year guarantee FREE rewards gallery Visit www.remington.co.uk/productregister You must register within 28 days of purchase. Thank you
TopStyler User Manual
 TopStyler User Manual 2 WARNINGS: TO REDUCE THE RISK OF SERIOUS IN- JURY, READ ALL INSTRUCTIONS AND WARNINGS COMPLETELY BEFORE USING THIS PRODUCT. The TopStyler has been carefully engineered for both effectiveness
Series 5. Series cc. Type Series 7. trimmer. Series 7. off. 760 cc. sensitive. intensive. clean. reset
 on Series 5 760 cc 760 cc ing sensitive intensive reset Type 5693 on Series 3 4 8 9 ing 10 2 1 5 6 760 cc 11 sensitive intensive 12 13 14 reset 15 7 16 17 20 18 19 760 cc sensitive on on reset intensive
CoolTec. CT6cc CT5cc CT4cc CT4s CT3cc CT2cc CT2s. Type 5676
 CoolTec CT6cc CT5cc CT4cc CT4s CT3cc CT2cc CT2s Type 5676 www.braun.com/jp 2 3 4 5 6 CoolTec CoolTec CoolTec CT6cc STOP 7 8 + CoolTec 2 CoolTec 2 1 1 9 10 12 CoolTec CoolTec 2 1 new 14 2 1 15 16 new
S series S8860 BC
 S8860 BC 2 IMPORTANT SAFETY INSTRUCTIONS DANGER WARNING When using an electrical product, basic precautions should always be followed, including the following: Read all instructions before using this product.
Alarm.com Wi-Fi Doorbell Camera and Slim Line - Installation Guide
 Alarm.com Wi-Fi Doorbell Camera and Slim Line - Installation Guide Introduction Each Alarm.com Doorbell Camera features a doorbell with an integrated camera, PIR motion sensor, digital microphone and speaker,
FlexCare Series Rechargeable sonic toothbrush
 FlexCare+ 900+ Series Rechargeable sonic toothbrush 1 Sonicare 900+ Series English 4 4 English Introduction Congratulations on your purchase and welcome to Philips! To fully benefit from the support that
Hair Clipper. User's manual
 Hair Clipper User's manual EN SHP 3301BL / SHP 3302RD SHP 4301BL / SHP 4302RD Prior to using this appliance, please read the user's manual thoroughly, even in cases, when one has already familiarised themselves
TEO ClearPAGE Precast Gel Running Instructions for SDS PAGE and DNA/Native Gels. Table of Contents
 TEO ClearPAGE Precast Gel Running Instructions for SDS PAGE and DNA/Native Gels Table of Contents General Information... 1 Running buffer preparation... 1 Sample preparation...2 Gel preparation...2 Loading
This symbol indicates an important hint for your safety. Disregarding this subject may cause physical harm to you or damage to the machine.
 NTCA4 A4 Thermal-Copier Guide (10.030) Operation Guide Thank for your purchase of an A4 Thermal-Copier. This guide is for Series A4AU models, indicated by A4AU-0000 to A4AU-9999 serial numbers. This guide
Philips Sonicare 2 series Plaque control plus
 Philips Sonicare 2 series Plaque control plus 1 Sonicare 2 series Plaque control plus ENGLISH 6 6 ENGLISH Introduction Congratulations on your purchase and welcome to Philips! To fully benefit from the
THEFAMILYCLIP TOOL TIPS. for the essential clipping kit for professional family hair cuts VS704A
 THEFAMILYCLIP TOOL TIPS for the essential clipping kit for professional family hair cuts 1 VS704A HEY YOU! TAKE A BOW FINE SIR. THINGS ARE LOOKING UP & YOU VE JUST MADE A QUALITY PURCHASE WITH THIS NEW
Model #7650 Instruction Manual Patent Pending
 Model #7650 Instruction Manual Patent Pending IMPORTANT SAFEGUARDS Read all instructions before use and keep for future reference. Use shaver and accessory chargers only for their intended purpose and
Wrinkle Reducer. Attachment USER MANUAL
 Wrinkle Reducer Attachment USER MANUAL TABLE OF CONTENTS 01 Introduction 02 Ideal User 02 Getting to Know Your Device 02 Before Using Your Attachment 03 Usage Instructions 03 Indications for Use 03 Contraindications
BEARD BOSS PRO TRIMMER
 BEARD BOSS PRO TRIMMER USE & CARE MANUAL PLEASE READ PRIOR TO USE To register your product go to www.remington-products.com.au www.remington.co.nz 2 YEAR WARRANTY MB4045AU IMPORTANT SAFETY INSTRUCTIONS
Smart Edge / Smart Edge Pro
 Smart Edge / Smart Edge Pro XF8500 XF8700 Register online for 10,000 prize draw EXTRA year guarantee FREE rewards gallery Visit www.productregister.co.uk/remington. You must register within 28 days of
Prosonic TM. 790 cc. Type trimmer. off. eco. normal. clean. intensive. high. auto select. low. empty. reset
 on Prosonic TM Prosonic TM 790 cc off reset Type 5671 Braun GmbH Frankfurter Straße 145 61476 Kronberg/Germany 5-671-363/00/IV-07/M China/GB on reset 3 4 4a 8 5 9 10 2 1 6 11 12 off reset 13 7 14 15 18
Electric Shaver User's manual
 User's manual EN SMS 3011BL / SMS 3012GR SMS 3013RD / SMS 3014TQ Prior to using this appliance, please read the user's manual thoroughly, even in cases, when one has already familiarised themselves with
REVOLUTION M SERIES MANUAL & PARTS GUIDE
 HP-M1 HP-M2 REVOLUTION M SERIES MANUAL & PARTS GUIDE NEED ASSISTANCE? If you have any issues with this product, call Iwata-Medea before returning to your place of purchase. 503-253-7308 Congratulations
EnglisH introduction general description (Fig. 1) Preparing for use Charging
 Preparing for use Charging") User manual HP6581 1 4 English Introduction Congratulations on your purchase and welcome to Philips! To fully benefit from the support that Philips offers, register your product at www.philips.com/welcome.
User manual HP6581 1 4 English Introduction Congratulations on your purchase and welcome to Philips! To fully benefit from the support that Philips offers, register your product at www.philips.com/welcome.
Glycoprotein Staining Kit
 193PR 02 G-Biosciences 1-800-628-7730 1-314-991-6034 technical@gbiosciences.com A Geno Technology, Inc. (USA) brand name Glycoprotein Staining Kit With Rapidstain for Enhanced Glycoprotein & Non Glycoproteins
BlephEx...A Revolutionary New Treatment for Blepharitis. Owner s Manual
 BlephEx...A Revolutionary New Treatment for Blepharitis Owner s Manual Table of Contents Warnings...2 Intended Use...2 Instructions for Use...3 Cleaning Instructions...8 Maintenance Details...8 Safety
Adafruit VL53L0X Time of Flight Micro-LIDAR Distance Sensor Breakout
 Adafruit VL53L0X Time of Flight Micro-LIDAR Distance Sensor Breakout Created by lady ada Last updated on 2017-12-28 11:56:14 PM UTC Guide Contents Guide Contents Overview Sensing Capablities Pinouts Power
FlexCare Platinum Connected
 FlexCare Platinum Connected 1 1 2 3 4 5 7 8 6 9 10 11 12 14 15 13 English 6 6 English Introduction Congratulations on your purchase and welcome to Philips! To fully benefit from the support that Philips
BodyBare AquaSmooth. Instruction Booklet. wet & dry epilator AP17SR. Please read these instructions carefully and retain for future reference.
 BodyBare AquaSmooth wet & dry epilator Instruction Booklet AP17SR Please read these instructions carefully and retain for future reference. Contents Emjoi s Safety Precautions 4 Features of your BodyBare
Ultimate Body & Bikini Kit
 Ultimate Body & Bikini Kit USE & CARE MANUAL PLEASE READ PRIOR TO USE To register your product go to remington-products.com.au remington.co.nz WPG4031AU IMPORTANT SAFETY INSTRUCTIONS When using appliances,
FlexCare Platinum. 5_020_9457_2_DFU-Luxury_A6_v1.indd 1 08/04/15 11:03
 FlexCare Platinum 5_020_9457_2_DFU-Luxury_A6_v1.indd 1 08/04/15 11:03 1 1 2 3 4 5 6 7 9 8 10 11 12 13 5_020_9457_2_DFU-Luxury_A6_v1.indd 2 08/04/15 11:03 ENGLISH 4 Sonicare FlexCare Platinum 5_020_9457_2_DFU-Luxury_A6_v1.indd
SW9700. Tripleheader shaver. & Lucasfilm Ltd. Disney BC
 SW9700 Tripleheader shaver & Lucasfilm Ltd. Disney BC English 4 4 English IMPORTANT SAFETY INSTRUCTIONS When using an electrical product, basic precautions should always be followed, including the following:
Prosonic TM. trimmer. off. eco. normal. clean. intensive. high. auto select. low. empty. reset
 on Prosonic TM Prosonic TM ing off reset Braun GmbH Frankfurter Straße 145 61476 Kronberg / Germany 5-673-363/00/IV-07/M China/GB on reset 3 4 8 9 ing 10 2 1 5 6 11 12 off reset 13 7 14 15 18 16 17 4 STOP
Philips FlexCare Rechargeable Sonic Toothbrush
 Philips FlexCare Rechargeable Sonic Toothbrush 1 small illustrations: incl. numbers of explosion FlexCare Rechargeable Sonic Toothbrush ENGLISH 4 4 ENGLISH Introduction Congratulations on your purchase
8-in-1 All Over Grooming Kit
 8-in-1 All Over Grooming Kit Model 7056CU 8-in-1 All Over Grooming Kit The BaByliss For Men 8-in-1 All Over Grooming Kit is a professional grade rechargeable trimmer with 4 interchangeable cutting heads
S5390 S5370. Always here to help you. Rechargeable Cordless Tripleheader Shaver. Register your product and get support at
 S5390 S5370 Rechargeable Cordless Tripleheader Shaver Always here to help you Register your product and get support at www.norelco.com/register Question? Contact Philips Norelco 2 4 Congratulations on
Part No Revised: June Sno-King. Instruction Manual Model #1888. Cincinnati, OH USA
 Part No. 12666 Revised: June 2009 Instruction Manual Model #1888 Cincinnati, OH 45241-4807 USA Safety Precautions Sno-King 2 Forward This manual covers the Sno-King Ice Shaver Machine, model number 1888.
INSTRUCTIONS. Ion cleansing with moisturizing support device CM-N8100BF AC/RECHARGEABLE 100V-240V AC FREE VOLTAGE. Made in Japan
 INSTRUCTIONS Ion cleansing with moisturizing support device CM-N8100BF AC/RECHARGEABLE 100V-240V AC FREE VOLTAGE Made in Japan English Page 1~12 13~24 English Safety precautions Precautions described
Type Syncro System Smart Logic
 + Type 5493 Syncro System Smart Logic Internet: www.braun.com 5-493-464/01/XII-02 KOR/GB Printed in Germany Syncro A 1 Clean & Charge B 13 14 2 3 4 5 No. 7000 4 15 16 17 18 6 12 7 8 9 10 19 11 2 1 0 4
PROFESSIONAL BEARD TRIMMER
 PROFESSIONAL BEARD TRIMMER USE & CARE MANUAL PLEASE READ PRIOR TO USE To register your product go to www.remington-products.com.au www.remington.co.nz 2 YEAR WARRANTY MB4130AU IMPORTANT SAFETY INSTRUCTIONS
Disposable Cartridge NAVEL Piercing System
 Disposable Cartridge NAVEL Piercing System Operators Manual A Innovative. Safe. Professional. Thank you for purchasing the. Our engineers have designed the Medisept Navel Piercing System to provide piercing
Cordless Ceramic Hair Cutting Set
 Cordless Ceramic Hair Cutting Set Instruction Booklet HC4900 Please read these instructions carefully and retain for future reference. Contents Sunbeam s Safety Precautions 3 Features of your Cordless
MN250/251 MODELS BEARD/MUSTACHE TRIMMER
 MN250/251 MODELS BEARD/MUSTACHE TRIMMER 1. 2. 3. 11. 4. 6. 9. 1. 3/4" Trimmer Attachment 2. On/Off Switch on Body 3. Battery Compartment 4. Comb Attachment 5. Eyebrow Comb Attachment 6. Comb Attachment
HAIR AND BEARD. HAIR AND BEARD CLIPPERs. Operation and Safety Notes
 HAIR AND BEARD CLIPPERS 7133016 HAIR AND BEARD CLIPPERs Operation and Safety Notes 6 Before reading, unfold both pages containing illustrations and familiarise yourself with all functions of the device.
Operating Instructions
 Operating Instructions (Household) Rechargeable Beard Trimmer Model No. ER GB37 ER-GB37_ME.indb 1 2013/07/16 13:30:50 2 ER-GB37_ME.indb 2 2013/07/16 13:30:50 Operating Instructions (Household) Rechargeable
ULTIMATE HAIRCUT KIT 2 YEAR WARRANTY HC5005AU USE & CARE MANUAL PLEASE READ PRIOR TO USE
 ULTIMATE HAIRCUT KIT USE & CARE MANUAL PLEASE READ PRIOR TO USE 2 YEAR WARRANTY HC5005AU IMPORTANT SAFETY INSTRUCTIONS When using an electric appliance, basic safety precautions should always be observed,
SW6700. Tripleheader shaver. & Lucasfilm Ltd. Disney
 SW6700 Tripleheader shaver & Lucasfilm Ltd. Disney BC English 4 4 English IMPORTANT SAFETY INSTRUCTIONS DANGER When using an electrical product, basic precautions should always be followed, including
TopStyler User Manual
 TopStyler User Manual IMPORTANT SAFETY INFORMATION 2 WARNINGS: TO REDUCE THE RISK OF SERIOUS INJURY, READ ALL INSTRUCTIONS AND WARNINGS COMPLETELY BEFORE USING THIS PRODUCT. The TopStyler has been carefully