8580 * Cordless Pole Pruner. Perche élagueuse à batterie. Akku-Hochentaster
|
|
|
- Alice West
- 5 years ago
- Views:
Transcription

1 Cordless Pole Pruner - Translation of the original Operating Instructions Warning! Read through the operating instructions carefully and observe the instructions contained herein. Familiarise yourself with the machine, its correct use and the safety devices by means of these operating instructions. Perche élagueuse à batterie - Traduction du mode d emploi d origine Attention! Lisez attentivement la notice d utilisation et respectez-en les consignes. Cette notice vous permettra de vous familiariser avec l appareil, avec son utilisation correcte et avec les prescriptions de sécurité. Akku-Hochentaster Operator / PARTS Manual Manuel d utilisation Gebrauchsanweisung - Originalbetriebsanleitung Lesen Sie diese Hinweise zur Handhabung des Gerätes aufmerksam durch. Verwenden Sie das Gerät erst, wenn Sie sich sicher sind, dass Sie alle Anweisungen verstanden haben * * AAS 2420
2

3 Important message Thank you for purchasing this Mantis product. You have purchased a world class product, one of the best designed and built anywhere. This machine comes with an Operator / Parts Manual. The useful life and good service you receive from this machine depends to a large extent on how well you read and understand this manual. Treat your machine properly, lubricate and adjust it as instructed, and it will give you many years of reliable service. Your safe use of this Mantis product is one of our prime design objectives. Many safety features are built in, but we also rely on your good sense and care to achieve accident-free operation. For best protection, study the manuals thoroughly. Learn the proper operation of all controls. Observe all safety precautions. Follow all instructions and warnings completely. Do not remove any safety features. Make sure those who operate this machine are as well informed and careful in its use as you are. Mantis designs and built its equipment to serve many years in a safe and productive manner. For longest life, use the machine only as directed in the manuals, keep it in good repair and follow safety warnings and instructions. You ll always be glad you did. Schiller Grounds Care, Inc Street Road Southampton, PA U.S.A. PHONE (800) FAX (215) This Operator / Parts Manual is part of the machine. Suppliers of both new and second-hand machines must take sure that this manual is provided with the machine. Contact us at 3

4
5 GB: Description of the parts (Fig. 1) 1. On/off switch 2. Accumulator 3. Handle 4. Telescope arm 5. Padded grip 6. Telescope quick-acting lock 7. Chain sprocket cover 8. Oil tank cover 9. Saw chain 10. Guide bar 11. Guide bar guard 12. Motor housing 13. Multi-function tool 14. Charging unit 15. Switch lock 16. Shoulder belt FR: Désignation des pièces (fig. 1) 1. Bouton marche/arrêt 2. Accu 3. Poignée 4. Manche télescopique 5. Poignée rembourrée 6. Verrouillage rapide télescopique 7. Protection du pignon d entraînement à chaîne 8. Couvercle du réservoir d huile 9. Chaîne de scie 10. Lame 11. Protection de la lame 12. Boîtier moteur 13. Outil multifonction 14. Station de charge de l accu 15. Verrouillage de l activation 16. Bandoulière DE: Bezeichnung der Teile (Abb. 1) 1. Ein-/Ausschalter 2. Akku 3. Handgriff 4. Teleskopstiel 5. Griffbereich gepolstert 6. Teleskop- Schnellverriegelung 7. Kettenzahnradabdeckung 8. Öltankdeckel 9. Sägekette 10. Schwert 11. Schwertschutz 12. Motorgehäuse 13. Multifunktionswerkzeug 14. Ladegerät 15. Einschaltsperre 16. Schultertragegurt 5


6 2 3 A mm 8 6


7


8 b a c 8


9 X A B C 9
10 Table of Contents General Safety Regulations...10 Explanation of Symbols...13 Description of the Machine and Scope of Delivery...14 Intended Use...14 Assembly...14 Operation...15 Working with the Pole Pruner...16 Technical Data...18 Maintenance...19 Cleaning and Storage...19 Information for Environmental protection / disposal...19 Ordering Spare Parts...19 Repair Service...20 Fault Remedy...20 Warranty...21 Declaration of Conformity...22 Packaging This machine is packaged to prevent damage during transportation. The packaging is raw material and can thus be reused or fed back into the raw materials cycle. When using the machine certain safety precautions must be taken in order to prevent injuries and damage: Read through the operating instructions carefully and observe the instructions contained therein. Familiarise yourself with the machine, its correct use and the safety devices by means of these operating instructions. Store these carefully so that the information is always available to you. In the event of the machine being handed over to another party, please include these operating instructions with it. We accept no liability for accidents and damage caused as a result of disregarding these instructions. 1. General Safety Regulations This machine is not intended for use by persons (including children) with an impaired physical, sensory or mental capacity or insufficient experience and/or insufficient knowledge unless they are supervised by a person responsible for their safety or receive instructions from that person in the use of the machine. Children should be supervised in order to ensure that they do not play with the machine. Remain alert, pay attention to what you are doing and proceed sensibly when working with an electric tool. Do not use the machine if you are tired or under the influence of drugs, alcohol or medication. General safety information for power tools Warning! Read all safety-related information and safety instructions! Failure to observe the safety information and instructions may result in electric shock, burns and/or severe injury. Keep the safety information and instructions for future reference. The term power tool as used in the safety information and instructions includes both mains-operated tools (with power cord) and battery-operated tools (without power cord). 1) Safety at the workplace a) Keep your working area clean, tidy and well-lit. Disorder and poorly lit working areas may result in accidents. b) Do not operate the power tool in potentially explosive environments containing combustible fluids, gases or dusts. Power tools generate sparks that may ignite dust or fumes. c) Keep children and other persons away while you are operating the power tool. Distractions may result in the operator losing control over the tool. 10 Cordless Pole Pruner Operator s Manual
11 2) Electrical safety a) The plug of the power tool must fit into the mains socket. The plug must not be modified in any way. Do not use adapter plugs/connectors in combination with tools with protective earthing. Unmodified plugs and fitting sockets reduce the risk of electric shock. b) Avoid physical contact with earthed surfaces as pipes, heaters, ovens and refrigerators. There is an increased risk of electric shock if your body is earthed. c) Keep the tool out of the rain or moisture in general. The penetration of water into a power tool increases the risk of electric shock. d) Do not use the cord to carry or hang up the tool or to pull the plug out of the socket. Keep the cord away from heat, oil and sharp edges or moving parts of the tool. Damaged or tangled cords increase the risk of electric shock. 3) Personal safety a) Always pay attention to what you do and apply reasonable care when working with a power tool. Do not use the power tool when you are tired or under the influence of medication, drugs or alcohol. When working with power tools, even a short moment of inattentiveness may result in severe injury. b) Wear personal protection equipment and always wear eye protection (safety goggles). Wearing personal protection equipment as a dust mask, nonslip safety shoes, safety helmet or ear protectors (depending on the type and application of the tool) reduces the risk of injury. c) Avoid unintentional operation. Make sure that the power tool is switched off before you connect it to the mains supply and/or the battery and whenever you pick up or carry the tool. When carrying the tool with your finger on the on/off switch or connecting the tool to the mains supply with the switch in ON position, this may result in accidents. d) Remove adjustment tools or wrenches and the like before you switch the power tool on. A wrench or other tool that is inside or on a rotating part of the tool may cause injury. e) Avoid unusual postures. Make sure to have a safe footing and keep your balance at all times. This will allow you to better control the power tool in unexpected situations. f) Wear suitable clothes. Do not wear wide clothing or jewellery. Keep your hair, clothes and gloves clear of all moving parts. Loose clothing, jewellery or long hair may get caught in moving parts. g) If dust extraction/collection devices are provided make sure that they are connected and used properly. The use of a dust extraction device may reduce risks caused by dust. 4) Use and handling of the power tool a) Do not overtax the power tool. Use the power tool intended for your type of work in each case. The use of the suitable power tool within the stated range of performance makes working more effective and safer. b) Do not use a power tool with a damaged switch. A power tool that cannot be switched on or off any more is dangerous and must be repaired. c) Pull the mains plug and/or remove the battery before adjusting a tool, changing accessories or putting the tool aside. This precaution avoids the unintentional start of the tool. d) Store power tools that are currently not used out of the reach of children. Do not allow persons to use the tool if they are not familiar with the tool or these instructions. Power tools are dangerous if used by inexperienced persons. e) Thoroughly maintain your power tool. Check whether moving parts are working properly and are not jamming/sticking, and whether parts are broken or otherwise damaged in a way that may affect the function of the power tool. Have damaged parts repaired before using the tool. Many accidents are the result of poorly maintained power tools. f) Keep cutting tools sharp and clean. Thoroughly maintained cutting tools with sharp cutting edges are jamming less often and are easier to guide. g) Use power tools, accessories, add-on tools, etc. in accordance with these instructions and in the way prescribed for the respective type of tool. You should also consider the working conditions and the work to be carried out. The use of power tools for purposes other than those intended for the respective tool may result in dangerous situations. 5) Appropriate handling and use of battery-operated power tools a) Make sure that the device has been switched off before inserting the battery. Inserting a battery into a switched-on power tool may lead to accidents! b) Only use charging devices recommended by the manufacturer to charge the batteries. Charging units are usually designed for certain types of batteries; if used with other types there is a risk of fire! Contact us at 11
12 c) Only use batteries designed for your power tool. The use of other batteries may lead to injury and risk of fire! d) Keep unused batteries clear of paper clips, coins, keys, nails, screws or other small metal objects that may bridge the contacts. A short circuit between the battery contacts may lead to burns or fire! e) Improper use may result in fluid leaking out of the battery. Avoid any contact with battery fluid. Flush with water in case of contact. If battery fluid should get into your eyes seek medical advice additionally. Leaking battery fluid may lead to irritations of the skin or burns! 6) Service a) Have the power tool serviced by qualified technical personnel only; repairs should be carried out using exclusively original spare parts. This will ensure the continued safe operation of the power tool. Device-specific safety instructions Keep all parts of your body clear of the chain while the unit is running. Before starting the unit, make sure that the chain does not touch any objects. When working with a pole pruner, even a short moment of inattentiveness may result in clothes or parts of the body being caught by the chain. Always hold the pole pruner with your right hand at the rear handle and your left hand at the front handle. Holding the pole pruner differently (left hand rear handle / right hand front handle) during operation will increase the risk of injury and is not permitted. Wear eye and hearing protection. Other personal protection equipment for the head, hands, legs and feet is recommended. Proper protective clothing and protection equipment reduce the risk of injury caused by thrownabout wood chips and accidental contact with the chain. Do not operate the pole pruner on trees. Operating a pole pruner while situated on a tree involves a high risk of injury. Make sure to have a safe stand at any time, and only use the pole pruner when standing on solid, safe and level ground. A slippery ground or instable surfaces as the steps of a ladder may lead to loosing balance or the control over the pole pruner. When cutting a branch that is under tension take into account that it will spring back. When the tension of the wood fibres is released the tensioned branch may hit the operator and/or the pole pruner resulting in a loss of control. Apply particular caution when cutting brush and young trees. The thin material may get caught in the chain and hit you or throw you off balance. Carry the switched-off pole pruner using the handle with the chain pointing away from your body. Always put on the protection cover when transporting or storing the pole pruner. The careful handling of the pole pruner reduces the risk of accidentally touching the sharp cutting chain. Follow the instructions for lubrication, chain tension and changing accessories. An improperly tensioned or lubricated chain may either break or considerably increase the risk of a kickback. Keep the handles dry, clean and free from oil and grease. Fatty, oily handles are slippery and may lead to a loss of control. Use the pole pruner for cutting wood only! Do not use the pole pruner for works it is not designed for. Example: Do not use the pole pruner for cutting plastics, brickwork or other construction materials that are not made of wood. The use of the pole pruner for applications, for which it is not designed, may result in dangerous situations. Never attempt to use an incomplete machine or one which an unauthorised alteration has been implemented. This machine is not intended for use by persons (including children) with an impaired physical, sensory or mental capacity or insufficient experience and/or insufficient knowledge unless they are supervised by a person responsible for their safety or receive instructions from that person in the use of the machine. Children should be supervised in order to ensure that they do not play with the machine. Remain alert, pay attention to what you are doing and proceed sensibly when working with an electric tool. Do not use the machine if you are tired or under the influence of drugs, alcohol or medication. Young persons under the age of 16 are not permitted to operate these devices. Please note that permissible uses for the tool could be limited by national regulations. Please note that improper maintenance, the use of non-compliant spare parts, or the removal or modification of safety devices can cause damage to the tool and serious injuries to the operator. 12 Cordless Pole Pruner Operator s Manual
13 2. Explanation of Symbols The following symbols are used on this electric tool. You can operate this electric tool more safely and effectively with the correct interpretation of these symbols. SYMBOLS MEANING WARNING INFORMATION If you do not adhere to the instructions and safety measures described in the Operating Instructions severe injuries may occur. Read the Operating Instructions before you start and operate this device. Wear eye and ear protection devices when operating this device. Falling objects may cause serious injuries of the head; wear a head protection when operating this device. Always wear safety boots and gloves when operating the device. Do not use the tool under wet weather conditions! Confirms the conformity of the electric tool with the Directives of the European Community. This device may not be disposed of with general/household waste. Dispose of only at an authorised disposal site. Maintain clearance from current-carrying lines. Life-threatening danger from electric shock. Guaranted acoustic capacity level 92 db(a). Battery contains lithium! Do not dispose of as household refuse. Defective batteries should be recycled! Risk of explosion! Never throw batteries into a fire. Contact us at 13
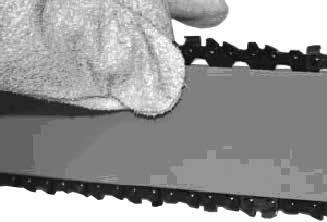
14 3. Description of the Machine and Scope of Delivery (Fig. 1) 1. On/off switch 2. Battery 3. Handle 4. Telescope arm 5. Padded grip 6. Telescope quick-acting lock 7. Chain sprocket cover 8. Oil tank cover 9. Saw chain 10. Guide bar 11. Guide bar guard 12. Motor housing 13. Multi-function tool 14. Charging unit 15. Switch lock 16. Shoulder belt 4. Intended Use The pole pruner arm is intended for removing branches from trees. It is not suitable for extensive sawing work and felling trees or for the sawing of materials other than wood. Please observe that our machine was not designed for use in commercial, technical or industrial applications. We assume no liability if the machine is used in commercial, technical or industrial applications or for equivalent activities. 5. Assembly Caution! Only connect the pole pruner to the battery when it is fully assembled and the chain tension has been adjusted. Always wear protective gloves when carrying out work on the chainsaw in order to prevent injury. 5.1 Assembly of guide bar and saw chain Carefully unpack and inspect all parts for completeness. (Fig.1) Loosen the fastening bolt for the chain sprocket cover. (Fig.2) Remove the chain sprocket cover. Place the chain in the groove of the guide bar as shown. (Fig.3/Pos. A) Insert the guide bar and chain into the mount on the chainsaw. (Fig. 4) In the process, guide the chain around the pinion and hang the guide bar in the chain tensioning bolts. Re-mount and hand-tighten the chain sprocket cover with the fastening bolt. (Fig.5) Attention! Only tighten the fastening bolt once the chain tension has been adjusted. 5.2 Tensioning the saw chain Caution! Always remove the battery before inspection and adjustment work. Always wear protective gloves when carrying out work on the chainsaw in order to prevent injury. Loosen the fastening bolt of the chain sprocket cover a few rotations. Adjust the chain tension with a screwdriver at the chain tensioning screw. (Fig.5) Clockwise rotation increases the chain tension; anticlockwise rotation reduces the chain tension. The saw chain is correctly tensioned if it can be raised approx. 2 mm in the centre of the guide bar. (Fig.6) Attention! All chain links must lie properly in the guide groove of the guide bar. Information regarding the tensioning of the chain The saw chain must be tensioned properly in order to ensure safe operation. The chain tension is optimal if the saw chain can be lifted 2 mm in the centre of the guide bar. Since the saw chain heats up during the sawing process, whereby its length changes, you must check the chain tension at least once every 10 min. and adjust it as necessary. This applies in particular for new saw chains. Slacken the saw chain after work is completed, because it shortens when cooling down. In doing so, you can prevent damage to the chain. 5.3 Saw chain lubrication Caution! Always remove the battery before inspection and adjustment work. Always wear protective gloves when carrying out work on the chainsaw in order to prevent injury. Attention! Never operate the chain without chainsaw oil! The use of the pole pruner without chainsaw oil or with an oil level below the minimum oil level mark results in damage to the pole pruner! Attention! Only use special chainsaw oil. The warranty is voided with the use of used oil. Filling the oil tank (Fig. 7) Place the pole pruner on a leveled surface. Clean the area around the oil tank cap (Pos.8) and then open it. Fill the oil tank with saw chain oil. In doing so, make sure that no dirt gets into the oil tank so that the oil nozzle does not clog. Close the oil tank cap (Pos.8). Instructions for using the battery 1. When the pole pruner is delivered, the replaceable battery is not charged. Before starting the machine for the first time, the battery must be charged. 2. You must never open the battery. 3. Never throw the used batteries in fire - RISK OF EXPLOSION! 14 Cordless Pole Pruner Operator s Manual
15 4. Connect the battery charger only to mains with such a voltage as stated on the type-bearing plate. 5. Use only the original battery. 6. Never charge the battery with a battery charger from other producer. This can result in the battery being damaged or it can result in an injury due to overheating. 7. During a long-term operation, the battery may heat up. Let it cool down before charging it. 8. Do not store the battery charger and the batteries within children s reach. 9. Do not use the battery charger in an environment with vapors or inflammable fluids. 10. Charge the batteries only at a temperature within the range of 10 C to 40 C. 11. Store the battery at temperatures up to 30 C only. Higher storage temperatures may result in damage to the battery. The ideal storage temperature range is C. 12. Never short-circuit the contacts of the batteries and never interconnect them with metal objects. 13. When transporting the battery, take care that the contacts are not interconnected, do not use metal transportation containers. 14. Short-circuit of the battery can lead to explosion. In any case, the short-circuit connection will damage the battery. 15. Check the cable regularly on whether it is damaged. If the cable is damaged, have it replaced. 16. Never discharge the batteries up to the point when the shears completely stop to operate. 17. Before storing the batteries for the wintertime, charge them fully once more. Disposal of accumulators Please observe the following directions for the disposal of your accumulator/battery. Batteries are not to be put into the rubbish. As a consumer you are legally obliged to return used batteries and accumulators. At the end of the duration of your apparatus, the batteries or accumulators have to be taken from the apparatus, disposing of them separately. You have the possibility of delivering your old batteries and accumulators to the local collecting points of your municipality or to your dealer or to the distribution centers. Charging the batteries (fig. 8) Caution! Only use the charger in dry areas. To take out the battery, press both push-buttons on the sides designated with the number 1 and take out the battery. (fig. 8.1) Connect the battery charger to the socket. Make sure that the voltage stated on the battery charger corresponds with the mains voltage in your socket. (fig. 8.3) Connect the charging set to the charging station using the jack plug of the charging set with the socket on the top of the charging station. (fig. 8.2) Information on the charger: --LED is red: Battery is charging --LED is green: Charging complete -- LED is flashing alternatively red and green: Fault (e.g. battery overheating) The period of charging amounts approximately 3 to 5 hours. During the process of charging, the battery heats up. This is normal and it indicates no defect. If the battery is not lit up, check if there is electric current in the socket. If the charging of the batteries is not possible, give the battery charger and the batteries to a service shop. The batteries will self-discharge! Remove the battery from the charge as soon as it is fully charged. General information on the battery: In the interests of ensuring that the battery has a long service life, pay attention to the following points: When the battery is at low voltage, the gardening tool switches off automatically. In this case, the battery must be charged. The lithium ion battery must be charged before long breaks in use, e.g. before winter storage. When the battery is fully discharged, charging time is 5 hours. The lithium ion battery can be charged whatever its current state of charge, and charging can be interrupted at any time, without damaging the battery (there is no memory effect). 6. Operation 6.1 Adjusting the telescope length 1. Rotate the locking cap nut (Fig.9) anti-clockwise. 2. The lock is released and can be adjusted to the desired length by pulling the ends out from one another to the desired length. 3. Then firmly tighten the locking cap nut in clockwise motion. 6.2 Switching on/off Switching on Hold the pole pruner firmly with both hands on the handle (thumb under the handle). Press and hold the switch lock (Fig.12). Switch the pole pruner on with the on/off switch (3). The switch lock (15) can now be released again. Switching off Release the on/off switch (3). Always remove the battery when stopping work. Contact us at 15
16 7. Working with the Pole Pruner 7.1 Preparation Before each use, check the following to ensure safe work: Condition of the pole pruner Inspect the pole pruner, before starting work, for damage to the housing, the battery, the saw chain, and the blade. Never put an obviously damaged tool into use. After dropping or other impacts, check the tool for significant damage or defects. Oil tank Fill level of the oil tank. Also check whether there is sufficient oil available while working. Never operate the saw if there is no oil or the oil level has dropped below the minimum oil level mark in order to prevent damage to the chain saw. On average, an oil filling is sufficient for 10 minutes of operation, depending on the duration of pauses and the stress. Saw chain Tension of the saw chain, condition of the cutters. The sharper the pole pruner is, the easier and more manageable the pole pruner is to operate. The same applies for the chain tension. Also check the chain tension at least once every 10 minutes while working in order to increase safety! New saw chains, in particular, tend to have a higher degree of elongation. Protective clothing Make absolutely sure to wear the appropriate, closefitting protective clothing, such as chainsaw-protective pants, gloves and safety shoes. Hearing protection and protective goggles Wear a safety helmet with integrated hearing protection and a face guard. This provides protection against falling branches and recoiling branches. Installing the shoulder strap 1. When working with the tool, always use the carrying strap and hold the tool with both hands by the handles provided. (see Fig. 9) Close your fingers and thumbs around the handles and pole. 2. Attach the spring hook to the shaft bracket on the shaft (Fig.10). Never carry the belt diagonally across your shoulders and chest, but rather only on one shoulder, so that you can rapidly move away from the tool in case of danger. Quick release locking device (figure 20) The shoulder belt is equipped with a quick release mechanism as indicated in figure 20. Position the quick release locking device (X) on front side of body (figure 20C). Open the fastener to remove the machine from your body. Safe work In order to ensure safe work, a maximum working angle of 60 is prescribed. (Fig.13) Never stand below the branch to be sawed. Exercise caution when sawing branches under tension or splintering wood. Potential risk of injury from falling branches and flying wood projectiles! If the machine is in operation, keep persons and animals away from the danger area. The machine is not protected against electric shock when coming into contact with high-voltage lines. Maintain a minimum clearance of 10 m from currentcarrying lines. Life-threatening danger from electric shock! (Fig.14) When working on an incline, always stand above or to the side of the branch to be sawed. Hold the machine as close as possible to your body. By doing so, you maximise your balance. Before cutting clear the working area of disruptive branches and undergrowth. Then create a fallback area, away from the point where sawn branches could fall, and remove all obstructions from this area. Keep the working area free of obstruction; remove fallen branches immediately. Place other tools and machines at a safe distance from the branches you are working on, but not in the fallback area. Pay attention to falling branches! As soon as a cut branch begins to break off, immediately move off to the side and maintain sufficient distance from the falling wood. Sawing techniques When removing branches, hold the machine at an angle ranging from a maximum 60 to horizontal in order to avoid being struck by a falling branch. Saw off the lower branches on the tree first. By doing so, it is easier for the cut branches to fall to the ground. At the end of the cut, the weight of the saw suddenly increases for the user, because the saw is no longer supported on the branch. There is the risk of losing control of the saw. Only pull the saw out of the cut with the saw chain running. By doing so, you can prevent it from getting jammed. Do not saw with the tip of the guide bar. Sawing off smaller branches (Fig.15) Place the stop face of the saw on the branch. This prevents fitful movements of the saw at the beginning of the cut. Applying light pressure, guide the saw through the branch from top to bottom. 16 Cordless Pole Pruner Operator s Manual
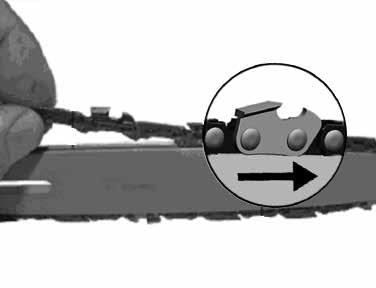
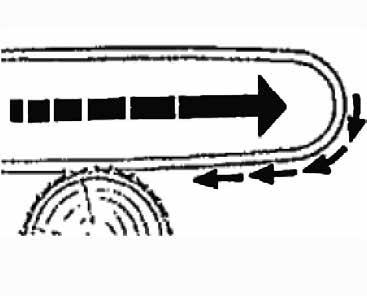
17 Sawing off larger and longer branches (Fig.16) Make a relief cut when sawing larger branches. a) First saw through 1/3 of the branch diameter from bottom to top using the top side of the guide bar. b) Then saw from top to bottom to the first cut using the bottom side of the guide bar. c) Saw off longer branches in sections in order to maintain control over the location of impact. Kickback The term kickback refers to when the pole pruner suddenly jumps up and back. This is usually caused by the workpiece coming into contact with the guide bar tip or the clamping of the saw chain. A kickback generates abrupt, powerful forces. Therefore, the pole pruner usually reacts in an uncontrolled manner. The consequence is often the severe injury of the user or nearby persons. The danger of a kickback is greatest if you apply the area near the guide bar tip to a branch, because the leverage effect is greatest there. Therefore, always apply the saw as flatly as possible. Avoid recoil! (Abb.17) Recoil can occur when the running saw chain on the top quarter of the guide rail strikes a fixed object or jams (Fig. 17). Pulling in! (Abb.18) If the chain suddenly becomes stuck, jammed or strikes a foreign object in the wood, the saw will be pulled forwards into the wood with a jerk (Fig. 18). Avoid kickback! (Abb.19) Kickback occurs when the chain suddenly becomes stuck on the top of the rail, because it is jammed or has struck a foreign object in the wood. The chain can then jerk the saw back against the user (Fig. 19). Attention! Always make sure that the chain tension is correct! Only use properly functioning pole pruner! Only work with a saw chain sharpened according to regulations! Never saw with the upper edge or tip of the guide bar! Always hold the pole pruner firmly with two hands! Sawing wood under tension Sawing wood which is under tension necessitates elevated caution! Wood that is under tension and is then released from that tension when cut occasionally reacts in a completely uncontrolled manner. This can result in severe to deadly injuries. Such work may only be performed by trained specialists. Contact us at 17
18 8. Technical Specifications Battery-operated pole pruner 8580 (AAS 2420) Rated Voltage 24 V DC / 1,9 Ah / 45,6 Wh No-load Speed 1800 min -1 Guide Bar 200 mm Cutting length ca. 17,5 cm Variable height adjustment from 1.85 m to 3.15 m Working height up to 4.5 m Oil 60 ml Weight with bar+chain 3.8 kg Chain type 91PJ033X Guide Bar type 080SDEA041 Sound Pressure Level (EN ISO ) 76,60 db(a) K = 2.5 db Acoustic capacity level L WA (EN ISO ) 92 db(a) K = 3 db Vibration (EN ISO ) m/s 2 K = 1.5 m/s 2 Mains battery charger Mains voltage Charging voltage / Charging current Period of charging 230 V~ / 50 Hz 25.9 V DC / 500 ma approx 3-5 hour Technical changes are reserved. Noise emission information in accordance with the German Product Safety Act (ProdSG) and the EC Machine Directive: the noise pressure level at the place of work can exceed 80 db(a). In such cases the operator will require noise protection (e.g. wearing of ear protectors). Wear hearing protection. The influence of noise can cause hearing loss. Attention! The vibration value will change on the basis of the area of application of the electric tool and may lie above the specified value in exceptional situations. Keep the development of noise and vibration to a minimum! Only use properly functioning machines. Maintain and clean the machine regularly. Adapt your working method to the machine. Do not overstress the machine. If necessary, have the machine inspected. Switch the machine off when it is not in use. Wear work gloves. Attention: Noise protection! Please observe the local regulations when operating your device. Warning! The prolonged utilisation of a tool will subject the user to vibration and shocks that could lead to Raynaud s syndrome or Carpal tunnel syndrome. This condition reduces the ability of the hand to sense and regulate temperature, causes numbness and a sensation of heat and can lead to damage to the nervous system and the circulatory system and to necrosis. Not all factors that lead to Raynaud s syndrome are known but cold water, smoking and illnesses that impact the blood vessels and the circulatory system as well as severe or long-lasting exposure to vibrations are known to be factors in the development of Raynaud s syndrome. Observe the following in order to reduce the risk of Raynaud s syndrome and Carpal tunnel syndrome: Wear gloves and keep your hands warm. Make sure the device is well maintained. A tool with loose components or with damaged or worn-out dampers will have a disposition towards increased vibrations. Always hold the handle firmly but do not clutch it constantly with excessive force. Take breaks often. All of the above precautions cannot exclude the risk of Raynaud s syndrome or Carpal tunnel syndrome. Therefore, with long-term or regular use it is advisable to keep a close watch on the condition of your hands and fingers. Seek medical attention immediately in the event of any of the above symptoms appearing. 18 Cordless Pole Pruner Operator s Manual
19 9. Maintenance 9.1 Replacing the saw chain and guide bar The guide bar must be replaced if the guide groove of the guide bar is worn out. the spur wheel in the guide bar is damaged or worn out. For this purpose, proceed as described in the chapter Assembly of the guide bar and saw chain! 9.2 Checking the automatic chain lubrication Regularly check the functionality of the automatic chain lubrication in order to prevent overheating and the subsequent damage to the guide bar and saw chain associated with it. For this purpose, align the guide bar tip against a smooth surface (board, cut-in of a tree) and allow the pole pruner to run. If an increasing amount of oil appears, the automatic chain lubrication functions properly. If no clear trace of oil appears, please read the appropriate information in the chapter Fault remedy! If this information does not help, please contact our customer service or a similarly qualified workshop. Attention! Do not touch the surface during the process. Maintain a sufficient safety clearance (approx. 20 cm). 9.3 Sharpening the saw chain Effective work with the pole pruner is only possible if the saw chain is in good condition and sharp. This also reduces the danger of a kickback. The saw chain can be resharpened by a specialty dealer. Do not attempt to sharpen the saw chain yourself if you do not have a suitable tool and the necessary experience. 10. Cleaning and Storage Regularly clean the tensioning mechanism by blowing compressed air onto or cleaning it with a brush. Do not use any tools for the cleaning. Keep oil away from the handle in order to ensure a secure hold. Clean the machine as necessary with a damp cloth and a mild cleanser, if appropriate. If the pole pruner is not used for an extended period of time, remove the chain oil from the tank. Briefly place the pole pruner and the guide bar in an oil bath and then wrap it in oil paper. Attention! Always replace the protective cover for transport or storage of the chainsaw. Remove the battery each time before cleaning. Never immerse the machine in water or other liquids. Store the pole pruner in a safe and dry place and out of the reach of children. 11. Information for Environmental Protection/ Disposal Dispose of the machine properly after it is worn out. Disconnect the mains cable in order to prevent misuse. Do not dispose of the machine with the household waste. In the interest of environmental protection, take it to a collection point for electric machines. Your responsible local authority can provide you with addresses and operating times. Also take the packaging materials and worn out accessories to the appropriate collection points. Only for EU countries Do not discard electric tools in the household waste! In accordance with European Directive 2002/96/EC on waste electrical and electronic equipment and its implementation in national law, waste electric tools must be collected separately for environmentally-compatible re-use. Recycling alternative to the return invitation: Instead of returning the electric equipment, the owner is alternatively obligated to take part in the proper recycling in the case of relinquishment of ownership. The waste equipment can also be taken to a collection facility which disposes of it in the sense of the national recycling management and waste acts. This does not pertain to the accessory parts and auxiliary equipment without electrical components accompanying the waste equipment. 12. Ordering Spare Parts The following information should be provided when ordering spare parts: Type of machine Item number of the machine Caution! The saw chain is sharp. When storing and transporting the tool, always fit the protective cover. Secure the tool during transport, in order to avoid damage or injuries. Always clean and perform maintenance work on the tool before placing it in storage. Contact us at 19
20 13. Repair Service Repairs to electric power tools should only be carried out by specialist electrical personel. UK Mantis UK Limited Orchard House Hempshaw Lane Stockport Cheshire SK1 4LH Phone Europe Mantis France SARL 20 rue des Garennes Marly France Tél Fault Finding Caution! Before performing troubleshooting, switch off the tool and remove the battery. The following table shows fault symptoms and describes how they can be rectified if your machine is not functioning properly. If this does not help you localise and rectify the problem, contact your service workshop. Or contact your local Mantis authorised dealer. Cause Fault Remedy Chainsaw operates irregularly External loose connection Take saw to a specialty workshop Internal loose connection Defective on/off switch Saw chain dry No oil in the tank Re-fill oil Take saw to a specialty workshop Take saw to a specialty workshop Ventilation in the oil tank cap clogged Clean oil tank cap Oil tank flow channel clogged Unclog oil flow channel Chain/guide rail hot No oil in the tank Re-fill oil Ventilation in the oil tank cap clogged Clean oil tank cap Oil tank flow channel clogged Unclog oil flow channel Dull chain Re-sharpen or replace chain Chainsaw jumps up, vibrates or Chain tension too loose Adjust chain tension does not saw properly Dull chain Re-sharpen or replace chain Chain worn out Replace chain Saw teeth pulling in the wrong direction Re-mount saw chain with teeth in the correct direction 20 Cordless Pole Pruner Operator s Manual
21 MANTIS LIMITED WARRANTY BATTERY POWERED PRODUCTS MANTIS extends this limited warranty against defects in material and workmanship for a period of two (2) years under normal usage from the date of purchase by the original purchaser. MANTIS will repair or replace, at its option, any part or parts of the product found to be defective in material or workmanship during the warranty period. Warranty repairs and replacements will be made without charge for parts or labor. All parts replaced under warranty will be considered as part of the original product, and any warranty on the replaced parts will expire coincident with the original product warranty. If you think your MANTIS Battery Powered product is defective in material or workmanship, you must return it to MANTIS, along with your proof of purchase (sales receipt). You are responsible for pickup and delivery charges; the product must be returned to us postage paid. MANTIS assumes no responsibility in the event that the product was not assembled or used in compliance with any assembly, care, safety, or operating instructions contained in the Owner s Manual or accompanying the product. This limited warranty does not cover damages or defects due to normal wear and tear, lack of reasonable and proper maintenance, failure to follow operating instructions or owner s manual, misuse, lack of proper storage or accidents [or routine maintenance parts and service]. This limited warranty shall not be effective if your MANTIS Battery Powered product has been subjected to negligence or has been repaired or altered by anyone other than an authorized dealer or authorized service center. You must maintain your MANTIS Battery Powered product by following the maintenance procedures described in the owner s manual. Such routine maintenance, whether performed by you or a dealer, is at your expense. MANTIS MAKES NO EXPRESS OR IMPLIED WARRANTIES REPRESENTATIONS OR PROMISES EXCEPT THOSE CONTAINED HEREIN. THERE ARE NO OTHER WARRANTIES, INCLUDING WARRANTIES OF MERCHANTABILITY AND FITNESS FOR A PARTICULAR PURPOSE. ALL WARRANTIES OTHER THAN THE EXPRESS WARRANTY SET FORTH ABOVE ARE SPECIFICAL- LY DISCLAIMED. THE DURATION OF ANY IMPLIED WARRANTY, INCLUDING MERCHANT- ABILITY AND FITNESS FOR A PARTICULAR PURPOSE, IS LIMITED TO THE DURATION OF THIS WRITTEN LIMITED WARRANTY. MANTIS DISCLAIMS ALL LIABILITY FOR INDIRECT, INCIDENTAL AND/OR CONSEQUENTIAL DAMAGES IN CONNECTION WITH THE USE OF THE MANTIS PRODUCTS COVERED BY THIS WARRANTY. SOME REGIONS DO NOT ALLOW LIMITATIONS ON HOW LONG AN IMPLIED WARRANTY LASTS AND/OR DO NOT ALLOW THE EXCLUSION OR LIMITATION OF INCIDENTAL OR CONSEQUENTIAL DAMAGES, SO THAT ABOVE LIMITATIONS AND EXCLUSIONS MAY NOT APPLY TO YOU. THIS WARRANTY GIVES YOU SPECIFIC LEGAL RIGHTS AND YOU MAY ALSO HAVE OTHER RIGHTS WHICH VARY FROM REGION TO REGION. Specifications, descriptions and illustrative material in this literature are as accurate as known at the time of publication, but are subject to change without notice Schiller Grounds Care, Inc. All Rights Reserved.
22 Table des matiéres Prescriptions générales de sécurité...10 Explication des symboles...13 Description de l appareil et contenu de la livraison...14 Utilisation conforme aux dispositions...14 Montage...14 Fonctionnement...15 Utilisation de la scie à chaîne...16 Caractéristiques techniques...18 Maintenance...19 Nettoyage et stockage...19 Consignes de protection de l environnement/d élimination...19 Commande de pièces de rechange...20 Service de réparation...20 Recherche des erreurs...20 Garantie...21 Déclaration de conformité...22 Emballage Cet appareil se trouve dans un emballage permettant d éviter tout dommage dû au transport. Cet emballage est constitué de matières premières et peut donc être recyclé ou réintégré dans le circuit des matières premières. Lors de l utilisation d appareils, il convient de respecter certaines mesures de sécurité afin de prévenir tous risques de blessures et de dommages: Lisez attentivement la notice d utilisation et respectez-en les consignes. Cette notice vous permettra de vous familiariser avec l appareil, avec son utilisation correcte et avec les prescriptions de sécurité. Conservez-bien celle-ci afin de vous pouvoir la consulter à tout moment. Si l appareil doit être transmis à d autres personnes, veuillez leur remettre également la présente notice d utilisation. Nous déclinons toute responsabilité pour les accidents ou les dommages résultant du non-respect de cette notice. 1. Prescriptions générales de sécurité Consignes de sécurité générales pour appareils électriques Attention! Lisez l intégralité des consignes de sécurité et instructions. La négligence des consignes de sécurité ou des instructions peut se solder par un choc électrique, des brûlures et/ou des blessures graves. Conservez toutes les consignes de sécurité et instructions pour une utilisation ultérieure. Le terme «appareil électrique» utilisé dans les consignes de sécurité se rapporte à des appareils électriques fonctionnant sur le réseau électrique (liaison par câble) et à des appareils électriques fonctionnant au moyen d accumulateurs (sans liaison par câble). 1) Sécurité au poste de travail a) Veillez à la propreté et au bon éclairage de votre zone de travail. Le désordre ou le manque d éclairage peuvent entraîner des accidents. b) N utilisez pas votre appareil électrique dans un environnement menacé d explosion dans lequel se trouvent des liquides, des gaz ou des poussières inflammables. Les appareils électriques produisent des étincelles qui risquent d enflammer les poussières ou les vapeurs. c) N utilisez pas votre appareil électrique à proximité des enfants ou d autres personnes. Un moment d inattention peut vous faire perdre le contrôle de votre appareil. 2) Sécurité électrique a) La fiche de raccordement de l appareil électrique doit être adaptée à la prise. La fiche ne doit surtout pas être modifiée. N utilisez pas d adaptateur avec des appareils reliés à la terre. Les prises non modifiées diminuent le risque de choc électrique. b) Evitez tout contact physique avec les surfaces reliées à la terre telles que tuyaux, radiateurs, cuisinières ou réfrigérateurs. Il existe un risque accru de choc électrique dans le cas où votre corps est relié à la terre. c) Ne laissez pas l appareil sous la pluie ou dans un endroit humide. La pénétration d eau dans un appareil électrique augmente le risque de choc électrique. 10 Perche élagueuse à batterie Manuel d utilisation
23 d) N utilisez pas le câble à d autres fins que celles prévues à l origine, par exemple pour porter l appareil, pour l accrocher ou tirer sur la fiche pour la débrancher de la prise de courant. Veillez à maintenir le câble à distance raisonnable de toute source de chaleur, de l huile, d arêtes acérées ou des pièces en mouvement de l appareil. Les câbles endommagés ou emmêlés augmentent le risque de choc électrique. e) Lorsque vous travaillez à l extérieur avec un appareil électrique, utilisez exclusivement des câbles de rallonge autorisés pour l utilisation en extérieur. L utilisation d un câble de rallonge adapté à l utilisation en extérieur réduit le risque de choc électrique. f) Lorsque l utilisation d un appareil électrique dans un environnement humide est inévitable, utilisez un disjoncteur différentiel contre les courants de défaut. L utilisation d un disjoncteur différentiel contre les courants de défaut réduit le risque de choc électrique. 3) Sécurité des personnes a) Restez attentif, veillez à ce que vous faites et faites preuve de bon sens en travaillant avec l appareil électrique. N utilisez pas d appareil électrique si vous êtes fatigué ou sous l influence de drogues, d alcool ou de médicaments. Un moment d inattention peut entraîner des blessures graves. b) Portez un équipement de protection personnel et n oubliez jamais vos lunettes de protection. Le port d un équipement de protection personnel tel que masque antipoussière, chaussures de sécurité antidérapantes, casque ou protection acoustique, en fonction du type d utilisation de l appareil, diminue le risque de blessures. c) Empêchez la mise en route involontaire. Assurez-vous que l appareil électrique est éteint avant de le raccorder au réseau électrique et/ou à l accumulateur, de le soulever ou de le porter. Il y a risque d accident si votre doigt est posé sur l interrupteur alors que vous portez l appareil ou que l appareil est allumé au moment où vous le raccordez au réseau électrique. d) Retirez les outils de réglage ou les tournevis avant de mettre en route l appareil. Un outil ou tournevis se trouvant sur une pièce mobile de l appareil représente un risque de blessures. e) Evitez toute posture anormale. Veillez à avoir une position stable et à conserver à tout moment votre équilibre. Ceci vous permettra de mieux maîtriser votre appareil électrique dans des situations imprévues. f) Portez des vêtements appropriés. Evitez les vêtement amples et les bijoux. Maintenez une distance suffisante entre vos cheveux, vos vêtements et vos gants et les pièces en mouvement de l appareil. Les vêtements amples, les bijoux ou les cheveux longs risquent d être happés par les pièces en mouvement de l appareil. g) En présence de dispositifs destinés à aspirer et à recueillir la poussière, assurez-vous qu ils sont raccordés et utilisés correctement. L utilisation d un dispositif d aspiration de la poussière peut réduire les dangers présentés par la poussière. 4) Utilisation et maniement de l appareil électrique a) Ne surchargez jamais l appareil. Utilisez l appareil électrique approprié au travail à effectuer. L utilisation de l appareil électrique approprié augmente vos performances et votre sécurité sur la plage de puissance prévue. b) N utilisez pas un appareil électrique dont l interrupteur est défectueux. Un appareil qui ne peut plus être allumé ni éteint est dangereux et doit être réparé. c) Retirez la fiche de la prise de courant et/ou enlevez l accumulateur avant de procéder à des réglages, de remplacer des pièces ou de ranger l appareil. Cette mesure de sécurité évite un démarrage inopiné de l appareil. d) Conservez les appareils électriques inutilisés hors de portée des enfants. L appareil ne doit pas être utilisé par des personnes ignorant son fonctionnement ou n ayant pas lu les présentes instructions. Les appareils électriques sont dangereux entre les mains de personnes inexpérimentées. e) Entretenez soigneusement l appareil. Vérifiez le parfait fonctionnement et la mobilité des pièces mobiles. Vérifiez si des pièces sont cassées ou endommagées au point de porter atteinte au bon fonctionnement de l appareil électrique. Avant d utiliser l appareil, faites réparer les pièces endommagées. De nombreux accidents sont dus à des appareils électriques mal entretenus. f) Veillez à ce que l outil de coupe soit toujours aiguisé et propre. Des outils de coupe bien entretenus présentant des arêtes de coupe acérées se coincent plus rarement et sont plus faciles à guider. g) Utilisez les appareils électriques, les accessoires, les outils rapportés, etc. conformément aux présentes instructions et aux prescriptions en vigueur pour ce type spécifique d appareil. Ce faisant, tenez compte des conditions de travail et du travail à effectuer. L utilisation d appareils électriques à des fins autres que celles prévues à l origine peut engendrer des situations dangereuses. 5) Manipulation et utilisation correctes des accumulateurs a) Assurez-vous que l appareil soit éteint avant d installer l accumulateur. L installation d un accumulateur dans un appareil électrique en activité peut entraîner des accidents. b) Ne chargez l accumulateur qu avec des chargeurs recommandés par le fabricant. Risque d incendie en cas d utilisation d un chargeur sur un autre type d accumulateur. Contactez-nous à 11
24 c) N utilisez que les accumulateurs prévus à cet usage dans les appareils électriques. L utilisation d autres accumulateurs peut entraîner des blessures et risquer un incendie. d) Entreposez un accumulateur désactivé loin des trombones, des pièces de monnaie, des clés, des clous, des vis ou autres petits objets métalliques pouvant entraîner un court-circuit. Un court-circuit entre les contacts de l accumulateur peut entraîner des brûlures, voire un grave incendie. e) En cas d utilisation non conforme, du liquide peut s échapper de l accumulateur. Évitez tout contact avec ce liquide. En cas de contact accidentel, rincer à l eau. Si le liquide pénètre dans les yeux, consulter également un médecin. L écoulement du liquide de l accumulateur peut entraîner des irritations de la peau ou des brûlures. 6) Service après-vente a) Faites exclusivement réparer votre appareil électrique par des spécialistes qualifiés utilisant des pièces de rechange d origine. Ceci permet de garantir le maintien de la sécurité de l appareil. Consignes de sécurité propres à l appareil Pendant le fonctionnement de la scie, aucune partie du corps ne doit se trouver à proximité de la chaîne de sciage. Avant de démarrer la scie, vérifiez que la chaîne de sciage n est en contact avec rien. Pendant le fonctionnement de la scie à chaîne, un vêtement ou une partie du corps peut être happé lors d un moment d inattention. Maintenez toujours la scie à chaîne de la main droite posée sur la poignée arrière et la main gauche, sur la poignée avant. Le positionnement inverse des mains sur les poignées de la scie à chaîne augmente le risque de blessures et n est pas autorisé. Portez des lunettes protectrices et une protection acoustique. Un équipement de protection complémentaire pour la tête, les mains, les jambes et les pieds est conseillé. Des vêtements de protection appropriés réduisent le risque de blessures dû à la projection de copeaux et au contact involontaire avec la chaîne de sciage. Ne travaillez jamais sur un arbre avec la scie à chaîne. L utilisation de la scie sur un arbre comporte un risque de blessures. Veillez toujours à garder une position bien stable et n utilisez la scie à chaîne que si vous vous trouvez sur une surface ferme, sûre et plane. Une surface glissante ou instable telle qu une échelle peut entraîner une perte d équilibre ou du contrôle de la scie à chaîne. Lorsque vous coupez une branche sous tension, n oubliez pas qu elle peut rebondir comme un ressort. Lorsque la tension des fibres du bois se libère, la branche sous tension risque de frapper l utilisateur et/ou d arracher la scie à chaîne de ses mains. Soyez très prudent lorsque vous coupez des broussailles ou de jeunes arbres. Les branches fines risquent de se prendre dans la chaîne de sciage et vous frapper ou vous faire perdre l équilibre. Après l avoir éteinte, portez la scie à chaîne par la poignée avant, la chaîne de sciage orientée dans la direction éloignée de votre corps. Placez toujours le couvercle de protection pour transporter ou stocker la scie à chaîne. Toutes les précautions prises lors du maniement de la scie à chaîne contribuent à réduire le risque de contact involontaire avec la chaîne de sciage en mouvement. Respectez les instructions relatives au graissage, à la tension de la chaîne et au remplacement des accessoires. Une chaîne de sciage qui n a pas été tendue ou graissée correctement risque de se rompre et augmente la tendance au rebond. Veillez à ce que les poignées soient sèches, propres et exemptes d huile ou de graisse. Des poignées grasses ou huileuses sont glissantes et engendrent la perte de maîtrise de l appareil. Ne sciez que du bois. N utilisez pas la scie à chaîne à des fins auxquelles elle n a pas été conçue. Exemple: n utilisez pas la scie à chaîne pour scier du plastique, une pièce de maçonnerie ou des matériaux non constitués de bois. L utilisation de la scie à chaîne à des travaux autres que ceux prévus à l origine peut engendrer des situations dangereuses. Ne tentez jamais d utiliser une machine incomplète ou ayant fait l objet d une modification non autorisée. Cet appareil n a pas été conçu pour être utilisé par des personnes (y compris les enfants) aux capacités physiques, sensorielles ou intellectuelles réduites ou manquant d expérience et/ou de connaissances sauf si ces personnes agissent sous la supervision d une personne responsable de la sécurité ou reçoivent d elle des instructions quant à la manière d utiliser l appareil. Les enfants doivent être surveillés afin de s assurer qu ils ne jouent pas avec l appareil. Faites preuve de la plus grande prudence et faites attention à ce que vous faites. Prenez les précautions qui s imposent lors de l utilisation d un appareil électrique. N utilisez pas l appareil lorsque vous êtes fatigué ou sous l emprise de drogues, d alcool ou de médicaments. Ces appareils ne doivent pas être utilisés par des mineurs de moins de 16 ans. Veuillez noter que les prescriptions nationales peuvent restreindre l utilisation de l appareil. Remarque : toute maintenance incorrecte, utilisation de pièces de rechange non conformes ou élimination ou modification des dispositifs de sécurité peut entraîner de graves blessures pour l utilisateur ou un endommagement majeur de l appareil. 12 Perche élagueuse à batterie Manuel d utilisation
25 2. Explication des symboles Les symboles suivants sont utilisés sur cet appareil électrique. Si vous réussissez à les interpréter correctement, vous pourrez utiliser cet appareil en toute sécurité et de manière plus efficace. SYMBOLE SIGNIFICATION AVERTISSEMENT INFORMATION Lire le livret d instruction de l opérateur avant de faire fonctionner cette machine. Porter des protections pour la tête, les yeux et les oreilles. Portez des bottes résistantes et des gants lors de l utilisation de cet appareil. Ne pas laisser cet outil électrique sous la pluie! Indique que cet appareil électrique est conforme aux directives de la Communauté européenne. Le présent appareil ne peut en aucun cas être éliminé avec les ordures ménagères/ déchets. Toujours déposer les appareils usagés dans un centre de collection. Respectez une distance aux conduites de courant. Risque de blessures mortelles par choc électrique! Niveau sonore garanti 92 db(a) Un accu contient du lithium! Ne pas le jeter aux ordures ménagères! Les accus défectueux doivent toujours être mis au recyclage! Risque d explosion! Ne jetez jamais les batterie au feu. Contactez-nous à 13
26 3. Description de l appareil et contenu de la livraison (fig. 1) 1. Bouton marche/arrêt 2. Accu 3. Poignée 4. Manche télescopique 5. Poignée rembourrée 6. Verrouillage rapide télescopique 7. Protection du pignon d entraînement à chaîne 8. Couvercle du réservoir d huile 9. Chaîne de scie 10. Lame 11. Protection de la lame 12. Boîtier moteur 13. Outil multifonction 14. Station de charge de l accu 15. Verrouillage de l activation 16. Bandoulière 4. Utilisation conforme aux dispositions La scie à chaîne avec manche télescopique a été conçue pour élaguer les arbres. Elle ne convient pas à l ensemble des travaux de sciage: par exemple, elle ne convient pas pour abattre des arbres ou encore pour scier d autres matériaux que le bois. Veuillez noter qu en vertu des dispositions, nos appareils n ont pas été conçus pour une utilisation commerciale, artisanale ou industrielle. Nous déclinons toute responsabilité si l appareil est utilisé dans le domaine commercial, artisanal ou industriel, ou encore pour toute activité similaire. 5. Montage Attention! Une fois la scie à chaîne entièrement montée et une fois la tension de chaîne réglée, connectez la scie à la batterie. Pour éviter toute blessure, portez toujours des gants de protection lorsque vous intervenez sur la scie. 5.1 Montage de la lame et de la chaîne de scie Déballez soigneusement toutes les pièces et vérifiez qu elles sont toutes présentes. (Fig. 1) Desserrez la vis de fixation de la protection du pignon d entraînement de la chaîne. (Fig. 2) Retirez la protection en question. Comme le montre l illustration, positionnez la chaîne dans la rainure qui fait le tour de la lame. (Fig. 3/ point A) Comme le montre l illustration, positionnez la lame et la chaîne dans le porte-outil de la scie à chaîne. (Fig. 4) Guidez la chaîne autour du pignon et accrochez la lame après le boulon de tension de la chaîne. Mettez en place la protection du pignon d entraînement de la chaîne et fixez-la à l aide de la vis de fixation. Attention! Une fois la tension de la chaîne réglée (voir le point 5.2), finissez de serrer la vis de fixation. 5.2 Serrage de la chaîne de scie Attention! Avant tout contrôle et travail de réglage, retirez toujours la batterie. Pour éviter toute blessure, portez toujours des gants de protection lorsque vous intervenez sur la scie. Desserrez de quelques tours la vis de fixation de la protection du pignon d entraînement de la chaîne. Réglez la tension de la chaîne en serrant/desserrant la vis de tension de la chaîne à l aide d un tournevis. (Fig. 5) Tournez vers la droite pour augmenter la tension de la chaîne et vers la gauche pour la réduire. Vous saurez que la chaîne de scie est correctement tendue lorsqu elle est soulevée d env. 2 mm au milieu de la lame. (Fig. 6) Attention! Tous les maillons de la chaîne doivent être positionnés correctement dans la rainure de guidage de la lame. Consignes concernant la tension de la chaîne Pour garantir un fonctionnement sûr de l appareil, la tension de la chaîne de la scie doit être correcte. Vous saurez que la tension est optimale lorsque vous constaterez que la chaîne de scie est soulevée d env. 2 mm au milieu de la lame. Étant donné que la chaîne de scie s échauffe en cours d utilisation et change ainsi de longueur, vérifiez au plus tard toutes les 10 min. la tension de la chaîne et au besoin réglez-la. Cette instruction vaut tout particulièrement pour les chaînes de scie neuves. Une fois que vous en avez fini avec la chaîne de scie, desserrez-la car celle-ci raccourcit en refroidissement. Vous éviterez ainsi d endommager la chaîne. 5.3 Lubrification de la chaîne de scie Attention! Avant tout contrôle et travail de réglage, retirez toujours la batterie. Pour éviter toute blessure, portez toujours des gants de protection lorsque vous intervenez sur la scie. Attention! Ne faites jamais fonctionner la chaîne sans huile pour chaîne de scie! Si vous utilisez la scie à chaîne sans huile pour chaîne de scie ou encore lorsque le niveau d huile est inférieur au marquage minimal, la scie s en trouvera endommagée! Attention! Utilisez uniquement de l huile spécialement conçue pour les scies à chaîne. Si vous utilisez de l huile usagée, vous perdez tout droit à garantie. Remplissage du réservoir d huile (fig. 7) Déposez la scie à chaîne sur une surface plane. Nettoyez la zone située autour du couvercle du réservoir d huile (Pos. 8) et ouvrez-le. Remplissez le réservoir d huile pour chaîne de scie. Veillez à ce qu aucun encrassement ne pénètre dans 14 Perche élagueuse à batterie Manuel d utilisation
27 le réservoir d huile afin d éviter que la buse d huile soit obstruée. Fermez le couvercle du réservoir d huile (n 8). Mode d emploi des accumulateurs 1. Au moment de livraison, l accumulateur remplaçable n est pas chargé. Il faut le charger avant la première mise en service. 2. Il est défendu d ouvrir l accumulateur. 3. Ne jetez jamais les accumulateurs au feu DANGER D EXPLOSION! 4. Ne brancher le chargeur qu à la tension de réseau indiquée sur la plaque indicatrice. 5. N utilisez que des accumulateurs originaux. 6. Ne chargez jamais l accumulateur en utilisant un chargeur d un autre fabricant. Cela pourrait provoquer une déterioration de l accumulateur ou un accident dû à la surchauffe. 7. L accumulateur peut se réchauffer en travaillant en régime de long durée. Laissez-le refroidir avant la charge. 8. Gardez le chargeur et l accumulateur hors de portée des enfants. 9. Ne vous servez pas du chargeur dans un milieu où se présentent des vapeurs ou des liquides inflammables. 10. Ne chargez l accumulateur qu à la température de 10 C à 40 C. 11. Stocker la batterie dans un endroit ne dépassant pas 30 C. Des températures de stockage supérieures peuvent endommager la batterie. La température idéale pour le stockage se situe entre 10 et 15 C. 12. Ne mettez pas les contacts d accumulateur en courtcircuit et n utilisez aucunes pièces en métal pour la connexion. 13. Pendant le transport des accumulateurs, veillez à ce que les contacts ne soient pas connectés, n utilisez pas de bacs de transport en métal. 14. Le court-circuit de l accumulateur peut provoquer une explosion. Chaque court-circuit déteriore l accumulateur. 15. Contrôlez régulièrement le câble, du point de vue de sa déterioration. Faites remplacer le câble déterioré. 16. La batterie possède une protection anti décharge profonde: L appareil se désactive automatiquement lorsque la batterie est déchargée. Dans ce cas, rechargez la batterie sans délai. Elimination des accus Pour l élimination des accus, veuillez observer les instructions suivantes: Ne pas éliminer les piles avec les déchets ménagers. En tant que consommateur, vous êtes tenu de retourner les piles ou les accus selon les directives légales. Quand votre appareil sera hors d usage, vous enlèverez les piles et les accus de l appareil et vous les éliminerez séparément.vous pouvez remettre les piles ou accus au point de ramassage local de votre commune ou chez votre fournisseur (point de vente) habituel. Chargement des accumulateurs (fig. 8) Attention! N utiliser le chargeur que dans un environnement sec. Pour retirer l accu du coupe bordures, appuyez sur la touche rouge placée sur le boîtier de l accu et retirez ce dernier. (Ill. 8.1) Connectez l appareil de recharge à l accu. Pour ce faire, branchez la fiche de l appareil de recharge dans la prise sur le côté frontal de l accu. (Ill. 8.2) Enfoncez la fiche du chargeur dans la prise de courant. Assurez-vous que la tension, indiquée sur la plaque indicatrice du chargeur, soit conforme à la tension de réseau de votre prise. (Ill. 8.3) Consignes relatives au chargeur : -- la DEL est rouge : la batterie est en charge --la DEL est verte : chargement terminé -- la DEL est rouge et verte et clignote: panne (par ex. batterie trop chaude) Le temps de chargement est égal approximativement à 3-5 heures. L accumulateur se réchauffe pendant le chargement. C est un phénomène normal et il ne s agit pas d un défaut. En cas de non-usage, retirez l appareil de recharge de la prise. Si l accu n est pas rechargé, vérifiez si la prise est sous tension. Si une recharge est impossible, rapportez l appareil de recharge ainsi que l accu à un point de service après-vente ou dans un atelier spécialisé. Auto-déchargement des batteries! Retirez la batterie du chargeur dès qu elle est complètement chargée. Consignes générales relatives à la batterie. Pour garantir la longévité de la batterie, observez les points suivants : Lorsque la tension de la batterie est basse, l appareil de jardinage se déconnecte automatiquement. Dans ce cas, la batterie doit être chargée. La batterie lithium-ion doit être chargée avant les pauses prolongées par ex. avant le stockage d hiver. La durée du chargement est de 5 heures pour une batterie complètement déchargée. La batterie lithium-ion peut être chargée quel que soit le niveau de charge et le chargement peut être interrompu à tout moment, sans que la batterie ne soit endommagée (par d effet mémoire). 6. Fonctionnement 6.1 Réglage de la longueur télescopique 1. Comme le montre l illustration (Fig. 11), faites tourner l écrou raccord de verrouillage dans le sens inverse des aiguilles d une montre. 2. Le verrouillage est desserré et peut être réglé à la longueur souhaitée en tirant les extrémités. 3. Serrez ensuite l écrou raccord de verrouillage dans le sens des aiguilles d une montre. Contactez-nous à 15
28 6.2 Marche/arrêt Marche Tenez la scie à chaîne des deux mains par les poignées (en positionnant vos pouces sous les poignées). Appuyez sur le verrouillage de l activation (Fig. 12) et maintenez-le enfoncé. Mettez en marche la scie à chaîne à l aide du bouton de marche/arrêt (1). Le verrouillage de l activation (15) peut maintenant être relâché. Mettre à l arrêt Relâchez le bouton de marche/arrêt (1). Lorsque vous interrompez le travail, débranchez systématiquement la batterie. 7. Utilisation de la scie à chaîne 7.1 Préparation Avant toute utilisation, vérifiez les points suivants afin de garantir un fonctionnement en toute sécurité: État de la scie à chaîne Avant de commencer à utiliser la scie à chaîne, inspectez-la afin de détecter les éventuels dommages au niveau du boîtier, de la batterie, de la chaîne de scie et de la lame. Ne faites jamais fonctionner un appareil visiblement endommagé. Après une chute ou un choc, contrôlez la machine afin de détecter des dommages ou défauts significatifs. Réservoir d huile Niveau de remplissage du réservoir d huile. Vérifiez même en cours de travail si vous disposez toujours d une quantité d huile suffisante. Afin d éviter tout endommagement de la scie à chaîne, vous ne devez jamais la faire fonctionner en l absence d huile ou si le niveau d huile est passé au-dessous du marquage minimal. Selon les pauses et la charge, un remplissage suffit en coupe pour 10 minutes. Chaîne de scie Tension de la chaîne de scie, état de la coupe. Plus la chaîne de la scie est affûtée, plus l utilisation de la scie à chaîne est aisée et contrôlable. Il en va de même de la tension de la chaîne. Même en cours d utilisation, vérifiez au plus tard toutes les 10 minutes la tension de la chaîne afin de garantir votre sécurité! Les chaînes de scie neuves en particulier ont tendance à beaucoup se dilater. Vêtements de protection Portez impérativement des vêtements de protection près du corps et adaptés, comme des pantalons de protection contre la coupe, des gants et des chaussures de sécurité. Protections acoustiques et lunettes de protection Portez un casque de protection couvrant les oreilles et dotées d une protection pour le visage. Vous vous protégerez ainsi des chutes de branches et retours de branches. Montage de la bandoulière 1. Lorsque vous travaillez, utilisez toujours la bandoulière et tenez toujours l appareil à deux mains par les poignées prévues à cet effet. (voir fig. 9) Fermez vos doigts y compris les pouces autour des poignées et de la barre. 2. Fixez le crochet à ressort au support du manche (fig. 10). Ne portez jamais la courroie en diagonale sur l épaule et la poitrine, mais sur une seule épaule. Ainsi, en cas de danger, vous pourrez éloigner rapidement l appareil de votre corps. Utilisation en toute sécurité Pour garantir une utilisation en toute sécurité, nous vous recommandons de respecter un angle de travail de max. 60. (fig.13) Ne vous tenez jamais sous la branche que vous êtes en train de scier. Lors du sciage, faites attention aux branches sous tensions et aux éclats de bois. Risque de blessures en raison des chutes de branches et des projections de morceaux de bois! Lorsque l appareil est en cours d utilisation, les personnes et animaux de compagnie doivent être maintenus à bonne distance de la zone de danger. L appareil n est pas protégé contre les chocs électriques en cas de contact avec les lignes haute tension. Respectez une distance minimale de 10 m par rapport aux conduites de courant. Risque de blessures mortelles par choc électrique! (fig.14) Tenez-vous toujours au-dessus ou sur le côté de la branche à scier. Maintenez l appareil aussi près du corps que possible. Vous serez ainsi parfaitement équilibré. Dégagez les broussailles et branchages gênants de la zone de travail avant de démarrer le travail de coupe. Créez ensuite une zone de retrait loin de l endroit où les branches coupées risquent de tomber, et dégagez-y tous les obstacles. Gardez la zone de travail dégagée et enlevez immédiatement les branches coupées. Placez tous les autres outils et appareils à une distance sûre des branches à couper, mais pas dans la zone de retrait. Attention aux chutes de branches! Déplacez-vous immédiatement sur le côté et tenez-vous à une distance sûre de l endroit où le bois tombe, dès qu une branche coupée commence à se détacher. Techniques de sciage Lors de l ébranchage, maintenez l appareil à un angle de max. 60 par rapport à l horizontale afin de ne pas être heurté par les chutes de branches. Commencez par scier les branches situées le plus bas sur l arbre. Vous faciliterez ainsi la chute des branches coupées. 16 Perche élagueuse à batterie Manuel d utilisation
29 Lorsque la coupe se termine, le poids de la scie devient soudain plus lourd pour l utilisateur étant donné qu elle n est plus soutenue par la branche. Vous risquez alors de perdre le contrôle de la scie. Tirez la scie de la coupe uniquement lorsque la chaîne de scie est en cours de fonctionnement. Vous éviterez ainsi tout coincement. Ne sciez pas avec la pointe de la lame. Ne sciez pas du côté renflé de la branche. Vous empêcheriez ainsi l arbre de cicatriser. Sciage des branches fines (fig.15) Positionnez la surface de butée de la scie sur la branche. Vous éviterez ainsi tout mouvement de recul de la scie au début de la coupe. Guidez la scie à travers la branche par un léger mouvement de bas en haut. Sciage des branches plus longues et plus épaisses (fig.16) Dans le cas de grosses branches, procédez à une coupe initiale. a) Commencez par scier à l aide de la partie supérieure de la lame de bas en haut sur le 1/3 du diamètre de la branche. b) Avec le bas de la lame, sciez ensuite de haut en bas sur la première coupe. c) Sciez les branches plus longues par sections afin de mieux contrôler le choc. Recul Le recul désigne le mouvement soudain vers le haut ou vers l arrière de la scie à chaîne en cours de fonctionnement. Les causes en sont principalement le contact de la pièce avec la pointe de la lame ou le coincement de la chaîne de scie. Tout recul implique un gros déploiement de forces. La scie à chaîne peut alors réagir de manière incontrôlée. Il peut en résulter de graves blessures pour l utilisateur ou les personnes se trouvant aux alentours. Vous encourez principalement le risque d un recul lorsque vous utilisez la scie au niveau de la pointe de la lame car c est là que l effet de levier se fait le plus ressentir. Par conséquent, utilisez la scie autant à plat que possible. Éviter les retours! Un retour peut se produire lorsque la chaîne de la scie en marche tombe sur un objet solide au niveau du quart supérieur de la glissière de guidage ou se bloque (fig. 17). Entraînement vers l avant! Lorsque la chaîne reste soudainement bloquée au niveau de la partie inférieure de la glissière, qu elle est coincée ou lorsqu elle tombe sur un corps étranger dans le bois, la scie est alors brutalement entraînée en avant vers le bois (fig. 18). Éviter les rebonds! Un rebond se produit lorsque la chaîne reste soudainement bloquée au niveau de la partie supérieure de la glissière car elle est coincée ou lorsqu elle tombe sur un corps étranger dans le bois. La chaîne peut pousser la scie vers l utilisateur par saccades (fig. 19). Attention! Veillez toujours à ce que la tension de la chaîne soit correcte! Utilisez uniquement les scies à chaîne lorsqu elles se trouvent dans un état impeccable! Utilisez uniquement une chaîne de scie ayant été affûtée conformément aux dispositions! Ne sciez pas jamais avec l arête supérieure ou la pointe de la lame! Tenez toujours la scie à chaîne fermement et des deux mains! Sciage de bois sous tension Le sciage de bois se trouvant sous tension réclame une attention particulière! Lors du sciage, le bois qui se trouvait jusqu alors sous tension est libéré de cette force et réagit de manière totalement incontrôlée. Cela peut conduire à des blessures extrêmement graves, voire mortelles. Ces travaux ne doivent par conséquent être réalisés que par des spécialistes formés à cet effet. Contactez-nous à 17
30 8. Données techniques Perche élagueuse à batterie 8580 (AAS 2420) Tension nominale 24 V DC / 1,9 Ah / 45,6 Wh Vitesse à vide 1800 min -1 Guide-Chaîne 200 mm Longueur de coupe ca. 17,5 cm Réglage en hauteur variable de 1,85 m à 3,15 m Hauteur de travail jusqu à 4,5 m Capacité du réservoir d huile 60 ml Poids 3.8 kg Chaîne 91PJ033X Barre guide 080SDEA041 Niveau de la pression sonore (EN ISO ) 76,60 db(a) K = 2,5 db Niveau sonore L WA (EN ISO ) 92 db(a) K = 3 db Niveau de vibration (EN ISO ) m/s 2 K = 1,5 m/s 2 Chargeur de réseau Tension de réseau Tension de charge / Courant de charge Durée de chargement V ~ / 50 Hz 25,9 V DC / 500 ma env. 3-5 heure Sous réserve de modifications techniques. Les indications relatives aux émissions sonores de bruit sont conformes à la loi sur la sécurité des produits (ProdSG), voire à la Directive Machines de l Union Européenne: le niveau de pression acoustique au lieu de travail peut dépasser 80 db (A). Dans ce cas il convient de prévoir des mesures de protection acoustique pour l opérateur(par ex. port de protègeoreilles). Portez une protection acoustique. Le bruit peut entraîner une perte de l ouïe. Attention! Selon le contexte d utilisation de l appareil électrique, l oscillation peut varier. Dans des cas exceptionnels, elle peut dépasser la valeur définie. Limitez autant que possible le développement de bruit et de vibrations! Utilisez uniquement des appareils en parfait état. Procédez régulièrement à la maintenance et au nettoyage de l appareil. Adaptez votre méthode de travail à l appareil. Ne surchargez pas l appareil. Faites contrôler l appareil au besoin. Débranchez l appareil lorsqu il n est pas utilisé. Portez des gants. Attention: protection contre le bruit! Avant la mise en marche, informez-vous des prescriptions locales. Avertissement! L utilisation prolongée d un outil soumet l utilisateur à des vibrations susceptibles de causer un syndrome de Raynaud (se caractérisant par une décoloration des doigts) ou un syndrome du canal carpien. Cet état diminue la capacité pour la main de ressentir et de réguler les températures, ce qui entraîne un engourdissement et des sensations de chaleur et peut endommager les nerfs et le système circulatoire, voire la mort des tissus. Tous les facteurs entraînant le syndrome de Raynaud ne sont pas identifiés, mais le temps froid, fumer et les maladies qui concernent les vaisseaux sanguins et le système circulatoire, de même que les vibrations importantes et subies de manière prolongée figurent parmi les causes signalées. Pour réduire les risques de syndrome de Raynaud et de syndrome du canal carpien, respectez les précautions suivantes : Portez des gants et maintenez vos mains au chaud. 18 Perche élagueuse à batterie Manuel d utilisation
31 Procédez à une maintenance correcte de l appareil. Un outil dont les composants sont desserrés ou les amortisseurs endommagés ou usés entraînent des vibrations importantes. Maintenez une pression ferme mais n enserrez pas constamment les poignées en exerçant une pression excessive. Observez de nombreuses pauses. Les précautions susmentionnées ne peuvent pas exclure l apparition du syndrome de Raynaud ou de syndrome du canal carpien. Il est recommandé aux personnes utilisant le matériel régulièrement et de manière prolongée de faire examiner avec attention l état de leurs mains et de leurs doigts. Consultez immédiatement un médecin si vous constatez l apparition des symptômes susmentionnés. 9. Maintenance 9.1 Remplacez la chaîne de scie et la lame. La lame doit être remplacée dans les cas suivants: Sa rainure de guidage est usée. Le pignon de la lame est endommagé ou usé. Pour savoir comment procéder, consultez le chapitre «Montage de la lame et de la chaîne de scie»! 9.2 Contrôle de la lubrification automatique de chaîne Contrôlez régulièrement le fonctionnement de la lubrification automatique de chaîne pour éviter une surchauffe et par conséquent un endommagement de la lame et de la chaîne de scie. Pour ce faire, dirigez la pointe de la lame vers une surface lisse (planche, entame d un arbre) et laissez fonctionner la scie à chaîne. Si au cours de cette opération vous voyez apparaître une trace d huile de plus en plus importante, cela signifie que la lubrification automatique de la chaîne fonctionne de manière impeccable. Si en revanche aucune trace d huile notable n apparaît, consultez les consignes correspondantes au chapitre «Recherche des erreurs»! Si ces consignes ne vous sont d aucune aide, adressezvous à notre service d assistance ou à un atelier qualifié du même type. Attention! Ne touchez jamais la surface. Préservez une distance de sécurité suffisante (env. 20 cm). 9.3 Affûtage de la chaîne de scie Vous ne pourrez utiliser efficacement votre scie à chaîne que si la chaîne est en bon état et bien affûtée. Vous réduisez du même coup le risque de recul. La chaîne de scie peut être réaffûtée par n importe quel revendeur spécialisé. N essayez pas d affûter vous-même la chaîne de scie si vous ne disposez pas de l outil et de l expérience nécessaires. 10. Nettoyage et stockage Nettoyez régulièrement le mécanisme de tension en soufflant dessus de l air sous pression ou en utilisant une brosse. N utilisez pas d outil pour effectuer le nettoyage. Faites en sorte que les poignées restent exemptes d huile afin de garantir un maintien sûr. Au besoin, nettoyez l appareil avec un chiffon humide et au besoin un produit de nettoyage doux. Si la scie à chaîne n est pas utilisée pendant une période prolongée, videz le réservoir d huile pour chaîne. Plongez brièvement la chaîne de scie et la lame dans un bain d huile et enroulez-les ensuite dans du papier huilé. Attention! Chaîne de la scie coupante. Placez toujours le cache de protection lors du stockage et du transport de l appareil. Sécurisez la machine pendant le transport, afin d éviter dommages et blessures. Nettoyez et entretenez toujours l appareil avant de le stocker. Attention! Lors du transport ou de l entreposage de la scie à chaîne, remettez toujours en place la protection. Avant tout nettoyage, retirez la batterie. Pour le nettoyage, ne plongez jamais l appareil dans l eau ou dans un autre liquide. Conservez la scie à chaîne en lieu sec et sûr, et hors de portée des enfants. 11. Consignes de protection de l environnement/ d élimination Une fois l appareil hors d état, procédez à son élimination conformément aux dispositions. Débranchez le câble secteur afin d éviter toute utilisation abusive. Ne jetez pas l appareil avec les ordures ménagères. Dans un but de protection de l environnement, remettez-le à un centre de collecte spécialisé dans les appareils électriques. Votre commune se fera un plaisir de vous fournir les adresses et horaires d ouverture correspondants. Remettez également les matériaux d emballage et accessoires usés aux centres de collecte prévus. Uniquement en ce qui concerne les pays de l UE Ne jetez pas les outils électriques avec les ordures ménagères! Conformément à la directive européenne 2002/96/CE sur les anciens appareils électriques et électroniques et à la mise en oeuvre de la législation nationale, les outils électriques usés doivent être triés à part et remis à un centre de recyclage. Contactez-nous à 19
32 Alternative de recyclage aux exigences de retour: Au lieu d un renvoi, le propriétaire de l appareil électrique est tenu d assurer une valorisation. L ancien appareil peut à ces fins être confié à un centre de reprise qui se chargera de son élimination conformément aux lois nationales sur le recyclage et les déchets. Ne sont pas concernés les accessoires joints aux anciens appareils et les consommables sans composants électriques. 12. Commande des pièces de rechange Lors de la commande de pièces de rechange, les indications suivantes doivent être fournies: Type de l appareil Référence de l appareil 13. Service de réparation Les réparations des outils électriques devront être uniquement effectuées par un électricien spécialisé. Veuillez décrire l erreur constatée lorsque vous envoyez l appareil en réparation. UK Mantis UK Limited Orchard House Hempshaw Lane Stockport Cheshire SK1 4LH Phone Europe Mantis France SARL 20 rue des Garennes Marly France Tél Recherche des erreurs Prudence! Avant de procéder à la recherche des erreurs, arrêtez l appareil et retirez la batterie. Le tableau suivant indique les symptômes des erreurs et décrit la résolution à tenter si votre machine ne fonctionne plus correctement. Si vous ne réussissez pas à localiser et à résoudre le problème, adressez-vous à votre atelier d entretien. Cause Erreur Solution La scie à chaîne fonctionne de Contact d oscillation externe Adressez-vous à un atelier spécialisé manière irrégulière Contact d oscillation interne Adressez-vous à un atelier spécialisé Bouton marche/arrêt défectueux Adressez-vous à un atelier spécialisé Séchez la chaîne de scie Absence d huile dans le réservoir Faites l appoint d huile Aération obstruée au niveau de la fermeture du réservoir d huile Canal d évacuation de l huile obstrué Nettoyez la fermeture du réservoir d huile Libérez le canal d évacuation de l huile Chaîne/rail de guidage brûlant Absence d huile dans le réservoir Faites l appoint d huile La scie à chaîne s arrache, vibre ou ne scie pas correctement Aération obstruée au niveau de la fermeture du réservoir d huile Canal d évacuation de l huile obstrué Chaîne émoussée Tension de chaîne trop lâche Chaîne émoussée Chaîne usée Les dents de la scie ne sont pas orientées dans la bonne direction Nettoyez la fermeture du réservoir d huile Libérez le canal d évacuation de l huile Réaffûtez la chaîne ou remplacez-la Réglez la tension de la chaîne Réaffûtez la chaîne ou remplacez-la Remplacez la chaîne Remontez la chaîne de scie avec les dents orientées dans le bon sens 20 Perche élagueuse à batterie Manuel d utilisation
33 Conditions de garantie GARANTIE LIMITEE MANTIS PRODUITS ALIMENTES PAR BATTERIE MANTIS accorde la présente garantie limitée contre les vices de matériau et de fabrication pendant une période de deux (2) ans dans des conditions normales d utilisation à compter de la date d achat par l acheteur initial. MANTIS réparera ou remplacera, à sa discrétion, toute pièce du produit présentant un vice de matériau ou de fabrication durant la période de garantie. Les réparations et remplacements sous garantie seront effectués sans frais de pièces ou de main-d œuvre. Toutes les pièces remplacées sous garantie seront considérées comme faisant partie du produit d origine et la date d expiration de garantie des pièces remplacées sera celle de la garantie du produit d origine. Si vous pensez que votre produit alimenté par batterie MANTIS présente un vice de matière ou de fabrication, renvoyez le à MANTIS, accompagné de votre justificatif d achat (reçu de vente). Les frais d enlèvement et de livraison sont à votre charge ; le produit doit nous être renvoyé en port payé. MANTIS décline toute responsabilité dans l éventualité où le produit n a pas été assemblé ou utilisé conformément aux instructions d assemblage, d entretien, de sécurité ou d utilisation figurant dans le manuel de l utilisateur ou accompagnant le produit. La présente garantie limitée ne couvre pas les dommages ni les défaillances liés à l usure normale, à un défaut d entretien raisonnable et approprié, au non-respect des instructions d utilisation ou du mode d emploi, à un emploi abusif, à un entreposage incorrect ou à des accidents [ni les pièces et les services d entretien courant]. La présente garantie limitée est annulée si le produit à batterie MANTIS a fait l objet de négligence ou a été réparé ou modifié par toute personne autre qu un concessionnaire agréé ou un centre de service après-vente agréé Vous devez entretenir votre produit alimenté par batterie MANTIS conformément aux instructions d entretien figurant dans le manuel. Cet entretien courant, qu il soit effectué par vous-même ou par un concessionnaire, sont à votre charge. MANTIS N OFFRE AUCUNE GARANTIE EXPLICITE OU IMPLICITE, DÉCLARATION NI ASSURANCE, À L EXCEPTION DE CELLES CONTENUES AUX PRÉSENTES. IL N EST OFFERT AUCUNE AUTRE GARANTIE, NOTAMMENT AUCUNE GARANTIE DE QUALITÉ MARCHANDE OU D ADAPTATION À UN EMPLOI PARTICULIER. TOUTES LES GARANTIES AUTRES QUE LA GARANTIE EXPRESSE CI-DESSUS SONT SPÉCIFIQUEMENT REJETÉES. LA DURÉE DE TOUTE GARANTIE IMPLICITE, Y COMPRIS DE QUALITÉ MARCHANDE ET D ADAPTATION À UN EM- PLOI PARTICULIER, EST LIMITÉE À LA DURÉE DE LA PRÉSENTE GARANTIE LIMITÉE. MAN- TIS DÉCLINE TOUTE RESPONSABILITÉ POUR TOUS LES DOMMAGES INDIRECTS, ACCES- SOIRES OU CONSÉCUTIFS EN RAPPORT AVEC L EMPLOI DES PRODUITS MANTIS COUVERTS PAR LA PRÉSENTE GARANTIE. CERTAINS ÉTATS N AUTORISANT PAS LA LIMITATION DE LA DURÉE D UNE GARANTIE IMPLICITE ET/OU N AUTORISANT PAS L EXCLUSION OU LA LIMI- TATION DES DOMMAGES INDIRECTS OU ACCESSOIRES, IL SE PEUT QUE LES LIMITATIONS ET EXCLUSIONS QUI PRÉCÈDENT NE S APPLIQUENT PAS À VOUS. LA PRÉSENTE GARANTIE VOUS DONNE DES DROITS PRÉCIS ET IL SE PEUT QUE VOUS AYEZ ÉGALEMENT D AUTRES DROITS, SUSCEPTIBLES DE DIFFÉRER D UNE RÉGION À UNE AUTRE.
34 Inhaltsverzeichnis Allgemeine Sicherheitsvorschriften...10 Symbolerkärung...13 Gerätbeschreibung und Lieferumfang...14 Bestimmungsgemäßer Gebrauch...14 Montage...14 Betrieb...15 Arbeiten mit der Kettensäge...16 Technische Daten...18 Wartung...19 Reinigung und Lagerung...19 Hinweise zum Umweltschutz / Entsorgung...19 Ersatzteilbestellung...20 Reparaturdienst...20 Fehlersuche...20 Garantie...21 Konformitätserklärung...22 Verpackung Das Gerät befindet sich in einer Verpackung um Transportschäden zu verhindern. Diese Verpackung ist Rohstoff und ist somit wiederverwendbar oder kann dem Rohstoffkreislauf zurückgeführt werden. Beim Benutzen von Geräten müssen einige Sicherheitsvorkehrungen eingehalten werden, um Verletzungen und Schäden zu verhindern: Lesen Sie die Bedienungsanleitung sorgfältig durch und beachten Sie deren Hinweise. Machen Sie sich anhand dieser Gebrauchsanweisung mit dem Gerät, dem richtigen Gebrauch sowie den Sicherheitsvorschriften vertraut. Bewahren Sie diese gut auf, damit Ihnen die Informationen jederzeit zur Verfügung stehen. Falls Sie das Gerät an andere Personen übergeben sollten, händigen Sie diese Bedienungsanleitung bitte mit aus. Wir übernehmen keine Haftung für Unfälle oder Schäden, die durch Nichtbeachten dieser Anleitung entstehen. 1. Allgemeine Sicherheitsvorschriften Allgemeine Sicherheitshinweise für Elektrowerkzeuge Warnung! Lesen Sie alle Sicherheitshinweise und Anweisungen. Versäumnisse bei der Einhaltung der Sicherheitshinweise und Anweisungen können elektrischen Schlag, Brand- und/oder schwere Verletzungen verursachen. Bewahren Sie alle Sicherheitshinweise und Anweisungen für die Zukunft auf. Der in den Sicherheitshinweisen verwendete Begriff Elektrowerkzeug bezieht sich auf netzbetriebene Elektrowerkzeuge (mit Netzkabel) und auf akkubetriebene Elektrowerkzeuge (ohne Netzkabel). 1) Arbeitsplatzsicherheit a) Halten Sie Ihren Arbeitsbereich sauber und gut beleuchtet. Unordnung oder unbeleuchtete Arbeitsbereiche können zu Unfällen führen. b) Arbeiten Sie mit dem Elektrowerkzeug nicht in explosionsgefährdeter Umgebung, in der sich brennbare Flüssigkeiten, Gase oder Stäube befinden. Elektrowerkzeuge erzeugen Funken, die den Staub oder die Dämpfe entzünden können. c) Halten Sie Kinder und andere Personen während der Benutzung des Elektrowerkzeugs fern. Bei Ablenkung können Sie die Kontrolle über das Gerät verlieren. 2) Elektrische Sicherheit a) Der Anschlussstecker des Elektrowerkzeuges muss in die Steckdose passen. Der Stecker darf in keiner Weise verändert werden. Verwenden Sie keine Adapterstecker gemeinsam mit schutzgeerdeten Geräten. Unveränderte Stecker und passende Steckdosen verringern das Risiko eines elektrischen Schlages. b) Vermeiden Sie Körperkontakt mit geerdeten Oberflächen, wie von Rohren, Heizungen, Herden und Kühlschränken. Es besteht ein erhöhtes Risiko durch elektrischen Schlag, wenn Ihr Körper geerdet ist. c) Halten Sie das Gerät von Regen oder Nässe fern. Das Eindringen von Wasser in ein Elektrogerät erhöht das Risiko eines elektrischen Schlages. 10 Akku Hochentaster Gebrauchsanweisung
35 d) Zweckentfremden Sie das Kabel nicht, um das Gerät zu tragen, aufzuhängen oder um den Stecker aus der Steckdose zu ziehen. Halten Sie das Kabel fern von Hitze, Öl, scharfen Kanten oder sich bewegenden Geräteteilen. Beschädigte oder verwickelte Kabel erhöhen das Risiko eines elektrischen Schlages. e) Wenn Sie mit einem Elektrowerkzeug im Freien arbeiten, verwenden Sie nur Verlängerungskabel, die auch für den Außenbereich zugelassen sind. Die Anwendung eines für den Außenbereich geeigneten Verlängerungskabels verringert das Risiko eines elektrischen Schlages. 3) Sicherheit von Personen a) Seien Sie aufmerksam, achten Sie darauf, was Sie tun, und gehen Sie mit Vernunft an die Arbeit mit einem Elektrowerkzeug. Benutzen Sie kein Elektrowerkzeug, wenn Sie müde sind oder unter dem Einfluss von Drogen, Alkohol oder Medikamenten stehen. Ein Moment der Unachtsamkeit beim Gebrauch des Elektrowerkzeuges kann zu ernsthaften Verletzungen führen. b) Tragen Sie persönliche Schutzausrüstung und immer eine Schutzbrille. Das Tragen persönlicher Schutzausrüstung, wie Staubmaske, rutschfeste Sicherheitsschuhe, Schutzhelm oder Gehörschutz, je nach Art und Einsatz des Elektrowerkzeuges, verringert das Risiko von Verletzungen. c) Vermeiden Sie unbeabsichtigte Inbetriebnahme. Vergewissern Sie sich, dass das Elektrowerkzeug ausgeschaltet ist, bevor Sie es an die Stromversorgung und/oder den Akku anschließen, es aufnehmen oder tragen. Wenn Sie beim Tragen des Gerätes den Finger am Schalter haben oder das Gerät eingeschaltet an die Stromversorgung anschließen, kann dies zu Unfällen führen. d) Entfernen Sie Einstellwerkzeuge oder Schraubenschlüssel, bevor Sie das Elektrowerkzeug einschalten. Ein Werkzeug oder Schlüssel, der sich in einem drehenden Geräteteil befindet, kann zu Verletzungen führen. e) Vermeiden Sie eine abnormale Körperhaltung. Sorgen Sie für einen sicheren Stand und halten Sie jederzeit das Gleichgewicht. Dadurch können Sie das Elektrowerkzeug in unerwarteten Situationen besser kontrollieren. f) Tragen Sie geeignete Kleidung. Tragen Sie keine weite Kleidung oder Schmuck. Halten Sie Haare, Kleidung und Handschuhe fern von sich bewegenden Teilen. Lockere Kleidung, Schmuck oder lange Haare können von sich bewegenden Teilen erfasst werden. g) Wenn Staubabsaug- und Auffangeinrichtungen montiert werden können, vergewissern Sie sich, dass diese angeschlossen sind und richtig verwendet werden. Verwendung einer Staubabsaugung kann Gefährdungen durch Staub verringern. 4) Verwendung und Behandlung des Elektrowerkzeuges a) Überlasten Sie das Gerät nicht. Verwenden Sie für Ihre Arbeit das dafür bestimmte Elektrowerkzeug. Mit dem passenden Elektrowerkzeug arbeiten Sie besser und sicherer im angegebenen Leistungsbereich. b) Benutzen Sie kein Elektrowerkzeug, dessen Schalter defekt ist. Ein Elektrowerkzeug, das sich nicht mehr ein- oder ausschalten lässt, ist gefährlich und muss repariert werden. c) Ziehen Sie den Stecker aus der Steckdose und/oder entfernen Sie den Akku, bevor Sie Geräteeinstellungen vornehmen, Zubehörteile wechseln oder das Gerät weglegen. Diese Vorsichtsmaßnahme verhindert den unbeabsichtigten Start des Gerätes. d) Bewahren Sie unbenutzte Elektrowerkzeuge außerhalb der Reichweite von Kindern auf. Lassen Sie Personen das Gerät nicht benutzen, die mit diesem nicht vertraut sind oder diese Anweisung nicht gelesen haben. Elektrowerkzeuge sind gefährlich, wenn Sie von unerfahrenen Personen benutzt werden. e) Pflegen Sie das Gerät mit Sorgfalt. Kontrollieren Sie, ob bewegliche Geräteteile einwandfrei funktionieren und nicht klemmen, ob Teile gebrochen oder so beschädigt sind, dass die Funktion des Elektrowerkzeuges beeinträchtigt ist. Lassen Sie beschädigte Teile vor dem Einsatz des Gerätes reparieren. Viele Unfälle haben ihre Ursache in schlecht gewarteten Elektrowerkzeugen. f) Halten Sie Schneidwerkzeuge scharf und sauber. Sorgfältig gepflegte Schneidwerkzeuge mit scharfen Schneidkanten verklemmen sich weniger und sind leichter zu führen. g) Verwenden Sie Elektrowerkzeuge, Zubehör, Einsatzwerkzeuge usw. entsprechend diesen Anweisungen und so, wie es für diesen speziellen Gerätetyp vorgeschrieben ist. Berücksichtigen Sie dabei die Arbeitsbedingungen und die auszuführende Tätigkeit. Der Gebrauch von Elektrowerkzeugen für andere als die vorgesehenen Anwendungen kann zu gefährlichen Situationen führen. 5) Sorgfältiger Umgang und Gebrauch von Akkugeräten a) Stellen Sie sicher, dass das Gerät ausgeschaltet ist, bevor Sie den Akku einsetzen. Das Einsetzen eines Akkus in ein Elektrowerkzeug, das eingeschaltet ist, kann zu Unfällen führen. b) Laden Sie die Akkus nur in Ladegeräten auf, die vom Hersteller empfohlen werden. Für ein Ladegerät, das für eine bestimmte Art von Akkus geeignet ist, besteht Brandgefahr, wenn es mit anderen Akkus verwendet wird. c) Verwenden Sie nur die dafür vorgesehenen Akkus in den Elektrowerkzeugen. Der Gebrauch von anderen Akkus kann zu Verletzungen und Brandgefahr führen. Kontaktieren Sie uns unter 11
36 d) Halten Sie den nicht benutzten Akku fern von Büroklammern, Münzen, Schlüsseln, Nägeln, Schrauben oder anderen kleinen Metallgegenständen, die eine Überbrückung der Kontakte verursachen können. Ein Kurzschluss zwischen den Akkukontakten kann Verbrennungen oder Feuer zur Folge haben. e) Bei falscher Anwendung kann Flüssigkeit aus dem Akku austreten. Vermeiden Sie den Kontakt damit. Bei zufälligem Kontakt mit Wasser abspülen. Wenn die Flüssigkeit in die Augen kommt, nehmen Sie zusätzlich ärztliche Hilfe in Anspruch. Austretende Akkuflüssigkeit kann zu Hautreizungen oder Verbrennungen führen. 6) Service a) Lassen Sie ihr Elektrowerkzeug nur von qualifiziertem Fachpersonal und nur mit Original- Ersatzteilen reparieren. Damit wird sichergestellt, dass die Sicherheit des Gerätes erhalten bleibt. Gerätespezifische Sicherheitshinweise Halten Sie bei laufender Säge alle Körperteile von der Sägekette fern. Vergewissern Sie sich vor dem Starten der Säge, dass die Sägekette nichts berührt. Beim Arbeiten mit einer Kettensäge kann ein Moment der Unachtsamkeit dazu führen, dass Bekleidung oder Körperteile von der Sägekette erfasst werden. Halten Sie die Kettensäge immer mit Ihrer rechten Hand am hinteren Griff und Ihrer linken Hand am vorderen Griff. Das Festhalten der Kettensäge in umgekehrter Arbeitshaltung erhöht das Risiko von Verletzungen und darf nicht angewendet werden. Tragen Sie Schutzbrille und Gehörschutz. Weitere Schutzausrüstung für Kopf, Hände, Beine und Füße wird empfohlen. Passende Schutzkleidung mindert die Verletzungsgefahr durch herumfliegendes Spanmaterial und zufälliges Berühren der Sägekette. Arbeiten Sie mit der Kettensäge nicht auf einem Baum. Bei Betrieb einer Kettensäge auf einem Baum besteht Verletzungsgefahr. Achten Sie immer auf festen Stand und benutzen Sie die Kettensäge nur, wenn Sie auf festem, sicherem und ebenem Grund stehen. Rutschiger Untergrund oder instabile Standflächen wie auf einer Leiter können zum Verlust des Gleichgewichts oder zum Verlust der Kontrolle über die Kettensäge führen. Rechnen Sie beim Schneiden eines unter Spannung stehenden Astes damit, dass dieser zurückfedert. Wenn die Spannung in den Holzfasern freikommt, kann der gespannte Ast die Bedienperson treffen und/oder die Kettensäge der Kontrolle entreißen. Seien Sie besonders vorsichtig beim Schneiden von Unterholz und jungen Bäumen. Das dünne Material kann sich in der Sägekette verfangen und auf Sie schlagen oder Sie aus dem Gleichgewicht bringen. Tragen Sie die Kettensäge am vorderen Griff im ausgeschalteten Zustand, die Sägekette von Ihrem Körper abgewandt. Bei Transport oder Aufbewahrung der Kettensäge stets die Schutzabdeckung aufziehen. Sorgfälltiger Umgang mit der Kettensäge verringert die Wahrscheinlichkeit einer versehentlichen Berührung mit der laufenden Sägekette. Befolgen Sie die Anweisungen für die Schmierung, die Kettenspannung und das Wechseln von Zubehör. Eine unsachgemäß gespannte oder geschmierte Sägekette kann entweder reißen oder das Rückschlagrisiko erhöhen. Halten Sie Griffe trocken, sauber und frei von Öl und Fett. Fettige, ölige Griffe sind rutschig und führen zum Verlust der Kontrolle. Nur Holz sägen. Die Kettensäge nicht für Arbeiten verwenden, für die sie nicht bestimmt ist Beispiel: Verwenden Sie die Kettensäge nicht zum Sägen von Plastik, Mauerwerk oder Baumaterialien, die nicht aus Holz sind. Die Verwendung der Kettensäge für nicht bestimmungsgemäße Arbeiten kann zu gefährlichen Situationen führen. Versuchen Sie niemals eine unvollständige Maschine zu benutzen oder eine, die mit einer nicht genehmigten Änderung versehen ist. Dieses Gerät ist nicht dafür bestimmt, durch Personen (einschließlich Kinder) mit eingeschränkten physischen, sensorischen oder geistigen Fähigkeiten oder mangels Erfahrung und/oder mangels Wissen benutzt zu werden, es sei denn, sie werden durch eine für ihre Sicherheit zuständige Person beaufsichtigt oder erhielten von ihr Anweisungen, wie das Gerät zu benutzen ist. Kinder sollten beaufsichtigt werden, um sicherzustellen, dass sie nicht mit dem Gerät spielen. Seien Sie aufmerksam, achten Sie darauf, was Sie tun, und gehen Sie mit Vernunft an die Arbeit mit einem Elektrowerkzeug. Benutzen Sie das Gerät nicht, wenn Sie müde sind oder unter dem Einfluss von Drogen, Alkohol oder Medikamenten stehen. Jugendliche unter 16 Jahren dürfen die Gerätenicht bedienen. Beachten Sie, dass nationale Vorschriften den Einsatz des Hochentasters beschränken können. Beachten Sie, nicht ordnungsgemäße Wartung, die Verwendung von nicht konformen Ersatzteilen, oder Entfernung oder Modifikation der Sicherheitseinrichtungen können zu Schäden am Gerät und schweren Verletzungen der damit arbeitenden Person führen. 12 Akku Hochentaster Gebrauchsanweisung
37 2. Symbolerklärung Folgenden Symbole werden auf diesem Elektrowerkzeug verwendet. Mit der richtigen Interpretation dieser Symbole können Sie das Elektrowerkzeug sicherer und effektiver bedienen. SYMBOLE ERKLÄRUNG WARNUNG INFORMATION Vor Inbetriebnahme und vor allen Wartungs-, Montage- und Reinigungs- arbeiten Gebrauchsanweisung gründlich lesen. Vor dem Starten des Elektrowerkzeugs Schutzhelm, Schutzbrille und Gehörschutz tragen. Feste Sicherheitsschuhe und Handschuhe beim Betrieb des Gerätes tragen. Das Elektrowerkzeug nicht bei Regen benutzen oder dem Regen aussetzen. Bestätigt die Konformität des Elektrowerkzeugs mit den Richtlinien der Europäischen Gemeinschaft. Ausgemusterte Elektrowerkzeuge und andere elektrotechnische und elektrische Erzeugnisse getrennt sammeln und einer umweltgerechten Wiederverwertung zuführen. Halten Sie Abstand von Hochspannungsleitungen. Es besteht Lebensgefahr durch Stromschlag! Garantierter Schallleistungspegel 92 db(a) Akku enthält Lithium! Nicht in der Mülltonne entsorgen! Defekten Akku dem Recycling zuführen! Explosionsgefahr! Werfen Sie niemals Akkus ins Feuer. Kontaktieren Sie uns unter 13
38 3. Gerätebeschreibung und Lieferumfang (Abb. 1) 1. Ein-/Ausschalter 2. Akku 3. Handgriff 4. Teleskopstiel 5. Griffbereich gepolstert 6. Teleskop- Schnellverriegelung 7. Kettenzahnradabdeckung 8. Öltankdeckel 9. Sägekette 10. Schwert 11. Schwertschutz 12. Motorgehäuse 13. Multifunktionswerkzeug 14. Ladegerät 15. Einschaltsperre 16. Schultertragegurt 4. Bestimmungsgemäßer Gebrauch Die Kettensäge mit Teleskopstiel ist für Entastungsarbeiten an Bäumen vorgesehen. Sie ist nicht geeignet für umfangreiche Sägearbeiten und Baumfällungen sowie zum Sägen von anderen Materialien als Holz. Bitte beachten Sie, dass unsere Geräte bestimmungsgemäß nicht für den gewerblichen, handwerklichen oder industriellen Einsatz konstruiert wurden. Wir übernehmen keine Gewährleistung, wenn das Gerät in Gewerbe-, Handwerks- oder Industriebetrieben sowie bei gleichzusetzenden Tätigkeiten eingesetzt wird. 5. Montage Achtung! Schließen Sie die Kettensäge erst an den Akku an, wenn diese vollständig montiert ist und die Kettenspannung eingestellt ist. Tragen Sie immer Schutzhandschuhe, wenn Sie Arbeiten an der Kettensäge vornehmen, um Verletzungen zu vermeiden. 5.1 Montage von Schwert und Sägekette (Abb. 2-6) Packen Sie alle Teile sorgfältig aus und überprüfen Sie diese auf Vollständigkeit. (Abb.1) Befestigungsschraube für Kettenzahnradabdeckung lösen. (Abb.2) Kettenzahnradabdeckung abnehmen. Kette wie abgebildet in die umlaufende Nut des Schwertes legen. (Abb.3/Pos.A) Beachten Sie die Laufrichtung der Kette! Auf jedem Schneideglied ist ein Pfeil eingeprägt. Dieser muss auf der Oberseite des Schwertes nach vorn zur Schwertspitze zeigen. Schwert und Kette wie abgebildet in die Aufnahme der Kettensäge einlegen. (Abb. 4) Dabei die Kette um das Ritzel führen und das Schwert in den Kettenspannbolzen einhängen. 14 Kettenzahnradabdeckung anbringen und mit Befestigungsschraube handfest anziehen. Achtung! Befestigungsschraube erst nach dem Einstellen der Kettenspannung (Siehe Punkt 5.2) endgültig anziehen. 5.2 Spannen der Sägekette Achtung! Vor Überprüfung und Einstellarbeiten immer den Akku entfernen. Tragen Sie stets Schutzhandschuhe, wenn Sie Arbeiten an der Kettensäge vornehmen, um Verletzungen zu vermeiden. Befestigungsschraube der Kettenzahnradabdeckung einige Umdrehungen lösen. Kettenspannung anhand eines Schraubendrehers mit der Kettenspannschraube einstellen (Abb. 5). Rechtsdrehen erhöht die Kettenspannung, Linksdrehen verringert die Kettenspannung. Die Sägekette ist richtig gespannt, wenn sie in der Mitte des Schwertes um ca. 2 mm angehoben werden kann. (Abb.6) Akku Hochentaster Gebrauchsanweisung Achtung! Alle Kettenglieder müssen ordnungsgemäß in der Führungsnut des Schwertes liegen. Hinweise zum Spannen der Kette Die Sägekette muss richtig gespannt sein, um einen sicheren Betrieb zu gewährleisten. Sie erkennen die optimale Spannung, wenn die Sägekette in der Mitte des Schwertes um 2 mm abgehoben werden kann. Da sich die Sägekette durch das Sägen erhitzt und dadurch ihre Länge verändert, überprüfen Sie spätestens alle 10 min. die Kettenspannung und regulieren Sie diese bei Bedarf. Das gilt besonders für neue Sägeketten. Entspannen Sie nach abgeschlossener Arbeit die Sägekette, weil sich diese beim Abkühlen verkürzt. Damit verhindern Sie, dass die Kette Schaden nimmt. 5.3 Sägekettenschmierung Achtung! Vor Überprüfung und Einstellarbeiten immer den Akku entfernen. Tragen Sie stets Schutzhandschuhe, wenn Sie Arbeiten an der Kettensäge vornehmen, um Verletzungen zu vermeiden. Achtung! Betreiben Sie die Kette niemals ohne Sägekettenöl! Die Benutzung der Kettensäge ohne Sägekettenöl oder bei einem Ölstand unterhalb der Minimum- Markierung führt zur Beschädigung der Kettensäge! Achtung! Verwenden Sie nur spezielles Kettensägenöl. Bei Verwendung von Altöl erlischt die Garantie. Öltank befüllen (Abb.7) Kettensäge auf ebener Fläche abstellen. Bereich um den Öltankdeckel (Pos.8) reinigen und anschließend öffnen. Öltank mit Sägekettenöl befüllen. Achten Sie dabei darauf, dass kein Schmutz in den Öltank gelangt, damit die Öldüse nicht verstopft. Öltankdeckel (Pos.8) schließen.
39 Hinweis zum Gebrauch des Akkus 1. Der AKKU ist im Auslieferzustand nicht geladen - vor Inbetriebnahme den AKKU erst vollständig laden. (siehe - Laden des Akkus) 2. Der Akku darf niemals geöffnet werden. 3. Werfen Sie alte oder defekte Akkus niemals ins Feuer - EXPLOSIONSGEFAHR! 4. Schließen Sie das Ladegerät nur an die auf dem Typschild angegebene Netzspannung an. 5. Verwenden Sie nur den Original Akku. 6. Akku niemals mit Ladegerät eines anderen Herstellers laden. Dies kann zum Defekt des Akkus oder auch durch Überhitzung zu körperlichen Schäden führen. 7. Bei Dauerbetrieb kann sich der Akku erwärmen. Lassen Sie ihn vor erneutem Laden abkühlen. 8. Ladegerät und Akku außerhalb der Reichweite von Kindern lagern. 9. Benutzen Sie das Ladegerät nicht im Bereich von Dämpfen und brennbaren Flüssigkeiten. 10. Akku nur bei Temperaturen von 10 C bis 40 C laden. 11. Akku nur bei Temperaturen bis 30 C lagern. Höhere Lagertemperaturen können den Akku schädigen. Die ideale Lagertemperatur liegt bei C. 12. Akkukontakte niemals kurzschließen oder mit metallischen Gegenständen überbrücken. 13. Beim Transport des Akkus beachten, dass die Kontakte nicht überbrückt werden, keine metallischen Transportbehälter verwenden. 14. Kurzschluss des Akkus kann zu Explosionen führen. Auf jeden Fall wird der Akku durch Kurzschluss beschädigt. 15. Untersuchen Sie das Ladekabel regelmäßig auf Beschädingungen. Lassen Sie beschädigte Kabel ersetzen. 16. Der Akku hat einen Tiefentladeschutz: Das Gerät wird bei entladenem Akku selbsttätig abgeschaltet. Laden Sie in diesem Falle unverzüglich den Akku. 17. Laden Sie den Akku vor Überwinterung nochmals voll auf. Hinweise zum Umweltschutz Batterien gehören nicht in den Hausmüll. Als Verbraucher sind Sie gesetzlich verpflichtet, gebrauchte Batterien bzw. Akkus zurückzugeben. Am Ende der Lebensdauer Ihres Gerätes müssen die Batterien bzw. Akkus entnommen und gesondert entsorgt werden. Sie können Ihre alten Batterien und Akkus an den örtlichen Sammelstellen Ihrer Gemeinde oder bei Ihrem Händler bzw. Verkaufsstelle abgeben. Laden des Akkus (Abb. 8) Achtung! Ladegerät nur in trockenen Räumen verwenden. Zum Entnehmen des Akkus drücken Sie bitte die beiden seitlichen Drucktasten 1 und ziehen den Akku heraus (Abb. 8.1). Stellen Sie die Verbindung zwischen Ladegerät und Akku her. Dazu den Stecker des Ladegerätes in die Buchse auf der Stirnseite des Akkus stecken (Abb. 8.2). Stecken Sie das Ladegerät in die Netzsteckdose. Vergewissern Sie sich, dass die auf dem Ladegerät angegebene Netzspannung mit der Ihrer Steckdose übereinstimmt (Abb. 8.3). Hinweise zum Ladegerät: --LED leuchtet rot: Akku wird geladen --LED leuchtet grün: Ladevorgang abgeschlossen -- LED blinkt abwechselnd rot und grün: Störung (z. B. Akku zu heiß) Die Ladezeit beträgt ca. 3-5 Stunden. Während des Ladevorgangs erwärmt sich der Akku. Dies ist normal und nicht als Fehler zu betrachten. Bei Nichtgebrauch das Ladegerät aus der Steckdose entfernen. Falls der Akku nicht geladen wird, überprüfen Sie bitte, ob an der Steckdose Spannung vorhanden ist. Falls das Laden des Akkus nicht möglich ist, geben Sie bitte Ladegerät und Akku an die Servicestelle oder eine Fachwerkstatt. Selbstentladung der Akkus! Entnehmen Sie den Akku aus dem Ladegerät, sobald er voll geladen ist. Allgemeine Hinweise zum Akku. Im Interesse einer langen Lebensdauer des Akku, sollten Sie folgende Punkte beachten: Bei geringer Akku-Spannung schaltet das Gartengerät automatisch ab. In diesem Fall muss der Akku geladen werden. Der Lithium-Ionen-Akku muss vor langen Pausen z. B. vor der Lagerung im Winter aufgeladen werden. Die Ladezeit beträgt bei vollständig entladenem Akku 5 Stunden. Der Lithium-Ionen-Akku kann in jedem Ladezustand geladen werden und die Ladung kann jederzeit unterbrochen werden, ohne dem Akku zu schaden (kein Memory-Effekt). 6. Betrieb 6.1 Teleskoplänge einstellen (Abb.11) 1. Gemäß Abbildung (Abb.11) die Verriegelungsüberwurfmutter (6) gegen den Uhrzeigersinn drehen. 2. Die Verriegelung ist gelöst und kann durch Auseinanderziehen der Enden auf die gewünschte Länge eingestellt werden. 3. Anschließend die Verriegelungsüberwurfmutter (6) im Uhrzeigersinn fest andrehen. 6.2 Ein-/Auschalten (Abb.12) Einschalten Kettensäge mit beiden Händen an den Griffen festhalten (Daumen unter den Handgriff). Kontaktieren Sie uns unter 15
40 Einschaltsperre (Abb.12) drücken und halten. Kettensäge mit Ein-/Ausschalter (Pos. 1) einschalten. Die Einschaltsperre (Pos.15) kann jetzt wieder losgelassen werden. Ausschalten Ein-/Ausschalter (Pos.1) loslassen. Entfernen Sie stets den Akku, wenn Sie die Arbeit unterbrechen. 7. Arbeiten mit der Kettensäge 7.1 Vorbereitung Überprüfen Sie vor jedem Einsatz folgende Punkte, um sicher arbeiten zu können: Zustand der Kettensäge Untersuchen Sie die Kettensäge vor Beginn der Arbeiten auf Beschädigungen am Gehäuse, dem Akku, der Sägekette und dem Schwert. Nehmen Sie niemals ein offensichtlich beschädigtes Gerät in Betrieb. Nach Fallenlassen oder anderer Stöße die Maschine prüfen, um signifikante Schäden oder Defekte festzustellen. Ölbehälter Füllstand des Ölbehälters. Überprüfen Sie auch während der Arbeit, ob immer ausreichend Öl vorhanden ist. Betreiben Sie die Säge nie, wenn kein Öl vorhanden oder der Ölstand unter die Minimum- Markierung gesunken ist, um eine Beschädigung der Kettensäge zu vermeiden. Eine Füllung reicht im Schnitt für 10 Minuten, abhängig von den Pausen und der Belastung. Sägekette Spannung der Sägekette und Zustand der Schneiden prüfen. Je schärfer die Sägekette ist, umso leichter und kontrollierbarer lässt sich die Kettensäge bedienen. Das Gleiche gilt für die Kettenspannung. Überprüfen Sie auch während der Arbeit spätestens alle 10 Minuten die Kettenspannung, um Ihre Sicherheit zu erhöhen! Besonders neue Sägeketten neigen zu erhöhter Ausdehnung. Schutzkleidung Tragen Sie unbedingt die entsprechende, eng anliegende Schutzkleidung wie Schnittschutzhose, Handschuhe und Sicherheitsschuhe. Gehörschutz und Schutzbrille Tragen Sie einen Schutzhelm mit integriertem Gehör und Gesichtsschutz. Dieser bietet Schutz vor herabfallenden Ästen und zurückschlagenden Zweigen. Montage des Schultergurts (Abb. 9+10) 1. Benutzen Sie bei der Arbeit immer den Tragegurt und halten Sie das Gerät stets mit beiden Händen an den vorgesehenen Griffen fest. (siehe Abb. 9) Schließen Sie Ihre Finger und Daumen um die Griffe und die Stange. 2. Befestigen Sie den Federhaken an der Schafthalterung des Schafts (Abb.10). 16 Akku Hochentaster Gebrauchsanweisung Tragen Sie den Gurt niemals diagonal über Schulter und Brust sondern nur auf einer Schulter, dadurch können Sie bei Gefahr das Gerät schnell vom Körper entfernen. Schnellspannverschluss (Abb.20) Der Schultergurt ist ausgerüstet mit einem Schnellspannverschluss wie in Abb.20 gezeigt. Positionieren Sie den Schnellspannverschluss (X) auf der Vorderseite des Körpers (Abb.20 C). Öffnen Sie im Notfall den Verschluss um das Gerät schnell vom Körper zu entfernen. Sicheres Arbeiten (Abb ) Um sicheres Arbeiten zu gewährleisten ist ein Arbeitswinkel von max. 60 vorgeschrieben (Abb.13). Nie unter dem zu sägenden Ast stehen. Vorsicht beim Sägen von unter Spannung stehenden Ästen und splitterndem Holz. Mögliche Verletzungsgefahr durch herabfallende Äste und wegschleudernde Holzteile! Wenn die Maschine in Betrieb ist Personen und Tiere aus dem Gefahrenbereich fernhalten. Das Gerät ist beim Berühren von Hochspannungsleitungen nicht gegen Stromschläge geschützt. Halten Sie einen Mindestabstand von 10 m zu stromführenden Leitungen ein. Es besteht Lebensgefahr durch Stromschlag! (Abb.14) Am Hang immer oberhalb oder seitlich zum zu sägenden Ast stehen. Das Gerät so nah wie möglich am Körper halten. So haben Sie die beste Balance. Befreien Sie den Arbeitsbereich vor dem Schneiden von störendem Geäst und Unterholz. Schaffen Sie anschließend einen Rückzugsbereich, fern der Stelle, auf die abgeschnittene Äste fallen können, und entfernen dort alle Hindernisse. Halten Sie den Arbeitsbereich frei, entfernen Sie die abgeschnittenen Äste sofort. Platzieren Sie alle andere Werkzeuge und Geräte in sicherem Abstand von den zu schniedenden Ästen, aber nicht im Rückzugsbereich. Achten Sie auf fallendes Geäst! Gehen Sie sofort zur Seite und halten Sie einen ausreichenden Abstand von dem fallenden Holz, sobald ein geschnittener Ast anfängt abzubrechen. Sägetechniken Halten Sie beim Entasten das Gerät in einem Winkel von maximal 60 zur Waagrechten, um nicht von einem herabfallenden Ast getroffen zu werden. Sägen Sie die unteren Äste am Baum zuerst ab. Dadurch wird ein Herabfallen der geschnittenen Äste erleichtert. Nach Beenden des Schnittes erhöht sich für den Bediener das Gewicht der Säge abrupt, da die Säge nicht mehr auf dem Ast abgestützt ist. Es besteht die Gefahr die Kontrolle über die Säge zu verlieren. Ziehen Sie die Säge nur mit laufender Sägekette aus dem Schnitt. Damit wird ein Festklemmen vermieden.
41 Sägen Sie nicht mit der Spitze des Schwertes. Sägen Sie nicht in den wulstigen Astansatz. Dies verhindert die Wundheilung des Baumes. Kleinere Äste absägen (Abb.15) Legen Sie die Anschlagfläche der Säge am Ast an. Dies vermeidet ruckartige Bewegungen der Säge bei Beginn des Schnittes. Führen Sie die Säge mit leichtem Druck von oben nach unten durch den Ast. Größere und längere Äste absägen (Abb.16) Machen Sie bei größeren Ästen einen Entlastungsschnitt. a) Sägen Sie zuerst mit der Oberseite des Schwertes von unten nach oben 1/3 des Astdurchmessers durch. b) Sägen Sie anschließend mit der Unterseite des Schwertes von oben nach unten auf den ersten Schnitt zu. c) Sägen Sie längere Äste in Abschnitten ab, um eine Kontrolle über den Aufschlagort zu haben. Rückschlag Unter dem Rückschlag versteht man das plötzliche Hoch- und Zurückschlagen der laufenden Kettensäge. Die Ursachen sind meist das Berühren des Werkstücks mit der Schwertspitze oder das Verklemmen der Sägekette. Bei einem Rückschlag treten unvermittelt große Kräfte auf. Daher reagiert die Kettensäge meist unkontrolliert. Die Folge sind oft schwerste Verletzungen beim Arbeiter oder Personen im Umfeld. Die Gefahr eines Rückschlages ist am größten, wenn Sie die Säge im Bereich der Schwertspitze ansetzen, weil dort die Hebelwirkung am stärksten ist. Setzen Sie die Säge daher immer möglichst flach an. Rückschlag vermeiden! (Abb.17) Der Rückschlag kann eintreten, wenn die laufende Sägekette an dem oberen Viertel der Führungsschiene auf ein festes Objekt trifft oder eingeklemmt wird. Hineinziehen! (Abb.18) Wenn die Kette an der Schienenunterseite plötzlich festsitzt, eingeklemmt wird oder auf einen Fremdkörper im Holz trifft, wird die Säge ruckartig vorwärts zum Holz hingezogen. Rückstoß vermeiden! (Abb.19) Der Rückstoß entsteht, wenn die Kette auf der Schienenoberseite plötzlich festsitzt, da sie eingeklemmt wird oder auf einen Fremdkörper im Holz trifft. Die Kette kann die Säge dann ruckartig gegen den Benutzer drücken. Achtung! Achten Sie immer auf die richtige Kettenspannung! Benutzen Sie nur einwandfreie Kettensägen! Arbeiten Sie nur mit einer vorschriftsmäßig geschärften Sägekette! Sägen Sie nie mit der Oberkante oder Spitze des Schwertes! Halten Sie die Kettensäge immer fest mit beiden Händen! Sägen von Holz unter Spannung Das Sägen von Holz, das unter Spannung steht, erfordert besondere Vorsicht! Unter Spannung stehendes Holz, das durch Sägen von der Spannung befreit wird, reagiert bisweilen völlig unkontrolliert. Das kann zu schwersten bis zu tödlichen Verletzungen führen. Solche Arbeiten dürfen nur von ausgebildeten Fachleuten ausgeführt werden. Kontaktieren Sie uns unter 17
42 8. Technische Daten Akku-Hochentaster 8580 (AAS 2420) Betriebsspannung / Leistung 24 V DC / 1,9 Ah / 45,6 Wh Nenndrehzahl 1800 min -1 Schwertlänge 200 mm Schnittlänge ca. 17,5 cm Variable Höheneinstellung von 1,85 m bis 3,15 m Arbeitshöhe bis zu 4,5 m Öltank-Füllmenge 60 ml Gewicht mit Schwert+Kette 3,8 kg Kette 91PJ033X Schwert 080SDEA041 Schalldruck (EN ISO ) 76,6 db(a) K = 2,5 db Schallleistungspegel L WA (EN ISO ) 92 db(a) K = 3 db Vibrationen (EN ISO ) m/s 2 K = 1,5 m/s 2 Netz- / Ladegerät Netzspannung Ladespannung / Ladestrom Ladedauer 230 V~ / 50 Hz 25,9 V DC / 500 ma ca. 3-5 Std. Technische Änderungen bleiben vorbehalten. Angaben zur Geräuschemission gemäß Produktsicherheitsgesetz (ProdSG) bzw. EG-Maschinenrichtlinie: Der Schalldruckpegel am Arbeitsplatz kann 80 db (A) überschreiten. In dem Fall sind Schallschutzmaßnahmen für den Bediener erforderlich (z.b. Tragen eines Gehörschutzes). Tragen Sie einen Gehörschutz. Die Einwirkung von Lärm kann einen Gehörverlust bewirken. Achtung! Der Schwingungswert wird sich aufgrund des Einsatzbereiches des Elektrowerkzeuges ändern und kann in Ausnahmefällen über dem angegebenen Wert liegen. Beschränken Sie die Geräuschentwicklung und Vibration auf ein Minimum! Verwenden Sie nur einwandfreie Geräte. Warten und reinigen Sie das Gerät regelmäßig. Passen Sie Ihre Arbeitsweise dem Gerät an. Überlasten Sie das Gerät nicht. Lassen Sie das Gerät gegebenenfalls überprüfen. Schalten Sie das Gerät aus, wenn es nicht benutzt wird. Tragen Sie Handschuhe. Bitte beachten Sie: Dieses Gerät darf in Wohngebieten nach der deutschen Maschinenlärmschutzverordnung vom September 2002 an Sonn- und Feiertagen sowie an Werktagen von 20:00 Uhr bis 7:00 Uhr nicht in Betrieb genommen werden. Beachten Sie zusätzlich auch die landesrechtlichen Vorschriften zum Lärmschutz! 18 Akku Hochentaster Gebrauchsanweisung
43 Warnung! Die ausgedehnte Nutzung eines Werkzeugs setzt den Nutzer Erschütterungen aus, die zur Weißfingerkrankheit (Raynaud-Syndrom) oder zum Karpaltunnelsyndrom führen können. Dieser Zustand verringert die Fähigkeit der Hand, Temperaturen zu empfinden und zu regulieren, verursacht Taubheit und Hitzeempfindungen und kann zu Nerven- und Kreislaufschäden und Gewebetod führen. Nicht alle Faktoren, die zur Weißfingerkrankheit führen, sind bekannt, aber kaltes Wetter, Rauchen und Krankheiten, die Blutgefäße und den Blutkreislauf betreffen sowie große bzw. lang andauernde Belastung durch Erschütterungen werden als Faktoren in der Entstehung der Weißfingerkrankheit genannt. Beachten Sie Folgendes, um das Risiko der Weißfingerkrankheit und des Karpaltunnelsyndroms zu verringern: Tragen Sie Handschuhe und halten Sie Ihre Hände warm. Warten Sie das Gerät gut. Ein Werkzeug mit lockeren Komponenten oder beschädigten oder abgenutzten Dämpfern neigen zu größerer Vibration. Halten Sie den Griff stets fest, aber umklammern Sie die Handgriffe nicht ständig mit übermäßigem Druck. Machen Sie viele Pausen. Alle oben genannte Vorkehrungen können das Risiko der Weißfingerkrankheit oder des Karpaltunnelsyndrom nicht ausschließen. Langzeit- und regelmäßigen Nutzern wird daher empfohlen, den Zustand Ihrer Hände und Finger genau zu beobachten. Suchen Sie unverzüglich einen Arzt auf, falls eines der obigen Symptome auftauchen sollte. 9. Wartung 9.1 Sägekette und Schwert auswechseln. Das Schwert muss erneuert werden, wenn die Führungsnut des Schwerts abgenutzt ist. das Stirnrad im Schwert beschädigt oder abgenutzt ist. Gehen Sie hierzu wie in Kapitel Montage von Schwert und Sägekette vor! 9.2 Prüfen der automatischen Kettenschmierung Überprüfen Sie regelmäßig die Funktion der automatischen Kettenschmierung, um einer Überhitzung und damit verbundenen Beschädigung von Schwert und Sägekette vorzubeugen. Richten Sie dazu die Schwertspitze gegen eine glatte Oberfläche (Brett, Anschnitt eines Baumes) und lassen Sie die Kettensäge laufen. Wenn sich während dieses Vorgangs eine zunehmende Ölspur zeigt, arbeitet die automatische Kettenschmierung einwandfrei. Zeigt sich keine deutliche Ölspur, lessen Sie bitte die entsprechenden Hinweise im Kapitel Fehlersuche! Wenn auch diese Hinweise nicht helfen, wenden Sie sich an unseren Service oder eine ähnlich qualifizierte Werkstatt. Achtung! Berühren Sie dabei nicht die Oberfläche. Halten Sie einen ausreichenden Sicherheitsabstand (ca. 20 cm) ein. 9.3 Schärfen der Sägekette Ein effektives Arbeiten mit der Kettensäge ist nur möglich, wenn die Sägekette in gutem Zustand und scharf ist. Dadurch verringert sich auch die Gefahr eines Rückschlages. Die Sägekette kann bei jedem Fachhändler nachgeschliffen werden. Versuchen Sie nicht, die Sägekette selbst zu schärfen, wenn Sie nicht über ein geeignetes Werkzeug und die notwendige Erfahrung verfügen. 10. Reinigung und Lagerung Reinigen Sie regelmäßig den Spannmechanismus, indem Sie ihn mit Druckluft ausblasen oder mit einer Bürste säubern. Verwenden Sie keine Werkzeuge zum Reinigen. Halten Sie die Griffe ölfrei, damit Sie immer sicheren Halt haben. Reinigen Sie das Gerät bei Bedarf mit einem feuchten Tuch und gegebenenfalls mit einem milden Spülmittel. Wird die Kettensäge über einen längeren Zeitraum nicht genutzt, so entfernen Sie das Kettenöl aus dem Tank. Legen Sie die Sägekette und das Schwert kurz in ein Ölbad und wickeln Sie es danach in Ölpapier. Achtung! Scharfe Sägekette. Bei Lagerung und transportieren des Gerätes stets die Schutzabdeckung aufziehen. Sichern Sie die Maschine bei Transport, um Beschädigung oder Verletzungen zu vermeiden. Reinigen und Warten Sie das Gerät immer vor Lagerung. Achtung! Bei Transport oder Aufbewahrung der Kettensäge stets die Schutzabdeckung aufziehen. Vor jeder Reinigung Akku entfernen. Tauchen Sie das Gerät zur Reinigung keinesfalls in Wasser oder andere Flüssigkeiten. Bewahren Sie die Kettensäge an einem sicheren und trockenen Platz und außerhalb der Reichweite von Kindern auf. 11. Hinweise zum Umweltschutz / Entsorgung Führen Sie das Gerät einer ordnungsgemäßen Entsorgung zu, wenn es einmal ausgedient hat. Trennen Kontaktieren Sie uns unter 19
44 Sie das Netzkabel ab, um Missbrauch zu vermeiden. Entsorgen Sie das Gerät nicht über den Hausmüll, sondern geben Sie es im Interesse des Umweltschutzes an einer Sammelstelle für Elektrogeräte ab. Ihre zuständige Kommune informiert Sie gerne über Adressen und Öffnungszeiten. Geben Sie auch Verpackungsmaterialien und abgenutzte Zubehörteile an den vorgesehenen Sammelstellen ab. Nur für EU-Länder Werfen Sie Elektrowerkzeuge nicht in den Hausmüll! Gemäß europäischer Richtlinie 2002/96/EG über Elektro- und Elektronik- Altgeräte und Umsetzung in nationales Recht müssen verbrauchte Elektrowerkzeuge getrennt gesammelt werden und einer umweltgerechten Wiederverwertung zugeführt werden. Recycling-Alternative zur Rücksendeaufforderung: Der Eigentümer des Elektrogerätes ist alternativ anstelle Rücksendung zur Mitwirkung bei der sachgerechten Verwertung im Falle der Eigentumsaufgabe verpflichtet. Das Altgerät kann hierfür auch einer Rücknahmestelle überlassen werden, die eine Beseitigung im Sinne der nationalen Kreislaufwirtschafts und Abfallgesetze durchführt. Nicht betroffen sind den Altgeräten beigefügte Zubehörteile und Hilfsmittel ohne Elektrobestandteile. 12. Ersatzteilbestellung Bei der Ersatzteilbestellung sollten folgende Angaben gemacht werden: Typ des Gerätes Artikelnummer des Gerätes 13. Reparaturdienst Reparaturen an Elektrowerkzeugen dürfen nur durch eine Elektro-Fachkraft ausgeführt werden. Bitte beschreiben Sie bei der Einsendung zur Reparatur den von Ihnen festgestellten Fehler. UK Mantis UK Limited Orchard House Hempshaw Lane Stockport Cheshire SK1 4LH Phone Europe Mantis SARL Verbindungsbüro Deutschland Lebacher Straße Saarbrücken Tel Fehlersuche Vorsicht! Vor der Fehlersuche das Gerät ausschalten und den Akku entfernen. Die folgende Tabelle zeigt Fehlersymptome auf und beschreibt wie Sie Abhilfe schaffen können, wenn Ihre Maschine einmal nicht richtig arbeitet. Wenn Sie damit das Problem nicht lokalisieren und beseitigen können, wenden Sie sich an Ihre Service-Werkstatt. Ursache Fehler Abhilfe Kettensäge arbeitet unregelmäßig Externer Wackelkontakt Fachwerkstatt aufsuchen Interner Wackelkontakt Ein-/Ausschalter defekt Fachwerkstatt aufsuchen Fachwerkstatt aufsuchen Sägekette trocken Kein Öl im Tank Öl nachfüllen Entlüftung im Öltankverschluss Öltankverschluss reinigen verstopft Ölausflusskanal verstopft Ölausflusskanal frei machen Kette/Führungsschiene heiß Kein Öl im Tank Öl nachfüllen Entlüftung im Öltankverschluss Öltankverschluss reinigen verstopft Ölausflusskanal verstopft Ölausflusskanal frei machen Kette stumpf Kette nachschleifen oder ersetzen Kettensäge rupft, vibriert oder Kettenspannung zu locker Kettenspannung einstellen sägt nicht richtig Kette stumpf Kette nachschleifen oder ersetzen Kette verschlissen Kette ersetzen Sägezähne zeigen in die falsche Richtung Sägekette neu montieren mit Zähnen in korrekter Richtung 20 Akku Hochentaster Gebrauchsanweisung

45 BESCHRÄNKTE MANTIS-GARANTIE BATTERIEBETRIEBENE PRODUKTE MANTIS gewährt diese beschränkte Garantie auf Material- und Ausführungsmängel für einen Zeitraum von zwei (2) Jahren bei normalem Gebrauch ab dem Datum des Kaufs durch den Erstkäufer. MANTIS verpflichtet sich dazu, alle Teile dieses Produkts, an denen während der Garantiezeit nachweislich Material- oder Ausführungsmängel auftreten, im eigenen Ermessen zu reparieren oder zu ersetzen. Unter die Garantie fallende Reparatur- und Ersatzleistungen werden kostenlos durchgeführt. Alle unter dieser Garantie ersetzten Teile gelten als Teile des Originalprodukts und jede Garantie für die ersetzten Teile erlischt zusammen mit der ursprünglichen Produktgarantie. Wenn Sie der Ansicht sind, dass Ihr batteriebetriebenes MANTIS-Produkt Material- oder Verarbeitungsmängel aufweist, müssen Sie es zusammen mit Ihrem Kaufbeleg (Ihrer Quittung) an MANTIS zurückschicken. Sie sind für alle Abhol- und Zustellkosten verantwortlich; das Produkt muss unter Bezahlung der Portogebühren an uns zurückgesandt werden. MANTIS übernimmt keine Verantwortung für den Fall, dass das Produkt nicht gemäß der im Benutzerhandbuch enthaltenen oder dem Produkt beiliegenden Montage-, Pflege-, Sicherheits- oder Bedienungsanleitung zusammengebaut oder benutzt wurde. Diese beschränkte Garantie deckt keine Schäden oder Defekte aufgrund normalen Verschleißes, einer Nichtdurchführung angemessener und geeigneter Wartungsmaßnahmen, einer Nichtbeachtung der Bedienungsanleitung oder des Benutzerhandbuchs, einer unsachgemäßen Lagerung oder von Unfällen. [Von der Garantie ausgeschlossen sind ferner Ersatzteile und Serviceleistungen im Rahmen der laufenden Wartung.] Diese beschränkte Garantie ist unwirksam, wenn Ihr batteriebetriebenes Mantis-Produkt fahrlässig gehandhabt oder von anderen Personen als einem Vertragshändler oder autorisierten Kundendienstzentrum repariert oder modifiziert wurde. Sie müssen Ihr batteriebetriebenes MANTIS-Produkt durch Beachtung der im Benutzerhandbuch beschriebenen Wartungsverfahren in Stand halten. Diese laufende Wartung durch Sie selbst oder einen Händler erfolgt auf Ihre eigenen Kosten. MANTIS GEWÄHRT KEINE AUSDRÜCKLICHEN ODER STILLSCHWEIGENDEN GARANTIEN ODER ZUSICHERUNGEN AUSSER DENJENIGEN, DIE HIER ENTHALTEN SIND. ES GIBT KEINE ANDEREN GEWÄHRLEISTUNGEN; EINSCHLIESSLICH GEWÄHRLEISTUNGEN DER HAN- DELSÜBLICHEN QUALITÄT UND DER EIGNUNG ZU EINEM BESTIMMTEN ZWECK. ALLE GEWÄHRLEISTUNGEN MIT AUSNAHME DER OBEN BESCHRIEBENEN AUSDRÜCKLICHEN GARANTIE WERDEN AUSDRÜCKLICH ABGELEHNT. DIE DAUER JEGLICHER STILSCHWEI- GENDEN GARANTIE, EINSCHLIESSLICH DER GARANTIE DER HANDELSÜBLICHEN QUA- LITÄT UND DER EIGNUNG ZU EINEM BESTIMMTEN ZWECK, IST AUF DIE DAUER DIESER SCHRIFTLICHEN BESCHRÄNKTEN GARANTIE BESCHRÄNKT. MANTIS LEHNT JEGLICHE HAFTUNG FÜR MITTELBARE, NEBEN- UND/ODER FOLGESCHÄDEN IN VERBINDUNG MIT DER NUTZUNG DER UNTER DIESE GARANTIE FALLENDEN MANTIS PRODUKTE AB. BE- STIMMTE RECHTSPRECHUNGEN GESTATTEN KEINE BESCHRÄNKUNGEN BEZÜGLICH DER DAUER EINER STILLSCHWEIGENDEN GARANTIE UND/ODER SIEUNTERSAGEN DEN AUS- SCHLUSS ODER DIE EINSCHRÄNKUNG MITTELBARER ODER FOLGESCHÄDEN. DIE OBEN GENANNTEN EINSCHRÄNKUNGEN UND AUSSCHLÜSSE TREFFEN DAHER MÖGLICHERWEI- SE NICHT AUF SIE ZU. DURCH DIESE GARANTIE ERHALTEN SIE SPEZIFISCHE RECHTE. SIE BESITZEN DARÜBER HINAUS MÖGLICHERWEISE NOCH WEITERE RECHTE, DIE SICH JE NACH RECHTSPRECHUNG UNTERSCHEIDEN KÖNNEN.
Hair Clipper. User's manual
 Hair Clipper User's manual EN SHP 3301BL / SHP 3302RD SHP 4301BL / SHP 4302RD Prior to using this appliance, please read the user's manual thoroughly, even in cases, when one has already familiarised themselves
Charging base. Trimming head (30mm) on charging stand. Main body unit. On/Off switch. Indicated light. Connecting jack Connecting jack
 on charging stand. Main body unit. On/Off switch. Indicated light. Connecting jack Connecting jack") X Thank you for your purchase. In order to make you more comfortable by using the product, please read this user manual carefully and keep it for future reference. www.dixix.com 1 Trimming head (30mm)
X Thank you for your purchase. In order to make you more comfortable by using the product, please read this user manual carefully and keep it for future reference. www.dixix.com 1 Trimming head (30mm)
Electric Shaver User's manual
 User's manual EN SMS 3011BL / SMS 3012GR SMS 3013RD / SMS 3014TQ Prior to using this appliance, please read the user's manual thoroughly, even in cases, when one has already familiarised themselves with
HAIR AND BEARD. HAIR AND BEARD CLIPPERs. Operation and Safety Notes
 HAIR AND BEARD CLIPPERS 7133016 HAIR AND BEARD CLIPPERs Operation and Safety Notes 6 Before reading, unfold both pages containing illustrations and familiarise yourself with all functions of the device.
28145_HKVAC_IB 9/1/05 10:14 AM Page 1 VACUUM TRIM. Use and Care Guide HKVAC-2000
 28145_HKVAC_IB 9/1/05 10:14 AM Page 1 VACUUM TRIM REVOLUTIONARY TRIMMING TECHNOLOGY Use and Care Guide HKVAC-2000 28145_HKVAC_IB 9/1/05 10:14 AM Page 2 IMPORTANT SAFETY INSTRUCTIONS Read all instructions
GMT180WTPBCSC BEARD/MUSTACHE TRIMMER
 GMT180WTPBCSC BEARD/MUSTACHE TRIMMER Cutter Blades Blade Set TURBO SWITCH ON/OFF SWITCH with lock button Charging Light Indicator Line Cord TWO YEAR LIMITED WARRANTY Conair will repair or replace (at our
GENTLE SKINCARE & HAIR REMOVAL SYSTEM
 YOUR SAFETY & INSTRUCTION MANUAL PLEASE READ CAREFULLY GENTLE SKINCARE & HAIR REMOVAL SYSTEM MODEL C85010 TECHNICAL DATA Description: Skin Care and Hair Removal System Model: C85010 Power Supply: DC 6V
Type Syncro System Smart Logic
 + Type 5493 Syncro System Smart Logic Internet: www.braun.com 5-493-464/01/XII-02 KOR/GB Printed in Germany Syncro A 1 Clean & Charge B 13 14 2 3 4 5 No. 7000 4 15 16 17 18 6 12 7 8 9 10 19 11 2 1 0 4
HAIRCUT KIT. 2 YEAR WARRANTY HC2000 Series USE & CARE MANUAL. To register your product go to PLEASE READ PRIOR TO USE
 HAIRCUT KIT USE & CARE MANUAL PLEASE READ PRIOR TO USE To register your product go to www.remington-products.com.au 2 YEAR WARRANTY HC2000 Series IMPORTANT SAFETY INSTRUCTIONS When using an electric appliance,
Operating Instructions. Model No. ES-LF70. (Household) AC/Rechargeable Shaver. English 17
 AC/Rechargeable Shaver. English 17") Operating Instructions (Household) AC/Rechargeable Shaver Model No. ES-LF70 2 English 17 Before operating this unit, please read these instructions completely and save them for future use. 2 3 4 1 2 3
Operating Instructions (Household) AC/Rechargeable Shaver Model No. ES-LF70 2 English 17 Before operating this unit, please read these instructions completely and save them for future use. 2 3 4 1 2 3
PrecisionCut Hair Clipper
 PrecisionCut Hair Clipper HC5900 Register online for 10,000 prize draw EXTRA year guarantee FREE rewards gallery Visit www.remington.co.uk/productregister You must register within 28 days of purchase.
Operating Instructions
 Operating Instructions (Household) Rechargeable Shaver Model No. ES LF71 Before operating this unit, please read these instructions completely and save them for future use. ES-LF71_AUS.indb 1 2011/02/25
Men's Shaver (Battery / Mains)
") Men's Shaver (Battery / Mains) Instructions for Use English...1 00800-36 4636 00 MODEL: 9113956 PRODUCT CODE: 91628 11/2014 Congratulations! Contents You have made an excellent choice with the purchase
Men's Shaver (Battery / Mains) Instructions for Use English...1 00800-36 4636 00 MODEL: 9113956 PRODUCT CODE: 91628 11/2014 Congratulations! Contents You have made an excellent choice with the purchase
MN250/251 MODELS BEARD/MUSTACHE TRIMMER
 MN250/251 MODELS BEARD/MUSTACHE TRIMMER 1. 2. 3. 11. 4. 6. 9. 1. 3/4" Trimmer Attachment 2. On/Off Switch on Body 3. Battery Compartment 4. Comb Attachment 5. Eyebrow Comb Attachment 6. Comb Attachment
HAIRCUT KIT. 2 YEAR WARRANTY HC1090 Series USE & CARE MANUAL. To register your product go to PLEASE READ PRIOR TO USE
 HAIRCUT KIT USE & CARE MANUAL PLEASE READ PRIOR TO USE To register your product go to www.remington-products.com.au 2 YEAR WARRANTY HC1090 Series IMPORTANT SAFETY INSTRUCTIONS When using electrical appliances,
10,000 prize draw. Register online for FC2000. EXTRA year guarantee FREE rewards gallery
 FC2000 Register online for 10,000 prize draw EXTRA year guarantee FREE rewards gallery Visit www.remington.co.uk/productregister You must register within 28 days of purchase. NORMAL Everyday deep cleansing
10,000 prize draw. Register online for HC5800 HC5600 HC5400. EXTRA year guarantee FREE rewards gallery
 3 HC5800 HC5600 HC5400 Register online for 10,000 prize draw EXTRA year guarantee FREE rewards gallery Visit www.productregister.co.uk/remington. You must register within 28 days of purchase. Thank you
CUTTING EDGE BEARD TRIMMER
 CUTTING EDGE BEARD TRIMMER USE & CARE MANUAL PLEASE READ PRIOR TO USE 2 YEAR WARRANTY MB6025AU IMPORTANT SAFETY INSTRUCTIONS When using electrical appliances, basic precautions should always be observed,
clean off auto select eco normal intensive cartridge full empty
 8795 8795 3 2 1 off start ing 8795 8795 2 STOP 3 4 5 6 7 3 9 1 10 2 3 4 11 12 12 start ing 5 6 off 13 14 7 2 1 15 16 17 8 8795 18 19 8 off 3 2 1 auto sel 1 2 a b c start ing a b c d 9 2 1 off start ing
ULTIMATE HAIRCUT KIT 2 YEAR WARRANTY HC5005AU USE & CARE MANUAL PLEASE READ PRIOR TO USE
 ULTIMATE HAIRCUT KIT USE & CARE MANUAL PLEASE READ PRIOR TO USE 2 YEAR WARRANTY HC5005AU IMPORTANT SAFETY INSTRUCTIONS When using an electric appliance, basic safety precautions should always be observed,
Baldfader Clipper. Baldfader Clipper
 Baldfader Clipper 1 Please read all instructions carefully to familiarize yourself with the Wahl Baldfader Clipper before using. Save these instructions for further reference. For any further assistance
MUSTACHE GROWING A BEARD AND. the manufacturer-to trim your beard and. For the best trimming results, your beard
 ON/OFF SWITCH To operate, simply push slide toward blade; to stop, push slide away from blade. On/Off Switch Turbo Switch Battery Cover TURBO FEATURE This product is equipped with a turbo boost button.
TITANIUM TURBO PRO HAIRCUT KIT
 TITANIUM TURBO PRO HAIRCUT KIT USE & CARE MANUAL PLEASE READ PRIOR TO USE To register your product go to www.remington-products.com.au www.remington.co.nz 2 YEAR WARRANTY HC5800AU IMPORTANT SAFETY INSTRUCTIONS
Model #7650 Instruction Manual Patent Pending
 Model #7650 Instruction Manual Patent Pending IMPORTANT SAFEGUARDS Read all instructions before use and keep for future reference. Use shaver and accessory chargers only for their intended purpose and
Philips Sonicare 2 series Plaque control plus
 Philips Sonicare 2 series Plaque control plus 1 Sonicare 2 series Plaque control plus ENGLISH 6 6 ENGLISH Introduction Congratulations on your purchase and welcome to Philips! To fully benefit from the
5 in1. Hair & Beard Trimmer. with accessories. Instruction Manual V
 5 in1 Hair & Beard Trimmer with accessories Instruction Manual V6-160404 Thank you for purchasing your LloydsPharmacy 5 in 1 Hair & Beard Trimmer. Please read the instruction manual carefully before use.
LA COLLECTION THE COLLECTION
 LA COLLECTION THE COLLECTION 322 323 324 325 326 327 ATTENTION La sûreté de l'appareil n'est garantie qu'en suivant scrupuleusement les instructions. Il est donc nécessaire de les conserver. Isoler l'appareil
i-twin Trim Dual Blade Rechargeable Trimmer
 i-twin Trim Dual Blade Rechargeable Trimmer Model VSM2A SAFETY CAUTIONS WARNING! Polythene bags over the product or packaging may be dangerous. To avoid danger of suffocation, keep away from babies and
Prosonic BS washable clean. trimmer. off. eco. normal. intensive. high. auto select. low. empty. reset
 on ActivePower Prosonic 9795 ing 9795 off reset BS 9795 www.braun.co.jp 2 3 STOP 4 5 6 7 8 9000 Series reset reset on off on off ing 3 4 6 5 1 2 4a 9 8 10 11 12 13 14 15 16 17 7 18 9795 9 10 11 on tr reset
EasyClean 500 series
 EasyClean 500 series 1 EasyClean 500 series English 4 4 English Introduction Congratulations on your purchase and welcome to Philips! To fully benefit from the support that Philips offers, register your
THEFAMILYCLIP TOOL TIPS. for the essential clipping kit for professional family hair cuts VS704A
 THEFAMILYCLIP TOOL TIPS for the essential clipping kit for professional family hair cuts 1 VS704A HEY YOU! TAKE A BOW FINE SIR. THINGS ARE LOOKING UP & YOU VE JUST MADE A QUALITY PURCHASE WITH THIS NEW
CoolTec. CT6cc CT5cc CT4cc CT4s CT3cc CT2cc CT2s. Type 5676
 CoolTec CT6cc CT5cc CT4cc CT4s CT3cc CT2cc CT2s Type 5676 www.braun.com/jp 2 3 4 5 6 CoolTec CoolTec CoolTec CT6cc STOP 7 8 + CoolTec 2 CoolTec 2 1 1 9 10 12 CoolTec CoolTec 2 1 new 14 2 1 15 16 new
Operating Instructions
 Operating Instructions (Household) Rechargeable Beard Trimmer Model No. ER GB37 ER-GB37_ME.indb 1 2013/07/16 13:30:50 2 ER-GB37_ME.indb 2 2013/07/16 13:30:50 Operating Instructions (Household) Rechargeable
Bald Eagle Shavers INSTRUCTION MANUAL
 Bald Eagle Shavers INSTRUCTION MANUAL Bald Eagle Smart B2117 IMPORTANT SAFETY PRECAUTIONS PLEASE READ CAREFULLY BEFORE USING THIS APPLIANCE. Please follow all the precautions listed below for safety and
 Register your product and get support at www.philips.com/welcome HP6522 1 HP6522 EnglisH 6 6 English Introduction Congratulations on your purchase and welcome to Philips! To fully benefit from the support
HQ6990, HQ6970, HQ6950, HQ6920 CHARGE
 HQ6990, HQ6970, HQ6950, HQ690 3 4 5 6 7 CHARGE 8 9 0 3 4 5 6 7 8 9 0 ENGLISH Introduction Congratulations on your purchase and welcome to Philips! To fully benefit from the support that Philips offers,
8-in-1 All Over Grooming Kit
 8-in-1 All Over Grooming Kit Model 7056CU 8-in-1 All Over Grooming Kit The BaByliss For Men 8-in-1 All Over Grooming Kit is a professional grade rechargeable trimmer with 4 interchangeable cutting heads
DURABLADE PRO 5 YEAR WARRANTY MB061AU USE & CARE MANUAL. To register your product go to remington-products.com.au remington.co.nz
 DURABLADE PRO USE & CARE MANUAL PLEASE READ PRIOR TO USE To register your product go to remington-products.com.au remington.co.nz 5 YEAR WARRANTY MB061AU IMPORTANT SAFETY INSTRUCTIONS When using electrical
Acne Treatment USER GUIDE. Includes important safety information. Read all instructions before using device.
 Acne Treatment USER GUIDE Includes important safety information. Read all instructions before using device. The revive Light Therapy Acne Treatment is intended for treatment of acne and inflammation associated
HyperFlex Aqua. 10,000 prize draw. Register online for XR1430 XR1450 XR1470. EXTRA year guarantee FREE rewards gallery
 HyperFlex Aqua XR1430 XR1450 XR1470 Register online for 10,000 prize draw EXTRA year guarantee FREE rewards gallery Visit www.remington.co.uk/productregister. You must register within 28 days of purchase.
PowerSeries Aqua. 10,000 prize draw. Register online for PR1350 PR1370. EXTRA year guarantee FREE rewards gallery
 PowerSeries Aqua PR1350 PR1370 Register online for 10,000 prize draw EXTRA year guarantee FREE rewards gallery Visit www.remington.co.uk/productregister You must register within 28 days of purchase. Thank
TITANIUM ALL-IN-ONE RECHARGEABLE GROOMING SYSTEM
 TITANIUM ALL-IN-ONE RECHARGEABLE GROOMING SYSTEM USE & CARE MANUAL PLEASE READ PRIOR TO USE To register your product go to www.remington-products.com.au 2 YEAR WARRANTY PG6020AU IMPORTANT SAFETY INSTRUCTIONS
YOUR SAFETY & INSTRUCTION MANUAL PLEASE READ CAREFULLY MANICURE GIFT SET MODEL C85004
 YOUR SAFETY & INSTRUCTION MANUAL PLEASE READ CAREFULLY MANICURE GIFT SET MODEL C85004 TECHNICAL DATA Description: Model: Power: Batteries: Manicure Gift Set C85004 DC 3V 2 x AA batteries (Not Supplied)
STUBBLE TRIMMER LITHIUM ION STUBBLE TRIMMER
 LITHIUM ION STUBBLE TRIMMER 1 Please read all instructions carefully to familiarise yourself with your new Wahl Lithium Ion Stubble Trimmer before using. Save these instructions for further reference.
Cordless Ceramic Hair Cutting Set
 Cordless Ceramic Hair Cutting Set Instruction Booklet HC4900 Please read these instructions carefully and retain for future reference. Contents Sunbeam s Safety Precautions 3 Features of your Cordless
Series cc 570 cc. Type on off. min. clean
 Series5 590 cc 570 cc Series 5 sensitive sensitive start cleaning on off low clean Type 5751 www.braun.com/register 3 4 5 7 aning start cle 8 9 2 10 11 Series 5 se ns iti ve washable 1 12 on off 13 low
BLUSH STYLE COLLECTION
 BLUSH STYLE COLLECTION For straight hair that's sleek and shiny USE & CARE MANUAL PLEASE READ PRIOR TO USE To register your product go to www.remington-products.com.au www.remington.co.nz 2 YEAR WARRANTY
Beard Trimmer. 10,000 prize draw. Register online for MB4130. EXTRA year guarantee FREE rewards gallery
 Beard Trimmer MB4130 Register online for 10,000 prize draw EXTRA year guarantee FREE rewards gallery Visit www.remington.co.uk/productregister You must register within 28 days of purchase. Thank you for
Sonic Skincare Cleansing System
 by Sonic Skincare Cleansing System Model 9950U Sonic Skincare Cleansing System A professional skincare cleansing system with gentle sonic technology to thoroughly remove daily impurities without irritation
R3150AU 2 YEAR WARRANTY. Use and Care Instruction Manual PLEASE READ PRIOR TO USE
 R3150AU 2 YEAR WARRANTY Use and Care Instruction Manual PLEASE READ PRIOR TO USE IMPORTANT SAFETY INSTRUCTIONS When using an electric shaver, basic safety precautions should always be observed, including
clean eco normal intensive fix cartridge full empty trim foil replace+cutter empty charge reset Type /00/VI-05
 5649456_8985_KO_CH_S1 Seite 1 Donnerstag, 30. Juni 2005 10:42 10 auto s elect on off 8985 start cle reset foil replace+cutter trim charge 8985 g anin fix Type 5649 www.braun.com/register 5-649-456/00/VI-05
EnglisH introduction general description (Fig. 1) Preparing for use Charging
 Preparing for use Charging") User manual HP6581 1 4 English Introduction Congratulations on your purchase and welcome to Philips! To fully benefit from the support that Philips offers, register your product at www.philips.com/welcome.
User manual HP6581 1 4 English Introduction Congratulations on your purchase and welcome to Philips! To fully benefit from the support that Philips offers, register your product at www.philips.com/welcome.
PROFESSIONAL BEARD TRIMMER
 PROFESSIONAL BEARD TRIMMER USE & CARE MANUAL PLEASE READ PRIOR TO USE To register your product go to www.remington-products.com.au www.remington.co.nz 2 YEAR WARRANTY MB4130AU IMPORTANT SAFETY INSTRUCTIONS
POWER TOOL HAIR CUT KIT
 PROFESSIONAL POWER TOOL HAIR CUT KIT USE & CARE MANUAL PLEASE READ PRIOR TO USE To register your product go to www.remington-products.com.au 5 YEAR WARRANTY HC5851AU IMPORTANT SAFETY INSTRUCTIONS When
Vacuum 5 in 1 Grooming Kit
 Vacuum 5 in 1 Grooming Kit PG6070 Register online for 10,000 prize draw EXTRA year guarantee FREE rewards gallery Visit www.productregister.co.uk/remington. You must register within 28 days of purchase.
Operating Instructions
 SPIN-PULL THREADED INSERT TOOL Operating Instructions Read All Safety Rules and Instructions Carefully Save this manual for Future Reference Complete Seal Kit IMPORTANT SAFETY WARNINGS: THE SAFETY WARNINGS
MAINS CLIPPER CONSUMER MAINS CLIPPER INSTRUCTIONS
 CONSUMER MAINS CLIPPER INSTRUCTIONS 1 Please read all instructions carefully to familiarise yourself with your new Wahl Mains Clipper before using. Save these instructions for further reference. For any
Operating Instructions
 SPIN-PULL THREADED INSERT TOOL Operating Instructions Read All Safety Rules and Instructions Carefully Save this manual for Future Reference IMPORTANT SAFETY WARNINGS: THE SAFETY WARNINGS BELOW CANNOT
POWER PRO GROOMING KIT 2 YEAR WARRANTY USE & CARE MANUAL. To register your product go to remington-products.com.au remington.co.
 POWER PRO GROOMING KIT USE & CARE MANUAL PLEASE READ PRIOR TO USE To register your product go to remington-products.com.au remington.co.nz 2 YEAR WARRANTY HC9000AU IMPORTANT SAFETY INSTRUCTIONS FOR THE
WASHABLE NOSE, EAR & EYEBROW TRIMMER
 WASHABLE NOSE, EAR & EYEBROW TRIMMER USE & CARE MANUAL PLEASE READ PRIOR TO USE 2 YEAR WARRANTY NE3550AU IMPORTANT SAFETY INSTRUCTIONS When using appliances, especially when children are present, basic
LADY SHAVER WASHABLE LS 7140
 LADY SHAVER WASHABLE LS 7140 DE EN ES FR IT SV NO NL PL PT TR EL A B C D G H I E F J K 3 SAFETY Please note the following instructions when using the appliance: 7 This appliance is designed for domestic
Foot and Calf Massager Model Number: FCM1000
 Foot and Calf Massager Model Number: FCM1000 INSTRUCTION MANUAL Welcome Congratulations on choosing to buy a Visage product. All products brought to you by Visage are manufactured to the highest standards
Haircut kit IMPORTANT SAFETY INSTRUCTIONS. DANGER Any appliance is. WARNING To reduce the risk PIECE
 Instructions for Care and Use MODEL HC220DCSC 20 PIECE Haircut kit IMPORTANT SAFETY INSTRUCTIONS When using electrical appliances, especially basic precautions should always be followed, including the
PreShave Power Cleanser
 PreShave Power Cleanser Lift, Exfoliate and Cleanse Instructions for Use & Warranty Information Model ST247 Limited 90 Day Warranty Your Pretika product is warranted to be free from defect in material
Smart Edge / Smart Edge Pro
 Smart Edge / Smart Edge Pro XF8500 XF8700 Register online for 10,000 prize draw EXTRA year guarantee FREE rewards gallery Visit www.productregister.co.uk/remington. You must register within 28 days of
SyncroPro. Type 5492 Type
 7790 7785 7765 3 2 1 automatic lock SyncroPro Type 5492 Type 5493 www.braun.com/register Synchro Pro 7790 Syncro Pro 7790 Syncro Pro 7785 Syncro Pro 7765 7000 3 2 1 automatic lock 3 2 1 automatic lock
Comfort Series Plus/Pro Foil Shaver
 Comfort Series Plus/Pro Foil Shaver PF7400 PF7500 Register online for 10,000 prize draw EXTRA year guarantee FREE rewards gallery Visit www.productregister.co.uk/remington. You must register within 28
Instructions for Use & Warranty Information
 PLUS FOR FULLER, SOFTER SHINY HAIR Model HS262 Instructions for Use & Warranty Information Congratulations and thank you for being a customer of Pretika! Before you start, please take a moment to get to
nail trimmer fast, gentle & stress free
 nail trimmer fast, gentle & stress free INSTRUCTION Manual For Pets with Long Hair It is very important to Keep your Pet s Hair Out of the Way it may be best to put a stocking or sock over the paw, foot
Ultimate Body & Bikini Kit
 Ultimate Body & Bikini Kit USE & CARE MANUAL PLEASE READ PRIOR TO USE To register your product go to remington-products.com.au remington.co.nz WPG4031AU IMPORTANT SAFETY INSTRUCTIONS When using appliances,
Manuel d Instruction. Instruction Manual PONCEUSE DE CLOISONS SÈCHES À MAIN DE 225 MM. 225mm HAND-HELD DRYWALL SANDER.
 UK P2 225mm HAND-HELD DRYWALL SANDER FR P18 PONCEUSE DE CLOISONS SÈCHES À MAIN DE 225 MM Instruction Manual Read instructions before operating this tool. Manuel d Instruction Merci de lire ces instructions
HOT AIR STYLER PROFESSIONAL 2 YEAR WARRANTY AD355 USE & CARE MANUAL. To register your product go to
 PROFESSIONAL HOT AIR STYLER USE & CARE MANUAL PLEASE READ PRIOR TO USE To register your product go to www.remington-products.com.au 2 YEAR WARRANTY AD355 IMPORTANT SAFEGUARDS Warning: When the hot air
ShaveMaster II. Block Ice Shaver Instruction Manual Model #1005. Cincinnati, OH USA. Part No Revised June 1996
 Block Ice Shaver Instruction Manual Model #1005 Part No. 12354 Revised June 1996 Cincinnati, OH 45241-4807 USA SAFETY PRECAUTIONS HOW TO OPERATE THE SHAVEMASTER II MAIN SHAFT Rotates when motor is "ON".
BODY & BIKINI KIT 2 YEAR WARRANTY WPG4020AU USE & CARE MANUAL. To register your product go to PLEASE READ PRIOR TO USE
 BODY & BIKINI KIT USE & CARE MANUAL PLEASE READ PRIOR TO USE To register your product go to www.remington-products.com.au 2 YEAR WARRANTY WPG4020AU IMPORTANT SAFETY INSTRUCTIONS When using electrical appliances,
ELECTRIC SHAVER (CORD/CORDLESS)
") User Manual ELECTRIC SHAVER (CORD/CORDLESS) MANUAL DEVELOPED IN GERMANY myhansecontrol.com User-friendly Manual ID: #05007 QR codes take you where you want to go quickly and easily Whether you require
User Manual ELECTRIC SHAVER (CORD/CORDLESS) MANUAL DEVELOPED IN GERMANY myhansecontrol.com User-friendly Manual ID: #05007 QR codes take you where you want to go quickly and easily Whether you require
AT940, AT893, AT890, AT753, AT752, AT750
 AT940, AT893, AT890, AT753, AT752, AT750 I 1 ENGLISH 6 FRANÇAIS (CANADA) 23 AT940, AT893, AT890, AT753, AT752, AT750 6 ENGLISH Introduction Congratulations on your purchase and welcome to offers, register
Series7. Series 7. trimmer. Series 7. off. sensitive. intensive. clean. high. low. empty. reset
 on Series7-3 & dry fast sensitive off intensive reset www.braun.co.jp 2 3 4 5 6 7 on on sensitive off off intensive reset 8 off Series Series & dry fast sensitive on on reset intensive 9 on sensitive off
LITHIUM ALL-IN-ONE BEARD TRIMMER
 LITHIUM ALL-IN-ONE BEARD TRIMMER USE & CARE MANUAL PLEASE READ PRIOR TO USE To register your product go to remington-products.com.au remington.co.nz 2 YEAR WARRANTY MB6125AU IMPORTANT SAFETY INSTRUCTIONS
PRECISION PERSONAL GROOMER
 PRECISION PERSONAL GROOMER USE & CARE MANUAL PLEASE READ PRIOR TO USE To register your product go to www.remington-products.com.au 2 YEAR WARRANTY PG025AU IMPORTANT SAFETY INSTRUCTIONS When using electrical
EasyClean 500 series
 EasyClean 500 series 1 EasyClean 500 series ENGLISH 4 4 ENGLISH Introduction Congratulations on your purchase and welcome to Philips! To fully benefit from the support that Philips offers, register your
QuickCut Clipper. 10,000 prize draw. Register online for HC4250. EXTRA year guarantee FREE rewards gallery
 QuickCut Clipper HC4250 Register online for 10,000 prize draw EXTRA year guarantee FREE rewards gallery Visit www.remington.co.uk/productregister You must register within 28 days of purchase. Thank you
Metro Cordless haircut
 Metro Cordless haircut Model VS704A IMPORTANT SAFETY INSTRUCTIONS When using electrical appliances, especially when children are present, basic safety instructions should always be followed, including
BEAUTY TRIMMER. 1 YEAR WARRANTY MPT3800 Series USE & CARE MANUAL. To register your product go to
 BEAUTY TRIMMER USE & CARE MANUAL PLEASE READ PRIOR TO USE To register your product go to www.remington-products.com.au 1 YEAR WARRANTY MPT3800 Series IMPORTANT SAFEGUARDS WHEN USING APPLIANCES, ESPECIALLY
DUAL FOIL-X 2 YEAR WARRANTY F3800AU USE & CARE INSTRUCTION MANUAL PLEASE READ PRIOR TO USE
 DUAL FOIL-X USE & CARE INSTRUCTION MANUAL PLEASE READ PRIOR TO USE 2 YEAR WARRANTY F3800AU IMPORTANT SAFETY INSTRUCTIONS When using an electric shaver, basic safety precautions should always be observed,
Series 7. Series7. trimmer. Series 7. off. sensitive. intensive. clean. high. low. empty. reset
 on Series7-3 start ing sensitive intensive reset www.braun.co.jp 2 3 4 5 6 7 on on sensitive intensive reset 8 S start ing sensitive on on reset intensive 9 on sensitive intensive reset 10 charge mid charge
DANGER WARNING IMPORTANT SAFETY INSTRUCTIONS SAVE THESE INSTRUCTIONS READ ALL INSTRUCTIONS BEFORE USING KEEP AWAY FROM WATER
 IMPORTANT SAFETY INSTRUCTIONS When using electrical appliances, especially when children are present, basic safety precautions should always be taken, including the following: READ ALL INSTRUCTIONS BEFORE
S5620, S5600, S5420, S5400, S5380, S5230
 S5620, S5600, S5420, S5400, S5380, S5230 2_002_5832_1_FrontCover_A6_bl.indd 1 11-09-15 11:42 15 1 14 2 3 4 5 6 13 12 11 10 9 8 7 16 18 17 English 5 Introduction Congratulations on your purchase and welcome
THELITHIUMCUT TOOL TIPS. for the lithium powered clipper for professional, at-home hair cutting. VSM7473A
 THELITHIUMCUT TOOL TIPS for the lithium powered clipper for professional, at-home hair cutting. 1 VSM7473A HEY YOU! TAKE A BOW FINE SIR. THINGS ARE LOOKING UP & YOU VE JUST MADE A QUALITY PURCHASE WITH
TITANIUM POWER WET/DRY SHAVER
 TITANIUM POWER WET/DRY SHAVER USE & CARE MANUAL PLEASE READ PRIOR TO USE 2 YEAR WARRANTY PR1347AU IMPORTANT SAFETY INSTRUCTIONS When using electrical appliances, basic precautions should always be observed,
VOLUME PLUS AIR STYLER 2 YEAR WARRANTY AS500AU USE & CARE MANUAL. To register your product go to
 VOLUME PLUS AIR STYLER USE & CARE MANUAL PLEASE READ PRIOR TO USE To register your product go to www.remington-products.com.au www.remington.co.nz 2 YEAR WARRANTY AS500AU IMPORTANT SAFEGUARDS Warning:
DualTrack-X. 10,000 prize draw. Register online for R4150. EXTRA year guarantee FREE rewards gallery
 DualTrack-X R4150 Register online for 10,000 prize draw EXTRA year guarantee FREE rewards gallery Visit www.productregister.co.uk/remington. You must register within 28 days of purchase. Thank you for
X-SYSTEM PRECISION 2 YEAR WARRANTY R3151AU USE & CARE MANUAL. To register your product go to remington-products.com.au remington.co.
 X-SYSTEM PRECISION USE & CARE MANUAL PLEASE READ PRIOR TO USE To register your product go to remington-products.com.au remington.co.nz 2 YEAR WARRANTY R3151AU IMPORTANT SAFETY INSTRUCTIONS When using electrical
SMART EDGE ADVANCED HYBRID SHAVER
 SMART EDGE ADVANCED HYBRID SHAVER USE & CARE MANUAL PLEASE READ PRIOR TO USE To register your product go to www.remington-products.com.au 2 YEAR WARRANTY XF8550AU IMPORTANT SAFETY INSTRUCTIONS When using
PR O ST YL E. Men s Foil Shaver. Model Number: AP Product Number: INSTRUCTION MANUAL. Version 5 - Issued 01/09/15
 PR O ST YL E Men s Foil Shaver Model Number: AP4500 Product Number: 5730 INSTRUCTION MANUAL Version 5 - Issued 0/09/5 Welcome Congratulations on choosing to buy a Visage product. All products brought to
THEBEARDBUDDY TOOL TIPS. for the lithium powered trimmer for your beard & stubble, nose & ears. VSM703A
 THEBEARDBUDDY TOOL TIPS for the lithium powered trimmer for your beard & stubble, nose & ears. VSM703A HEY YOU! TAKE A BOW FINE SIR. THINGS ARE LOOKING UP & YOU VE JUST MADE A QUALITY PURCHASE WITH THIS
FlexCare Series Rechargeable sonic toothbrush
 FlexCare+ 900+ Series Rechargeable sonic toothbrush 1 Sonicare 900+ Series English 4 4 English Introduction Congratulations on your purchase and welcome to Philips! To fully benefit from the support that
600/700. Charger type 3757 Handle type Braun GmbH Frankfurter Straße Kronberg Germany/Allemagne /XI-15 China/GB
 600/700 CN Charger type 3757 Handle type 3756 90622172/XI-15 China/GB Braun GmbH Frankfurter Straße 145 61476 Kronberg Germany/Allemagne Oral r a l A O a B - f B b g c d e 1 f a b c 2 3 4 c 3 e 0 0 s s
BEARD BOSS PRO TRIMMER
 BEARD BOSS PRO TRIMMER USE & CARE MANUAL PLEASE READ PRIOR TO USE To register your product go to www.remington-products.com.au www.remington.co.nz 2 YEAR WARRANTY MB4045AU IMPORTANT SAFETY INSTRUCTIONS
Series7. Series 7. trimmer. Series cc. off. sensitive. intensive. clean. high. low. empty. reset
 on Series7 Series 7 Series 7 760 cc start trimmer sensitive off intensive reset www.braun.co.jp 2 3 4 5 6 reset off on reset on on Series 7 760 cc Series Series Series 7 3 4 Series 7 8 9 start ing 10 5
Beard Trimmer. 10,000 prize draw. Register online for MB4850. EXTRA year guarantee FREE rewards gallery
 Beard Trimmer 5 MB4850 Register online for 10,000 prize draw EXTRA year guarantee FREE rewards gallery Visit www.productregister.co.uk/remington. You must register within 28 days of purchase. Thank you