Roman Battle Sarcophagi: An Analysis of Composition as a Reflection of Changing Imperial Styles and Production
|
|
|
- Elwin McGee
- 6 years ago
- Views:
Transcription
1
2 Roman Battle Sarcophagi: An Analysis of Composition as a Reflection of Changing Imperial Styles and Production A thesis submitted to the Graduate School of the University of Cincinnati in partial fulfillment of the requirements for the degree of Master of Arts in the Department of Classics of the College of Arts and Sciences by Sarah Beal B.A. The Ohio State University May 2014 Committee Chair: B. Burrell, Ph.D.
3 Abstract Roman sarcophagi that show battle scenes were produced in Italy during the Antonine period. These scenes are completely devoid of mythological figures and likely represent real battles from Rome s history, in which Roman soldiers fought wild barbarians. Past scholars, such as Per Gustaf Hamberg and Bernard Andreae, have studied the iconography and compositions of these battle sarcophagi; however, they have yet to be reexamined in light of recent developments in the study of sarcophagus production. This thesis seeks to examine the compositions of Roman battle sarcophagi in order to answer questions about their production. It considers the precedents for such battle scenes, from Classical grave stelai to grand imperial monuments. This study demonstrates how the battle sarcophagi expand upon trends already seen in imperial art of the Antonine period, while incorporating stylistic elements from Hellenistic sculptures. Next, the compositions of the battle scenes are examined, in which the prevalence of specific figural types and groups that are repeated on the full corpus of battle sarcophagi are noted. Many of these figural types are identical to Roman copies of the Attalid victory statues, leading to the argument that the compositions of the Roman battle sarcophagi were inspired not by a single painted prototype, as suggested by Andreae, but instead are the gathered collection of various statuary forms that were applied to a relief. This thesis then discusses various models of production in order to show that the Roman battle sarcophagi support the heterogeneous model developed by Ben Russell. While some workshops were large enough to maintain a stock of completed works to be sold off the shelf, others were much smaller, only creating commissioned works. ii
4 Finally, the figural types on the battle sarcophagi are examined alongside the figural types on sarcophagi that show Amazonomachies. This examination brings to light the similarities between these two sarcophagus types. This thesis argues that these similarities in composition are evidence that a workshop could rough out a generic battle narrative on a sarcophagus, to which finer details could later be applied according to the wishes of the customer in order to transform the scene into either an Amazonomachy or a battle between Romans and barbarians. The figures of Roman soldiers and Amazons in these scenes would have been interchangeable, which suggests complexities in how the Romans viewed these female warriors. iii
5 iv
6 Acknowledgments The completion of this thesis would not have been possible without the support of various individuals. First and foremost, I would like to express my great appreciation to Barbara Burrell for her tireless encouragement. From my first semester at UC, she has inspired me to change the way I approach my research and to ask questions of the material which I never would have imagined on my own. Through our many impromptu brainstorming sessions and her constant enthusiasm for my work and our field, she has provided me with extraordinary guidance for completing this thesis with a smile on my face. I also wish to express my gratitude to Kathleen Lynch, who has always been willing to find time to meet with me and to discuss the more tedious aspects of this thesis. She is a constant model for how to balance scholarship, outreach, and free time, for which I am indebted. Gratitude is also due to my many colleagues who were a constant source of encouragement throughout this process. In particular, I wish to thank Alice Crowe, who was always readily available to bounce around ideas, Simone Agrimonti, who was a constant help with his optimism and Italian language skills, and Carina Moss, who was continually available to listen. A very special thank you goes to Aaron Caffrey and Sylvia Czander, who both found time in their busy schedules to help me with editing. Finally, I wish to thank my family for always supporting my love of Classics. From my sisters who taught me how to dig in the dirt, to my mother who encouraged me to major in Classics in undergrad and my father who inspired my love of travel, they have never questioned my desire to enter this field, for which I am eternally grateful. Thanks also to Chris Kanner, who has endured many months of me talking about sarcophagi and has always at least pretended to be interested. v
7 Table of Contents Chapter 1: Introduction pp. 1-5 Chapter 2: Past Scholarship. pp Sarcophagi in Context Production Roman Battle Sarcophagi Other Battle Scenes Conclusion Chapter 3: Earlier Precedents... pp Athenian Grave Stele Alexander Sarcophagus Altar of Zeus at Pergamon Dedications by Attlid Kings Paintings and Painted Panels Conclusion Chapter 4: Imperial Reliefs.. pp Column of Trajan Great Trajanic Frieze Column of Marcus Aurelius Arch of Septimius Severus Conclusion Chapter 5: Compositions and Iconography... pp Figural Types and Groups Other Trends in Composition Iconography Conclusion vi
8 Chapter 6: Workshops and Production. pp Models of Production Production of Battle Sarcophagi Conclusion Chapter 7: Amazonomachies on Sarcophagi pp Amazonomachies Sculpting Workshops Conclusion Chapter 8: Conclusion.... pp Bibliography pp Catalogue of Roman Battle Sarcophagi pp Images.. pp vii
9 Chapter 1: Introduction The mid-2nd century CE, known as the Antonine period, saw the longstanding Roman burial practice of cremation give way to the rapidly popularized method of inhumation in a sarcophagus. Sarcophagus production and distribution exploded during this period, as evidenced by the sudden prevalence of sarcophagus burials, though there is little consensus as to the reason for this change in practice.1 These marble caskets held a prominent position within Roman burial practices, being displayed during funerals and ultimately placed within the familial tomb. Here the sarcophagus would be regularly visited by the family, at future funerals and during the yearly Parentalia, a nine-day festival held to honor the ancestors. As a result, Roman sarcophagi were elaborately decorated for the conspicuous display of both wealth and highly honored virtues. There were three main types of sarcophagi produced throughout the Roman world, named for where they are believed to have been produced. Attic sarcophagi are decorated on all four sides, and usually conform to a standard size and shape. These sarcophagi present a wide array of scenes, especially stories from mythology, though they sometimes show battles of Greeks fighting against a barbaric enemy. Though these battles may be somewhat historical, they are mythologized by the nudity of all of the figures. Asiatic sarcophagi can be distinguished by the use of columns to frame the scenes, breaking a continuous narrative in individual figures and groupings. These sarcophagi most often depict various mythological figures. Roman sarcophagi are decorated on only three sides, with the fourth side left blank as they were often placed against a wall. The sizes and shapes of these sarcophagi are extremely variable. Roman sarcophagi from this period are decorated with a wide range of motifs, from mythological scenes to biographical 1 For major works on sarcophagi in general, see Die antiken Sarkophagreliefs; Sarkophag-Studien; Koch and Sichtermann 1982; Zanker and Ewald 2004; Elsner and Huskinson 2011; Birk
10 representations of daily life. These biographical scenes almost always feature allegorical figures and are more focused on the repetition of imperial virtues rather than true biography. Much scholarship on Roman sarcophagi has been focused on iconography, such as Die antiken Sarkophagreliefs series, published over the last 100 years, which is organized according to the various iconographic types for all Roman sarcophagi. This and other iconographic studies have allowed for a wider examination of the stylistic and ideological changes that occurred during the imperial period. The Sarkophag-Studien series is similarly centered on iconographic studies, with the exception of the most recent volume by Katharina Meinecke.2 Meinecke s volume is part of a rising trend towards attempting to contextualize sarcophagi, which includes new discussions on sarcophagus placement within the tomb context, production techniques, and the identification of workshops. Further studies have focused on the changing ideologies occurring during the Antonine period, as reflected on the sarcophagi.3 This thesis will focus on Roman sarcophagi that feature a battle between Romans and barbarians on the main front side. This group is distinct in that they represent real Romans fighting in chaotic battles, rather than showing mythologized versions of warfare. Whereas most Roman sarcophagi feature Greek myths or biographical characters interacting with mythological figures, the battle scenes are completely devoid of mythological figures.4 The resulting compositions go beyond the typological representation of virtues found on biographical sarcophagi and instead extend into the realm of historical representations of real battles. Because the group of battle sarcophagi is small, it allows for a closer and more detailed study than may be 2 Meinecke See Hölscher 2003; There is the exception of the few battle sarcophagi which are framed by winged Victories, but these deities do not directly interact with the main action of the scene. 3 2
11 possible with a larger sample set. These battle sarcophagi are worthy of closer examination as they reflect the stylistic trends occurring on imperial art throughout this period, as well as the dominant imperial virtues which were gaining prominence. They are a small and short-lived group, traditionally ranging in date from about CE, with one later example dated to around 220 CE. Only a few of the eighteen sarcophagi included in this study have known findspots, and all of them lack associated finds. As a result, only general findspots can be determined based on the collection history of these objects and their current locations in museums, and further contextualization must rely entirely upon stylistic and compositional considerations. Fortunately, sarcophagi are a widely researched and published medium of Roman art, making it possible to examine stylistic development on a large scale. Of the Roman battle sarcophagi included in this study, most have decoration on the two shorter sides and some have upper friezes; however, this thesis will focus on the main battle scenes alone. The shorter sides of the sarcophagi are here ignored as not all of the sarcophagi have side scenes, and the sides that have been preserved and published are often badly damaged. Additionally, the front scenes on Roman sarcophagi, which are carved in deeper relief than the sides, are the primary scenes. Upper friezes for sarcophagi are problematic, as many of the lids assigned to sarcophagi by private collections and in museums do not belong with their cases. By focusing on the main scenes alone, it is possible to study the battle scenes in greater detail, and the results of this thesis will not be contaminated by the uncertainty of the side and upper reliefs. In addition to lacking mythological figures, these Roman battle sarcophagi always feature Roman soldiers who are dressed in full uniform. This further distinguishes them from Attic battle scenes, which usually feature nude men. The nudity on the Attic sarcophagi serves to elevate the 3
12 battles beyond reality. By contrast, the lack of mythological figures and the clothing of the soldiers suggest that the battles shown on the Roman battle sarcophagi were intended to represent either historical or contemporary battle scenes, fought by real Roman men against a real enemy. Owing to the uniqueness of their depiction, the Roman battle sarcophagi have been discussed in past within the context of general stylistic and iconographic trends, but no one has tried to further contextualize these sarcophagi within growing discussions of production. 5 In this thesis, I will show that by conducting a thorough and comprehensive examination of the compositions of all Roman battle sarcophagi that date from roughly the mid-2 nd to mid-3 rd centuries CE, it is possible to reconstruct the role of these sarcophagi within the greater context of Roman funerary practices, ideologies, and production. In particular I will consider how these sarcophagi reflect the changing imperial values and styles of the period, as well as how their compositions allow us to reconstruct the production process. This thesis will attempt to contextualize the sarcophagi in three ways. First, I will examine the earlier and contemporary precedents for depictions of battles. This will involve a consideration of Classical and Hellenistic Greek monuments and statues. In addition, I will consider the changing artistic styles occurring in imperial monuments throughout the Antonine period. From this examination, I will show how the Roman battle sarcophagi were inspired by Hellenistic statuary groups, which emphasize extreme emotion and dramatic body movements, while at the same time reflecting new innovations of representation that were being explored on imperial reliefs. 5 Such as Hamberg 1945 and Andreae 1956, both to be discussed below. 4
13 Second, I will bring the Roman battle sarcophagi into the recent discussions of sarcophagus production. By examining the various compositional types and figural groups that are found on the battle sarcophagi, I will show how four of the sarcophagi must come from a single workshop, while the others were produced at a wide variety of workshops. The battle sarcophagi therefore support a heterogeneous model of sarcophagus production, in which small workshops and larger workshops capable of supporting a stock of product were working within the same market. Finally, I will turn to the Roman Amazonomachy sarcophagi. 6 These sarcophagi similarly show battles, though these are mythological battles between Greeks and Amazons. The Amazonomachy was a popular motif on Roman sarcophagi throughout the Antonine period and long outlived the battle sarcophagi after the turn of the 3 rd century. Unlike the battle sarcophagi, which show historical battles, the Amazonomachy sarcophagi represent myth. I will show how the compositional groups and figural types used on the Amazonomachy sarcophagi are similar to those on the Roman battle sarcophagi, despite their different intentions. From this evidence, it is possible to reconstruct a model in which a sculpting workshop could rough out the design of a generic battle on a sarcophagus, to which final details could be applied to alter the scene into either a battle between Romans and barbarians or an Amazonomachy. 6 Unfortunately, the Attic Amazon sarcophagi lie beyond the scope of this study, but may provide useful comparanda for future studies. 5
14 Chapter 2: Past Scholarship Sarcophagi in Context The field of sarcophagus studies has long been dominated by iconographic investigations that often ignore the contexts of the sarcophagi, as in Die antiken Sarcophagreliefs series. Nevertheless, there has been a more recent shift towards the study of sarcophagi within their tomb contexts and the sarcophagus trade, a trend that has most recently been undertaken by the Sarkophag-Studien series. In his examination of the burial practices and rituals in ancient Rome, Ian Morris argued that, while cremation was the most popular or possibly even the only burial practice of Rome in the 1st century CE, at some point during the 2nd century CE, inhumation quickly took over as the dominant practice within Rome.7 This is often attributed to the so-called classical revival or Hellenization of Rome, as inhumation had long been considered a lavish eastern practice, and is particularly associated with philhellenic emperors such as Hadrian. In her book on burial customs in 3rd century Rome, Barbara Borg examined the role of a sarcophagus within the specific context of the tomb.8 The tombs themselves took a variety of forms, from simple chambers to more elaborate temple tombs and mausolea. Within these tombs, various niches and arcosolia line the walls to hold cremation urns and sarcophagi. Whereas sarcophagi are often now treated as display pieces, featured prominently in museums, Borg argued that sarcophagi in their original contexts were just one part of a series of decorative choices, from the design of the tomb structure to the painting upon the walls. Sarcophagi could 7 8 Morris 1992, pp See also Koch and Sichtermann 1982, pp Borg 2013, pp
15 either be set up as the primary or secondary feature of the tomb, with some sarcophagi in later periods even being buried in the floor of the tomb and thus remaining invisible despite their lavish decoration.9 The iconography and design were still the most important part of a sarcophagus, even on the invisible sarcophagi, as the box would have been displayed during the funerary procession or the eulogy, with its specific scene intended to express the values of the deceased or of the family.10 Sarcophagi as primary features would often be framed in niches and aediculae or raised on a platform for greater visibility. This was particularly common for nonelite tombs, basic tomb structures that served a wider range of peoples beyond a single family and were therefore frequently visited. The more frequent use of non-elite tombs by multiple families and various users, such as a collegia, allowed the sarcophagi themselves to be more repeatedly viewed. Borg further argued that, especially nearing the 3rd century CE, marble cost more than the labor of the sculptor to carve the sarcophagus, and therefore the size of the sarcophagus became more important than before. As a result, the figures on sarcophagi became larger and the scenes more readable.11 Katharina Meinecke also studied sarcophagi in context in her PhD thesis, which was later expanded into Sarcophagum Posuit.12 Meinecke examined 129 different contexts from the 1st-3rd centuries CE which held 239 sarcophagi. She carefully considered all aspects of these burials, as well as the available information about burial rituals and funerary cults. Ultimately, Meinecke demonstrated that there is no single homogeneous model for sarcophagus burial, supporting Borg s discussion of sarcophagi as primary or secondary features. She further argued that there is no concrete evidence for continued funerary commemoration occurring directly beside the 9 Borg 2013, pp Pearson 1999, pp , Borg 2013, pp Meinecke 2014;
16 sarcophagi. Sarcophagi would still be viewed as more bodies were interred, but this was not the intention of visits to the tomb. According to Meinecke s interpretation, once a sarcophagus was interred, viewing the sarcophagus would have been an unintended result of future burials. Production Due to the deeply personal nature of burial, scholars long believed that sarcophagi were made according to orders placed by consumers. This production-to-order model was questioned by John Ward-Perkins 1980 study of the evidence for marble trade at Nicomedia.13 Citing evidence for mass-production, such as the various sarcophagus shapes that were roughed out at quarries and the standardization of column lengths, Ward-Perkins proposed a sarcophagus industry in which sarcophagi were produced and fully completed, to be held at workshops and sold off the shelf. Ward-Perkins argued that this production-to-stock model would allow families to quickly purchase completed sarcophagi, which was necessary owing to the immediacy of death. More recently, Ben Russell has reexamined sarcophagus production, in an attempt to understand better the organization of the marble trade as it pertains to sarcophagi.14 Russell, responding to the mass-production model brought forth by Ward-Perkins, saw the sarcophagus trade as a complex relationship of supply and demand between the consumer, the marble sculptor, and the quarry. He reconstructed a heterogeneous model of sarcophagus production, in which some workshops were able to maintain a stock of mostly completed sarcophagi, while the Ward-Perkins 1980, pp Russell 2013, pp
17 majority of workshops were small and produced in accordance with consumer demand. These models of production will be discussed in greater detail in Chapter 6. At the beginning of the 20th century, Carl Robert created a system of classification for sarcophagi, separating them into three main categories: decorative, mythological, and biographical.15 Paul Zanker and Bjӧrn Ewald argued that the latter two categories should not be considered to be entirely separate, instead seeing the influences of mythological motifs on historical depictions.16 Accordingly, sarcophagus sculptors, faced with a new challenge of representing not only the heroic side of battle but also the tragedy, turned to mythological scenes as the basis for their depictions. Zanker and Ewald drew numerous pictorial parallels between scenes of heroic deeds, especially boar and lion hunts, and biographical sarcophagi. While these parallels undoubtedly exist in the sarcophagus corpus due to the overwhelming influence of Classical and Hellenistic themes on all Roman art, it is equally beneficial to consider the biographical scenes independently of mythological styles, allowing one to better understand the evolution of biographical scenes within their socio-political context of Antonine art. The battle sarcophagi stand out within this evolution as a short-lived style that captured the stylistic trends and dramatic representations of war found in imperial art from this period. These sarcophagi combine biographical depictions with historical themes. Battle Sarcophagi Two major studies have been done on the battle sarcophagi. The most influential work appears in the 1945 book by Per Gustaf Hamberg titled Studies in Roman Imperial Art.17 In his 15 See Robert Zanker and Ewald (2012, pp ) discussed the history of the study of Roman sarcophagi over the past 100+ years. 16 Zanker and Ewald 2012, pp Hamberg 1945, pp
18 section on Antonine Battle Sarcophagi, Hamberg examined five battle sarcophagi and their role in glorifying the deceased. Without discussing exact dates, Hamberg identified a stylistic transition from the earliest to the latest examples. Beginning with the Ammendola sarcophagus, which Hamberg assigned to the beginning of the reign of Marcus Aurelius, battle scenes were composed of disparate figures that lacked true unity. Later examples, such as the Portonaccio sarcophagus which Hamberg saw as roughly contemporary with the Column of Marcus Aurelius, featured more cohesive scenes. Finally Hamberg recognized the latest iteration of battle sarcophagi that depict what appear to be actual battle tactics, as seen on the Large Villa Doria Pamphili sarcophagus from the turn of the century. He therefore noted a transition, not only from disparate to more cohesive compositions, but also from mythological to more historical representations of battle. This tendency towards greater realism allowed artists to abandon the balance and rhythm of Classical scenes in favor of the forms achieved by the Hellenistic style, characterized by its confused compositions of overlapping and disorganized figures and its explicit presentation of unrestrained emotions. Hamberg identified this shift in style as a direct reflection of a spiritual change born from a greater appreciation for the tragic consequences of frequent war, which allowed the viewer to participate personally in the experience, as seen on the Column of Marcus Aurelius. Similarly, there was a change in the understanding of contemporary history and a new interest in reality that resulted from a continuing threat from Northern peoples. 18 There was ultimately a reversal of this trend by the reign of Septimius Severus, identified by Hamberg on the Large Ludovisi sarcophagus, upon which the depiction of reality was abandoned in favor of a battle trope, an idealistic representation of what war should be. The commander figure on this sarcophagus is placed at the center, surrounded by a series of 18 Hamberg 1945, p
19 assembled yet individual groups that depict an ideal of the enemy. Hamberg was the first to present a holistic examination of this stylistic group and to question its historical and social impact. Both Roman and Attic battle sarcophagi were discussed by Bernard Andreae in his 1956 book, Motivgeschichtliche Untersuchungen zu den römischen Schlachtsarkophagen. Andreae closely examined the sarcophagi and identified various repeated figures and figural groups within the various compositions. Although he catalogued 21 battle sarcophagi, including 4 Attic ones, Andreae chose to focus on four sarcophagi in particular, due to their compositional similarities: the Ammendola (1), the Via Tiburtina (4), the Small Villa Doria Pamphili (3), and the Small Ludovisi (5).19 He examined the figural representations on these sarcophagi in depth, finding similarities in the types of figures used and the artistic methods employed to represent the chaos of battle, as well as identifying parallels for these fighting types and group schemes in Hellenistic art. Andreae, however, found Hellenistic forms, such as the various Attilid sculptures, to be unsatisfying models, owing to small differences in stylistic choice. He argued that, because the sarcophagi were made to order, no stock of sarcophagi would have been available for workshops to copy, and the iconography of each was thus independent.20 The similarities between the various figural types and groups was explained by Andreae as the result of assorted adaptations of some original work of art in an unknown medium, an original that is now impossible to reconstruct with certainty, though he suggested that it may have been a painting by Phyromachos.21 He argued that variations among the figural types on the sarcophagi could be examined in order to understand better how each scene is faithful to or diverges from this 19 Andreae 1956, pp Andreae 1956, pp The various models of production will be discussed at length in Chapter Andreae 1956, p
20 original. Larger groupings of repeated figures would therefore represent a more faithful reproduction of this original work, groupings which were gradually split up over time. He identified these figural types on his four main sarcophagi in particular, citing their acute similarities as the ultimate evidence for the reconstruction of his unknown original. Other Battle Scenes Since the work of Hamberg and Andreae, scholars have failed to provide a comprehensive examination of the battle sarcophagi from the Antonine period as a distinct phenomenon. Battle scenes are discussed more broadly by Tonio Hӧlscher in his 2004 book on The Language of Images in Roman Art. He first examined the use of pathos in Hellenistic depictions of battles, drawing his examples from the Alexander mosaic, the Alexander sarcophagus, the various Attalid statue groups, and the monument of Aemilius Paulus.22 Through this examination, Hӧlscher pointed to the striking similarities between Hellenistic depictions of battle scenes, with their depth, strong pathos, and a mixture of isolated and closely connected images, and the writings of tragic historiographers from the Hellenistic period. Their shared emphasis on graphic clarity [and] the intention to bring the events before one s very eyes 23 was shown to be the result of a mutual desire to present a more subjective understanding of events, whereby the pathos of the defeated could be portrayed without diminishing the glory of the victor. Hӧlscher then traced how Classical and Hellenistic styles were combined in Roman depictions of battles, starting from painted panels carried at triumphs, as described in literary sources, to imperial works such as the Great Trajanic Frieze.24 Roman reliefs tended to combine the Classical tendency towards individual fighting pairs with the Hellenistic use of dense 22 Hӧlscher 2004, pp Hӧlscher 2004, p Hӧlscher 2004, pp
21 compositions, which suggest great depth while at the same time showing explicitly the pathos of the enemy, in order to create scenes that allow the viewer to experience both pity for the defeated and awe for the victor. Hӧlscher pointed to the Roman concept of labor as one of the main driving forces behind the display of true struggle in battle scenes. In a 2003 article, Hӧlscher elaborated on the relationship between these depictions of war and contemporary Roman society.25 He singled out four main aspects: the psychological impact of war, the differentiation between the Roman and the other, the need to legitimize war, and the memorialization of war in order to gain political power. Through the combination of Hellenistic and Classical styles, the Romans were able to present realistic depictions of war to people who would not have had military experience on account of the now professionalized army. This allowed Roman commanders to perpetuate long-standing Roman ideals and further secure their power. Pathos could be shown through Hellenistic stylistic choices, while Classical undertones underlined the importance of the individual within the action. Stine Birk discussed the use of sarcophagi for displaying the virtues of the deceased.26 He examined hunting scenes at length which, despite the presence of allegorical figures, carry interesting parallels to battle sarcophagi. Zanker and Ewald noted how the Romans often chose to use allegories in place of historical scenes on sarcophagi, leading them to consider whether the commander figures on sarcophagi should not be read as allegories for imperial virtue.27 In his book about Attalid statue groups, Andrew Stewart briefly discussed Roman battle sarcophagi and their potential dependence upon these Pergamene dedications for their 25 Hӧlscher 2003, pp Birk 2013, pp Zanker and Ewald 2004, pp
22 inspiration.28 He reexamined Andreae s interpretation of an unknown original upon which the battle scenes were based, but rejected this idea. Stewart argued that, in the case of two similar images, it is impossible to tell if one inspired the other, if both were inspired by a third image, or if each developed independently.29 More recently, Stephan Faust s book examined representations of battles on all media during the Roman imperial period, from the time of Trajan to Septimius Severus.30 In his chapter on battle sarcophagi, Faust recognized a tendency for the Romans to present their enemy as an ideological type, against whom the virtues of the victorious Romans are more pronounced. He discussed the iconography of the enemy in detail, but entirely within the context of general artistic trends throughout this period. Others have used the battle sarcophagi in broader discussions on the depictions of the enemy.31 Conclusion Despite these more recent trends in sarcophagus scholarship towards discussions of context and production, the battle sarcophagi have yet to be revisited. The works of Hamberg, Andreae, and Hӧlscher have been widely accepted and incorporated into discussions of the social history of the Antonine period, and no one has tried to incorporate the battle sarcophagi into discussions of the sarcophagus industry. In this paper, I will reexamine the battle sarcophagi as a comprehensive group. I will reconsider the various evidence for the changing styles in both private and state arts from the time of Trajan to Septimius Severus that is reflected on these complex and chaotic scenes of battle. Next, I will expand upon the compositional studies of 28 Stewart 2004, pp Stewart 2004, pp Faust Bieńkowski (1908) and Ferris (2000) both discuss depictions of the enemy in more general terms, while Krierer (1995) considers the physiognomies of Roman depictions of barbarians
23 Andreae and reexamine his results in light of the more recent understandings of sarcophagus trade and production. Finally, I will conclude that the Roman battle sarcophagi support Russell s heterogeneous model of production. 15
24 Chapter 3: Earlier Precedents for the Battle Sarcophagi In this chapter, I will examine various works of art that are likely to have influenced the style and composition of the battle sarcophagi. The most commonly cited sources for the compositions of these battle scenes are the Alexander sarcophagus, the various monuments and dedications of the Pergamenes, the lost art of Hellenistic and Roman paintings and painted panels, and the sarcophagi which show Amazonomachies. Here I will add to this list grave stelai from 4th century Athens. I will delay a discussion of the Amazon battle scenes until Chapter 7, due to their contemporaneity with the battle sarcophagi and their close compositional parallels that deserve greater examination. Athenian Grave Stelai The Dexileos grave stele from early 4th century BCE Athens features a horseman with his right arm swinging behind him, his body turned to the viewer and his cloak billowing behind him [fig. 1].32 His focus is directed intently downwards towards his target, a nude man who kneels before him, his arms raised in defense. The two figures both have somber expressions and idealized faces and bodies, as is expected for the Classical style. Their bodies twist in such a way that emphasizes the frontality of the figures, drawing the viewer in to watch the action and at the same time distancing the viewer as a mere spectator of that action rather than a participant: this is not a realistic representation of a battle, but a theatrical performance of Greek victory. Though the bodies of the men and horse are intertwined, their limbs overlapping to create the idea of depth, the two men are positioned awkwardly in relation to one another, in reality functioning on the same plane while conceptually facing off. With his eyes closed, the defeated figure does not 32 Eliopoulos 2009, pp , fig. 16, with full bibliography. 16
25 meet the gaze of his adversary. This stele represents a Greek tendency to depict battles as oneon-one conflicts. The deceased is shown as the conqueror who is at once actively involved in the fighting and removed from the drama of the surrounding death. This figure is seen in various forms throughout ancient art. As discussed below, it was borrowed and adapted by the Romans for the Great Trajanic Frieze. Another frequent use of this figural type was for the depiction of hunting scenes. On a round Hadrianic panel on the Arch of Constantine, Hadrian is shown pursuing an animal [fig. 2].33 His body twists so that his torso faces the viewer, and his right arm is raised in triumph as his cloak billows back. He stands out from the scene, the clear focal point of the action. This theme is copied on hunting scenes on sarcophagi of this period.34 Whether a boar hunt or lion hunt, the central figure almost always stands out from the surrounding action, framed by his companions and hunting dogs. He twists his body to be frontal to the viewer and raises his spear to strike. This is not a representation of a real hunt, but a dramatic representation of the central figure s victory over his wild prey. Alexander Sarcophagus Found in the Royal Necropolis of Sidon, the so-called Alexander Sarcophagus probably held the burial of a king from the mid to late 4th century BCE [fig. 3].35 All four sides of the sarcophagus are sculpted, with one long side and one short side showing hunting scenes, and the other two showing battles between Greeks and Persians. The long battle scene is believed to represent the battle in 333 BCE between Alexander s men and the Achaemenid king Darius III, known as the Battle of Issos. This was the major turning point for Alexander s conquest of the 33 Ferris 2013, pp , fig. 16. For the full corpus of hunting scenes on sarcophagi, see ASR I For the identification of the owner as Mazaeus, satrap of Babylon, see Heckel 2006 (with most recent bibliography); see also Johannes 1970; Pasinli
26 Persians. This battle scene is centered on a Greek horseman, who twists and raises his sword to strike a Persian who kneels behind him.36 Two other Greek horsemen frame the scene, each raising his right arm to strike. The man on the far left is identified as Alexander, recognizable because he wears the lion skin headdress of Hercules. The bottom of the scene is dominated by the falling and dying bodies of various Persian soldiers, as well as the occasional Greek. One Persian on the left of the scene tries to defend himself from the oncoming attack of a Greek as his horse falls headlong to the ground.37 A fighting pair to the right of the central horseman features a Persian horseman, whose right arm is raised to almost cover his face as he prepares to strike a nude Greek who stands to face him, stretching to fill the full height of the scene [fig. 3a].38 The two figures almost directly face one another, creating a realistic representation of their actual special relationship. The sarcophagus is notable for the use of extremely high relief, which allowed the sculptor to create a greater sense of three-dimensionality, almost as if the scene were composed of separate statues, joined to create a cohesive frieze. This effect is further aided by the way the various figures twist through the space. While many stand frontal to the viewer, the few who turn towards the back or side of the scene invite the viewer to become an active part of the action that is occurring. This use of deep relief and twisting bodies to create a more threedimensional conception of space is similarly prominent on the battle sarcophagi. The Altar of Zeus at Pergamon This interest in drama which will play such a large role in the battle sarcophagus scenes is featured prominently on the Altar of Zeus at Pergamon.39 This 2nd century BCE altar is decorated 36 Pasinli 1997, pp Pasinli 1997, p Pasinli 1997, pp. 22, For a discussion on the altar s date, reconstruction, and function, see Stewart 2000, pp See also Prignitz 2008, with most complete bibliography
27 with a frieze depicting the gigantomachy. The altar, now housed in Berlin, is carved in extremely deep relief. The entire frieze features various gods and giants, and a great deal of scholarship has been devoted to identifying and naming these figures. For the battle sarcophagi, the frieze is significant as a model for the representation of a dramatic battle. In the scene showing Athena battling a giant, usually identified as Alcyoneus, the goddess grasps the wild hair of the giant kneeling before her [fig. 4]. 40 The giant reaches up, trying to push Athena s hand away. His head is bent back awkwardly by her grasp. The giant s fate is etched on his face: his deep-set eyes turn upwards and his mouth falls agape, clearly indicating his inevitable suffering. 41 A similar scene shows one of the Moirai grasping the hair of a giant with snaky legs [fig. 5]. 42 As the goddess raises her right arm to strike her foe, her eyes lock with his. The giant tries to push her away, and while the goddess face shows her calm determination, the giant s eyes are wide and his mouth is open, showing his wild and unrestrained fear. This scene is repeated throughout the altar and will be extremely common on the battle sarcophagi, to be discussed below. Similarly repeated is the juxtaposition between the control shown by the deities and the barbaric loss of control shown by the giants, as well as a tendency for the figures to be frontal, rendering the confusion of the battle as almost two-dimensional. The figures do not twist and turn throughout the space, but instead function on a single plane. The effect is to glorify the victory of the gods and goddesses while underlining the defeat of the giants. Though the action is implicit, the outcome is made explicit. Everything on the frieze occurs along a single ground line, with the giants often occupying the lower half of the space and the gods and goddesses standing over their victims. This is clear on 40 Schmidt 1962, pl. 10. A similar composition can be found on the scene showing Zeus, in Schmidt 1962, pl. 8. See also Pollitt 1986, pp For a detail of his face, see Schmidt 1962, pl Schmidt 1962, pl
28 the east frieze panel showing Leto and Apollo fighting Tityos and Ephialtes, respectively [fig. 6]. 43 The victorious deities stand tall over the collapsing bodies of their defeated opponents. This frontality and division of space has its exceptions, as seen on a panel on the south frieze which shows Artemis and Hecate each fighting a giant [fig. 7]. 44 Artemis strides to the left towards her opponent, her left leg crossing before her right and her body twisting. Her giant opponent, usually identified at Otos, maintains a similar stance. He strides to the right, his right leg crossing before his left, and his chest turned towards Artemis. This scene abandons the rigid frontal poses found elsewhere on the altar in favor of creating this intimate face-to-face moment in the battle. The motion of the figures is not implied but is instead explicitly shown. To the left of this pair, Hecate raises her weapon against Klyteios. Hecate stands to the right of her opponent, but she stands with her back towards the viewer, her right arm raised high to strike. Her head, which faces left towards her opponent, anticipates her movement, as does her left foot which barely touches the ground. This is not a simple attack, but a powerful one, for which the goddess will use the full force of her body weight as she untwists and lunges towards her enemy. These two pairs of figures abandon frontal poses in favor of a more active scene. Their combats are not decided, but instead unfold before the eyes of the viewer, allowing the viewer to fill in the missing parts and to anticipate the outcome. The sculptor here shows a single moment of the battle, rendering the outcome subordinate to the action. This focus on action is also a key feature on the battle sarcophagi. Dedications by Attalid Kings 43 Schmidt 1962, pls Schmidt 1962, pl
29 Other sculptures depicting battle and its aftermath are believed to have been set up by the Attalids in commemoration of their victories against the Galatians. 45 The Lesser Attalid Group, perhaps erected at the foot of the Akropolis in Athens, featured the dead and dying enemies from four famous Greek battles: Giants, Amazons, Persians, and Galatians [fig. 8]. 46 Individual figures from the group survive as Roman copies. Each is in a different pose, either lying sprawled upon the ground, collapsing to one side, or struggling to continue the fight. With wild hair and dramatic expressions, the entire group can be categorized by unrestrained, barbaric emotion. No statues of victors have been found that may belong to this group, suggesting that the goal of the statues was to put the viewer in the place of the victor. By walking among these various statues, the viewer would feel as though they were walking through the battlefield, looking down upon the falling enemy, and thus gaining a better appreciation for the glory of a victory over such brave and noble foes. 47 Other statues erected by the Attalids include various representations of Galatians. The most famous of these is the Dying Gaul, a figure which shows a Galatian trumpeter sitting upon the ground and collapsing over to his right side [fig. 9]. 48 His expression is downcast and somber, and blood can be seen spurting from a wound on his chest. Other Galatian representations include the Venice Falling Gaul, 49 the Kneeling Gaul, 50 the Dead Gaul, 51 and the 45 For the dating of these statues to the 2 nd century BCE, see Stewart 2000, pp Museo Archeologico Nazionale di Napoli inv Pollitt 1986, pp , figs ; Cain and Rieckhoff 2002, pp , cat (with full bibliography); Stewart 2004, pp. 1-10, fig See the discussion in Pollitt 1986, pp A Roman copy of a Greek original, dated to ca BCE. It is now held in the Capitoline Museum in Rome (inv. 747). See image in Cain and Rieckhoff 2002, pp , Cat. 145 (with full bibliography); Stewart 2004, p. 14, fig Venice Museo Archeologico inv. 55; Müller 2002, pp , cat. 149 (with full bibliography); Stewart 2004, p. 2, fig. 2; p. 7, fig. 17; pp , figs Venice Museo Archeologico inv. 57; Müller 2002, pp , cat. 147 (with full bibliography); Stewart 2004, p. 2, fig. 2; p. 7, fig. 16; pp , figs Venice Museo Archeologico inv. 56; Müller 2002, pp , cat. 146 (with full bibliography); Stewart 2004, p. 2, fig. 2; p. 6, fig. 12; p. 9, fig. 20; pp , figs
30 Ludovisi Gaul, who, having killed his wife, turns the sword on himself [figs ]. 52 All of these statues are characterized by wild hair and mustaches, typical features of a Galatian. Many wear torques around their necks, but the Kneeling Gaul wears a tunic, loosely tied on his right hip, and the Ludovisi Gaul wears a cape. Each has his mouth open, and the Kneeling, Falling, and Ludovisi Gauls all look up with wide eyes. Other statue types may be added to this group, including two equestrian statues of Amazons: the Amazon who falls from her horse [fig. 14] 53 and the Amazon fighting a Gaul [fig. 15]. 54 The bodies of these figures twist through space, requiring the viewer to circle the sculpture in order to take in every angle. By playing with the poses of the Galatians and the various angles of the bodies, the sculptor creates an interactive sculpture that is more true to actual human movements. These bodies show the tension of the muscles as they fall and strain to continue fighting, but their limbs flail in every direction, further emphasizing their lack of restraint. The Ludovisi Gaul, who stands in a strong and determined manner as he plunges his own sword into his chest, is an exception to this pattern. He shows a great deal of restraint and power, which stands in contrast with the wildness of his hair and his desperate action. Because of the way this figure twists through space, it is impossible to fully appreciate his bold stance and tragic circumstance without viewing him from every angle. The figural types of the various Attalid statues of Galatians were frequently copied by the Romans. These Roman copies have been studied by Andrew Stewart, who dates them stylistically to the early 2 nd century CE. 55 Stewart cited the uniqueness of these statuary types as 52 A Roman copy of a Greek original, dated to ca BCE. Palazzo Altemps inv. 8608, pp Cain and Rieckhoff 2002, pp , cat. 144 (with full bibliography); Stewart 2004, p. 15, fig Farnese Collection inv. 6405; Stewart 2004, p. 61, fig Museo Nazionale Romano inv ; Stewart 2004, p. 67, fig. 85. There are other statues as well that are worthy of recognition, including other dying Persians and Gauls. For a more comprehensive examination of this entire group of statues, as well as their influence of Roman and Renaissance art, see Stewart This statue will be discussed at length below. 55 Stewart 2004, pp
31 evidence that they must have been imperial commissions, a point that is supported by the lack of private dedications made during the reigns of Trajan and Hadrian. 56 Because the statues are not weathered, Stewart argued that they must have been displayed indoors, while their threedimensionality suggests that they were freestanding and not placed within niches. Stewart proposed that the statues may have been held in either a portico or bath built by Hadrian in the Campus Martius. Regardless of the where exactly these statues were displayed, they were clearly public works that would have been readily viewable by the Roman people. Owing to their distinct similarities to the Roman battle sarcophagi, these copies of Attalid statues were probably the inspiration for the figures found on the battle sarcophagi, as discussed below. In addition to intentionally imitating the figures from these sculptures, the battle sarcophagi effectively capture the essence of these depictions. The Attalid statues of Galatians are certainly realistic representations of a fearsome enemy, but they are also pieces that encourage the active engagement of the viewer, who can only truly appreciate the statutes by examining them from all angles, looking down onto the face of the falling men and Amazons, and assuming the role of the victor. As we will see, the battle sarcophagi foster this same level of participation from the viewer. Though the medium is relief rather than a free-standing statue, the figures move as though the space were three-dimensional. Unlike on the Altar of Zeus at Pergamon, where the figures move wildly within the frieze, giving the idea of more complex actions while still maintaining a forced frontality, the figures on the battle sarcophagi move into and project out of the space, creating ringed compositions that pull the viewer in, forcing them to become not just an observer of the chaos, but an active participant within it. 56 Stewart 2004, pp
32 Paintings and Painted Panels Painting, an art form of antiquity that is now almost entirely lost, is often credited as the main source of inspiration for the style of the Roman battle sarcophagi.57 One of the few examples of Hellenistic paintings is preserved for us in a Pompeiian mosaic that is believed to have copied a painted original. This Alexander Mosaic features the decisive battle between Alexander the Great and King Darius III at the Battle of Issos [fig. 16].58 The mosaic features the moment of Darius flight, as the inevitable victor Alexander charges forward with an expression of calm determination. The young king sits on his horse and twists to open his chest to the viewer, though his gaze is fixed on Darius. The scene is filled with figures, who fight, flee, and fall to the ground. No space is left blank within the main action, although the top portion is rather empty except for spears. The battle is divided into two distinct armies: Alexander and his men on the left, the Persians on the right. This is the moment when the two sides first clash and at the same time the moment when the Persians flee. What is not shown is the actual action of the battle in the present tense, but instead the idea of the battle, of what has happened and what will happen in future. Though the artist of this mosaic or painting plays with three-dimensionality, as evidenced by the many horses foreshortened from the back, the figures in the front of the scene are positioned frontally. It is clear from the movement of his horses and the surrounding men that Darius is fleeing from Alexander, but he actually turns and reaches towards Alexander. Similar to Athena and her giant foe on the Altar of Zeus, the two men face frontally, creating the idea of a battle without necessarily showing the reality of their special relationship. 57 See Rodenwaldt 1921; Hamberg 1945; Andreae 1956; Beard 2007, pp ; Ferris 2009; Beckmann 2011, pp Cohen 1997 (with full bibliography). 24
33 Another lost form of painting from the Roman world survives only through literary sources. During a triumph, painted panels were carried through the city in order to illustrate for the Roman crowds the places and peoples important to the campaign. Pliny mentions these painted panels twice. His first mention is in reference to M. Valerius Maximus Messala, who is said to have been the first Roman to display a tabula in Rome, upon which was depicted his defeat of the Carthaginians in Sicily.59 There is no mention of the design of this panel or the artist. Pliny later mentions two tabulae set up by Augustus in celebration, which depicted War and Triumph.60 It is unclear what exactly this depiction of war may have been, whether it was a painting of a battle or a personification. Josephus, in writing about the Jewish Wars, also mentions the practice of carrying painted panels throughout the city. He provides a more extensive description of the scenes shown on these panels: θαῦμα δ ἐν τοῖς μάλιστα παρεῖχεν ἡ τῶν φερομένων πηγμάτων κατασκευή καὶ γὰρ διὰ μέγεθος ἦν δεῖσαι τῷ βεβαίῳ τῆς φορᾶς ἀπιστήσαντα, τριώροφα γὰρ αὐτῶν πολλὰ καὶ τετρώροφα πεποίητο, καὶ τῇ πολυτελείᾳ τῇ περὶ τὴν κατασκευὴν ἦν ἡσθῆναι μετ ἐκπλήξεως. καὶ γὰρ ὑφάσματα πολλοῖς διάχρυσα περιβέβλητο, καὶ χρυσὸς καὶ ἐλέφας οὐκ ἀποίητος πᾶσι περιεπεπήγει. διὰ πολλῶν δὲ μιμημάτων ὁ πόλεμος ἄλλος εἰς ἄλλα μεμερισμένος ἐναργεστάτην ὄψιν αὑτοῦ παρεῖχεν ἦν γὰρ ὁρᾶν χώραν μὲν εὐδαίμονα δῃουμένην, ὅλας δὲ φάλαγγας κτεινομένας πολεμίων, καὶ τοὺς μὲν φεύγοντας τοὺς δ εἰς αἰχμαλωσίαν ἀγομένους, τείχη δ ὑπερβάλλοντα μεγέθει μηχαναῖς ἐρειπόμενα καὶ φρουρίων ἁλισκομένας ὀχυρότητας καὶ πόλεων πολυανθρώπους περιβόλους κατ ἄκρας ἐχομένους, καὶ στρατιὰν ἔνδον τειχῶν εἰσχεομένην, καὶ πάντα φόνου πλήθοντα τόπον, καὶ τῶν ἀδυνάτων χεῖρας ἀνταίρειν ἱκεσίας, πῦρ τε ἐνιέμενον ἱεροῖς καὶ κατασκαφὰς οἴκων ἐπὶ τοῖς δεσπόταις, καὶ μετὰ 59 Pliny NH 35.7: dignatio autem praecipua Romae increvit, ut existimo, a M'. Valerio Maximo Messala, qui princeps tabulam [picturam] proelii, quo Carthaginienses et Hieronem in Sicilia vicerat, proposuit in latere curiae Hostiliae anno ab urbe condita CCCCXC. But, as I believe, the particular esteem of painting at Rome grew thanks to M. Valerius Maximus Messala, who, in the year of the city 490, first displayed a tabula upon the side of the Curia Hostilia, where he had defeated the Carthaginians and Hieron in Sicily (translated by the author). 60 Pliny NH 35.10: super omnes divus Augustus in foro suo celeberrima in parte posuit tabulas duas, quae Belli faciem pictam habent et Triumphum, item Castores ac Victoriam. Above all others, Divus Augustus placed two tabulae in the most celebrated part of his forum, which had a painted depiction of War and Triumph, also one showing Castor and Pollux and Victory (translated by the author). 25
34 πολλὴν ἐρημίαν καὶ κατήφειαν ποταμοὺς ῥέοντας οὐκ ἐπὶ γῆν γεωργουμένην, οὐδὲ ποτὸν3 ἀνθρώποις ἢ βοσκήμασιν ἀλλὰ διὰ τῆς ἔτι πανταχόθεν φλεγομένης ταῦτα γὰρ Ἰουδαῖοι πεισομένους αὑτοὺς τῷ πολέμῳ παρέδοσαν. ἡ τέχνη δὲ καὶ τῶν κατασκευασμάτων ἡ μεγαλουργία τοῖς οὐκ ἰδοῦσι γινόμενα τότ ἐδείκνυεν ὡς παροῦσι. Josephus Jewish Wars 7.5 But nothing in the procession excited so much astonishment as the structure of the moving stages; indeed, their massiveness afforded ground for alarm and misgiving as to their stability, many of them being three or four stories high, while the magnificence of the fabric was a source at once of delight and amazement. For many were enveloped in tapestries interwoven with gold, and all had a framework of gold and wrought ivory. The war was shown by numerous representations, in separate sections, affording a very vivid picture of its episodes. Here was to be seen a prosperous country devastated, there whole battalions of the enemy slaughtered; here a party in flight, there others led into captivity; walls of surpassing compass demolished by engines, strong fortresses overpowered, cities with well-manned defenses completely mastered and an army pouring within the ramparts, an area all deluged with blood, the hands of those incapable of resistance raised in supplication, temples set on fire, houses pulled down over their owners heads, and, after general desolation and woe, rivers flowing, not over a cultivated land, nor supplying drink to man and beast, but across a country still on every side in flames. For to such sufferings were the Jews destined when they plunged into the war; and the art and magnificent workmanship of these structures now portrayed the incidents to those who had not witnessed them, as though they were happening before their eyes.61 This description brings forth two important considerations. The first is that these painted panels clearly showed actual battles. Josephus describes the devastation of cities and countrysides alike, the deaths of countless enemies, and the siege of cities. His description of battalions being slaughtered and the enemy fleeing from the battle has interesting parallels with many of the depictions seen on the battle sarcophagi. But he also stresses that these scenes show more than just men fighting in battle; they show constructions of forts and city walls, as well as rivers and lands that would have been completely unknown to the average Roman. Thus the panels served a double purpose, showing to the people what the soldiers had endured and the exotic lands to which they had travelled. 61 Translation by H. Thackeray
35 These descriptions of triumphal paintings do not explain how the battles were depicted. It is therefore difficult to claim, as many scholars have done, that the lost art of Hellenistic and Roman painting was the inspiration for the battle sarcophagi.62 Indeed the focus of these paintings, and the trends seen on all other wall paintings from the Roman period,63 seems to have been upon the representation of landscapes, something that is entirely lacking from the battle sarcophagi.64 There is also an issue of switching between media, as painting cannot be directly translated onto a relief. More recently, this passage by Josephus has been reexamined. Ida Ӧstenberg presented an alternative interpretation for these triumphal displays, arguing that rather than painted panels, these were stages that held either actors or statues.65 Ӧstenberg based her interpretation on the observation that the tabulae mentioned by various sources are only ever described as being set up alongside famous buildings.66 Such paintings would have been complex, requiring the viewer to linger for a while upon the image being presented, something that would have been unachievable were they carried in a triumphal procession. Additionally, the two-dimensional nature of a painted panel would not have been practical during a procession, with spectators on all sides.67 In his description, Josephus describes these displays as separate scenes of various events, presented in an easily comprehended manner and presented upon stages. Ӧstenberg interpreted this as evidence that these stages must have held either actors, reenacting particular moments of battle, or statues positioned as though in battle. She also noted that Josephus description of such scenes focused on 62 Rodenwaldt 1921; Hamberg 1945; Andreae 1956; Beard 2007, pp ; Ferris 2009; Beckmann 2011, pp Picard 1968; Ling Hamberg (1945, p. 175) also questioned the assumption that Hellenistic painting inspired these scenes. 65 Ӧstenberg 2009, pp Ӧstenberg 2009, pp Ӧstenberg 2009, p
36 the enemy and the disastrous consequences of war rather than on the triumphal Romans.68 If her interpretation of Josephus is correct, and these triumphal displays featured statues, then they may have taken a form similar to the statues of the Attalid dedications, which focused on the conquered in order to position the viewer in the place of the victor. Conclusion Through this examination of various art forms from the Hellenistic and Roman periods, a number of trends come forward that may have directly impacted the compositions of the Roman battle sarcophagi. The depiction of the deceased upon horseback with his cloak billowing behind him as he prepares to strike is a trope that dates back to the Classical period, and was continued through various artistic forms, most predominately in hunting scenes. The art of the Pergamenes was dominated by dramatic emotion on the faces of the enemy and a strong sense of threedimensionality, which required the viewer to become an active part of the composition. The various figural types discussed among these Attalid dedications and upon the Altar of Zeus and Alexander Sarcophagus will be shown in Chapter 5 to be direct models for the various figural types on the battle sarcophagi. Finally, the limited evidence of Roman painting that we have available suggests that this artistic form was dominated by landscapes, a feature which is completely absent on the battle sarcophagi. It is therefore difficult to consider these paintings to be the direct inspiration for the battle scenes. If Ida Ӧstenberg is correct to reconstruct the triumphal displays as stages carrying statues, then this may strengthen the connection between the Attalid statues and the battles depicted on sarcophagi. 68 Ӧstenberg 2009, pp
37 Chapter 4: Imperial Reliefs from Trajan to Septimius Severus Gerhart Rodenwaldt was the first to recognize that the evolution of various motifs and stylistic trends found in imperial art of the late Antonine period is represented on the battle sarcophagi from the same period.69 In this chapter, I will consider the battle scenes depicted on four imperial monuments: the Column of Trajan, the Great Trajanic Frieze, the Column of Marcus Aurelius, and the Arch of Septimius Severus. In particular, I will consider the evolution of the depiction of battles on these imperial monuments in order to better understand these representational trends as they appear on the battle sarcophagi. Column of Trajan The Column of Trajan was built after Trajan s victory in the Dacian Wars and dedicated in 113 CE.70 Revolutionary for its conceptual treatment of space, which combined lateral and bird s-eye views, the 30 meter high column is decorated with a spiraling frieze. Depicted on this frieze is a wide array of scenes from the two Dacian wars that were fought between CE. The narrative scenes are continuous, with different episodes separated by trees or the changing direction of the figures. Battles scenes are relatively rare on the column, with the majority of scenes showing everyday activities such as camp construction, imperial addresses, marches, and public sacrifices. Trajan appears 59 times in the frieze, but never in a battle. As noted by Fabio Coarelli, this is both a realistic representation of the emperor s role on a campaign, as well as a symbolic representation of the might of the emperor as the driving force behind the operation, 69 Rodenwaldt His understanding is discussed by Martin Beckmann (2011, pp ). See Cichorius 1927; Rossi 1971; Brilliant 1984, pp ; Lepper and Frere 1988; Coarelli 2000, Faust 2012, pp (with the most complete bibliography)
38 who is both calm and contemplative despite the surrounding disorder. 71 The war is won not by brute force, but through Trajan s superior technical and bureaucratic abilities. There are distinct trends in the depiction of battle scenes on the Column of Trajan, including a strong division of space between the two opposing sides and the use of multiple ground lines. In scenes XXIV-XXV, Roman soldiers, some on horseback and others on foot, are shown with their right arms raised, presumably holding spears [fig. 17]. 72 These Romans cluster in a group on the left side of the scene, charging right as a single mass. From the right of the scene, the Dacians charge towards the oncoming enemy with their swords similarly raised. These men gather into three separate groups, all on a lower ground level than their Roman opponents. Because the narrative on the column as a whole moves up and towards the right, the Romans are clearly in such a position that they will simply roll over the Dacians. The bodies of dead and dying Dacians lie at the bottom of the scene. As this battle scene proceeds, we see the last of the barbarian troops, where the dead and injured are being dragged away. The scene then shifts, with Trajan and two of his officers standing up high, overlooking the destruction of a Dacian village to his right with his back turned on the violent battle. A later battle, on scenes XXXVII-XXXIX, shows a surprise attack conducted by the Romans at night [fig. 18]. 73 As before, dead and wounded Dacians are shown at the forefront of the scene. Behind them, the battle rages on. Unlike the previous battle scene, the Dacians largely occupy the left and upper parts of this scene, but the two sides still clash as large blocks of figures, with the wall of barbarians struggling to fight off the wall of Romans. Immediately to the right of this scene, the barbarians are shown surrendering. Though only the Dacians were shown 71 Coarelli 2000, p Coarelli 2000, pp , pls Coarelli 2000, pp , pls
39 injured in the actual battle, the next scene on the frieze, scene XL, depicts Roman soldiers caring for their wounded. 74 Trajan stands to the left with his back turned towards the wounded Romans. In the next battle, scenes XL-XLIII, the Dacians again occupy the upper part of the scene. 75 They are all clustered into a group, and each man holds his right arm raised in an identical pose. The Roman troops, with their backs turned towards the viewer, surround the barbarians. Fallen Dacian bodies lie between their feet. To the right, many Dacians flee the battle, only to be massacred in the woods. Once again, the depiction of battle is followed by the figure of Trajan, who addresses his troops, his back turned towards the action. These depictions of battles emphasize a strong division of space between the two opposing armies, who form masses of fighters, which turns the focus of these scenes upon the impending action, rather than actual combat. As another example of this strong division of space, scene LXIV shows a battle in which the Moorish cavalry on the left rides towards a mass of fleeing and dying Dacians [fig. 19]. 76 Though a few Dacians turn to fight, it is likely that this attack was nothing short of a massacre. This scene is divided into the two opposing sides, with all of the Moors on the left and all of the Dacians on the right. These two masses are completely separated from each other, but this division does not obscure the viewer s understanding of the outcome. Another battle takes place just outside a Roman fortification on scenes XCIV-XCIVII. 77 The Romans, who occupy the upper right of the scene, tower over the Dacians, who raise their shields in defense and flee the battle. The fighting continues on the other side of the Roman fortifications. Here, for the first time, Trajan is shown leading a cavalry charge towards the battle. Trajan stands out from the scene, as no other figures stand directly next to him and his 74 Coarelli pp , pls Coarelli 2000, pp , pls See Coarelli 2000, pp , pls Coarelli 2000, pp , pls
40 figure projects more from the scene than those around him. Adding more emphasis to his significance, he is scaled larger than his horse and practically floats off its back, sitting in what would in reality be an impossible position. He raises his right arm before him, as though signaling to his troops, while his cloak billows out slightly behind him. With his profile view, Trajan s pose on his horse is almost identical to how he is shown in the various adlocutio scenes. Although he is leading the charge, he is not part of the actual battle, just as in the previous scenes when he has his back turned to the action. The emperor is removed from any of the real violence. Perhaps the most dramatic battle scene is found farther along the column in scene CXII [fig. 20].78 Various barbarian bodies and disjointed limbs line the bottom of this scene, and at least three distinct pairs of fighters are visible. In all three instances, a barbarian sits or kneels on the ground and raises his arms in a last, desperate attempt to fight away his Roman assailant, who raises a sword to strike. On the right of the scene, the Roman soldier already brings his sword down upon the barbarian, plunging it into his head. The barbarian reaches up to push away the sword, looking at his foe. This pairing of a standing Roman striking a kneeling barbarian is frequently repeated on the battle sarcophagi, as discussed below. Another interesting figure is a soldier whose identity as a Roman or barbarian is difficult to discern. With his back turned to the viewer, this undeclared soldier raises his sword above his head and twists into the background of the scene. Another barbarian figure faces this man in a similar fashion. The pose of the turning man matches that of the Ludovisi Gaul [fig. 13] and is another recurring figural type on the battle sarcophagi. Unlike the other battle scenes on the column, this scene focuses on the actual action of war by showing these fighting pairs. Though most of the figures are posed to show their moment of greatest potential for action, the Roman who does strike his foe shows the real action, 78 Coarelli 2000, p. 180, pl
41 which is further underlined by the presence of the dead bodies lying upon the ground. A one-onone combat is also shown in one other battle scene, scene LXVI. The Roman and Dacian troops advance toward each other, just about to meet in battle; however, one Roman and one Dacian soldier have broken from their respective masses of troops to face off in single combat. The two men both twist to emphasize their preparedness to strike, but the resulting composition creates an unrealistic spatial relationship between the two men. 79 The battle scenes on the Column of Trajan are rendered in such a way to show the clashing of two distinct armies, one good and one bad. The outcomes of these battles are always clear, as only one side is ever shown to be suffering. There are a few exceptions to this rule, such as the scene which shows Roman soldiers tending to their wounded, or the few instances where individual Roman and barbarian soldiers have broken off from the main action to fight one-onone. The general trend, however, is to show the moments just before the actual clash of the armies, or the moment immediately after the battle, as the enemy begins to flee. The artists of this frieze had begun experimenting with the use of multiple ground lines, allowing many more figures to be shown within the battle scene than if only one ground line were used. Though barbarians are often on the lower ground, signaling their inferiority to the Roman soldiers, it is notable when individual barbarians sometimes break this division. There is the occasional tendency to experiment with the mixing of figures to represent better an actual moment of action within the battle, but this tendency is limited and overshadowed by the strong division of space throughout. Along with this division of space, the moment of greatest potential between the two armies is underlined by the body positioning of many of the figures. Rather than showing two fighters actually striking one another, they are shown with their weapons raised and prepared to 79 Coarelli 2000, p. 117, pl
42 strike, held at the climax of their swing. These battles are carefully organized to show the potential of action rather than the action itself. 80 One major innovation in the column s depiction of war is its willingness to show the more gruesome aspects of battle. Many scenes show Roman soldiers proudly presenting the severed heads of their victims to the emperor, as seen on scene LXXI [fig. 21]. 81 The bodies of dead Dacians are shown piled up, some of them completely broken and contorted. 82 There is even a depiction on scenes CXX-CXXI in which the Dacians poison themselves rather than allowing themselves to be captured. 83 They are shown collapsing and dying, holding the bodies of their loved ones and comforting each other in their final moments. These scenes boldly present the true horror that accompanies war; however, the Romans are almost never directly involved in these dramatic moments. It is clear that they are the cause of the Dacians sufferings, but the Romans are not shown as sharers in that suffering. This is further emphasized by Trajan s role within these scenes. Only once is Trajan shown actively involved in a battle, leading a cavalry charge. In this instance, the Romans approach the enemy, though they are not yet actively fighting. In all other battles, the emperor stands in the following frame, his back turned to the dramatic action, as he addresses the troops or receives captives. Every time Trajan appears, his figure dominates the scene and overshadows the surrounding figures. Not only is the emperor separated from the action of the battle scenes, but he is also separated from the scenes in which he is shown. He is a stock figure for the representation of imperial values, glorified by the submission of his conquered foes and the praise of his troops. 80 It can also be argued that this division of space between the two armies may have aided in the visibility and readability of these scenes, as the viewer would look up at them from such a great distance. 81 Coarelli 2000, p. 125, pl On various scenes, including scenes XCIV-XCVII, Coarelli 2000, pp , pls Coarelli 2000, pp , pls
43 The stylistic and compositional trends on the Column of Trajan are a prelude to the trends on the battle sarcophagi. Although the column mostly features strongly divided scenes, the occasional use of one-on-one combats to further dramatize the action is the beginning of a trend that will be heavily utilized on the sarcophagus battle scenes. Likewise, the column s presentation of the more gruesome aspects of war is a main feature on the sarcophagi, but while the Roman soldiers are not part of this dramatic action on the column, they will be fully integrated into the action on the battle sarcophagi. Great Trajanic Frieze The trend of depicting the emperor within the context of war and at the same time removed from the action of battle can be seen on the Great Trajanic Frieze, a series of panels repurposed for the Arch of Constantine [fig. 22].84 Trajan appears twice on this frieze. On the far left, he is shown in an adlocutio scene, standing out from those who surround him as he addresses a crowd. This is identical to the many representations of Trajan on his column. Trajan is also shown on the right of the frieze, engaged in a battle. In this scene, his horse leaps to the right, surrounded by his triumphant men who raise standards and play trumpets. In his wake, Roman soldiers loom over their enemy, striking down the already broken bodies of Dacians. The tone is clearly that of Roman victory, emphasized by the placement of the Roman soldiers above their enemy. The purpose of this scene is not to show the chaos of battle, but rather to show the victory of the Romans, with Trajan as a personification of imperial virtue. The battle continues before him and is rather blocky: the Dacians are grouped to the right, fleeing before the 84 Touati 1987; Faust 2012, pp (with the most complete bibliography). 35
44 oncoming wall of Romans that approaches from the left. This is the moment before the two armies clash, or perhaps the moment after they clashed and the enemy now flees. The image of Trajan on this relief is reminiscent of the Dexileos stele. His horse leaps to the right, and he raises his right arm behind himself, causing his torso to turn towards the viewer. As a result of his twisting action and his forward motion, Trajan s cloak billows dramatically behind him, effectively framing his figure. Trajan stands out from the scene, his body and that of his horse completely unobscured. At the same time, he is of the same scale as the surrounding figures, and his gaze is directed slightly downwards towards the barbarian who kneels before him, begging for clemency. Unfortunately, the right arm of the emperor is missing, making it impossible to know what he held, but the angle of his arm and his focused stare suggest that he was holding a sword, ready to strike. This representation of Trajan is therefore twofold. His physical separation from the enemy and from his own men, as well as his frontal torso and billowing cloak, elevate Trajan to the status of a hero, something beyond a mere mortal man. He personifies what it is to be an excellent commander and emperor. On the other hand, Trajan is engaged in the battle. Unlike on the Column of Trajan, this figure of the emperor is raising a weapon, his eyes locked onto a target. He acknowledges the chaotic battle that rages before him and plays an active role within it. These different modes of representing the emperor suggest that there were two different understandings of the emperor s role in war. Whereas the Trajan on the column won his war through careful planning and speeches, the Trajan on the Great Trajanic Frieze won the war by actively leading his troops and taking a personal role in the action of the battle. The depiction of the emperor on the Column of Trajan is probably more realistic, as it is unlikely he actually fought in any of the battles. By showing the emperor in the midst of battle of the Great Trajanic Frieze, his role within the war is allegorized and elevated beyond the bounds 36
45 of historical accuracy. This trend of representing the emperor as an active part of the battle is translated onto the commanding figures on the battle sarcophagi. These figures are at once removed from the action and actively engaged with the battle. Column of Marcus Aurelius The Column of Marcus Aurelius was constructed either around 176 CE, after the emperor s triumph over the German and Sarmatian tribes, or in 180 CE, as a funerary dedication.85 As with the Column of Trajan, the Column of Marcus Aurelius has a continuous frieze, with the various scenes divided by natural elements and shifts in the directions of the figures. The frieze has been badly damaged over time due to its long exposure to the elements. The figures are deeply carved, creating a greater contrast between light and shadow than was achieved on the Column of Trajan, while many of the figures heads are enlarged to allow for an easier display of emotion. Similar to the Column of Trajan, Marcus Aurelius appears throughout the frieze, usually in an adlocutio scene, and other commonly occurring scenes include marches and construction projects. There are thirty battle scenes on the Column of Marcus Aurelius, making them the most frequent type of scene on the frieze.86 As on the Column of Trajan, many of the battle scenes on the Column of Marcus Aurelius show battles as the clash between two distinct armies, two solid masses that face off, as discussed at length by Martin Beckmann.87 Such scenes do not show the height of battle, but 85 Griebel 2013 (with the most complete bibliography). See also Hanfmann 1964, p. 115; Brilliant 1984, pp ; Coarelli 2008; Kleiner 2010, pp ; Beckmann 2011; Faust 2012, pp Our lack of literary evidence surrounding the construction of the column makes dating it quite difficult, though attempts have been made to date it on the basis of the events represented on its frieze; in particular, see the extensive discussion in Beckmann 2011, pp See Iain Ferris discussion of the violent depictions on the column (Ferris 2000, pp ) and the depictions of violence against women (Ferris 2000, pp ). 87 Beckmann 2011, pp
46 rather a battle that is about to begin, the exact moment when the two armies meet. On scene XIX, Roman soldiers cluster in a linear rank at the top of the scene, preparing to thrust their spears into the barbarians before them. 88 It is clear that a battle is about to begin, a moment in time a viewer understands without seeing the true chaos of a battle. Other battles, such as on scene XCII, show the two sides not as ranks but as masses of bodies [fig. 23]. 89 In this particular example, the Roman cavalry clusters to the left, driving away the wall of barbarian troops to the right. Unlike on Trajan s Column, where such scenes represent the moments before or immediately after the two battle lines meet, this scene depicts various barbarians falling to the ground, as they are still under direct attack from the Romans. One barbarian sits with his back arched and his chin raised as a Roman soldier drives a spear into his back. But most of the battle scenes on the Column of Marcus Aurelius go beyond this, showing the more gruesome aspects of war. Unlike on the Column of Trajan, which stresses Roman victory through technical skill and achievement, this frieze instead presents the real physical efforts of the soldiers. These battle scenes are extremely innovative in their more heavily integrated depiction of battles; instead of showing two separate masses and the moment that they meet, these scenes separate out a few of the individual figures into one-on-one combats. Various one-on-one combats are shown on scene LXXIX [fig. 24]. 90 At the bottom, a barbarian s dead body lies limp upon the ground, and beside him another dead barbarian is tossed across the body of his fallen horse. Above these two, a Roman pursues a barbarian, both 88 Coarelli 2008, p. 148; Beckmann 2011, p. 169, fig Coarelli 2008, pp ; Beckmann 2011, p. 170, fig Coarelli 2008, p
47 on horseback. The Roman turns his back to the viewer while the barbarian turns to look at his pursuer, with his chest turned to the viewer. This is a clear attempt to show the realistic spatial relationship between the two men. Another barbarian falls backwards off his horse behind this pair, and to the right a Roman soldier drives his sword into the chest of a kneeling barbarian while pulling back his head. The barbarian reaches to the sky, begging for mercy. This pair is particularly dramatic, as the barbarian does not fight but is simply executed. Many similar figures and pairings are common on the battle sarcophagi, as discussed below. On scene LXI, barbarian captives are decapitated by Roman soldiers [fig. 25]. 91 Two bodies have already crumpled to the ground, their disarticulated heads positioned to face directly out towards the audience. Two more barbarians lean over and present their necks as two Roman soldiers raise their swords to strike. The scene is shown at the moment of greatest potential, at the height of the sword swing, and at the very final moment of the barbarians lives. Even without the beheaded bodies on the ground, it is clear what is about to happen in this scene. Yet the sculptors chose to include the decapitated bodies, boldly showing the most gruesome aspects of war. 92 Even with these stylistic changes, many of the battle scenes on the Column of Marcus Aurelius are still quite blocky. The two sides of the battle are kept separate, with only a couple of soldiers from either side actually mixing in with each other, as on scenes LXIII and LXIV. 93 As on the Column of Trajan, the armies are sometimes shown at their maximum potential for fighting, giving the illusion of action without really showing it. The viewer is shown the initiation of the battle, as two armies meet, and the results of the battle, where bodies are piled 91 Coarelli 2008, pp ; Ferris 2009, pp , fig. 64; Beckmann 2011, p. 149, fig See also Iain Ferris chapter on the screaming man (Ferris 2000, pp ). 93 Coarelli 2008, pp ; Beckmann 2011, p. 172, fig
48 high. At the same time, a number of scenes show more advanced battle compositions, which feature one-on-one combats and the actual action of battle, with swords being driven into chests and enemy soldiers in the act of falling from their mounts. There is also a tendency towards crowding figures into these scenes at the expense of any backgrounds. One of the great differences between the two columns is the exaggeration of separate ground lines on the Column of Marcus Aurelius. Whereas the Column of Trajan presents multiple ground lines in a subtle way to fit more figures into the scene and to play with bird seye views, this column presents a much more abstract treatment of space. The various ground lines are completely separated from one another, as seen on scene L [fig. 26]. 94 While barbarians lie upon the ground dying in this scene, Roman cavalryman seem to fly through the air above them, preparing to strike the other barbarians who remain standing, similarly floating off of the ground. These divided ground lines are crossed by various figures, such as the barbarian who turns to strike a Roman cavalryman and the falling bodies behind him, which appear to drop from the highest ground line to the lowest ground line where their allies lie. Separated ground lines are also pronounced on scene CIX, where the bodies of dead and dying barbarians are shown on three distinct levels, as the surrounding figures proceed with the battle as though the separate ground lines do not exist [fig. 27]. 95 The multiple ground lines of the Column of Marcus Aurelius are over-exaggerated, allowing the sculptors to play with the presentation of falling and dying bodies in order to give the impression that these bodies are piled high throughout the battlefields and fall continuously Coarelli 2008, p Coarelli 2008, p Scene XXVII in Beckmann 2011, p. 147, fig
49 While the Column of Trajan maintained a separation of the two armies, the Column of Marcus Aurelius tends to feature one-on-one combats, a trend that is even more prominent on the battle sarcophagi. Similarly, while Trajan s Column experimented with multiple ground lines, the Column of Marcus Aurelius fully expands these ground lines, an over-exaggeration that will be used on the battle sarcophagi to crowd as many figures as possible into the scene. The Column of Marcus Aurelius shows the intensification of trends that were tested on the Column of Trajan and which would ultimately impact the stylistic choices of the battle sarcophagi. Arch of Septimius Severus Built in 203 CE in the Roman Forum, the Arch of Septimius Severus served to commemorate the emperor s successful Parthian campaigns.97 The arch bears a series of panels that present purely historical scenes devoid of allegorical figures, replacing them with real generals and conquered people. The continuous narrative is presented moving not in a linear direction but instead snaking back and forth through the space, as if to imitate the spiral friezes on the great imperial columns on a flat surface and adding complexity to these compositions.98 At the same time, the division of space among the various ground lines is completely arbitrary. Similar to the over-exaggerated separation of ground lines on the Column of Marcus Aurelius, here the multiple ground lines are separated to the extent that they form separate scenes. On Panel III from the northwest of the arch, which is believed to show the capture of Seleucia, there is a siege scene, and the Romans and their Parthian enemies are divided, not only into separate masses but also by their different ground lines [fig. 28].99 Roman soldiers surround 97 Hanfmann 1964, pp ; Brilliant 1967; 1984, pp ; Lusnia 2006; Kleiner 2010, pp , Faust 2012, pp (with most complete bibliography). 98 Richard Brilliant (1984, pp ) argues that the panels on the Arch of Septimius Severus are derived from the spiraling friezes of the two imperial columns. 99 Brilliant 1967 pp , pls. 5,
50 the Parthian soldiers, but the two do not directly clash in battle. The scene presents the idea of Roman soldiers surrounding the enemy s camp, but in reality they stand below the camp, reaching across the separated ground lines to attack. The two armies are thus divided in space into two separate masses, as has been seen above on the two imperial columns. The center of Panel I on the southeast side of the arch shows a skirmish between Romans and barbarians [fig. 29]. 100 Unlike the siege scenes, where the Romans and their enemy are kept apart, this battle allows for greater confusion between the two opposing sides, with individually fighting pairs interspersed between the collapsing bodies of defeated soldiers. Multiple ground lines are used to present a greater depth to the scene, but figures are not confined to these designated spaces; a number of barbarian bodies crumple to the ground, crossing over the various ground lines and falling into the unrelated scene below. Because they cross over these divisions of space, these falling bodies are stuck in a loop of perpetual motion and seem to fall forever. The sculptor therefore abandoned the strict divisions of space in favor of greater confusion within the battle scene. The panels on the Arch of Septimius Severus have taken the continuous spiral friezes from the imperial columns, uncoiled them, and applied them to a flat panel. Instead of moving in one consistent direction, the action on these panels snakes back and forth. This removes the directionality and the continuous flow of action found on the friezes on the columns in favor of more stationary action, which is read chronologically from the top to the bottom in individual scenes. The entire story is before the viewer s eyes, giving him snapshots into distinct episodes of the campaign, rather than the more explicit movement through time that is portrayed by the 100 Brilliant 1967, pp , pls
51 columns. The battle sarcophagi similarly present a single panel of action, presenting the viewer with a single moment within the chaos of a battle. Conclusion Through these various imperial monuments, a few trends become clear in the depiction of battle scenes. First, the separation of the emperor from the action had become the norm. Either he is separated entirely from all battles, as shown on the Column of Trajan, never shown actually fighting and with his back turned towards the action, which emphasizes his role in careful tactical planning and bureaucratic decisions, or he is shown fighting, but is rendered in such a way that raises him above the action, as an almost mythological ideal of a soldier, as seen on the Great Trajanic Frieze. Another trend on the imperial art of this period is the over-exaggerated use of multiple ground lines. Whereas the Column of Trajan used multiple ground lines in order to fit more figures into the scenes, the multiple ground lines on the Column of Marcus Aurelius were completely separated so that by the time of the Arch of Septimius Severus, the separated ground lines created completely separate scenes. A final trend is a shift away from blocky divisions of space between opposing armies towards the integrated one-on-one combat compositions on the Column of Marcus Aurelius and on Panel I of the Arch of Septimius Severus, allowing for the presentation of more chaotic battles. The Arch of Septimius Severus also represents the final shift away from the continuous flow of narrative towards a snapshot of a single moment within a battle. These various stylistic trends, termed the Antonine Stilwandel by Rodenwaldt, clearly governed the compositions of the battle sarcophagi, as discussed in the next chapter For the origins of this Stilwandel, see Jung 1984, pp
52 Chapter 5: Compositions and Iconography of Battle Scenes on Sarcophagi Various groupings of figures are repeated on the battle scenes on Roman sarcophagi. As discussed in Chapter 2, Bernard Andreae identified these repeated figures on four sarcophagi in particular: the Ammendola (1), the Via Tiburtina (4), the Small Villa Doria Pamphili (3), and the Small Ludovisi (5).102 His compositional analysis of the battle sarcophagi deserves further reexamination, as he focused on only four examples and his results were based on an outdated model of sarcophagus production.103 In order to create a more complete understanding of the individual figures and groups depicted on these battle sarcophagi, it is necessary to conduct a comprehensive examination of their scenes and iconography. This will allow for a better understanding of how they reflect the changing ideology and reception of the enemy occurring during this period, while providing a new prospective on sarcophagus production and workshops. I will begin with the figural types that were identified by Andreae and apply them more widely to the complete set of Roman battle sarcophagi. I will consider other repeated groupings that he exempted from his study. I will discuss how these figural types, as well as the general stylistic trends on these sarcophagi, were influenced by the various works of art discussed in the previous two chapters. Through this examination of the figural types and groups on the full corpus of Roman battle sarcophagi, I argue that prototypes for the individual figures must have existed, rather than a single prototype for complete battle scenes. Finally, in Chapter 6, I will show how it is possible to use the compositions of these battle sarcophagi to understand their production better. Two Riders Group Andreae 1956, pp These models of production are discussed in Chapter 6. 44
53 Andreae s first figural type is the Two Riders Group (die Zweireitergruppe).104 This group includes a Roman whose horse leaps to the right and a nude barbarian who falls from his horse. The Roman rider wears full uniform and raises a weapon, usually a spear, in his right arm. Though his horse leaps to the right, it turns its head back to the left, creating the illusion that the horse is projecting out of the scene towards the viewer. The rider twists in the saddle so that he faces left, his torso turned towards the viewer. I will refer to this figure as the Roman Horseman [fig. 30]. This figure is found on many of the battle sarcophagi, including the Ammendola (1), Small Via Tiburtina (4), Dallas Museum (2), Small Villa Doria Pamphili (3), Small Ludovisi (5), Ince Blundell (11), Large Ludovisi (18), Large Campo Santo (12), Palermo (14), and Concordia University (6) sarcophagi. The Roman Horseman is found in various places throughout these scenes, sometimes attacking a falling barbarian, and other times attacking an unseen victim. The falling barbarian in Andreae s Two Riders Group is nude and has his back turned to the viewer. The horse collapses to the ground with the rider, whose right arm and leg are still wrapped around the body of the creature. I will refer to this figure as Falling Barbarian A [fig. 31]. By placing the barbarian and his horse in front of the Roman rider, who is already twisting around, the sculptor creates a sense of depth in the scene, as though the two men are circling around each other during the battle. The open chest of the Roman invites the viewer into the scene, while his and his horse s downward gazes draw the attention of the viewer down towards the action of the falling barbarian. Similarly, the turned back of the barbarian forces the viewer to become part of the action, while still creating a degree of separation. The nature of the relief prevents the viewer from examining this pairing from every angle and forces the viewer to 104 Andreae 1956, pp
54 infer the rest of the scene. Despite his pathetic body position, the face of the barbarian is obscured, removing the viewer from the drama of the event and the inevitable death, and instead directing the viewer s eye and perhaps emotions towards the heroic victor. Because the viewer engages with the scene in this way, he is at once an active participant in the recreation of the three-dimensional image and put into the place of the Roman solider who has conquered this falling foe. This pairing of the Roman Horseman and Falling Barbarian A is seen on the left of the Ammendola (1), the Small Via Tiburtina (4), the Dallas Museum (2), and the Small Villa Doria Pamphili (3) sarcophagi, and on the right of the Small Ludovisi sarcophagus (5). On all but the Ammendola (1), the cloak of the Roman soldier billows out behind him. The face of the barbarian turned up to look at his assailant can be seen on the Ammendola sarcophagus (1) alone. The falling barbarian is also featured on the left of the Villa Borghese sarcophagus (13), though the barbarian and his horse have already fallen to the ground, and no Roman enemy is seen, forcing the viewer to imagine the Roman who has attacked this man. A similar pairing is found on the left of the Concordia University sarcophagus (6). The barbarian in this example does not fall from a horse but is freefalling in a position that closely resembles the Falling Barbarian A figural type. His Roman assailant stands to the left and reaches over him to stab another barbarian to the right. Other types of falling barbarians are also shown on the sarcophagi. On the Badia di Farfa sarcophagus (8), the central figure is a barbarian who has fallen off the side of his horse. This figure, Falling Barbarian B [fig. 32], sits on the ground with his back to the viewer, his right leg and left arm still reaching up towards his horse, which faces left. Because this backwards facing figure is central to the scene, he invites the viewer s attention into the action of the battle. The 46
55 viewer is encouraged to imagine the front of this figure, as well as to imagine what unseen enemy stands behind his horse. A figure in a similar position can be seen on the far left of the Small Campo Santo sarcophagus (7) and in the center of the Badia di Cava sarcophagus (9). Though heavily damaged on each, it is clear that this figure faces back into the scene, his left arm raised. Other sarcophagi show barbarians sliding off the backs of their horses, such as the example on the Small Ludovisi sarcophagus (5). I will call this Falling Barbarian C [fig. 33]. The figure on the Small Ludovisi looks up with his mouth open wide in shock. He falls back onto his right hand, raising his shield with his left arm. His legs are still raised as he is only just now falling from his horse. The Small Ludovisi sarcophagus (5) also features a man who falls with his arms and legs flung behind him, projecting his chest towards the ground, his body completely broken as it falls. Other falling barbarians are seen on the Via Tiburtina sarcophagus (4), on the center of which two barbarians plunge headfirst to the ground. Many figures fall on the Large Villa Doria Pamphili (17) and the Portonaccio (16) sarcophagi, tumbling from different heights and at different angles, each body broken and contorted with pain; however, none of these falling figures match the design of those mentioned above, as their motions are random and varied. Bodies dying upon the ground dominate the bottom half of most of the sarcophagi. These falling and fallen figures add to the chaos and drama of the scenes. Rather than focusing entirely on the glorious battle that rages, the sculptors have made the conscious decision to show some of the grisly effects of war. The scenes do not just show the final moments of life, when the victim is still actively part of the fight, but instead show also the first moments of death, as the victim 47
56 slowly slips from life. These figures further fill any negative space between the legs of the other figures. Turning Barbarian Another figural type identified by Andreae is the Gaul who is shown standing with his back to the viewer, stretching across the full height of the scene, which I will call the Turning Barbarian [fig. 34].105 He holds a shield on his left arm at his side and raises his right arm up and over his head, his sword pointing down over his back in an exaggerated striking position, showing the moment of greatest potential for his upcoming action. The man s legs are spread in a wide stance and he is nude, allowing the viewer to see the full length of his body and his tense muscles as he stretches and twists. This figure strongly recalls the Ludovisi Gaul. The Turning Barbarian figure plays an important role in the overall composition of a battle scene. Similar to Falling Barbarian A and B, who fall from their horses with their backs to the viewer, this standing barbarian draws the attention of the viewer into the action of the scene. His turned back allows the viewer to imagine a greater depth to the scene, as this man s unseen foe must lie somewhere deeper within the composition; at the same time, by hiding his face, this barbarian remains anonymous. The viewer is kept distant from the scene as a mere spectator of the action, desiring, but unable, to walk around the statue-like figure and engage directly with the action. His stance tends to be the most victorious of the barbarians within the scene; yet he is faceless, his glory hidden from the viewer. He represents a worthy opponent. The turning barbarian also gives a more accurate representation of the spatial relationship between the opposing figures. It is far more realistic in a battle that the figures would directly face each other, 105 Andreae 1956, pp
57 rather than awkwardly turning their bodies to face an imaginary audience. By turning some of the figures within the space, the sculptor realistically represents how men would face off in a real battle, showing a greater concern for realism than for artistic convention. This figure is featured most prominently near the center of the Ammendola (1) and the Dallas Museum (2) sarcophagi. On these two examples, the barbarian is almost entirely unobscured by the surrounding action and instead stands out as a central point in the scene. His gaze appears to be directed slightly to the left, though it is difficult to tell since his face cannot be seen. There is no specific target for his attack; instead, his attention is directed towards an unseen victim. On the Small Villa Doria Pamphili sarcophagus (3), a barbarian stands in this same position, again central within the scene and unobscured by the surrounding action. His head is turned to look up to the right, where a Roman horseman rushes towards him. Unlike on the Ammendola (1) and Dallas Museum (2) sarcophagi, where the barbarian s opponent is unseen, this man has a definite target. On all three of these sarcophagi, the Turning Barbarian is part of a group of four, which also includes a barbarian horseman, a Roman horseman, and a barbarian who has fallen to the ground and is about to be stabbed.106 The four figures in this group, which I will call the Dallas Museum Circle, form a circle of fighting figures [fig. 35] The turned barbarian is repeated on the Large Ludovisi sarcophagus (18). The figure is on the far right of the scene and is the only figure on the sarcophagus to turn his back to the viewer. Unlike in the previous examples, this barbarian wears trousers, and his right arm is not raised over his head, but is instead drawn back to strike. He quite clearly looks up to the left where a Roman cavalryman bounds towards him with his spear raised. Although the positioning 106 These correspond with the Fleeing Barbarian, Central Commander C, and Cowering Barbarian discussed below. 49
58 of these two figures is not realistic, as the barbarian would in reality be under the Roman s horse rather than in front of him, the two figures successfully create the idea of depth. On the Palermo sarcophagus (14), a barbarian stands with his back turned in the center of the scene, his shield raised high and his right arm drawn back. A Roman soldier on horseback hovers over him, clearly prepared to strike; the barbarian, however, does not meet his gaze, instead seeming to look beyond this man and towards the central Roman horseman. The commander looks back towards his barbarian, though another barbarian lies below the feet of his horse, looking up in terror. These four figures complete a circle similar to the Dallas Museum Circle, creating the illusion of three dimensional space. The Turning Barbarian on the Palermo sarcophagus (14), unlike on the other sarcophagi, is a smaller figure than those who surround him. Instead of standing out from the action, he almost disappears within it. The smaller scale of the Turning Barbarian causes the figure to shrink away, as though his presence has no impact on the battle, especially compared to the tunic-wearing barbarian to the right, who bravely faces off with his opponent. A Turning Barbarian is featured on the left of the Villa Borghese sarcophagus (13). This barbarian is fully dressed and holds a shield, his drawn sword now missing. His head is also missing, but his attention seems to be directed to the Roman soldier on the left, whose torso alone has survived. The barbarian stands above his falling and dying allies, though he himself is still continuing to fight. The Turning Barbarian figure is also seen on the Palazzo Giustiniani sarcophagus (10). Here, the barbarian strides to the left towards the central Roman horseman. The pair stands out from the surrounding action as the clear focal point. Twisting so that his back is turned to the viewer, the position of the barbarian is the direct opposite of that of the Roman horseman, who 50
59 twists his torso to face towards the viewer. The two realistically represent the spatial relationship between a fighting pair. Their gazes meet, and the two almost appear to be frozen in time, directly on the cusp of a dramatic encounter. Without actually engaging directly in the action, the figures represent the idea of a battle and allow the viewer to infer what has happened and what is about to happen. The frontal torso of the Roman invites the viewer into his position within the scene to face off against this fearless barbarian. A figure that looks like the Turning Barbarian type is found on the far left of the Large Villa Doria Pamphili sarcophagus (17). It is difficult on this particular scene to tell if this figure is a Roman or barbarian. The figure holds his right arm to his side and raises his left arm high, stretching up towards the wall that is being besieged in the background. The turning barbarian has a small role on the Portonaccio sarcophagus (16). Just to the right of the main central figure, a barbarian turns back to face a Roman horseman. This barbarian is on a horse, but his twisting body and raised arm are similar to the other examples we have seen. He looks up to his attacker and raises his left arm in supplication or defense, his sword by his side. Although unobscured by the surrounding action, the dramatic bend of the barbarian s neck makes him a sympathetic figure rather than a heroic one. The importance of the Turning Barbarian figure becomes less prominent on these later sarcophagi. A variation on this figure can be seen on the Small Campo Santo sarcophagus (7). On the far right of the scene, a nude barbarian faces the back of the scene and awkwardly bends his neck to look upwards. His left arm raises a shield in defense and his right arm bears a sword. Instead of stretching out bravely towards his enemy, this barbarian seems to cower back with fear. The figure creates chiasmic composition with the four surrounding figures, though this grouping, which I will call the Small Campo Santo Circle, is different from the Dallas Museum Circle 51
60 [compare figs. 35 and 36]. The Turning Barbarian looks diagonally towards a Roman horseman to the upper left. This Roman raises his arm to strike the Turning Barbarian. Their line of vision crosses over a second, diagonally placed pair, another a fight between a Roman soldier and a barbarian who tries to defend himself. This second barbarian carries the crumpled body of one of his fallen comrades. There is another Turning Barbarian on the far left of the Campo Santo sarcophagus who strides to the left, turning so his back faces the viewer. On his left arm, he raises his shield to protect himself from the oncoming attack of a Roman soldier on horseback, whose sword is raised.107 This barbarian bravely faces his opponent. His partial twist is not only more inviting for the viewer, but also more realistically represents the spatial relationship between himself and his opponent. Another similar adaptation of the Turning Barbarian is found on the sarcophagus from Concordia University (6). Again, on the far right of the scene, a barbarian wearing trousers stands to fill the full height of the scene. He holds his shield before him and draws back as a Roman soldier advances towards him, his sword raised and ready to strike. On both the Small Campo Santo (7) and the Concordia University (6) sarcophagi, the barbarian, who is only partially twisted, focuses his attention towards his attacker, drawing the viewers attention similarly towards the Roman soldiers. Unlike in the other examples, these turned barbarians are preparing to be struck down, rather than looking as though they have a real chance in the battle. Rather than representing a heroic enemy, they display the imminent victory of their Roman assailants. Three Riders Group 107 This figure corresponds with the Central Commander C type, discussed below. 52
61 Andreae also identifies a figural group called the Three Riders Group (die Dreitreitergruppe). One figure within this group is a barbarian whose horse falls face first to the ground, its forehead touching the ground between its front two legs, which I will call the Collapsing Horse [fig. 37].108 The barbarian himself is tossed forward on the horse, lying almost flat on the creature s back. This figure can be found on the bottom left of the Large Campo Santo sarcophagus (12), the center of the Ince Blundell sarcophagus (11), to the right of the center on the Small Villa Doria Pamphili sarcophagus (3), on the left of the Badia di Cava sarcophagus (9), and on the far right of the Small Ludovisi sarcophagus (5). In each of these examples, no one is visibly attacking the falling barbarian, rather it seems as though the damage has already been done. This man is caught in his final, falling moment. Andreae also points to examples where the horse can be seen without a rider, such as on the Ammendola (1), Large Villa Doria Pamphili (17), Dallas Museum (2), Villa Borghese (13), and Palermo (14) sarcophagi. The second figure in Andreae s Three Riders Group is a Gaul who flees in the background of the scene, sometimes pursued by the third figure in the group, a Roman horseman. This last figure is quite clear on Andreae s four sarcophagi and on the Dallas Museum sarcophagus, but is not readily found on the other sarcophagi in this study. The Fleeing Barbarian figure [fig. 38] is found on a wide variety of the sarcophagi, usually in the background trying to escape the battle. Execution Group The next group identified by Andreae includes a Roman soldier who holds the hair of a barbarian kneeling before him (über Wältigungsgruppe).109 This Execution Group [fig. 39] is the most commonly used group on the battle sarcophagi. Usually, the Roman soldier raises his right Andreae 1956, pp Andreae 1956, pp
62 arm ready to strike, while the barbarian tries to push away the hand that grasps his hair. This scene does not represent a real struggle, but an execution. The Roman soldier is the clear victor. The figural group is seen in its most typical form on the Ammendola (1), Small Villa Doria Pamphili (3), Dallas Museum (2), and Via Tiburtina (4) sarcophagi. These four examples are almost identical, each featuring a nude barbarian who looks up at his assailant. The dramatic expression of the barbarian is clear; his mouth and eyes open wide with fear as he tries to push away the grasp of the Roman soldier above him. Another similar example is on the Villa Borghese sarcophagus (13). This clothed barbarian does not reach up to the Roman soldier, his expression more somber than dramatic; he seems to have accepted his fate. The grouping on the Concordia University sarcophagus (6) also features a clothed barbarian, who kneels rather awkwardly, his neck bent back impossibly so that he faces the Roman who stands behind him. The barbarian holds his arm above his head in despair as the Roman s sword plunges into his neck. On the Palermo sarcophagus (14), a nude barbarian kneels in the center of the scene and a Roman soldier stands behind him. The arms of both figures are missing, though the barbarian s neck is bent back awkwardly in such a way that suggests his hair is being grabbed by the Roman. The expression on the barbarian s face is passive, though his dying allies who surround him add to the drama of the scene. This Execution Group is found on the far right of the Ludovisi sarcophagus, where a barbarian sits on the ground, his hair held by a Roman soldier in a tunic, whose sword is drawn. A second pair on the left of the sarcophagus depicts a similar scene, except the Roman holds his hand under the chin of a barbarian who kneels with his arms crossed before him in supplication. The Trumpeter 54
63 Another figural type on the battle scenes is the Trumpeter (der Tubicen) [fig. 40].110 Andreae identifies the Trumpeter on the Small Ludovisi (5) and Small Villa Doria Pamphili (3) sarcophagi, and assumes that a trumpeter would have been depicted on the Via Tiburtina sarcophagus (4) where the scene is now damaged. The trumpets on the Small Ludovisi (5) and Small Villa Doria Pamphili (3) sarcophagi are now missing. The positioning of the Trumpeter on the Small Ludovisi (5) makes it obvious that he once held a trumpet, though the Trumpeter on the Small Villa Doria Pamphili sarcophagus (3) stands awkwardly, with his right arm outstretched and his left arm on his head. His position becomes clearer when compared to the Trumpeters on the Badia di Farfa (8) and Palazzo Giustiniani (10) sarcophagi. These trumpeters raise their trumpets with their left arms outstretched and right hands on their heads, the same positioning as the Small Villa Doria Pamphili trumpeter. Roman trumpeters are similarly present on the right side of the Small Campo Santo sarcophagus (7) and on the left side of the Ince Blundell sarcophagus (11). Two trumpeters are depicted on the Large Ludovisi sarcophagus (18). A Roman trumpeter stands on the right of the scene, hidden in the background of the action. On the left side of the scene, a barbarian trumpeter stands in plain view, framed by the horn that encircles his head. This particular horn resembles the one that lies on the ground on the Dying Gaul statue, which is discussed above. The Trumpeter type can also be seen hidden in the background of the Large Villa Doria Pamphili (17), Large Campo Santo (12), Portonaccio (16), and Villa Borghese (13) sarcophagi. The Commander 110 Andreae 1956, pp Various depictions of trumpeters are discussed in detail in Alexandrescu
64 One of the most common figural types in these battles scenes is the central Roman cavalryman, here called the Central Commander. This figure usually stands out dramatically from the rest of the scene and is assumed to represent a Roman commander or to act as a representation and sometimes a portrait of the deceased. These central figures can be divided into three separate types. In many of these examples, the horse of the central figure leaps over a falling or fallen barbarian, creating a juxtaposition between the victor and the tragic defeat of his enemy. This fallen barbarian, which I call the Cowering Barbarian [fig. 41], is often seen sitting on the ground, leaning back upon one arm and looking up with horror at his assailant. This Cowering Barbarian type wears a tunic that is tied at his waist and falls from one shoulder, leaving his lower half completely exposed. He looks up at the commander with his mouth wide in fear and awe. The Cowering Barbarian is featured prominently on the Ammendola (1), Dallas Museum (2), Small Villa Doria Pamphili (3), Via Tiburtina (4), Concordia University (6), Ince Blundell (11), and Palermo (14) sarcophagi, as well as on the Palazzo Giustiniani Fragment (15). A similarly cowering figure can be seen on the Badia di Farfa (8) and Badia di Cava (9) sarcophagi, though these two barbarians have different attire from the other examples. The first commander type, Central Commander A [fig. 42], is most reminiscent of imperial art from the period, such as the image of Trajan on the Great Trajanic Relief. In this depiction, the central figure twists on his horse so that his torso turns out towards the viewer. His chin is raised and his head looks out to the left. The rider flings his right arm out, causing his cloak to billow dramatically behind him. Such a figure can be seen on the Large Ludovisi sarcophagus (18) and on the sarcophagus from Concordia University (6). On the Large Ludovisi (18) example, the central figure is so disengaged that he stands out not only from the surrounding action but also from his own horse: he only rides the horse in concept, while in reality he floats 56
65 off of the horse s back in such a way that is not physically possible. Because these Central Commander A figures look up and away from the action, they do not play an active role within the battle narrative; instead, they are removed from the chaos in order to revel in their own victory. Their faces show distinctive features, which may indicate that the central figure was intended to show a portrait. Because of the figures prominence within each scene, these portrait features can be assumed to represent the deceased. Another type of central figure, Central Commander B [fig. 43], looks to the right. On all of these examples, the horse leaps to the right, and the commander twists only slightly on the back of the horse so that his torso faces out towards the viewer. As seen above, this often forces the central figure into an impossible sitting position. On the Palermo sarcophagus (14), the central figure flings his right arm out in a gesture of victory, similar to those shown in the previous group. What sets him apart is his gaze, which is focused before him, perhaps towards the nude barbarian who strides towards him. He is removed from the action by his unobscured positioning within the scene and the fact that he does not raise a weapon, but his attention is still directed towards the battle. The viewer is thus encouraged not just to revel in the glory of the commander, despite the surrounding chaos, but also to appreciate his role within the chaos. The commander s gaze directs the viewer towards the fighting, suggesting that he himself was cognizant of the drama that war entails. Of the other sarcophagi with Central Commander B, many of the central figures are missing their right arms. It is therefore possible that some of these figures may have been similarly raising an empty hand in triumph, but based on the angles of these arms, it is far more likely that they once held weapons. These include the Small Ludovisi (5), Small Campo Santo (7), and Villa Borghese (13) sarcophagi. On each of these, the commander stands out, seated in the same impossible twisting position with his cloak billowing 57
66 behind him. The central figure on the Small Campo Santo sarcophagus (7) is somewhat obscured by the horse of the barbarian he is fighting, and he leans forward on his horse at a different angle from the other examples. Portrait features can be seen on the face of this central figure, such as his pronounced chin and curly hair. The faces of the commander on the Small Ludovisi (5) and Villa Borghese (13) sarcophagi have either been damaged or were never completed. The Villa Borghese sarcophagus (13) stands out from the others in this group, as the commander does not look directly towards his enemy, but instead focuses down upon the victim. This slight change in the angle of his head alters his seated posture and dramatically redirects the attention of the viewer. If the viewer follows the outward gazes on the other examples in this group, they are encouraged to look along the top of the scene to the right of the Central Commander B, where Roman soldiers dominate the upper part of the scene. When a Central Commander B figure is looking towards an enemy, that enemy stands on the same ground as the central figure, and thus has a visible fighting chance despite the imminent defeat. But for the Central Commander B on the Villa Borghese sarcophagus (13), his opponent is already below him. The commander s gaze draws the viewer directly into the action, towards the men who lie dying and defeated at the feet of the commander, creating a dramatic composition. On other sarcophagi with the Central Commander B type, the arm of the commander is entirely preserved or better preserved, making it quite clear that he is holding a weapon. These include the Large Villa Doria Pamphili (17), Palazzo Giustiniani (10), and Portonaccio (16) sarcophagi, as well as the Palazzo Giustiniani Fragment (15). Each of these three commanders holds his weapon in a different way. The central figure on the Palazzo Giustiniani sarcophagus (10) looks directly to the right towards a standing barbarian who strides towards him. Portrait features have been applied to this figure, whose right arm is drawn back with a weapon. By not 58
67 raising his weapon over his head, he exudes an aura of composure and determination, his pose static and statuesque. The central figure on the Large Villa Doria Pamphili sarcophagus (17) also has portrait features, such as his large nose and pronounced brow. This man is much more dramatically positioned within the scene. Instead of trotting directly to the right, his horse projects forward and turns its head back to the left, creating the illusion of the commander riding directly out of the scene. His right arm is raised high as he prepares to strike. Yet his body positioning is quite rigid, his gaze directed outwards rather than towards a specific enemy. On the Portonaccio sarcophagus (16), the face of the central figure is blank. It seems that the portrait features were never completed, either unintentionally due to lack of time or intentionally for the sake of making the scene more generic. This commander is shown on a larger scale than the other figures. His body twists to face the viewer and with his right arm he raises a spear. Unlike the commander on the Large Villa Doria Pamphili sarcophagus (17), this central figure looks downwards, directly towards his barbarian victim who holds out an arm in supplication. As on the Villa Borghese sarcophagus (13), the focus of this general invites the viewer to focus not on his victory but on his active role within the chaotic battle. The last commander type is discussed by Andreae in detail.111 This commander figure, Central Commander C [fig. 44], is often not placed in the center of the scene, but slightly to the left. Nevertheless, the pose of this figure is distinctive: instead of twisting his torso outwards towards the viewer, the figure turns into the scene, raising his right arm so that it covers his face from view. As a result, the figure is hunched over on his horse. In all instances, a Cowering Barbarian figure sits on the ground before the commander, his raised arm bent either in defense or in an act of suicide. This figural group is found on the Ammendola (1), Small Villa Doria 111 Andreae 1956, pp
68 Pamphili (3), Via Tiburtina (4), and Dallas Museum (2) sarcophagi. Only on the Ammendola sarcophagus (1) is the figure centrally placed. This figure stands out on all of these sarcophagi, separated from the action, and on the Ammendola (1) and Dallas Museum (2) sarcophagi, the figure is rendered on a larger scale. His position on his horse is not physically possible, and the horse s head turns back awkwardly. Because the commander figure on these sarcophagi has his face covered, portrait features of the deceased could not be added, making the scene generic. It is possible that the person interred within these sarcophagi was not in the army, and this battle scene was merely a symbolic representation of virtue in a broader sense. On the Small Ludovisi (5) sarcophagus, which is centered around a Central Commander B type, the Central Commander C is also found on the far left of the scene. Even more surprising are the few sarcophagi that do not have a central figure. Instead of a central Roman horseman, the Badia di Farfa sarcophagus (8) is centered on a Falling Barbarian B figure. The only figure close to the central commander type is to the left of the scene, a horseman who leans back as he prepares to strike, but this figure is unremarkable and blends into the surrounding action. Similarly, the center of the Ince Blundell sarcophagus (11) is split between two prominent figures. One is a Roman horseman who, although rushing to the right, twists and looks back to the left towards a fallen barbarian, and the other is a nude barbarian who stands to fill the entire height of the scene, his head tilted dramatically upwards. Neither of these figures stands out from the other figures within the scene. In both of these examples, there is no main central focus to guide the viewer s attention within the scene, thus encouraging the viewer to look instead at the battle scene as a whole, focusing equally on the Roman and barbarian figures. Other Trends in Composition 60
69 Many of the battle scenes on these sarcophagi are framed on either side. The most common framing device is tropaea and barbarian captives. On the Ammendola (1), Small Villa Doria Pamphili (3), and Ince Blundell (11) sarcophagi, these captives are seated below the tropaea with their hands tied behind their backs. The captives, displayed on the same scale as the rest of the figures, turn their torsos towards the viewer while turning their legs towards the action, a position that invites the viewer into the scene. Other sarcophagi have a set of barbarian captives, one male and one female, standing below the tropaea, sometimes accompanied by a child or a helmet. This group, often scaled much larger than the rest of the figures within the scene, appears on the Portonaccio (16), Large Villa Doria Pamphili (17), Large Campo Santo (12), Palermo (14), and Villa Borghese (13) sarcophagi. These are the only battle sarcophagi that include female barbarians on the main scene. The Large Ludovisi (18) and the Small Campo Santo (7) sarcophagi are both framed by tropaea without barbarian captives. Another framing option is seen on the Small Ludovisi (5), Via Tiburtina (4), and Palazzo Giustiniani (10) sarcophagi. Instead of using tropaea to symbolize Roman victory, these sarcophagi are framed by winged Victories who fly above seated barbarian captives. On each example, the Victory figure flies away from the battle but looks back upon the action. The winged Victories on the Via Tiburtina sarcophagus (4) hold tropaea towards the soldiers. All of these various framing types symbolize Roman victory over her barbarian enemy. The inevitability of Roman victory is further emphasized by the placement of figures within the scenes. Consider the Small Campo Santo sarcophagus (7): every figure along the top half of the scene is a Roman soldier, while the middle and bottom of the scene is filled with barbarians. The same is true on the Palazzo Giustiani sarcophagus. This division of space between the Romans and the enemy is a common trope in Roman imperial art, as discussed 61
70 above on the Column of Trajan and Column of Marcus Aurelius. On imperial art, however, the division of space was achieved laterally, whereas the division of space on the sarcophagi is vertical. By placing the Romans soldiers towards the top of the scene, the sculptor was able to emphasize the inevitable victory of the Romans over the barbarians who fall at their feet. The other battle sarcophagi show a trend away from this division of space. In the case of the Ammendola (1) sarcophagus, most of the Roman soldiers stand above their barbarian opponents, but two barbarians break this division. One is the Fleeing Barbarian, who rushes to the left in the background, and the second is the Turning Barbarian, who stretches his body to fill the entire height of the scene. Although barbarians fill the bottom half of the scene with their broken bodies, the upper part of the scene is no longer reserved for the victorious Romans alone. This trend continues and becomes prominent on the Portonaccio sarcophagus (16). Barbarian bodies still fill the lower part of the scene, but the rest of the scene is a conglomeration of Roman and barbarian fighters. Although the presence of the tropaea and barbarian captives framing the scene makes Roman victory forthcoming, the mixing of barbarians and Romans makes the scene chaotic and realistic. The Romans do not merely destroy an inferior enemy, but face off against a worthy opponent. There is clearly some risk involved for the Roman soldiers, a risk which is ignored in scenes such as on the Small Campo Santo sarcophagus (7). The confusion created by the lack of division of space is further aided by the crowdedness of these scenes. None of the battles have scenery in the backgrounds, with the exception of the city walls on the Large Villa Doria Pamphili sarcophagus (17). Other mythological sarcophagi, when backgrounds are lacking, will use different sized figures and putti to fill in the empty spaces; however, most of the figures on the battle sarcophagi are rendered on the same scale, with the exception of the sometimes larger Central Commander and framing 62
71 figures. While some of the sarcophagi have a mild amount of empty space remaining due to this lack of scenery, as on the Concordia University sarcophagus (6), most of them fill this empty space with flailing limbs, flowing garments, and raised shields. On the Dallas Museum sarcophagus (2), the emptiness behind the head of the Central Commander C is filled with his billowing sagum. On the Palazzo Giustiniani sarcophagus (10), the Fleeing Barbarian in the background raises his shield to fill the empty space beside his head. This pattern continues on the Portonaccio sarcophagus (16), upon which it is impossible to find any empty space between the limbs, cloaks, and weapons. This traps the viewer s gaze within the scene, moving from one falling body to the next, unable to leave the chaos of the battle. Iconography Another major trend among all of these battle sarcophagi is the tendency for the figures to be dressed. All of the Roman soldiers are shown in military garb, almost all of them in full uniform, including a helmet, tunic, cuirass, greaves, and a sagum. Showing Romans fully clothed is a trend that is characteristic of Roman art as a whole. But the dress of the barbarians on these sarcophagi is much more variable. The sarcophagi can be divided into three groups based on the clothing on the barbarians: mostly nude, mostly dressed, and completely dressed. Seven sarcophagi show barbarians who are almost all nude. Four of these are the sarcophagi that Andreae focuses on in his book: the Ammendola (1), Villa Doria Pamphili, Small Ludovisi (5), and Via Tiburtina (4) sarcophagi. He chose these four due to their strong compositional similarities. To these four should be added the Dallas Museum sarcophagus (2). On all five of these sarcophagi, most of the barbarians are shown wearing only a torque or cloak. The exception is the Cowering Barbarian who sits below the Central Commander C figure. This barbarian wears a loose tunic that is bound on one hip and slips from his shoulders. The wild hair 63
72 and mustaches sported by all of the barbarians on these five sarcophagi suggest that they are based on the Pergamene style of representing Gauls. The other two sarcophagi in this mostly nude group are the Palazzo Giustiniani (10) and the Ince Blundell (11) sarcophagi. Every barbarian on the Palazzo Giustiniani sarcophagus (10) is nude, with the exception of the occasional helmet or cloak. On the Ince Blundell sarcophagus (11), three barbarians are fully clothed in trousers or a tunic, and the rest are nude. The standing barbarian near the center of the scene is distinct as one of the few examples on these Roman battle sarcophagi of full frontal nudity. The depiction of a nude enemy is common in Greek art, and is often used in Roman art in order to mythologize a scene.112 These sarcophagi do not necessarily show a real enemy that Rome was currently facing, but rather the Gauls, whom the Romans had historically fought in the past. In the second group of battle sarcophagi, the majority of the barbarians are dressed and only a few are shown nude. On the Palermo (14) and Small Campo Santo (7) sarcophagi, the barbarians are dressed in tunics or trousers, and again have the wild hair and facial hair of Gauls. The barbarians on the Badia di Farfa sarcophagus (8) are similarly dressed, but some also wear crested helmets. Here, there is shift away from the unreal enemy of the past to a more realistic enemy of the present. All of the barbarians are dressed on the final group of battle sarcophagi, including the Concordia University (6), Large Ludovisi (18), Large Campo Santo (12), Villa Borghese (13), Large Villa Doria Pamphili (17), and Portonaccio (16) sarcophagi. All of these sarcophagi have a crowded composition, in part due to their larger size, which allowed the sculptor to play with 112 For a discussion of the uses of nudity in Greek art, see Hurwit For a discussion of the uses of nudity in Roman art, see Hallett
73 multiple ground levels. This crowdedness is emphasized by the fact that all of the barbarians wear clothes, as their clothing helps to fill in all available space. By showing all of the barbarians in clothes, these sarcophagi suggest a greater tendency towards depicting the reality of battle rather than elevating the enemy to a superhuman or mythological status. These barbarians may be intended to represent a more recent Roman enemy, such as the Dacians or Germanic tribes.113 Another trend in the depiction of the barbarian fighters is to show excessive emotion on their faces. This is best seen on the barbarians who sit on the ground and look up at their Roman assailants with their mouths and eyes wide, such as the Cowering Barbarian on the Dallas Museum sarcophagus (2). Wild and unrestrained emotion was discussed above on the Athena panel from the Altar of Zeus at Pergamon, and was often used in Hellenistic art for the depiction of the barbaric enemy. But on these Roman battle sarcophagi, this unrestrained emotion sometimes spreads to the Roman soldiers as well, which is quite different from the Altar of Zeus use of calm control on the faces of the gods and goddesses. On the Dallas Museum sarcophagus (2), a Roman soldier on the right of the scene holds his hand to his head, his mouth wide and his eyes turned upwards. Although restraint is commonly shown on the Roman soldiers, the occasional use of extreme emotion is indicative of a new trend in understanding the effects of war on the soldiers involved. Yet this negative emotional response to the battles is short-lived, as evidenced by the Large Ludovisi sarcophagus (18), the latest example in this study. The Romans on this sarcophagus all look quite proud of their actions, despite the surrounding slaughter. Restraint is also maintained on the faces of every central commander figure, again emphasizing the connection between this figure and depictions of the Roman emperor in state reliefs. 113 Notably, the clothing shown on the sarcophagi is similar to the clothing of the barbarians on the columns of Trajan and Marcus Aurelius. 65
74 For the Central Commander A and B types, the faces of these figures are a prominent part of their scenes, further emphasized by the fact that they are usually the only Roman soldiers who do not wear helmets. Often it seems that portrait features have been added to these central figures. For example, the Central Commander A on the Concordia University sarcophagus (6) has chubby cheeks and a small nose. The Central Commander B on the Palermo sarcophagus (14) has a thick beard, curly hair, and a wrinkled brow. Attempts have even been made to identify the Central Commander A on the Large Ludovisi sarcophagus (18), who has a prominent brow and wide nose. In some cases, the face of the Central Commander is blank, as seen on the Portonaccio (16) and Villa Borghese (13) sarcophagi. This may be the result of damage done to the sarcophagus, but it is more likely that the portraits were never added to these pieces. Either this was done unintentionally, as the customer could not wait for the workshop to complete the portrait, or unintentionally as a means of generalizing the scene. If the latter is true, then the faceless Central Commander A and B types act in the same manner as the Central Commander C, whose face is entirely obscured. This allows the viewer to put himself in the role of the victorious general. Conclusion As discussed in Chapter 2, Andreae illustrated the figural types found on the Roman battle sarcophagi, and any variations within these types, in order to recreate a now lost original work upon which these scenes were based, with particular attention paid to his main group of four sarcophagi. There are two major issues with Andreae s examination of these sarcophagi. First, he focused on only four sarcophagi, resulting in a limited presentation of repeated figural types and groups. As shown above, many of his figural groups are not limited to these four, but are widely represented on a variety of battle sarcophagi. Secondly, his argument relied on a 66
75 production-to-order model of production, which does not allow for the possibility of a workshop maintaining a stock of sarcophagi. Without this stock, Andreae argued that similarities in composition could not be explained as works of the same workshop. Recent research on sarcophagus production and distribution has greatly altered our understanding of how they were commissioned and sold, and this second issue will be thoroughly examined in Chapter 7. Andreae was correct that four Roman battle sarcophagi stand out thanks to their striking similarities, though the group he cited should be modified. The Ammendola (1), the Small Via Tiburtina (4), the Small Villa Doria Pamphili (3), and the Dallas Museum (2) sarcophagi share the most similar compositions. Andreae had included the Small Ludovisi sarcophagus (5) in this group, but its scene, while sharing many of the same figural types, is composed rather differently from the other three, so I have chosen to exclude it from this group. The Dallas Museum sarcophagus (2), on the other hand, is nearly identical to the Ammendola sarcophagus (1) and has therefore been added to the discussion. Unlike the other sarcophagi, which only share a handful of common figural types and groupings, these four sarcophagi repeat the exact layout of these groups, as well as the subtle stylistic trends in rendering the figures. I will refer to this group as the Ammendola Group, since the Ammendola sarcophagus (1) is the most basic composition of the four, featuring just four of the figural groups discussed above. The other three feature slight alterations to this scene. On the Ammendola sarcophagus (1), the scene begins on the left with the Falling Barbarian A figure and the Roman Horseman standing over him. Next, the Central Commander C looks down upon the Cowering Barbarian. In the background, the Fleeing Barbarian rushes to the left. The head of a Collapsing Horse can be seen behind the Cowering Barbarian, and to the right the Turning Barbarian fills the height of the scene. The scene ends with the Execution Group. In the case of the Dallas Museum sarcophagus (2), which 67
76 is almost identical to the Ammendola sarcophagus (1), two figures were added on the far right of the scene. The Small Villa Doria Pamphili sarcophagus (3) is identical to the Ammendola (1), with the addition of a figure riding the Collapsing Horse. On the Small Via Tiburtina sarcophagus (4), the scene is identical, but split in half between the Cowering Barbarian and the Execution Group, with a few other, now heavily damaged figures inserted into the center of the scene. The figural types used on the sarcophagi in the Ammendola Group are not exclusive to the Ammendola Group, as has been illustrated in this chapter. Indeed, these figures are widely repeated on all of the battle sarcophagi, though with various spatial relationships. The repetition of figures such as the Turning Barbarian or the various Central Commander types, suggests that these were common tropes in Roman art, both of which have already been shown on the imperial friezes above. As an example, the Small Ludovisi (5) uses many of the same figural types, including the Central Commander C, Falling Barbarian A, Collapsing Horse, and Roman Horseman. Unlike the Ammendola Group, however, the Central Commander C figure is on the far left of the scene, while the Falling Barbarian A is on the far right. The sarcophagus uses the same figural types to create a different composition. This is also clear on the Ince Blundell sarcophagus (11), which combines the Roman Horseman with the Cowering Barbarian figure and the Central Commander B type with the Turning Barbarian. If one were to consider the wider group of all Roman battle sarcophagi, it is clear that prototypes for individual figures must have existed, rather than a prototype for the complete composition. Instead of searching for a single battle scene as the inspiration for all of these sarcophagi, as Andreae proposed, it is likely that the shared prototype was not a complete narrative scene, but a number of disjointed figures or groups of figures that were assembled by the sarcophagus sculptors to create comprehensive 68
77 scenes. If this is correct, and all of the Roman battle sarcophagi share a variety of statues and statue groups as their inspiration, then we must reject Andreae s theory that the Ammendola Group was inspired by a single painted prototype. Identifying the possible inspiration for these figural types requires us to return the Hellenistic statues discussed in Chapter 3. The Roman copies of the Pergamene statues of Gauls may all be cited as prototypes for these barbarian figures. The Ludovisi Gaul may have inspired the Turning Barbarian. Both twist through space and hold their swords high over their shoulders. The Kneeling Gaul may have inspired the Cowering Barbarian, as their body positions and slipping tunics are identical. The body positioning of the Venice Falling Gaul is reminiscent of the Falling Barbarian C type. The preponderance of collapsing and dying figures recalls the various dying enemies from the Attalid dedications. The scenes on the sarcophagi seem to be a conglomeration of these disparate figural types, all joined together in various ways to create comprehensive scenes. In addition to the figures themselves, the overall sense of depth presented on the battle sarcophagi, as figures twist through space and entice the viewer to conceptualize the full three-dimensionality of the figures, takes its inspiration from these Pergamene statues, which require the viewer to observe the statues from every angle in order to fully appreciate them. The battle scenes on the imperial columns do not have this same impact as those on the sarcophagi. As noted by Hamberg, it is as if the scenes on the battle sarcophagi are composed of various statues that had been packed together and applied to a marble slab. 114 In addition to these specific compositional types and groups, the battle sarcophagi develop over time from disjointed scenes towards more unified fusions of the whole. 115 It is as 114 Hamberg 1945, p This evolution of style on the sarcophagi is traced in Hamberg 1945, pp
78 though the initial, individual statuary prototypes had become so standardized in form that sculptors were comfortable in making minor adjustments to these figures in order to allow more than two figures to interact at once. As an example, consider the chiastic composition found on the Campo Santo sarcophagus [fig. 36]. The sculptor was not limited to the one-on-one fighting pairs, but instead portrayed these single combats in such a way that they began to form a unified whole. This pattern culminates on the Portonaccio sarcophagus (16), where it is often impossible to see where one fighting pair stops and the other begins. Instead, all of the men are fighting throughout the same space. This is not the same as the fighting masses that dominate the imperial reliefs, which show two distinct walls of soldiers facing off; rather, these scenes are filled at random with both Romans and barbarians, expanding on a trend that was being tested on the imperial reliefs. Another trend discussed in the imperial art of this period was the removal of the commander from the surrounding chaos. Some of the earlier sarcophagi have no central figure, and Central Commander C type found on the Ammendola Group, while prominent, has his face obscured. The barbarians on these sarcophagi are also mostly nude, implying that these scenes are meant to show a generic and almost mythologized account of Roman battles against an historical enemy of the past. Eventually, the commander figures become more pronounced, though they are often still engaged with the action, as seen with the Central Commander B type on the Villa Borghese (13) and Portonaccio (16) sarcophagi. These two sarcophagi also show a fully dressed enemy, suggesting that these depictions were intended to present a realistic account of battle. Over time, the commander figures on the sarcophagi become even more separated from the action until the development of the Central Commander A type on the Ludovisi sarcophagus, who actually rises off of his horse and towards the sky as an idealization of Roman virtue. 70
79 The imperial reliefs also showed a trend towards increasingly exaggerated and unrealistic perspective. Although none of the battle sarcophagi feature more than a single ground line, there is a tendency towards showing an extremely slanted perspective, almost as though multiple ground lines exist, but are completely obscured by figures reaching and falling across them. The earliest battle sarcophagi do not show this slanted perspective; their height is equal to the height of the tallest figure within the scene, as on the Concordia University sarcophagus (6), so only a single ground line with a normal perspective was possible. The Small Villa Doria Pamphili sarcophagus (3) is an example of a scene in which the sculptor was experimenting with the more slanted perspective, similar to what was done on the Column of Trajan. The horsemen in the background of this scene seem to fly through the air, adding a greater sense of depth to the scene. This trend continues until the Portonaccio (16) and Large Villa Doria Pamphili (17) sarcophagi, both of which use slanted perspective in a way similar to the frieze on the Column of Marcus Aurelius and the panels on the Arch of Septimius Severus. The effect of this new compositional technique is twofold. By allowing figures to stand above and behind one another, the scenes become more crowded, with barbarians and Romans fighting on every inch. Similarly, the use of slanted perspective allows for figures to fall between the imaginary ground lines, creating the impression of greater depth and perpetual motion. This is unlike the multiple ground lines on imperial reliefs, which are completely separate and defined; instead, the slanted perspective gives the idea of many rows of soldiers. This is particularly prominent on the Large Villa Doria Pamphili sarcophagus (17), where men fall from the walls in the background of the scene and to the ground in the forefront of the scene, engaged in hand-to-hand combat. It is as though the men who fall from the walls then become the men who fight upon the ground; for them, there is no escape from the battle. On the Portonaccio sarcophagus (16), slanted perspective is used to the 71
80 same effect. Barbarians in the upper part of the scene are being pursued and attacked, and the viewer can imagine that these men will soon join their comrades who have already fallen to the ground at the bottom of the scene. Figures on these sarcophagi fall as though there were separate ground lines, as on the Arch of Septimius Severus. This confusion of battle created by the use of multiple ground lines is further emphasized by the use of small, standard sized figures. As an example, the figures on the Small Ludovisi sarcophagus (5) are all about the same size. Instead of using larger or smaller figures to fill in the empty spaces of the scene, the sculptor found a way to use more figures and more complex body movements and patterns of billowing cloaks to fill the entire space. This not only creates greater confusion within the scene, but also obscures the obvious dominance of the Roman soldiers over the barbarians. In contrast, the central figure on the Large Campo Santo sarcophagus (12) and his barbarian opponents are scaled differently, with the commander much larger and the barbarians smaller. The smaller figures can easily fill in any empty gaps within the scene, but they are also obviously inferior to their Roman opponent, creating a battle scene that has a clear victor, one who will succeed with little difficulty. Confusion is added by the total lack of empty space, especially on the later examples such as the Portonaccio sarcophagus (16), which force the eye of the viewer to wander from body to body without a rest from the action. The trends on these battle sarcophagi, therefore, directly reflect the developments occurring from the time of Trajan to the time of Septimius Severus. Battles become less mythologized and more realistic, through the addition of clothing as well as the representation of actual combat. The disparate figural types and groups begin to be more fully integrated to create chaotic scenes. This chaos is underscored by the smaller size of the figures, tightly squeezed to fill the space, and the use of multiple ground lines. Eventually, the sarcophagi abandon the 72
81 standardized figures in favor of more complex body movements. Still, even the later battle sarcophagi maintain a strong sense of three-dimensionality, causing the viewer to imagine the full depth of the scene and to fill in any missing pieces. 73
82 Chapter 6: Workshops and Production In this chapter, I will consider the production of the Roman battle sarcophagi and show how by carefully considering the compositions of the battle scenes, it is possible to better understand how sarcophagus workshops in Italy functioned. The variation present in the compositions of the battle sarcophagi support the idea that they were largely produced in small workshops; however, the similarities of compositions within the Ammendola Group suggest that some workshops were capable of producing stock.116 Thus the battle sarcophagi support a heterogeneous model of production. Models of Production As discussed above, various scholars, including Ian Morris, have shown that sarcophagus use began in earnest during the mid-2nd century CE in Rome.117 This change in burial practice also produced a new demand for sarcophagus production and trade.118 Sarcophagus production involved a complex network of suppliers, skilled craftsmen, and expensive transportation. Thanks to evidence at quarries and from shipwrecks, it has been possible in recent years to begin to reconstruct the process of production and distribution. There are various models that have been proposed in order to explain sarcophagus production. One long-standing understanding of sarcophagus production was based on the production to order model.119 This model assumes that the customer would place a specific order 116 These models of production do not take into account the strigilated and garland sarcophagi, which could be mass produced due to their generic scenes. The existence of these more basic sarcophagus types accounts for the likely high demand on sarcophagi which would have required workshops to be able to produce them in great quantities. 117 Morris For an overview of the increased marble trade during the 2 nd century CE and imperial control of this market, see Fant 1988, pp This idea of imperial control of the sarcophagus trade has since been rejected, see Russell 2013, p This is the model used in Andreae
83 with a sarcophagus workshop, which would then order marble from the quarry and sculpt it according to the desires of the customer. Sarcophagi were expensive and could have been deeply personal works, and the production to order model therefore assumes that a customer would want to have direct control over his order. This model places the customer at the forefront of the decision making, as he is the one who chooses the specific size, shape, and decoration of the sarcophagus. Bernard Andreae followed this production-to-order model when writing his book on the compositions of the battle sarcophagi. 120 He argued that, because the sarcophagi were made to order, no stock of sarcophagi would have been available for workshops to copy, and the iconography of each was thus independent. In his 1980 article, John Ward-Perkins discussed the Roman marble trade and its connection with Nicomedia in particular. 121 More broadly, he examined the empire-wide shipment of marbles, and the tendency for certain marbles to be used within select regions and for particular purposes, such as the use of Proconnesian marble for garland sarcophagi, which were particularly popular in the eastern Mediterranean. These sarcophagi were often shaped out on site at the quarry, to be polished upon arriving at their destinations. Ward-Perkins uses other evidence, such as the standardization of column lengths, which tended to be 40 Roman feet, and the evidence for columns of the same length found unfinished in quarries, to argue for massproduction. Dissatisfied with the length of time a customer would have needed to wait for a custom-ordered sarcophagus, which is problematic considering the immediacy of death, Ward- Perkins production-to-stock model suggests that marble was produced by quarries in bulk and shipped to sculpting workshops, where they were completely carved and stored by the marble 120 Andreae Ward-Perkins 1980, pp
84 workshops for later distribution. 122 The sarcophagi were thus mass-produced, and the customer played a secondary role, simply choosing a sarcophagus off the shelf. Ben Russell has more recently reexamined the production-to-stock model for the marble business, with specific consideration of the sarcophagus trade. 123 Russell has attempted to examine more thoroughly the actual effort that would have been required to make even a single sarcophagus. Unlike Ward-Perkins production-to-stock model, Russell s model focuses on the stages of production and the resulting skill specialization for these various stages. A single sarcophagus was ordered, quarried, and carved, requiring the involvement of at least three separate parties. The result was the growing specialization of production, including the division of labor at a quarry and the sculpting expertise at individual workshops. Russell identified two different types of workshops, the sculpting and the quarrying, though both may have had an equal hand in the final design of the sarcophagus, as many sarcophagi were roughly carved at the quarry, only to be refined later on. Completing much of the carving at the quarry itself would allow for easier carving, as marble is softest at the quarry, and easier shipment, as the sarcophagi would be lighter. Instead of a production-to-stock or production-to-order model, Russell argued that there is no single model that can be used for sarcophagus production. Production occurred in a variety of forms depending on the customer s distance from the quarry, the size of the workshops, and consumer demand. Russell recognized that it was necessary to identify at what step within the production the customer became involved in order to understand how the sarcophagus industry functioned. Three possibilities emerged: either the customer commissioned the entire production, ordering 122 See also Koch and Sichtermann 1982, pp Russell 2011, pp ; 2013, pp
85 the exact design, which is then quarried and sculpted; he arrived at a sculpting workshop, which had blank sarcophagi on hand that were ready to be carved, and commissioned a specific design; or he simply purchased the product off the shelf. 124 Andreae s production-to-order assumes the first of these, but this requires the customer either to order a sarcophagus before his death or to wait for a long time with a corpse on hand before the final resting place was obtained. This has been widely regarded as an unsatisfactory model for sarcophagus production. On the other hand, Ward-Perkins production-to-stock model assumes the last of these, with sarcophagi being purchased upon the death of a loved one and thus likely to be kept in stock. This scenario required sculptors to have capital available to maintain a constant stock and to rely upon a degree of predictability in the market. 125 To combat these issues, Russell considered the scale of the sarcophagus industry. At Rome in particular, the number of sarcophagi that were produced in the city, the variety of marbles that were used, and the stylistic variation that exists on the final products suggests that there were many workshops, all working on a small, more local scale. Smaller workshops are less likely to have the capital required to maintain a large stock on hand. Russell therefore recognized any standardization of form upon the sarcophagi as the result not of sarcophagi being mass-produced for a stock supply, but rather the product of the growing popularity of stylistic trends. The evidence for garland sarcophagi shows that they were largely shaped in the quarry itself before the marble was transported, to be refined at a local workshop before sale; but for sarcophagi with more complex scenes, which are greatly variable, it is increasingly likely that 124 There is also the question of whether a person would purchase his sarcophagus during his lifetime, but it is more likely that sarcophagi were purchased by the surviving family; see Russell 2013, p Strigilated and garland sarcophagi could more easily be produced to stock, as their styles were widely popular and therefore presented little risk for workshops. 77
86 these were the product of many small scale workshops and that they were not mass-produced for stock. Nevertheless, there is evidence that some sarcophagi which would receive more elaborate frieze decoration were quarried with one wall left thicker in order to later receive decoration. The mid-3rd century CE San Pietro shipwreck from Taranto contained many such sarcophagi.126 The sarcophagi found in this shipwreck also attest to a great variety of shapes and sizes being transported together. The Torre Sgarrata shipwreck from Apulia, dated to about the end of the 2nd century CE, presents similar evidence.127 Fifteen sarcophagi were discovered, all with a rectangular outer shape, but of various sizes. Russell argued that because sarcophagi were roughed out in some fashion at the quarry, including examples where one wall is left thicker than the others, the quarries and workshops must have had some inclination of what the consumer wanted from the beginning. He thus sees the quarries as reactive to market trends and the requests of the sculpting workshops. Standardization of form is inherent in Russell s model, which arose not from the initiative of the quarries and workshops to have stock on hand, but instead from the nature of art during this period, which relied heavily on particular artistic and architectural themes for the expression of status and power. Customers wanted their sarcophagi to look similar to others.128 The quarries were thus reactive to the workshops and ultimately the consumers. Production of Battle Sarcophagi 126 Parker 1992, p. 381; Ward-Perkins and Throckmorton See the discussion in Russell 2013, pp Parker 1992, pp ; Throckmorton Russell 2013, pp
87 Returning to the battle sarcophagi, Andreae s production-to-order model is unsatisfying. Both Ward-Perkins and Russell agree that it is unlikely that the marble for a sarcophagus was obtained after the customer placed the order. This would have taken far too long for the order to be completed. The disagreement between these two scholars is whether the sarcophagi were carved and held to be purchased off the shelf, or left blank until a customer placed a request. The variability and rarity of the battle sarcophagi suggests that they were produced in small workshops, which allows us to reject the production-to-stock model. Small workshops would not have had the capital to maintain a stock of fully completed sarcophagi for purchase, and were therefore unlikely to produce sarcophagi with identical compositions, as no prototypes would have been readily available for copying. If sarcophagi were needed somewhat urgently but were not mass-produced, we must accept Russell s explanation that marbles were kept in stock at workshops, ready to be carved upon the request of a consumer. This is further supported by Stine Birk s study, in which he examined the backs of marble sarcophagi. 129 He discovered that many sarcophagi appear to have been carved from marble blocks that were not originally intended to be used as sarcophagi. This reuse of marble would serve to reduce both the cost and time of sarcophagus production, while allowing the customer to have a considerable degree of agency over the decoration. He took this further by recognizing that some sarcophagi may have been mostly, but not entirely, completed by sculptors at workshops, allowing for final details to be added and changed according to the desires of the eventual purchaser. Evidence for the actual carving of sarcophagi at a workshop is rare and is largely limited to production in Attica and Asia Minor, but this evidence does allow us to reconstruct the sculpting process. The lid of a boar-hunting sarcophagus, which is now in the Centrale 129 Birk 2012, pp
88 Montemartini in Rome, provides insight into the working stages [fig. 76]: the sarcophagus was first hollowed out, then the design was roughed out, including the outlining of the figures on the main scene in shallow relief using a chisel. 130 Next, the main scene was carved and details were added to the figures and the backgrounds, with greater depth being added by a drill. As a result of this process, details could be added at the end, but a sarcophagus would be legible early on in the sculpting process. 131 Let us then assume that sculpting workshops held marbles on hand, with either roughed out decoration or thicker walls to which decoration may be applied. Such marbles could receive any variety of decoration from the entire corpus of Roman sarcophagi, whether a hunting scene, a mythological scene, putti, or a battle. Though some workshops may have specialized in a single type of scene, it is difficult to attribute sarcophagi to specific workshops as we lack evidence for their findspots, and must therefore turn to their compositions. The variation on the battle scenes suggests that there was no single model from which these scenes were designed, but rather a general series of figural types that were traditionally assembled to compose the scene, as was shown in Chapter 5. This small scale workshop model is nuanced by the Ammendola Group. Each of these sarcophagi feature battle scenes whose compositions are so similar that they appear to be direct copies of each other or perhaps works from the same workshop. That is not to say that they were the product of the same hand; indeed, many of the stylistic details vary greatly between the four, which makes it likely that they were not crafted by the same sculptor. Nonetheless, the similarities in composition and the stylistic choices made in the rendering of the body forms and 130 Bertoletti, Cima, and Talamo 2006, inv. 837; Rockwell 1993, pp ; Russell 2013, pp This process was somewhat different for architectural and garland sarcophagi, as discussed in Russell 2013, pp
89 musculature suggest that the sculptors of each of these sarcophagi had similar training. It might even be possible that one was a direct copy of another. Thus, in the case of the Ammendola Group, it is likely that at least one workshop in Rome was capable of supporting some stock on hand, which allowed the various sculptors at the workshop to repeat the composition.132 Nevertheless, the variability of the size, shape, and composition of the entire group of battle sarcophagi suggests that most were carved at a variety of small workshops. This means that they were unlikely to be produced to stock and sold off the shelves, as small workshops would not have the available capital to support this style of production. Rather, some workshops held a few marbles on hand which were carved by sculptors upon being ordered. The evidence from the Ammendola Group for a single workshop capable of supporting a stock of sarcophagi, combined with the greater variability of forms found on the wider corpus of battle sarcophagi, supports Russell s suggestion that we must consider a heterogeneous model of production. Conclusion Rather than assuming that all sarcophagi were made to order, and therefore no finished sarcophagi would have been stored at a workshop, the Ammendola Group is evidence that some sarcophagi were produced to stock. This stock of sarcophagi would have allowed sculptors at a single workshop to recreate similar scenes or to copy preexisting scenes. The remaining battle sarcophagi, with their unique compositions, were more likely produced by smaller workshops, which either had blank marble caskets available to be carved, had access to other marble blocks 132 Andreae (1956, pp ) suggests that this group of sarcophagi were similar due to a common painted prototype or pattern book. It is impossible to prove whether such a prototype existed. 81
90 which could be recut into sarcophagi, or had sarcophagi with partially rendered scenes, to which finalizing details could be added according to the specifications of the purchaser. 82
91 Chapter 7: Amazonomachies on Sarcophagi Battle between the Greeks and Amazons is a common motif on Roman sarcophagi during the 2nd and 3rd centuries CE, born from the Classical Greek tendency towards mythologizing battles, which was continued and expanded throughout the Hellenistic period.133 The Amazonomachy symbolizes an epic struggle between Greeks and the Other, and is often used alongside depictions of Gigantomachies, Centauromachies, and the Trojan War.134 This theme was picked up by the Etruscans, who widely incorporated Amazons in their funerary art as well as on various other media such as mirrors, and its popularity continued into the Roman period. Various scholars, most prominently Richard Brilliant, have cited Amazonomachies as the inspiration for the Roman battle sarcophagi, an assumption largely made because of the popularity of the subject.135 In this chapter, I will show how the Roman battle sarcophagi and Amazon sarcophagi share many stylistic and compositional features, and in particular how each uses the same figural groupings that were discussed in Chapter 5. I will then consider how these compositional similarities may affect our understanding of sarcophagus production. Rather than assuming that Amazonomachies inspired the battle sarcophagi, I instead argue that earlier Amazonomachy and battle sarcophagi would have been produced at workshops at the same time. These workshops would have roughed out generic battle scenes upon the sarcophagi, to which final details could be added in order to transform this generic battle into either an Amazonomachy or a Roman battle scene. 133 ASR II, pp ; ASR XII.1, pp ; LIMC I.1, pp ; Koch and Sichtermann 1982, pp , pls Amazons in Classical Greek art are discussed in Bothmer Amazons more broadly are discussed in Appelt 2009, Koch 2010, Mayor 2014, and Russenberger The most famous example is on the Parthenon metopes, which show all four of these battle types. See Brommer 1979, pp ; Fullerton 2000, pp ; Schwab 2005, pp (with most complete bibliography). For the inspiration of the Amazonomachy in particular, we may also turn to the shield of the Athena Parthenos statue; see Harrison 1981, pp Brilliant 1974, p
92 Amazonomachies Consider two sarcophagi featuring Amazonomachies, one of which is currently held in the Vatican Museum136 and the second in Mantua [figs ].137 Each features a dramatic battle between the Greeks and the Amazons. On the Vatican example, warriors raise their arms to strike, fall from their horses, and lie crumpled upon the ground. To the right, a lunging man holds the hair of the Amazon kneeling before him. In the center of the scene, a warrior has fallen from his horse, his back turned to the viewer and his right leg still wrapped around his horse s body. Such figures are identical to those seen on the battle sarcophagi. Bodies fall upside down and sideways, and figures face every direction to aim at their foes. On the example from Mantua, the scene similarly features falling and broken bodies, flying cloaks, and striking arms. Horses rear back as their riders are attacked. In this case, the figures are all rendered on the same scale, creating a chaotic scene in which every empty space is filled with another arm, another horse, or another cloak. These sarcophagi are strikingly similar to the battle scenes depicted on the battle sarcophagus collection. The only defining feature that sets them as Amazonomachies as opposed to more generic or Roman battles is the presence of breasts on half of the warriors. Dagmar Grassinger examined the Amazonomachies on sarcophagi and identified various figural types used.138 Grassinger s Group F features an Amazon on horseback galloping to the right [fig. 65]. The Amazon raises her sword and twists back to face the nude Greek who stands behind her, his shield raised in defense. This twisting rider resembles many Roman cavalrymen from the battle sarcophagi, who twist around in their seats, identified in Chapter 5 as the Roman 136 Ca. 180 CE. Vatican, Cortile del Belvedere inv. 896; ASR XII.1, p. 240, cat. 101, pls (with bibliography). End of the 2nd century CE. Mantua, Palazzo Ducale; ASR XII.1, p. 242, cat. 103, pls (with bibliography). 138 Grassinger 1999 (ASR XII.1), pp
93 Horseman A type. Grassinger s Group G also features a twisting Amazon on horseback, this time preparing to strike a Greek who wears a tunic that has fallen from one of his shoulders as he falls off the side of his horse, raising his left arm and right leg towards the creature [fig. 66]. This Amazon is again similar to Roman Horseman A on the battle sarcophagi, and the falling Greek is similar to Falling Barbarian B. These two figures make up the Two Riders Group on the Badia di Farfa sarcophagus (8), which features a figural group that is almost identical to the Amazon Group G. Two other figures are identified by Grassinger as Group H2, consisting of an Amazon on horseback, raising her sword arm and looking down upon a nude Greek, who turns so that his back is towards the viewer, stretching to fill the height of the scene [fig. 67]. This Greek is identical to the Turning Barbarian type from the battle sarcophagi. This similarity is further solidified by the Amazon on horseback, who is positioned in the same way as the Central Commander B type. The combination of the Turning Barbarian and the Central Commander is repeated on many of the battle sarcophagi. A similar pairing is identified by Grassinger as Group E [fig. 68]. Grassinger s Groups N and O both feature a horse who is falling head first to the ground, in a position reminiscent of the Collapsing Horse [fig. 69]. Perhaps most striking is the frequency of what appears to be the same composition as the Execution Group, identified on the Amazonomachies as Group B [fig. 70]. In the case of the Amazonomachies, it is an Amazon who kneels on the ground, her hair held by a Greek soldier. Many of the fallen figural types, Grassinger s Gefallene P, Q, R, S, W, and X, are identical to the various dying barbarians that line the bottoms of the battle sarcophagi [figs ]. Finally, the Trumpeter has been identified on a few Amazon sarcophagi, Grassinger s Tubicen Y, a tunic-wearing Greek who holds his trumpet in one hand and places his other hand on his helmet, a pose identical to the Trumpeters found on the battle sarcophagi [fig. 73]. 85
94 Many of these figural types have already been shown in Chapter 3 to be directly inspired by the Roman copies of Pergamene statues of Gauls. This is especially true for the falling and fallen bodies that occupy the lower parts of the sarcophagus battle scenes. A Roman statue of an Amazon, which features an Amazon who slumps backwards off of her horse as it rears back, reinforces this connection between these figures on sarcophagi and statues.139 This simple representation is found on many Amazonomachy sarcophagi of this period, usually with a Greek pulling the Amazon off her horse by her hair.140 As shown in Chapter 5, many of the battle sarcophagi are framed on either side by tropaea or winged Victories. On the other hand, only a few of the Amazon sarcophagi are framed. One Amazon sarcophagus at the Capitoline Museum in Rome is framed by a winged Victory on the left and a standing woman with an exposed breast holding a tropaeum on the right [fig. 74].141 This second woman is positioned identically to the framing Victories on the Via Tiburtina sarcophagus (4). On the other hand, the Badia di Farfa battle sarcophagus (8) is not framed. This is a particularly interesting case, as a few of the figures on this particular sarcophagus are types more frequently found in the Amazonomachies.142 For example, the barbarian who has fallen off the side of his horse, Falling Barbarian B, is quite common on the Amazon sarcophagi.143 This sarcophagus also lacks any central commander figure. The prominence of the falling barbarian and the lack of framing and a central figure on the Badia di Farfa sarcophagus (8) suggest that this scene may have been roughed out at a workshop with the 139 Farnese Collection inv. 6405; Giuliano 1979, pp , n. 111 (with bibliography); Stewart 2004, p. 61, fig Group A in Grassinger Ca. 170 CE. Museo Capitolino Inv Krierer 1995, p. 40, pls. 5-6; ASR XII.1, p. 237, cat. 94, pls (with bibliography). 142 The similarities between the Badia di Farfa (8) and Badia di Cava (9) battle sarcophagi are recognized by Russenberger (2015, pp ). 143 Group G in Grassinger
95 intention of adding the details of an Amazonomachy, only to have a customer choose to instead have a Roman and barbarian battle. The figures used on the Badia di Cava sarcophagus (9) are similar to those on the Badia di Farfa (8). Here the scene is framed only by standing nude men. The Falling Barbarian B type is prominently featured in the center of the scene. On the far left of the scene, a man in uniform sits on the ground about to be struck by the nude soldier who stands above him. The man on the ground recalls the Cowering Barbarian figural type, but he is in full Roman uniform. Again, this may be an example of a sarcophagus that had been roughed out with the intention of becoming an Amazonomachy. That would explain why a body in uniform is here shown upon the ground, something that is almost never shown on the Roman battle sarcophagi. It was more practical for the sculptor to turn this figure, which was intended to be an Amazon in a tunic, into a Roman in full uniform than it would have been to transform this figure into a nude barbarian. What this analysis of the compositional groupings on the Amazonomachy sarcophagi reveals is that these scenes were using the same figural types as the Roman battle sarcophagi. Accordingly, it has been suggested that the Amazon sarcophagi were the inspiration for the Roman battle sarcophagi.144 Because the Amazonomachy has a much longer history of representation than do the non-mythological battle scenes of the battle sarcophagi, it is therefore more likely that the Amazon battles would inspire the barbarian battles rather than the other way around.145 Amazon sarcophagi, however, are roughly contemporary with the Roman battle sarcophagi. This chronology is extremely problematic, as it is almost entirely based on stylistic comparisons between various sarcophagi and the imperial art from the period, but nevertheless Brilliant 1974, p See the full list in LIMC I.1, pp
96 there is no clear evidence to suggest that the Amazonomachy sarcophagi were popular before the battle sarcophagi. The two scenes are contemporary. Adding to the contemporaneity of the two types of sarcophagus scenes, a consideration of prior representations of Amazomachies reveals that their form on the sarcophagi is quite different from anything that comes before. Firstly, Amazonomachies, especially in Roman art, tend to be focused on a specific Amazon myth, such as Achilles and Penthesilea, Herakles and Hippolyta, or Theseus and Antiope.146 More generalized Amazon battles exist, though they are less popular; however, generalized Amazonomachies were rather popular in Greek art, including depictions on various vase paintings and architectural sculptures, such as on the Temple of Apollo at Bassae [fig. 75].147 In these Amazonomachies, the figures are almost entirely frontal and paratactic, creating a much different composition than what is seen on the chaotic and overly crowded Amazon sarcophagi.148 Greek Amazonomachies do not account for the stylistic trends that occur on the Amazon sarcophagi. It is possible that the sculptors of these Amazonomachies were similarly using the various statuary prototypes that were identified on the battle sarcophagi, including Roman copies of the Attalid Gauls and the various Roman Amazon statues. This would explain the use of almost identical compositional groupings between the two types of battles. The conglomeration of a variety of statuary types to create a cohesive scene may have simply been the standard practice for the representation of battles on sarcophagi during this period, following the trend 146 This is apparent when one examines Zanker and Ewald s 2004 book, Living with Myths. Amazonomachies are only discussed within the context of the Achilles and Penthesilea myth, despite the preponderance of more generic Amazonomachies on Antonine sarcophagi. Few studies have been done on the generic Amazon battle scenes. 147 Bothmer For the Temple of Apollo at Bassae, see Mallwitz 1975, pp ; Arapoyianni 2007 (with a full bibliography). 148 Hamberg (1945, pp ) discusses the similarities between the Amazon and battle sarcophagi that distinguish the Amazonomachies from prior, more Classical renditions. 88
97 seen on imperial art away from separated fighting masses and towards a greater emphasis on one-on-one combats. It can be assumed that such scenes could have been crafted at the same workshops by the same sculptors.149 Sculpting Workshops As noted above in Chapter 6, evidence from the Centrale Montemartini boar-hunt sarcophagus suggests that the carving of a sarcophagus scene was a gradual process.150 The sculptor did not simply carve the entire scene at once, but instead roughed out the decoration and gradually added the finer details. This sculpting procedure allowed a workshop to hold a stock of roughed-out chests, rather than entirely completed chests, which could more easily be sold. These partially sculpted sarcophagi could have been completed according to the desires of a customer, allowing for a faster purchasing process, and at the same time reducing the risk for the workshop that was inherent in maintaining completed stock. Completed sarcophagi may never have been purchased, but partially sculpted sarcophagi, which could have been altered, were more likely to have been purchased. The workshops could have achieved a careful balance between sarcophagi that could be quickly acquired and sarcophagi that fit the customer s needs.151 Sometimes, the initial intent of the roughed out scene might have been altered according to the needs of the customer, as evidenced by the sarcophagus from Campania that represents a reclining Endymion, surrounded by Cupids [fig. 77].152 Upon closer examination, it is quite clear 149 This is similar to the argument that sarcophagus sculptors were used to carve the Column of Marcus Aurelius, as discussed in Beckmann 2011, pp Bertoletti, Cima, and Talamo 2006, inv. 837; Rockwell 1993, pp ; Russell 2013, pp As it is put by Russell (2013, p. 295), the more defined the product, the more reduced the potential marketplace for it. 152 Elsner 1998, pp
98 that the main figure originally had breasts and female genitalia and was intended to represent Ariadne. It is likely that the sarcophagus was available and ready to be sold but was altered at the request of the purchaser, who wanted a male to be featured instead. In the case of the Amazonomachy and battle sarcophagi, we can imagine a similar model, whereby the workshop roughly carved a generic battle scene, and the purchaser could then request that some of the figures be altered to resemble either Amazons or barbarians. Perhaps Roman battles were preferred for male burials and Amazonomachies for female burials. 153 One difficulty with this interpretation is the fact that barbarians on Roman battle sarcophagi are often nude, while Amazons are always shown wearing a belted chiton. Because of this, it would not be plausible that these two enemies were easily interchangeable. However, a careful consideration of the figural groups reveals that it was often the Roman soldiers who were interchangeable with the Amazons. Consider Grassinger s Groups F, G, and H2 cited above. Each of these figural types on the Amazonomachies feature an Amazon on horseback, attacking a nude Greek. These same groupings on the battle sarcophagi consist of a Roman horseman, such as the Roman Horseman A or the various Central Commander types, attacking a nude barbarian. The barbarian and Greek would thus be easily interchangeable, as little to no wardrobe change would be necessary. Similarly, the Roman and Amazon could be interchanged with relative ease: the Roman wears a tunic and the Amazon a belted chiton, each of which falls to the mid-thigh creating a sort of skirt. The sculptor would simply need to apply specific details to distinguish between the two, either a muscle cuirass for a Roman or an exposed breast for an Amazon. Adding to this connection, many of the Amazons on Roman Amazon sarcophagi wear helmets, 153 Russenberger (2015) argued that Amazonomachy sarcophagi were intended to represent female virtues and were therefore used for female burials. 90
99 similar to those that the Roman soldiers wear. 154 This pattern of Romans and Amazons being interchangeable has its exceptions. The best example is the Execution Group, or Grassinger s Group B; in the case of the battle sarcophagi, it is a barbarian who is killed, and in the case of the Amazonomachy, it is an Amazon. This association between the Amazonian warriors and the Roman soldiers has interesting implications. It would, of course, be extremely un-roman to imply that Romans are comparable to women. 155 Indeed, the Amazons, though a fair match to their Greek opponents, are intended to represent the enemy in the Amazonomachy. Two potential explanations arise. The first is purely pragmatic: Amazons and Romans both wear skirts and ride horses, Greeks and barbarians are both (mostly) nude and fight on foot. If generic battle scenes were roughed out, to which detail could later be applied, it would be logical to allow for as much overlap between the two potential final products as possible. The interchangeability between the Roman and Amazonian figures was purely practical and had no further implications. That being said, it is also worth considering that this association may have had some deeper connotations. The final products of either a battle or Amazonomachy sarcophagus would have been noticeably similar, with the Romans taking many of the same fighting stances as the Amazons. To solidify this potential connection, I turn to the statue featuring an Amazon fighting Gaul, as mentioned in Chapter The Gaul is an exclusively Roman enemy during the 2 nd century CE, and to see an Amazon taking the place of a Roman soldier must have been striking. 154 It is important to note that these connections apply to Amazon sarcophagi found and likely produced in Italy. Other similarities between Attic Amazon sarcophagi and Attic battle sarcophagi also exist, but this goes beyond the scope of this particular paper. 155 As stated by Inge Hansen: women may be ennobled by reference to male characteristics, but a woman behaving like a man is a monster who overturns social order and stability (Hansen 2003, p. 108). 156 Museo Nazionale Romano inv ; Krierer 1995, pp , pl. 58, n. 201; Stewart 2004, p. 67, fig. 85 (with most up to date bibliography). 91
100 The Romans did occasionally identify themselves with the east, particularly through their Trojan lineage.157 Roma herself is usually personified as an Amazonian warrior. Nevertheless, further study would be required before making any claims about the connections between the Romans and the Amazons. Another possible explanation requires a reexamination of the meaning behind Amazonomachies on sarcophagi. While most scholars agree that the Amazonomachy is a metaphorical representation of Roman male virtus, Christian Russenberger has recently questioned this assessment.158 Russenberger noticed a pattern of using this scene type on sarcophagi that held females. The Amazonomachy would therefore not represent male virtus, but instead the tragedy of female death. According to Russenberger s interpretation, the gruesome aspects of war that are underlined by the chaotic nature of the Amazon scenes and that focus upon the defeated enemy serve to symbolize the tragedy of death more broadly. The viewer is not expected to identify with either the Greeks or Amazons, but to recognize the more difficult aspects of war. With this interpretation, the use of Amazonomachies is rather similar to the battle sarcophagi, which emphasize the drama of war through the prominence of the dead and dying barbarians. This pattern of roughing out battle scenes for the later application of detail does not apply to all Amazonomachy and battle sarcophagi. Many Amazonomachies, such as the sarcophagus at the Vatican [fig. 78], prominently feature the myth of Achilles and Penthesilea.159 Most of the figures in this scene follow the same patterns described above, but two figures are featured in the center: Achilles holds the collapsing body of Penthesilea, rendered on a larger scale and standing 157 Rose 2014, pp Russenberger Grassinger 1999, ASR XII.1, cat. no. 127, pl
101 apart from the action. Similarly, the central commander figure on many of the battle sarcophagi stands out as a feature unique to the battle scenes. However, the Achilles and Penthesilea scene does not become prominent until the early 3rd century CE.160 This is around the same period when the Roman battle sarcophagi begin to abandon the confined set of figural groupings in favor of the far more complex and chaotic scenes, in which every single barbarian is shown clothed and all of the figures are rendered on a smaller scale, as on the Villa Borghese (13) and Portonaccio (16) sarcophagi. These scenes seem to move away from the stylistic conventions of the earlier battle sarcophagi in order to create scenes that are even more realistic and dramatic. Thus there is a point around the turn of the century during which the Amazon and battle sarcophagi branch off into two rather distinct compositional types. The battles are no longer closely related, and it is no longer possible to see one as a direct inspiration for the other. The Central Commander figure on the battle sarcophagi begins to be emphasized in a more dramatic way, which shifts the mood of the battle scenes away from the tragedy of the dying enemy and towards the victory of the Romans over this enemy. This also corresponds with the quickly diminishing popularity of the battle scenes on sarcophagi, as scenes of battles became exclusive to imperial art.161 Because the battle sarcophagi were no longer as popular, the few later examples, such as the Ludovisi sarcophagus, were the result of private commission. This explains why the Amazonomachies and battle sarcophagi were no longer similar in composition: workshops would no longer have had a market for battle sarcophagi, and would thus have been safe to simply produce Amazonomachies. Conclusion 160 This trend towards featuring the main figures of a myth at the center of the composition was noted by Borg 2013, pp Discussed in Hölscher
102 Amazonomachies on Roman sarcophagi are composed of many of the same figural types and groups found on the Roman battle sarcophagi. The similarities between these two sarcophagus types suggest that they may have been produced by the same workshops. Because the sculpting process allowed workshops to rough out sarcophagus decoration, to which later detail may have been applied, the similarities between the Amazonomachy and battle sarcophagi suggest that the two scenes were originally interchangeable. A workshop could rough out a generic battle scene, to which final details would have been added according to the desires of the customer, changing the scene into either a battle between Greeks and Amazons or Romans and barbarians. Both the Amazonomachy and battle sarcophagi may have appealed to the Roman audience for similar reasons. While the battle sarcophagi showed realistic and historical battles to represent Roman victory, the scenes were focused upon the virtue of the Roman soldiers and their glorious ability to vanquish a worthy foe. Similarly, the Amazonomachy sarcophagi may have represented victory over a vicious foe, emphasizing the virtues of the victor. 162 This suggests that their messages were almost as interchangeable as their compositions; the customer simply had to choose between mythology and history. 162 Russenberger (2015, pp ) instead argued that, while Antonine representations of the myth of the Amazons may have been intended to emphasize these virtues, 3 rd century CE Amazonomachies, with their increased focus on the emotional aspects of death, instead represented the paradigm of female death. 94
103 Chapter 8: Conclusions Contextualizing the Roman battle sarcophagi requires a thorough examination of their stylistic and compositional trends, as they lack findspots. This paper has sought to illuminate the position of these sarcophagi within broader changes of artistic style, ideology, and production. A number of earlier works inspired the Roman battle sarcophagi, but the stylistic tendencies first presented by the various arts of the Pergamenes were particularly influential. The Hellenistic baroque style featured on the Altar of Zeus at Pergamon laid the foundation for the depiction of extreme emotion in battle scenes. The twisted and contorted bodies of the various Attalid dedications were widely copied by the Romans, and these statuary types inspired the dramatic body positions of the figures on the sarcophagi, which turn through space and invite the viewer to imagine their full three-dimensional form. It is as though the sculptors simply assembled these Attalid-inspired sculptures to create their comprehensive scenes. While Roman triumphal paintings have long been considered to be a major inspiration for the battle sarcophagi, the prominence of landscapes in Roman paintings and the lack of landscapes on the battle sarcophagi suggest that the inspiration must lie elsewhere. Additionally, new evidence that reconstructs these so-called triumphal paintings as stages carrying statues reaffirms that the sarcophagi were inspired instead by sculptures. Stylistically, the battle sarcophagi also reflect a number of major innovations occurring in imperial art from the time of Trajan to the time of Septimius Severus. The separation of the emperor from the action of a battle, in a triumphal pose upon his horse, became a major trope on the sarcophagi, especially on the later examples. The use of multiple ground lines as on the Column of Marcus Aurelius and the Arch of Septimius Severus was incorporated onto the sarcophagi to create densely packed compositions with figures reaching and falling across the 95
104 entire height of the scene. While imperial art only experimented with a shift away from blocky divisions of space towards more complex patterns of one-on-one combats, the battle sarcophagi presented scenes that jumbled these single combats to create chaotic depictions of battles. Specific figural types and groups can be identified on all of the battle sarcophagi. These types are arranged in various ways, suggesting that there was no single model for their creation. Instead, a wide range of individual types could be assembled by sculptors to achieve a desired effect. However, four sarcophagi stand out because their compositions not only used the same figures, but also arranged these figures in a similar way. It is therefore plausible that this Ammendola Group was carved at a single workshop. The rest of the battle sarcophagi, however, show such a wide range of compositions that it is likely they were all produced at separate, smaller scale workshops. The battle sarcophagi therefore support a heterogeneous model for the sarcophagus industry, which allowed for both small scale workshops working under commission and larger workshops capable of producing some stock of sarcophagi. By comparing the compositions on the battle sarcophagi and Amazonomachy sarcophagi, it is apparent that the compositions of the two are similar. The scenes on the Amazonomachy sarcophagi feature many of the same figural types and groups that are found on the battle sarcophagi. Iconographically, the two types of battles are interchangeable, apart from the dress of the figures. The similarities between the compositions of the Amazonomachy and battle sarcophagi suggest that some workshops would have had mostly completed sarcophagi on hand, which could be further refined according to the desires of the purchaser. The ability for workshops to have almost completed works available for purchase would have sped up the purchasing process, while the ability to refine the scenes on these sarcophagi according to the desires of the consumer would have given the workshops greater security. 96
105 This thesis has shown that compositional analysis can be an effective tool for understanding production. Studying the battle sarcophagi in isolation from the full range of sarcophagi allows for a more in depth understanding of their compositions. Without this close examination, it would not be possible to draw conclusions about their workshops. While a similar composition-based study could be applied to other sarcophagi, it would be necessary to first examine sarcophagi that show the same types of scenes in order to look for repeated figural types, as I have done by examining the battle sarcophagi separately from the Amazonomachy sarcophagi. I do not, however, believe that other sarcophagus scenes would lend themselves to the same patterns seen here with the battle and Amazonomachy sarcophagi. These two scenes could be carved interchangeably at workshops because of the similarities of their representations: they both show battles that feature unnamed figures. The majority of other figural sarcophagi show mythological or biographical scenes that cannot be made generic because they represent specific figures and events. Nevertheless, it would be beneficial to conduct a study of the Roman battle sarcophagi alongside the Attic battle sarcophagi. Though some similarities exist between the two, the Attic sarcophagi are generally more paratactic and rigid. It may be possible to identify specific figural types and groups on these Attic battle sarcophagi, and perhaps sculptural parallels for these types. There is also excellent evidence for the similarities between the Attic battle sarcophagi and Attic Amazonomachy sarcophagi, as was mentioned briefly by Roman Redlich in his dissertation on Amazon sarcophagi. 163 Much could be learned by studying these parallels alongside the Roman examples discussed here. By considering the compositions of the Attic battle sarcophagi and their relationship with Attic Amazon sarcophagi, it may be possible to find 163 Redlich
106 similar conclusions about the sarcophagus industry and sculptural workshops. If these parallels between the Attic battle and Amazon sarcophagi are similar to those found between the Roman battle and Amazon sarcophagi, this would reaffirm the conclusions made by this thesis. 98
107 Bibliography ASR = Die antiken Sarkophagreliefs Agnoli, N Museo Archeologico Nazionale di Palestrina: le sculture. Rome. Alexandrescu, C Blasmusiker und Standartenträger im römischen Heer: Untersuchungen zur Benennung, Funktion und Ikonographie, Cluj-Napoca, Romania. Amedick, R Die Sarkophage mit Darstellungen aus dem Menschenleben (ASR 14), Berlin. Amedick, R Etruskische Sepulkralkunst und römische Sarkophage, in SarkophagStudien III, ed. G. Koch, Mainz, pp Andreae, B Motivgeschichtliche Untersuchungen zu den römischen Schlachtsarkophagen, Berlin. Andreae, B Zur Komposition des großen Ludovisischen Schlachtsarkophages, in Wissenschaftliche Zeitschrift der Universität Rostock, Rostock, pp Andreae, B Imitazione ed originalita nei sarcofagi Romani, RendAccIt 41, pp Andreae, B The Art of Rome, trans. R. Wolf, New York. Andreae, B Vom Pergamonaltar bis Raffael: Vorbilder, Eingenart, und Wirkung der römischen Sarkophage, AW 23, pp Appelt, H Die Amazonen: Töchter von Liebe und Krieg, Stuttgart. Arapoyianni, X The Temple of Apollo Epikourios at Bassae, trans. A. Farrington, Athens. Arias, P., E. Cristiani, and E. Gabba Camposanto monumentale di Pisa: la antichita, Pisa. Ashmole, B A Catalogue of the Ancient Marbles at Ince Blundell Hall, Oxford. Aurigemma, S Terme de Diocleziano e il Museo Nazionale Romano, Rome. Aurigemma, S Le Terme di Diocleziano e il Museo Nazionale Romano 5, Rome. Aurigemma, S Die Diokletiansthermen und das Museo Nazionale Romano, Rome. 99
108 Austin, N. and N. Rankov Exploratio: Military and Political Intelligence in the Roman World, London. Bandinelli, R Rome, The Centre of Power: Roman Art to AD 200, trans. P. Green, London. Bartman, E Carving the Badminton Sarcophagus, MMAJ 28, pp Baumer, L., T. Hölscher, and L. Winkler Narrative Systematik in den Reliefs der Traianssäule: Drei Fallstudien, JdI 106, pp Beard, M The Roman Triumph, Cambridge, Mass. Beckmann, M The Column of Marcus Aurelius: The Genesis and Meaning of a Roman Imperial Monument, Chapel Hill. Bellido, A Esculturas Romanas de España y Portugal, Madrid. Bertoletti, M., M. Cima, and E. Talamo Centrale Montemartini: Museo Capitolini, Milan. Bie, O Kampfgruppe und Kämpfertypen in der Antike, Berlin. Bielfeldt, R Orestes auf römischen Sarkophagen, Berlin. Bieńkowski, P Die Darstellungen der Gallier der hellenistischen Kunst, Vienna. Birk, S Carving Sarcophagi: Roman Sculptural Workshops and their Organization, in Ateliers and Artisans in Roman Art and Archaeology (JRA Supplementary Series 92), ed. T. Kristensen and B. Poulsen, pp Birk, S Depicting the Dead: Self-Representation and Commemoration on Roman Sarcophagi with Portraits (Aarhus Studies in Mediterranean Antiquity XI), Aarhus. Bonfante, L The Barbarians of Ancient Europe: Realities and Interactions, Cambridge. 100
109 Borg, B Crisis and Ambition: Tombs and Burial Customs in Third Century CE Rome, Oxford. Bothmer, D Amazons in Greek Art, Oxford. Brandenburg, H Der Beginn der stadtrömischen Sarkophag-Produktion der Kaiserzeit, JdI 93, pp Brilliant, R Gesture and Rank in Roman Art, New Haven, Conn. Brilliant, R The Arch of Septimius Severus in the Roman Forum (MAAR XXIX), Rome. Brilliant, R Roman Art from the Republic to Constantine, London. Brilliant, R Visual Narratives: Storytelling in Etruscan and Roman Art, Ithaca, N.Y. Brilliant, R The Pax Romana: Bridge or Barrier between Romans and Barbarians, in Gegenwelten zu den Kulturen Griechenlands und Roms in der Antike, ed. T. Hölscher, Leipzig, pp Cain, H. and S. Rieckhoff Die Religion der Kelten, Mainz. Calza, R Antichità di Villa Doria Pamphilj, Rome. Campelli, V Sarcofago del Museo Mussolini con scene di battaglia, BullCom 63, pp Candilio, D Il restauro dei rilievi Giustiniani, in I Giustiniani e l'antico: Palazzo Fontana di Trevi, Roma 26 ottobre gennaio 2002, ed. G. Fusconi, Rome, pp Cichorius, C Die Reliefs der Traianssäule, Berlin. Ciliberto, F Die Sarkophage der Region von Friuli-Venezia Giulia, in SarkophagStudien III, ed. G. Koch, Mainz, pp
110 Claveria, M Roman Sarcophagi in Tarragona, in Sarkophag-Studien I, ed. G. Koch, Mainz, pp Coarelli, F The Column of Trajan, trans. C. Rockwell, Rome. Coarelli, F La Colonna di Marco Aurelio, trans. H. Patterson, Rome. Cohen, A The Alexander Mosaic: Stories of Victory and Defeat, Cambridge. Cossiga, F. (ed) Palazzo Cenci: Palazzo Giustiniani, Rome. Curtius, L Neue Denkmäler antiker Kunst, RM 54, pp Dallas Museum of Art = Dallas Museum of Art. A Guide to the Collection, Dallas De Angelis D Ossat, M., ed Scultura antica in Palazzo Altemps: Museo Nazionale Romano, Milan. De Angelis D Ossat, M., ed Palazzo Altemps: le collezioni, Milan. De Lachenal, L "Sarcofago colossale con battaglia fra Romani e barbari," in Museo Nazionale Romano 1.5.1: I Marmi Ludovisi nel Museo Nazionale Romano, ed. B. Palma, Rome, pp Dillon, S Women on the Columns of Trajan and Marcus Aurelius and the Visual Language of Roman Victory, in Representations of War in Ancient Rome, ed. S. Dillon and K. Welch, Cambridge, pp Dowling, M Clemency and Cruelty in the Roman World, Ann Arbor, Mich. Eliopoulos, T The Kerameikos Archaeological Museum, Athens. Ellis, A Rev. of R. Redlich, Die Amazonensarkophage des 2. und 3. Jahrhunderts N. Chr., in AJA 54, pp Elsner, K Art and the Roman Viewer: The Transformation of Art from the Pagan World to Christianity, Cambridge. 102
111 Elsner, J The Imperial Rome and Christian Triumph: The Art of the Roman Empire AD , Oxford. Elsner, J. and J. Huskinson, eds Life, Death, and Representation: Some New Work on Roman Sarcophagi, Berlin. Ewald, B. and C. Noreña The Emperor and Rome: Space, Representation, and Ritual (YCS XXXV), Cambridge. Fant, J The Roman Emperors in the Marble Business: Capitalists, Middlemen or Philanthropists? in Classical Marble: Geochemistry, Technology, Trade (NATO ASI Series 153), ed. N. Herz and M Waelkens, Dordrecht, Netherlands. Faust, S Schlachtenbilder der römischen Kaiserzeit: erzählerische Darstellungskonzepte in der Reliefkunst von Traian bis Septimius Severus, Rahden. Ferris, I Enemies of Rome: Barbarians through Roman Eyes, Gloucestershire. Ferris, I Hate and War: The Column of Marcus Aurelius, Gloucestershire. Ferris, I The Arch of Constantine, Amberley. Fittschen, K Sarkophage römischer Kaiser oder vom Nutzen der Porträtforschung, JdI 94, pp Francis, J A Roman Battle Sarcophagus at Concordia University, Montreal, Phoenix 54.3/4, pp Frothingham, A. The Ludovisi Sarcophagus and the Dating of Roman Sarcofagi, AJA 26, pp Fullerton, M Greek Art, Cambridge. Gabelmann, H Pantherfellschabracken. BJb 196, pp Gasparri, C., ed Le sculture Farnese I, Milan. 103
112 Gasparri, C. and R. Paris Palazzo Massimo alle Terme: le collezioni, Milan. Giuliano, A Arco di Constantino, Rome. Non vidi. Giuliano, A Museo Nazionale Romano: le sculture I.1, Rome. Giuliano, A Museo Nazionale Romano: le sculture. I Marmi Ludovisi nel Museo Nazionale Romano I.5, Rome. Giuliano, A Museo Nazionale Romano: le sculture I.8, Rome, pp Non vidi. Giustiniani, V Galleria Giustiniana II, Rome. Grant, M The Antonines: The Roman Empire in Transition, London. Grassinger, D Die Mythologischen Sarkophage (ASR XII.1), Berlin. Griebel, J Der Kaiser im Krieg: Die Bilder der Säule des Marc Aurel, Berlin. Guerrini, L Sculture di Palazzo Mattei, Rome. Hallett, C The Roman Nude: Heroic Portrait Statuary 200 BC-AD 300, Oxford. Hamberg, P Zur Bewaffnung und Kampfesart der Germanen, ActaArch 7, pp Hamberg, P Studies in Roman Imperial Art, with Special Reference to the State Reliefs of the Second Century, Copenhagen. Hanfmann, G Roman Art: A Modern Survey of the Art of Imperial Rome, Greenwich, Conn. Hannestad, N Roman Art and Imperial Policy, Aarhus. Hansen, I Gendered Identities and the Conformity of Male-Female Virtues on Roman Mythological Sarcophagi, in Public Roles and Personal Status. Men and Women in Antiquity. Proceedings of the Third Nordic Symposium on Gender and Women s History in Antiquity, ed. L. Lovén and A. Strömberg, pp Hardwick, L Ancient Amazons: Heroes, Outsiders, or Women? GaR 37.1, pp
113 Harrison, E Motifs of the City-Siege on the Shield of Athena Parthenos, AJA 85.3, pp Heckel, W Mazaeus, Callisthenes, and the Alexander Sarcophagus, Historia 55.4, pp Heilmeyer, W Ancient Workshops and Ancient Art, OJA 23.4, pp Heitz, C Die Guten, die Bösen und die Hasslichen: nördliche "Barbaren" in der römischen Bildkunst, Hamburg. Helbig, W Guide to the Public Collections of Classical Antiquities in Rome I-III, trans. J. and F. Muirhead, Leipzig. Holliday, P Roman Triumphal Painting: Its Function, Development, and Reception, The Art Bulletin 79.1, pp Hӧlscher, T., ed Gegenwelten: zu den Kulturen Griechenlands und Roms in der Antike, Munich. Hӧlscher, T Images of War in Greece and Rome: Between Military Practice, Public Memory, and Cultural Symbolism, JRS 93, pp Hӧlscher, T The Language of Images in Roman Art, Cambridge. Hӧlscher, T The Transformation of Victory into Power: From Event to Structure, in Representations of War in Ancient Rome, ed. S. Dillon and K. Welch, Cambridge, pp Hurwit, J The Problem with Dexileos: Heroic and Other Nudities in Greek Art, AJA 111.1, pp Huskinson, J Roman Strigillated Sarcophagi: Art and Social History, Oxford. Ippoliti, A Il restauro di Palazzo Giustiniani, Rome. Non vidi. 105
114 Johannes, D Der Alexandersarkophag und seine Werkstatt, Berlin. Jones, S Catalogue, Museo Capitolino, Rome. Jung, H Zum Reliefstil der stadtrömischen Sarkophage des frühen 3. Jahrhunderts n. Chr., JdI 93, pp Jung, H Zur Vorgeschichte des spӓtantoninischen Stilwandels, MarbWPr, pp Kähler, H Rom und seine Welt: Bilder zur Geschichte und Kultur, Munich. Kampen, N Biographical Narration and Roman Funerary Art, JRA 85, pp Kistler, E Funktionalisierte Keltenbilder: die Indienstnahme der Kelten zur Vermittlung von Normen und Werten in der hellenistischen Welt, Berlin. Kleiner, D Roman Sculpture, Yale. Kleiner, F A History of Roman Art, Boston, Mass. Koch, A. et al Amazonen: Geheimnisvolle Kriegerinnen, Munich. Koch, G Sarkophage der römischen Kaiserzeit, Darmstadt. Koch, G. and H. Sichtermann Griechische Mythen auf römische Sarkophagen, Tübingen. Koch, G. and H. Sichtermann Römische Sarkophage, Munich. Koortbojian, M Myth, Meaning, and Memory on Roman Sarcophagi, Berkeley, Calif. Krierer, K Sieg und Niederlage: Untersuchungen physiognomischer und mimischer Phänomene in Kampfdarstellungen der römischen Plastik, Vienna. Krierer, K Antike Germanenbilder, Vienna. Künzl, E Der Traum vom Imperium: Der Ludovisisarkophag Grabmel eines Feldherrn Roms, Regensburg/Mainz. Landskron, A Parther und Sasaniden: das Bild der Orientalen in der römischen Kaiserzeit, Vienna. 106
115 Landskron, A Das Partherdenkmal von Ephesos: Ein Monument für die Antoninen, ÖJh 75, pp La Regina, A., ed Palazzo Massimo Alle Terme, Milan. Leal, E The Empire s Muse: Roman Interpretations of the Amazons through Literature and Art (thesis San Diego State University). Lepper, R. and S. Frere Trajan s Column: A new tradition of the Cichorius Plates, Gloucester. Ling, R Roman Painting, Cambridge. Lusnia, S Battle Imagery and Politics on the Severan Arch in the Roman Forum, in Representations of War in Ancient Rome, ed. S. Dillon and K. Welch, Cambridge, pp Maderna-Lauter, C Unordnung als Bedrohung: Der Kampf der Giganten gegen die Götter in der Bildkunst der hellenistischen und römischen Zeit, in Gegenwelten zu den Kulturen Griechenlands und Roms in der Antike, ed. T. Hölscher, Leipzig, pp Mallwitz, A Der Bassai-fries in der ursprünglich geplanten Anordnung, Munich. Marszal, J Ubiquitous Barbarians: Representations of the Gauls at Pergamon and Elsewhere, in From Pergamon to Sperlonga: Sculpture and Context, ed. N. de Grummond and B. Ridgway, Berkeley, pp Matz, F Ein römisches Meisterwerk: Der Jahreszeitensarkophag Badminton, New York. Matz, F. and F. Duhn Antike Bildwerke in Rom I-III, Leipzig. Mayor, A The Amazons: Lives and Legends of Warrior Women across the Ancient World, Princeton. McCann, A Roman Sarcophagi in The Metropolitan Museum of Art, New York. 107
116 Meinecke, K. Roman Sarcophagi in their Original Context: Rome and Vicinity, published online at Meinecke, K Funerary Cult at Sarcophagi: Rome and Vicinity, in Iconographie funéraire romaine et société: corpus antique, approches nouvelles? Collection Histoire de l art 3, ed. M. Galinier and F. Baratte, Perpignan, pp Meinecke, K Sarcophagum Posuit: Römische Steinsarkophage im Kontext (SarkophagStudien 7), Ruhpolding. Moreno, P. and A. Viacava I marmi antichi della Galleria Borghese: la collezione archeologica di Camillo e Francesco Borghese, Rome. Morris, I Death-Ritual and Social Structure in Classical Antiquity, Cambridge. Moscati, S. and C. di Stefano Palermo: Museo Archeologico, Palermo. Müller, H Die Kelten aus Sicht der Anderen, in Die Religion der Kelten, ed. H. Cain and S. Rieckhoff, Mainz, pp Musso, L Sarcofago da Portonaccio con raffigurazione di scontro tra romani e barbari, in Museo Nazionale Romano: le sculture I.8, ed. A. Giuliani, Rome, pp Musso, L Sarcophago con Galatomachia complete di coperchio, in Musei Capitolini: le sculture del Palazzo Nuovo I, ed. E. La Rocca and C. Presicce, Rome, pp Mustilli, D Museo Mussolini, Rome. Muth, S Im Angesicht des Todes. Zum Wertediskurs in der römische Grabkultur, in Römische Werte als Gegenstand der Altertumswissenschaft, ed. A. Haltenhoff, A. Heil, and F. Mutschler, Leipzig, pp Nibby, A Monumenti scelti della Villa Borghese, Rome. 108
117 Ӧstenberg, I Staging the World: Spoils, Captives, and Representations in the Roman Triumphal Procession, Oxford. Panofsky, E Tomb Sculpture: Four Lectures on its Changing Aspects from Ancient Egypt to Bernini, ed. H. Janson, New York. Pardyová, M La representation de bataille sur le sarcophage de Portonaccio et sa composition, Eirene 42, pp Paribeni, R Le Terme di Diocleziano e il Museo Nazionale Romano, Rome. Parker, A Ancient Shipwrecks of the Mediterranean and the Roman Provinces (BAR-IS 580), Oxford. Pasinli, A The Book of the Alexander Sarcophagus, Istanbul. Pearson, P The Archaeology of Death and Burial, Rome. Pelikán, O Vom antiken Realismus zur spätantiken Expressivität, Praha. Picard, G Roman Painting, Milan. Pirson, F Vom Kämpfen und Sterben der Kelten in der antiken Kunst, in Die Religion der Kelten, ed. H. Cain and S. Rieckhoff, Mainz, pp Platt, V Framing the Dead on Roman Sarcophagi, in RES: Anthropology and Aesthetics, ed. J. Elsner and H. Wu, Cambridge, Mass., pp Pollitt, J The Art of Rome c. 753 B.C.- A.D. 337: Sources and Documents, Cambridge. Pollitt, J Art in the Hellenistic Age, Cambridge. Prignitz, S Der Pergamonaltar und die pergamenische Gelehrtenschule, Berlin. Ramage, A. and N. Ramage Roman Art: Romulus to Constantine, Upper Saddle River, N.J. 109
118 Redlich, R Die Amazonensarkophage des 2. und 3. Jahrhunderts N. Chr., Berlin. Non vidi. Reinach, S Gaulois dans l art antique, RA 28, pp.11-22, , Reinach, S Répertoire de Reliefs: Grecs et Romains 3, Paris. Reinsberg, C Senatorensarkophage (RM 102), Mainz. Reinsberg, C Die Sarkophpage mit Darstellungen aus dem Menschenleben: Vita Romana (ASR III.1), Berlin. Reschke, E Römische Sarkophagkunst zwischen Gallienus und Constatin, Berlin. Non vidi. Rich, J. and G. Shipley War and Society in the Roman World, London. Richter, G Perspective in Greek and Roman Art, London. Richter, G. and J. Breckenridge The Relation of Early Imperial Rome to Greek Art, ANRW II.12.1, pp Rivière, Y I sarcophagi con scene di battaglia, in Roma e i barbari: la nascita di un nuovo mondo, ed. J. Aillagon, Venice, pp Rivière, Y Il sarcofago di Portonaccio (Roma), in Roma e i barbari: la nascita di un nuovo mondo, ed. J. Aillagon, Venice, pp Rizzo, G Sculture antiche del Palazzo Giustiniani, BCom 32, pp Robert, C Einzelmythen (ASR III, 1-3), Berlin. Rocca, E. and C. Presicce, eds Musei Capitolini: le sculture del Palazzo Nuovo, Rome. Rockwell, P The Art of Stoneworking: A Reference Guide, Cambridge. Rodenwaldt, G Die Kunst der Antike: Hellas und Rom, Berlin. Rodenwaldt, G Der große Schlachtsarkophag Ludovisi, AntDenk 4, pp
119 Rodenwaldt, G Über den Stilwandel in der antoninischen Kunst, Berlin. Rodenwaldt, G Art from Nero to the Antonines, in Cambridge Ancient History XI, 1st ed, ed. S. Book, F. Adcock, and M. Charlesworth, Cambridge, pp Rose, C.B The Archaeology of Greek and Roman Troy, Cambridge. Rosso, E I barbari nell arte romana (I-III secolo d.c.), in Roma e i barbari: la nascita di un nuovo mondo, ed. J. Aillagon, Venice, pp Russell, B The Roman Sarcophagus Industry : a Reconsideration, in Life, Death, and Representation: Some New Work on Roman Sarcophagi, ed. J. Elsner and J. Huskinson, Berlin, pp Russell, B The Economics of the Roman Stone Trade, Oxford. Russenberger, C Der Tod und die Mädchen: Amazonen auf römischen Sarkophagen, Berlin. Schäfer, T Zum Schlachtsarkophag Borghese, MÉFRA 91.1, pp Schäfer, T Römische Schlachtenbilder, MM 27, pp. 3s Schober, A Die Kunst von Pergamon, Vienna. Schmidt, E Le Grand Autel de Pergame, Leipzig. Schreiber, T Die antiken Bildwerke der Villa Ludovisi in Rom, Leipzig. Schwab, K Celebrations of Victory: The Metopes of the Parthenon, in The Parthenon: From Antiquity to the Present, ed. J. Neils, Cambridge, pp Stewart, A Pergamo Ara Marmorea Magna: On the Date, Reconstruction, and Functions of the Great Altar of Pergamon, in From Pergamon to Sperlonga: Sculpture and Context, ed. N. de Grummond and B. Ridgway, Berkeley, pp
120 Stewart, A Attalos, Athens, and the Akropolis: The Pergamene Little Barbarians and their Roman and Renaissance Legacy, Cambridge. Stewart, P The Social History of Roman Art, Cambridge. Strong, E La scultura romana: da Augusto a Costantino, trans. Giulio Giannelli, Florence. Strong, A Roman Sculpture from Augustus to Constantine, New York. Strong, D Roman Imperial Sculpture, London. Strong, D Roman Art, Yale. Throckmorton, P Ancient Shipwreck Yields New Facts and a Strange Cargo, National Geographic 117, pp Töpfer, K Signa Militaria: Die römische Feldzeichen in der Republik und im Prinzipat, Mainz. Touati, A The Great Trajanic Frieze: The Study of a Monument and of the Mechanisms of Message Transmission in Roman Art (ActaRom I.45), Stockholm. Toynbee, J Death and Burial in the Roman World, London. Turcan, R Les Sarcophages romains à représentations dionysiaques, essai de chronologie et d'histoire religieuse, Paris. Turcan, R Messages d'outre-tombe: l'iconographie des sarcophages romains. Paris. Tusa, V I Sarcofagi Romani in Sicilia (BibArch 14), Rome. Van Voorhis, J The Working and Reworking of Marble Statuary at the Sculptor s Workshop at Aphrodisias, in Ateliers and Artisans in Roman Art and Archaeology (JRA Supplementary Series 92), ed. T. Kristensen and B. Poulsen, pp Várhelyi, Z The Religion of Senators in the Roman Empire: Power and the Beyond, Cambridge. 112
121 Von Heintze, H Studien zu den Porträts des 3. Jahrhunderts n. Chr: Der Feldherr des großen Ludovisischen Schlachtsarkophages, RM 64, pp Vulpe, R Columna Lui Traiana. Trajan s Column, trans. A. Cornaciu, Bucharest. Walker, S Memorials to the Roman Dead, London. Walker, S Aspects of Roman Funerary Art, in Image and Mystery in the Roman World, Gloucester. Walker, S Catalogue of Roman Sarcophagi in the British Museum (CSIR II.2), London. Ward-Perkins, J The Marble Trade and Its Organization: Evidence from Nicomedia, MAAR 36, pp Ward-Perkins, J. and P. Throckmorton The San Pietro Wreck, Archaeology 18, pp Wegner, M Die Herrscherbildnisse in antoninischer Zeit: Das rӧmische Herrscherbild, Berlin. Welch, K Introduction, in Representations of War in Ancient Rome, ed. S. Dillon and K. Welch, Cambridge, pp Wolf, S Der Schlachtsarkophag Ammendola: ein konventioneller wie exzeptioneller Entwurf, in Rom und die Provinzen: Gedenkschrift für Hanns Gabelmann, ed. G. Brands et al., Mainz, pp Wrede, H Senatorische Sarkophage Roms, Mainz. Zanker, P Die Gegenwelt der Barbaren und die Überhöhung der häuslichen Lebenswelt, in Gegenwelten zu den Kulturen Griechenlands und Roms in der Antike, ed. T. Hölscher, Leipzig, pp Zanker, P Roman Art, trans. H. Heitmann-Gordon, Los Angeles. 113
122 Zanker, P. and B. Ewald Living with Myths: The Imagery of Roman Sarcophagi, trans. J. Slater, Oxford. 114
123 Catalogue of Roman Battle Sarcophagi 1. Ammendola Sarcophagus, fig. 45 Marble. H: 0.78 m. L: 2.11 m. Capitoline Museum Inv. S 213 Reinach 1889, pp ; Helbig 1895, p. 304, n. 422; Bieńkowski 1908, p , pl. 4; Jones 1912, p. 74, n. 5, pl. 14; Strong 1926, p , pl. 62; Rodenwaldt 1927, p. 656; Rodenwaldt 1935, p. 24; Hamberg 1945, pp , pl. 38; Andreae 1956, p. 14, n. 3, fig. 1; Fittschen 1969, p. 329, pl. 107; Bandinelli 1970, cat no. 341; Andreae 1977, p. 249, fig. 205; McCann 1978, p. 116, fig. 143; Schäfer 1979, p. 357f; Koch and Sichtermann 1982, p. 91, pl. 74; Koch 1993, p , fig. 37; Krierer 1995, p , cat. no. S 01, pls ; Landskron 2005, pp. 6974, pl. 8, fig. 31; Amedick 2007 pp. 1-11, pl. 8.4; Ferris 2000, pp , fig. 55; Wolf 2001, pp ; Pirson 2002, p. 81, fig. 10; Krierer 2004, Cat. 185, pl. 32.4; Heitz 2009, pp ; Kistler 2009, pp ; Musso 2010, pp ; Kleiner 2010, p. 224, fig ; Faust 2012, p.177f. pl Two tropaea frame the sarcophagus, and below them sit barbarian captives, each with his hands tied behind his back and a torque around his neck. On the right of the sarcophagus, a Roman cavalryman in full armor raises his weapon, pointing it towards a barbarian who is falling from his horse. This man is nude, his legs still wrapped around his horse, and his back is turned to the viewer. To the right, a Roman soldier, on horse and in full uniform, raises his right arm high, holding a sword ready to strike. The soldier s body is twisted in such a way that would not in reality allow him to stay on his horse. His cape flows behind him, and his raised arm covers his face. He looks down upon a barbarian who sits on the ground at his feet. This barbarian, who wears a tunic, looks up at his foe and holds a sword near his chest. Behind this pair is a barbarian horseman, with wild hair, a mustache, and a cape. Below him a horse that falls headfirst to the ground. Another barbarian stands to the right, his back turned to the viewer. He is nude, and he raises his right sword arm, stretching to fill the full height of the scene. There is a shield on his left arm. To his right, a Roman soldier prepares to strike a nude barbarian who kneels before 115
124 him. The Roman holds the hair of his foe, who looks upwards at his attacker. The barbarian wears a torque around his neck. Behind this pair, a Roman horseman, leaping to the right, twists and raise his arm to strike to the left. Barely visible to his left is the head of a barbarian. It is unclear if this is the Roman horseman s opponent. The Romans largely dominate the top of the scene. As a result, the battle is broken into two distinct zones, with the victorious Romans at the top and their defeated enemy below; however, these zones are broken by three barbarians. One is the barbarian horseman at the top center of the scene, the second is the man to the right of the horseman, and the third is the nude twisting barbarian, with his arm raised and back turned. These men are still actively engaged in the fight, unlike all of their falling allies. The central Roman horseman, with the flowing cape and hidden face, is the focal point of the scene. His body is completely visible, in front of all of the surrounding action. He is probably intended to act as a representation of the deceased, though his face is hidden. This Roman wears the same uniform as the other soldiers, though he is rendered on a slightly larger scale than the rest of the figures. Ca. 170 CE (Andreae), ca CE (Hamberg) 2. Dallas Museum Sarcophagus, fig. 46 Marble. H: 0.63 m. L: 2.83 m. Dallas Museum of Art 2012, pp The scene on this sarcophagus is framed by two tropaea, underneath each of which sits a barbarian captive. Both captives are completely nude, with their hands tied behind their backs and torques around their necks. On the far left of the scene, there is a Roman soldier on 116
125 horseback. His horse leaps to the right, but the Roman turns back to the left, raising a spear in his right arm to strike the barbarian below him. This barbarian is falling from his horse, his right arm and leg still up on the horse, and his left leg intertwined with the animal s legs. To the right of this pair, a second Roman soldier on horseback bounds to the right. In full uniform, he raises his sword with his right arm over his head, obscuring his face. His victim sits on the ground below him, raising himself on his left arm and looking up at his assailant. This barbarian wears a tunic, and his horse falls to the ground beside him. Behind this barbarian, a nude barbarian on a horse flees to the left, his cape billowing behind him. A nude barbarian stands next to him, his back turned to the view. He holds a shield on his left arm and raises his right arm, which holds his sword, over his head, stretching his body upwards. To the right of this barbarian, the head of bearded barbarian can be seen in the background, facing a Roman cavalryman. The Roman wears full military armor and raises a spear in his right arm, his head bent back awkwardly. His horse strides right but he turns to face left. Another Roman stands in the forefront, in full uniform, holding his sword high in his right hand. With his left hand, he grasps the head of a barbarian who sits at his feet. The barbarians has wild hair and wears a torque, and he looks up at the Roman, trying to push away his hand. Another Roman horseman stands to the right of this pair, bounding to the right. He wears full military garb and holds his sword over his head to strike, covering his face. This Roman s foe stands behind him, and as such the Roman turns so his back is facing the viewer. The head of his victim can be seen, his left arm raised for protection. This sarcophagus features five Roman soldiers, eight barbarians, and two barbarian captives. The Romans are clearly winning this battle, as almost every barbarian is being struck down and all the Romans are safe from attack. The Romans are mixed in with the barbarians 117
126 throughout the scene, with both occupying space along the top of the sarcophagus; however, the barbarians dominate the lowest part of the scene, further evidence for their impending defeat. The Romans soldiers are all in full military gear, including helmets, greaves skirts with pteruges, and saga. The barbarians are variously dressed, though most are nude or mostly nude, wearing only a torque or cape. The torques and wild hair of the barbarians suggest that they may represent Gauls. All of the figures in this scene are presented on the same scale, though they have awkward body proportions. The sculptor therefore used flying drapery, flailing limbs, and raised weapons to fill in the empty spaces between figures. Ca. 190 CE 3. Small Villa Doria Pamphili, fig. 47 Luna marble. H: 0.86 m. L: 2.30 m. Villa Doria Pamphili Matz-Duhn II n. 3320; Bieńkowski 1908, pp , pl. 9a; Schober 1951, p. 64; Reinach 1912, p. 247, fig. 2; Andreae 1956 p. 15, n. 8, pl. 3; Calza 1977, pp , cat. no. 232, pl. 87; Koch and Sichtermann 1982, p. 91, pl. 75; Andreae 1992, pp. 44, 59; Krierer 1995, pp , 211, cat. no. S 06, pl ; Krierer 2004, p. 197, cat. no. 189, pl. 38.3; Alexandrescu 2010, p. 334, cat. no. P 40; Faust 2012, pp , pl. 71. Tropaea frame this sarcophagus, and below each sits a barbarian captive, seated on a rock with his hands tied behind his back. On the left of the sarcophagus, a Roman cavalryman twists so his chest faces forward, raising his right arm to strike as his horse leaps to the right. The nude barbarian below him falls from his horse, his legs still wrapped around the creature and his back turned to the viewer. To the right is another Roman horseman, in full uniform with his cape flowing back. His right arm is raised to strike his opponent, completely covering his face. 118
127 Directly below him, the sarcophagus is badly damaged, though an arm bearing a shield is visible, suggesting that we are missing the fallen body of a barbarian fighter. The Roman horseman prepares to strike the barbarian who has fallen to the ground before him, looking up at his vanquisher. In the background, a barbarian horseman flees to the left, his cape and right arm flowing behind. In front of him, a nude barbarian with his back turned to the viewer stretches up, spanning the height of the scene. He turns to face the Roman cavalryman to the right. This Roman bounds to the left and twists so his back is facing the viewer. His right arm is raised to strike. Below his feet, a barbarian horseman with a torque around his neck collapses to the ground upon his horse s broken body. On the right of the scene, a Roman cavalryman, striding right, twists and raises his arms to strike a foe to the left. Below him, a Roman soldier on foot raises his sword to strike the nude barbarian who kneels at his feet. A horse can be seen behind the pair, perhaps the horse of this fallen barbarian. The figures are largely rendered on the same scale, thus the sculptor used flailing limbs and broken bodies to fill much of the empty space. All of the Romans are shown in full uniform, and the soldiers dominate the top of the scene. Only the fleeing barbarian at the center breaks this division of space. The figures closer to the top of the scene seem to float through the air, suggesting that they stand on a higher, or perhaps slanting, ground line. Ca. 180 CE 4. Via Tiburtina, fig. 48 Marble. L: 2.31 m. H: 0.69 m. Palazzo Massimo alle Terme inv
128 Paribeni 1932, p. 112; Schober 1951, p. 64; Aurigemma 1954, p. 48, cat. no. 93; Andreae 1956, p. 14, no. 4, pl. 2; Krierer 1995, pp , cat. no. S 03, pls ; Krierer 2004, Cat. 186, pl This sarcophagus is heavily damaged, particularly in the center and right of the scene. Framing the scene on either side is a nude, crouching barbarian with his hands tied behind his back. Above him floats a winged Victory, holding a tropaeum. On the far left of the scene, a horse strains has he falls to the ground, losing his nude barbarian passenger. The barbarian falls with his back towards the audience, his right arm and leg still on the horse and his left leg entwined with the creature s leg. Above him, a Roman cavalryman, whose horse leaps to the right, twists around and reaches out his now missing right arm, presumably to strike his victim. The Roman wears a muscled cuirass, sagum, pteuges, greaves, and a plumed helmet. His position on his horse is not physically possible. To the right of this pair, a horse rears up carrying a Roman cavalryman, whose head is now missing. The soldier s muscled cuirass, sagum, and pteurges are clearly visible. His missing right arm was raised before him to strike. Though the head of this Roman is missing, his hunched shoulders suggest that he was looking down towards his victim, his face covered by his raised right arm. His opponent sits before him, a barbarian wearing a tunic, holding a sword to his chest and looking up at the Roman. Beside this man, a nude barbarian body lies crumpled on the ground, his head on the ground and his left arm outstretched. This central part of the sarcophagus is badly damaged. The only preserved figure is a barbarian horseman, wearing a cape and cap, who rushes to the right with his right arm raised. The man, who appears to be fleeing, turns and looks up and to the right. Near the back of his horse, the legs and torso of a nude man can be seen, falling headfirst towards the ground. On the right of the sarcophagus, past the damaged area, the leg and pteruges of a standing Roman soldier are visible. The crumpled body of a barbarian lies on the ground between his legs. The 120
129 Roman stretches out his left had to grasp the hair of a nude barbarian who kneels before him, reaching up in an attempt to push away his assailant. On the far right of the sarcophagus, a nude barbarian stands, stretching the full height of the scene. He holds his sword across his chest and his shield above his head. He lunges left towards an unseen enemy. Ca CE 5. Small Ludovisi, fig. 49 Fine grain marble. H: 0.66 m. L: 2.48 m. Museo Nazionale Romano, inv Schreiber 1880, p. 151, no. 138; Helbig 1896 (II), p , n. 891; Bieńkowski 1908, p. 40, 43, 60, pl. 6a; Reinach 1912, p. 330, fig. 3; Andreae 1956, p. 14, n. 5; Koch and Sichtermann 1982, p. 91; Guiliano 1983, pp , n. 23; Krierer 1995, pp , cat. S 04, pls ; Gabelmann 1996, p. 34; De Angelis D Ossat 2002, p. 252, inv. 8569; Krierer 2004, Cat. 188, pl. 30.2; Landskron 2005, pp , pl. 5, figs ; Rivière 2008, p. 167f; Heitz 2009, p. 215; Alexandrescu 2010, cat. no. P 35, pl. 32; De Angelis D Ossat 2011, pp ; Faust 2012, p. 184, pl This sarcophagus is well preserved, though some of the facial details have faded. The scene is framed by winged Victories, who stand above nude barbarians crouching in the two bottom corners. On the far left of the sarcophagus, a Roman soldier in full uniform can be seen. The man turns his head to the left. His horse strides outwards towards the viewer, its legs turned slightly to the left and his head turned to the right. Below, a barbarian wearing trousers falls headfirst to the ground. His back is turned to the audience, and his left arm is outstretched. A Roman horseman in full uniform leaps to the right beside him. He raises his right arm to strike, covering his face. This man is completely unobscured by the surrounding action. His horse s head wraps behind him to look left. Two legs and the torso of a man wearing a tunic can be seen below his horse. This barbarian s head and arms are either missing or obscured by the 121
130 surrounding figures. Behind the Roman horseman, a second Roman on horse rushes to the right. He is in full uniform, his sagum billowing behind him, and he raises a spear with his right arm. To his right, a barbarian horseman, wearing trousers, leaps to the right, looking back over his shoulder. He flexes his wrist in a gesture of surprise. Another barbarian horseman falls below him. The man, with wild hair and beard and wearing a tunic and trousers, falls backwards, his shield raised and his sword at his side. His legs are still wrapped around the horse that falls before him. Standing behind this horse, a man, facing backwards, twists to the left. His head and right arm are missing, but he seems to be preparing to strike. The central figure in this scene is completely isolated from the surrounding action, his entire body unobscured. Sitting on his horse, he strides to the right, while raising his right arm to strike. His cloak billows out behind him. This man s chest is turned to face the viewer, though his head is focused into the battle. Two nude barbarians fall below him: one falls headfirst, the other has his back arched and his arms drawn back, his left leg still caught around the reigns of his horse which tries to flee. A third barbarian stands to the right of the central figure, his sword raised over his head and his cape billowing. A Roman soldier in full uniform stands to the right of the barbarian, holding his sword across his chest and preparing to swing. Below this pair, there are two more barbarians. One lies dead upon the ground, his head awkwardly forced back so that he faces the viewer upside down. The second nude barbarian is about to fall on top of him. He falls from his horse with his back to the viewer, his right arm and leg still wrapped around the creature. A Roman soldier on horseback stands above him, his horse rushing to the right with its head turned back to the left. The Roman twists to the left with his cloak billowing back. On the far right of the sarcophagus, a Roman soldier in full uniform leans to the right, his arms held up, perhaps to hold a trumpet. A barbarian falls before him, his horse plunging headfirst to the ground. 122
131 All of the Romans on this sarcophagus wear full uniform, including helmets, muscle cuirasses, tunics with pteruges, and saga. The barbarians are variously dressed, some nude and others in tunics and trousers, though they all have wild hair. The Romans generally dominate the top of the scene, though two barbarians break this division. The remaining eight barbarians are either falling or have already fallen. The Romans are clearly the victors of this battle. The central figure, who stands out clearly in the scene, appears to have had some portrait features and is likely a representation of the deceased. All of the figures depicted on the same scale, though the horses are smaller than they should be. Most of the empty space within the scene is filled in with billowing drapery and awkwardly bent limbs, but a large amount of empty space surrounds the central figure. This may be in part due to preservation, as his arm and his horse s head would have filled much of this space. Ca CE 6. Concordia University, fig. 50 Proconnesian marble. H: 0.39 m. L: 1.71 m. Francis 2000, pp , pls. 1, 3. Framing the sarcophagus stand two Roman soldiers, each holding a tropaeum. Over the shoulder of the Roman soldier on the left, a horse can be seen. To the right of the horse, a Roman horseman bounds to the right. His right arm is extended forward as he prepares to stab the man before him, a lunging, bearded barbarian wearing a cape and trousers. Between the pair, a second barbarian, also bearded and wearing trousers, falls to the ground with his left arm raised in defense. Right of this group, a Roman cavalryman leaps to the right with his right arm drawn back. The crumpled body of a defeated barbarian lies below his horse. A Roman soldier stands 123
132 beside them, lunging to the right. His left arm is raised to hold the reigns of the horse behind him, while his right arm is drawn back, holding a dagger. A barbarian, wearing a tunic, trousers, and cloak, falls to the ground before him, attempting to defend himself with his right arm. The center of the scene is dominated by a Roman horseman. His horse strides right but turns his head to the viewer. The Roman soldier poses with his right arm thrown back, his cloak billowing out behind him. He looks outwards, away from the action that surround him. A barbarian in trousers sits at the feet of this Roman soldier, looking up at his conqueror. To the right of this central pair is a group of three figures. Two Roman soldiers, one on a horse leaping to the right and the other on foot lunging left, frame a bearded barbarian. Both soldiers raise weapons, prepared to strike the barbarian, who has fallen to the ground and attempts to raise his shield in defense. The barbarian has his back turned to the viewer, while both Romans twist so that their chests face outwards. Two final pairs occupy the right side of the scene. The first pair includes a Roman soldier who stands over a barbarian. The Roman, in full uniform, holds the head of the barbarian and prepares to slit his throat. The barbarian, wearing a tunic, trousers, and cape, kneels on the ground, his head bent back awkwardly as he raises his left arm in an attempt to fight off the Roman. The final pair features a Roman horseman, striding right, who raises his right hand to strike. Before him stands a barbarian wearing trousers. The barbarian s back is turned to the audience, and he holds a shield, though it is clear that the Roman will strike him down. All of the Roman soldiers on this sarcophagus are identically dressed, in plumed helmets, muscle cuirasses, tunics, and saga. The exception is the central figure who is not wearing a helmet. This figure is centrally placed and removed from the surrounding action. His face shows signs of portrait features, setting him apart from the other soldiers. He is likely intended to represent the deceased. This figure is rendered on a smaller scale than the others, which is 124
133 perhaps a result of the sculptor s desire to further separate him from the scene. The other Roman horsemen fit perfectly into the space without being shrunken down. The head of the central figure is similarly smaller than the other figures, which may have resulted from the postproduction application of portrait features. The Roman soldiers dominate the top half of the scene. Every Romans raises his hand to strike, and as such there can be no doubt who will win this battle. Almost all of the barbarians have already fallen, thus dominating the lower half of the scene. The two exceptions including the standing barbarian on the far left and his counterpart on the far right. Both of these men continue to fight, breaking the plane of separation between the conquerors and conquered, though their defeats are imminent. Ca CE 7. Small Campo Santo, fig. 51 Marble. H: 0.73 m. L: 1.95 m. Bieńkowski 1908, pl. 7b; Andreae 1956, p. 15, n. 6; Arias, Cristiani, Gabba 1977, pp , n. A 13 est, pl. 15; Faust 2012, p. 197, n This sarcophagus is heavily weathered and in low relief. The main scene is framed by two tropaea. To the left of the scene, a Roman soldier on a horse, striding to the left, raises his right arm and looks down upon a nude enemy, who sits on the ground with his back to the audience, reaching up towards his foe. Beside him, a bearded barbarian in trousers extends an arm towards a Roman horseman, twisting his body so that his back is turned. A Roman trumpeter stands behind this group. To the right, two horsemen face each other. The man towards the top of the scene is bearded and wears a cap, thus he is probably a barbarian. His horse leaps to the right and he looks down upon the second horseman, a beardless man wearing what appears to be full 125
134 Roman military garb. This second horseman leaps towards the top left of the scene, his back to the audience as he pursues the man behind him. He holds a sword raised to strike in his right hand and a shield in his left, and his cape flows behind him. Right of this pair is another Roman cavalryman. His horse bounds to the right, and his right arm (now missing) extends behind him, preparing to strike, causing his cape to flow back. Though looking to his right, the soldier s body is twisted to face the audience. The centrality of this figure and the majesty of his flowing cape suggest that he may be a representation of the deceased. His facial features and beard may be portrait features. Before him, a second horseman, angled in such a way to parallel the previously discussed pair of horsemen, leaps up towards the Roman soldier with his arms outstretched. This man is bearded and wears a tunic, and he is presumably a barbarian. Below his horse lies the crumpled body of a dead barbarian, nude and with wild hair. To the right of this cavalry group, another Roman horseman rushes to the right in full military gear and his arm raised to strike. A bearded barbarian, wearing a tunic and a cap, holds his shield over his head in one arm and the crumpled body of a second, trouser-wearing barbarian in his other. On the far right of the scene, a Roman soldier raises his arm to strike this barbarian. In front of this Roman soldier, a nude barbarian with his back turned to the viewer raises a sword to strike the Roman horseman. These four figures create a more complex scene: he horseman and nude barbarian fight diagonally from each other, crossing the path of the tunic-wearing barbarian and his Roman adversary. The Roman soldiers largely dominate the upper part of the scene, showing their inevitable victory, though there is one fighting pair in which the barbarian horseman stands over his Roman counterpart. The scene is broken into individual fighting pairs, broken up only on the right side of the scene where the four figures fight in diagonal pairs. 126
135 The sculptor used foreshortening to show depth in the scene. Five figures fight with their backs turned to the viewer in order to create a sense of depth within the scene. The result, however, is undermined by the low relief. Three of the turned figures stand exactly parallel with each other, as do the four horsemen along the back of the scene. A great deal of empty space remains between the figures. Ca. 180 BCE 8. Badia di Farfa, fig. 52 Marble. No dimensions published. Andreae 1969, p. 153, fig. 5; Koch and Sichtermann 1982, p. 91; Landskron 2005, pp , pl. 7, figs ; Reinsberg 2006, p. 95; Amedick 2007 pp. 1-11, pl. 8.1; Faust 2012, p. 186, no. 1032, pl. 74; Russenberger 2015, p , fig Crypt of the Badia di Farfa On the left of the scene, two Roman soldiers in full uniform, one on foot and one on horse, raise their arms to strike a nude barbarian, who lunges to the right with his back turned to the viewer. Beside this group, two barbarians, both with beards and wearing tunics, face a Roman cavalryman to their right, who leaps to the left, with one arm raised to strike and the other holding a shield. A third barbarian lies injured at the feet of this group, wearing a tunic and trousers. Bounding to the right, another Roman cavalry man raises his right arm, his body twisted so that his chest faces the audience. He looks down upon a nude barbarian, who kneels to the ground and looks away from the Roman. To the right of the Roman cavalryman, a barbarian in the background raises his arm to strike. In front of him, a horse rears as his rider, a barbarian wearing a tunic, falls to the ground. The barbarian has one leg and one arm raised, his back turned to the viewer. A Roman soldier stands behind the horse, raising his right arm to strike a 127
136 bearded barbarian in trousers, who extends his right arm in supplication. At his feet lies the crumpled body of a barbarian. Behind the pair stands a Roman trumpeter. To the right of this group is another Roman cavalryman, who rushes to the right and prepares to strike. Below the horse is another fallen barbarian. One more Roman horseman stands to his right, preparing to strike the barbarian at his feet, who is kneeling with his sword over his head. On the far right of the scene, a standing barbarian holds his sword over his head to strike the Roman horseman. This scene is not broken into one-on-one battles; instead, there is a variety different groupings, with multiple Romans striking a single barbarian, or multiple barbarians striking the same Roman soldier. The barbarians outnumber the Romans, though many are showed injured or dying. Although some barbarians stand at the top of the scene, the Romans dominate this upper half, a sign of their superiority in the battle. The figures are largely rendered on the same scale, with some foreshortening applied. Andreae (1969) identifies this scene as a battle between the Greeks and Persians. This identification accounts for the helmets, trousers, and tunics of the barbarian fighters. Many of the other fighters may wear Greek dress; however, the two soldiers on the far left and the horseman just left of the center are wearing Roman armor. Thus this scene may also be identified as a battle between Romans and barbarians. Ca. 170 CE 9. Badia di Cava, fig. 53 Marble. H: 0.9 m. L: 0.47 m. Andreae 1969, p. 153, fig. 4; Guerrini 1972, pp , pl. 66b; Koch and Sichtermann 1982, p. 91, fig. 73; Bielfeldt 2005, pp , fig. 59; Amedick 2007, pp. 7-10; Faust 2012, p. 187, n. 1033; Russenberger 2015, p , fig
137 The scene on this sarcophagus is poorly preserved. On the far left stands a nude figure who looks onto the ensuing battle. This is likely a captive. To the right of this figure, a cavalryman in full armor bounds to the right, his right arm swinging behind him. The man s face is now faded, but his military gear, including a muscle cuirass and tunic, is discernable. Below him, a barbarian, wearing trousers, falls forward on the crumpled body of his horse. A horse can be seen behind the falling barbarian, leaping to the right. An indiscernible figure is in front of the horse, perhaps the body of its rider, falling forward and holding the left arm of the barbarian below. To the right of this group, a bearded man stands, facing to the left, with his right arm raised to strike and his left arm bearing a shield. It is difficult to determine if this man is clothed, though he seems to have a sleeve on his right shoulder which would be typical for a full Roman uniform. A barbarian kneels below this man with his sword arm at his side, clearly defeated as he looks to the ground. He wears a tunic, trousers, and a cap. The body of a dead barbarian lies to his right. Another barbarian can be seen to the right of this pair. His back is completely turned to the viewer and his right leg and left arm are raised as he falls from the back of his horse. He wears a tunic that falls off his shoulder and holds a dagger in his right hand. Above him, a horseman looks down on him, with his right arm raised to strike. A sleeve is visible on his right arm, likely part of a Roman uniform. The final pair in this scene includes a man on the ground who looks up towards a nude man, who raises his sword to strike a final blow. The man on the ground appears to be in full uniform, and his attacker seems to wear a helmet. On the far right, a figure wearing a tunic stands, probably another captive. The poor preservation of this sarcophagus makes it difficult to comfortably identity the figures in the scene. Andreae (1969) identifies the scene as a battle between the Greeks and Persians. This sarcophagus may also be showing a battle between Romans and barbarians. The 129
138 three men in full uniform could be Roman soldiers, while the nude and tunic-wearing men may be barbarians. Ca. 170 CE 10. Palazzo Giustiniani, fig. 54 Marble. No dimensions published. Galleria Giustiniani II n. 134; Reinach 1912, p. 262, fig. 1; Matz-Duhn II n. 3331; Rizzo 1904, pp ; Bieńkowski 1908, pp , pl. 6b; Andreae 1956 p. 15, no. 7; Brilliant 1963, p. 185, fig. 4.62; Koch and Sichtermann 1982, p. 92; Cossiga 1984, p. 197; Musso 1985, p. 186; Krierer 1995, pp , cat. no. S 05, pl ; Candilio 2001, pp ; Krierer 2004, p. 198, cat. no. 194, pl. 37.3; Alexandrescu 2010, cat. no. P 42, pl. 35; Faust 2012, p. 197, n Framing the scene are two winged Victories, standing above two barbarian captives, each with his hands tied behind his back and wearing trousers. On the left of the scene, a Roman horseman in full military gear leaps to the right, his right arm drawn back to strike an unseen enemy. Below him, a nude barbarian kneels to the left, raising his left arm which bears a shield. A second nude barbarian kneels to the right of this man, reaching his arms down to aid the crumpled body of one of his fallen comrades. His gaze is directed up towards the central figure, who stands out as the clear focal point of the scene. This Roman s horse bounds to the right, as he twists his body back to the left with his right arm pulled back, causing his chest to face the viewer. His haircut and facial features suggest that this is a portrait of the deceased. He wears full military gear, but no helmet. His gaze is locked on to the barbarian who approaches him, his body twisting to strike. This man wears only a helmet, and his body is turned so that his back faces the viewer. Below the central figure s horse, a Roman soldier has fallen to the ground, perhaps having tripped over the barbarian body upon which he now sits. The arm of this barbarian is clearly visible, reaching out from below the Roman. This is one of the few instances 130
139 in which a battle scene shows a fallen Roman. Behind the central Roman horseman are two horsemen rushing to the left, one a Roman and the other a barbarian, and between them a trumpeter facing right. Facing downwards with his face obscured, the Roman horseman is preparing to strike an unseen enemy. To the right of the fleeing barbarian horseman, another horse is rearing back, having just unseated a nude barbarian, whose body can be seen falling to the ground headfirst. He is about to land upon the fallen body of another horse and a nude barbarian. The reigns of the rearing horse are held by the Roman soldier standing on the far right of the scene. One last barbarian horseman can be seen rushing to the right behind his Roman soldier, perhaps in an attempt at fleeing the battle. All of the Romans in this battle scene wear full military armor, while all of the barbarians are nude or wear just a helmet. The two barbarian captives wear trousers. There can be no doubt that the Romans were victorious in this battle. Three barbarians are shown dead, and many others are shown dying. The Roman soldiers dominate the top of the scene, most of them confidently striking down foes. The exception is the Roman soldier who lies at the feet of the central Roman horseman, who may represent the courage of the central figure to protect his allies. The central Roman and his nude barbarian combatant are the clear focus of the scene. Both figures stretch the full height of the scene and stand forward from the crowded action. The barbarians who are shown at the top of the scene are attempting to flee. The figures in this scene are rendered on different scales in order to fill the space. The winged Victories and barbarian captives that frame the scene are much smaller than the other figures, while the central Roman horseman and his foe are much larger. Such variation in scale can be seen throughout the scene. Ca. 180 CE 131
140 11. Ince Blundell, fig. 55 Parian Marble. H: 0.73 m. L: 2.28 m. Ince Blundell Collection at the Liverpool Museum Bieńkowski 1908, pl. 7a; Ashmole 1929, p. 101, pl. 303; Andreae 1956, p. 14, no. 2; Krierer 2004, p. 197, cat. no. 190, pl. 38.2; Faust 2012, p. 197, n Flanking this battle scene stand two tropaea, below each of which sits a barbarian captive. Each captive is nude and bearded, and sits with his arms tied behind his back, looking up at the tropaea. The twisted bodies of the two men, with their chests facing the viewer and their legs turned in towards the main action, invite the viewer s eyes into the center of the scene. The left of the scene is dominated by a Roman soldier on horseback in full uniform with his sword drawn. He faces a beardless barbarian who wears only a helmet and whose back is turned to the viewer. This barbarian is raising his shield in defense of the Roman s sword. He stands above two fallen barbarians: a clothed barbarian lies face down under the Roman s horse, and to his right a bearded barbarian, wearing a cape, has fallen to the ground and looks up at another Roman cavalryman. This barbarian holds a sword in his ribcage, perhaps in an act of suicide. The Roman above him twists to look back at the Roman and nude barbarian fighting behind him. His sword is raised above his head, ready to strike. Although somewhat central within the scene, this Roman soldier faces away from the viewer. Immediately to the right of this Roman cavalryman, a bearded barbarian, with sword raised, approaches. The center of the scene is dominated by a barbarian horseman who crumples to the ground. This barbarian is fully clothed in trousers and a tunic. His face is hidden as he is crouched flat over his collapsing horse. Above him stands another beardless barbarian. This barbarian stands fully frontal to the viewer, tilting his head up and to the left. He is not actively engaged in the fight. To the right of this figure, a third Roman cavalryman in full uniform draws his sword against a beardless barbarian, who 132
141 wears a helmet and tunic. The Roman s body is twisted so that his front faces the viewer, while the barbarian is twisted so that his back faces the viewer. Below this pair, a barbarian lies on the ground with his back arched. He holds a sword, driven into his chest, which again may be a suicide attempt. A shield lies directly behind his broken body. On the far right of the scene, one final Roman soldier stands, almost exactly in line with the tunic wearing barbarian. This Roman holds a shield and raises a trumpet. All of the Roman soldiers on this sarcophagus wear full military gear, including a muscle cuirass, skirt with pteruges, and a helmet. One Roman horseman also wears a sagum. The barbarians are more randomly dressed. Some are nude, others wear a cape, while others wear tunics and trousers. The Romans in this scene dominate the middle and top of the sarcophagus, while the barbarians are either placed below the Romans, dying at their feet, or are carefully framed between the Roman soldiers. Three barbarians do break this separation of space, stretching to the top of the scene, but each of them is about to be struck down by a Roman soldier. Every Roman depicted in this scene has his front facing the viewer, while the bodies of the barbarians are contorted to face all possible directions. The bottom of the scene is occupied by the four dying barbarians and the two barbarian captives, making the outcome of the battle immediately clear to the viewer. This battle scene does not have an obvious central figure. None of the three Roman horsemen face the viewer, and none have a cape flowing victoriously behind them in the wind. Indeed the figure that stands out as the most, being both frontal and central, is the nude barbarian who looks up to the right. Though his facial features are poorly preserved, the angle of the head is an obvious indication of the dramatic expression of the figure. 133
142 All of the figures within this scene are depicted on the same scale. This creates a great deal of empty space between the figures. Though some of this space is filled in with limbs and swords, particularly in the bottom half of the scene, the sculptor did not make use of drapery to fill the empty spaces in the upper part of the sarcophagus. Ca CE 12. Large Campo Santo, fig. 56 Marble. H: 1.05 m. L: 2.40 m. Campo Santo C 21 est Rodenwaldt 1935, p , pl. 9; Andreae 1956 p. 15, no. 11; Brilliant 1963, p. 157; Arias, Cristiani, Gabba 1977, pp , n. C 21 est, pl ; Jung 1978, pp ; Koch and Sichtermann 1982, p. 260; Wrede 2001, pl. 5; Alexandrescu 2010, Cat. P 37; Faust 2012, p. 197, n On the far left of the sarcophagus, a standing female captive and kneeling male captive in trousers and a cape are surrounded by fallen shields and helmets. The male s arms appear to be tied behind his back. Above the pair is a winged Victory. On the far right of the sarcophagus, a male captive in trousers and a tunic, his hands bound before him, stands with a female captive, now almost completely missing. The wing of a now missing Victory can be seen above. In the top left of the scene, a Roman soldier on horseback strides to the right. His head is missing, but he wears full military uniform. The man raises his right arm, which is now missing, and his cloak billows out behind him. To his right, in very low relief, another Roman soldier can be seen. In front of this figure are the torso and leg of a barbarian, who wears a tunic and trousers and rides a horse that leaps to the right. Two more Roman cavalrymen bound to the right before him, both in full uniform. The head of one of these figures is missing, and the other figure is in extremely low relief. On the far left of the scene, two more figures can be seen. One is a Roman 134
143 soldier on horseback. This figure is badly damaged, though his pteruges and the sleeve of his tunic are visible. His horse leaps to the right. Below him, a barbarian wearing trousers collapses forward onto his fallen horse. A second falling horse is barely discernible behind him, and a third horse falls before him. Above this third horse, a barbarian horseman rushes to the right. The figure is badly damaged, but he appears to be twisting so that his back is turned to the audience and he faces the horsemen behind him. Here the sarcophagus has received extensive damaged, and the central figures are entirely missing. An unidentifiable figure rides a horse at the top right corner of this damaged area. Before him, the tunic and bottom of the cuirass of a Roman soldier can be seen upon a damaged horse who leaps right. A Roman soldier peaks out from behind this horse, looking to the left. He is largely obscured by a shield. To his right, the underside of a horse can be seen, above which what appears to be an arm wearing a long-sleeve tunic appears. Below this figure is a horse that projects forward from the scene, and on his back is the knee and pteruges of a Roman soldier. This soldier leans far forward on his horse, reaching around the horse s head. His cloak can be seen flying straight upwards. Below the damaged portion of the scene, two feet of a Roman soldier are visible. A horse falls to the right of these feet, and the foot of a barbarian can be seen on its side, suggesting that its rider, now missing, would have been falling from its back. To the right of this horse, another horse falls, again with the trouserwearing leg of a barbarian clearly visible. A third horse plunges headfirst towards the ground. The tunic and trousers of its rider are visible, lunging to the left. Above this horse, another horse rears back. Its rider wears a tunic and holds a shield. The legs, arms, and head of the rider are missing, and he is difficult to identify. Before this horse, a billowing cloak is visible, along with a detached shin, foot, and bent arm. 135
144 Unlike the other battle sarcophagi, most of the men in this scene are on horseback. At various points throughout the sarcophagus, there are nubs of marble where other figures had once been attached, which would have filled in much of the empty space. The surviving figures are rendered in a combination of high and low relief, creating a sense of depth. The Roman soldiers who are visible all wear full uniform, whereas the barbarians wear tunics and trousers. Although the center of the scene is missing, it seems as though the surrounding figures are encircling this space, suggesting that a central commander figure may have been depicted here. It is difficult to tell where the Roman and barbarian figures are located relative to one another, though on the left side of the sarcophagus, the Roman soldiers do dominate the upper portion. Ca. 190 CE 13. Villa Borghese, fig. 57 Luni marble. H: 0.98 m. L: 2.38 m. Villa Borghese Casino inv. 557 Reinach 1912, p. 170, fig. 4; Rodenwaldt 1935, p. 25, pl. 10; Hamberg 1945, p , pl. 41; Andreae 1956, p. 16, no. 16; Pelikán 1965, pp ; Turcan 1966, pp. 178, 210, 213, and 245; Jung 1978, pp ; Schäfer 1979, pp , figs. 1-15; Koch and Sichtermann 1982, p. 92; Krierer 1995, pp , cat. no. S 09, pls ; Turcan 1999, p. 64, fig. 68; Wrede 2001, p. 40; Moreno and Viacava 2003, pp , no. 47; Krierer 2004, p. 198, cat. no. 196, pl ; Landskron 2005, p , pl. 6, fig. 23; Reinsberg 2006, p. 221, cat. no. 96, pl. 25.3; Rivière 2008, p. 169; Alexandrescu 2010, cat. no. P 41, pl. 34; Töpfer 2011, pp. 248, 379, cat. no. SD 63; Faust 2012, pp , pl This battle scene is framed on either side by tropaea and two barbarian captives, one male and one female, with a helmet on the ground between them. On the left of the scene, a Roman horseman, whose head and arm are now missing, prepares to strike down a barbarian, who turns to face the Roman, his back towards the viewer. Between the pair, a barbarian can be 136
145 seen on the ground. Behind the Roman horseman, a barbarian horseman rushes to the left, trying to flee the battle. He is closely followed by a second barbarian horseman. Both look back at a Roman horseman who pursues the two, his sword raised. At the bottom of the scene, a barbarian and his horse fall to the ground. The barbarian, who is nude, still wraps his legs around the creature, his back turned to the audience. Above him, a Roman soldier in full uniform stands, grasping the hair of a barbarian who sits on the ground wearing a tunic. The Roman soldier s right arm is missing, but he likely raises a sword. To the right, a Roman horseman leaps to the left, and behind him, a Roman soldier follows behind him with his sword raised, as another Roman soldier stands looking down upon a barbarian. This barbarian cowers on the ground beside his horse, looking up at his assailant. Another barbarian horseman is on the ground beside him, shirtless and with a thick beard. He looks up towards the central figure of the scene. This Roman horseman is in full uniform, with his sagum flowing back behind him. His right arm, now missing, is raised to strike. The head of this figure is badly damaged, or perhaps was never carved. Behind him, a Roman horseman rushes to the right, pursuing a barbarian horseman, who wears a tunic and trousers and turns to look at the Roman. Below this pair are two Roman soldiers, one on horse and the other on foot wearing scale armor. Both of their heads are missing. They look down upon three barbarians. One, wearing a tunic and trousers, kneels on the ground with his right arm raised in supplication. His head is missing, but he might be looking towards the central figure. The crumpled body of a nude barbarian lies between his legs and the third barbarian sits on the ground behind him. His head is also missing, but he probably looks towards the Roman in scale armor. The poorer preservation of this sarcophagus, as well as the shallowly carved clothing makes the scene difficult to read. Generally, the Roman and barbarian soldiers are well mixed 137
146 within the scene, though the barbarians dominate the lowest level with their broken and dying bodies. The Roman soldier dominate the center of the scene as barbarians flee on horse to either side. Almost all of the figures in this scene are fully clothed, and the drapery itself is rather heavy, giving a weightiness to the scene as a whole. Ca CE 14. Palermo, fig. 58 Marble. H: 0.48 m. L: 1.77 m. Palermo, Museo Nazionale inv. 739/90 Bieńkowski 1908, p. 54, pl. 2a; Reinach 1912, p. 99, fig. 1; Hamberg 1945, pp , pl. 39; Andreae 1956, p. 15, no. 9; Brilliant 1963, p. 186, fig. 4.63; Tusa 1995, pp , cat. no. 77, pls ; Krierer 2004, cat. no. 192, pl. 38.1; Moscati and Di Stefano 2006, pp , fig. 98. Both sides of the sarcophagus are framed by tropaea and a male and female captive, with a helmet lying between them. On the far left of the battle scene, a Roman horseman, whose head is now missing, raises his arm to strike the barbarian who kneels at his feet, looking upwards. The barbarian has his back turned to the viewer, and the Roman horseman leaps not directly to the right but outward towards the audience, creating a strong sense of depth. Behind this pair, another Roman horseman rushes to the right towards a bearded barbarian horseman, who raises his sword to strike. Again, the barbarian has his back turned to the audience. Below the barbarian s horse is the crumpled body of a fallen barbarian. In the background, a barbarian flees left. The next pair includes a barbarian, driving his spear up and to the right towards a Roman horseman. This Roman twists to face his attacker to the left with his sword raised, though his horse bounds to the right. A Roman soldier peeks out from behind this horse, standing over a barbarian who kneels beside his fallen horse. The next figure to the right is clearly the focus of 138
147 the scene. A bearded man in full Roman military attire sits upon his horse. He flings his empty right hand out and back behind him, causing his cape to flutter back and his chest to open out to the viewer. The facial features, including his wrinkled brow and thick beard, are distinct, and he most likely represents the deceased. He is rendered on a slightly larger scale than the other figures. On the ground below his horse is a fallen barbarian wearing a tunic, who is similarly unarmed and extends his left arm up in a sign of submission. Beside this pair, a Roman horseman leaps to the right, preparing to strike the nude barbarian, whose back is turned to the viewer and arm is raised with a spear. The head of a barbarian can be seen to the right of the Roman horseman, looking up towards a Roman horseman. This soldier s horse bounds to the left as he raises his sword behind his head, an ovular shield in his left arm. A barbarian in in a tunic stands below him, holding a spear towards a Roman horseman who leaps left. Behind the barbarian, the rear of a horse can be seen on the ground, and before him sits the body of a barbarian wearing trousers, who looks up at the Roman horseman. To the right, a barbarian horseman flees the battle, looking back over his should at the ensuing action. The bottom of this scene is dominated by barbarians who are falling and dying, but the middle and upper parts of the scene have both Romans and barbarians. The Romans are all shown in full uniform, while the barbarians either wear tunics or are nude. With the exception of the slightly enlarged central figure, the figures in this scene are rendered on the same scale. Though some empty space remains between the figures, the sculptor made use of flailing arms, weapons, and cloaks to fill most of the space. Ca. 180 CE 139
148 15. Palazzo Giustiniani Fragment, fig. 59 Marble. No dimensions published. Galleria Giustiniani II, no. 71; Reinach 1912, p. 260, fig. 2; Matz-Duhn II, pp , n. 3329; Cossiga 1984, p This sarcophagus fragment, now hanging on a wall in the Palazzo Giustiniani, represents the left half of a battle scene. On the far left of the scene stand two barbarian captives, one male and one female. The man stands with his hands crossed before him, and the female holds an infant in her arms. A tropaeum stands behind the couple. To the right of the captives, the fight begins with a Roman infantryman, who stands and raises his right arm over his head. He faces off against a barbarian in a similar body position. Both men are turned so that their torsos face the viewer in a forced frontal position. Between their legs, a shirtless barbarian lies upon the ground along with his horse, a dramatic expression of pain on his face. Behind these men, a Roman horseman strides to the right, with the head of another barbarian horseman barely visible behind him, perhaps preparing to flee to the left. The Roman horseman appears to be pursuing a barbarian horseman who strides before him. Below, a Roman soldier stands behind a barbarian who is on his knees. The barbarian s neck is bent back awkwardly to look up at his assailant, his arm raised in supplication. To the right, the most prominent figure, who is rendered on a larger scale than those who surround him, rides a horse which leaps to the right. In his right hand he raises a spear, leaving his chest open to the viewer and his cloak billowing behind him. This figure does not wear a cuirass, but instead wears a tunic and boots. Below him, two barbarians have fallen to the ground. One struggles to clamber away, looking up towards this central figure, while the other collapses, his back tuned to the viewer. Behind this main Roman horseman, various Roman and barbarian horsemen and horses crowd the top of the scene. In the far right corner, the face of a trumpeter is visible. This is where the scene breaks off. 140
149 The figures in this scene are mostly frontally positioned, with the exception of the two barbarians at the bottom of the scene who show their backs to the viewer. The Romans in this scene are all shown in full uniform, while the barbarians are almost all clothed or partially clothed. The central figure appears to show portrait features, including his short cropped hair and his pronounced jaw line. Empty space is non-existent in this scene, fill with flailing arms and falling bodies. End of the 2nd century CE 16. Portonaccio, fig. 60 Marble. H: 1.15 m. L: 2.39 m. Museo Nazionale Romano (Palazzo Massimo alle Terme) Inv Parabeni 1932, p. 344, no. 8; Rodenwaldt 1935, p. 25; Hamberg 1936, p ; Hamberg 1945, pp , pl. 40; Andreae 1956, p. 15, n. 13; Matz 1958, pp , pl. 38; Kähler 1958, pp ; Aurigemma 1963, p. 30, no. 52, pl. 14; Pelikán 1965, pp ; Brilliant 1967, fig. 49; Andreae 1969, pp , fig. 7; Bandinelli 1970, no ; Andreae 1977, p. 312, fig. 503; Jung 1978, pp , fig. 1; McCann 1978, p. 110; Schäfer 1979, p. 359; Kampen 1981, pp , pls ; Koch and Sichtermann 1982, pp , pl. 76; Jung 1984, pp ; Musso 1985, pp ; Amedick 1991, p. 151, no. 179; Kleiner 1992, p. 301; Krierer 1995, pp , cat. no. S 07, pls ; Reinsberg 1995, p. 357; La Regina 1998, pp ; Elsner 1998, pp ; Ferris 2000, pp ; Wrede 2001, pl. 6.1; Krierer 2004, pp , Cat. 195, pl ; Landskron 2005, p , pl. 6, fig. 25; Pardyová 2006, pp ; Reinsberg 2006, pp. 24, 91-93, , cat. no. 85; Rivière 2008, pp ; Heitz 2009, pp ; Alexandrescu 2010, cat. no. P 38, pl. 34; Musso 2010, pp ; Töpfer 2011, pp , cat. no. SD 53; Faust 2012, p , pl ; Gasparri and Paris 2013, pp , no Found in Portonaccio, Cave di Pietralata This sarcophagus is framed on either side by tropaea. Below each of these stand two barbarian captives, one male and one female. The female captives both wear long robs, and both 141
150 males, with beards and trousers, hold their hands crossed before them, a symbol of their captivity. These captives and the tropaea are on a larger scale than the rest of the figures. In the bottom left of the scene, the head and shoulders of a dead or dying barbarian can be seen on the ground with his mouth open wide, and beside him a fallen horse. Kneeling above them is a barbarian in trousers who holds a shield and spear, prepared to strike an unseen opponent. To the right of this barbarian, a second barbarian wearing a tunic and trousers falls to the ground. His body is bent over awkwardly, his left arm and knee touching the ground as his right arm is bent upwards. A Roman soldier in full uniform stands above this falling barbarian, his right arm drawn across his body as he prepares to strike his foe. In his left arm, he holds his shield above his head. Above this pair and to the left, a Roman cavalryman in full scale armor raises his spear to strike a barbarian to his left, a bearded man in a tunic who looks back at the Roman, unable to defend himself. The Roman s horse leaps forward, projecting out from the scene. Above this soldier, another Roman infantryman can be seen, looking to his right. He is partially obscured by a horse which bounds to the left, ridden by a bearded barbarian wearing a tunic and trousers. This man holds a shield and looks towards the center of the scene, while raising his right arm out and up. Below, a barbarian in a tunic and cape holds a spear and looks concernedly towards a Roman horseman to his right, who raises his spear to attack. The rider turns to the left, but his horse strides forward towards the viewer, turning its head to the right. The Roman s raised spear crosses in the air with the spear of the central figure. Behind these spears, the head of a trumpeter with long hair can be seen in the background. To his right, a barbarian, perhaps on horse, strides to the right while looking back to his left, where his comrade gestures outwards. The central figure of the scene stands out clearly from the action. He is rendered on a slightly larger scale than the surrounding figures, and his entire body, as well as 142
151 his horse s, is completely unobscured by the surrounding chaos. With his right arm raised to hold a spear, his chest is open to the viewer. His head focuses down upon his victim, a barbarian who stands before his horse, wearing a tunic and trousers and raising his left arm in supplication. The central figure wears a high-waisted cuirass, a fashion that was gaining popularity among Roman officers by the time of Trajan, with a double skirt of pteruges, a sagum, pants, and an officer s helmet with crest. His sagum billows out behind him. Below the central figure, a Roman soldier wearing lorica segmentata armor lunges to the left, plunging his sword into the neck of a barbarian, who, wearing a tunic, falls face first from his horse. The Roman soldier stands behind another barbarian falling from his horse. This man s body is contorted so that this back faces the viewer and his left leg is still raised up onto this horse. Only the rear of the horse is visible. The head of another barbarian can be seen peeking up from behind the horse. Along the bottom of the sarcophagus to the right of this group, a dead barbarian wearing a tunic and a dead horse can be seen, crushed under the other figures, and the head of another barbarian who is being trampled. To the right of the central figure, two Roman soldiers on horseback stride to the right, one bearing a standard and the other a spear. Behind these men, a barbarian looks to the right. One of Roman cavalryman looks down at a barbarian who stands before him. This barbarian wears a tunic and trousers and raises his shield in defense, his spear drawn back. He turns to face the Roman soldier, his back turned to the audience. There is a horse without a rider to his left. Below this barbarian, a horse rears as his rider, a barbarian wearing a tunic and trousers, falls to the ground on top of other barbarians. He looks up to his right, grasping the spear that a Roman soldier is driving into his chest. Behind this Roman, a barbarian horseman projects forth. This barbarian wears a tunic and a cape. He is raising his spear towards a Roman horseman who cowers slightly below him. This Roman soldier also raises a weapon, now missing. The right 143
152 elbow of the barbarian horseman obscures the face of a Roman soldier who stands to his left, wearing lorica segmentata. Two more Roman infantrymen stand in the background, facing to the right. In the top right corner of the scene stands a barbarian horseman, wearing a tunic and a cape. The man has his right arm raised and he faces to the left. His horse projects straight forward, and he turns his head to the right. The right side of the scene is dominated by a Roman horseman wearing scale armor, pants, and a baldric. He raises his spear over his head. The man and his horse are turned so that their backs face the viewer. His target seems to be the barbarian on the ground to his left. This barbarian wears only trousers. He sits with his back to the viewer, his right hand holding a spear on the ground, while his left arms is raised in defense. Both the Roman cavalryman and the barbarian are facing backwards, thus the perspective is nonsensical. This sarcophagus is particularly tall, which allowed the sculptor to play with space in a unique way. This scene has countless levels of figures. Ca CE 17. Large Villa Doria Pamphili, fig. 61 Marble. No dimensions published. Palazzo Doria Matz-Duhn II n. 3319; Rodenwaldt 1935, pp , pl. 8; Hamberg 1945, p. 176; Andreae 1956, p. 15, no. 12; Brilliant 1967, pp , fig. 70; Calza 1977, pp , cat. no. 233, pls ; Krierer 1995, pp , cat. no. S 08, pl ; Krierer 2004, cat. no. 198, pl. 38.4; Landskron 2005, pp , pl. 6, fig. 24; Alexandrescu 2010, cat. no. P 39. On either side of this scene a male and female barbarian stand, with a child, below a tropaeum. These figures are rendered on a much larger scale than those within the scene itself. This sarcophagus shows a siege scene. A wall can be seen running through the center of the sarcophagus. Along the top left of the scene, there are three Roman soldiers, all raising their 144
153 arms and leaning over the city wall. To the right of these three is a female, gesturing in a similar fashion. Below this line of Romans, various men can be seen trying to climb the walls. At the bottom left, a barbarian stands with his back turned to the viewer, his left arm raised. He seems to look up towards the city wall. The broken body of a barbarian lies at his feet. Another barbarian collapses over this man, and a third barbarian lies beside him. Behind these figures, a Roman soldier grabs the arm of a barbarian. To the right of these figures, a Roman soldier lunges to the left, his torso completely turned to the viewer. He creates a chiasmic composition with the barbarian who lunges to the right, holding the collapsed body of one of his comrades. Another barbarian lies at the feet of the Roman soldier. Behind him, a Roman cavalryman projects out of the scene. Immediately to the right of this horseman, a larger Roman cavalryman similarly projects from the scene. While his horse leaps to the right, it twists its head back to face the left, creating the appearance of the creature protruding directly towards the viewer. The commander sits awkwardly upon his horse, as he is too large for the creature and seemingly floats off of its back, with his right arm raised to strike. He looks down, though his target is not clear. Behind this Roman, other Roman cavalrymen charge to the right. Before the central figure stands a barbarian who turns to look up at the commander, his arms raised in supplication. The right half of this scene is dominated by another city wall. Here the scene becomes a jumbled mass of limbs, as Roman soldiers toss barbarians from the top of the walls while other soldiers attempt to climb up the walls. At the bottom right of the scene, a barbarian sits upon the ground beside his fallen horse, looking up with a shocked expression towards the attack of the city. All of the figures in this scene are fully clothed. No space is left empty, as it is filled in with flailing limbs and falling bodies. Though space is not strictly divided between the two 145
154 opposing sides, the Roman cavalrymen seem to dominate the center of the scene. The central horseman on this scene seems to be a portrait, as he has a beard, small nose, and pursed lips. Ca CE 18. Large Ludovisi, fig. 62 Proconnesian Marble. H: 1.53 m. L: 2.73 m. Palazzo Altemps inv Helbig 1896, p. 123, n. 890; Reinach 1912, p. 331, fig. 1; Frothingham 1922, pp ; Rodenwaldt 1929, pp ; Hamberg 1945, pp , pl. 44; Andreae 1956, p. 16, cat. no. 17; von Heintze 1957, pp , pl. 13; Brilliant 1963, pp , fig. 4.64; Pelikán 1965, pp ; Reschke 1966, pp ; Pelikán 1965, pp ; Andreae 1968, pp ; Andreae 1969, pp ; Aurigemma 1970, p. 95, no. 221, pl. 33; Jung 1978, p. 368, n. 110; McCann 1978, p. 110; Fittschen 1979, pp ; Richter and Breckenridge 1982, p. 12, pl. 5.5; Koch and Sichtermann 1982, p. 92, pls ; Giuliano 1983, pp , cat. no. 25; De Lachenal 1983, pp ; Andreae 1992, p. 57; Krierer 1995, pp , cat. no. S 10, pl. 4348; Reinsberg 1995, pp ; Gabelmann 1996, p. 34; Turcan 1999, p. 64, fig. 67; Ferris 2000, pp ; Wrede 2001, pl. 6.3; De Angelis D Ossat 2002, pp ; Zanker and Ewald 2004, p. 230; Krierer 2004, cat. no. 200, pl. 44.6; Landskron 2005, pp , pl. 7, fig. 26; Muth 2005, pp ; Reinsberg 2006 p. 88, cat. no. 31; Heitz 2009, pp ; Künzl 2010; Alexandrescu 2010, pp , cat. no. P 36, pl. 33; Töpfer 2011, pp. 153, 248, 383, cat. no. SD 72; De Angelis D Ossat 2011, pp ; Faust 2012, pp , pls This battle scene is centered upon a Roman horseman, who leaps to the right and raises his right arm, his face and chest directed out towards the audience. His cape flows dramatically behind him. His seated position on his horse is not possible, and is rendered in such a way to show the man s entire body at the cost of realism. His face bears clear portrait features, such as his prominent brow and curly hair. On the left of the scene, a barbarian upon a fallen horse can be seen peeking around the corner from the side of the sarcophagus. Next to him sits a barbarian who attempts to cover his back with a shield. This man has been defeated and now cowers in the corner. A tropaeum is shown on the top left corner of the scene. Here, a Roman soldier holding 146
155 the reigns of a horse strides right. In front of this man stands another Roman soldier. He raises his shield to block an attack coming from a barbarian horseman, who stands behind the Roman. The barbarian has his arm raised, prepared to strike. Just to the left of this barbarian is a Roman trumpeter. Below this battle pair, a Roman soldier stands, holding the chin of a barbarian captive, whose hands are crossed before him in a sign of submission. Another defeated barbarian peeks out from behind this Roman. Under his feet, the crumpled body of a fallen barbarian is visible, as well as a second barbarian who tries to crawl away. The head of a fallen horse is visible behind this barbarian. A barbarian kneels above these fallen bodies, raising his shield to block the attack of the Roman soldier who stands above him. To his right, a Roman horseman is visible. It is unclear whether he is falling or attacking. Below the central figure, two crouching barbarians look up in apparent awe and anguish. Two barbarians fall from their horses to the right. Above the pair, a Roman soldier raises his sword to strike an unseen enemy, and the head of a second Roman can be seen to his right. A Roman horseman strides to the right behind these Roman soldiers, parallel to the central figure. He raises a spear to strike a standing barbarian, who wears trousers and turns his back to the viewer. A trumpeter stands to the right of this pair, framed by the arch of the instrument with his cheeks puffed. On the far right side of the scene, three Roman soldiers stand, one behind the other. The lowest Roman holds the hair of and prepares to strike a nude barbarian who sits at this feet. Behind his right shoulder and somewhat hidden in the shadows of the scene is the face of another barbarian. A tropaeum is shown on the top right corner of the sarcophagus. No space is left empty in this scene, as every inch is filled with garments and shields. All of the figures within the scene are clothed, and this drapery adds to the confusion and clutter of 147
156 the scene. The battle is made more dramatic by the exaggerated expressions on the faces of the Romans, barbarians, and even the horses. Mid-3 rd century CE 148


157 Images Fig. 1: Grave stele of Dexileos, after Eliopoulos 2009, p. 22, fig. 16. Fig. 2: Hadrianic hunting scene, after Ferris 2013, fig


158 Fig. 3: Alexander Sarcophagus battle scene, after Pasinli 1997, pp Fig. 3a: Alexander Sarcophagus Detail Fig. 4: Athena group from the Altar of Zeus at Pergamon, after Schmidt 1962, pl


159 Fig. 5: Moirai group from the Altar of Zeus at Pergamon, after Schmidt 1962, pl. 35. Fig. 6: Leto and Apollo group from the Altar of Zeus at Pergamon, after Schmidt 1962, pls


160 Fig. 7: Artemis and Hecate group from the Altar of Zeus at Pergamon, after Schmidt 1962, pls. 15. Fig. 8: Lesser Attalid Group, after Stewart 2004, p. 2, fig


161 Fig. 9: Dying Gaul, after Stewart 2004, p. 14, fig. 28. Fig. 10: Venice Falling Gaul, after Stewart 2004, p. 41, fig


162 Fig. 11: Venice Kneeling Gaul, after Stewart 2004, p. 37, fig. 49. Fig. 12: Venice Dying Gaul, after Stewart 2004, p. 44, fig


163 Fig. 13: Ludovisi Gaul, after Stewart 2004, p. 15, fig. 27. Fig. 14: Amazon falling from her horse, after Gasparri 2009, p. 362, pl


164 Fig. 15: Amazon fighting a Gaul, after Giuliano 1979, p. 163, no Fig. 16: Alexander Mosaic, after Cohen 1997, fig


165 Fig. 17: Column of Trajan scene XXIV, after Coarelli 2000, p. 67, pl. 23. Fig. 18: Column of Trajan scene XXXIX, after Coarelli 2000, p. 84, pl


166 Fig. 19: Column of Trajan scene LXIV, after Coarelli 2000, p. 112, pl. 68. Fig. 20: Column of Trajan scene CXII, after Coarelli 2000, p. 180, pl


167 Fig. 21: Column of Trajan scene LXXI, after Coarelli 2000, p. 125, pl. 81. Fig. 22: Great Trajanic Frieze, after Faust 2012, pl


168 Fig. 23: Column of Marcus Aurelius scene XCII, after Coarelli 2008, p Fig. 24: Column of Marcus Aurelius scene LXXIX, after Coarelli 2008, p


169 Fig. 25: Column of Marcus Aurelius scene LXI, after Coarelli 2008, p Fig. 26: Column of Marcus Aurelius scene L, after Coarelli 2008, p


170 Fig. 27: Column of Marcus Aurelius scene CIX, after Coarelli 2008, p Fig. 28: Arch of Septimius Severus panel III, after Brilliant 1967, pl. 60a. 162

171 Fig. 29: Arch of Septimius Severus panel I, after Brilliant 1967, pl. 76a. 163
172 Fig. 30: Roman Horseman Fig. 31: Falling Barbarian A Fig. 32: Falling Barbarian B Fig. 33: Falling Barbarian C Fig. 34: Turning Barbarian 164
173 Fig. 35: Dallas Museum Circle Fig. 36: Small Campo Santo Circle Fig. 37: Collapsing Horse Fig. 38: Fleeing Barbarian Fig. 39: Execution Group Fig. 40: Trumpeter 165
174 Fig. 41: Cowering Barbarian Fig. 42: Central Commander A Fig. 43: Central Commander B Fig. 44: Central Commander C 166


175 Fig. 45: Ammendola Sarcophagus, after Krierer 1995, pl. 24, fig. 83. Fig. 46: Dallas Museum Sarcophagus, after Dallas Museum of Art 2012, pp


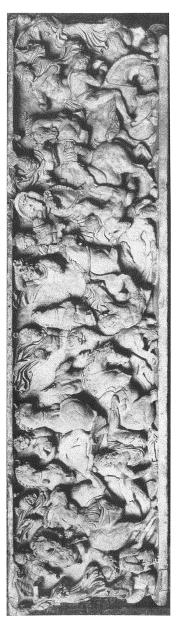
176 Fig. 47: Small Villa Doria Pamphili Sarcophagus, after Krierer 1995, pl. 33, fig Fig. 48: Via Tiburtina Sarcophagus, after Krierer 1995, pl. 28, fig. 99. Fig. 49: Small Ludovisi Sarcophagus, after Krierer 1995, pl. 31, fig


177 Fig. 50: Concordia University Sarcophagus, after Francis 2000, pl. 1. Fig. 51: Small Campo Santo Sarcophagus, after Arias, Cristiani, Gabba 1977, pl. 15. Fig. 52: Badia di Farfa Sarcopahgus, after Faust 2012, pl


178 Fig. 53: Badia di Cava Sarcophagus, after Russenberger 2015, p. 334, fig Fig. 54: Palazzo Giustiniani Sarcophagus, after Krierer 1995, pl. 33, fig Fig. 55: Sketch of Ince Blundell Sarcophagus, after Bieńkowski 1908, pl. 7a. 170


179 Fig. 56: Large Campo Santo Sarcophagus, after Rodenwaldt 1935, pl. 9. Fig. 57: Villa Borghese Sarcophagus, after Krierer 1995, pl. 41, fig


180 Fig. 58: Palermo Sarcophagus, after Brilliant 1963, fig Fig. 59: Palazzo Giustiniani Fragment, after Cossiga 1984, p


181 Fig. 60: Portonaccio Sarcophagus, after Faust 2012, pl. 77. Fig. 61: Large Villa Doria Pamphili Sarcophagus, after Krierer 1995, pl. 41, fig


182 Fig. 62: Large Ludovisi Sarcophagus, after Krierer 1995, pl. 43, fig Fig. 63: Vatican Amazonomachy Sarcophagus, after Grassinger 1999, pl

183 Fig. 64: Mantua Amazonomachy Sarcophagus, after Grassinger 1999, pl Fig. 65: Grassinger s Amazon Group F, after Grassinger 1999, fig. 1. Fig. 66: Grassinger s Amazon Group G, after Grassinger 1999, fig
184 Fig. 67: Grassinger s Amazon Group H2, after Grassinger 1999, fig. 1. Fig. 68: Grassinger s Amazon Group E, after Grassinger 1999, fig
185 Fig. 69: Grassinger s Amazon Groups N and O, after Grassinger 1999, fig. 1. Fig. 70: Grassinger s Amazon Group B, after Grassinger 1999, fig. 1. Fig. 71: Grassinger s Gefellene R, W, and S, after Grassinger 1999, fig

186 Fig. 72: Grassinger s Gefellene P, Q, and X, after Grassinger 1999, fig. 1. Fig. 73: Grassinger s Tubicen Y, after Grassinger 1999, fig. 1. Fig. 74: Capitoline Museum Amazonomachy Sarcophagus, after Grassinger 1999, pl


187 Fig. 75: Amazonomachy from Temple of Bassae Frieze, after Mallwitz 1975, p. 75, pl Fig. 76: Boar-hunting Sarcophagus from Centrale Montemartini, after Russell 2013, p. 287, fig


188 Fig. 77: Campania Endymion Sarcophagus, after Elsner 1998, p. 153, fig Fig. 78: Vatican Achilles and Penthesilea Sarcophagus, after Grassinger 1999, pl
Life and Death at Beth Shean
 Life and Death at Beth Shean by emerson avery Objects associated with daily life also found their way into the tombs, either as offerings to the deceased, implements for the funeral rites, or personal
INGRAM GALLERY FEBRUARY 23 MAY 28, 2018
 Cover: Statue head of Augustus (Rome, Italy), ca. 30 BCE. Marble, 14 3/4 x 8 1/4 x 8 5/8 in. The British Museum, 1888,1210.1. The Trustees of the British Museum INGRAM GALLERY FEBRUARY 23 MAY 28, 2018
XXXXXXX XXXXXXX Final Paper
 XXXXXXX XXXXXXX Final Paper ----- Art 101.01: History of Western Art I: Prehistoric to the 14th Century Valerie Lalli April 30, 2018 Artist: Unknown Title: Statuette of a female Period: Iran, Ancient Near
EXECUTIVE SUMMARY. 1. Brief Description of item(s)
") EXECUTIVE SUMMARY 1. Brief Description of item(s) What is it? A figurine of a man wearing a hooded cloak What is it made of? Copper alloy What are its measurements? 65 mm high, 48mm wide and 17 mm thick,
EXECUTIVE SUMMARY 1. Brief Description of item(s) What is it? A figurine of a man wearing a hooded cloak What is it made of? Copper alloy What are its measurements? 65 mm high, 48mm wide and 17 mm thick,
GETTY VILLA UNVEILS A BEHIND-THE-SCENES LOOK AT OBJECT COLLECTION AND CONSERVATION IN THREE SIMULTANEOUS EXHIBITIONS
 DATE: October 22, 2008 FOR IMMEDIATE RELEASE GETTY VILLA UNVEILS A BEHIND-THE-SCENES LOOK AT OBJECT COLLECTION AND CONSERVATION IN THREE SIMULTANEOUS EXHIBITIONS Reconstructing Identity: The Statue of
ACHAEMENID PERSIA AN UNSUNG HERO FOR HISTORY TEACHERS
 ACHAEMENID PERSIA AN UNSUNG HERO FOR HISTORY TEACHERS YEAR 12 (NSW) SYLLABUS Ancient Societies: Persian Society at the Time of Darius and Xerxes Personalities in Their Times: Xerxes Historical Periods:
The early Kushite kings adopted all Egyptian customs and beliefs. kings were buried on beds placed on stone platforms within their pyramids.
 the kushite period 747 BC 350 AD Funeral practice After the time of Egyptian new kingdom there was a political and artistic decline and Egypt entered one of the obscure periods of its history, the weakening
Xian Tombs of the Qin Dynasty
 Xian Tombs of the Qin Dynasty By History.com, adapted by Newsela staff In 221 B.C., Qin Shi Huang became emperor of China, and started the Qin Dynasty. At this time, the area had just emerged from over
Chalcatzingo, Morelos, Mexico
 Chalcatzingo, Morelos, Mexico From Wikipedia, the free encyclopedia Photos: Josef Otto Chalcatzingo is a Mesoamerican archaeological site in the Valley of Morelos dating from the Formative Period of Mesoamerican
Common Core Correlations Grade 8
 Common Core Correlations Grade 8 Number ELACC8RL1 ELACC8RL2 ELACC8RL3 Eighth Grade Reading Literary (RL) Key Ideas and Details Cite the textual evidence that most strongly supports an analysis of what
Marshall High School Mr. Cline Western Civilization I: Ancient Foundations Unit Two BA
 Marshall High School Mr. Cline Western Civilization I: Ancient Foundations Unit Two BA Have you ever happened across a dollar on the sidewalk? What about a gold ring or an expensive watch? Perhaps you
Color Harmony Plates. Planning Color Schemes. Designing Color Relationships
 Color Harmony Plates Planning Color Schemes Designing Color Relationships From Scheme to Palette Hue schemes (e.g. complementary, analogous, etc.) suggest only a particular set of hues a limited palette
SERIATION: Ordering Archaeological Evidence by Stylistic Differences
 SERIATION: Ordering Archaeological Evidence by Stylistic Differences Seriation During the early stages of archaeological research in a given region, archaeologists often encounter objects or assemblages
A Sense of Place Tor Enclosures
 A Sense of Place Tor Enclosures Tor enclosures were built around six thousand years ago (4000 BC) in the early part of the Neolithic period. They are large enclosures defined by stony banks sited on hilltops
Spring IDCC 3900 STP ITALY Forward Fashion, Omni Retail and the Creative Consumer - Reality and Imagination
 NOTE: This is a SAMPLE syllabus/itinerary and may not be the most up-todate version. Please contact the faculty leader of this course for more recent information. Spring 2019 IDCC 3900 STP ITALY Forward
A Memorial is something that is intended to honor an event, person, or memory.
 12127 1 12127 Professor Overman English 155 November 2, 2006 Tattoo Memorial A Memorial is something that is intended to honor an event, person, or memory. Traditionally these types of representations
IRAN. Bowl Northern Iran, Ismailabad Chalcolithic, mid-5th millennium B.C. Pottery (65.1) Published: Handbook, no. 10
 Published: Handbook, no. 10") Bowl Northern Iran, Ismailabad Chalcolithic, mid-5th millennium B.C. Pottery (65.1) IRAN Published: Handbook, no. 10 Bowl Iran, Tepe Giyan 2500-2000 B.C. Pottery (70.39) Pottery, which appeared in Iran
Bowl Northern Iran, Ismailabad Chalcolithic, mid-5th millennium B.C. Pottery (65.1) IRAN Published: Handbook, no. 10 Bowl Iran, Tepe Giyan 2500-2000 B.C. Pottery (70.39) Pottery, which appeared in Iran
Information for Teachers
 Sueno s Stone in Forres is the tallest carved stone in Scotland and shows a dramatic battle scene. Investigating Sueno s Stone Information for Teachers education investigating historic sites 2 Sueno s
Censer Symbolism and the State Polity in Teotihuacán
 FAMSI 2002: Saburo Sugiyama Censer Symbolism and the State Polity in Teotihuacán Research Year: 1998 Culture: Teotihuacán Chronology: Late Pre-Classic to Late Classic Location: Highland México Site: Teotihuacán
Costumes Of The Greeks And Romans
 Costumes Of The Greeks And Romans 1 / 6 2 / 6 3 / 6 Costumes Of The Greeks And Costumes of the Greeks and Romans (Dover Fashion and Costumes) [Thomas Hope] on Amazon.com. *FREE* shipping on qualifying
THE YORUBA PEOPLE OF SOUTH WEST NIGERIA, AFRICA
 THE YORUBA PEOPLE OF SOUTH WEST NIGERIA, AFRICA People: Yoruba Location: SW Nigeria Population: Perhaps 20,000,000 Arts: Yoruba beliefs and rituals, gods and spirits, with their blithering array of cults
Medieval Burials and the Black Death
 Medieval Burials and the Black Death A Report on Badia Pozzeveri, Italy Bioarchaeology Field School Summer 2015 During the summer of 2015, I was given the opportunity to participate in the Ohio State University/Universitá
FINDING LIFE FROM GRAVE GOODS
 FINDING LIFE FROM GRAVE GOODS Summary: In archaeology classes it appears that students are often told what the correct answer is, rather than being forced to make inferences themselves based upon archaeological
BULLETIN OF THE MUSEUM OF FINE ARTS VOLUME XXXVII BOSTON, JUNE, 1939 NUMBER 221. Harvard University-Museum of Fine Arts Egyptian Expedition
 BULLETIN OF THE MUSEUM OF FINE ARTS VOLUME XXXVII BOSTON, JUNE, 1939 NUMBER 221 Prince Ankh-haf Harvard University-Museum of Fine Arts Egyptian Expedition PUBLISHED BIMONTHLY SUBSCRIPTION ONE DOLLAR XXXVII,
the Aberlemno Stone Information for Teachers investigating historic sites
 The astonishing stone in the kirkyard at Aberlemno demonstrates the full range of Pictish skill and artistry. Investigating the Aberlemno Stone Information for Teachers education investigating historic
THE PERMANENCE OF SCARRING, VISIBILITY AND COSMETIC DEFECT
 THE PERMANENCE OF SCARRING, VISIBILITY AND COSMETIC DEFECT The 13 th edition of the Judicial College Guidelines indicate a number of factors to be taken into consideration in the valuation of facial injuries
Gardner s Art Through the Ages, 13e. Chapter 2 The Ancient Near East
 Gardner s Art Through the Ages, 13e Chapter 2 The Ancient Near East 1 The Ancient Near East 2 Goals Understand the cultural changes in the Neolithic Revolution as they relate to the art and architecture.
The Vikings Begin. This October, step into the magical, mystical world of the early Vikings. By Dr. Marika Hedin
 This October, step into the magical, mystical world of the early Vikings The Vikings Begin By Dr. Marika Hedin Director of Gustavianum, Uppsala University Museum This richly adorned helmet from the 7th
The Shang Dynasty CHAPTER Introduction. 4 A chariot buried in a Shang ruler's tomb was to serve the king in the afterlife.
 4 A chariot buried in a Shang ruler's tomb was to serve the king in the afterlife. CHAPTER I The Shang Dynasty 20.1 Introduction In Chapter 19, you explored five geographic regions of China. You learned
Council of Fashion Designers of America Page CFDA SCHOLARSHIP AWARD
 Council of Fashion Designers of America Page 1 2019 CFDA SCHOLARSHIP AWARD Council of Fashion Designers of America Page 2 ABOUT Established in 1996, the CFDA Scholarship Program has awarded $1.9 million
IB VISUAL ARTS (HL) COMPARATIVE STUDY KYLIE KELLEHER IB CANDIDATE NUMBER:
 COMPARATIVE STUDY KYLIE KELLEHER IB CANDIDATE NUMBER:") IB VISUAL ARTS (HL) COMPARATIVE STUDY KYLIE KELLEHER IB CANDIDATE NUMBER: 000878-0097 RAJASTHAN, INDIA PHOTOGRAPH BY STEVE MCCURRY Steve McCurry is best known for his color photography that captures the
IB VISUAL ARTS (HL) COMPARATIVE STUDY KYLIE KELLEHER IB CANDIDATE NUMBER: 000878-0097 RAJASTHAN, INDIA PHOTOGRAPH BY STEVE MCCURRY Steve McCurry is best known for his color photography that captures the
objects of desire: the foot as a site by Lia Marie Braaten July 1998
 objects of desire: the foot as a site by Lia Marie Braaten July 1998 This thesis is submitted to the faculty of Virginia Polytechnic Institute and State University in partial fulfillment of the requirements
The Iron Handle and Bronze Bands from Read's Cavern: A Re-interpretation
 46 THE IRON HANDLE AND BRONZE BANDS FROM READ'S CAVERN The Iron Handle and Bronze Bands from Read's Cavern: A Re-interpretation By JOHN X. W. P. CORCORAN. M.A. Since the publication of the writer's study
The Upper Sabina Tiberina Project: Report for the Archaeological Institute of America Rutgers University Newark
 The Upper Sabina Tiberina Project: Report for the Archaeological Institute of America Rutgers University Newark My archeological dig took place near the village of Vacone, a small town on the outskirts
Memorials. Fact sheets Taking a closer look at.
 Fact sheets Taking a closer look at. Memorials It is suggested that one or two the following fact sheets are printed out and used as wall or poster displays or laminate and make available for students
G2 Studio Barbara Iglesias
 G2 Studio Barbara Iglesias The crown molding along the back wall acts as a planar datum organizing all the elements of the photo underneath it. The organization of the people, two clusters of three people
Higher National Unit Specification. General information for centres. Fashion: Commercial Design. Unit code: F18W 34
 Higher National Unit Specification General information for centres Unit title: Fashion: Commercial Design Unit code: F18W 34 Unit purpose: This Unit enables candidates to demonstrate a logical and creative
Content: The History of the Sculptures / Analysis of the Clothes Worn by the Moresque Dancers / Interpretation of the Costumes
 The Costumes of the Moresque Dancers in Munich Johannes Pietsch Abstract: The ten Moresque Dancers, a group of wooden sculptures, range among the most famous works of art ever produced in Munich. They
We Stand in Honor of Those Forgotten
 Portsmouth s African Burying Ground We Stand in Honor of Those Forgotten I stand for the Ancestors Here and Beyond I stand for those who feel anger I stand for those who were treated unjustly I stand for
An overview of Cochin Ceramics in Taiwan with an emphasis on the influence of Hong Kun-Fu and his school s to 1980s
 University of Wollongong Research Online University of Wollongong Thesis Collection 1954-2016 University of Wollongong Thesis Collections 2008 An overview of Cochin Ceramics in Taiwan with an emphasis
Abstract. Greer, Southwestern Wyoming Page San Diego
 Abstract The Lucerne (48SW83) and Henry s Fork (48SW88) petroglyphs near the southern border of western Wyoming, west of Flaming Gorge Reservoir of the Green River, display characteristics of both Fremont
Cultural Corner HOW MUMMIES WERE MADE
 Cultural Corner HOW MUMMIES WERE MADE A mummy is the body of a person that has been preserved after death. The ancient Egyptians believed that mummifying a person's body after death was essential to ensure
A Highland Revival Drawstring Plaid
 Introduction A Highland Revival Drawstring Plaid The late 18th and early 19th centuries were a period of great variation and change in the development of Highland Dress. Covering much of the reign of Geo
Kandy Period Bronze Buddha Images of Sri Lanka: Visual and Technological Styles
 Kandy Period Bronze Buddha Images of Sri Lanka: Visual and Technological Styles Arjuna Thantilage Senior Lecturer, Coordinator, Laboratory for Cultural Material Analysis (LCMA), Postgraduate Institute
THE BESSBOROUGH PHALERA' 1 '
 THE BESSBOROUGH PHALERA' 1 ' BY PHILIP NELSON, M.D., F.R.S.E. Read 16 September 1948 world-famous collection known as the Marlborough A Gems included the Arundel Gems, The Bessborough Gems, (2) and those
Assyrian Reliefs Bowdoin College Museum of Art
 Assyrian Reliefs Bowdoin College Museum of Art Middle School Resource Created by Blanche Froelich 19 Student Education Assistant What is a relief? All words appearing in a bold color are defined in the
Title: Defying the Censorship Author: Alejandra Freile Date: March 10, 2012 Institution name/journal where submitted: Dartmouth College
 Title: Defying the Censorship Author: Alejandra Freile Date: March 10, 2012 Institution name/journal where submitted: Dartmouth College The use of this database indicates agreement to the terms and conditions
Palette of King Narmer
 Palette of King Narmer Palette of King Narmer, from Hierakonpolis, Egypt, Predynastic, c. 3000-2920 B.C.E., slate, 2' 1" high (Egyptian Museum, Cairo) Vitally important, but difficult to interpret Some
Unit 3 Hair as Evidence
 Unit 3 Hair as Evidence A. Hair as evidence a. Human hair is one of the most frequently pieces of evidence at the scene of a violent crime. Unfortunately, hair is not the best type of physical evidence
ROYAL TOMBS AT GYEONGJU -- CHEONMACHONG
 ROYAL TOMBS AT GYEONGJU -- CHEONMACHONG GRADES: High School AUTHOR: Daryl W. Schuster SUBJECT: World History TIME REQUIRED: 60 minutes OBJECTIVES: 1. Awareness of Korean tombs including size and structure
Fiber Evidence. What is a fiber? Fiber transfer 2/21/2007
 Fiber Evidence What is a fiber? A fiber is the smallest unit of a textile material that has a length many times greater than its diameter. Fibers can occur naturally as plant and animal fibers, but they
Early African Art. By Anthony Sacco (Late African Art by Caroline DelVecchio)
") Early African Art By Anthony Sacco (Late African Art by Caroline DelVecchio) -Sub-Saharan = Africa with the exception of the Mediterranean Coast (Egypt, Morocco, etc.) -Mihrab = A niche that points to
Early African Art By Anthony Sacco (Late African Art by Caroline DelVecchio) -Sub-Saharan = Africa with the exception of the Mediterranean Coast (Egypt, Morocco, etc.) -Mihrab = A niche that points to
THE REPRESENTATION OF THE INFLUENCE OF THE BRITISH IMPERIALISM TOWARDS INDIAN SOCIETY IN RUDYARD KIPLING S KIM
 THE REPRESENTATION OF THE INFLUENCE OF THE BRITISH IMPERIALISM TOWARDS INDIAN SOCIETY IN RUDYARD KIPLING S KIM (A POSTCOLONIAL STUDIES) THESIS Submitted as a Partial Fulfillment of Sarjana Humaniora Degree
TEXTILES AND DESIGN 3 UNIT (ADDITIONAL) HIGHER SCHOOL CERTIFICATE EXAMINATION. Time allowed One hour and a half (Plus 5 minutes reading time)
 HIGHER SCHOOL CERTIFICATE EXAMINATION. Time allowed One hour and a half (Plus 5 minutes reading time)") N E W S O U T H W A L E S HIGHER SCHOOL CERTIFICATE EXAMINATION 1997 TEXTILES AND DESIGN 3 UNIT (ADDITIONAL) Time allowed One hour and a half (Plus 5 minutes reading time) DIRECTIONS TO CANDIDATES Attempt
N E W S O U T H W A L E S HIGHER SCHOOL CERTIFICATE EXAMINATION 1997 TEXTILES AND DESIGN 3 UNIT (ADDITIONAL) Time allowed One hour and a half (Plus 5 minutes reading time) DIRECTIONS TO CANDIDATES Attempt
Chapter 4 THE GREEKS AND THEIR NEIGHBORS
 Chapter 4 THE GREEKS AND THEIR NEIGHBORS In every respect the Greek culture differed from Egypt and the Near East. The Greeks lacked any political unity or a common system of government. It was a maritime
Hair in the Classical World Hair and Cultural Exchange Text Panel
 Fairfield University DigitalCommons@Fairfield Hair in the Classical World - Ephemera Hair in the Classical World 9-2015 Hair in the Classical World Hair and Cultural Exchange Text Panel Bellarmine Museum
period? The essay begins by outlining the divergence in opinion amongst scholars as to the
 Abstract: The title of this essay is: How does the intensity and purpose of Viking raids on Irish church settlements in ninth century Ireland help to explain the objectives of the Vikings during that period?
The Art Issue 60+ Maine Artists: Collect Them While You Can Farnsworth Award Winner Alex Katz Art at Home: Maine s Most Enviable Collections
 April 2010 The Art Issue 60+ Maine Artists: Collect Them While You Can Farnsworth Award Winner Alex Katz Art at Home: Maine s Most Enviable Collections 75 Market Street Suite 203 207-772-3373 www.mainehomedesign.com
C. J. Schwarz Department of Statistics and Actuarial Science, Simon Fraser University December 27, 2013.
 Errors in the Statistical Analysis of Gueguen, N. (2013). Effects of a tattoo on men s behaviour and attitudes towards women: An experimental field study. Archives of Sexual Behavior, 42, 1517-1524. C.
Each object here must have served a purpose. Archaeologists must do their best to explain what that purpose was.
 Archaeologists have to use many different forms of reasoning to decipher the what and how about artifacts they discover. I mean seriously, what in the world are these things? Each object here must have
Rudyard Kipling s India: Literature, History, and Empire (TR, GS164)
") History 1400, Spring 2017 Robert Travers, Associate Professor of History Email: trt5@cornell.edu Office hours (McGraw Hall 345), Thursday 3.30-5.30pm Rudyard Kipling s India: Literature, History, and Empire
History 1400, Spring 2017 Robert Travers, Associate Professor of History Email: trt5@cornell.edu Office hours (McGraw Hall 345), Thursday 3.30-5.30pm Rudyard Kipling s India: Literature, History, and Empire
Early Medieval. This PowerPoint includes information on the following images: 53 and 55
 Early Medieval This PowerPoint includes information on the following images: 53 and 55 Key Point 1 Illuminated Manuscripts Transition from scroll to bound books (codices) Allows for preservation of writing
Contexts for Conservation
 Contexts for Conservation 2013 National Conference - Adelaide 23-25 October The Wrap on Mummies Using the story of Tutankhamen to Introduce Conservation and Science to Children Kristin Phillips, Principal
International Training Programme Final Report
 International Training Programme 2016 Final Report Barbara Vujanović, senior curator Ivan Meštrović Museums - Meštrović Atelier, Zagreb barbara.vujanovic@mestrovi.hr Supported by the John Armitage Trust
Evolution of the Celts Unetice Predecessors of Celts BCE Cultural Characteristics:
 Evolution of the Celts Unetice Predecessors of Celts 2500-2000 BCE Associated with the diffusion of Proto-Germanic and Proto-Celto-Italic speakers. Emergence of chiefdoms. Long-distance trade in bronze,
Cetamura Results
 Cetamura 2000 2006 Results A major project during the years 2000-2006 was the excavation to bedrock of two large and deep units located on an escarpment between Zone I and Zone II (fig. 1 and fig. 2);
Mathematical Material for Chapter V. Freckleham
 Mathematical Material for Chapter V Freckleham 160 MATHEMATICAL MATERIAL V The "Freckleham" theme forms the basic material with which three-dimensional goal description as prepared by us will be demonstrated.
Roger Bland Roman gold coins in Britain. ICOMON e-proceedings (Utrecht, 2008) 3 (2009), pp Downloaded from:
 3 (2009), pp Downloaded from:") Roger Bland Roman gold coins in Britain ICOMON e-proceedings (Utrecht, 2008) 3 (2009), pp. 31-43 Downloaded from: www.icomon.org Roman gold coins in Britain Roger Bland Head of Portable Antiquities & Treasure
Roger Bland Roman gold coins in Britain ICOMON e-proceedings (Utrecht, 2008) 3 (2009), pp. 31-43 Downloaded from: www.icomon.org Roman gold coins in Britain Roger Bland Head of Portable Antiquities & Treasure
CALL FOR ARTISTS 2019
 CALL FOR ARTISTS 2019 : created to be shared 6 months running show 6 April - 27 October 2019 Application Deadline 1 st February 2019 Download your application pack: www.kunsthuisgallery.com/opportunities
TO STUDY THE RETAIL JEWELER S IMPORTANCE TOWARDS SELLING BRANDED JEWELLERY
 TO STUDY THE RETAIL JEWELER S IMPORTANCE TOWARDS SELLING BRANDED JEWELLERY Prof. Jiger Manek 1, Dr.Ruta Khaparde 2 ABSTRACT The previous research done on branded and non branded jewellery markets are 1)
MacDonald of Glenaladale
 Background MacDonald of Glenaladale The MacDonald of Glenaladale is one of a small group of tartans where an extant specimen survives that can accurately be dated to the mid-c18th. For many years confusion
EXHIBITION - INTERVIEW
 Friday, January 24, 2014 EXHIBITION - INTERVIEW Reynolds Gallery, Richmond VA January 10 - February 15, 2014 Amanda Dalla Villa Adams recently conducted an email interview with Siemon Allen discussing
The Roman Times. Marc Antony and Cleopatra Commit Suicide! March 13, 29 B.C Rome, Italy. By Julia Kolodny
 March 13, 29 B.C Marc Antony and Cleopatra Commit Suicide! Lately things have been very quiet about the young couple Marc Antony and Cleopatra. The lovers had been living together in Cleopatra s Palace
Durham, North Carolina
 Durham, North Carolina 27708-0103 Department of Classical Studies Telephone: (919) 681-4292 Box 90103, 233 Allen Building Fax: (919) 681-4262 classics@duke.edu http://www.classicalstudies.duke.edu Cultural
Sizing and Fit 2/20/12. Beyond Design. Chapter 11 Beyond Design. By Sandra J. Keiser and Myrna B. Garner. Copyright 2009 Fairchild Books
 2/20/12 Beyond Design By Sandra J. Keiser and Myrna B. Garner PowerPoint developed by Elizabeth Law Copyright 2009 Fairchild Books All rights reserved. No part of this presentation covered by the copyright
December 06, MOTEL OF the mysteries
 MOTEL OF the mysteries In 2013 a cataclysmic event of huge proportion extinguished virtually all forms of life on the the North American Continent. Because of a reduction in postal rates, mail literally
Glossier is an up-and-coming makeup and skincare brand that celebrates real girls, in real life.
 identity Glossier is an up-and-coming makeup and skincare brand that celebrates real girls, in real life. RATIONALE Glossier built its lines based on input collected from cool girls around the world to
NUBIAN EXPEDITION. oi.uchicago.edu. Keith C. Seele, Field Director
 NUBIAN EXPEDITION Keith C. Seele, Field Director Time for contemplation is seldom available in the field during an Oriental Institute season of excavation. But matters are scarcely better after the return
Six Thinking Hats. American Business Book Café J/E. Relax. Learn. Grow.
 J/E American Business Book Café Relax. Learn. Grow. Six Thinking Hats Author: Edward De Bono Publisher: Back Bay Books by Little, Brown and Co. 1999 ISBN: 0 316 17791 1 173 American Business Book Café
Hy Density: Archimedes Revisited. Teacher Information Page Activity 3B Part 4
 Hy Density: Archimedes Revisited Teacher Information Page Activity 3B Part 4 Activity Description: Students will read the background on Archimedes and the Golden Crown. After having done the Buoyancy and
The origin of man is believed to have started some 3 million years ago in southern Africa.
 The origin of man is believed to have started some 3 million years ago in southern Africa. Thousands of years ago Human migratory patterns can be traced back almost 200,000 years by using bones, tools
2018 Florida Folk Festival Participant Guidelines
 2018 Florida Folk Festival Participant Guidelines Mission: The mission of the Florida Folk Festival is to provide a Florida heritage-based celebration while conserving and interpreting Florida s diverse
RESULTS AND INTERPRETATION
 CHAPTER 6 RESULTS AND INTERPRETATION 6.1 INTRODUCTION Chapter 6 deals with the factor analysis results and the interpretation of the factors identified for the product category lipstick and the three advertisements
Sophie's Adventure. An Honors Thesis (HONRS 499) Kelly E. Ward. Thesis Advisor Dr. Laurie Lindberg. Ball State University Muncie, Indiana
 Kelly E. Ward. Thesis Advisor Dr. Laurie Lindberg. Ball State University Muncie, Indiana") Sophie's Adventure An Honors Thesis (HONRS 499) by Kelly E. Ward Thesis Advisor Dr. Laurie Lindberg Ball State University Muncie, Indiana December 2002 Expected Date of Graduation May 2003 ;, ( Z,, ~v
Sophie's Adventure An Honors Thesis (HONRS 499) by Kelly E. Ward Thesis Advisor Dr. Laurie Lindberg Ball State University Muncie, Indiana December 2002 Expected Date of Graduation May 2003 ;, ( Z,, ~v
WHY CLASSICAL MYTHOLOGY?
 WHY CLASSICAL MYTHOLOGY? MEDUSA S LOOK Pilar Torres Carmona IES Narcís Monturiol, Barcelona What is this object? It is a plate Look at the picture below When was it made? It was made in about 600 BC Where
Control ID: Years of experience: Tools used to excavate the grave: Did the participant sieve the fill: Weather conditions: Time taken: Observations:
 Control ID: Control 001 Years of experience: No archaeological experience Tools used to excavate the grave: Trowel, hand shovel and shovel Did the participant sieve the fill: Yes Weather conditions: Flurries
Fieldwalking at Cottam 1994 (COT94F)
") Fieldwalking at Cottam 1994 (COT94F) Tony Austin & Elizabeth Jelley (19 Jan 29) 1. Introduction During the winter of 1994 students from the Department of Archaeology at the University of York undertook
Fieldwalking at Cottam 1994 (COT94F) Tony Austin & Elizabeth Jelley (19 Jan 29) 1. Introduction During the winter of 1994 students from the Department of Archaeology at the University of York undertook
NATHAN JOHNSON APOSTOLIC CLOTHING
 NATHAN JOHNSON APOSTOLIC CLOTHING Analysis by Jacob Tapia Introduction The business analysis found in this review is intended to be a broad analysis of Nathan Johnson s business, Apostolicclothing.com.
Honors 177. Hidden Beneath. Maria Gordienko Psychology
 Honors 177 Hidden Beneath Maria Gordienko Psychology ABSTRACT Body painting can be both spiritual and provocative. However, the painting of inner organs on the skin provides knowledge about human anatomy
Check for updates on the web now!
 Click anywhere in the slide to view the next item on the slide or to advance to the next slide. Use the buttons below to navigate to another page, close the presentation or to open the help page. Slide
STAN DOUGLAS: PHOTOGRAPHS
 NIKOLAJ KUNSTHAL, COPENHAGEN CONTEMPORARY ART CENTRE MARCH 20 MAY 10 2015 STAN DOUGLAS: PHOTOGRAPHS 2008-2013 There s more truth in the lie than in the documentary Stan Douglas, The Guardian, 2014. Photo:
1 of 5 11/3/14 2:03 PM
 Home About Us Laboratory Services Forensic Science Communications Back Issues July 2000 Hairs, Fibers, Crime, and Evidence, Part 2, by Deedrick... Hairs, Fibers, Crime, and Evidence Part 2: Fiber Evidence
Joel Shapiro Talks Public Art, Henry Moore, And The Pursuits Of An Artist
 The Huffington Post By Katherine Brooks Posted: 10/21/13 EDT Joel Shapiro Talks Public Art, Henry Moore, And The Pursuits Of An Artist Joel Shapiro has been constructing artworks both massive and minuscule
Primary Sources: Carter's Discovery of King Tutankhamun's Tomb
 Primary Sources: Carter's Discovery of King Tutankhamun's Tomb By Original transcription from the Griffith Institute, University of Oxford, adapted by Newsela staff on 08.08.16 Word Count 1,029 Level 1120L
Exhibition Roman Empire: Power & People A British Museum Tour
 Exhibitions & Events 24 January 10 May 2015 Exhibition Roman Empire: Power & People A British Museum Tour Saturday 24 January to Sunday 10 May Admission Free Exhibition opening times: Mon to Sat: 10am
Centurio helmet from Sisak
 Centurio helmet from Sisak Exposed in Archeological Museum Zagreb, Croatia Centurio helmet from Sisak, Croatia Is this the only one proven centurio helmet model Galic F.A helmet of Weisenau type - Imperial
Between Art and Asset
 Saturday, November 3, 2018 Between Art and Asset Silver Vessels from Antiquity to Today Silver vessels have been prized possessions in many cultures, both ancient and modern. Some of the most elaborate
PRESS RELEASE LUÍSA ROSAS
 PRESS RELEASE LUÍSA ROSAS LUÍSA ROSAS - CREATIVITY AS A GENUINE AND INEVITABLE EXPRESSION Luísa Rosas comes from a family from the north of Portugal, with great goldsmithery tradition. Her proximity to
Fashion Make-up: Runway and Editorial Make-up and Hair Skills (SCQF level 7)
") Higher National Unit Specification General information Fashion Make-up: Runway and Editorial Make-up and Hair Skills Unit code: J0H3 34 Superclass: HL Publication date: June 2018 Source: Scottish Qualifications
Higher National Unit Specification General information Fashion Make-up: Runway and Editorial Make-up and Hair Skills Unit code: J0H3 34 Superclass: HL Publication date: June 2018 Source: Scottish Qualifications
CMS.405 Media and Methods: Seeing and Expression
 MIT OpenCourseWare http://ocw.mit.edu CMS.405 Media and Methods: Seeing and Expression Spring 2009 For information about citing these materials or our Terms of Use, visit: http://ocw.mit.edu/terms. EXPERIENCE