Spinning Disc Step Sequencer
|
|
|
- Darren Garrison
- 5 years ago
- Views:
Transcription

1 Spinning Disc Step Sequencer Created by John Park Last updated on :27:17 PM UTC
2 Guide Contents Guide Contents Overview How it Works Parts Materials Feather M4 and Crickit Prep Crickit FeatherWing Setup Audio Amp Audio Jumper Plug the Feather M4 into the Crickit Build the Sensor Circuit Proto Board Build Sensors Resistors Ground Interconnects Wiring the Sensors Speaker Servo Power Disc Step Sequencer Audio and Code Code Tune the Servo Build the Sequencer and Make Beats Sequencer Theory Pattern Discs Platter Servo Horn Mount Build the Player Sensor Arm Sensor Placement and Test Run DIY Patterns Mods and Improvements Adafruit Industries Page 2 of 43
3 Overview Play fresh drum patterns with this 16-step disc sequencer, made with CircuitPython on Feather M4 Express and Crickit! It uses reflection sensors to read the steps marked on the paper wheel four tracks of different sound samples can be triggered. The outer clock track keeps everything synchronized. You ll use a continuous rotation servo to spin the disc, driven by the Crickit FeatherWing, plus the capacitive touch pads provide tempo controls to increase or decrease the BPM (beats per minute) of your player. CircuitPython code running on the Feather M4 handles all of the coordination of the elements, and audio mixer playback duties as well. Adafruit Industries Page 3 of 43

4 Sequencers come in many forms. Today, we recognize drum machines, groove boxes, and computer DAW (digital audio workstation) software as typical sequencers. However, the player piano, with its paper roll that actuates valves and hammers to strike strings, or a music box, with its revolving cylinder or disc that plucks a tuned metal comb are also early forms of music sequencers. Our disc-based step sequencer works just like these early sequencers, but uses optical sensing to read the steps to play at the proper time. How it Works The Disc Step Sequencer works like this: The Feather M4, running a CircuitPython program, tells the Crickit's servo driver to spin the continuous rotation servo, to which the disc is connected Five IR (infrared) reflection sensors watch for black drum pattern step marks and clock step marks (more on this later) on the disc, and send signals through the Crickit's Signal I/O pins to the Feather M4 Each time the outer sensor detects a clock step, the Feather M4 polls the other four sensors to see if any of them have encountered a drum pattern step When one or more of the four drum track sensors are triggered for a given clock step, the CircuitPython audio mixer plays the assocated drum voice sample.wav files over the Crickit's amplifier to the connected speaker The tempo can be adjusted by touching the capacitive touch sensors on the Crickit Adafruit Industries Page 4 of 43
5 Parts 1 x Adafruit Feather M4 Express - Featuring ATSAMD51 Featuring ATSAMD51 ADD TO CART 1 x Adafruit CRICKIT FeatherWing for any Feather for any Feather OUT OF STOCK 1 x Continuous Rotation Servo Continuous Rotation Servo ADD TO CART 1 x Miniature Reflective Infrared Optical Sensors 5 Pack OUT OF STOCK 1 x Adafruit Perma-Proto Half-sized Breadboard PCB Single ADD TO CART 1 x Helping Third Hand Magnifier W/Magnifying Glass Tool ADD TO CART 1 x 5V 2A (2000mA) switching power supply UL Listed Adafruit Industries Page 5 of 43
6 ADD TO CART 1 x Speaker - 40mm Diameter 4 Ohm 3 Watt 1 x Through-Hole Resistors 220 ohm 5% 1/4W - Pack of 25 ADD TO CART ADD TO CART 1 x Jumper Shunt with Handle (0.1" / 2.54mm) 10 Pack ADD TO CART 1 x Break-away 0.1" 36-pin strip male header (10 pieces) ADD TO CART 1 x 0.1" 36-pin Strip Right-Angle Female/Socket Header (5 pack) ADD TO CART 1 x Break-away 0.1" 36-pin strip right-angle male header (10 pack) ADD TO CART 1 x Premium Male/Male Raw Jumper Wires 40 x 6" (150mm) ADD TO CART 1 x Premium Male/Female Raw Jumper Wires 40 x 6" ADD TO CART 1 x Small Single Row Wire Housing Pack for DIY Jumper Cables ADD TO CART 1 x Hook-up Wire Spool Set - 22AWG Solid Core 6 x 25 ft ADD TO CART 1 x Black Nylon Screw and Stand-off Set M2.5 Thread ADD TO CART Materials In addition to the parts listed above, you'll also need: White letter sized cardstock or paper, 8-1/2" x 11" Adafruit Industries Page 6 of 43
7 Printer for printing the disc template Black chalk marker for creating patterns by hand (regular markers are too shiny and don't reliably absorb the infrared light) Scissors Hobby knife Soldering iron and solder Small screwdriver Diagonal cutters Chipboard for cutting an 8" diameter disc, or MDF wood circle ( from hobby store Glue stick Hot melt glue gun and glue sticks Adafruit Industries Page 7 of 43
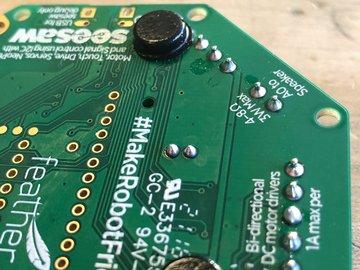
8 Feather M4 and Crickit Prep We'll be using CircuitPython for this project. Are you new to using CircuitPython? No worries, there is a full getting started guide here ( Adafruit suggests using the Mu editor to edit your code and have an interactive REPL in CircuitPython. You can learn about Mu and its installation in this tutorial ( Follow this guide for instructions on installing the latest release version of CircuitPython for the Feather M4 Express. You'll also need to add the following libraries for this project. Follow this guide ( on adding libraries. The ones you'll need are: adafruit_bus_device adafruit_motor adafruit_register adafruit_seesaw adafruit_crickit adafruit_dotstar adafruit_debouncer neopixel simpleio Download the latest adafruit-circuitpython-bundle.zip file as instructed in the guide linked below. Unzip the file and drag those libraries to the lib folder on your Feather M4 CIRCUITPY drive (create it if it does not already exist). Crickit FeatherWing Setup If you're new to the wonderful Crickit board, take a look at the main guide here ( You'll notice the Crickit has its own micro USB port -- this is used only occasionally to update the seesaw firmware on the Crickit itself. You can follow these instructions on updating to the latest firmware ( before getting started. Audio Amp The Crickit FeatherWing has a 3W class-d audio amplifier built in. By default, it is not connected to the Feather's pin A0 DAC (digital-analog converter) pin, since you can also choose to connect it to a PWM pin. We'll be using the A0 DAC output pin, so go ahead and solder a jumper across the pads shown here to send the DAC audio to the amp. You can use a small wire or solder blob to get the job done, however, I like to use two male header pins and a jumper shunt so that I can "mute" the speaker easily by lifting the shunt. Adafruit Industries Page 8 of 43


9 Audio Jumper Solder two male header pins to the pads labeled "Audio" Connect them with a jumper shunt to send the Feather M4 pin A0 DAC output to the Crickit FeatherWing's Class-D amplifier Adafruit Industries Page 9 of 43


10 Adafruit Industries Page 10 of 43


11 There is a tiny trim potentiometer on the Crickit just below the Audio jumper where you can adjust volume with a small screwdriver. Plug the Feather M4 into the Crickit Adafruit Industries Page 11 of 43

12 Now, we're ready to build the sensor circuit, and connect it to the Crickit, along with the speaker, servo, and power. Adafruit Industries Page 12 of 43


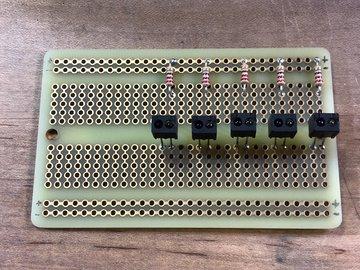
13 Build the Sensor Circuit We'll build our own sensor bar to read the track steps. We'll use five sensors. The IR sensor packages contain two small elements, an IR LED and an IR sensor enclosed in a plastic housing. Adafruit Industries Page 13 of 43


14 You can ignore the leg lengths (short leg doesn't mean ground in all cases) and instead use the diagram to orient things properly. The IR LED is the clear element. It will receive power from the Crickit's 3.3V line, with a 220 Ohm resistor to reduce the voltage. The dark element is the IR phototransistor. It will send a signal to one of the Crickit's Signal input pins, using the internal pullup resistors of the Crickit. Both are tied to ground. Adafruit Industries Page 14 of 43


15 You can build this on a breadboard for testing; ultimately we'll solder it onto an Adafruit Perma Proto board. Proto Board Build Sensors To start, place the sensors into the perma-proto board as shown and solder them in place. Match the orientation and spacing shown here. You don't have to flip the board upside down, I only did so to keep the fancy silkscreen side facing up in the final project. Don't push them down too far, the distance from the board must be consistent from sensor to sensor -- about 12mm away from the board. This will allow us to angle the board for optimal reflection reading. Adafruit Industries Page 15 of 43


16 Resistors Next, add 220 Ohm current limiting resistors for each IR LED element. Run a resistor from the V+ leg of each sensor to the + power rail on the Perma Proto board. (Note how I marked each rail to avoid confusion due to flipping the board upside down.) Adafruit Industries Page 16 of 43


17 Adafruit Industries Page 17 of 43


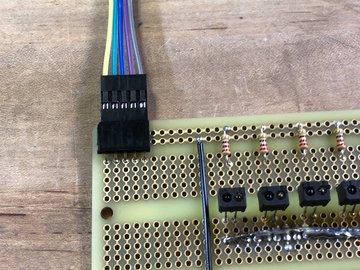
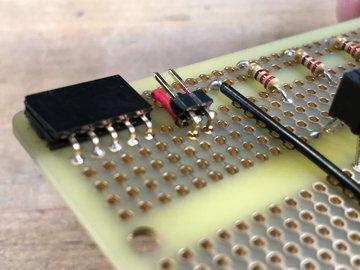
18 Ground Now, ground each of the sensor ground legs to the bottom ground rail on the perma-proto board with a small wire jumper. You can ground each wire to the rail individually, or jumper them all horizontally as shown. It doesn't look pretty, but it works and won't be seen in the final project! To connect them horizontally, strip the insulation from a length of wire that spans the width of the sensor array and then solder it down to each column with a giant, slug-like trail of solder. Admittedly, this was faster than making nine more small jumpers, but I sorta wish I had now ; ] We'll also connect the Perma Proto board's two ground rails with a jumper wire. Interconnects To connect the sensor bar to the Crickit sensor inputs and power, we'll make some cable sets and add removable header connectors. Adafruit Industries Page 18 of 43


19 First, peel off a five wire section of the raw male/male jumper wires with the color set as shown. Then, push the cable ends on either side into their own 5-pin dupont connector. Repeat this with a red-brown pair of male/female jumper wire, and add 2-pin dupont connectors to it. Next, use diagonal cutters to clip off a 5-pin section of the right-angled female header, and a 2-pin section of the right-angled male header. We'll use different polarities here to reduce the chance of mis-plugging something. Solder the 5-pin header as shown. Jumper a column to power rail and ground as shown, then add the 2-pin male header as shown, this is where the power will plug in. It is important to plug these in correctly! The color coded jumper wire helps. Adafruit Industries Page 19 of 43


20 Adafruit Industries Page 20 of 43


21 Adafruit Industries Page 21 of 43


22 Wiring the Sensors Lastly, run a color coded jumper wire from each sensor's signal leg to the associated pin coming from the cable interconnect as shown. Solder these in place and our sensor board is ready for use! Adafruit Industries Page 22 of 43


23 Now, plug the cables into the Crickit's Signal I/O ports as shown. Adafruit Industries Page 23 of 43

24 Speaker Place the speaker wires into the two speaker terminal ports on the Crickit and screw them down firmly. You may need to strip a little extra insulation from each wire first to get a better connection. Servo Plug the continuous rotation servo cable into the Servo 1 port on the Crickit with the orange wire nearest to the outside edge of the Crickit. Power Plug the 5V 2A DC power adapter plug into the Crickit's power barrel jack. Adafruit Industries Page 24 of 43

25 Adafruit Industries Page 25 of 43
26 Disc Step Sequencer Audio and Code Power your Crickit with a 5V supply into the black power connector (and not the Crickit's silver USB port). Plug in your Feather M4 to your computer via USB and then turn on the Crickit's power switch. (Make sure you plug into the Feather M4 USB port, not the Crickit USB port!) The Feather M4's CIRCUITPY drive will show up on your computer. We're going to copy some.wav files onto the CIRCUITPY drive. Download and uncompress this.zip file and then drag the.wav files onto the Feather M4's CIRCUITPY drive. Code Here is the code we'll use. Copy it and then paste it into the Mu editor. Save it to your Feather M4 as code.py """ Opto Mechanical Disc Step Sequencer from John Park's Workshop Crickit Feather M4 Express, Crickit FeatherWing, continuous servo, four reflection sensors, speaker Adafruit invests time and resources providing this open source code. Please support Adafruit and open source hardware by purchasing products from Adafruit! Written by Dave Astels for Adafruit Industries Copyright (c) 2018 Adafruit Industries Licensed under the MIT license. All text above must be included in any redistribution. """ import audioio import board from digitalio import DigitalInOut, Direction from adafruit_crickit import crickit from adafruit_debouncer import Debouncer # You get 4 samples, they must all have the same sample rate and must # all be mono or stereo (no mix-n-match!) # mixer info VOICES = ["bd_tek.wav", "elec_hi_snare.wav", "ch_01.wav", "clap_01.wav"] # Parse the first file to figure out what format its in with open(voices[0], "rb") as f: wav = audioio.wavefile(f) print("%d channels, %d bits per sample, %d Hz sample rate " % (wav.channel_count, wav.bits_per_sample, wav.sample_rate)) # Audio playback object - we'll go with either mono or stereo depending on # what we see in the first file if wav.channel_count == 1: audio = audioio.audioout(board.a0) Adafruit Industries Page 26 of 43
27 audio = audioio.audioout(board.a0) elif wav.channel_count == 2: # audio = audioio.audioout(board.a0, right_channel=board.a0) audio = audioio.audioout(board.a0) else: raise RuntimeError("Must be mono or stereo waves!") mixer = audioio.mixer(voice_count=4, sample_rate=wav.sample_rate, channel_count=wav.channel_count, bits_per_sample=wav.bits_per_sample, samples_signed=true) audio.play(mixer) samples = [] # Read the 4 wave files, convert to stereo samples, and store # (show load status on neopixels and play audio once loaded too!) for v in VOICES: wave_file = open(v, "rb") print(v) # OK we managed to open the wave OK sample = audioio.wavefile(wave_file) # debug play back on load! mixer.play(sample, voice=0) while mixer.playing: pass samples.append(sample) led = DigitalInOut(board.D13) led.direction = Direction.OUTPUT # For signal control, we'll chat directly with seesaw, use 'ss' to shorten typing! ss = crickit.seesaw # define and set up inputs to use the debouncer def make_criket_signal_debouncer(pin): # create pin signal objects ss.pin_mode(pin, ss.input_pullup) return Debouncer(lambda : ss.digital_read(pin)) # The IR sensors on are pullups, connect to ground to activate clock_pin = make_criket_signal_debouncer(crickit.signal1) voice_1_pin = make_criket_signal_debouncer(crickit.signal2) voice_2_pin = make_criket_signal_debouncer(crickit.signal3) voice_3_pin = make_criket_signal_debouncer(crickit.signal4) voice_4_pin = make_criket_signal_debouncer(crickit.signal5) # Crickit capacitive touch pads touch_1_pad = Debouncer(lambda: crickit.touch_1.value) touch_4_pad = Debouncer(lambda: crickit.touch_4.value) touch_2_3_pad = Debouncer(lambda: crickit.touch_2.value and crickit.touch_3.value) crickit.continuous_servo_1.set_pulse_width_range(min_pulse=500, max_pulse=2500) speed = #this is clockwise/forward at a moderate tempo def play_voice(vo): mixer.stop_voice(vo) mixer.play(samples[vo], voice=vo, loop=false) while True: clock_pin.update() #debouncer at work voice_1_pin.update() Adafruit Industries Page 27 of 43
28 voice_1_pin.update() voice_2_pin.update() voice_3_pin.update() voice_4_pin.update() touch_1_pad.update() touch_4_pad.update() touch_2_3_pad.update() crickit.continuous_servo_1.throttle = speed # spin the disc at speed defined by touch pads if clock_pin.fell: # sensor noticed change from white (reflection) to black (no reflection) # this means a clock tick has begun, time to check if any steps will play led.value = 0 if voice_1_pin.value: # a black step (no reflection) mark during clock tick, play a sound! led.value = 1 # light up LED when step is read # print('.kick. ') play_voice(0) if voice_2_pin.value: led.value = 1 # print('.snare. ') play_voice(1) if voice_3_pin.value: led.value = 1 # print('.closed hat. ') play_voice(2) if voice_4_pin.value: led.value = 1 # print('.clap. ') play_voice(3) if touch_4_pad.rose: # speed it up speed -= # print("speed: %s" % speed) if touch_1_pad.rose: # slow it down speed += # you can comment out the next two lines if you want to go backwards # however, the clock ticks may not register with the default template spacing if speed >= 0: # to prevent backwards speed = 0 # print("speed: %s" % speed) if touch_2_3_pad.rose: # stop the disc speed = 0 # print("speed: %s" % speed) The board will start up and play the four samples and then begin turning the servo motor! Tune the Servo Go ahead and plug in the power adapter and turn on the Crickit. The sounds will each play one time and then the servo will start to spin. In order to calibrate the servo, press the Crickit's touch pads 2 & 3 at the same time. If the servo stopped spinning, great! More likely, it is still spinning, perhaps even faster than before. Adafruit Industries Page 28 of 43
29 Use a small Phillips screwdriver to turn the adjustment potentiometer that is accessible through a small hole in the servo housing until the servo stops spinning. Now, it is calibrated. You can get the servo moving forward again by tapping the Crickit's touch pad 4 a few times. Go ahead and turn off the Crickit's power switch while we set it all up! Adafruit Industries Page 29 of 43
30 Build the Sequencer and Make Beats Sequencer Theory This is the anatomy of a sequencer disc. There are five circular tracks, each broken into 16 steps. Think of them as four measures of 4/4 time (four beats to the measure, 1/4 note gets the beat). So, each step is a quarter note. This is a typical pattern style for a 16-step drum machine pattern. You can count it off as "one-2-3-4, two-2-3-4, three-2-3-4, four-2-3-4" The outer ring is the clock track. It keeps time and its steps tell the whole system when to check for drum steps to play. Whenever a new clock step is sensed, the pattern has advanced one step. The four inner tracks are for the four drum sample.wav files (they don't have to be drums, actually, any sample you want to play will work). One sample sound will be triggered per track, wherever a filled-in black step is sensed. I've chosen a kick drum, snare drum, closed high hat, and clap as the four samples. Each track corresponds to one sample.wav file as well as one "voice" of the CircuitPython audio mixer. Here's an example of a traditional, Roland 808-style drum pattern, created with Pattern.Sketch.com ( Adafruit Industries Page 30 of 43


31 Now, imagine we tidy that up to only the four tracks and the clock track at the top: Then, we deform it into a circle, by going from rectangular to circular polar coordinates: Adafruit Industries Page 31 of 43


32 Hey! Now we've got a disc version of our drum pattern! Pattern Discs Here's a clean version we can use with the sensor strip: Adafruit Industries Page 32 of 43

33 One difference you'll notice is that the clock steps have been rotated to occur a little bit before the drum steps. This is to give the clock track sensor and Feather M4 time to register a clock tick and then scan the other four sensors to see if a drum step needs to be triggered. I've also added some space between steps, this aids the sensors in detecting the "edge" between a white, reflective portion of the disc, and a black, non-reflective step mark. You can now download and print out the.pdf files linked below. Just make sure you print them at 1:1 scale (a.k.a. "actual size") -- the circle has an 8" diameter so will fit on a sheet of Letter-sized paper. White cardstock works great, but you can use regular printer paper as well. Use scissors to cut out the discs You can use a hobby knife to cut out the center circle, which helps with alignment later. Adafruit Industries Page 33 of 43


34 Platter Now, we need a way to mount the pattern disc to the continuous rotation servo motor. You can cut out a flat piece of chipboard, or even better, laser cut an 8" circle with a hole in the middle for perfect servo horn alignment. This can also be done with an MDF circle from the craft store or laser cut acrylic if you want something perfectly flat. You can print and cut this template to make it simple to find the edges and center of your cardboard if you like. Adafruit Industries Page 34 of 43


35 Servo Horn Mount Use hot glue to mount one of the servo horns to the center of the platter. To keep things even, I find it best to hold the two parts together and then use hot glue on top of them, rather than between the surfaces. Next, use a few dabs of glue stick to hold the paper disc to the cardboard platter. Go sparingly and the disc will work well, but still be easy to remove to swap out discs. Adafruit Industries Page 35 of 43


 Adafruit Industries https://learn.adafruit.")
36 Now, press the platter and horn onto the servo shaft. Build the Player Now, we'll arrange our parts onto a base made of foam-core board, using hot glue to hold down the servo and speaker. (Platter has been removed from the servo for this photo.) Adafruit Industries Page 36 of 43


37 You don't need to mount the Crickit if you don't want to, or use some double-stick foam tape or 2.5mm nylon screws and standoffs to secure it. Sensor Arm The sensor bar requires adjustment to get the best angle, so we'll convert a third-hand tool into our adjustable sensor arm. Remove the main arm from the base by loosening the retention screw. Take one of the alligator clips off of one end, and place it into the base socket, then tighten. Adafruit Industries Page 37 of 43


 The stand can now be adjusted easily!")
38 This will allow three degrees of freedom in placing the board. Add a nylon standoff and screw to the perma proto board as shown. Clamp alligator clip onto the standoff. (Heat shrink tubing is optional.) The stand can now be adjusted easily! Adafruit Industries Page 38 of 43


39 Adafruit Industries Page 39 of 43

40 Sensor Placement and Test Run We're ready to do this! Place the sensor assembly over the disc and angle it as shown, with the sensors a few millimeters from the surface. Adafruit Industries Page 40 of 43

41 Plug in the power adapter, and turn on the Crickit on/off switch. The sounds will each play once, then the disc will start to spin! If it doesn't spin, double check all connections and make sure you calibrated the servo as outlined on the previous page of this guide. You'll hear a hip hop beat playing when the sensor is aligned properly. This is the trickiest part, so take your time adjusting the angle and height of the sensors over the disc. Each sensor should be over it's own track. Once you have a good alignment, go ahead and secure the sensor base to the foam-core with some hot glue. You'll still be able to make fine adjustments if needed, but won't need to worry about the base being knocked off course. Adafruit Industries Page 41 of 43


42 DIY Patterns To make your own pattern discs, all you need to do is print out a blank template, and then fill in the steps with a black chalk marker. Sharpies and other ink markers tend to be too shiny, so the matte finish of the chalk paint marker is what you want. Adafruit Industries Page 42 of 43


43 Now, you can make your own drum tracks! You can also use your own samples as well -- just make sure they are PCM 16-bit Mono WAV files at 22KHz sample rate. You can follow this guide for more info on converting your audio files. Mods and Improvements This project could be extended into an even more fully featured drum sequencer! Here are some ideas: With a greater distance between sensors you may improve their ability to read tracks from a greater distance (less lateral IR light spill from neighbors You could use a full sized perma-proto board and a larger disc to add more sensors and therefore the ability to Adafruit Industries Last Updated: :27:16 PM UTC Page 43 of 43
44 read more tracks. How about some toms, cymbals, and clavs? What about subdividing it into 32 steps for greater variety? A metal disc with magnetic step markers could be fun for quickly adjusting patterns You could go out to a proper amplifier and speaker stack for some huge sound!
Milk Jug Glow Skull. Created by John Park. Last updated on :28:36 PM UTC
 Milk Jug Glow Skull Created by John Park Last updated on 2018-09-14 09:28:36 PM UTC Guide Contents Guide Contents Overview Parts Materials & Tools Optional Skull/Sculpting Stand Build the Skull Prep the
Stumble-Bot. Created by Dano Wall. Last updated on :04:06 AM UTC
 Stumble-Bot Created by Dano Wall Last updated on 2018-09-06 05:04:06 AM UTC Guide Contents Guide Contents Overview Simply Stumbling We Have the Technology Other Supplies Leg Assembly Front Legs Back Legs
The Scream: Interactive Screaming Painting
 The Scream: Interactive Screaming Painting Created by John Park Last updated on 2018-08-22 04:10:47 PM UTC Guide Contents Guide Contents Overview Parts & Materials Optional Build the Interactive Painting
BLE Light Switch with Feather nrf52840 and Crickit
 BLE Light Switch with Feather nrf52840 and Crickit Created by John Park Last updated on 2019-02-15 07:06:19 PM UTC Guide Contents Guide Contents Overview Parts Adafruit Feather nrf52840 Express Adafruit
Neon LED Signs. Created by John Park. Last updated on :11:09 PM UTC
 Neon LED Signs Created by John Park Last updated on 2018-08-22 04:11:09 PM UTC Guide Contents Guide Contents Overview Parts Materials Tools Build the Sign Driver Preparation Solder the Circuit Solder the
Adabot Operation Game
 Adabot Operation Game Created by John Park Last updated on 2018-08-22 04:11:17 PM UTC Guide Contents Guide Contents Overview Parts Materials & Tools Build the Operating Table Print the Board and Pieces
Crickit Dancing Marionette Kit Created by Dano Wall. Last updated on :03:11 PM UTC
 Crickit Dancing Marionette Kit Created by Dano Wall Last updated on 2019-04-04 07:03:11 PM UTC Overview This project demonstrates how to build a robotic marionette that is controlled with four arcade-style
3D Printed 20w Amplifier Box
 3D Printed 20w Amplifier Box Created by Ruiz Brothers Last updated on 2018-02-26 06:48:02 PM UTC Guide Contents Guide Contents Overview Prerequisite Guide Tools & Supplies Parts 3D Printing Print in your
Circuit Playground Express Head-Tilt Ears
 Circuit Playground Express Head-Tilt Ears Created by Dave Astels Last updated on 2018-10-09 04:07:03 PM UTC Guide Contents Guide Contents Overview Parts Circuit Playground Express Micro servo Lithium Ion
Trash Panda. Created by Dano Wall. Last updated on :30:46 AM UTC
 Trash Panda Created by Dano Wall Last updated on 2018-06-06 02:30:46 AM UTC Guide Contents Guide Contents Overview Amazon's playful boxes We have the technology Other supplies you will need Create your
Android GBoard Morse Code Control with Circuit Playground Express
 Android GBoard Morse Code Control with Circuit Playground Express Created by Dave Astels Last updated on 2018-08-22 04:10:30 PM UTC Guide Contents Guide Contents Overview Parts Materials for the box Installing
Hammer Time Mini Golf Hazard with Crickit
 Hammer Time Mini Golf Hazard with Crickit Created by John Park Last updated on 2018-07-09 06:47:53 AM UTC Guide Contents Guide Contents Overview Please Hammer, Don't Hurt Em Parts Materials & Tools Program
Paper Airplane Launcher
 Paper Airplane Launcher Created by Dano Wall Last updated on 2018-08-27 08:36:14 PM UTC Guide Contents Guide Contents Overview A Launching Platform The Electronics Materials Build the Launcher Attach Motors
3D Printed 20w Amplifier Box
 3D Printed 20w Amplifier Box Created by Noe & Pedro Ruiz Last updated on 2014-04-22 03:01:38 PM EDT Guide Contents Guide Contents Overview Prerequisite Guide Tools & Supplies Parts 3D Printing Print in
HalloWing Jump Scare Trap
 HalloWing Jump Scare Trap Created by John Park Last updated on 2018-10-16 04:38:42 PM UTC Guide Contents Guide Contents Overview Parts Materials Build the Jump Scare Trap Circuit Mounting Sensor Lens Blocker
Crickit Carnival Bumper Bot
 Crickit Carnival Bumper Bot Created by John Park Last updated on 2018-08-22 04:08:52 PM UTC Guide Contents Guide Contents Overview Parts Materials and Tools Build the Bumper Bot Cut the Cardboard Chassis
Ping Pong Ball Launcher
 Ping Pong Ball Launcher Created by Dano Wall Last updated on 2019-01-25 03:19:13 AM UTC Guide Contents Guide Contents Overview Electronic Parts Circuit Playground Express USB cable - USB A to Micro-B Alkaline
Crickit Powered Mini Chair Swing Ride!
 Crickit Powered Mini Chair Swing Ride! Created by Isaac Wellish Last updated on 2018-11-05 09:18:17 PM UTC Guide Contents Guide Contents Overview Adafruit Parts Materials and Tools Swing Structure First
Slider Crank Mechanism -- from Cardboard and Craft Sticks
 Slider Crank Mechanism -- from Cardboard and Craft Sticks Created by John Park Last updated on 2018-08-22 04:07:21 PM UTC Guide Contents Guide Contents Overview Materials Tools Build the Slider Crank Build
Crawling Baby Sea Turtle Robot
 Crawling Baby Sea Turtle Robot Created by Dano Wall Last updated on 2018-08-22 04:10:26 PM UTC Guide Contents Guide Contents Overview Save the Wee Turtles Household Materials Adafruit Electronics Create
DIY Circuit Playground Shields
 DIY Circuit Playground Shields Created by Dave Astels Last updated on 2018-08-22 04:05:06 PM UTC Guide Contents Guide Contents Overview Small Alligator Clip Test Lead (set of 12) Small Alligator Clip to
Crickit Powered Holiday Diorama
 Crickit Powered Holiday Diorama Created by Isaac Wellish Last updated on 2018-12-04 12:49:07 AM UTC Guide Contents Guide Contents Overview Prerequisite Guides Adafruit Parts Tools and Materials Wiring
Pushrod Garage. Created by John Park. Last updated on :07:30 PM UTC
 Pushrod Garage Created by John Park Last updated on 2018-08-22 04:07:30 PM UTC Guide Contents Guide Contents Overview Parts & Materials Tools Pushrod Mechanism Code it with MakeCode Functions On Start
Snake Charmer Box. Created by Dano Wall. Last updated on :07:25 PM UTC
 Snake Charmer Box Created by Dano Wall Last updated on 2018-08-22 04:07:25 PM UTC Guide Contents Guide Contents Overview Materials Circuit Playground Express Standard servo - TowerPro SG-5010 Small Alligator
Crawling Animatronic Hand
 Crawling Animatronic Hand Created by Dano Wall Last updated on 2018-12-03 06:39:35 PM UTC Guide Contents Guide Contents Overview Parts Used Tools & Materials Prepare the Hand Your hand is now ready to
Clockwork Goggles. Created by John Park. Last updated on :03:10 PM UTC
 Clockwork Goggles Created by John Park Last updated on 2018-08-22 04:03:10 PM UTC Guide Contents Guide Contents Overview Assemble Circuit and Goggles CircuitPython Setup and Code Rock the Goggles 2 3 6
Adafruit Capacitive Touch Sensor Breakouts
 Adafruit Capacitive Touch Sensor Breakouts Created by Bill Earl Last updated on 2018-08-22 03:36:13 PM UTC Guide Contents Guide Contents Overview Momentary Toggle 5-Pad Momentary Assembly and Wiring Installing
Audio Prank Gift Box. Created by Becky Stern. Last updated on :46:15 PM UTC
 Audio Prank Gift Box Created by Becky Stern Last updated on 2018-08-22 03:46:15 PM UTC Guide Contents Guide Contents Overview Circuit Diagram Prepare Components Build Circuit Wrap and Give 2 3 5 6 12 14
Boomy The Boombox. Created by Ruiz Brothers. Last updated on :52:13 PM UTC
 Boomy The Boombox Created by Ruiz Brothers Last updated on 2017-09-05 08:52:13 PM UTC Guide Contents Guide Contents Overview Boomy The Boombox AdaBox 004 Parts 3D Printing 3D Printed Parts Enclosure Design
Reindeer Mask with Animated Eyes
 Reindeer Mask with Animated Eyes Created by Dano Wall Last updated on 2018-12-05 10:50:10 PM UTC Guide Contents Guide Contents Overview Parts Adafruit HalloWing M0 Express Convex Plastic Lens with Edge
Joy Featherwing. Created by Dean Miller. Last updated on :03:07 PM UTC
 Joy Featherwing Created by Dean Miller Last updated on 2018-08-22 04:03:07 PM UTC Guide Contents Guide Contents Overview Pinouts Power and Reset Pins I2C Data Pins I2C Addressing Optional Interrupt Pin
Prophet 600 GliGli mod
 Prophet 600 GliGli mod Created by Collin Cunningham Last updated on 2018-08-22 04:04:56 PM UTC Guide Contents Guide Contents Overview What you'll need Program the Teensy++ Modify the Teensy++ Prep header
Mad Science Test Tube Rack
 Mad Science Test Tube Rack Created by John Park Last updated on 2016-10-17 09:21:01 PM UTC Guide Contents Guide Contents Overview Lighted Test Tube Parts Materials and Tools Optional Test Tube Rack Parts
Con Badge with Circuit Playground Express
 Con Badge with Circuit Playground Express Created by Sophy Wong Last updated on 2018-04-11 05:00:16 PM UTC Guide Contents Guide Contents Overview Tools & Materials Laser Cutting Program the Circuit Playground
Toy Car Speed Timer. Created by Kirby Griese. Last updated on :13:49 PM UTC
 Toy Car Speed Timer Created by Kirby Griese Last updated on 2017-03-20 09:13:49 PM UTC Guide Contents Guide Contents Overview Parts needed Prerequisites 3D Printing Assembly Wiring Software Use It 2 3
3D Printed Google AIY Voice Kit
 3D Printed Google AIY Voice Kit Created by Ruiz Brothers Last updated on 2018-01-09 12:47:26 AM UTC Guide Contents Guide Contents Overview 3D Print a DIY AI enclosure for the Raspberry PI! Parts, Tools
Adafruit AMG8833 8x8 Thermal Camera Sensor
 Adafruit AMG8833 8x8 Thermal Camera Sensor Created by Justin Cooper Last updated on 2017-11-27 10:00:27 PM UTC Guide Contents Guide Contents Overview Pinouts Power Pins: Logic pins: Assembly Prepare the
NeoPixel Bike Light. Created by Ruiz Brothers. Last updated on :43:46 PM UTC
 NeoPixel Bike Light Created by Ruiz Brothers Last updated on 2018-11-15 07:43:46 PM UTC Guide Contents Guide Contents Overview 3D Printed Headlight Adafruit's Feather Platform Circuit Python Powered Parts
i2c/spi LCD Backpack Created by lady ada Last updated on :11:04 PM UTC
 i2c/spi LCD Backpack Created by lady ada Last updated on 2017-08-16 05:11:04 PM UTC Guide Contents Guide Contents Overview Which LCD to Use? Wait - the backpack has 16 holes, but my LCD only has 14 pins!
Bunny Ears with MakeCode
 Bunny Ears with MakeCode Created by Erin St Blaine Last updated on 2018-08-22 04:05:47 PM UTC Guide Contents Guide Contents Introduction Tools & Other Materials Programming with MakeCode Set Up the Light
Adafruit VL53L0X Time of Flight Micro-LIDAR Distance Sensor Breakout
 Adafruit VL53L0X Time of Flight Micro-LIDAR Distance Sensor Breakout Created by lady ada Last updated on 2017-12-28 11:56:14 PM UTC Guide Contents Guide Contents Overview Sensing Capablities Pinouts Power
Coffee Detonator: The TNT Plunger Grinder
 Coffee Detonator: The TNT Plunger Grinder Created by John Park Last updated on 2017-04-12 08:04:36 PM UTC Guide Contents Guide Contents Overview Materials Voltage Conversion AC/DC Voltage Divider Microcontroller
Mini Golf Course with Circuit Playground and Crickit
 Mini Golf Course with Circuit Playground and Crickit Created by Dano Wall Last updated on 2018-08-22 04:09:31 PM UTC Guide Contents Guide Contents Overview Materials & Tools Adafruit Parts CRICKIT Assembly
LED Eyes. Created by Ruiz Brothers. Last updated on :50:55 AM UTC
 LED Eyes Created by Ruiz Brothers Last updated on 2018-01-13 05:50:55 AM UTC Guide Contents Guide Contents Overview Parts, Tools and Supplies Enameled Copper Magnet Wire 11 meters / 0.1mm diameter Adafruit
Infinity Mirror Valentine's Candy Box
 Infinity Mirror Valentine's Candy Box Created by Kathy Ceceri Last updated on 2019-02-07 09:44:54 PM UTC Guide Contents Guide Contents Overview Parts List -- Mini Box Version Chibitronics Color LEDs Add-On
Circuit Playground Yoyo
 Circuit Playground Yoyo Created by Ruiz Brothers Last updated on 2018-01-13 05:56:02 AM UTC Guide Contents Guide Contents Overview 3D Printed NeoPixel Yoyo History of the Yo-Yo Expectations Parts Tools
Feather Weather Lamp. Created by Ruiz Brothers. Last updated on :54:26 PM UTC
 Feather Weather Lamp Created by Ruiz Brothers Last updated on 2018-08-22 03:54:26 PM UTC Guide Contents Guide Contents Overview Weather Reactive Pixels Prerequisite Guides Parts Tools & Supplies Circuit
3D Printed Case for Adafruit Feather
 3D Printed Case for Adafruit Feather Created by Ruiz Brothers Last updated on 2018-08-22 03:59:38 PM UTC Guide Contents Guide Contents Overview Adafruit Feather Box New Update! Check out the TFT Feather
Cup o' Sound. Created by Becky Stern. Last updated on :30:06 PM EST
 Cup o' Sound Created by Becky Stern Last updated on 2015-02-18 01:30:06 PM EST Guide Contents Guide Contents Overview Circuit Diagram Load Sound and Prepare Components Solder Circuit and Assemble Use it!
Data Logging with Feather and CircuitPython
 Data Logging with Feather and CircuitPython Created by Kattni Rembor Last updated on 2018-04-30 09:58:20 PM UTC Guide Contents Guide Contents Overview Things You'll Need Adafruit Feather M0 Express - Designed
Adafruit APDS9960 breakout
 Adafruit APDS9960 breakout Created by Dean Miller Last updated on 2018-01-19 11:18:59 PM UTC Guide Contents Guide Contents Overview Pinouts Power Pins: Logic pins: Assembly Prepare the header strip: Add
Making Adabot: Part 1
 Making Adabot: Part 1 Created by Rick Winscot Last updated on 2018-08-22 03:37:47 PM UTC Guide Contents Guide Contents Overview Tools / Materials Chassis Fantastic Easy Hardware Classic Connectors Magnificent
MCP Bit DAC Tutorial
 MCP4725 12-Bit DAC Tutorial Created by lady ada Last updated on 2018-03-05 10:51:16 PM UTC Guide Contents Guide Contents Overview Wiring Arduino Code Using the library Increasing the speed CircuitPython
Portable Apple Watch Charger
 Portable Apple Watch Charger Created by Ruiz Brothers Last updated on 2017-10-22 09:58:04 PM UTC Guide Contents Guide Contents Overview Smart Charging Prerequisite Guides Parts, Tool & Supplies Circuit
Adafruit PowerBoost 500 Shield
 Adafruit PowerBoost 500 Shield Created by lady ada Last updated on 2018-08-22 03:43:27 PM UTC Guide Contents Guide Contents Overview Pinouts DC/DC Boost section Indicator LEDs Charging section Power Switch
Phone-Activated Talking Dog Collar
 Phone-Activated Talking Dog Collar Created by Phillip Burgess Last updated on 2017-01-24 08:28:00 PM UTC Guide Contents Guide Contents Overview Circuit Diagram & Code Leather Collar & Greebles Assemble
PyPortal View Master Created by Ruiz Brothers. Last updated on :51:28 AM UTC
 PyPortal View Master Created by Ruiz Brothers Last updated on 2019-03-13 11:51:28 AM UTC Overview In this project we re building a view master inspired device using Adafruit s PyPortal. The eyepiece makes
Adafruit DRV2605 Haptic Controller Breakout
 Adafruit DRV2605 Haptic Controller Breakout Created by lady ada Last updated on 2018-08-20 03:28:51 PM UTC Guide Contents Guide Contents Overview Pinouts Power Pins I2C Pins Other! Assembly Prepare the
UFO Flying Saucer with Circuit Playground Express
 UFO Flying Saucer with Circuit Playground Express Created by John Park Last updated on 2018-08-31 08:42:17 PM UTC Guide Contents Guide Contents Overview Code the UFO with CircuitPython Build the Flying
FLORA TV-B-Gone. Created by Becky Stern. Last updated on :32:57 PM UTC
 FLORA TV-B-Gone Created by Becky Stern Last updated on 2018-08-22 03:32:57 PM UTC Guide Contents Guide Contents Overview Parts Tutorials Transistors Resistors LEDs Pushbutton Program it Power Fabric pinwheel
Adafruit MCP9808 Precision I2C Temperature Sensor Guide
 Adafruit MCP9808 Precision I2C Temperature Sensor Guide Created by lady ada Last updated on 2017-11-12 06:09:49 PM UTC Guide Contents Guide Contents Overview Pinouts Power Pins I2C Data Pins Optional Pins
Fiddy - the FTDI Clip
 Fiddy - the FTDI Clip Created by Timothy Reese Last updated on 2016-11-22 09:18:04 PM UTC Guide Contents Guide Contents Overview FTDI is Great! Things you'll need: What You'll Learn: 3D Printing Assembly
Fiddy - the FTDI Clip
 Fiddy - the FTDI Clip Created by Timothy Reese Last updated on 2018-08-22 03:57:42 PM UTC Guide Contents Guide Contents Overview FTDI is Great! Things you'll need: What You'll Learn: 3D Printing Assembly
Raspberry Pi Selfie Bot
 Raspberry Pi Selfie Bot Created by Sophy Wong Last updated on 2018-08-22 04:03:16 PM UTC Guide Contents Guide Contents Overview Parts & Supplies The Circuit Power Circuit Other Connections Laser Cutting
Modifying Servos for Continuous Rotation
 Modifying Servos for Continuous Rotation Created by Rick Winscot Last updated on 2018-01-13 05:46:39 AM UTC Guide Contents Guide Contents Overview Tools / Materials Void the Warranty Breaking Bad Barriers
Circuit Playground Combadge
 Circuit Playground Combadge Created by Ruiz Brothers Last updated on 2017-10-22 10:42:02 PM UTC Guide Contents Guide Contents Overview What's a Combadge? DIY Combadge How Does It Work? Make It How You
NeoLoch. Inquisitor Core. Assembly Instructions (9/3/2015)
") NeoLoch Inquisitor Core Assembly Instructions (9/3/2015) Your kit should contain the following items. If you find a part missing, please contact NeoLoch for a replacement. Kit contents: 1 PCB 1 2.1mm DC
NeoLoch Inquisitor Core Assembly Instructions (9/3/2015) Your kit should contain the following items. If you find a part missing, please contact NeoLoch for a replacement. Kit contents: 1 PCB 1 2.1mm DC
PyPortal NeoPixel Color Picker Created by Kattni Rembor. Last updated on :42:41 PM UTC
 PyPortal NeoPixel Color Picker Created by Kattni Rembor Last updated on 2019-03-27 10:42:41 PM UTC Overview This simple project adds a little color to your life with CircuitPython, PyPortal and NeoPixels.
Interior Purse Light. Created by Becky Stern. Last updated on :41:08 PM UTC
 Interior Purse Light Created by Becky Stern Last updated on 2018-08-22 03:41:08 PM UTC Guide Contents Guide Contents Overview Circuit Diagram Stitch Sequins Add Tape Arduino Code CircuitPython Code Use
CircuitPython Media Dial
 CircuitPython Media Dial Created by Ruiz Brothers Last updated on 2018-02-07 05:00:25 AM UTC Guide Contents Guide Contents Overview Prerequisite Guides Adafruit Trinket M0 - for use with CircuitPython
Circuit Playground Express Laser Tag
 Circuit Playground Express Laser Tag Created by John Park Last updated on 2017-11-14 01:56:23 AM UTC Guide Contents Guide Contents Build a Laser Tag Game Code the Laser Tag Game MakeCode Transmitting IR
New Years Eve Ball Drop Created by Ruiz Brothers. Last updated on :22:24 PM UTC
 New Years Eve Ball Drop Created by Ruiz Brothers Last updated on 2019-03-16 07:22:24 PM UTC Overview Since 1907, the Times Square Ball (https://adafru.it/dtu) has been an annual spectacle that signals
MCP Bit DAC Tutorial
 MCP4725 12-Bit DAC Tutorial Created by lady ada Last updated on 2016-10-07 04:47:03 PM UTC Guide Contents Guide Contents Overview Wiring Using with Arduino Using the library Increasing the speed Download
Trellis 3D Printed Enclosure
 Trellis 3D Printed Enclosure Created by Ruiz Brothers Last updated on 2018-08-22 03:39:07 PM UTC Guide Contents Guide Contents Overview Parts Tools & Supplies Modeling 123D Design Customize Measuring Parts
CPX Mystery Dreidel. Created by Kathy Ceceri. Last updated on :51:40 PM UTC
 CPX Mystery Dreidel Created by Kathy Ceceri Last updated on 2018-12-04 02:51:40 PM UTC Guide Contents Guide Contents Overview Parts List -- Electronics Circuit Playground Express USB cable - USB A to Micro-B
Wind Blowing Emoji Prop
 Wind Blowing Emoji Prop Created by John Park Last updated on 2018-08-22 04:05:17 PM UTC Guide Contents Guide Contents Overview Code it with MakeCode Start Up Variables On Loud Sound If - Else Iterate Debounce
7 Portable Multitouch Raspberry Pi Tablet
 7 Portable Multitouch Raspberry Pi Tablet Created by Ruiz Brothers Last updated on 2017-02-27 04:13:53 PM UTC Guide Contents Guide Contents Overview Portable Raspberry Pi Tablet 7" Multitouch Display Parts
Guardian Shield+ Zelda Breath of the Wild
 Guardian Shield+ Zelda Breath of the Wild Created by Ruiz Brothers Last updated on 2018-08-22 04:01:50 PM UTC Guide Contents Guide Contents Overview Articulating Handle Rechargeable Prerequisite Guides
Solar Boost Bag. Created by Becky Stern. Last updated on :44:55 PM UTC
 Solar Boost Bag Created by Becky Stern Last updated on 2018-08-22 03:44:55 PM UTC Guide Contents Guide Contents Overview 3D Design Files Customize Design Assemble Circuit Prepare Solar Panel Enclosure
NeoMatrix 8x8 Word Clock
 NeoMatrix 8x8 Word Clock Created by Andy Doro Last updated on 2017-10-10 04:10:51 AM UTC Guide Contents Guide Contents Overview Parts List Parts Tools Circuit Assembly Overview Uploading Code Understanding
Trinket-Powered Conference Room Occupancy Display
 Trinket-Powered Conference Room Occupancy Display Created by Mike Barela Last updated on 2018-08-22 03:38:56 PM UTC Guide Contents Guide Contents Overview Build Wiring Diagrams Populating the Board Code
Tent Lantern. Created by Timothy Reese. Last updated on :17:25 AM UTC
 Tent Lantern Created by Timothy Reese Last updated on 2017-07-14 05:17:25 AM UTC Guide Contents Guide Contents Overview Things you'll need: What You'll Learn: 3D Printing Code Assembly Wiring Diagram Soldering
Adafruit HUZZAH32 - ESP32 Feather
 Adafruit HUZZAH32 - ESP32 Feather Created by lady ada Last updated on 2017-07-14 02:14:00 AM UTC Guide Contents Guide Contents Overview Pinouts Power Pins Logic pins Serial pins I2C & SPI pins GPIO & Analog
LED Lightbox. Created by Sam Clippinger. Last updated on :50:00 AM UTC
 LED Lightbox Created by Sam Clippinger Last updated on 2016-09-03 01:50:00 AM UTC Guide Contents Guide Contents Overview TL;DR Skill Level Parts List Yellow sticker reads: "Bad planning on your part does
Adafruit LED Sequins. Created by Becky Stern. Last updated on :02:00 AM UTC
 Adafruit LED Sequins Created by Becky Stern Last updated on 2018-03-02 04:02:00 AM UTC Guide Contents Guide Contents Overview Sewing with conductive thread Circuit Diagram GEMMA sequin hat Arduino Code
Adafruit Prototyping Pi Plate. Created by Ladyada
 Adafruit Prototyping Pi Plate Created by Ladyada Guide Contents Guide Contents Overview Solder it! User Manual Buy Adafruit Prototyping Pi Plate 2 3 4 14 17 Adafruit Industries http://learn.adafruit.com/adafruit-prototyping-pi-plate
FeatherWing Proto, Doubler and Tripler
 FeatherWing Proto, Doubler and Tripler Created by lady ada Last updated on 2018-11-15 10:39:12 PM UTC Guide Contents Guide Contents Overview FeatherWing Proto FeatherWing Doubler FeatherWing Tripler Proto
Steven Universe Cosplay Shirt & Gem Created by Erin St Blaine. Last updated on :54:25 PM UTC
 Steven Universe Cosplay Shirt & Gem Created by Erin St Blaine Last updated on 2019-04-04 06:54:25 PM UTC Overview Make yourself a Steven Universe costume that will light up the world. This guide will show
Bluetooth Controlled NeoPixel Headphones
 Bluetooth Controlled NeoPixel Headphones Created by Ruiz Brothers Last updated on 2017-03-09 07:38:05 PM UTC Guide Contents Guide Contents Overview Smart LED HeadPhones Prerequisite Guides Parts Tools
Adafruit DRV2605 Haptic Controller Breakout
 Adafruit DRV2605 Haptic Controller Breakout Created by lady ada Last updated on 2016-10-03 09:48:16 PM UTC Guide Contents Guide Contents Overview Pinouts Power Pins I2C Pins Other! Assembly Prepare the
Adafruit GPIO Expander Bonnet for Raspberry Pi Created by Kattni Rembor. Last updated on :12:47 PM UTC
 Adafruit GPIO Expander Bonnet for Raspberry Pi Created by Kattni Rembor Last updated on 2019-03-09 11:12:47 PM UTC Overview The Raspberry Pi is an amazing single board computer - and one of the best parts
LED Breath Stats Mask
 LED Breath Stats Mask Created by Michael Sklar Last updated on 2018-01-11 11:09:33 PM UTC Guide Contents Guide Contents Overview Materials Asssembly CircuitPython Code Wear It 2 3 4 6 10 13 Adafruit Industries
Naughty or Nice Machine
 Naughty or Nice Machine Created by Brian Corteil Last updated on 2018-08-22 03:45:31 PM UTC Guide Contents Guide Contents Overview It knows if you have been Naughty or Nice! Make It! Parts The Case The
Solder Dispenser Adabot Head
 Solder Dispenser Adabot Head Created by Ruiz Brothers Last updated on 2017-01-04 02:15:15 PM UTC Guide Contents Guide Contents Overview Solder Dispenser Parts Solder Spool - 1/4 lb SAC305 RoHS lead-free
Bike Wheel POV Display
 Bike Wheel POV Display Created by Becky Stern Last updated on 2017-09-12 03:10:38 PM UTC Guide Contents Guide Contents Overview Parts and Tools Circuit Diagram Prep LEDs & Breadboard Code Solder Circuit
Adafruit 8x16 LED Matrix FeatherWing
 Adafruit 8x16 LED Matrix FeatherWing Created by lady ada Last updated on 2019-01-28 05:47:44 PM UTC Guide Contents Guide Contents Overview Pinouts Power Pins I2C pins Address Jumpers Changing Addresses
FPV Mini Display. Created by Ruiz Brothers. Last updated on :00:18 PM UTC
 FPV Mini Display Created by Ruiz Brothers Last updated on 2017-07-19 01:00:18 PM UTC Guide Contents Guide Contents Overview Mini FPV monitor Adafruit Parts Tools and Supplies Circuit Diagram Electronics
NeoPixel Ring Bangle Bracelet
 NeoPixel Ring Bangle Bracelet Created by Becky Stern Last updated on 2017-09-28 11:14:48 PM UTC Guide Contents Guide Contents Overview Circuit Diagram Build it! Arduino Code CircuitPython Code Planning
No-Sew LED Wristband. Created by Kathy Ceceri. Last updated on :23:40 PM UTC
 No-Sew LED Wristband Created by Kathy Ceceri Last updated on 2018-11-13 09:23:40 PM UTC Guide Contents Guide Contents Overview Playing with LED Options Suggested Parts List -- Electronics Suggested Materials
Adafruit Pi Cobbler Kit
 Adafruit Pi Cobbler Kit Created by lady ada Last updated on 2018-08-22 03:30:27 PM UTC Guide Contents Guide Contents Overview Solder it! Buy a Pi Cobbler Kit! Downloads 2 3 5 15 16 Adafruit Industries