Neon LED Signs. Created by John Park. Last updated on :11:09 PM UTC
|
|
|
- Alexander Shaw
- 5 years ago
- Views:
Transcription

1 Neon LED Signs Created by John Park Last updated on :11:09 PM UTC
2 Guide Contents Guide Contents Overview Parts Materials Tools Build the Sign Driver Preparation Solder the Circuit Solder the Darlington Driver to the ScrewShield Power & Ground Digital Pins to Darlington Inputs Output to Screw Terminals Power Output Add the ScrewShield to the Metro M0 Wire the Buttons Wire the Red On/Off Button Connect Buttons to ScrewShield Four Wire Cable Code with MakeCode Build the Neon Sign Build Signs Splicing Neon LED Strips Action! Adafruit Industries Page 2 of 41

3 Overview Make your own neon-style signs without any of the glass, gas, and high voltage! These neon-like LED strips have a great look, are easy to shape and splice, and you can drive them with just 9V to 12V DC. We'll learn how to control them for blinking and animation using a microcontroller and a Darlington transistor driver. Parts You can decide how many strips you need depending on the sign you're making. The parts listed below are for the Adabot / Lightning bolt sign I made. 1 x Adafruit METRO M0 Express designed for CircuitPython - ATSAMD21G18 ADD TO CART 2 x Flexible Silicone Neon-Like LED Strip 1 Meter - Ice Blue OUT OF STOCK 2 x Flexible Silicone Neon-Like LED Strip 1 Meter - Blue OUT OF STOCK 1 x Flexible Silicone Neon-Like LED Strip 1 Meter - Pink ADD TO CART Adafruit Industries Page 3 of 41
4 1 x Flexible Silicone Neon-Like LED Strip 1 Meter - Cold White ADD TO CART 1 x Proto-ScrewShield WingShield Kit for Arduino and METRO ADD TO CART 1 x ULN2803: 8 Channel Darlington Driver (Solenoid/Unipolar Stepper) - ULN2803A ADD TO CART 1 x 12V 5A Switching Power Supply UL listed 3 x 2-Pin Wire Joints 3 pack ADD TO CART ADD TO CART 1 x Waterproof Polarized 4-Wire Cable Set Set of two cables - one plug and one jack, 16" total ADD TO CART 1 x 16mm Illuminated Pushbutton Yellow Momentary ADD TO CART 1 x 16mm Illuminated Pushbutton Red Latching On/Off Switch ADD TO CART 1 x Through-Hole Resistors ohm 5% 1/4W Pack of 25 ADD TO CART 1 x Heat Shrink Tubing Pack High-grade flexible polyolefin material ADD TO CART 1 x Silicone Cover Stranded-Core Wire 2m 26AWG White ADD TO CART 1 x Silicone Cover Stranded-Core Wire 2m 26AWG Black ADD TO CART 1 x Silicone Cover Stranded-Core Wire 2m 26AWG Orange Adafruit Industries Page 4 of 41
5 ADD TO CART 1 x Silicone Cover Stranded-Core Wire 2m 26AWG Gray 1 x Hook-up Wire Spool Set 22AWG Solid Core - 10 x 25ft ADD TO CART OUT OF STOCK Materials In addition to the parts above, you'll also want a large piece of black foam core board to mount your sign. This will vary depending on size -- I used a 32" x 40" piece for the backboard, and two 20" x 30" pieces for mounting the two sign halves. You'll use clear zip ties to mount the neon tube strips. Tools You'll need wire strippers for stripping insulation from wire ends. You'll need a soldering iron and solder to put the circuit on the Proto ScrewShield. Alternately, you can keep the circuit on a breadboard if you don't want to do any soldering! Adafruit Industries Page 5 of 41

6 Build the Sign Driver We're going to power and control the neon LED strips with a Metro M0 Express microcontroller. The Metro M0, like all microcontrollers, is designed to power low voltage devices with a small current draw -- such as individual LEDs -- from it's digital output pins. We can't run high current devices such as solenoids, motors, and neon LED strips from the Metro M0's pins directly. So how can we do it? No fear! The answer in this case is the Darlington driver! The Darlington driver is a DIP chip with eight addressable Darlinton transistor pairs inside. By sending a small 3.3V control signal to one of the Darlington's input pins, it can switch on and off a high-voltage, high-current flow to it's paired output pin. In fact, we use a Darlington driver on our Crickit boards to power the solenoids and electromagets and the like that you can plug into the Crickit's Driver ports! Here's the breadboard diagram of our circuit. In it you can see, for example, the yellow wire running from the Metro M0's digital output pin 12 to the Darlington's pin 1 (input 01). When this pin 12 is sent high, the teal neon LED strip that has its ground plugged into the Darlington's pin 18 (output 01) will suddenly flow with 12V current and turn on! Adafruit Industries Page 6 of 41


7 The 12V current is supplied by the 12V DC power plug and then made available through the VIN pin on the Metro M0, rather than using the 3.3V or 5V pins. Only plug the 12V DC power supply into the Metro M0's 2.1mm DC power jack, NOT directly into the VIN pin. Doing so can cause the board to overheat and possibly destroy the board. Rather than building it on a breadboard, we'll solder the chip and circuit wiring to a Proto ScrewShield as shown here. Adafruit Industries Page 7 of 41
.")
8 Note the two switch/led pairs in the diagram used to denote the illuminated buttons we'll be using. Preparation If you haven't done so already, solder together the Proto ScrewShield following these instructions ( Solder the Circuit Adafruit Industries Page 8 of 41


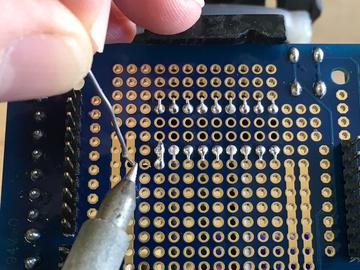
9 Solder the Darlington Driver to the ScrewShield Place the chip on the ScrewShield as shown -- note the orientation of the chip, it is critical to have the half circle at the top of the chip facing left as shown Bend the legs down as shown Solder the legs in place Adafruit Industries Page 9 of 41


10 Power & Ground Next, we need to provide power and ground from the Metro M0's VIN and GND to the Darlington's legs 10 and 9 respectively. Adafruit Industries Page 10 of 41


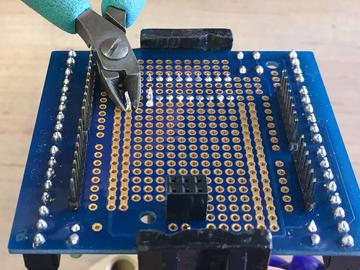
11 Place a small jumper wire from the GND strip on the ScrewShield to pin 9 on the Darlington as shown Solder the wire in place -- note how the wire is bent over to contact the pin before soldering to the Darlington pin Solder the other end of the wire to the GND strip Clip any excess wire with diagonal cutters Repeat this process for power, running a wire from VIN to pin 10 Adafruit Industries Page 11 of 41

12 Adafruit Industries Page 12 of 41


13 Digital Pins to Darlington Inputs We'll trigger each of the transistor pairs in the driver by sending digital pins high on the Metro M0 using the following connections: (you can add more if you want to control more neon strips separately for animations) D12 to Input 1 D11 to Input 2 D10 to Input 3 Adafruit Industries Page 13 of 41


14 Solder the wires to the digital pins' holes as usual and then bend their other ends onto the Darlington's pins before soldering. Output to Screw Terminals Adafruit Industries Page 14 of 41
 to Y Darlington Output 02 (leg 17) to X Darlington Output 03 (leg 16) to W Power Output The three outputs we just connected are for the ground wires of three neon LED")
15 Now, you'll solder jumper wires from the Darlington's output pins to the ScrewShield's W, X, and Y terminals. It is here that we'll connect the neon LED strips later through a cable. Darlington Output 01 (leg 18) to Y Darlington Output 02 (leg 17) to X Darlington Output 03 (leg 16) to W Power Output The three outputs we just connected are for the ground wires of three neon LED strips. Now, we need a convenient way to share the common 12V line. We can do this by soldering a jumper from the VIN connection we made already at Darlington leg 10 over to the ScrewShield Z terminal. Adafruit Industries Page 15 of 41


16 Add the ScrewShield to the Metro M0 Now we get the very satisfying task of inserting the ScrewShield into the Metro M0! Just like that, all of the Metro M0's pins are connected to all of those screw terminals and to our pre-wired Darlington circuit! Adafruit Industries Page 16 of 41


17 Wire the Buttons We'll use two buttons to control the sign -- an on/off latching button and a momentary button to control the animation of two of our neon LED tubes. Adafruit Industries Page 17 of 41


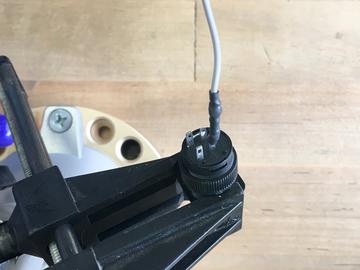
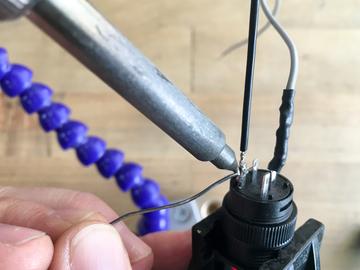
18 These buttons are special -- they each have an LED built into them. So, we'll wire them so that we have a nice little cable bundle per button for ground, digital input to the Metro M0 to read the button state, and digital output from a Metro M0 pin to light the LED. We'll even solder in a 220 Ohm resistor inline with each button's LED power pin so the wires can be plugged directly into Metro M0 pins via ScrewShield terminals! Wire the Red On/Off Button Solder a jumper wire from the LED GND pin to the Switch contact to GND pin, this ground can be shared. There's no need in this case to run four wires to the board when three will do Solder one end of a 220 Ohm resistor to the LED Power contact on the button Solder a length of grey stranded wire to the other end of the resistor -- this is the wire that will connect to the screw terminal at D9 Add some heat shrink tubing to insulate the connections Solder a length of black wire to the Switch contact to GND contact Solder a length of blue wire to the Switch contact to digital pin contact Add heat shrink to these two connections You can optionally use a piece of wider diameter Adafruit Industries Page 18 of 41


19 heat shrink to neaten up the base of the button as shown Adafruit Industries Page 19 of 41

20 Adafruit Industries Page 20 of 41

21 Adafruit Industries Page 21 of 41
: Jumper between LED GND and Switch contact")

22 Repeat this procedure for the yellow momentary button, this time with these color connections (to make it easier to follow the schematic above): Jumper between LED GND and Switch contact to ground Black to GND contact White to 220 Ohm resistor to LED Power contact Orange to Switch contact to digital pin Adafruit Industries Page 22 of 41


23 Connect Buttons to ScrewShield Now you can insert the button wires into the ScrewShield screw terminals. Follow the diagram above and this drawing. Note that you can twist the two black wires together and have them share a single GND terminal. Adafruit Industries Page 23 of 41

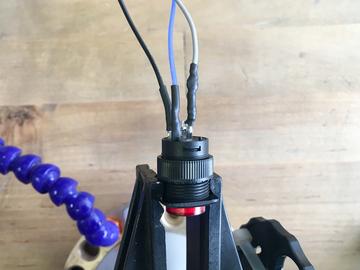
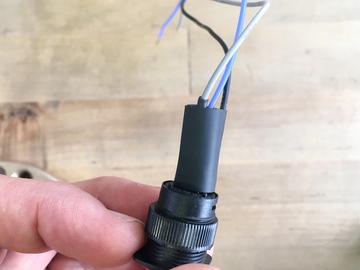
24 Four Wire Cable We want a good way to connect the neon LED strips to the Metro M0 that is solid, secure, and polarized to avoid plugging things in the wrong way. Enter the 4-wire polarized cable set! Screw the wires of the female receptacle half into the W, X, Y, and Z terminals as shown in the schematic and the photo below. The board circuit and wiring is complete, time to program it with MakeCode! Adafruit Industries Page 24 of 41

25 Adafruit Industries Page 25 of 41
 Click on the Metro M0 Express board on that page, and then click on the New Project button.")
26 Code with MakeCode MakeCode isn't just for Circuit Playground Express, it can program a variety of boards, including Metro M0 Express, Trinket M0, Feather M0 Express, and Gemma M0 by using this URL: maker.makecode.com ( Click on the Metro M0 Express board on that page, and then click on the New Project button. (If you're new to MakeCode in general, this guide ( is an excellent place to get started!) This is the program I built to control neon LED strips. This allows us to use the two buttons to control the sign -- turn the red button on and all of the tubes are lit. Click the yellow button and the two tubes on pins D11 and D10 will alternate blinking every second. Adafruit Industries Page 26 of 41

27 If you'd like to open this program in your browser, click the button above. Then, you can press Download in MakeCode to save the.uf2 file to your computer. Plug in your Metro M0, press the Reset button to enter bootloader mode, and then drag the.uf2 file onto the METROBOOT drive. The M0 Express will restart and your program is running! We'll do a more complete test on the next page as we connect the neon LED strips, but for now you can test the program by clicking the buttons as shown here. Adafruit Industries Page 27 of 41

28 Adafruit Industries Page 28 of 41

29 Build the Neon Sign Before we build the full sign, it's a good idea to test out the board by plugging in three strips and running the board through its paces. Using the 2-pin wire joints, connect the wires as shown below: You can see we're sharing power by connecting the three red wires from the neon LED strips to a single connector. Each strip's ground is connected to a different control wire coming from the 4-wire cable. Adafruit Industries Page 29 of 41


30 Plug the male end of the 4-wire cable into the female receptacle end that's connected to the ScrewShield and Metro M0. Plug in your 12V power supply to the DC jack on the Metro M0, and turn on the small on switch on the Metro M0. Press the red button to turn on the neon! Adafruit Industries Page 30 of 41


31 Now, press the yellow button to start the blinking! Build Signs Now we can get creative! Time to start laying out your neon LED strips onto foam core board. Adafruit Industries Page 31 of 41


32 To secure the strips, use a small screwdriver to poke pairs of holes through the foam core board, and then secure the strip at that point with a small, clear zip tie. Adafruit Industries Page 32 of 41


33 Adafruit Industries Page 33 of 41


34 Adafruit Industries Page 34 of 41


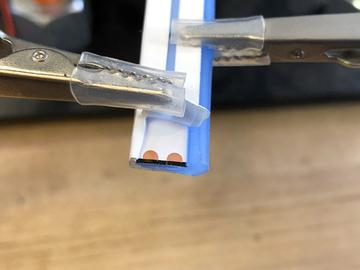
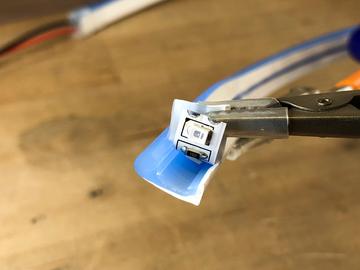
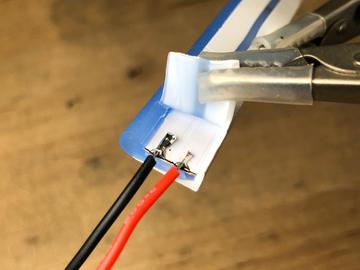
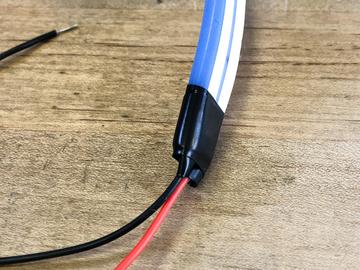
35 Splicing Neon LED Strips Sometimes you may want to use short lengths of the neon LED strip -- that's great, simply cut the strips right along the black lines you can see inside of the tubing on the back side of the tape. To then use the cut off end -- or even to join multiple strips together to create multi-color lengths -- you will need to solder leads onto the exposed pads. Use heat shrink tubing or electrical tape to finish off the job neatly. Cut the strip at any one of the black marks Peel back a bit of the silicone covering to reveal the solder pads If you look at the other side, the markings around the LED shows you which side is ground -- the black rectangle has a diagonal mark in one corner, that's the ground side Tin the pads Solder a black wire to GND and red wire to + Finish it off with some electrical tape Adafruit Industries Page 35 of 41

36 Adafruit Industries Page 36 of 41

37 Adafruit Industries Page 37 of 41


38 Now, you can add this short, darker blue length to the design! Adafruit Industries Page 38 of 41


39 You can create holes to push the wiring through to the back side of the board as shown. Adafruit Industries Page 39 of 41


40 You can see here how the 2-pin wire joint connectors are used to daisy chain the neon LED strips. You can add more elements to your sign -- here I stacked two boards to make assembly easier, and to create options for displaying Adabot with or without a cool lightning bolt/pink curve in shield logo! Adafruit Industries Page 40 of 41

41 Action! OK, now you can plug in the four wire connector to the Metro M0 and ScrewShield, plug in the 12V 5A DC power, and fire up your own custom neon LED strip sign! Adafruit Industries Last Updated: :11:04 PM UTC Page 41 of 41
Paper Airplane Launcher
 Paper Airplane Launcher Created by Dano Wall Last updated on 2018-08-27 08:36:14 PM UTC Guide Contents Guide Contents Overview A Launching Platform The Electronics Materials Build the Launcher Attach Motors
Ping Pong Ball Launcher
 Ping Pong Ball Launcher Created by Dano Wall Last updated on 2019-01-25 03:19:13 AM UTC Guide Contents Guide Contents Overview Electronic Parts Circuit Playground Express USB cable - USB A to Micro-B Alkaline
Crickit Carnival Bumper Bot
 Crickit Carnival Bumper Bot Created by John Park Last updated on 2018-08-22 04:08:52 PM UTC Guide Contents Guide Contents Overview Parts Materials and Tools Build the Bumper Bot Cut the Cardboard Chassis
Crickit Powered Holiday Diorama
 Crickit Powered Holiday Diorama Created by Isaac Wellish Last updated on 2018-12-04 12:49:07 AM UTC Guide Contents Guide Contents Overview Prerequisite Guides Adafruit Parts Tools and Materials Wiring
Hammer Time Mini Golf Hazard with Crickit
 Hammer Time Mini Golf Hazard with Crickit Created by John Park Last updated on 2018-07-09 06:47:53 AM UTC Guide Contents Guide Contents Overview Please Hammer, Don't Hurt Em Parts Materials & Tools Program
Adafruit Capacitive Touch Sensor Breakouts
 Adafruit Capacitive Touch Sensor Breakouts Created by Bill Earl Last updated on 2018-08-22 03:36:13 PM UTC Guide Contents Guide Contents Overview Momentary Toggle 5-Pad Momentary Assembly and Wiring Installing
Crickit Dancing Marionette Kit Created by Dano Wall. Last updated on :03:11 PM UTC
 Crickit Dancing Marionette Kit Created by Dano Wall Last updated on 2019-04-04 07:03:11 PM UTC Overview This project demonstrates how to build a robotic marionette that is controlled with four arcade-style
Adafruit MCP9808 Precision I2C Temperature Sensor Guide
 Adafruit MCP9808 Precision I2C Temperature Sensor Guide Created by lady ada Last updated on 2017-11-12 06:09:49 PM UTC Guide Contents Guide Contents Overview Pinouts Power Pins I2C Data Pins Optional Pins
Infinity Mirror Valentine's Candy Box
 Infinity Mirror Valentine's Candy Box Created by Kathy Ceceri Last updated on 2019-02-07 09:44:54 PM UTC Guide Contents Guide Contents Overview Parts List -- Mini Box Version Chibitronics Color LEDs Add-On
Snake Charmer Box. Created by Dano Wall. Last updated on :07:25 PM UTC
 Snake Charmer Box Created by Dano Wall Last updated on 2018-08-22 04:07:25 PM UTC Guide Contents Guide Contents Overview Materials Circuit Playground Express Standard servo - TowerPro SG-5010 Small Alligator
Crawling Baby Sea Turtle Robot
 Crawling Baby Sea Turtle Robot Created by Dano Wall Last updated on 2018-08-22 04:10:26 PM UTC Guide Contents Guide Contents Overview Save the Wee Turtles Household Materials Adafruit Electronics Create
FLORA and GEMMA ICSP. Created by Becky Stern. Last updated on :42:16 PM UTC
 FLORA and GEMMA ICSP Created by Becky Stern Last updated on 2018-08-22 03:42:16 PM UTC Guide Contents Guide Contents Overview Reprogram FLORA over ICSP Reprogram GEMMA over ICSP 2 3 4 9 Adafruit Industries
i2c/spi LCD Backpack Created by lady ada Last updated on :11:04 PM UTC
 i2c/spi LCD Backpack Created by lady ada Last updated on 2017-08-16 05:11:04 PM UTC Guide Contents Guide Contents Overview Which LCD to Use? Wait - the backpack has 16 holes, but my LCD only has 14 pins!
Slider Crank Mechanism -- from Cardboard and Craft Sticks
 Slider Crank Mechanism -- from Cardboard and Craft Sticks Created by John Park Last updated on 2018-08-22 04:07:21 PM UTC Guide Contents Guide Contents Overview Materials Tools Build the Slider Crank Build
Feather Weather Lamp. Created by Ruiz Brothers. Last updated on :54:26 PM UTC
 Feather Weather Lamp Created by Ruiz Brothers Last updated on 2018-08-22 03:54:26 PM UTC Guide Contents Guide Contents Overview Weather Reactive Pixels Prerequisite Guides Parts Tools & Supplies Circuit
FLORA TV-B-Gone. Created by Becky Stern. Last updated on :32:57 PM UTC
 FLORA TV-B-Gone Created by Becky Stern Last updated on 2018-08-22 03:32:57 PM UTC Guide Contents Guide Contents Overview Parts Tutorials Transistors Resistors LEDs Pushbutton Program it Power Fabric pinwheel
Portable Apple Watch Charger
 Portable Apple Watch Charger Created by Ruiz Brothers Last updated on 2017-10-22 09:58:04 PM UTC Guide Contents Guide Contents Overview Smart Charging Prerequisite Guides Parts, Tool & Supplies Circuit
Bunny Ears with MakeCode
 Bunny Ears with MakeCode Created by Erin St Blaine Last updated on 2018-08-22 04:05:47 PM UTC Guide Contents Guide Contents Introduction Tools & Other Materials Programming with MakeCode Set Up the Light
Reindeer Mask with Animated Eyes
 Reindeer Mask with Animated Eyes Created by Dano Wall Last updated on 2018-12-05 10:50:10 PM UTC Guide Contents Guide Contents Overview Parts Adafruit HalloWing M0 Express Convex Plastic Lens with Edge
Crawling Animatronic Hand
 Crawling Animatronic Hand Created by Dano Wall Last updated on 2018-12-03 06:39:35 PM UTC Guide Contents Guide Contents Overview Parts Used Tools & Materials Prepare the Hand Your hand is now ready to
Adafruit Si7021 Temperature + Humidity Sensor
 Adafruit Si7021 Temperature + Humidity Sensor Created by lady ada Last updated on 2017-11-12 06:14:07 PM UTC Guide Contents Guide Contents Overview Pinouts Power Pins: I2C Logic pins: Assembly Prepare
Clockwork Goggles. Created by John Park. Last updated on :03:10 PM UTC
 Clockwork Goggles Created by John Park Last updated on 2018-08-22 04:03:10 PM UTC Guide Contents Guide Contents Overview Assemble Circuit and Goggles CircuitPython Setup and Code Rock the Goggles 2 3 6
FLORA and GEMMA ICSP. Created by Becky Stern. Last updated on :30:55 PM EST
 FLORA and GEMMA ICSP Created by Becky Stern Last updated on 2015-02-19 02:30:55 PM EST Guide Contents Guide Contents Overview Reprogram FLORA over ICSP Reprogram GEMMA over ICSP 2 3 5 10 Adafruit Industries
Con Badge with Circuit Playground Express
 Con Badge with Circuit Playground Express Created by Sophy Wong Last updated on 2018-04-11 05:00:16 PM UTC Guide Contents Guide Contents Overview Tools & Materials Laser Cutting Program the Circuit Playground
Adafruit Mini TFT " 160x80
 Adafruit Mini TFT - 0.96" 160x80 Created by lady ada Last updated on 2017-11-17 05:56:10 PM UTC Guide Contents Guide Contents Overview Pinouts Assembly Prepare the header strip: Add the breakout board:
LED Eyes. Created by Ruiz Brothers. Last updated on :50:55 AM UTC
 LED Eyes Created by Ruiz Brothers Last updated on 2018-01-13 05:50:55 AM UTC Guide Contents Guide Contents Overview Parts, Tools and Supplies Enameled Copper Magnet Wire 11 meters / 0.1mm diameter Adafruit
Adabot Operation Game
 Adabot Operation Game Created by John Park Last updated on 2018-08-22 04:11:17 PM UTC Guide Contents Guide Contents Overview Parts Materials & Tools Build the Operating Table Print the Board and Pieces
Tent Lantern. Created by Timothy Reese. Last updated on :17:25 AM UTC
 Tent Lantern Created by Timothy Reese Last updated on 2017-07-14 05:17:25 AM UTC Guide Contents Guide Contents Overview Things you'll need: What You'll Learn: 3D Printing Code Assembly Wiring Diagram Soldering
Mini Golf Course with Circuit Playground and Crickit
 Mini Golf Course with Circuit Playground and Crickit Created by Dano Wall Last updated on 2018-08-22 04:09:31 PM UTC Guide Contents Guide Contents Overview Materials & Tools Adafruit Parts CRICKIT Assembly
Adafruit DRV2605 Haptic Controller Breakout
 Adafruit DRV2605 Haptic Controller Breakout Created by lady ada Last updated on 2016-10-03 09:48:16 PM UTC Guide Contents Guide Contents Overview Pinouts Power Pins I2C Pins Other! Assembly Prepare the
Mad Science Test Tube Rack
 Mad Science Test Tube Rack Created by John Park Last updated on 2016-10-17 09:21:01 PM UTC Guide Contents Guide Contents Overview Lighted Test Tube Parts Materials and Tools Optional Test Tube Rack Parts
Audio Prank Gift Box. Created by Becky Stern. Last updated on :46:15 PM UTC
 Audio Prank Gift Box Created by Becky Stern Last updated on 2018-08-22 03:46:15 PM UTC Guide Contents Guide Contents Overview Circuit Diagram Prepare Components Build Circuit Wrap and Give 2 3 5 6 12 14
Circuit Playground Express Laser Tag
 Circuit Playground Express Laser Tag Created by John Park Last updated on 2017-11-14 01:56:23 AM UTC Guide Contents Guide Contents Build a Laser Tag Game Code the Laser Tag Game MakeCode Transmitting IR
Solar Boost Bag. Created by Becky Stern. Last updated on :44:55 PM UTC
 Solar Boost Bag Created by Becky Stern Last updated on 2018-08-22 03:44:55 PM UTC Guide Contents Guide Contents Overview 3D Design Files Customize Design Assemble Circuit Prepare Solar Panel Enclosure
Monochrome OLED Breakouts
 Monochrome OLED Breakouts Created by lady ada Last updated on 2018-01-02 08:35:47 PM UTC Guide Contents Guide Contents Overview Power Requirements OLED Power Requirements 5V- ready 128x64 and 128x32 OLEDs
DIY Circuit Playground Shields
 DIY Circuit Playground Shields Created by Dave Astels Last updated on 2018-08-22 04:05:06 PM UTC Guide Contents Guide Contents Overview Small Alligator Clip Test Lead (set of 12) Small Alligator Clip to
Adafruit PowerBoost 500 Shield
 Adafruit PowerBoost 500 Shield Created by lady ada Last updated on 2018-08-22 03:43:27 PM UTC Guide Contents Guide Contents Overview Pinouts DC/DC Boost section Indicator LEDs Charging section Power Switch
3D Printed 20w Amplifier Box
 3D Printed 20w Amplifier Box Created by Ruiz Brothers Last updated on 2018-02-26 06:48:02 PM UTC Guide Contents Guide Contents Overview Prerequisite Guide Tools & Supplies Parts 3D Printing Print in your
Pushrod Garage. Created by John Park. Last updated on :07:30 PM UTC
 Pushrod Garage Created by John Park Last updated on 2018-08-22 04:07:30 PM UTC Guide Contents Guide Contents Overview Parts & Materials Tools Pushrod Mechanism Code it with MakeCode Functions On Start
MiniPOV4 - DIY Full-Color Persistence of Vision & Light-Painting Kit
 MiniPOV4 - DIY Full-Color Persistence of Vision & Light-Painting Kit Created by lady ada Last updated on 2018-08-22 03:41:06 PM UTC Guide Contents Guide Contents Overview Make it! Testing Upload Images
Adafruit DRV2605 Haptic Controller Breakout
 Adafruit DRV2605 Haptic Controller Breakout Created by lady ada Last updated on 2018-08-20 03:28:51 PM UTC Guide Contents Guide Contents Overview Pinouts Power Pins I2C Pins Other! Assembly Prepare the
Adafruit 8x16 LED Matrix FeatherWing
 Adafruit 8x16 LED Matrix FeatherWing Created by lady ada Last updated on 2016-05-20 01:58:38 PM EDT Guide Contents Guide Contents Overview Pinouts Power Pins I2C pins Address Jumpers Changing Addresses
NeoPixel Ring Bangle Bracelet
 NeoPixel Ring Bangle Bracelet Created by Becky Stern Last updated on 2017-09-28 11:14:48 PM UTC Guide Contents Guide Contents Overview Circuit Diagram Build it! Arduino Code CircuitPython Code Planning
Cup o' Sound. Created by Becky Stern. Last updated on :30:06 PM EST
 Cup o' Sound Created by Becky Stern Last updated on 2015-02-18 01:30:06 PM EST Guide Contents Guide Contents Overview Circuit Diagram Load Sound and Prepare Components Solder Circuit and Assemble Use it!
Joy Featherwing. Created by Dean Miller. Last updated on :03:07 PM UTC
 Joy Featherwing Created by Dean Miller Last updated on 2018-08-22 04:03:07 PM UTC Guide Contents Guide Contents Overview Pinouts Power and Reset Pins I2C Data Pins I2C Addressing Optional Interrupt Pin
Adafruit TPL5110 Power Timer Breakout
 Adafruit TPL5110 Power Timer Breakout Created by lady ada Last updated on 2017-12-11 06:28:19 AM UTC Guide Contents Guide Contents Overview Pinouts Power Pins Control Pins Assembly Prepare the header strip:
Adafruit VL53L0X Time of Flight Micro-LIDAR Distance Sensor Breakout
 Adafruit VL53L0X Time of Flight Micro-LIDAR Distance Sensor Breakout Created by lady ada Last updated on 2017-12-28 11:56:14 PM UTC Guide Contents Guide Contents Overview Sensing Capablities Pinouts Power
Guardian Shield+ Zelda Breath of the Wild
 Guardian Shield+ Zelda Breath of the Wild Created by Ruiz Brothers Last updated on 2018-08-22 04:01:50 PM UTC Guide Contents Guide Contents Overview Articulating Handle Rechargeable Prerequisite Guides
LED Lightbox. Created by Sam Clippinger. Last updated on :50:00 AM UTC
 LED Lightbox Created by Sam Clippinger Last updated on 2016-09-03 01:50:00 AM UTC Guide Contents Guide Contents Overview TL;DR Skill Level Parts List Yellow sticker reads: "Bad planning on your part does
MCP Bit DAC Tutorial
 MCP4725 12-Bit DAC Tutorial Created by lady ada Last updated on 2018-03-05 10:51:16 PM UTC Guide Contents Guide Contents Overview Wiring Arduino Code Using the library Increasing the speed CircuitPython
Adafruit TPL5111 Reset Enable Timer Breakout
 Adafruit TPL5111 Reset Enable Timer Breakout Created by lady ada Last updated on 2017-11-02 07:32:27 PM UTC Guide Contents Guide Contents Overview Pinouts Power Pins Control Pins Assembly Prepare the header
NeoPixel Bike Light. Created by Ruiz Brothers. Last updated on :43:46 PM UTC
 NeoPixel Bike Light Created by Ruiz Brothers Last updated on 2018-11-15 07:43:46 PM UTC Guide Contents Guide Contents Overview 3D Printed Headlight Adafruit's Feather Platform Circuit Python Powered Parts
Adafruit APDS9960 breakout
 Adafruit APDS9960 breakout Created by Dean Miller Last updated on 2018-01-19 11:18:59 PM UTC Guide Contents Guide Contents Overview Pinouts Power Pins: Logic pins: Assembly Prepare the header strip: Add
Data Logging with Feather and CircuitPython
 Data Logging with Feather and CircuitPython Created by Kattni Rembor Last updated on 2018-04-30 09:58:20 PM UTC Guide Contents Guide Contents Overview Things You'll Need Adafruit Feather M0 Express - Designed
MCP Bit DAC Tutorial
 MCP4725 12-Bit DAC Tutorial Created by lady ada Last updated on 2016-10-07 04:47:03 PM UTC Guide Contents Guide Contents Overview Wiring Using with Arduino Using the library Increasing the speed Download
Adafruit MMA8451 Accelerometer Breakout
 Adafruit MMA8451 Accelerometer Breakout Created by lady ada Last updated on 2014-07-31 07:00:14 PM EDT Guide Contents Guide Contents Overview Pinouts (http://adafru.it/dln)power Pins I2C Pins INT and ADDR
Coffee Detonator: The TNT Plunger Grinder
 Coffee Detonator: The TNT Plunger Grinder Created by John Park Last updated on 2017-04-12 08:04:36 PM UTC Guide Contents Guide Contents Overview Materials Voltage Conversion AC/DC Voltage Divider Microcontroller
7 Portable Multitouch Raspberry Pi Tablet
 7 Portable Multitouch Raspberry Pi Tablet Created by Ruiz Brothers Last updated on 2017-02-27 04:13:53 PM UTC Guide Contents Guide Contents Overview Portable Raspberry Pi Tablet 7" Multitouch Display Parts
1.8" TFT Display Breakout and Shield
 1.8" TFT Display Breakout and Shield Created by lady ada Last updated on 2017-11-17 05:51:22 PM UTC Guide Contents Guide Contents Overview Breakout Pinouts Breakout Assembly Prepare the header strip: Add
No-Sew LED Wristband. Created by Kathy Ceceri. Last updated on :23:40 PM UTC
 No-Sew LED Wristband Created by Kathy Ceceri Last updated on 2018-11-13 09:23:40 PM UTC Guide Contents Guide Contents Overview Playing with LED Options Suggested Parts List -- Electronics Suggested Materials
Fiddy - the FTDI Clip
 Fiddy - the FTDI Clip Created by Timothy Reese Last updated on 2016-11-22 09:18:04 PM UTC Guide Contents Guide Contents Overview FTDI is Great! Things you'll need: What You'll Learn: 3D Printing Assembly
3D Printed 20w Amplifier Box
 3D Printed 20w Amplifier Box Created by Noe & Pedro Ruiz Last updated on 2014-04-22 03:01:38 PM EDT Guide Contents Guide Contents Overview Prerequisite Guide Tools & Supplies Parts 3D Printing Print in
Stumble-Bot. Created by Dano Wall. Last updated on :04:06 AM UTC
 Stumble-Bot Created by Dano Wall Last updated on 2018-09-06 05:04:06 AM UTC Guide Contents Guide Contents Overview Simply Stumbling We Have the Technology Other Supplies Leg Assembly Front Legs Back Legs
Adafruit Prototyping Pi Plate. Created by Ladyada
 Adafruit Prototyping Pi Plate Created by Ladyada Guide Contents Guide Contents Overview Solder it! User Manual Buy Adafruit Prototyping Pi Plate 2 3 4 14 17 Adafruit Industries http://learn.adafruit.com/adafruit-prototyping-pi-plate
Adafruit AMG8833 8x8 Thermal Camera Sensor
 Adafruit AMG8833 8x8 Thermal Camera Sensor Created by Justin Cooper Last updated on 2017-11-27 10:00:27 PM UTC Guide Contents Guide Contents Overview Pinouts Power Pins: Logic pins: Assembly Prepare the
Adafruit ATWINC1500 WiFi Breakout
 Adafruit ATWINC1500 WiFi Breakout Created by lady ada Last updated on 2018-01-29 08:25:04 PM UTC Guide Contents Guide Contents Overview Pinouts Power Pins SPI Pins Other SPI Interface Pins Assembly Prepare
Adafruit 1.27" and 1.5" Color OLED Breakout Board
 Adafruit 1.27" and 1.5" Color OLED Breakout Board Created by Bill Earl Last updated on 2017-11-17 05:54:22 PM UTC Guide Contents Guide Contents Overview Board Technical Details Assembly Prepare the header
Bike Wheel POV Display
 Bike Wheel POV Display Created by Becky Stern Last updated on 2017-09-12 03:10:38 PM UTC Guide Contents Guide Contents Overview Parts and Tools Circuit Diagram Prep LEDs & Breadboard Code Solder Circuit
BLE Light Switch with Feather nrf52840 and Crickit
 BLE Light Switch with Feather nrf52840 and Crickit Created by John Park Last updated on 2019-02-15 07:06:19 PM UTC Guide Contents Guide Contents Overview Parts Adafruit Feather nrf52840 Express Adafruit
Trinket NeoPixel LED Longboard
 Trinket NeoPixel LED Longboard Created by Ruiz Brothers Last updated on 2017-10-02 06:00:32 PM UTC Guide Contents Guide Contents Overview Parts Tools & Supplies Prerequisite Guides 3D Printing PLA Material
TRON Bag. Created by Becky Stern
 TRON Bag Created by Becky Stern Last updated on 2018-08-22 03:30:39 PM UTC Guide Contents Guide Contents Overview Tools Design Soldering Sewing Detailing Splitting Finishing Buy EL! Forums 2 3 5 7 12 15
Interactive Gift Box. Created by codingpro. Last updated on :47:40 AM UTC
 Interactive Gift Box Created by codingpro Last updated on 2018-01-10 01:47:40 AM UTC Guide Contents Guide Contents Overview Adafruit GEMMA M0 - Miniature wearable electronic platform Lithium Ion Polymer
Prophet 600 GliGli mod
 Prophet 600 GliGli mod Created by Collin Cunningham Last updated on 2018-08-22 04:04:56 PM UTC Guide Contents Guide Contents Overview What you'll need Program the Teensy++ Modify the Teensy++ Prep header
DIY Bluetooth Gamepad
 DIY Bluetooth Gamepad Created by Ruiz Brothers Last updated on 2016-09-03 02:23:21 AM UTC Guide Contents Guide Contents Overview Prerequisite Guides Expectations Parts Tools & Supplies Circuit Diagram
Simple LED Unicorn Horn
 Simple LED Unicorn Horn Created by Ruiz Brothers Last updated on 2018-08-22 03:56:14 PM UTC Guide Contents Guide Contents Overview 3D Printed Unicorn Horn Want More Magic/Colors? Great For Beginners Parts
3D Printed Camera LED Ring
 3D Printed Camera LED Ring Created by Ruiz Brothers Last updated on 2018-08-22 03:39:34 PM UTC Guide Contents Guide Contents Overview DIY LED Ring Light Prerequisite Guide: Parts List: Tools & Supplies
NeoMatrix 8x8 Word Clock
 NeoMatrix 8x8 Word Clock Created by Andy Doro Last updated on 2017-10-10 04:10:51 AM UTC Guide Contents Guide Contents Overview Parts List Parts Tools Circuit Assembly Overview Uploading Code Understanding
Fiddy - the FTDI Clip
 Fiddy - the FTDI Clip Created by Timothy Reese Last updated on 2018-08-22 03:57:42 PM UTC Guide Contents Guide Contents Overview FTDI is Great! Things you'll need: What You'll Learn: 3D Printing Assembly
Trellis 3D Printed Enclosure
 Trellis 3D Printed Enclosure Created by Ruiz Brothers Last updated on 2018-08-22 03:39:07 PM UTC Guide Contents Guide Contents Overview Parts Tools & Supplies Modeling 123D Design Customize Measuring Parts
3D Printed Google AIY Voice Kit
 3D Printed Google AIY Voice Kit Created by Ruiz Brothers Last updated on 2018-01-09 12:47:26 AM UTC Guide Contents Guide Contents Overview 3D Print a DIY AI enclosure for the Raspberry PI! Parts, Tools
Android GBoard Morse Code Control with Circuit Playground Express
 Android GBoard Morse Code Control with Circuit Playground Express Created by Dave Astels Last updated on 2018-08-22 04:10:30 PM UTC Guide Contents Guide Contents Overview Parts Materials for the box Installing
Phone-Activated Talking Dog Collar
 Phone-Activated Talking Dog Collar Created by Phillip Burgess Last updated on 2017-01-24 08:28:00 PM UTC Guide Contents Guide Contents Overview Circuit Diagram & Code Leather Collar & Greebles Assemble
Adafruit I2C FRAM Breakout
 Adafruit I2C FRAM Breakout Created by lady ada Last updated on 2017-07-14 05:38:45 AM UTC Guide Contents Guide Contents Overview Pinouts Power Pins: I2C Logic pins: Assembly Prepare the header strip: Add
Adafruit Si5351 Clock Generator Breakout
 Adafruit Si5351 Clock Generator Breakout Created by lady ada Last updated on 2017-06-02 07:54:50 PM UTC Guide Contents Guide Contents Overview Pinouts Power Pins I2C Pins Assembly Prepare the header strip:
Adafruit Pi Cobbler Kit
 Adafruit Pi Cobbler Kit Created by lady ada Last updated on 2018-08-22 03:30:27 PM UTC Guide Contents Guide Contents Overview Solder it! Buy a Pi Cobbler Kit! Downloads 2 3 5 15 16 Adafruit Industries
Circuit Playground Express Head-Tilt Ears
 Circuit Playground Express Head-Tilt Ears Created by Dave Astels Last updated on 2018-10-09 04:07:03 PM UTC Guide Contents Guide Contents Overview Parts Circuit Playground Express Micro servo Lithium Ion
TSL2561 Luminosity Sensor
 TSL2561 Luminosity Sensor Created by lady ada Last updated on 2018-01-27 12:17:52 AM UTC Guide Contents Guide Contents Overview Wiring the TSL2561 Sensor Breakout Board Prep Wiring up the sensor Arduino
Introducing Adafruit Trellis
 Introducing Adafruit Trellis Created by lady ada Last updated on 2016-09-16 09:12:22 PM UTC Guide Contents Guide Contents Overview Adding LEDs Connecting Library reference Creating the objects Controlling
'Sup Brows. Created by Kate Hartman. Last updated on :52:04 PM UTC
 'Sup Brows Created by Kate Hartman Last updated on 2018-08-22 03:52:04 PM UTC Guide Contents Guide Contents Overview Circuit Bluetooth Test Upload the Code Place the Sensor View Sensor Values Via Bluetooth
FPV Mini Display. Created by Ruiz Brothers. Last updated on :00:18 PM UTC
 FPV Mini Display Created by Ruiz Brothers Last updated on 2017-07-19 01:00:18 PM UTC Guide Contents Guide Contents Overview Mini FPV monitor Adafruit Parts Tools and Supplies Circuit Diagram Electronics
0.96" mini Color OLED
 0.96" mini Color OLED Created by lady ada Last updated on 2016-09-08 03:41:52 PM UTC Guide Contents Guide Contents Overview Power Wiring New Model Older Model Wiring the OLDER design (two rows of pins
DC & USB Boarduino Kits
 DC & USB Boarduino Kits Created by lady ada Last updated on 2018-08-22 03:34:24 PM UTC Guide Contents Guide Contents Overview Make It! Steps Preparation Prep (https://adafru.it/c06)tools DC Parts List
Milk Jug Glow Skull. Created by John Park. Last updated on :28:36 PM UTC
 Milk Jug Glow Skull Created by John Park Last updated on 2018-09-14 09:28:36 PM UTC Guide Contents Guide Contents Overview Parts Materials & Tools Optional Skull/Sculpting Stand Build the Skull Prep the
NeoPixie Dust Bag with Circuit Playground Express
 NeoPixie Dust Bag with Circuit Playground Express Created by John Park Last updated on 2017-12-20 10:00:29 PM UTC Guide Contents Guide Contents Overview Code It Setup Animation Color Touch Variable Color
Chirping Plush Owl Toy
 Chirping Plush Owl Toy Created by Becky Stern Last updated on 2018-11-21 08:56:55 PM UTC Guide Contents Guide Contents Overview Tools & Supplies Solder Circuit Arduino Code CircuitPython Code Assemble
PyPortal View Master Created by Ruiz Brothers. Last updated on :51:28 AM UTC
 PyPortal View Master Created by Ruiz Brothers Last updated on 2019-03-13 11:51:28 AM UTC Overview In this project we re building a view master inspired device using Adafruit s PyPortal. The eyepiece makes
Sword & Wand Prop Effects with Circuit Playground
 Sword & Wand Prop Effects with Circuit Playground Created by John Park Last updated on 2018-01-13 05:32:54 AM UTC Guide Contents Guide Contents Overview Circuit Playground Express with MakeCode Lots of
Magical Mistletoe. Created by Leslie Birch. Last updated on :45:29 PM UTC
 Magical Mistletoe Created by Leslie Birch Last updated on 2018-08-22 03:45:29 PM UTC Guide Contents Guide Contents Overview Tools & Supplies Circuit Diagram Test the Sensor Prepare Parts Attach LED Sequins
Interior Purse Light. Created by Becky Stern. Last updated on :41:08 PM UTC
 Interior Purse Light Created by Becky Stern Last updated on 2018-08-22 03:41:08 PM UTC Guide Contents Guide Contents Overview Circuit Diagram Stitch Sequins Add Tape Arduino Code CircuitPython Code Use
NeoLoch. Inquisitor Core. Assembly Instructions (9/3/2015)
") NeoLoch Inquisitor Core Assembly Instructions (9/3/2015) Your kit should contain the following items. If you find a part missing, please contact NeoLoch for a replacement. Kit contents: 1 PCB 1 2.1mm DC
NeoLoch Inquisitor Core Assembly Instructions (9/3/2015) Your kit should contain the following items. If you find a part missing, please contact NeoLoch for a replacement. Kit contents: 1 PCB 1 2.1mm DC