Infinity Mirror Valentine's Candy Box
|
|
|
- Roxanne Morton
- 5 years ago
- Views:
Transcription

1 Infinity Mirror Valentine's Candy Box Created by Kathy Ceceri Last updated on :44:54 PM UTC
2 Guide Contents Guide Contents Overview Parts List -- Mini Box Version Chibitronics Color LEDs Add-On Pack Copper Foil Tape with Conductive Adhesive - 6mm x 15 meter roll CR2032 Lithium Coin Cell Battery Parts List -- Animated Version Adafruit GEMMA M0 - Miniature wearable electronic platform Adafruit NeoPixel LED Strip w/ Alligator Clips - 60 LED/m USB cable - USB A to Micro-B 3 x AAA Battery Holder with On/Off Switch and 2-Pin JST Alkaline AAA batteries - 3 pack Suggested Materials List -- Both Versions Build the Infinity Mirror Lid Make the Inner Mirror Make the One-Way Outer Mirror Mark the Opening Cut the Opening Cut and Attach the Outer Mirror Window Film Mini Box LED Stickers Prepare the Box Prepare the Copper Tape Attach the Tape Attach the Circuit Stickers Attach the Battery Finish the Lid Make Supports for the Inner Mirror Insert the Inner Mirror Animated NeoPixel Box Prepare the NeoPixel Strip Fasten the Ends Together Attach Glue Tabs Connect the NeoPixel Strip to the Gemma M0 Board Connect the Battery Holder Program the Gemma M0 in MakeCode Attach the Electronics to the Box Finish Attaching the Neopixel Strip Attach the Gemma M0 and the Battery Holder to the Inner Mirror Finish the Box Build the Lid Connector Last Touches Adafruit Industries Page 2 of 29


3 Overview An infinity mirror is an optical illusion that makes a single row of lights look like countless rows of lights, receding into the void forever. It's created by placing a one-way mirror over a second mirror with lights in-between. The lights turn the upper mirror transparent from the outside. Inside, the two mirrored surfaces reflect each other in ever decreasing images. The lights appear to be marching in perspective towards a vanishing point, which gives them the feeling of depth. This guide will show you how to build an infinity mirror box lid and light it two different ways: a Mini Box that uses press-on Circuit Sticker LEDs an Animated Box that uses a strip of NeoPixels controlled by an Adafruit Gemma M0 programmed in beginnerfriendly MakeCode. Both versions can be used to store treasures after the candy is gone and are kid-friendly. The Animated Box uses AAA batteries (rather than LiPo ( and a Gemma M0 microcontroller that's inexpensive enough to build in permanently. Try one or both! Parts List -- Mini Box Version Chibitronics Color LEDs Add-On Pack $24.95 IN STOCK ADD TO CART Adafruit Industries Page 3 of 29


4 Copper Foil Tape with Conductive Adhesive - 6mm x 15 meter roll $5.95 IN STOCK ADD TO CART CR2032 Lithium Coin Cell Battery $0.95 IN STOCK ADD TO CART Parts List -- Animated Version Your browser does not support the video tag. Adafruit GEMMA M0 - Miniature wearable electronic platform $9.95 IN STOCK ADD TO CART Your browser does not support the video tag. Adafruit NeoPixel LED Strip w/ Alligator Clips - 60 LED/m $12.50 IN STOCK ADD TO CART Adafruit Industries Page 4 of 29


5 ADD TO CART USB cable - USB A to Micro-B $2.95 IN STOCK ADD TO CART 3 x AAA Battery Holder with On/Off Switch and 2-Pin JST $1.95 IN STOCK ADD TO CART Alkaline AAA batteries - 3 pack $1.50 IN STOCK ADD TO CART Suggested Materials List -- Both Versions If you don't have any of the items below, you can probably substitute from crafts materials you have on hand. For either box: heart-shaped candy box with thin flat top: Mini Box -- about 4 inches wide, holding three pieces of chocolate Animated Box -- about 7 inches wide, holding eight pieces of chocolate black cardstock or poster board one-way mirror window film (such as this ( -- sold in giant rolls, but you only need two Adafruit Industries Page 5 of 29
6 pieces about the size of your box glue stick clear tape scrap cardboard, cardstock, or paper For the Animated Box: mini zip ties clear removable adhesive mini-squares (such as these ( to make it easier to attach and detach the microcontroller and battery pack shiny red cardboard (such as this ( to extend the lid Adafruit Industries Page 6 of 29
.")

7 Build the Infinity Mirror Lid First, you need to prepare the box lid for the Infinity Mirror. Then go to the page for your version to see how to add the electronics. For this step you only need the lid and the heart-shaped paper liner. Set aside the bottom of the box with the candy in a safe place (away from pets and chocolate fiends). Make the Inner Mirror Trace around the paper liner onto the black cardstock. Cut about 1/4 inch larger than the paper liner -- you want the black heart to fit snugly into the lid. Cut a piece of the mirrored window film a little larger than the heart. Put the black heart on a piece of scrap paper. Use a glue stick to apply a thin layer of glue all around the edge of the heart. Place the window film over the glued heart. Starting at one edge, smooth the film down as much as possible. The smoother your film, the better your infinity mirror. Let dry, then trim the window film to the exact size of the black heart. Adafruit Industries Page 7 of 29


8 You'll need to cut more pieces the same size as the inner mirror, so trace it onto a piece of scrap paper as a template. Make the One-Way Outer Mirror Adafruit Industries Page 8 of 29


9 For the outer mirror, you will cut an opening in the lid and cover it with another piece of window film. Children may need adult help cutting the opening. Mark the Opening Turn the lid over. On the inside, draw the outline of the opening you need to cut for your version (see below). For the Mini Box: Draw an outline about 1/2 inch from the sides of the box. (Optional) For the Animated Version: To partially hide the ends of the NeoPixel strip, prepare the strip as described here, then trace around it to determine the edges of your opening. (After testing the prototype, I don't think they would be very visible anyway.) Cut the Opening For both versions, use a craft knife or scissors to cut out the opening along the lines you drew. Adafruit Industries Page 9 of 29

10 Cut and Attach the Outer Mirror Window Film Adafruit Industries Page 10 of 29


11 Cut another piece of window film the same size as the inner mirror. Use the glue stick to apply glue to the inside lip around the opening in the lid. Carefully place the window film heart over the glued opening, smoothing as much as possible. Next, go to the section that tells you how to add the electronics for your version! Adafruit Industries Page 11 of 29
12 Adafruit Industries Page 12 of 29
.")
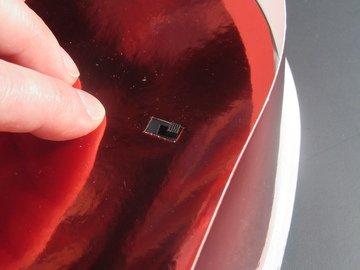
13 Mini Box LED Stickers For the Mini Box, you'll be making a parallel circuit with Chibitronics Circuit Stickers, conductive copper tape, and a 3- volt coin battery. The press-on LEDs make this project a snap! I chose to use seven red LEDs, but you can mix and match as you please (up to the limits of the battery). Prepare the Box You need to make an opening at the point of the heart to bring the circuit to the outside. If there's tape holding it together, you may be able to unpeel it and use it to hold the battery. If you can't, just slit the point open. Prepare the Copper Tape Unroll enough copper tape to fit around the entire inside of the box, plus about 3 inches. Cut the tape down the middle to make two thinner strips. You will attach these to the inside of the box to make a circuit that carries electricity from the battery to the LEDs. Adafruit Industries Page 13 of 29


14 Attach the Tape Starting a tiny bit away from the open point of the heart, attach one piece of tape to inside of the box, close to the window film. Go all the way around, smoothing as you go. At the other side of the open point, bring the remaining tape around to the outside of the box. Make sure the tape is firmly attached all the way around. Then starting a little bit from the edge where you just ended, take the second piece of tape and go around in the opposite direction, about 1/4 inch above the first piece. Again, bring the end of the tape out the opening at the point. This time, keep going right onto the tape you unpeeled from the point of the box. Or, if needed, make a new flap from a piece of clear or decorative tape. Adafruit Industries Page 14 of 29
 side up, to the copper tape lines.")

 side of the battery should be facing out.")
15 Attach the Circuit Stickers Decide where you want to put your Circuit Stickers. Then attach them, pointy (negative) side up, to the copper tape lines. Make sure the ends of the stickers are touching the lines of tape underneath. Press firmly to make a good electrical connection. Attach the Battery If the unpeeled tape at the point of the heart is still sticky, press the battery right onto it so the negative side is touching the copper tape. The positive (+) side of the battery should be facing out. If needed, hold the battery on with clear or decorative tape. Make sure to leave the battery uncovered where it is supposed to touch the copper tape. Adafruit Industries Page 15 of 29


16 Press the battery against the outside of the box, so that the positive side is touching the other copper tape. The LEDs should light up! If not, check that all the components are making a good connection to the circuit. When everything's working, use clear tape to hold the battery in place. Cut a thin strip of cardstock and slide it underneath the battery when you want to turn the lights off. Finish the Lid Make Supports for the Inner Mirror Cut some small rectangles from scrap cardboard, a little higher than the Circuit Stickers. Use the glue stick to attach them right over the copper tape, between the LEDs. Let dry. Insert the Inner Mirror Rest the inner mirror on top of the supports. Use small pieces of clear or decorative tape around the edge of the lid to hold the mirror in place. Adafruit Industries Page 16 of 29

17 Turn the LEDs on and flip the lid over to see the infinity mirror in action! If the image is distorted, make sure the window film and the inner mirror are flat and as smooth as possible. The lid should still fit over the candy in the bottom of the box -- although it will sit a little higher than before you squeezed an infinite number of lights into it. Adafruit Industries Page 17 of 29
, which contains 30 individually-addressable LEDs that can change color and turn on and off, one by one.")
18 Animated NeoPixel Box The Animated Box is a little more complicated than the Mini Box, but the added wow factor when the lights sparkle and flash are worth it. It uses a NeoPixel strip ( which contains 30 individually-addressable LEDs that can change color and turn on and off, one by one. The strip also has alligator clip connectors, which means you can take all the components apart and reuse them in other projects later if you choose. The following pages show you how to prepare the box, assemble the electronics, and program them in MakeCode. Adafruit Industries Page 18 of 29


19 Prepare the NeoPixel Strip The NeoPixel Strip comes in a protective plastic sheathing. When you curve it around to fit inside the heart, it makes a handy ledge to rest the inner mirror on. However -- fun fact! -- glue won't stick to the silicone it is made out of. Instead, to keep the NeoPixel strip in place, you will use mini zip-ties to connect it to itself, and to attach strips of cardstock which you can then glue to the inside of the box. Fasten the Ends Together With the LEDs facing inwards, pinch the ends of the strip together to make a heart shape. Wrap a mini zip-tie around the ends at a spot where it is not covering any LEDs and pull tightly. Snip off the extra with scissors. Attach Glue Tabs Add a few more zip ties around the strip where you would like to secure it to the inside of the box. Before you tighten it all the way, insert a thin strip of cardstock under the zip tie on the outside of the light strip. To attach a strip of cardstock to the indent at the top of the heart, take a zip tie and fasten it loosely to make a loop. Then take another zip tie and use it to attach the loop above the ends of the LED strip, as shown. Insert a strip of cardstock into the second zip-tie, then tighten both zip ties to hold the cardstock in place. Adafruit Industries Page 19 of 29


20 If you want to trace around your NeoPixel strip to mark the opening in the lid, do that now. Connect the NeoPixel Strip to the Gemma M0 Board Before you glue your NeoPixel strip in place, connect it to the microcontroller board so you can test out your code as Adafruit Industries Page 20 of 29

21 you write it. The NeoPixel Strip has three alligator clip wires you can attach right to the pins (numbered holes) on the Gemma M0. The black wire is ground. Attach it to the pin marked GND. The white wire is the signal. This connects to the pin you will program to tell the lights what to do. For this project, attach it to pin D1. The red wire is power. Attach it to the pin marked VOUT (which stands for Voltage Output). Connect the Battery Holder The battery holder can plug right into the board using the JST connector. Leave it turned off until you're ready to attach the whole thing to the candy box. The Gemma can run off the computer while you're programming it. Now go to the next page to find out how to program your board and lights in MakeCode! Adafruit Industries Page 21 of 29

22 Program the Gemma M0 in MakeCode It's simple to program an animated infinity mirror on the Gemma M0 in Microsoft MakeCode! Just open and edit the sample code below and add to or change the light display as you wish. Or, create your own program using the strip code blocks, found in the LIGHT category. You can preview it in the simulator before you download it to your Gemma. There's more information about using MakeCode on the Gemma M0 guide ( To download the file to the board, connect the Gemma M0 to your computer with the USB cable. Press the reset button and it will go into bootloader mode. That means it's ready to receive code. If it is your first time running MakeCode on your Gemma board, or if you have previously installed Arduino or CircuitPython, you may need to double press the reset button to get your board into bootloader mode. Click download on the MakeCode page and save the file. It will have a.uf2 extension. Then find the drive on your computer labeled GEMMABOOT. Drag and drop (or copy and paste) the program into Gemma! You'll know the code was downloaded when the onboard pixel changes to violet. While the Gemma is still connected to the computer, check how the MakeCode runs on the actual NeoPixel strip so you can make any adjustments. Next, you'll attach the lights and the Gemma and finish the box! Optional: To make your box even fancier, use a Circuit Playground Express ( instead of a Gemma and add sensors and music to your infinity mirror! If you're new to using MakeCode with the CPX, check out the Adafruit MakeCode Guide ( Adafruit Industries Page 22 of 29

23 Attach the Electronics to the Box It's time to glue the NeoPixel strip to the lid, and the rest of the electronics to the inner mirror. Finish Attaching the Neopixel Strip Adafruit Industries Page 23 of 29


24 Figure out where the wires need to go through the inner mirror. Mark the spot and cut a small opening. Then insert the NeoPixel strip into the lid. Glue the cardstock tabs to the sides to hold the lights in place. Crafts sticks wedged in between the strip and the lid will hold the tabs in place while they dry. Attach the Gemma M0 and the Battery Holder to the Inner Mirror To attach the Gemma to the back of the inner mirror, stack a few reusable adhesive squares on the back of the board. This will give the board enough height to allow for the alligator clips. Use more squares to attach the battery pack, with the on/off switch facing up. The squares should make it easier to remove the battery holder to put in fresh batteries. Remove it slowly to Adafruit Industries Page 24 of 29


25 minimize tears to the cardstock. When the glue holding the NeoPixel strip to the lid is dry, carefully pull the alligator clips through the hole in the inner mirror. Then insert the inner mirror into the lid. Let it rest on the edge of the light strip sheathing. Glue small rectangles of cardboard above the inner mirror to hold it in place. You can still slide it out if you need to. Adafruit Industries Page 25 of 29

26 Adafruit Industries Page 26 of 29

 is on the box. Tape the two long strips together.")
27 Finish the Box Unlike the Mini Box, the electronics for the Animated Box fills almost the entire lid. So you'll need to build a connector that covers the electronics nicely and gives the lid enough extra height to fit over the candy. I used shiny red cardboard that matched the box. Build the Lid Connector Cut out another heart that fits snugly inside the box. Then cut two strips long enough to reach halfway around the box. They should be wide enough to cover the sides when the lid (with the electronics inside) is on the box. Tape the two long strips together. You need to shape them to fit around the box (the part with the candy in it). With the taped ends inside the indent at the top of the heart, bend the cardboard strips around the outside of the box. Trim where they meet at the point and tape those ends together. Insert the cardboard heart into the new sides, about halfway down, with the "wrong" side facing out. Use small pieces of tape around the entire heart to connect it to the new sides. Flip the lid connector over so the "right" side is facing up. Place it over the lid. Find the battery pack on/off switch by pressing down on the cardboard. Cut a small opening for the switch. Adafruit Industries Page 27 of 29


28 Last Touches Adafruit Industries Page 28 of 29


29 Hold the lid and the connector together as you flip them over and slide them over the bottom of the box. Add any finishing touches your box needs. I cut out a smaller heart to cover the tab I made to hide the ends of the NeoPixel strip. You're done! Enjoy the infinite light-up chocolate pleasures you've created, or share them with your favorite Valentine. Adafruit Industries Last Updated: :44:53 PM UTC Page 29 of 29
CPX Mystery Dreidel. Created by Kathy Ceceri. Last updated on :51:40 PM UTC
 CPX Mystery Dreidel Created by Kathy Ceceri Last updated on 2018-12-04 02:51:40 PM UTC Guide Contents Guide Contents Overview Parts List -- Electronics Circuit Playground Express USB cable - USB A to Micro-B
No-Sew LED Wristband. Created by Kathy Ceceri. Last updated on :23:40 PM UTC
 No-Sew LED Wristband Created by Kathy Ceceri Last updated on 2018-11-13 09:23:40 PM UTC Guide Contents Guide Contents Overview Playing with LED Options Suggested Parts List -- Electronics Suggested Materials
Ping Pong Ball Launcher
 Ping Pong Ball Launcher Created by Dano Wall Last updated on 2019-01-25 03:19:13 AM UTC Guide Contents Guide Contents Overview Electronic Parts Circuit Playground Express USB cable - USB A to Micro-B Alkaline
Adabot Operation Game
 Adabot Operation Game Created by John Park Last updated on 2018-08-22 04:11:17 PM UTC Guide Contents Guide Contents Overview Parts Materials & Tools Build the Operating Table Print the Board and Pieces
Snake Charmer Box. Created by Dano Wall. Last updated on :07:25 PM UTC
 Snake Charmer Box Created by Dano Wall Last updated on 2018-08-22 04:07:25 PM UTC Guide Contents Guide Contents Overview Materials Circuit Playground Express Standard servo - TowerPro SG-5010 Small Alligator
Crawling Baby Sea Turtle Robot
 Crawling Baby Sea Turtle Robot Created by Dano Wall Last updated on 2018-08-22 04:10:26 PM UTC Guide Contents Guide Contents Overview Save the Wee Turtles Household Materials Adafruit Electronics Create
Slider Crank Mechanism -- from Cardboard and Craft Sticks
 Slider Crank Mechanism -- from Cardboard and Craft Sticks Created by John Park Last updated on 2018-08-22 04:07:21 PM UTC Guide Contents Guide Contents Overview Materials Tools Build the Slider Crank Build
Bunny Ears with MakeCode
 Bunny Ears with MakeCode Created by Erin St Blaine Last updated on 2018-08-22 04:05:47 PM UTC Guide Contents Guide Contents Introduction Tools & Other Materials Programming with MakeCode Set Up the Light
Crawling Animatronic Hand
 Crawling Animatronic Hand Created by Dano Wall Last updated on 2018-12-03 06:39:35 PM UTC Guide Contents Guide Contents Overview Parts Used Tools & Materials Prepare the Hand Your hand is now ready to
Hammer Time Mini Golf Hazard with Crickit
 Hammer Time Mini Golf Hazard with Crickit Created by John Park Last updated on 2018-07-09 06:47:53 AM UTC Guide Contents Guide Contents Overview Please Hammer, Don't Hurt Em Parts Materials & Tools Program
Crickit Carnival Bumper Bot
 Crickit Carnival Bumper Bot Created by John Park Last updated on 2018-08-22 04:08:52 PM UTC Guide Contents Guide Contents Overview Parts Materials and Tools Build the Bumper Bot Cut the Cardboard Chassis
Con Badge with Circuit Playground Express
 Con Badge with Circuit Playground Express Created by Sophy Wong Last updated on 2018-04-11 05:00:16 PM UTC Guide Contents Guide Contents Overview Tools & Materials Laser Cutting Program the Circuit Playground
Crickit Powered Holiday Diorama
 Crickit Powered Holiday Diorama Created by Isaac Wellish Last updated on 2018-12-04 12:49:07 AM UTC Guide Contents Guide Contents Overview Prerequisite Guides Adafruit Parts Tools and Materials Wiring
NeoPixel Fairy Crown. Created by Erin St Blaine. Last updated on :22:47 AM UTC
 NeoPixel Fairy Crown Created by Erin St Blaine Last updated on 2018-12-31 02:22:47 AM UTC Guide Contents Guide Contents Overview Adafruit NeoPixel LED Dots Strand - 20 LEDs at 2" Pitch Adafruit GEMMA M0
Paper Airplane Launcher
 Paper Airplane Launcher Created by Dano Wall Last updated on 2018-08-27 08:36:14 PM UTC Guide Contents Guide Contents Overview A Launching Platform The Electronics Materials Build the Launcher Attach Motors
Neon LED Signs. Created by John Park. Last updated on :11:09 PM UTC
 Neon LED Signs Created by John Park Last updated on 2018-08-22 04:11:09 PM UTC Guide Contents Guide Contents Overview Parts Materials Tools Build the Sign Driver Preparation Solder the Circuit Solder the
NeoPixel Ring Bangle Bracelet
 NeoPixel Ring Bangle Bracelet Created by Becky Stern Last updated on 2017-09-28 11:14:48 PM UTC Guide Contents Guide Contents Overview Circuit Diagram Build it! Arduino Code CircuitPython Code Planning
Steven Universe Cosplay Shirt & Gem Created by Erin St Blaine. Last updated on :54:25 PM UTC
 Steven Universe Cosplay Shirt & Gem Created by Erin St Blaine Last updated on 2019-04-04 06:54:25 PM UTC Overview Make yourself a Steven Universe costume that will light up the world. This guide will show
Crickit Dancing Marionette Kit Created by Dano Wall. Last updated on :03:11 PM UTC
 Crickit Dancing Marionette Kit Created by Dano Wall Last updated on 2019-04-04 07:03:11 PM UTC Overview This project demonstrates how to build a robotic marionette that is controlled with four arcade-style
Wind Blowing Emoji Prop
 Wind Blowing Emoji Prop Created by John Park Last updated on 2018-08-22 04:05:17 PM UTC Guide Contents Guide Contents Overview Code it with MakeCode Start Up Variables On Loud Sound If - Else Iterate Debounce
Pushrod Garage. Created by John Park. Last updated on :07:30 PM UTC
 Pushrod Garage Created by John Park Last updated on 2018-08-22 04:07:30 PM UTC Guide Contents Guide Contents Overview Parts & Materials Tools Pushrod Mechanism Code it with MakeCode Functions On Start
Circuit Playground Express Head-Tilt Ears
 Circuit Playground Express Head-Tilt Ears Created by Dave Astels Last updated on 2018-10-09 04:07:03 PM UTC Guide Contents Guide Contents Overview Parts Circuit Playground Express Micro servo Lithium Ion
Stumble-Bot. Created by Dano Wall. Last updated on :04:06 AM UTC
 Stumble-Bot Created by Dano Wall Last updated on 2018-09-06 05:04:06 AM UTC Guide Contents Guide Contents Overview Simply Stumbling We Have the Technology Other Supplies Leg Assembly Front Legs Back Legs
Mini Golf Course with Circuit Playground and Crickit
 Mini Golf Course with Circuit Playground and Crickit Created by Dano Wall Last updated on 2018-08-22 04:09:31 PM UTC Guide Contents Guide Contents Overview Materials & Tools Adafruit Parts CRICKIT Assembly
Interactive Gift Box. Created by codingpro. Last updated on :47:40 AM UTC
 Interactive Gift Box Created by codingpro Last updated on 2018-01-10 01:47:40 AM UTC Guide Contents Guide Contents Overview Adafruit GEMMA M0 - Miniature wearable electronic platform Lithium Ion Polymer
Circuit Playground Express Laser Tag
 Circuit Playground Express Laser Tag Created by John Park Last updated on 2017-11-14 01:56:23 AM UTC Guide Contents Guide Contents Build a Laser Tag Game Code the Laser Tag Game MakeCode Transmitting IR
NeoPixie Dust Bag with Circuit Playground Express
 NeoPixie Dust Bag with Circuit Playground Express Created by John Park Last updated on 2017-12-20 10:00:29 PM UTC Guide Contents Guide Contents Overview Code It Setup Animation Color Touch Variable Color
3D Printed Camera LED Ring
 3D Printed Camera LED Ring Created by Ruiz Brothers Last updated on 2018-08-22 03:39:34 PM UTC Guide Contents Guide Contents Overview DIY LED Ring Light Prerequisite Guide: Parts List: Tools & Supplies
Reindeer Mask with Animated Eyes
 Reindeer Mask with Animated Eyes Created by Dano Wall Last updated on 2018-12-05 10:50:10 PM UTC Guide Contents Guide Contents Overview Parts Adafruit HalloWing M0 Express Convex Plastic Lens with Edge
LED Eyes. Created by Ruiz Brothers. Last updated on :50:55 AM UTC
 LED Eyes Created by Ruiz Brothers Last updated on 2018-01-13 05:50:55 AM UTC Guide Contents Guide Contents Overview Parts, Tools and Supplies Enameled Copper Magnet Wire 11 meters / 0.1mm diameter Adafruit
Simple LED Unicorn Horn
 Simple LED Unicorn Horn Created by Ruiz Brothers Last updated on 2018-08-22 03:56:14 PM UTC Guide Contents Guide Contents Overview 3D Printed Unicorn Horn Want More Magic/Colors? Great For Beginners Parts
NeoPixel Manicure. Created by Sophy Wong. Last updated on :50:38 PM UTC
 NeoPixel Manicure Created by Sophy Wong Last updated on 2018-04-11 05:50:38 PM UTC Guide Contents Guide Contents Overview Parts & Supplies Tools Circuit Diagram Build the Circuit Measure Your Circuit Prepare
Easy Sparkle Pocket T-Shirt
 Easy Sparkle Pocket T-Shirt Created by Erin St Blaine Last updated on 2018-10-18 06:45:05 PM UTC Guide Contents Guide Contents Overview Parts Materials Needed Code with MakeCode Vinyl Cutting Sizing and
FLORA TV-B-Gone. Created by Becky Stern. Last updated on :32:57 PM UTC
 FLORA TV-B-Gone Created by Becky Stern Last updated on 2018-08-22 03:32:57 PM UTC Guide Contents Guide Contents Overview Parts Tutorials Transistors Resistors LEDs Pushbutton Program it Power Fabric pinwheel
Adafruit LED Sequins. Created by Becky Stern. Last updated on :02:00 AM UTC
 Adafruit LED Sequins Created by Becky Stern Last updated on 2018-03-02 04:02:00 AM UTC Guide Contents Guide Contents Overview Sewing with conductive thread Circuit Diagram GEMMA sequin hat Arduino Code
Guardian Shield+ Zelda Breath of the Wild
 Guardian Shield+ Zelda Breath of the Wild Created by Ruiz Brothers Last updated on 2018-08-22 04:01:50 PM UTC Guide Contents Guide Contents Overview Articulating Handle Rechargeable Prerequisite Guides
Interior Purse Light. Created by Becky Stern. Last updated on :41:08 PM UTC
 Interior Purse Light Created by Becky Stern Last updated on 2018-08-22 03:41:08 PM UTC Guide Contents Guide Contents Overview Circuit Diagram Stitch Sequins Add Tape Arduino Code CircuitPython Code Use
FLORA and GEMMA ICSP. Created by Becky Stern. Last updated on :42:16 PM UTC
 FLORA and GEMMA ICSP Created by Becky Stern Last updated on 2018-08-22 03:42:16 PM UTC Guide Contents Guide Contents Overview Reprogram FLORA over ICSP Reprogram GEMMA over ICSP 2 3 4 9 Adafruit Industries
Adafruit LED Sequins. Created by Becky Stern. Last updated on :00:06 PM EST
 Adafruit LED Sequins Created by Becky Stern Last updated on 2015-02-19 05:00:06 PM EST Guide Contents Guide Contents Overview Sewing with conductive thread GEMMA sequin hat 2 3 8 15 Adafruit Industries
Sewable NeoPixels. Created by Becky Stern. Last updated on :50:14 PM EDT
 Sewable NeoPixels Created by Becky Stern Last updated on 2015-08-25 07:50:14 PM EDT Guide Contents Guide Contents Overview Prerequisite guides Lots of Pixels? Hook up alligator clips Run pixel test code
Adafruit TPL5110 Power Timer Breakout
 Adafruit TPL5110 Power Timer Breakout Created by lady ada Last updated on 2017-12-11 06:28:19 AM UTC Guide Contents Guide Contents Overview Pinouts Power Pins Control Pins Assembly Prepare the header strip:
UFO Flying Saucer with Circuit Playground Express
 UFO Flying Saucer with Circuit Playground Express Created by John Park Last updated on 2018-08-31 08:42:17 PM UTC Guide Contents Guide Contents Overview Code the UFO with CircuitPython Build the Flying
7 Portable Multitouch Raspberry Pi Tablet
 7 Portable Multitouch Raspberry Pi Tablet Created by Ruiz Brothers Last updated on 2017-02-27 04:13:53 PM UTC Guide Contents Guide Contents Overview Portable Raspberry Pi Tablet 7" Multitouch Display Parts
Trellis 3D Printed Enclosure
 Trellis 3D Printed Enclosure Created by Ruiz Brothers Last updated on 2018-08-22 03:39:07 PM UTC Guide Contents Guide Contents Overview Parts Tools & Supplies Modeling 123D Design Customize Measuring Parts
Sword & Wand Prop Effects with Circuit Playground
 Sword & Wand Prop Effects with Circuit Playground Created by John Park Last updated on 2018-01-13 05:32:54 AM UTC Guide Contents Guide Contents Overview Circuit Playground Express with MakeCode Lots of
FLORA and GEMMA ICSP. Created by Becky Stern. Last updated on :30:55 PM EST
 FLORA and GEMMA ICSP Created by Becky Stern Last updated on 2015-02-19 02:30:55 PM EST Guide Contents Guide Contents Overview Reprogram FLORA over ICSP Reprogram GEMMA over ICSP 2 3 5 10 Adafruit Industries
Clockwork Goggles. Created by John Park. Last updated on :03:10 PM UTC
 Clockwork Goggles Created by John Park Last updated on 2018-08-22 04:03:10 PM UTC Guide Contents Guide Contents Overview Assemble Circuit and Goggles CircuitPython Setup and Code Rock the Goggles 2 3 6
'Sup Brows. Created by Kate Hartman. Last updated on :52:04 PM UTC
 'Sup Brows Created by Kate Hartman Last updated on 2018-08-22 03:52:04 PM UTC Guide Contents Guide Contents Overview Circuit Bluetooth Test Upload the Code Place the Sensor View Sensor Values Via Bluetooth
Glowing Smokey Skull. Created by Ruiz Brothers. Last updated on :03:40 PM UTC
 Glowing Smokey Skull Created by Ruiz Brothers Last updated on 2018-08-22 04:03:40 PM UTC Guide Contents Guide Contents Overview Easy DIY Halloween Props Electronic Halloween! Circuit Playground NeoPixels
Learning with LEDs. Created by Rick Winscot. Last updated on :39:11 PM UTC
 Learning with LEDs Created by Rick Winscot Last updated on 2018-08-22 03:39:11 PM UTC Guide Contents Guide Contents Tools / Materials Introduction Did you know... Diode? Components Packaging Kitting Teaching
Light-Up Angler Fish Embroidery
 Light-Up Angler Fish Embroidery Created by Becky Stern Last updated on 2018-08-22 03:35:36 PM UTC Guide Contents Guide Contents Overview Tools & Supplies Layout & Circuit Diagram Sew Circuit Code Hand
Audio Prank Gift Box. Created by Becky Stern. Last updated on :46:15 PM UTC
 Audio Prank Gift Box Created by Becky Stern Last updated on 2018-08-22 03:46:15 PM UTC Guide Contents Guide Contents Overview Circuit Diagram Prepare Components Build Circuit Wrap and Give 2 3 5 6 12 14
Solar Boost Bag. Created by Becky Stern. Last updated on :44:55 PM UTC
 Solar Boost Bag Created by Becky Stern Last updated on 2018-08-22 03:44:55 PM UTC Guide Contents Guide Contents Overview 3D Design Files Customize Design Assemble Circuit Prepare Solar Panel Enclosure
Portable Apple Watch Charger
 Portable Apple Watch Charger Created by Ruiz Brothers Last updated on 2017-10-22 09:58:04 PM UTC Guide Contents Guide Contents Overview Smart Charging Prerequisite Guides Parts, Tool & Supplies Circuit
Android GBoard Morse Code Control with Circuit Playground Express
 Android GBoard Morse Code Control with Circuit Playground Express Created by Dave Astels Last updated on 2018-08-22 04:10:30 PM UTC Guide Contents Guide Contents Overview Parts Materials for the box Installing
FLORA Pixel Brooch. Created by Becky Stern. Last updated on :19:07 PM EST
 FLORA Pixel Brooch Created by Becky Stern Last updated on 2015-02-20 01:19:07 PM EST Guide Contents Guide Contents Overview Connect first signal wire Connect power and ground wires Add more pixels Program
Circuit Playground Kaleidoscope
 Circuit Playground Kaleidoscope Created by Mike Barela Last updated on 2016-08-30 11:10:51 PM UTC Guide Contents Guide Contents Overview Materials Inside Program Assemble and Play Fancy It Up 2 3 3 6 6
CircuitPython Snow Globe
 CircuitPython Snow Globe Created by John Park Last updated on 2018-08-22 04:04:24 PM UTC Guide Contents Guide Contents Overview Materials and Parts Code with CircuitPython Get Ready! Download the Snow
PyPortal NeoPixel Color Picker Created by Kattni Rembor. Last updated on :42:41 PM UTC
 PyPortal NeoPixel Color Picker Created by Kattni Rembor Last updated on 2019-03-27 10:42:41 PM UTC Overview This simple project adds a little color to your life with CircuitPython, PyPortal and NeoPixels.
Secret Hollow Book Intrusion Detector
 Secret Hollow Book Intrusion Detector Created by John Park Last updated on 2018-08-22 04:05:48 PM UTC Guide Contents Guide Contents Overview Materials & Tools Optional Android Hollowing the Book Preparation
LED NeoPixel Corset with Circuit Playground Express and
 LED NeoPixel Corset with Circuit Playground Express and MakeCode Created by Erin St Blaine Last updated on 2019-03-19 04:23:28 PM UTC Overview Create your own bespoke glowing NeoPixel corset and smile
Trinket NeoPixel LED Longboard
 Trinket NeoPixel LED Longboard Created by Ruiz Brothers Last updated on 2017-10-02 06:00:32 PM UTC Guide Contents Guide Contents Overview Parts Tools & Supplies Prerequisite Guides 3D Printing PLA Material
3D Printed Case for Adafruit Feather
 3D Printed Case for Adafruit Feather Created by Ruiz Brothers Last updated on 2018-08-22 03:59:38 PM UTC Guide Contents Guide Contents Overview Adafruit Feather Box New Update! Check out the TFT Feather
GPS Logging Dog Harness
 GPS Logging Dog Harness Created by Becky Stern Last updated on 2015-01-15 10:15:19 PM EST Guide Contents Guide Contents Overview Circuit Diagram Sew Circuit Use It! 2 3 5 6 15 Adafruit Industries https://learn.adafruit.com/gps-logging-dog-harness
PyPortal View Master Created by Ruiz Brothers. Last updated on :51:28 AM UTC
 PyPortal View Master Created by Ruiz Brothers Last updated on 2019-03-13 11:51:28 AM UTC Overview In this project we re building a view master inspired device using Adafruit s PyPortal. The eyepiece makes
Circuit Playground Yoyo
 Circuit Playground Yoyo Created by Ruiz Brothers Last updated on 2018-01-13 05:56:02 AM UTC Guide Contents Guide Contents Overview 3D Printed NeoPixel Yoyo History of the Yo-Yo Expectations Parts Tools
NeoMatrix 8x8 Word Clock
 NeoMatrix 8x8 Word Clock Created by Andy Doro Last updated on 2017-10-10 04:10:51 AM UTC Guide Contents Guide Contents Overview Parts List Parts Tools Circuit Assembly Overview Uploading Code Understanding
3D Printed LED Buckle
 3D Printed LED Buckle Created by Ruiz Brothers Last updated on 2018-08-22 03:38:02 PM UTC Guide Contents Guide Contents Overview Customize the Buckle Artwork, Design and Text Scale, Adjust and Combine
Crickit Powered Mini Chair Swing Ride!
 Crickit Powered Mini Chair Swing Ride! Created by Isaac Wellish Last updated on 2018-11-05 09:18:17 PM UTC Guide Contents Guide Contents Overview Adafruit Parts Materials and Tools Swing Structure First
Adafruit PowerBoost 500 Shield
 Adafruit PowerBoost 500 Shield Created by lady ada Last updated on 2018-08-22 03:43:27 PM UTC Guide Contents Guide Contents Overview Pinouts DC/DC Boost section Indicator LEDs Charging section Power Switch
7" Portable HDMI Monitor
 7" Portable HDMI Monitor Created by Ruiz Brothers Last updated on 2017-05-29 05:47:14 PM UTC Guide Contents Guide Contents Overview DIY Monitor Connect to a Raspberry pi Use as a second monitor Camera
3D Printed LED Knuckle Jewelry
 3D Printed LED Knuckle Jewelry Created by Ruiz Brothers Last updated on 2015-02-20 09:31:06 AM EST Guide Contents Guide Contents Overview Prerequisite Guides Parts Tools & Supplies 3D Printing Filament
3D Printed Google AIY Voice Kit
 3D Printed Google AIY Voice Kit Created by Ruiz Brothers Last updated on 2018-01-09 12:47:26 AM UTC Guide Contents Guide Contents Overview 3D Print a DIY AI enclosure for the Raspberry PI! Parts, Tools
Punk LED Collar. Created by Becky Stern. Last updated on :02:45 PM EST
 Punk LED Collar Created by Becky Stern Last updated on 2015-02-20 01:02:45 PM EST Guide Contents Guide Contents Overview Tools & Supplies Circuit Diagram Install LEDs Solder Components Test & Finish Wear
NeoPixel LED Cortana Costume
 NeoPixel LED Cortana Costume Created by Ruiz Brothers Last updated on 2018-08-22 03:43:43 PM UTC Guide Contents Guide Contents Overview How it Works Project Advisory Prerequisite Guides Parts & Components
Trash Panda. Created by Dano Wall. Last updated on :30:46 AM UTC
 Trash Panda Created by Dano Wall Last updated on 2018-06-06 02:30:46 AM UTC Guide Contents Guide Contents Overview Amazon's playful boxes We have the technology Other supplies you will need Create your
NeoPixel Basketball Hoop
 NeoPixel Basketball Hoop Created by Justin Cooper Last updated on 2018-08-27 12:19:58 AM UTC Guide Contents Guide Contents Overview Parts Needed Power choices! Parts for Option #1 Parts for Option #2 Tools
Adafruit Capacitive Touch Sensor Breakouts
 Adafruit Capacitive Touch Sensor Breakouts Created by Bill Earl Last updated on 2018-08-22 03:36:13 PM UTC Guide Contents Guide Contents Overview Momentary Toggle 5-Pad Momentary Assembly and Wiring Installing
Celebration Spectacles
 Celebration Spectacles Created by Becky Stern Last updated on 2018-08-22 03:45:59 PM UTC Guide Contents Guide Contents Overview Circuit Diagram Assemble Circuit Test and Glue Wear 'em! 2 3 6 7 10 14 Adafruit
The Scream: Interactive Screaming Painting
 The Scream: Interactive Screaming Painting Created by John Park Last updated on 2018-08-22 04:10:47 PM UTC Guide Contents Guide Contents Overview Parts & Materials Optional Build the Interactive Painting
Mystical LED Halloween Hood
 Mystical LED Halloween Hood Created by Becky Stern Last updated on 2017-09-28 11:13:20 PM UTC Guide Contents Guide Contents Overview NeoPixel GEMMA circuit Arduino Code NeoPixel Überguide: Arduino Library
Qi Wireless Recharging Battery Case
 Qi Wireless Recharging Battery Case Created by Rick Winscot Last updated on 2015-11-04 12:50:13 PM EST Guide Contents Guide Contents Introduction Disassembly Guts! Testing 2 3 5 10 16 Adafruit Industries
Bike Wheel POV Display
 Bike Wheel POV Display Created by Becky Stern Last updated on 2017-09-12 03:10:38 PM UTC Guide Contents Guide Contents Overview Parts and Tools Circuit Diagram Prep LEDs & Breadboard Code Solder Circuit
Adafruit Prototyping Pi Plate. Created by Ladyada
 Adafruit Prototyping Pi Plate Created by Ladyada Guide Contents Guide Contents Overview Solder it! User Manual Buy Adafruit Prototyping Pi Plate 2 3 4 14 17 Adafruit Industries http://learn.adafruit.com/adafruit-prototyping-pi-plate
Magical Mistletoe. Created by Leslie Birch. Last updated on :45:29 PM UTC
 Magical Mistletoe Created by Leslie Birch Last updated on 2018-08-22 03:45:29 PM UTC Guide Contents Guide Contents Overview Tools & Supplies Circuit Diagram Test the Sensor Prepare Parts Attach LED Sequins
Jewel Hair Stick. Created by Leslie Birch. Last updated on :47:17 PM UTC
 Jewel Hair Stick Created by Leslie Birch Last updated on 2018-08-22 03:47:17 PM UTC Guide Contents Guide Contents Overview Tools & Supplies Prepare Chopstick Circuit Diagram Solder Circuit Arduino Code
DIY Wireless DDR Dance Pad with Bluefruit EZ-Key
 DIY Wireless DDR Dance Pad with Bluefruit EZ-Key Created by Paul Beaudet Last updated on 2018-08-22 03:40:07 PM UTC Guide Contents Guide Contents Overview What's DDR? Materials Cheapo method - As Shown
Getting Started with FLORA
 Getting Started with FLORA Created by Becky Stern Last updated on 2018-01-03 04:31:24 AM UTC Guide Contents Guide Contents Overview Windows Driver Installation Manual Driver Installation Download software
Luminous LED Flowers. Created by Becky Stern. Last updated on :47:44 PM UTC
 Luminous LED Flowers Created by Becky Stern Last updated on 2018-08-22 03:47:44 PM UTC Guide Contents Guide Contents Overview Circuit Diagram Prepare LED Sequins Affix Inside Bouquet Connect Battery &
Milk Jug Glow Skull. Created by John Park. Last updated on :28:36 PM UTC
 Milk Jug Glow Skull Created by John Park Last updated on 2018-09-14 09:28:36 PM UTC Guide Contents Guide Contents Overview Parts Materials & Tools Optional Skull/Sculpting Stand Build the Skull Prep the
Adafruit MCP9808 Precision I2C Temperature Sensor Guide
 Adafruit MCP9808 Precision I2C Temperature Sensor Guide Created by lady ada Last updated on 2017-11-12 06:09:49 PM UTC Guide Contents Guide Contents Overview Pinouts Power Pins I2C Data Pins Optional Pins
Toy Car Speed Timer. Created by Kirby Griese. Last updated on :13:49 PM UTC
 Toy Car Speed Timer Created by Kirby Griese Last updated on 2017-03-20 09:13:49 PM UTC Guide Contents Guide Contents Overview Parts needed Prerequisites 3D Printing Assembly Wiring Software Use It 2 3
Feather Weather Lamp. Created by Ruiz Brothers. Last updated on :54:26 PM UTC
 Feather Weather Lamp Created by Ruiz Brothers Last updated on 2018-08-22 03:54:26 PM UTC Guide Contents Guide Contents Overview Weather Reactive Pixels Prerequisite Guides Parts Tools & Supplies Circuit
Phone-Activated Talking Dog Collar
 Phone-Activated Talking Dog Collar Created by Phillip Burgess Last updated on 2017-01-24 08:28:00 PM UTC Guide Contents Guide Contents Overview Circuit Diagram & Code Leather Collar & Greebles Assemble
NeoPixel Bike Light. Created by Ruiz Brothers. Last updated on :43:46 PM UTC
 NeoPixel Bike Light Created by Ruiz Brothers Last updated on 2018-11-15 07:43:46 PM UTC Guide Contents Guide Contents Overview 3D Printed Headlight Adafruit's Feather Platform Circuit Python Powered Parts
Adafruit VL53L0X Time of Flight Micro-LIDAR Distance Sensor Breakout
 Adafruit VL53L0X Time of Flight Micro-LIDAR Distance Sensor Breakout Created by lady ada Last updated on 2017-12-28 11:56:14 PM UTC Guide Contents Guide Contents Overview Sensing Capablities Pinouts Power
Adafruit TPL5111 Reset Enable Timer Breakout
 Adafruit TPL5111 Reset Enable Timer Breakout Created by lady ada Last updated on 2017-11-02 07:32:27 PM UTC Guide Contents Guide Contents Overview Pinouts Power Pins Control Pins Assembly Prepare the header
i2c/spi LCD Backpack Created by lady ada Last updated on :11:04 PM UTC
 i2c/spi LCD Backpack Created by lady ada Last updated on 2017-08-16 05:11:04 PM UTC Guide Contents Guide Contents Overview Which LCD to Use? Wait - the backpack has 16 holes, but my LCD only has 14 pins!
Unicorn Hat with Moving Ears
 Unicorn Hat with Moving Ears Created by Erin St Blaine Last updated on 2017-06-15 09:53:10 PM UTC Guide Contents Guide Contents Introduction Other Materials Tools Code Before You Start TiCo Servo Library
3D Printed Bone Conduction Transducer Box
 3D Printed Bone Conduction Transducer Box Created by Ruiz Brothers Last updated on 2018-08-22 03:40:25 PM UTC Guide Contents Guide Contents Overview Tools & Supplies Parts 3D Printing Circuit Diagram Stereo