So... You Want To Use The 3D Printers
|
|
|
- Gabriel Claud Pearson
- 5 years ago
- Views:
Transcription
1 So... You Want To Use The 3D Printers
2 3D Printing Overview When a student would like to use the 3D Printers: 1. They should contact a supervisor and prepare the build plate. 2. Supervisors will level the build plate and make sure the filament is loaded as the student opens their.stl in Makerware. 3. Supervisors should be present to double check Makerware settings before the.x3g (printable file) is saved to SD card or sent to print. * 4. Supervisors may then start the print job. 5. Students/Supervisors may label and remove completed jobs from the build plates and place them in the pick-up area. * A students may use Makerware on their own computer ahead of time to prepare a file, but should have a supervisor present to check the settings so that filament is not wasted and print-time is minimized.
 No internal geometry (We will be using software to clean it up later so it doesn")
3 Creating an STL from SketchUP. Make a model in SketchUp. When you are making your model keep in mind that you want: All of the external white faces showing Air-tight(no holes) No internal geometry (We will be using software to clean it up later so it doesn t need to be perfect) Installing the STL Plug-in. Install the Export to STL in SketchUp. Go to the Window Tab in SketchUp and Click on Extension Warehouse.

4 Search for SketchUp STL. Then Click on SketchUp STL. You will need a gmail account to login to download the extension. On the top right there will be a button to login to a gmail account. Once logged in the button should become an install button. Click the install button. Once it has installed click OK. Search for SketchUp STL. Then Click on SketchUp STL. You will need a gmail account to login to download the extension. On the top right their will be a button to login to a gmail account.


5 Click Accept for the Request for Permission. Once logged in the button should become an install button. Click the install button. Accept the Terms and Conditions of Use and Click Confirm. ***You may also wish to install CleanUp³ and its library TT_Lib². This plugin cleans up orphaned and unnecessary lines. It s really useful for creating a solid in SketchUp. Sometimes you don t even realize there are lines causing problems. This plug in will remove those for you. Running the cleanup script leaves you with a much cleaner model to work with


 Everything selected will be outlined or dotted in blue.")

6 Using the extension to export to an STL. With your model open in SketchUp, highlight the model or portion you wish to export. (If nothing is highlighted it will ask if you want to select the entire model.) Everything selected will be outlined or dotted in blue. Go to the File tab. Click on Export STL... Change the Export Unit to Millimeters. Leave the File format as ASCI. Click OK. Name your file with the extension {.stl} it will not automatically add that for you.

7 Cleaning up an STL. Go to Cloud.Netfabb.com Scroll down to the processing box. Click Choose File and select you stl. Enter your address. Select millimeters for units. Check the box, and accept the terms and conditions. Click Upload to Cloud.


8 Log into the you used with Netfabb Cloud. You should receive an confirming the upload. Shortly after, you will recieve an saying it was processed sucessfully or that it failed. If successful, click on the link in the second . Scroll down the page and download the REPAIRED FILE. (not the original) Congratulations you should now have a file ready to take into Makerware.


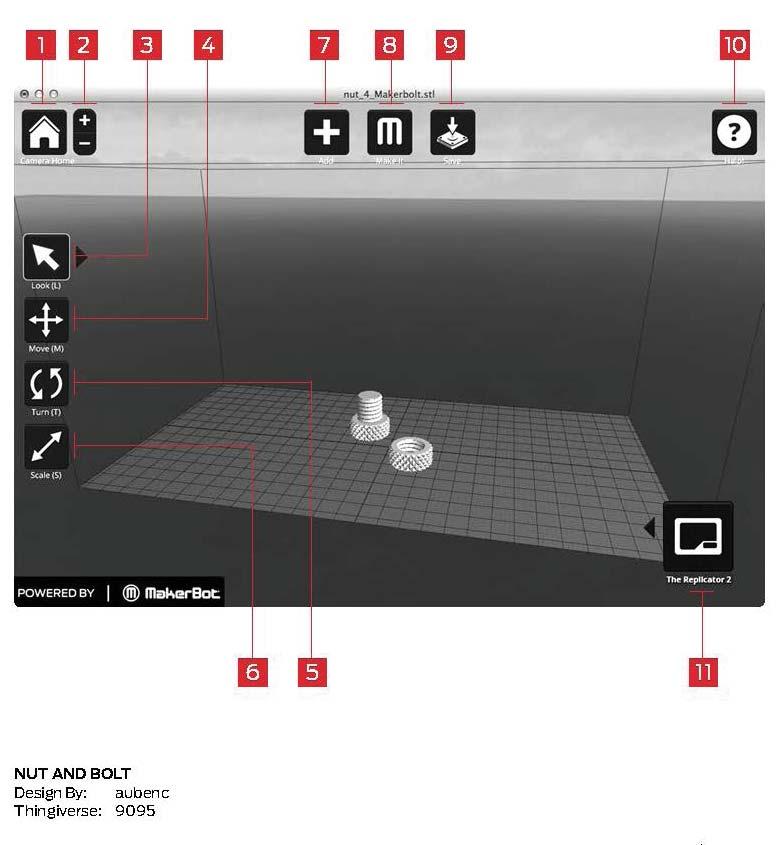
9 Using Makerbot Makerware. * Have supervisor present to double check settings Open Makerware. Click File > Open. Select your.stl file. Click Open. Select Move to Platform. Use the tools as described on the following page to move, rotate, and scale one or more models. Keep in mind that the less spaces between models, the less distance the extruder has to travel (so your job prints faster!). *Print one object at a time because if one part fails, the entire job will fail. Once you know the object will print successfully, then you can print multiple objects at once.
10

11 When your model(s) are postioned centrally with all of your desired adjustements, Click Make. Click Make It Now if you are printing directly from the computer to the attached 3D printer or select Export File if you wish to send the file to an SD Card. Use standard resolution, it has the best quality-time ratio. Make sure that Raft is checked (always) and that Supports also checked are if you have any spans (it should put it only where you need it, so couldn t hurt right?). The defaults of infill, shells, and layer height should be set at 10%, 2 and 0.20 mm respectively. Also, check the box for Preview before printing so that you can get an estimate of how long your print will take.


12 If you ve selected Make It Now, when you click Make It, Makerware will slice and verify the files. The Toolpath Visualization will show you a slice version of your model and give you an estimate for your print time. Click Export will send it to the connected 3D Printer. (*If the computer shutdown/ restarts you print will stop so we recommend printing from SD Cards.)

13 If you ve selected Export to a File, when you click Make It, you will be able to save the file to a SD Card. It will slice, verify, and show the preview like Make It Now. Do not use parathesis in the file name when saving your.x3g. Makerware will slice, verify and save the file. Name your files as: FirstInitialLastnameProject#_Part# ex.: BBernard1_3 This would be Ben Bernard s print part #3 of project No. 1. Eject your SD Card and have a supervisor start the print job in an open 3D printer.


 and then snap the front into place with the front tabs(b).")
14 Prepping and Placing the Build Plate We use acrylic build plates in the 3D Printers. A light layer of hairspray may be sprayed on the build plate before it is placed into the 3D printers to aid in the print job sticking to the build plate. **It is very important that you place it back then front so that you do not damage the tabs.** A When placing the acrylic build plates into the 3D printers, slide the back into the back tab(a) and then snap the front into place with the front tabs(b). B Build plate prep complete! Watch fist-bump!


15 Leveling the Build Plate! Why Leveling Is Important If the build platform is too far from the extruder nozzle, or if one part of the plate is farther away from the nozzle than another part, your builds might not stick to the build plate. If the build platform is too close to the extruder nozzle, the build plate can block the PLA Filament from extruding from the nozzle. This can also scratch the build plate. Leveling your build plate often will help ensure that objects adhere well to the plate. <- This is your Support card. We use NDSU business cards to level the build plates because they are thicker than plain paper.
16 To level the build plate, you must adjust the three knobs under the build platform. These three knobs lower and raise the build plate. Tightening the knobs [turning them to the right] moves the build plate away from the extruder nozzle. Loosening the knobs [turning them to the left] moves the build plate closer to the extruder nozzle. The distance between the extruder nozzle and the build plate should be about the thickness of the support card. How to Level the Build Plate Use the LCD Keypad on the 3D Printer to select Utlities -> Level Build Plate


17 The script will prompt you to adjust the knobs individually. As you adjust each knob, make sure the Support card just slides between the nozzle and build plate.


18 You should feel some friction on the support card, but still be able to easily pass the card between the plate and the extruder nozzle without tearing or damaging the card. The script will prompt you to adjust each knob again. This allows for fine tuning. This time, the Support card should slide between the build plate and nozzle with more friction.

19 After the second set of adjustments, the nozzle will move to the center of the build plate. Confirm that the MakerBot Support card slides between the nozzle and plate with a moderate amount of friction. NOTE: You can use these menus to return to the leveling script at any time. For a demonstration of this process, see the MakerBot Replicator 2 video page at makerbot.com/support/replicator2/videos.

20 Loading PLA Filament Rear-Mount Spool Holder For The Makerbot 3D Printer.! NOTE: To avoid filament jams, ensure that the PLA Filament feeds from the bottom of the spool toward the top of the spool to the guide. For the rear-mount, you may use either the left or the right side, but be sure that the filament feeds to the center where the guide tube is located. (leftside) (backside)


21 Top-Mount Spool Holder For The Makerbot 3D Printer. Filament Spool Extruder Filament goes around this way If the Makerbot you are using is set up with the top-mounted spool holder, no guide tube will be necessary.! NOTE: To avoid filament jams, ensure that the PLA Filament feeds over the top of the spool. (leftside) <-front, back ->

22 On the 3D Printer Menu, Press the arrow down to Utilites. Select Utilites -> Change Filament -> Load.! WARNING: Do not touch the extruder while it is heating it heats to 446 F. (230 C) Carefully remove the end of the filament guide tube from the hole in the top of the extruder. (Rear-mount only)


23 Free the end of the MakerBot PLA Filament from the filament spool. Be sure the filament has a clean edge. If not, use a pair of scissors or wire cutters to cut a clean edge. <- Like this, Not that -> Feed the free end of the MakerBot PLA Filament from the spool into the end of the filament guide tube where it attaches to the back of the MakerBot Replicator 2.


24 After the extruder reaches 230 C, the LCD panel will prompt you to load the PLA Filament into the extruder. Click through the message UNTIL your MakerBot Replicator 2 asks you to press the M when you see plastic extruding.

25 Take the end of the PLA Filament and firmly push it into the hole in the top of the extruder. Ensure that the filament goes into the center of the opening and doesn t get caught at the edge of the opening. Insert the free end of the MakerBot PLA Filament into the hole in the top of the extruder. Gently assist the filament into the extruder until you feel the motor pull the filament in.


26 Watch the extruder nozzle. After a few moments, you should see a thin string of the MakerBot PLA Filament that you loaded come out of the nozzle. Press the M button to stop extrusion. Wait a few seconds for the extruded PLA to cool, then pull it off the nozzle. You can discard this extra filament. Don t touch the nozzle; it may still be hot. Don t leave plastic clinging to the extruder nozzle. This can cause newly extruded plastic to stick to the nozzle instead of the build platform. Push the guide tube back into the opening on the top of the extruder.


 Carefully remove the end of the filament guide")
27 Unloading PLA Filament On the 3D Printer Menu, Press the arrow down to Utilites. Select Utilites -> Change Filament -> Unload.! WARNING: Do not touch the extruder while it is heating it heats to 446 F. (230 C) Carefully remove the end of the filament guide tube from the hole in the top of the extruder. (Rear-mount PLA only)


28 Once the guide tube is out, pull the filament gently out of the extruder. Press M to exit the menu when finished.


29 Printing an Object From the SD Card. After you have successfully leveled the build platform and loaded the PLA Filament into the extruder, place the loaded SD Card with the model into the SD port. The SD port is directly behind the LCD Panel. On the 3D Printer Menu, Press M to Select Build from SD. Then Use the up and down arrow buttons to navigate through the list of models on the SD card. To select a model, press M.


30 The MakerBot Replicator 2 will begin to build your object. You can use the LCD panel to monitor the temperature of the extruder and the status and progress of the object.


31 Removing Objects from the Build Plate. Release tabs at the back the build plate first. Then carefully lift the plate out of the 3D Printer. Take a thin metal craft spatula and carefully work the blade under the edge of the object on all the sides working it loose from the build plate. Be careful not to gouge the build plate itself.


32 Rafts on the model may be carefully removed in a similar manner.
33 SO... YOU NEED TO MAINTAIN THE 3D PRINTERS WITH AN INTRODUCTION INTO TROUBLESHOOTING...
34 Troubleshooting PROBLEM Can t load MakerBot PLA Filament into the extruder SOLUTION Make a clean cut at the end of the MakerBot PLA Filament. Cut the MakerBot PLA Filament at an angle a narrow tip will help with loading. It is also important that the filament have no bends in it. Use more force when pushing the MakerBot PLA Filament into the extruder. Grasp the filament firmly and push it into the middle of the hole on top of the extruder. To increase your grip, you can hold the filament with a pair of pliers. Ensure that you insert the MakerBot PLA Filament straight down into the extruder, not diagonally. After you feel the motor grab the filament, watch the filament come out of the extruder. You will want to see it coming out at a consisent speed and width. If you are still having trouble, remove the fan assembly as described in the Cleaning the Drive Gear section on Page 4. Load the filament again, watching to see that it goes straight down through the extruder. Extruder makes a clicking noise when loading MakerBot PLA Filament This probably means that the drive gear has filament built up in it. Remove the fan assembly as described in the Cleaning the Drive Gear section on Page 4. Load the filament again, watching to see that it goes straight down through the extruder. Object is stuck to build plate Wait for the object to cool down. Objects will detach more easily after they have cooled. If the object is still stuck, take a thin metal craft spatula and carefully work the blade under the edge of the object. When the blade is most of the way under the object, twist the handle slightly. The object should come free. *Be careful not to gouge the build plate. In the future, you can cover your build plate with blue tape. This allows your objects to stick to the build plate but be removed more easily.
35 PROBLEM Object won t stick to build plate SOLUTION Relevel your build plate. Inconsistent plate height will lead to inconsistent adhesion. If any one part of your object does not adhere well to the build plate, the whole object might peel off of the plate. Ensure that the plate is clean. Tears in tape, dust and oil from your hands can prevent objects from sticking to the plate. Wipe down the build plate with a clean, lintfree cloth. Retape the build plate if there are tears in it. If you are building on blue tape, consider building on the bare acrylic plate instead. Objects will adhere better to the acrylic. Can t remove MakerBot PLA Filament from extruder Run the filament load script in the onboard Utilities menu and let the filament advance for about five seconds. Then run the unload script again. Extrusion stops during a build Your build plate might be so close to the extruder that it is preventing plastic from coming out of the nozzle. Tighten each knob on the bottom of the build plate by a quarter turn to move the platform farther from the extruder nozzle. Extrusion could also stop if your MakerBot PLA filament has been kept heated for too long. Unload the filament, cut a clean edge, and load the filament again. Updating Your Firmware Keeping your firmware up to date will ensure that your MakerBot Replicator 2 always operates at its best. When MakerWare tells you that there s a new firmware release, click the MakerBots menu and select Upload Firmware.
36 Troubleshooting PROBLEM Makerbot won t turn on SOLUTION Check all cable connections from power source to bot. Issues persists after basic troubleshooting Check connections, swap parts with known good one. Call Makerbot support if troubleshooting fails to remedy the problem. If problem parts are found, they will be replaced under warranty or new parts will need to be purchased.

![Use a clean, lint-free rag [or your finger] to spread the PTFE-based grease onto the top section of the threaded rod. 4. Make sure you get the grease inside of the threads themselves. 5.](/docs-images/96/127238280/images/37-2.jpg "Grasp both sides of the build platform and move it to the top of the MakerBot Replicator 2. 6.")
37 Lubricating the Threaded Rod and the X-Axis Idler Pulley 1. Find the tube of PTFE-based grease included with your MakerBot Replicator Grasp both sides of the build platform and push it gently to the bottom of the MakerBot Replicator Use a clean, lint-free rag [or your finger] to spread the PTFE-based grease onto the top section of the threaded rod. 4. Make sure you get the grease inside of the threads themselves. 5. Grasp both sides of the build platform and move it to the top of the MakerBot Replicator Use a clean, lint-free rag [or your finger] to spread the PTFE-based grease onto the bottom section of the threaded rod. Make sure you get the grease inside of the threads themselves. 7. Locate the X-axis idler pulley. If you are facing the front of the MakerBot Replicator 2, the idler pulley is at the top left side. The idler pulley is one of the pulleys that allow the rubber belt to move the extruder from left to right, or along the X-axis. The pulley at the other side of the gantry is called the timing pulley and does not require lubrication. 8. Squeeze a small amount of the PTFEbased grease directly onto the exposed area of the dowel inside the idler pulley and manually move the pulley back and forth to spread the grease.
38 Cleaning the Drive Gear The drive gear is the part of the extruder that pushes filament through the extruder. When you make things with your MakerBot Replicator 2, small pieces of hardened PLA can stick to the drive gear. If you are having problems with your extruder, cleaning the drive gear might help. 1. Unload the MakerBot PLA Filament from the extruder. To start the script for unloading the MakerBot PLA Filament, go to the LCD panel and select Utilities > Filament Options > Unload. 2. Unscrew the two bolts at the lower corners of the fan guard using the 2.5 mm hex key included with your MakerBot Replicator 2. As one piece, remove the fan guard, the fan, the heat sink, and spacers. Keep these pieces together and set them aside. 3. Unclip the motor wires. 4. Pull the motor assembly out. 5. Find the drive gear on the motor shaft. Using dry q-tips remove all the pieces of filament stuck to the drive gear. 6. Reseat the motor assembly. 7. Plug in the motor wires. 8. Add the fan guard, the fan, the heat sink, and spacers to the front of the extruder and bolt them on. 9. Reload the MakerBot PLA Filament. To do this, go to the LCD panel and select Utilities > Filament Options > Load.
39 NORTH DAKOTA STATE UNIVERSITY ARCHITECTURE & LANDSCAPE ARCHITECTURE
3D Printing Guide: MakerBot Replicator 2X
 SOUTHERN POLYTECHNIC STATE UNIVERSITY 3D Printing Guide: MakerBot Replicator 2X Operating and Troubleshooting Guide Architecture Department 8/13/2014 Revision Table Version Dated Description By 1.00 06/25/2014
TROUBLESHOOTING AND MAINTENANCE
 TROUBLESHOOTING AND MAINTENANCE TABLE OF CONTENTS 1 TROUBLESHOOTING 04 Objects Do Not Stick to the Build Plate 05 Objects are Difficult to Remove from the Build Plate 05 Extrusion Stops 06 Replicator
1 WELCOME. LET S GET STARTED 04 Safety and Compliance 06 Specifications 08 How Does it Work? 09
 USER MANUAL TABLE OF CONTENTS 1 WELCOME. LET S GET STARTED 04 Safety and Compliance 06 Specifications 08 How Does it Work? 09 2 SETTING UP YOUR MAKERBOT REPLICATOR 2 DESKTOP 3D PRINTER 10 Accessory Checklist
1 WELCOME 06 Safety and Compliance 07 Specifications 09 How it Works 10
 USER MANUAL TABLE OF CONTENTS 1 WELCOME 06 Safety and Compliance 07 Specifications 09 How it Works 10 2 SETUP 12 Unpacking Your MakerBot Replicator 2X 13 MakerBot Replicator 2X Diagrams 14 Accessory Checklist
Trellis 3D Printed Enclosure
 Trellis 3D Printed Enclosure Created by Ruiz Brothers Last updated on 2018-08-22 03:39:07 PM UTC Guide Contents Guide Contents Overview Parts Tools & Supplies Modeling 123D Design Customize Measuring Parts
3D Printed 20w Amplifier Box
 3D Printed 20w Amplifier Box Created by Ruiz Brothers Last updated on 2018-02-26 06:48:02 PM UTC Guide Contents Guide Contents Overview Prerequisite Guide Tools & Supplies Parts 3D Printing Print in your
The product may differ slightly from the images and instructions in this guide as we continue to improve the MakerBot Replicator Mini.
 REFERENCE GUIDE The product may differ slightly from the images and instructions in this guide as we continue to improve the MakerBot Replicator Mini. Please see www.makerbot.com/um_rep_mini for the latest
Zelda Thunder Helm. Created by Ruiz Brothers. Last updated on :46:52 PM UTC
 Zelda Thunder Helm Created by Ruiz Brothers Last updated on 2017-08-23 02:46:52 PM UTC Guide Contents Guide Contents Overview Zelda: Breath Of The Wild Parts, Tools and Supplies Proto-Pasta - Aromatic
3D Printed 20w Amplifier Box
 3D Printed 20w Amplifier Box Created by Noe & Pedro Ruiz Last updated on 2014-04-22 03:01:38 PM EDT Guide Contents Guide Contents Overview Prerequisite Guide Tools & Supplies Parts 3D Printing Print in
3D Printed Google AIY Voice Kit
 3D Printed Google AIY Voice Kit Created by Ruiz Brothers Last updated on 2018-01-09 12:47:26 AM UTC Guide Contents Guide Contents Overview 3D Print a DIY AI enclosure for the Raspberry PI! Parts, Tools
Solder Dispenser Adabot Head
 Solder Dispenser Adabot Head Created by Ruiz Brothers Last updated on 2017-01-04 02:15:15 PM UTC Guide Contents Guide Contents Overview Solder Dispenser Parts Solder Spool - 1/4 lb SAC305 RoHS lead-free
Circuit Playground Combadge
 Circuit Playground Combadge Created by Ruiz Brothers Last updated on 2017-10-22 10:42:02 PM UTC Guide Contents Guide Contents Overview What's a Combadge? DIY Combadge How Does It Work? Make It How You
LED Eyes. Created by Ruiz Brothers. Last updated on :50:55 AM UTC
 LED Eyes Created by Ruiz Brothers Last updated on 2018-01-13 05:50:55 AM UTC Guide Contents Guide Contents Overview Parts, Tools and Supplies Enameled Copper Magnet Wire 11 meters / 0.1mm diameter Adafruit
PDOB-II-GRM-NSF Ice Shaver. Specially designed for making shaved snow! User s Manual. Brought to you by SAC Food Supplies
 GLOBAL BEAR CORP. PDOB-II-GRM-NSF Ice Shaver Specially designed for making shaved snow! User s Manual Brought to you by SAC Food Supplies Telephone: +1.714.261.6389 Email: sacfoodsupplies@gmail.com Website:
Feather Weather Lamp. Created by Ruiz Brothers. Last updated on :54:26 PM UTC
 Feather Weather Lamp Created by Ruiz Brothers Last updated on 2018-08-22 03:54:26 PM UTC Guide Contents Guide Contents Overview Weather Reactive Pixels Prerequisite Guides Parts Tools & Supplies Circuit
DIY Custom American Girl Doll Prosthetics
 DIY Custom American Girl Doll Prosthetics Created by Ruiz Brothers Last updated on 2017-11-15 08:53:16 PM UTC Guide Contents Guide Contents Overview Parts Tools and Supplies 3D Printing 3D Printed Parts
Circuit Playground Yoyo
 Circuit Playground Yoyo Created by Ruiz Brothers Last updated on 2018-01-13 05:56:02 AM UTC Guide Contents Guide Contents Overview 3D Printed NeoPixel Yoyo History of the Yo-Yo Expectations Parts Tools
Webcam Cover-Up Lego brick with Adabot Mini Fig
 Webcam Cover-Up Lego brick with Adabot Mini Fig Created by Ruiz Brothers Last updated on 2018-08-22 04:06:44 PM UTC Guide Contents Guide Contents Overview 3D Printing What If I Don't Have A 3D Printer?
Ping Pong Ball Launcher
 Ping Pong Ball Launcher Created by Dano Wall Last updated on 2019-01-25 03:19:13 AM UTC Guide Contents Guide Contents Overview Electronic Parts Circuit Playground Express USB cable - USB A to Micro-B Alkaline
Portable Apple Watch Charger
 Portable Apple Watch Charger Created by Ruiz Brothers Last updated on 2017-10-22 09:58:04 PM UTC Guide Contents Guide Contents Overview Smart Charging Prerequisite Guides Parts, Tool & Supplies Circuit
Crawling Baby Sea Turtle Robot
 Crawling Baby Sea Turtle Robot Created by Dano Wall Last updated on 2018-08-22 04:10:26 PM UTC Guide Contents Guide Contents Overview Save the Wee Turtles Household Materials Adafruit Electronics Create
Boomy The Boombox. Created by Ruiz Brothers. Last updated on :52:13 PM UTC
 Boomy The Boombox Created by Ruiz Brothers Last updated on 2017-09-05 08:52:13 PM UTC Guide Contents Guide Contents Overview Boomy The Boombox AdaBox 004 Parts 3D Printing 3D Printed Parts Enclosure Design
Circuit Cookie Roller
 Circuit Cookie Roller Created by Ruiz Brothers Last updated on 2018-01-23 08:50:41 PM UTC Guide Contents Guide Contents Overview Filament for 3D Printers in Various Colors and Types Ultimaker 2+ 3D Printer
3D Printing with NinjaFlex
 3D Printing with NinjaFlex Created by Ruiz Brothers Last updated on 2017-03-01 05:30:13 PM UTC Guide Contents Guide Contents Overview What is Ninjaflex Filament? Why Would I Want Flexible Filament? How
7 Portable Multitouch Raspberry Pi Tablet
 7 Portable Multitouch Raspberry Pi Tablet Created by Ruiz Brothers Last updated on 2017-02-27 04:13:53 PM UTC Guide Contents Guide Contents Overview Portable Raspberry Pi Tablet 7" Multitouch Display Parts
Crawling Animatronic Hand
 Crawling Animatronic Hand Created by Dano Wall Last updated on 2018-12-03 06:39:35 PM UTC Guide Contents Guide Contents Overview Parts Used Tools & Materials Prepare the Hand Your hand is now ready to
7" Portable HDMI Monitor
 7" Portable HDMI Monitor Created by Ruiz Brothers Last updated on 2017-05-29 05:47:14 PM UTC Guide Contents Guide Contents Overview DIY Monitor Connect to a Raspberry pi Use as a second monitor Camera
VALUE, QUALITY & PERFORMANCE distinguish these airbrushes!
 BS If it s quality your looking for then Iwata will deliver straight from the box with no tweaking required with absolute excellence that comes from the Iwata product. What about parts, Airbrush Megastore
BLE Light Switch with Feather nrf52840 and Crickit
 BLE Light Switch with Feather nrf52840 and Crickit Created by John Park Last updated on 2019-02-15 07:06:19 PM UTC Guide Contents Guide Contents Overview Parts Adafruit Feather nrf52840 Express Adafruit
3D Printed Case for Adafruit Feather
 3D Printed Case for Adafruit Feather Created by Ruiz Brothers Last updated on 2018-08-22 03:59:38 PM UTC Guide Contents Guide Contents Overview Adafruit Feather Box New Update! Check out the TFT Feather
3DPrinted Custom Keycaps
 3DPrinted Custom Keycaps Created by Ruiz Brothers Last updated on 2016-09-05 07:20:30 PM UTC Guide Contents Guide Contents Overview Custom Keycaps Easy to install Accessibility Project Expectations Parts
Guardian Shield+ Zelda Breath of the Wild
 Guardian Shield+ Zelda Breath of the Wild Created by Ruiz Brothers Last updated on 2018-08-22 04:01:50 PM UTC Guide Contents Guide Contents Overview Articulating Handle Rechargeable Prerequisite Guides
FPV Mini Display. Created by Ruiz Brothers. Last updated on :00:18 PM UTC
 FPV Mini Display Created by Ruiz Brothers Last updated on 2017-07-19 01:00:18 PM UTC Guide Contents Guide Contents Overview Mini FPV monitor Adafruit Parts Tools and Supplies Circuit Diagram Electronics
3D Printed Google Glass Adapter
 3D Printed Google Glass Adapter Created by Ruiz Brothers Last updated on 2015-02-20 09:31:34 AM EST Guide Contents Guide Contents Overview Tools Disassembly Measure & Customize 3D Printing 2 3 3 5 9 16
Snake Charmer Box. Created by Dano Wall. Last updated on :07:25 PM UTC
 Snake Charmer Box Created by Dano Wall Last updated on 2018-08-22 04:07:25 PM UTC Guide Contents Guide Contents Overview Materials Circuit Playground Express Standard servo - TowerPro SG-5010 Small Alligator
NeoPixel Bike Light. Created by Ruiz Brothers. Last updated on :43:46 PM UTC
 NeoPixel Bike Light Created by Ruiz Brothers Last updated on 2018-11-15 07:43:46 PM UTC Guide Contents Guide Contents Overview 3D Printed Headlight Adafruit's Feather Platform Circuit Python Powered Parts
3D Printed LED Buckle
 3D Printed LED Buckle Created by Ruiz Brothers Last updated on 2018-08-22 03:38:02 PM UTC Guide Contents Guide Contents Overview Customize the Buckle Artwork, Design and Text Scale, Adjust and Combine
Ember 3D Printer. Created by Ruiz Brothers. Last updated on :00:07 PM EDT
 Ember 3D Printer Created by Ruiz Brothers Last updated on 2015-03-11 03:00:07 PM EDT Guide Contents Guide Contents Overview How DLP SLA Works Print setup Orientation Tip diameter Resolution Fixing the
WHO USES 3D PRINTING?
 MAKERBOT EDUCATORS GUIDEBOOK CHAPTER ONE: WHO USES 3D PRINTING? WHO USES 3D PRINTING? 3D printing is used to solve problems in a variety of industries including engineering, product design, technology,
3D Printed LED Knuckle Jewelry
 3D Printed LED Knuckle Jewelry Created by Ruiz Brothers Last updated on 2015-02-20 09:31:06 AM EST Guide Contents Guide Contents Overview Prerequisite Guides Parts Tools & Supplies 3D Printing Filament
Pushrod Garage. Created by John Park. Last updated on :07:30 PM UTC
 Pushrod Garage Created by John Park Last updated on 2018-08-22 04:07:30 PM UTC Guide Contents Guide Contents Overview Parts & Materials Tools Pushrod Mechanism Code it with MakeCode Functions On Start
CircuitPython Media Dial
 CircuitPython Media Dial Created by Ruiz Brothers Last updated on 2018-02-07 05:00:25 AM UTC Guide Contents Guide Contents Overview Prerequisite Guides Adafruit Trinket M0 - for use with CircuitPython
Home Security Begins at the Front Door
 Video Doorbell Pro Home Security Begins at the Front Door Your new Ring Video Doorbell Pro is the start of a Ring of Security around your entire property. Now, you re always connected, so you can watch
Congratulations on your purchase of a. airbrush. CN GRAVITY-FEED DUAL-ACTION AIRBRUSH. color cup. main lever. needle cap. nozzle cap.
 NEO SERIES MANUAL Congratulations on your purchase of a airbrush. color cup needle cap CN GRAVITY-FEED DUAL-ACTION AIRBRUSH main lever nozzle cap handle TO AIRBRUSH CN GRAVITY-FEED DUAL-ACTION AIRBRUSH
MAKERBOT FILAMENT PLA ABS FLEXIBLE DISSOLVABLE
 MAKERBOT FILAMENT PLA ABS FLEXIBLE DISSOLVABLE THE IDEAL BUILD MATERIAL FOR YOUR MAKERBOT 3D PRINTER. MakerBot PLA Filament - SIZE S (Replicator Mini) MakerBot PLA Filament - SIZE L (Replicator 5th Gen
Solar Boost Bag. Created by Becky Stern. Last updated on :44:55 PM UTC
 Solar Boost Bag Created by Becky Stern Last updated on 2018-08-22 03:44:55 PM UTC Guide Contents Guide Contents Overview 3D Design Files Customize Design Assemble Circuit Prepare Solar Panel Enclosure
Paper Airplane Launcher
 Paper Airplane Launcher Created by Dano Wall Last updated on 2018-08-27 08:36:14 PM UTC Guide Contents Guide Contents Overview A Launching Platform The Electronics Materials Build the Launcher Attach Motors
Con Badge with Circuit Playground Express
 Con Badge with Circuit Playground Express Created by Sophy Wong Last updated on 2018-04-11 05:00:16 PM UTC Guide Contents Guide Contents Overview Tools & Materials Laser Cutting Program the Circuit Playground
Stumble-Bot. Created by Dano Wall. Last updated on :04:06 AM UTC
 Stumble-Bot Created by Dano Wall Last updated on 2018-09-06 05:04:06 AM UTC Guide Contents Guide Contents Overview Simply Stumbling We Have the Technology Other Supplies Leg Assembly Front Legs Back Legs
B-SERIES CONVERSION INSTRUCTIONS
 B-SERIES CONVERSION INSTRUCTIONS The B-SERIES inks are designed to replace the OEM ink set for the Brother GT3 Direct To Garment printer. These inks are designed with high performance capabilities, 35
Mystical LED Halloween Hood
 Mystical LED Halloween Hood Created by Becky Stern Last updated on 2017-09-28 11:13:20 PM UTC Guide Contents Guide Contents Overview NeoPixel GEMMA circuit Arduino Code NeoPixel Überguide: Arduino Library
Home Security Begins at the Front Door
 Video Doorbell Pro Home Security Begins at the Front Door Your new Ring Video Doorbell Pro is the start of a Ring of Security around your entire property. Now, you re always connected, so you can watch
3D Printed Camera LED Ring
 3D Printed Camera LED Ring Created by Ruiz Brothers Last updated on 2018-08-22 03:39:34 PM UTC Guide Contents Guide Contents Overview DIY LED Ring Light Prerequisite Guide: Parts List: Tools & Supplies
Prophet 600 GliGli mod
 Prophet 600 GliGli mod Created by Collin Cunningham Last updated on 2018-08-22 04:04:56 PM UTC Guide Contents Guide Contents Overview What you'll need Program the Teensy++ Modify the Teensy++ Prep header
Fiddy - the FTDI Clip
 Fiddy - the FTDI Clip Created by Timothy Reese Last updated on 2016-11-22 09:18:04 PM UTC Guide Contents Guide Contents Overview FTDI is Great! Things you'll need: What You'll Learn: 3D Printing Assembly
Slider Crank Mechanism -- from Cardboard and Craft Sticks
 Slider Crank Mechanism -- from Cardboard and Craft Sticks Created by John Park Last updated on 2018-08-22 04:07:21 PM UTC Guide Contents Guide Contents Overview Materials Tools Build the Slider Crank Build
Crickit Dancing Marionette Kit Created by Dano Wall. Last updated on :03:11 PM UTC
 Crickit Dancing Marionette Kit Created by Dano Wall Last updated on 2019-04-04 07:03:11 PM UTC Overview This project demonstrates how to build a robotic marionette that is controlled with four arcade-style
FLORA TV-B-Gone. Created by Becky Stern. Last updated on :32:57 PM UTC
 FLORA TV-B-Gone Created by Becky Stern Last updated on 2018-08-22 03:32:57 PM UTC Guide Contents Guide Contents Overview Parts Tutorials Transistors Resistors LEDs Pushbutton Program it Power Fabric pinwheel
CPX Mystery Dreidel. Created by Kathy Ceceri. Last updated on :51:40 PM UTC
 CPX Mystery Dreidel Created by Kathy Ceceri Last updated on 2018-12-04 02:51:40 PM UTC Guide Contents Guide Contents Overview Parts List -- Electronics Circuit Playground Express USB cable - USB A to Micro-B
MAKERBOT METHOD PAGE 1
 WWW.MAKERBOT.COM/METHOD MAKERBOT METHOD PAGE 1 MAKERBOT METHOD PAGE 2 The First Performance 3D Printer Bridging the gap between industrial and desktop 3D printing. MAKERBOT.COM/METHOD PAGE 3 MAKERBOT METHOD
3D Printed Camera Tripod Adapter for Telescope
 3D Printed Camera Tripod Adapter for Telescope Created by Ruiz Brothers Last updated on 2017-11-16 03:29:25 AM UTC Guide Contents Guide Contents Overview Designed for Mobile Phones 3D Printing Support
Congratulations on your purchase of a. airbrush.
 NEO SERIES MANUAL Congratulations on your purchase of a airbrush. CN GRAVITY-FEED DUAL-ACTION AIRBRUSH BCN SIPHON-FEED DUAL-ACTION AIRBRUSH 2 3 ASSEMBLY 1. Screw the airhose onto the airbrush (Iwata airhose
sign hangers & sign holders
 21 ceiling clips price at: 12 100 140000 wire t bar ceiling clip (min 12) metal.25.20 140001 lexan t bar ceiling clip (min 12) clear.60.50 140003 mobile button for ceilings white.35.20 ¾ square with adhesive
Grooming Gear Trimmer operating instructions
 Grooming Gear Trimmer operating instructions Please read all instructions carefully to familiarise yourself with your new trimmer before using. Save these instructions for further reference. For any further
REVOLUTION M SERIES MANUAL & PARTS GUIDE
 HP-M1 HP-M2 REVOLUTION M SERIES MANUAL & PARTS GUIDE NEED ASSISTANCE? If you have any issues with this product, call Iwata-Medea before returning to your place of purchase. 503-253-7308 Congratulations
Reindeer Mask with Animated Eyes
 Reindeer Mask with Animated Eyes Created by Dano Wall Last updated on 2018-12-05 10:50:10 PM UTC Guide Contents Guide Contents Overview Parts Adafruit HalloWing M0 Express Convex Plastic Lens with Edge
Mini Golf Course with Circuit Playground and Crickit
 Mini Golf Course with Circuit Playground and Crickit Created by Dano Wall Last updated on 2018-08-22 04:09:31 PM UTC Guide Contents Guide Contents Overview Materials & Tools Adafruit Parts CRICKIT Assembly
MUSTACHE GROWING A BEARD AND. the manufacturer-to trim your beard and. For the best trimming results, your beard
 ON/OFF SWITCH To operate, simply push slide toward blade; to stop, push slide away from blade. On/Off Switch Turbo Switch Battery Cover TURBO FEATURE This product is equipped with a turbo boost button.
Crickit Powered Holiday Diorama
 Crickit Powered Holiday Diorama Created by Isaac Wellish Last updated on 2018-12-04 12:49:07 AM UTC Guide Contents Guide Contents Overview Prerequisite Guides Adafruit Parts Tools and Materials Wiring
Fiddy - the FTDI Clip
 Fiddy - the FTDI Clip Created by Timothy Reese Last updated on 2018-08-22 03:57:42 PM UTC Guide Contents Guide Contents Overview FTDI is Great! Things you'll need: What You'll Learn: 3D Printing Assembly
Cartridge Machine USER MANUAL
 Cartridge Machine USER MANUAL 2018 INDEX Machine Overview 3 The Grip 4 The Body 5 The GiveKnob 6 Adjust the Give 7 Replacing the GiveKnob 8 The MotorBolt System 9 Changing the Stroke Wheel 10 Detaching
Seiko Australia Pty Ltd. Bracelet Sizing Manual
 Seiko Australia Pty Ltd Bracelet Sizing Manual SEIKO Bracelet Sizing Manual Contents Introduction 1 ( I ) General Information 2 ( II ) Suggested Tools 3 ( III ) Bracelet Sizing Codes And Methods 4 1. Sizing
Clare Video Doorbell Version 2 User Manual
 Clare Video Doorbell Version 2 User Manual Index Doorbell buttons and features...3 What s included in the box...4 Clare Video Doorbell power requirements...5 Wi-Fi signal strength requirements...6 Getting
Tent Lantern. Created by Timothy Reese. Last updated on :17:25 AM UTC
 Tent Lantern Created by Timothy Reese Last updated on 2017-07-14 05:17:25 AM UTC Guide Contents Guide Contents Overview Things you'll need: What You'll Learn: 3D Printing Code Assembly Wiring Diagram Soldering
Alarm.com Wi-Fi Doorbell Camera and Slim Line
 Alarm.com Wi-Fi Doorbell Camera and Slim Line INSTALLATION GUIDE INTRODUCTION Your customers will always know who is at the front door with an Alarm.com Doorbell Camera. Now with two options tochoose from
Desktop Fume Extractor
 Desktop Fume Extractor Created by Ruiz Brothers Last updated on 2018-06-18 02:20:04 PM UTC Guide Contents Guide Contents Overview Fumey The Fume Extrator Air Clean Friendly 3D Printing What If I Don't
Infinity Mirror Valentine's Candy Box
 Infinity Mirror Valentine's Candy Box Created by Kathy Ceceri Last updated on 2019-02-07 09:44:54 PM UTC Guide Contents Guide Contents Overview Parts List -- Mini Box Version Chibitronics Color LEDs Add-On
Alarm.com Wi-Fi Doorbell Camera and Slim Line - Installation Guide
 Alarm.com Wi-Fi Doorbell Camera and Slim Line - Installation Guide Introduction Each Alarm.com Doorbell Camera features a doorbell with an integrated camera, PIR motion sensor, digital microphone and speaker,
Video Doorbell Pro 1
 Video Doorbell Pro 1 Home Security Begins at the Front Door Your new Ring Video Doorbell Pro is the start of a Ring of Security around your entire property. Now, you re always connected, so you can watch
i-twin Trim Dual Blade Rechargeable Trimmer
 i-twin Trim Dual Blade Rechargeable Trimmer Model VSM2A SAFETY CAUTIONS WARNING! Polythene bags over the product or packaging may be dangerous. To avoid danger of suffocation, keep away from babies and
GMT180WTPBCSC BEARD/MUSTACHE TRIMMER
 GMT180WTPBCSC BEARD/MUSTACHE TRIMMER Cutter Blades Blade Set TURBO SWITCH ON/OFF SWITCH with lock button Charging Light Indicator Line Cord TWO YEAR LIMITED WARRANTY Conair will repair or replace (at our
Bluetooth Controlled NeoPixel Headphones
 Bluetooth Controlled NeoPixel Headphones Created by Ruiz Brothers Last updated on 2017-03-09 07:38:05 PM UTC Guide Contents Guide Contents Overview Smart LED HeadPhones Prerequisite Guides Parts Tools
Simple LED Unicorn Horn
 Simple LED Unicorn Horn Created by Ruiz Brothers Last updated on 2018-08-22 03:56:14 PM UTC Guide Contents Guide Contents Overview 3D Printed Unicorn Horn Want More Magic/Colors? Great For Beginners Parts
Magnetic shoelaces. Created by Ruiz Brothers. Last updated on :31:02 PM UTC
 Magnetic shoelaces Created by Ruiz Brothers Last updated on 2016-12-29 04:31:02 PM UTC Guide Contents Guide Contents Overview Parts, Tools and Supplies 3D Printing Download and 3D Print Slice Settings
IMPORTANT SAFETY INSTRUCTIONS. Grooming System. DANGER any appliance is electrically DO NOT REACH INTO THE WATER. WARNING To reduce risk of burns,
 Grooming System Have a Question? Please do not return this product to the retailer. Call Us First! Our customer service and product experts are ready to answer ALL your questions. Please call our TOLL-FREE
PyPortal View Master Created by Ruiz Brothers. Last updated on :51:28 AM UTC
 PyPortal View Master Created by Ruiz Brothers Last updated on 2019-03-13 11:51:28 AM UTC Overview In this project we re building a view master inspired device using Adafruit s PyPortal. The eyepiece makes
Using BodyPaint 3D with LightWave
 Addendum 23 Plugins ADDENDUM 1 Exchange Plugins Using BodyPaint 3D with LightWave If you are a LightWave user, the quickest way to get your models from LightWave to BodyPaint 3D then back again once you
The Scream: Interactive Screaming Painting
 The Scream: Interactive Screaming Painting Created by John Park Last updated on 2018-08-22 04:10:47 PM UTC Guide Contents Guide Contents Overview Parts & Materials Optional Build the Interactive Painting
signs sign hangers & sign holders vancouver edmonton ceiling clips banners 19 x 57 paper stock hooks, suction cups & wire
 signs 21 124012 124013 124022 22 x 28 card stock posters, single-sided 9.80 9.40 8.90 banners 19 x 57 paper stock 19 x 57 paper banners 10.50 10.00 9.45 banner stand 124019 124020 123011 123014 123100
1. Charging. 2. In-app Setup. 3. Physical Installation. 4. Features. 5. Troubleshooting. Home Security Begins at the Front Door.
 Video Doorbell 2 1 Home Security Begins at the Front Door Your new Ring Video Doorbell is the start of a Ring of Security around your entire property. Now, you ll always be connected to your home, so you
Crickit Carnival Bumper Bot
 Crickit Carnival Bumper Bot Created by John Park Last updated on 2018-08-22 04:08:52 PM UTC Guide Contents Guide Contents Overview Parts Materials and Tools Build the Bumper Bot Cut the Cardboard Chassis
No-Sew LED Wristband. Created by Kathy Ceceri. Last updated on :23:40 PM UTC
 No-Sew LED Wristband Created by Kathy Ceceri Last updated on 2018-11-13 09:23:40 PM UTC Guide Contents Guide Contents Overview Playing with LED Options Suggested Parts List -- Electronics Suggested Materials
This symbol indicates an important hint for your safety. Disregarding this subject may cause physical harm to you or damage to the machine.
 NTCA4 A4 Thermal-Copier Guide (10.030) Operation Guide Thank for your purchase of an A4 Thermal-Copier. This guide is for Series A4AU models, indicated by A4AU-0000 to A4AU-9999 serial numbers. This guide
Lenis Needle-free Safety Syringe Device User Manual
 Lenis Needle-free Safety Syringe Device User Manual 1 Table of Contents Welcome.3 Lenis Kit Components.4 Instructions 5-9 Maintenance and Care..10 Troubleshooting. 11 Warranty.12 Precautions 13 Return
Adafruit Capacitive Touch Sensor Breakouts
 Adafruit Capacitive Touch Sensor Breakouts Created by Bill Earl Last updated on 2018-08-22 03:36:13 PM UTC Guide Contents Guide Contents Overview Momentary Toggle 5-Pad Momentary Assembly and Wiring Installing
Instruction Booklet FOR AGES 6 AND UP Conforms to ASTM D-4236 No VISIT OUR WEBSITE:
 Instruction Booklet 2 VISIT OUR WEBSITE: www.nsi-int.com FOR AGES 6 AND UP Conforms to ASTM D-4236 No. 1990-08 2010-08 MCMXCVIII NSI INTERNATIONAL, INC. FARMINGDALE, NY 11735-1318 PRINTED IN CHINA Dear
V-Solder BON-7103/7203
 V-Solder BON-7103/7203 V-Cut solder machine (Applicable solder wire diameter φ0.3~φ0.8) Instruction manual (User s Manual) Preparation in Jyly 2010 The 7 th edition JAPAN BONKOTE CO.,LTD. Contents 1 Preface
Trinket NeoPixel LED Longboard
 Trinket NeoPixel LED Longboard Created by Ruiz Brothers Last updated on 2017-10-02 06:00:32 PM UTC Guide Contents Guide Contents Overview Parts Tools & Supplies Prerequisite Guides 3D Printing PLA Material
28145_HKVAC_IB 9/1/05 10:14 AM Page 1 VACUUM TRIM. Use and Care Guide HKVAC-2000
 28145_HKVAC_IB 9/1/05 10:14 AM Page 1 VACUUM TRIM REVOLUTIONARY TRIMMING TECHNOLOGY Use and Care Guide HKVAC-2000 28145_HKVAC_IB 9/1/05 10:14 AM Page 2 IMPORTANT SAFETY INSTRUCTIONS Read all instructions
Disposable Cartridge NAVEL Piercing System
 Disposable Cartridge NAVEL Piercing System Operators Manual A Innovative. Safe. Professional. Thank you for purchasing the. Our engineers have designed the Medisept Navel Piercing System to provide piercing