Mystery Box: Haunted Radio
|
|
|
- Evangeline Gallagher
- 5 years ago
- Views:
Transcription

1 Mystery Box: Haunted Radio Created by John Park Last updated on :01:09 PM UTC
2 Guide Contents Guide Contents Overview Parts & Materials Tools Radio Reuse Disassembly Tuning Mechanism On/Off Reuse Battery Prep Feather Prep Dial Sensing Plug in Power Sensor Placement Speaker Wiring Tidy Up Code It Use the Haunted Radio Reassembly Use It Adafruit Industries Page 2 of 44
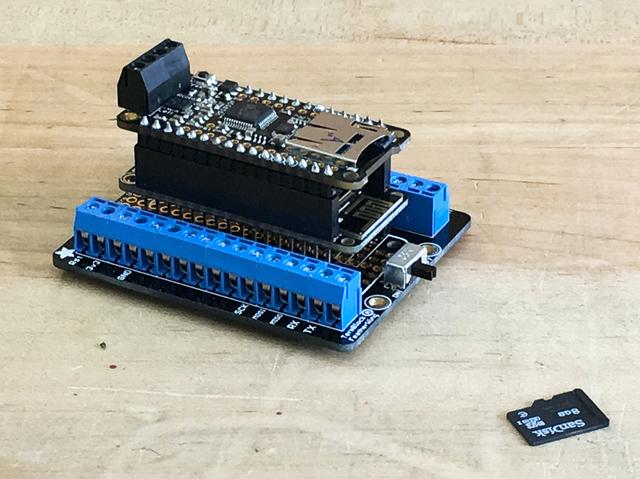
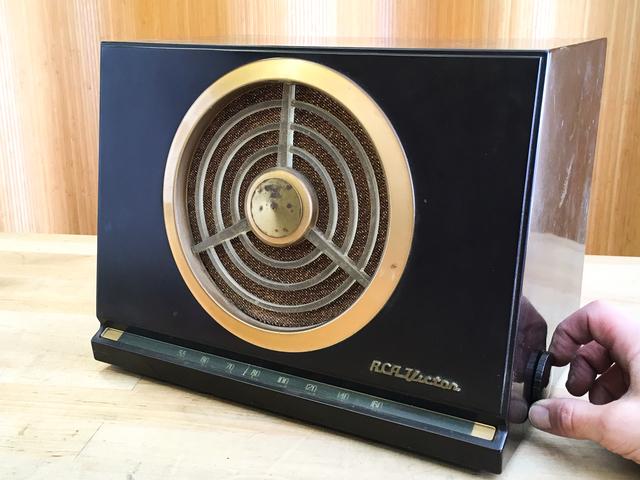
3 Overview Vintage radios are irresistible. When you hear one spewing static, your natural response is to turn the dial and try to tune in a station. The anticipation! What will you hear? With this Haunted Radio project, you can decide for your guests or escape room attendees exactly what they'll hear, and you can even choose the frequency. There isn't any pirate radio station involved here, either. Instead, the secret is a Feather microcontroller reading the dial position with a magnet sensor, and an attached Music Maker FeatherWing with amplifier to play back your prerecorded message over the radio's speaker. Parts & Materials Here's what you'll need to make your Haunted Radio: Vintage radio -- search your grandparents' attic for one, or head to a flea market. You'll be looking for three things: an appealing design, a pulley-based mechanical tuning indicator, and a "regular" permanent magnet speaker. (Some old radios will have an electrodynamic speaker that uses an electromagnet. Powering that is an added step we want to avoid.) Feather Huzzah ESP8266 ( microcontroller Music Maker FeatherWing w/ amp ( to play back songs and sounds SD card for the Music Maker ( T ( Block Breakout FeatherWing ( to simplify wiring (this is optional if you choose to wire things differently) 6600mAh 3.7V Lithium Ion battery ( to power everything (or, skip this and use a USB power plug if you don't need your Haunted Radio to be portable) Hall effect sensor ( to sense the magnet attached to the tuning indicator Rare earth magnet ( Feather Stacking Headers ( to connect Feather to Terminal Breakout FeatherWing and still allow Music Maker FeatherWing to connect above. Adafruit Industries Page 3 of 44
4 Jumper wires ( USB cable for programming the Feather ( 2-Wire splice connectors ( Stranded wire ( Tools Soldering iron and solder Wire cutters Wire strippers Pliers Hot glue gun or tape Let's take a look at how to prepare your vintage radio to be Haunted! Adafruit Industries Page 4 of 44

5 Radio Reuse A lot can vary from radio to radio, so these won't be exact steps for yours, but a general method for reusing the case, dial, knob, and speaker when possible. AC mains power is dangers! Be sure to unplug the radio from the wall first!! Disassembly Most vintage radios are accessed by removing a back panel. Go ahead and unscrew and remove yours. Adafruit Industries Page 5 of 44


6 Next, carefully pull of all knobs. These are often press-fit into place and can be removed with moderate force. Some may have a small set screw that must be loosened first. Adafruit Industries Page 6 of 44


7 Check the bottom for fasteners -- in this case small hex bolts -- are remove them. Adafruit Industries Page 7 of 44


8 The speaker will be connected to the radio electronics by two wires. Cut those right where they enter the board, leaving the full length of the wires connected to the speaker. Adafruit Industries Page 8 of 44


9 You can now remove the electronics from the radio. Look at those beautiful vacuum tubes. Tuning Mechanism You'll find a large wheel connected to the tuning knob shaft via a tensioned tuning cord. Try out the mechanism -- if you find that it is slipping you can apply some rosin to the cord, as the whole system relies on friction to turn the cord, Adafruit Industries Page 9 of 44


10 which in turn moves the dial indicator. Adafruit Industries Page 10 of 44


11 Here we can see the tuning indicator that slides back and forth. It is to this that we'll be attaching the magnet later. Adafruit Industries Page 11 of 44


12 On/Off Reuse Looking at the underside of the radio, you'll see a bunch of crusty old parts. Do not lick them. If you want to have your Haunted Radio turn on and off via the original knob --this is often a dual-use on/off plus volume knob -- check for a pair of wires running to the knob. These are the on/off switches, vs. the set of three lugs that are for volume. You can clip all of these wires and then test continuity with a multimeter to confirm. Solder two wires to the on/off lugs, about 8" each. Adafruit Industries Page 12 of 44


13 Soldering on your stranded wire is fun! Here I've removed one of the vacuum tubes to use as a convenient through hole for running wires up to the top. Adafruit Industries Page 13 of 44

 Adafruit Industries https://learn.adafruit.")
14 Battery Prep Next, you'll splice the on/off switch wires into the battery cable. Start by cutting the black wire (or the red, the decision is yours!) Adafruit Industries Page 14 of 44


15 Strip all of the wire ends. Use two butt splices to connect two pairs of green and black wires. Adafruit Industries Page 15 of 44


16 Squeeze down the connectors with a pair of pliers and you've now added the radio's on/off switch to your battery! Adafruit Industries Page 16 of 44

17 Adafruit Industries Page 17 of 44
 as a reference.")

18 Feather Prep First, solder on the stacking female/male headers to your Feather Huzzah ESP8266. (You can use this guide ( as a reference.) Then, connect the Feather to the Terminal Block Breakout FeatherWing. Solder the male headers onto the Music Maker FeatherWing, and then fit it on top of the Feather. Adafruit Industries Page 18 of 44

19 Adafruit Industries Page 19 of 44

, connecting the Music Maker to a small speaker (or your radio's speaker) and running the Feather Player example. Adafruit Industries https://learn.")
20 Before going any further, make sure you have a basic understanding of how to program and use an Arduinocompatible Feather microcontroller. Thankfully, we have a lot of great tutorials on how this whole thing works. Click here to get started with Arduino ( and then come back to this guide to continue. Confirm that everything is working as expected by following the Music Maker guide here ( connecting the Music Maker to a small speaker (or your radio's speaker) and running the Feather Player example. Adafruit Industries Page 20 of 44

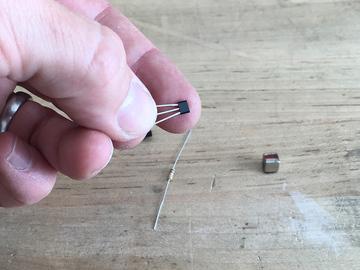
21 Dial Sensing There are a number of ways to read the position of the tuner indicator on an old radio. One versatile, but more involved way would be to read the capacitance of the tuner itself. Another would be to add a rotary encoder to the proceedings, or perhaps glue an encoder disk to the tuner's large wheel and read it optically. Since we only need to measure a single position, and we don't need to know that state of the tuner (where it has been) we'll get away with using one of the most simple methods here: a hall effect sensor placed at the desired station number position that can read the presence of a magnet that travels with the indicator needle. Need to read multiple station positions? Just add more Hall effect sensors -- as many as your microcontroller has available inputs! This is our circuit diagram for the Haunted Radio -- the Hall effect sensor has three connections: 1. power to 3v3 on the Feather 2. ground to GND 3. digital out to pin 4 You'll also run a 10k resistor between legs 1 and 3 of the sensor. Adafruit Industries Page 21 of 44


22 Build the sensor harness with three of the jumper wires. You'll plug the sensor legs into the female jumper connectors and do the same with the resistor. A bit of tape can hold the ends together nicely. Make sure you match the orientation so that leg one is on the left with the "front" of the sensor (the smaller face) toward you, and goes into the power (red) wire. Trim the legs of the resistor and then push them in to contact the sensor legs 1 and 3. Adafruit Industries Page 22 of 44


23 Adafruit Industries Page 23 of 44


24 Adafruit Industries Page 24 of 44


25 Plug the red power wire into the 3v3 terminal block, then screw it down. Adafruit Industries Page 25 of 44


26 Plug in and screw down the black wire to GND. Adafruit Industries Page 26 of 44
 terminal.")

27 Lastly, plug the yellow wire into the pin 4 (marked SDA on the board) terminal. Adafruit Industries Page 27 of 44


28 Plug in Power You can plug in the battery to the JST connector on the Feather board now -- check that the switch on the Terminal Block Breakout Board is in the "on" position. You'll turn on the whole system with the radio's on/off knob. Adafruit Industries Page 28 of 44


29 Sensor Placement Decide what frequency you'd like to use as your Haunted Radio's "cursed" frequency. Place the Hall effect sensor over this position (you may need to temporarily place the assembly back into the radio's case to determine the position). Place the magnet on the dial -- we'll check for proper orientation later when we upload the code to the Feather. In case Adafruit Industries Page 29 of 44


30 the dial isn't ferrous you can use tape or hot glue. Tilt and bend the sensor legs so that the sensing face is nearest the magnet -- on many Hall sensors this is the larger face -- then affix the sensor to the radio with tape or hot glue. Adafruit Industries Page 30 of 44

31 Adafruit Industries Page 31 of 44
 on the Music Maker FeatherWing.")
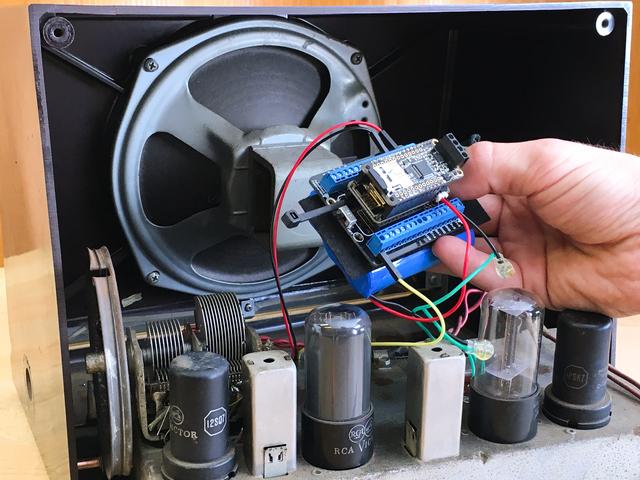
32 The magnet should be easily read by the sensor at this distance, but you can fine tune it later. Speaker Wiring Strip the ends of the radio's speaker wires, then screw them into one of the output pairs (either Left or Right) on the Music Maker FeatherWing. Adafruit Industries Page 32 of 44

33 Don't be tempted to wire the Left and Right outputs together -- it won't make things louder and could damage the amp! Adafruit Industries Page 33 of 44


34 Tidy Up Neaten up the whole package by combining the Feather stack and the battery using zip ties or rubber bands. I've placed a small piece of felt between them to keep the exposed terminal points on the bottom from poking the heat shrink of the battery pack. Adafruit Industries Page 34 of 44

35 Adafruit Industries Page 35 of 44


36 Before fully reassembling the radio, let's upload the code to the Feather! Adafruit Industries Page 36 of 44
37 Code It Our code is fairly simple -- it really just does two things: play a looping static file, and then when the magnet is detected, play a different file. You already got the Feather up and running in the Feather Prep section of the guide, so now we need to add code to read the Hall effect sensor and play the second track. You'll needs two audio.mp3 files on the SD card. I've named my files STATIC.MP3 and TUNED.MP3. Load your files onto the card and then put the card in the FeatherWing's SD slot. You can find more info on loading music files here ( Copy this code below, paste it into a new Arduino sketch, save the sketch as hauntedradio.ino in your Arduino sketches library, and then upload it to the Feather board which is plugged in via USB. //Haunted Radio //by John Park for Adafruit Industries //based on feather_player by Limor Fried // //Uses hall sensor to detect magnet attached to radio tuner dial //Plays static file and radio play files from Music Maker FeatherWing //connected to Feather microcontroller // //MIT License /*/////////// Hardware //////////////////////////////// Feather (of any variety, in this case ESP8266 Huzzah) Music Maker MP3 FeatherWing Hall sensor connected to digital input pin 4 Wiring is left (pin 1) to Vin, middle (2) to GND, right (3) to digital input -place 10K resistor between voltage in Pin 1 and voltage out Pin 3 \ / / \ + GND Output \-[ ]-/ 10k resistor /////////////////////////////////////////////////////*/ #include <SPI.h> #include <SD.h> #include <Adafruit_VS1053.h> // These are the pins used Adafruit Industries Page 37 of 44
38 #define VS1053_RESET -1 // VS1053 reset pin (not used!) // Feather M0 or 32u4 #if defined( AVR ) defined(arduino_samd_feather_m0) #define VS1053_CS 6 // VS1053 chip select pin (output) #define VS1053_DCS 10 // VS1053 Data/command select pin (output) #define CARDCS 5 // Card chip select pin // DREQ should be an Int pin *if possible* (not possible on 32u4) #define VS1053_DREQ 9 // VS1053 Data request, ideally an Interrupt pin // Feather ESP8266 #elif defined(esp8266) #define VS1053_CS 16 // VS1053 chip select pin (output) #define VS1053_DCS 15 // VS1053 Data/command select pin (output) #define CARDCS 2 // Card chip select pin #define VS1053_DREQ 0 // VS1053 Data request, ideally an Interrupt pin // Feather ESP32 #elif defined(esp32) #define VS1053_CS 32 // VS1053 chip select pin (output) #define VS1053_DCS 33 // VS1053 Data/command select pin (output) #define CARDCS 14 // Card chip select pin #define VS1053_DREQ 15 // VS1053 Data request, ideally an Interrupt pin // Feather Teensy3 #elif defined(teensyduino) #define VS1053_CS 3 // VS1053 chip select pin (output) #define VS1053_DCS 10 // VS1053 Data/command select pin (output) #define CARDCS 8 // Card chip select pin #define VS1053_DREQ 4 // VS1053 Data request, ideally an Interrupt pin // WICED feather #elif defined(arduino_stm32_feather) #define VS1053_CS PC7 // VS1053 chip select pin (output) #define VS1053_DCS PB4 // VS1053 Data/command select pin (output) #define CARDCS PC5 // Card chip select pin #define VS1053_DREQ PA15 // VS1053 Data request, ideally an Interrupt pin #elif defined(arduino_feather52) #define VS1053_CS 30 // VS1053 chip select pin (output) #define VS1053_DCS 11 // VS1053 Data/command select pin (output) #define CARDCS 27 // Card chip select pin #define VS1053_DREQ 31 // VS1053 Data request, ideally an Interrupt pin #endif Adafruit_VS1053_FilePlayer musicplayer = Adafruit_VS1053_FilePlayer(VS1053_RESET, VS1053_CS, VS1053_DCS, VS1053_DREQ, CARDCS); const int HALLPIN = 4; int hallstate = 0; // hall effect sensor pin (since we aren't using I2C) // variable for reading the hall sensor status int staticon = 1; // variable to store state of static being played int stationon = 0; // variable to store state of station being selected /////////////////////////// Setup ///////////////////////////////////////////// void setup() { Serial.begin(115200); Adafruit Industries Page 38 of 44
39 pinmode(hallpin, INPUT_PULLUP); //so we can read the Hall sensor // if you're using Bluefruit or LoRa/RFM Feather, disable the BLE interface //pinmode(8, INPUT_PULLUP); // Wait for serial port to be opened, remove this line for 'standalone' operation //while (!Serial) { delay(1); } Serial.println("\n\nAdafruit Music Maker VS1053 Feather Haunted Radio"); if (! musicplayer.begin()) { // initialise the music player Serial.println(F("Couldn't find VS1053, do you have the right pins defined?")); while (1); } Serial.println(F("VS1053 found")); //musicplayer.sinetest(0x44, 500); // Make a tone to indicate VS1053 is working if (!SD.begin(CARDCS)) { Serial.println(F("SD failed, or not present")); while (1); // don't do anything more } Serial.println("SD OK!"); // Set volume for left, right channels. lower numbers == louder volume! musicplayer.setvolume(40,40); #if defined( AVR_ATmega32U4 ) // Timer interrupts are not suggested, better to use DREQ interrupt! // but we don't have them on the 32u4 feather... musicplayer.useinterrupt(vs1053_fileplayer_timer0_int); // timer int #elif defined(esp32) // no IRQ! doesn't work yet :/ #else // If DREQ is on an interrupt pin we can do background // audio playing musicplayer.useinterrupt(vs1053_fileplayer_pin_int); // DREQ int #endif } ///////////////////////// Loop ////////////////////////////////////////////// void loop(){ hallstate = digitalread(hallpin); // the magnet is on 1500AM, //check to see if we're tuned in to this station if(staticon == 1) { Serial.println("Playing STATIC.MP3.\n"); musicplayer.startplayingfile("static.mp3"); staticon = 0; //flip the flag so it doesn't start playing over again Adafruit Industries Page 39 of 44
40 } staticon = 0; //flip the flag so it doesn't start playing over again if (hallstate == HIGH){ //this is HIGH when we don't sense a magnet Serial.println("No magnet.\n"); delay(200); } else if(hallstate == LOW){ //when this goes LOW, we're seeing the magnet Serial.println("\t Magnet has been sensed!"); if(stationon==0){ Serial.println("\t Playing file TUNED.MP3\n"); musicplayer.setvolume(30,30); musicplayer.stopplaying(); musicplayer.startplayingfile("tuned.mp3"); stationon=1; } delay(200); } } if(musicplayer.stopped()) { Serial.println("Player has stopped.\n"); staticon=1; //reset counter so static will start again //stationon=0; //reset counter so station can be restarted when sensor is //over the magnet again, comment this line out if you don't want the station file to loop or play mul } Now, when you turn on the Haunted Radio it will begin immediately playing the static track. As you tune the dial and reach the cursed station, it will play back the second track! Adafruit Industries Page 40 of 44

41 Use the Haunted Radio Reassembly Put your radio back together now, sliding it in place first, and then reconnecting the knobs. Adafruit Industries Page 41 of 44


42 Use It It's time to unleash the mysterious powers of the Haunted Radio on your guests! You can make up a puzzle in a game or escape room that can only be solved by tuning the radio and listening to the message, or perhaps use it as an interactive prop while telling a ghost story... Adafruit Industries Page 42 of 44

43 Adafruit Industries Page 43 of 44

44 Adafruit Industries Last Updated: :01:04 PM UTC Page 44 of 44
Neon LED Signs. Created by John Park. Last updated on :11:09 PM UTC
 Neon LED Signs Created by John Park Last updated on 2018-08-22 04:11:09 PM UTC Guide Contents Guide Contents Overview Parts Materials Tools Build the Sign Driver Preparation Solder the Circuit Solder the
MP3 Feather - Gordon Cole
 MP3 Feather - Gordon Cole Created by Ruiz Brothers Last updated on 2017-11-13 11:05:06 PM UTC Guide Contents Guide Contents Overview Parametric Design Wearable Prerequisite Guides Parts, Tool & Supplies
Coffee Detonator: The TNT Plunger Grinder
 Coffee Detonator: The TNT Plunger Grinder Created by John Park Last updated on 2017-04-12 08:04:36 PM UTC Guide Contents Guide Contents Overview Materials Voltage Conversion AC/DC Voltage Divider Microcontroller
Mad Science Test Tube Rack
 Mad Science Test Tube Rack Created by John Park Last updated on 2016-10-17 09:21:01 PM UTC Guide Contents Guide Contents Overview Lighted Test Tube Parts Materials and Tools Optional Test Tube Rack Parts
Circuit Playground Express Head-Tilt Ears
 Circuit Playground Express Head-Tilt Ears Created by Dave Astels Last updated on 2018-10-09 04:07:03 PM UTC Guide Contents Guide Contents Overview Parts Circuit Playground Express Micro servo Lithium Ion
Tent Lantern. Created by Timothy Reese. Last updated on :17:25 AM UTC
 Tent Lantern Created by Timothy Reese Last updated on 2017-07-14 05:17:25 AM UTC Guide Contents Guide Contents Overview Things you'll need: What You'll Learn: 3D Printing Code Assembly Wiring Diagram Soldering
NeoPixie Dust Bag with Circuit Playground Express
 NeoPixie Dust Bag with Circuit Playground Express Created by John Park Last updated on 2017-12-20 10:00:29 PM UTC Guide Contents Guide Contents Overview Code It Setup Animation Color Touch Variable Color
Feather Weather Lamp. Created by Ruiz Brothers. Last updated on :54:26 PM UTC
 Feather Weather Lamp Created by Ruiz Brothers Last updated on 2018-08-22 03:54:26 PM UTC Guide Contents Guide Contents Overview Weather Reactive Pixels Prerequisite Guides Parts Tools & Supplies Circuit
Audio Prank Gift Box. Created by Becky Stern. Last updated on :46:15 PM UTC
 Audio Prank Gift Box Created by Becky Stern Last updated on 2018-08-22 03:46:15 PM UTC Guide Contents Guide Contents Overview Circuit Diagram Prepare Components Build Circuit Wrap and Give 2 3 5 6 12 14
Celebration Spectacles
 Celebration Spectacles Created by Becky Stern Last updated on 2018-08-22 03:45:59 PM UTC Guide Contents Guide Contents Overview Circuit Diagram Assemble Circuit Test and Glue Wear 'em! 2 3 6 7 10 14 Adafruit
Interior Purse Light. Created by Becky Stern. Last updated on :41:08 PM UTC
 Interior Purse Light Created by Becky Stern Last updated on 2018-08-22 03:41:08 PM UTC Guide Contents Guide Contents Overview Circuit Diagram Stitch Sequins Add Tape Arduino Code CircuitPython Code Use
Chirping Plush Owl Toy
 Chirping Plush Owl Toy Created by Becky Stern Last updated on 2018-11-21 08:56:55 PM UTC Guide Contents Guide Contents Overview Tools & Supplies Solder Circuit Arduino Code CircuitPython Code Assemble
Adafruit Capacitive Touch Sensor Breakouts
 Adafruit Capacitive Touch Sensor Breakouts Created by Bill Earl Last updated on 2018-08-22 03:36:13 PM UTC Guide Contents Guide Contents Overview Momentary Toggle 5-Pad Momentary Assembly and Wiring Installing
Ping Pong Ball Launcher
 Ping Pong Ball Launcher Created by Dano Wall Last updated on 2019-01-25 03:19:13 AM UTC Guide Contents Guide Contents Overview Electronic Parts Circuit Playground Express USB cable - USB A to Micro-B Alkaline
Adafruit PowerBoost 500 Shield
 Adafruit PowerBoost 500 Shield Created by lady ada Last updated on 2018-08-22 03:43:27 PM UTC Guide Contents Guide Contents Overview Pinouts DC/DC Boost section Indicator LEDs Charging section Power Switch
Toy Car Speed Timer. Created by Kirby Griese. Last updated on :13:49 PM UTC
 Toy Car Speed Timer Created by Kirby Griese Last updated on 2017-03-20 09:13:49 PM UTC Guide Contents Guide Contents Overview Parts needed Prerequisites 3D Printing Assembly Wiring Software Use It 2 3
Clockwork Goggles. Created by John Park. Last updated on :03:10 PM UTC
 Clockwork Goggles Created by John Park Last updated on 2018-08-22 04:03:10 PM UTC Guide Contents Guide Contents Overview Assemble Circuit and Goggles CircuitPython Setup and Code Rock the Goggles 2 3 6
NeoPixel Ring Bangle Bracelet
 NeoPixel Ring Bangle Bracelet Created by Becky Stern Last updated on 2017-09-28 11:14:48 PM UTC Guide Contents Guide Contents Overview Circuit Diagram Build it! Arduino Code CircuitPython Code Planning
Bunny Ears with MakeCode
 Bunny Ears with MakeCode Created by Erin St Blaine Last updated on 2018-08-22 04:05:47 PM UTC Guide Contents Guide Contents Introduction Tools & Other Materials Programming with MakeCode Set Up the Light
FLORA and GEMMA ICSP. Created by Becky Stern. Last updated on :42:16 PM UTC
 FLORA and GEMMA ICSP Created by Becky Stern Last updated on 2018-08-22 03:42:16 PM UTC Guide Contents Guide Contents Overview Reprogram FLORA over ICSP Reprogram GEMMA over ICSP 2 3 4 9 Adafruit Industries
Adafruit ATWINC1500 WiFi Breakout
 Adafruit ATWINC1500 WiFi Breakout Created by lady ada Last updated on 2018-01-29 08:25:04 PM UTC Guide Contents Guide Contents Overview Pinouts Power Pins SPI Pins Other SPI Interface Pins Assembly Prepare
Adafruit APDS9960 breakout
 Adafruit APDS9960 breakout Created by Dean Miller Last updated on 2018-01-19 11:18:59 PM UTC Guide Contents Guide Contents Overview Pinouts Power Pins: Logic pins: Assembly Prepare the header strip: Add
Adabot Operation Game
 Adabot Operation Game Created by John Park Last updated on 2018-08-22 04:11:17 PM UTC Guide Contents Guide Contents Overview Parts Materials & Tools Build the Operating Table Print the Board and Pieces
i2c/spi LCD Backpack Created by lady ada Last updated on :11:04 PM UTC
 i2c/spi LCD Backpack Created by lady ada Last updated on 2017-08-16 05:11:04 PM UTC Guide Contents Guide Contents Overview Which LCD to Use? Wait - the backpack has 16 holes, but my LCD only has 14 pins!
Joy Featherwing. Created by Dean Miller. Last updated on :03:07 PM UTC
 Joy Featherwing Created by Dean Miller Last updated on 2018-08-22 04:03:07 PM UTC Guide Contents Guide Contents Overview Pinouts Power and Reset Pins I2C Data Pins I2C Addressing Optional Interrupt Pin
Adafruit TPL5111 Reset Enable Timer Breakout
 Adafruit TPL5111 Reset Enable Timer Breakout Created by lady ada Last updated on 2017-11-02 07:32:27 PM UTC Guide Contents Guide Contents Overview Pinouts Power Pins Control Pins Assembly Prepare the header
Portable Apple Watch Charger
 Portable Apple Watch Charger Created by Ruiz Brothers Last updated on 2017-10-22 09:58:04 PM UTC Guide Contents Guide Contents Overview Smart Charging Prerequisite Guides Parts, Tool & Supplies Circuit
Adafruit VL53L0X Time of Flight Micro-LIDAR Distance Sensor Breakout
 Adafruit VL53L0X Time of Flight Micro-LIDAR Distance Sensor Breakout Created by lady ada Last updated on 2017-12-28 11:56:14 PM UTC Guide Contents Guide Contents Overview Sensing Capablities Pinouts Power
Crickit Dancing Marionette Kit Created by Dano Wall. Last updated on :03:11 PM UTC
 Crickit Dancing Marionette Kit Created by Dano Wall Last updated on 2019-04-04 07:03:11 PM UTC Overview This project demonstrates how to build a robotic marionette that is controlled with four arcade-style
Data Logging with Feather and CircuitPython
 Data Logging with Feather and CircuitPython Created by Kattni Rembor Last updated on 2018-04-30 09:58:20 PM UTC Guide Contents Guide Contents Overview Things You'll Need Adafruit Feather M0 Express - Designed
FLORA TV-B-Gone. Created by Becky Stern. Last updated on :32:57 PM UTC
 FLORA TV-B-Gone Created by Becky Stern Last updated on 2018-08-22 03:32:57 PM UTC Guide Contents Guide Contents Overview Parts Tutorials Transistors Resistors LEDs Pushbutton Program it Power Fabric pinwheel
Pushrod Garage. Created by John Park. Last updated on :07:30 PM UTC
 Pushrod Garage Created by John Park Last updated on 2018-08-22 04:07:30 PM UTC Guide Contents Guide Contents Overview Parts & Materials Tools Pushrod Mechanism Code it with MakeCode Functions On Start
Adafruit TPL5110 Power Timer Breakout
 Adafruit TPL5110 Power Timer Breakout Created by lady ada Last updated on 2017-12-11 06:28:19 AM UTC Guide Contents Guide Contents Overview Pinouts Power Pins Control Pins Assembly Prepare the header strip:
Adafruit MCP9808 Precision I2C Temperature Sensor Guide
 Adafruit MCP9808 Precision I2C Temperature Sensor Guide Created by lady ada Last updated on 2017-11-12 06:09:49 PM UTC Guide Contents Guide Contents Overview Pinouts Power Pins I2C Data Pins Optional Pins
'Sup Brows. Created by Kate Hartman. Last updated on :52:04 PM UTC
 'Sup Brows Created by Kate Hartman Last updated on 2018-08-22 03:52:04 PM UTC Guide Contents Guide Contents Overview Circuit Bluetooth Test Upload the Code Place the Sensor View Sensor Values Via Bluetooth
Android GBoard Morse Code Control with Circuit Playground Express
 Android GBoard Morse Code Control with Circuit Playground Express Created by Dave Astels Last updated on 2018-08-22 04:10:30 PM UTC Guide Contents Guide Contents Overview Parts Materials for the box Installing
FLORA and GEMMA ICSP. Created by Becky Stern. Last updated on :30:55 PM EST
 FLORA and GEMMA ICSP Created by Becky Stern Last updated on 2015-02-19 02:30:55 PM EST Guide Contents Guide Contents Overview Reprogram FLORA over ICSP Reprogram GEMMA over ICSP 2 3 5 10 Adafruit Industries
1.8" TFT Display Breakout and Shield
 1.8" TFT Display Breakout and Shield Created by lady ada Last updated on 2017-11-17 05:51:22 PM UTC Guide Contents Guide Contents Overview Breakout Pinouts Breakout Assembly Prepare the header strip: Add
MCP Bit DAC Tutorial
 MCP4725 12-Bit DAC Tutorial Created by lady ada Last updated on 2018-03-05 10:51:16 PM UTC Guide Contents Guide Contents Overview Wiring Arduino Code Using the library Increasing the speed CircuitPython
Bluetooth Controlled NeoPixel Headphones
 Bluetooth Controlled NeoPixel Headphones Created by Ruiz Brothers Last updated on 2017-03-09 07:38:05 PM UTC Guide Contents Guide Contents Overview Smart LED HeadPhones Prerequisite Guides Parts Tools
Adafruit LED Sequins. Created by Becky Stern. Last updated on :02:00 AM UTC
 Adafruit LED Sequins Created by Becky Stern Last updated on 2018-03-02 04:02:00 AM UTC Guide Contents Guide Contents Overview Sewing with conductive thread Circuit Diagram GEMMA sequin hat Arduino Code
Crawling Animatronic Hand
 Crawling Animatronic Hand Created by Dano Wall Last updated on 2018-12-03 06:39:35 PM UTC Guide Contents Guide Contents Overview Parts Used Tools & Materials Prepare the Hand Your hand is now ready to
LED Eyes. Created by Ruiz Brothers. Last updated on :50:55 AM UTC
 LED Eyes Created by Ruiz Brothers Last updated on 2018-01-13 05:50:55 AM UTC Guide Contents Guide Contents Overview Parts, Tools and Supplies Enameled Copper Magnet Wire 11 meters / 0.1mm diameter Adafruit
Prophet 600 GliGli mod
 Prophet 600 GliGli mod Created by Collin Cunningham Last updated on 2018-08-22 04:04:56 PM UTC Guide Contents Guide Contents Overview What you'll need Program the Teensy++ Modify the Teensy++ Prep header
Adafruit HUZZAH32 - ESP32 Feather
 Adafruit HUZZAH32 - ESP32 Feather Created by lady ada Last updated on 2017-07-14 02:14:00 AM UTC Guide Contents Guide Contents Overview Pinouts Power Pins Logic pins Serial pins I2C & SPI pins GPIO & Analog
3D Printed 20w Amplifier Box
 3D Printed 20w Amplifier Box Created by Ruiz Brothers Last updated on 2018-02-26 06:48:02 PM UTC Guide Contents Guide Contents Overview Prerequisite Guide Tools & Supplies Parts 3D Printing Print in your
Adafruit Mini TFT with Joystick Featherwing
 Adafruit Mini TFT with Joystick Featherwing Created by lady ada Last updated on 2018-08-24 04:45:05 AM UTC Guide Contents Guide Contents Overview Pinouts Color TFT Display Buttons and Joystick seesaw Chip
Flora Brake Light Backpack
 Flora Brake Light Backpack Created by Becky Stern Last updated on 2018-02-14 02:47:42 PM UTC Guide Contents Guide Contents Overview Tools & Supplies Circuit Diagram Control Circuit LED Pixels The Code
Circuit Playground Digital Input
 Circuit Playground Digital Input Created by Carter Nelson Last updated on 2017-02-27 03:36:50 AM UTC Guide Contents Guide Contents Overview Required Parts Before Starting Digital Signals 3V Logic Pocket
Trinket NeoPixel LED Longboard
 Trinket NeoPixel LED Longboard Created by Ruiz Brothers Last updated on 2017-10-02 06:00:32 PM UTC Guide Contents Guide Contents Overview Parts Tools & Supplies Prerequisite Guides 3D Printing PLA Material
NeoPixel Bike Light. Created by Ruiz Brothers. Last updated on :43:46 PM UTC
 NeoPixel Bike Light Created by Ruiz Brothers Last updated on 2018-11-15 07:43:46 PM UTC Guide Contents Guide Contents Overview 3D Printed Headlight Adafruit's Feather Platform Circuit Python Powered Parts
Interactive Gift Box. Created by codingpro. Last updated on :47:40 AM UTC
 Interactive Gift Box Created by codingpro Last updated on 2018-01-10 01:47:40 AM UTC Guide Contents Guide Contents Overview Adafruit GEMMA M0 - Miniature wearable electronic platform Lithium Ion Polymer
NeoMatrix 8x8 Word Clock
 NeoMatrix 8x8 Word Clock Created by Andy Doro Last updated on 2017-10-10 04:10:51 AM UTC Guide Contents Guide Contents Overview Parts List Parts Tools Circuit Assembly Overview Uploading Code Understanding
Infinity Mirror Valentine's Candy Box
 Infinity Mirror Valentine's Candy Box Created by Kathy Ceceri Last updated on 2019-02-07 09:44:54 PM UTC Guide Contents Guide Contents Overview Parts List -- Mini Box Version Chibitronics Color LEDs Add-On
Trinket-Powered Conference Room Occupancy Display
 Trinket-Powered Conference Room Occupancy Display Created by Mike Barela Last updated on 2018-08-22 03:38:56 PM UTC Guide Contents Guide Contents Overview Build Wiring Diagrams Populating the Board Code
Con Badge with Circuit Playground Express
 Con Badge with Circuit Playground Express Created by Sophy Wong Last updated on 2018-04-11 05:00:16 PM UTC Guide Contents Guide Contents Overview Tools & Materials Laser Cutting Program the Circuit Playground
Adafruit 8x16 LED Matrix FeatherWing
 Adafruit 8x16 LED Matrix FeatherWing Created by lady ada Last updated on 2016-05-20 01:58:38 PM EDT Guide Contents Guide Contents Overview Pinouts Power Pins I2C pins Address Jumpers Changing Addresses
Adafruit IO Basics: ESP Arduino
 Adafruit IO Basics: ESP8266 + Arduino Created by Todd Treece Last updated on 2017-03-27 10:31:41 PM UTC Guide Contents Guide Contents Overview Adafruit Feather HUZZAH with ESP8266 WiFi Pros/Cons of the
Solar Boost Bag. Created by Becky Stern. Last updated on :44:55 PM UTC
 Solar Boost Bag Created by Becky Stern Last updated on 2018-08-22 03:44:55 PM UTC Guide Contents Guide Contents Overview 3D Design Files Customize Design Assemble Circuit Prepare Solar Panel Enclosure
Boomy The Boombox. Created by Ruiz Brothers. Last updated on :52:13 PM UTC
 Boomy The Boombox Created by Ruiz Brothers Last updated on 2017-09-05 08:52:13 PM UTC Guide Contents Guide Contents Overview Boomy The Boombox AdaBox 004 Parts 3D Printing 3D Printed Parts Enclosure Design
Slider Crank Mechanism -- from Cardboard and Craft Sticks
 Slider Crank Mechanism -- from Cardboard and Craft Sticks Created by John Park Last updated on 2018-08-22 04:07:21 PM UTC Guide Contents Guide Contents Overview Materials Tools Build the Slider Crank Build
Paper Airplane Launcher
 Paper Airplane Launcher Created by Dano Wall Last updated on 2018-08-27 08:36:14 PM UTC Guide Contents Guide Contents Overview A Launching Platform The Electronics Materials Build the Launcher Attach Motors
3D Printed Case for Adafruit Feather
 3D Printed Case for Adafruit Feather Created by Ruiz Brothers Last updated on 2018-08-22 03:59:38 PM UTC Guide Contents Guide Contents Overview Adafruit Feather Box New Update! Check out the TFT Feather
Crickit Carnival Bumper Bot
 Crickit Carnival Bumper Bot Created by John Park Last updated on 2018-08-22 04:08:52 PM UTC Guide Contents Guide Contents Overview Parts Materials and Tools Build the Bumper Bot Cut the Cardboard Chassis
Adafruit AM2320 Sensor
 Adafruit AM2320 Sensor Created by lady ada Last updated on 2018-03-07 09:49:28 PM UTC Guide Contents Guide Contents Overview Pinouts Arduino Usage Install Adafruit Sensor Download Adafruit_AM2320 Load
Cup o' Sound. Created by Becky Stern. Last updated on :30:06 PM EST
 Cup o' Sound Created by Becky Stern Last updated on 2015-02-18 01:30:06 PM EST Guide Contents Guide Contents Overview Circuit Diagram Load Sound and Prepare Components Solder Circuit and Assemble Use it!
Guardian Shield+ Zelda Breath of the Wild
 Guardian Shield+ Zelda Breath of the Wild Created by Ruiz Brothers Last updated on 2018-08-22 04:01:50 PM UTC Guide Contents Guide Contents Overview Articulating Handle Rechargeable Prerequisite Guides
7 Portable Multitouch Raspberry Pi Tablet
 7 Portable Multitouch Raspberry Pi Tablet Created by Ruiz Brothers Last updated on 2017-02-27 04:13:53 PM UTC Guide Contents Guide Contents Overview Portable Raspberry Pi Tablet 7" Multitouch Display Parts
Adafruit MMA8451 Accelerometer Breakout
 Adafruit MMA8451 Accelerometer Breakout Created by lady ada Last updated on 2018-02-06 04:55:03 PM UTC Guide Contents Guide Contents Overview Pinouts Power Pins I2C Pins INT and ADDR Pins Assembly Prepare
Alohamora Bottle. Created by Erin St Blaine. Last updated on :58:53 PM UTC
 Alohamora Bottle Created by Erin St Blaine Last updated on 2017-06-16 10:58:53 PM UTC Guide Contents Guide Contents Introduction Ingredients Tools Code 1. Arduino IDE 2. Teensyduino Installer 3. FastLED
Adafruit MPRLS Ported Pressure Sensor Breakout
 Adafruit MPRLS Ported Pressure Sensor Breakout Created by lady ada Last updated on 2018-09-26 08:51:24 PM UTC Guide Contents Guide Contents Overview Pinouts Power Pins: I2C Logic pins: Other pins: Arduino
DIY Circuit Playground Shields
 DIY Circuit Playground Shields Created by Dave Astels Last updated on 2018-08-22 04:05:06 PM UTC Guide Contents Guide Contents Overview Small Alligator Clip Test Lead (set of 12) Small Alligator Clip to
Circuit Playground Express Laser Tag
 Circuit Playground Express Laser Tag Created by John Park Last updated on 2017-11-14 01:56:23 AM UTC Guide Contents Guide Contents Build a Laser Tag Game Code the Laser Tag Game MakeCode Transmitting IR
3D Printed Camera LED Ring
 3D Printed Camera LED Ring Created by Ruiz Brothers Last updated on 2018-08-22 03:39:34 PM UTC Guide Contents Guide Contents Overview DIY LED Ring Light Prerequisite Guide: Parts List: Tools & Supplies
MiniPOV4 - DIY Full-Color Persistence of Vision & Light-Painting Kit
 MiniPOV4 - DIY Full-Color Persistence of Vision & Light-Painting Kit Created by lady ada Last updated on 2018-08-22 03:41:06 PM UTC Guide Contents Guide Contents Overview Make it! Testing Upload Images
Adafruit 2.4" TFT FeatherWing
 Adafruit 2.4" TFT FeatherWing Created by lady ada Last updated on 2018-01-12 04:29:29 PM UTC Guide Contents Guide Contents Overview Pinouts Power Pins SPI Pins TFT Control Pins Touch Screen control pins
Adafruit MMA8451 Accelerometer Breakout
 Adafruit MMA8451 Accelerometer Breakout Created by lady ada Last updated on 2014-07-31 07:00:14 PM EDT Guide Contents Guide Contents Overview Pinouts (http://adafru.it/dln)power Pins I2C Pins INT and ADDR
PyPortal View Master Created by Ruiz Brothers. Last updated on :51:28 AM UTC
 PyPortal View Master Created by Ruiz Brothers Last updated on 2019-03-13 11:51:28 AM UTC Overview In this project we re building a view master inspired device using Adafruit s PyPortal. The eyepiece makes
Adafruit Mini TFT " 160x80
 Adafruit Mini TFT - 0.96" 160x80 Created by lady ada Last updated on 2017-11-17 05:56:10 PM UTC Guide Contents Guide Contents Overview Pinouts Assembly Prepare the header strip: Add the breakout board:
Using IFTTT with Adafruit IO to Make an IoT Door Detector
 Using IFTTT with Adafruit IO to Make an IoT Door Detector Created by Todd Treece Last updated on 2017-09-12 03:10:35 PM UTC Guide Contents Guide Contents Overview Adafruit.io + IFTTT Wiring Low Power Usage
Mystery Box: NeoMatrix Mk I
 Mystery Box: NeoMatrix Mk I Created by John Park Last updated on 2017-12-01 07:31:05 PM UTC Guide Contents Guide Contents Overview Make the Panels Build the NeoMatrix Keypad Display Modules Metro Mounting
Adafruit Si7021 Temperature + Humidity Sensor
 Adafruit Si7021 Temperature + Humidity Sensor Created by lady ada Last updated on 2017-11-12 06:14:07 PM UTC Guide Contents Guide Contents Overview Pinouts Power Pins: I2C Logic pins: Assembly Prepare
Adafruit DRV2605 Haptic Controller Breakout
 Adafruit DRV2605 Haptic Controller Breakout Created by lady ada Last updated on 2018-08-20 03:28:51 PM UTC Guide Contents Guide Contents Overview Pinouts Power Pins I2C Pins Other! Assembly Prepare the
Phone-Activated Talking Dog Collar
 Phone-Activated Talking Dog Collar Created by Phillip Burgess Last updated on 2017-01-24 08:28:00 PM UTC Guide Contents Guide Contents Overview Circuit Diagram & Code Leather Collar & Greebles Assemble
Arduino Lesson 6. Digital Inputs
 Arduino Lesson 6. Digital Inputs Created by Simon Monk Last updated on 2018-02-27 10:20:04 PM UTC Guide Contents Guide Contents Overview Parts Part Qty Breadboard Layout Arduino Code Push Switches Other
GPS Logging Dog Harness
 GPS Logging Dog Harness Created by Becky Stern Last updated on 2015-01-15 10:15:19 PM EST Guide Contents Guide Contents Overview Circuit Diagram Sew Circuit Use It! 2 3 5 6 15 Adafruit Industries https://learn.adafruit.com/gps-logging-dog-harness
Stumble-Bot. Created by Dano Wall. Last updated on :04:06 AM UTC
 Stumble-Bot Created by Dano Wall Last updated on 2018-09-06 05:04:06 AM UTC Guide Contents Guide Contents Overview Simply Stumbling We Have the Technology Other Supplies Leg Assembly Front Legs Back Legs
Adafruit Color Sensors
 Adafruit Color Sensors Created by Bill Earl Last updated on 2018-11-05 03:48:12 PM UTC Guide Contents Guide Contents Overview Assembly and Wiring Assembly (breakout version only) Position the header Position
Magical Mistletoe. Created by Leslie Birch. Last updated on :45:29 PM UTC
 Magical Mistletoe Created by Leslie Birch Last updated on 2018-08-22 03:45:29 PM UTC Guide Contents Guide Contents Overview Tools & Supplies Circuit Diagram Test the Sensor Prepare Parts Attach LED Sequins
Mini Mac Pi. Created by Ruiz Brothers. Last updated on :43:27 PM UTC
 Mini Mac Pi Created by Ruiz Brothers Last updated on 2018-08-22 03:43:27 PM UTC Guide Contents Guide Contents Overview Build Your Own Mac Pi How it Works Project Advisory Challenges and Expectations Prerequisite
PyPortal NeoPixel Color Picker Created by Kattni Rembor. Last updated on :42:41 PM UTC
 PyPortal NeoPixel Color Picker Created by Kattni Rembor Last updated on 2019-03-27 10:42:41 PM UTC Overview This simple project adds a little color to your life with CircuitPython, PyPortal and NeoPixels.
Raspberry Pi Selfie Bot
 Raspberry Pi Selfie Bot Created by Sophy Wong Last updated on 2018-08-22 04:03:16 PM UTC Guide Contents Guide Contents Overview Parts & Supplies The Circuit Power Circuit Other Connections Laser Cutting
NeoPixel Basketball Hoop
 NeoPixel Basketball Hoop Created by Justin Cooper Last updated on 2018-08-27 12:19:58 AM UTC Guide Contents Guide Contents Overview Parts Needed Power choices! Parts for Option #1 Parts for Option #2 Tools
MCP Bit DAC Tutorial
 MCP4725 12-Bit DAC Tutorial Created by lady ada Last updated on 2016-10-07 04:47:03 PM UTC Guide Contents Guide Contents Overview Wiring Using with Arduino Using the library Increasing the speed Download
Crickit Powered Holiday Diorama
 Crickit Powered Holiday Diorama Created by Isaac Wellish Last updated on 2018-12-04 12:49:07 AM UTC Guide Contents Guide Contents Overview Prerequisite Guides Adafruit Parts Tools and Materials Wiring
Adafruit LED Sequins. Created by Becky Stern. Last updated on :00:06 PM EST
 Adafruit LED Sequins Created by Becky Stern Last updated on 2015-02-19 05:00:06 PM EST Guide Contents Guide Contents Overview Sewing with conductive thread GEMMA sequin hat 2 3 8 15 Adafruit Industries
BLE Light Switch with Feather nrf52840 and Crickit
 BLE Light Switch with Feather nrf52840 and Crickit Created by John Park Last updated on 2019-02-15 07:06:19 PM UTC Guide Contents Guide Contents Overview Parts Adafruit Feather nrf52840 Express Adafruit
Adafruit WINC1500 WiFi Shield for Arduino
 Adafruit WINC1500 WiFi Shield for Arduino Created by lady ada Last updated on 2017-11-27 07:04:37 PM UTC Guide Contents Guide Contents Overview Pinouts SPI Interface Pins WiFi Control Pins SD Card Interface
TSL2561 Luminosity Sensor
 TSL2561 Luminosity Sensor Created by lady ada Last updated on 2018-01-27 12:17:52 AM UTC Guide Contents Guide Contents Overview Wiring the TSL2561 Sensor Breakout Board Prep Wiring up the sensor Arduino
DIY Bluetooth Gamepad
 DIY Bluetooth Gamepad Created by Ruiz Brothers Last updated on 2016-09-03 02:23:21 AM UTC Guide Contents Guide Contents Overview Prerequisite Guides Expectations Parts Tools & Supplies Circuit Diagram