I. Introduction: Page 3
|
|
|
- Shonda Carter
- 6 years ago
- Views:
Transcription
1 Page 1
2 Table of Contents I. Introduction:... 3 II. Using Original Textures Preparing Hair Model for UHT Applying UHT2!UseOriginalTextures Preset Applying UHT2!UseOriginalScalp Preset to Scalp/Skullcap Making Adjustments using the UHT2 Utilities... 4 III. Using UHT2 Scalp Textures Preparing Hair Model for Using UHT2 Scalp Textures Selecting a Color for the Scalp Adjusting the Scalp Color for a better match... 6 IV. Using UHT2 Base Textures Preparing Hair Model for Using UHT2 Base Textures Selecting a Base Color Some Things to Consider When Choosing a Base Color Making Adjustments to the Base Texture... 7 V: Using the Color Mixer Preparing Hair Model for Color Mixer The Interface Using the Blend Colors with the Masks Using the Masks with Mask Position Slider VI: Using Utilities for Fine Tuning First, some important information Brightness Presets Cutout Presets Scatter Presets Shine Presets Tiling Presets Translucency Presets VII: Tips and Tricks VIII: Saving Materials and Color Mixes Saving Materials to Use on Same Hair Saving as a Shader Preset to Use on Any Hair IX: Conclusion: Page 2
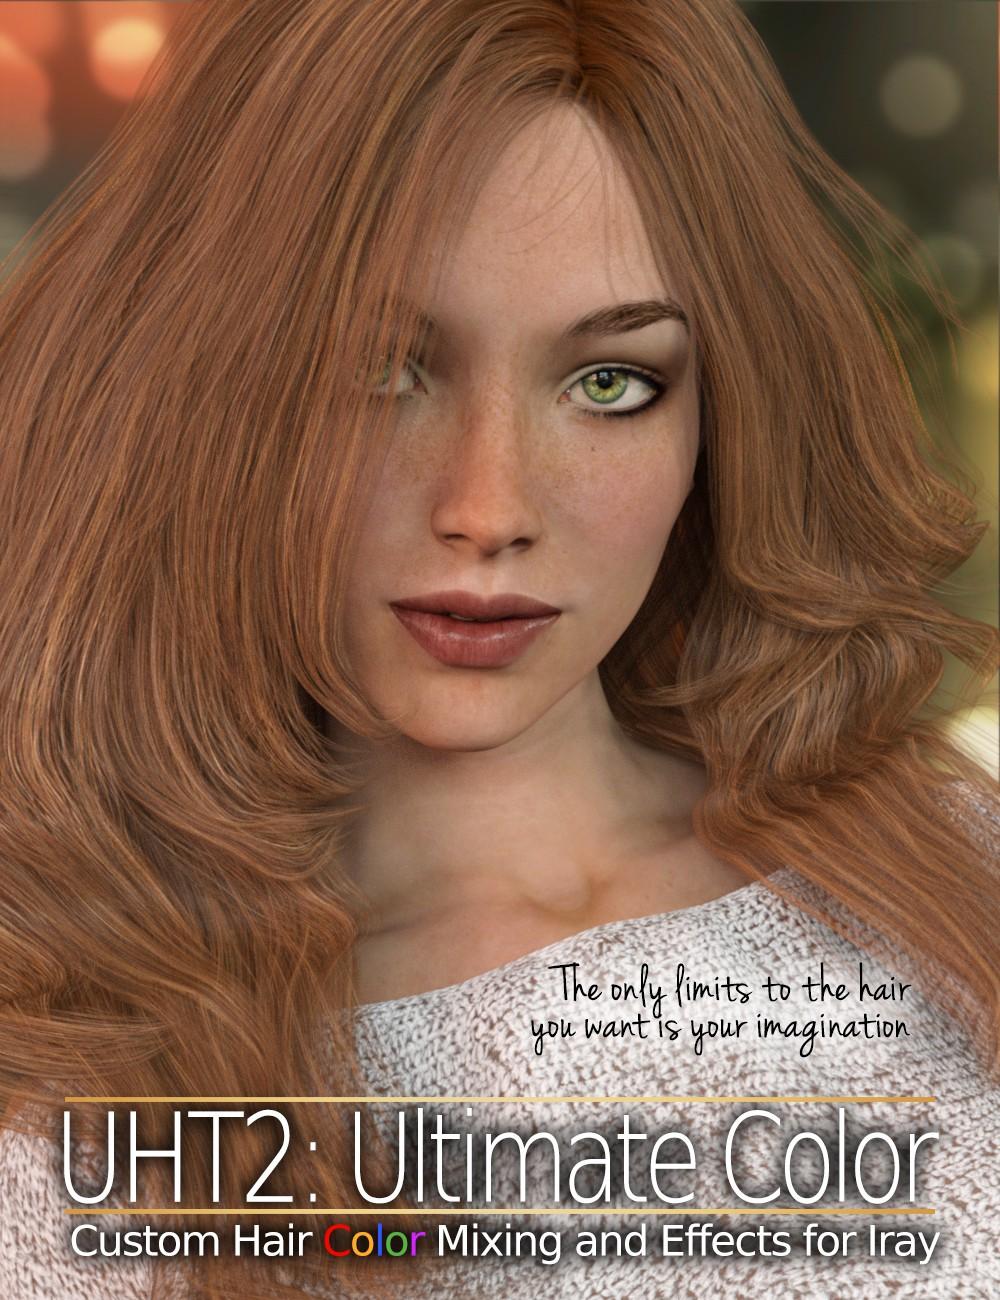
3 I. Introduction: Thank-you for purchasing what you will, hopefully, agree is the most versatile, all inclusive hair texturing solution for Iray renders in Daz Studio. The quality of the hair in your scene can make or break a render, which is why it is so important to start with great textures and shaders. What is UHT2? Universal Hair Textures 2, the much anticipated follow-up to UHT Hair Shaders for Iray. UHT2: Ultimate Color is a set of custom hair textures and shader presets meant to replace those on Hair Objects that do not have their own Iray material presets. But, UHT2 is so much more than that. With the option to use the original textures that come with the Hair Object in your scene, you have the ability to add just the optimized settings for shine, translucency, and bump that UHT2 has to offer, then further refine those settings with the Utility presets. More detail on these functions will follow. UHT2 also has the ability to convert the scalp textures to Iray and apply optimized settings to the scalp, as well as color match the scalp to a wide array of hair colors. But wait, there's more! UHT2 Color Mixer is a specialized script written to enable you, the artist, to mix your own custom hair colors with an almost endless variety of color variation, highlights, lowlights, balayage, or ombre effects. The effects can be used over ANY hair object with vertically aligned UVs. That includes hair that uses its original textures. UHT2 Color Mixer does not change the shader settings. It only affects the Diffuse and Translucency channels, so mixing the colors over existing textures is quite effective. Additionally, with UHT2 you have the option to tile the hair textures as many as ten times across the hair model, allowing you to get realistic hair widths no matter the size of the strands on the UV map. Use translucency presets to allow more or less light to pass between the layers of hair, which adds to the richness of the hair model in your renders. Use brightness presets to slightly darken or brighten the hair where needed without actually changing the color or tone of the textures. This is great for adding just a bit of light in darker scenes, or toning down blown out colors from bright lights. There is no guarantee that UHT2 will work on literally any hair available, but it does work wonders on the vast majority of transmapped hair in your runtime, no matter the vendor, marketplace, figure or generation. Some hair was made with UVs that run horizontally rather than vertically, or the UVs have not been laid out in strips, or maybe there are no UVs at all (such as with some fibermesh hair). These hair objects will not benefit from UHT2 quite as well as hair objects modeled with vertical strips for UVs, but in many cases they can still be improved with the UHT2 settings. A series of videos have been made to demonstrate some of the steps and techniques outlined in the pages to follow. At the end of each section, if a video has been made, there will be a link to the video that corresponds to that section. Additionally, a few other videos have been made to demonstrate some layering techniques not explicitly described in this Guide, such as using Color Mixer to create an Ombre Effect to the hair in your scene. All of the User's Guide videos and the additional videos have been collected in a Playlist on YouTube for easier viewing. UHT2 How-To Videos Page 3
4 II. Using Original Textures 1. Preparing Hair Model for UHT2 If the hair model you are using has textures included that are pleasing to you, but it does not have Iray settings, or if the hair does have Iray settings, but does not render the way you would like, or if you would like to be able to use the Color Mixer on the hair, you would want to first apply the UHT2 presets for using original textures. These presets will setup the proper Iray channels for use with UHT2 utilities, as well as give you a nice starting point for adjusting the materials. Set up your scene, including any lights, and pose your hair as you would like to see it in your final render. Load a preset color from your hair object's list of included textures. In other words, the colors that came with the hair you purchased. Setting up your lights and your scene prior to using UHT2 can be helpful when adjusting the shine and translucency of the hair, but can certainly be done at a later time. Further adjustments to the hair may be required at that point. **Please note, clicking the Original Textures presets will not restore original textures once you have applied any UHT2 textures. These presets will only work properly at the beginning of your hair material setup process. 2. Applying UHT2!UseOriginalTextures Preset To apply the UHT2!UseOriginalTextures preset, first make sure you have the hair object selected in the scene, then select all hair surfaces in the Surfaces Tab. Make sure NOT to select the skullcap (scalp), and also not select any hair ties, ribbons, etc. which are not actually hair. Scalp settings will be handled separately. Double-click the UHT2!UseOriginalTextures thumbnail, located in the Base Textures folder. 3. Applying UHT2!UseOriginalScalp Preset to Scalp/Skullcap To apply the UHT2!UseOriginalScalp preset, first make sure you have the hair object selected in the scene, then select the scalp surface in the Surfaces Tab. Make sure NOT to select any hair surfaces, or any hair ties, ribbons, etc. which are not actually the scalp. Some hair models call this scalp surface Skullcap or Cap, or even sometimes Hair Under. Be sure to check carefully that you have the correct surface selected. Double-click the UHT2!UseOriginalScalp thumbnail, located in the Scalp Textures folder. 4. Making Adjustments using the UHT2 Utilities At this stage, it is usually helpful to turn on the Iray Preview Render in the Daz Studio viewport to see the adjustments as they are applied. Or, you can simply do some quick test renders to view the changes as you make them. The presets provided for adjusting your hair are located in the Utilities folder. They are provided as a quick way to adjust certain settings and will affect more than one material channel at a time. Sometimes, further adjustments by the user might be needed. For example, applying Page 4
5 the UHT2 Translucency 02 Medium preset changes the translucency weight to 0.5, and the next preset changes it to 0.6, so the user might want to apply the preset, then manually adjust the Translucency weight up to 0.55, or down to For detailed descriptions of the UHT2 Utilities, see Section VI: Using Utilities for Fine Tuning To watch an informal video on using the techniques described in this section, follow this link to YouTube: UHT2: Using Original Textures III. Using UHT2 Scalp Textures 1. Preparing Hair Model for Using UHT2 Scalp Textures In most situations, especially with older hair models created before Daz Studio implemented Iray, you will want to use the UHT2 textures for your hair. That often means you want to change the color of the scalp to match the hair you are creating. UHT2 tries to use a neutral starting texture for the hair, then tints the diffuse channel to make the scalp match the hair you are using. The UHT2 scalp presets are actually mini-scripts that look at the original texture and find a map that will give a good, neutral base for tinting. The script first looks for a texture in the Diffuse Color channel. It then copies that texture into the Base Color and Translucency Color channels, then tints them accordingly. If there is no Diffuse Color texture, UHT2 presets will then look for a texture in the Bump channel and copy that into the Base Color and Translucency Color channels, then tint accordingly. For this reason, it is recommended that you look in the textures folder of the original hair product and apply the lightest color the artist has provided to you. In most cases, there is a white or pale blond option. This would be the best choice to use. 2. Selecting a Color for the Scalp In a large number of cases, the hair artist has created the hair without any visible scalp showing in the final render. It may not even be necessary to re-color the scalp at all, since it won't be seen in your render. But, for those situations where part of the scalp is showing, such as the hairline on the forehead, or at the sideburns, you can match very closely the color of the hair on the rest of the head. In my personal work, the scalp coloring is usually left as one of the final steps. After mixing your hair colors and adjusting the shine, brightness, and translucency, you may find that the scalp color you want to use doesn't quite match anymore. By doing this step near the end, you can get a better match. However, applying at least a close match in the beginning might help you visualize your final hair a little easier. UHT2 has matching scalp presets, located in the Scalp Textures folder, for nearly every color available in the Base Textures folder. They are named the same as the base textures to make it easier as a starting point for a color match, but you are certainly not limited to using the matching color. In real life, most hair is darker at the scalp then it is along the length of the hair. For this reason, the scalp colors are just a bit darker than their matching Base Color texture. There are a large number of scalp color presets, some which may look very similar, especially in Page 5
6 the thumbnail preview, but each is slightly different. Experiment with them to get a nice, natural match to your final hair color. To apply a Scalp Preset, make sure you have the hair object selected in the scene, then select the scalp material in the Surfaces Tab, then simply Double-click the preset in the Scalp Textures folder. 3. Adjusting the Scalp Color for a better match All of the adjustment presets in the Utilities folder will apply to scalps just as they do with the hair textures. However, the Tiling presets will not produce favorable results. If you apply a Tiling Preset, the scalp texture will tile and will not look like it is supposed to. If you find that you mistakenly tiled the scalp, and it is too late to Undo, you can apply the UHT2 Tile X1 preset, which will restore the tiling to only a single instance. Use the Brightness presets to make the scalp color a bit darker or lighter without actually changing the color. These are the presets with the light bulbs on the thumbnail. Use the Translucency presets to help lighten or darken the scalp as well. Lower settings will make the scalp appear a bit brighter, while higher settings will make the scalp appear a bit darker. In most situations, you don't see enough of the scalp to want to change the Shine settings, however the Shine presets will work on scalps. Perhaps there is a sharp highlight appearing at the hairline due to the lights in your scene. You can use the Shine presets to lessen this. As with any material settings, some individual adjustments by the user might be necessary. For example, minor color changes might require you to adjust the diffuse tint (labeled Base Color in the Iray material settings). For detailed descriptions of the UHT2 Utilities, see Section VI: Using Utilities for Fine Tuning To watch an informal video on using the techniques described in this section, follow this link to YouTube: UHT2: Scalp Texturing IV. Using UHT2 Base Textures 1. Preparing Hair Model for Using UHT2 Base Textures If you plan to use the UHT2 Base Textures for your hair model, there is virtually no preparation needed before using the presets. Some hair models load without textures at all. If the hair model loads solid white with no apparent transparency, be sure to select a texture from the default textures that came with the hair product. This will put in the required transparency maps that UHT2 uses to texture the hair. It is recommended that you apply the lightest default texture available, especially if you plan to color the scalp. 2. Selecting a Base Color There are a large number of base color presets, some which may look very similar, especially in the thumbnail preview, but each is slightly different. The base colors look quite nice on their Page 6
7 own and may be used without Color Mixing, especially for distant shots. There is not much need to layer colors if you are not rendering a close up. To apply a Base Color Preset, make sure you have the hair object selected in the scene, then select the hair materials in the Surfaces Tab, then simply Double-click the preset in the Base Textures folder. 3. Some Things to Consider When Choosing a Base Color If you intend to use the Color Mixer, there are a couple of things to consider first when choosing your base color. If you want, for example, to simply put some blonde highlights on a brown hair, simply select the brown base you want. Then use Color Mixer to add the highlights. If you are rendering a closeup and want to layer several colors together for a unique, multi-toned look, you want to start with a base color that is a shade or two darker than what you ultimately want. As you layer colors over the base, it will likely appear that the base looks lighter. It isn't any lighter, but the eye sees the dark base and the highlights together, giving the illusion that the base has gotten lighter. Another thing to consider is the roots. There are masks in the Color Mixer that will allow you to place darker roots on the hair, but depending on the UVs, this could be tricky to get just right. If you start with your roots color as your base texture, you can layer another base color over it, adjusted vertically down just slightly, using the Color Mixer and one of the higher-coverage masks. For example, if you know you want a Ginger colored final hair, but you want a bit of natural root coloring, you might use Deep Ginger or Chestnut Brown as your base color, then in the Color Mixer, you would layer Medium Ginger using Mask001 vertically placed at around 10 on the slider. More details on using the Color Mixer are in Section V: Using the Color Mixer. Also to consider, don't be afraid to mix base colors on different parts of the hair. If the hair designer has set up multiple material zones, such as Under Hair, or Fine Hairs, etc. you can apply slightly darker or lighter bases to each section. Maybe the Fine Hairs will have a shade or two lighter than the main hair, or the Under Hair will be a shade or two darker. This will give more depth to the overall look of the hair, resulting in a more realistic and natural color. When using the Color Mixer to add highlights, it does not matter that all the hair does not have the same Base Color. This is the reason so many Base Textures have been provided that are very close in tone and value, and are arranged in the Base Textures folder by overall value. 4. Making Adjustments to the Base Texture The Utilities folder contains many presets to help adjust the overall look of the Base Textures. Base textures are loaded in tiled only once, so depending on the UVs, the hair may look coarse, or spaghetti-like. Five tiling presets are provided in the Utilities folder (1 through 5 times) to help fit the strands to the UVs better. Keep in mind, if you change the tiling on the base texture, then decide later to load a different base texture, the tiling will reset to 1. Changes made in the Color Mixer will not affect tiling, nor any of the other Utilities presets (except, obviously, the tiling presets). Only applying a new Base Texture from the Base Textures folder will reset the tiling. An example of using the Utilities to adjust the base colors: If you choose to do a bottom layer of hair with Sunny Blonde, then a top layer with Pale Blonde, the difference between the two Page 7
8 shades might be too contrasting for your taste. You can try to either lighten the Sunny Blonde by using the Brighten Preset, or deepen the Pale Blonde using the Darken Preset. Or, change the translucency setting of either Blonde using the Translucency Presets. Lower translucency values will make the hair appear brighter, while higher settings will make it appear darker. As with any material settings, some individual adjustments by the user might be necessary. For example, minor color changes might require you to adjust the diffuse tint (labeled Base Color in the Iray material settings), or manually changing the Translucency Weight to a value not given using the presets. For detailed descriptions of the UHT2 Utilities, see Section VI: Using Utilities for Fine Tuning To watch an informal video on using the techniques described in this section, follow this link to YouTube: UHT2: Using Base Textures V: Using the Color Mixer 1. Preparing Hair Model for Color Mixer If you have followed the steps outlined in Section II or Section IV above, there is no additional preparation required to use the Color Mixer. If you started with original textures, be sure you have applied the UHT2!UseOriginalTextures preset on the hair surfaces before using Color Mixer. This will ensure that all of the required material channels are on the hair surfaces and that all of the maps used by Color Mixer are loaded into Daz Studio. If you started with UHT2 Base Textures, all of these settings are already on the hair surfaces. 2. The Interface The Color Mixer interface is divided into four simple sections: Blend Color: This is represented in the upper left corner with a large thumbnail preview of the hair texture that will be layered over whatever hair texture is currently on your model (hereafter referred to as current texture ). A slider below the thumbnail allows you to scroll through the available blend colors. The name of each blend color is indicated above the slider. Mask: The masks control where the Blend Color will overlay the current texture. Black areas of the mask indicate where the current texture will show, whereas white areas of the mask indicate where the Blend Color will show. It is represented in the upper right corner with a large thumbnail preview of the mask as well as a basic representation of how it will blend over the current texture. A slider below the thumbnail allows you to scroll through the available masks. The name of each mask is indicated above the slider. Mask Position (Up/Down): This slider will allow you to change the vertical position of the mask, further controlling where the Blend Color will lay over the current texture. This is most helpful when using masks that have a specific hairline, such as ombre or balayage. Negative numbers will move the mask up, positive numbers will move the mask down. This sounds opposite of what you might expect, but it is a core behavior of Layered Image Editor Page 8

9 and could not be changed. Blend Opacity: This slider controls how strong the Blend Color will overlay the current texture. At 100, the full strength and color of the Blend Color will be applied. Keep in mind, however, that the mask also controls how strong the blend will be. Pure white areas of the mask will be 100% color, while pure black will be 0% color. Any gray areas between will be lighter versions of the Blend Color. For this reason, it is recommended to only lower this number slightly or you may lose too much color and not see enough of the effect you are trying to achieve. Slightly meaning lower it to a number between 60 and 100 to avoid losing the blend altogether. One very good use for this feature would be to give an overall tint to your current texture. If, for example, the hair seems too light, you can overlay a darker color using Mask001 with opacity set to 60 and you will get a slightly darker color without losing all of the other highlights and color blends that you put in before. 3. Using the Blend Colors with the Masks The Base Colors that come with UHT2 look pretty good on their own, and in distant shots they may be enough to make your character's hair look great. But, for closer renders, or for truly unique color combinations, Color Mixer is the way to go. The Blend Colors use the exact same textures as the Base Colors, so they will line up perfectly every time. Depending on the effect you are going for, choose a Blend Color that is either very close to the Page 9
10 current texture (Base Color), or boldly contrasting to it. For blonde hair with just a few touches of highlights, you might choose a Blend Color only a shade or two lighter than the current texture. For black hair streaked with bright red highlights, you could either start with a black base, then layer a red Blend Color over it, or start with the red base and blend a black Blend Color over that. Or run the Color Mixer several times, using a different Blend Color and Mask each time, creating a rich variety of tones across the hairstyle. It is recommended to start with the darkest color, then blend progressively lighter tones with each layer. If you layer a color and it is not dark enough, you can layer the same color with the same mask again and it will be more intense. Many of the masks might look very similar in the preview Thumbnail, but each one is completely unique. So, even if you choose two masks that look like they cover the hair the same, they will actually lay over each other differently, giving you a proper blend. You can start with a dark base color, then layer a medium color with Mask001, then do it again with a light color using Mask003 and you will get three colors blended together with highlights and lowlights. To create interesting ombre or balayage (a softer ombre), you can use one of the ombre masks and, using 3 or 4 passes with Color Mixer and a different color each time, move the mask down about 10 percent each time and you will have a colorful gradient. 4. Using the Masks with Mask Position Slider Any of the masks can be moved up or down to control where they will place the Blend Color over the current texture. Each of the masks has a black area at the top which represents roots, if you will. This line can be moved down by entering POSITIVE numbers into the Mask Position slider. As stated earlier in this guide, to make dark roots it is best to start with the darker color as your Base Color, then using one of the masks with heavier coverage (such as Mask001) and a lighter color, then move the mask down about 10 units using the Mask Position slider. Masks with a solid white area at either the top or bottom, and a soft transition line to the black area, have been included with Color Mixer, however I think it looks more natural to use one of the masks at the beginning of the slider list. The final six masks in Color Mixer have either mostly black or mostly white, and then a line to separate them. The masks that put the Blend Color at the top of the head need to be moved UP to move the hairline and will therefore require NEGATIVE numbers in the Position slider. Think of it this way: If you want the color to show from the roots to about 10% blended into the current texture, you would set the slider to -90%. To put the roots at 35%, move the slider to -65%, etc. To watch informal videos on using the techniques described in this section, follow this link to YouTube: UHT2: Using Masks in Color Mixer Page 10
11 VI: Using Utilities for Fine Tuning 1. First, some important information The UHT2 Utilities are a set of presets located in the Utilities folder that allow for easy adjustments to the brightness, glossiness, translucency, and tiling of the UHT2 Shaders. Each of the presets only affects certain channels in the shader, so they make a good shortcut to making some specialized changes to each part of the shader. As with any material setup, additional tweaking by the user may be required, but for the most part we tried to make it as easy as possible to get great looking Iray rendered hair with little effort. 2. Brightness Presets These three presets, featured with a light bulb on the thumbnail, are for making a slight increase or decrease to the brightness of the diffuse and translucency textures. They work by slightly shifting the color scale. When you apply a Base Texture from the Base Textures folder, the textures load in at 1.5 color scale. This makes them vivid and bright enough for your scene without adjusting image gamma. UHT2 B_Brighten raises the color half a step (to 2.0), while UHT2 B_Darken lowers it half a step (to 1.0) from the default color. UHT2 B_Revert simply sets the color back to the default (1.5). This is technical information that you probably don't care about, but is good to know anyway. These presets are best used when you have used two Base colors that are very close in value. Brightening the lighter base or darkening the darker base will provide more color separation, giving a richer look. Conversely, darkening the lighter base or brightening the darker base can bring two base colors closer to a match in tone, making the difference less extreme. It's a very subtle effect that is not visible in the viewport until you render (or use the Iray Render preview). Another great use for the Brightening presets is to bring the value of the scalp, or skullcap, closer to match the hair that is growing out of it, making the blend smoother and eliminating the harsh transition between scalp color and hair color that can happen. You would get as close as you can using the Scalp Texture presets and other adjustments (such as translucency or diffuse color changes), then apply a Brightness preset if it is still slightly mismatched. 3. Cutout Presets In some cases, the transparency maps that come with a particular hair model do not translate well when converted to Iray shaders. They may appear too thin and whispy, with more transparent areas than intended. Most times, simply increasing the cutout opacity in the shader is enough to balance the blacks and whites of the transparency map. Four Cutout Presets are provided to make this process more simple. The presets change the Cutout Opacity to 1.0, 1.25, 1.5, and 2.0, which should take care of the transparency issues in most cases. 4. Scatter Presets Depending on the lighting in your scene, hair with UHT2 shader settings applied may appear waxy or too translucent, which can sometimes have an effect that doesn't look the way you want. It may make the glossiness too extreme, or even interfere with the transparency of the Page 11
12 cutout maps. A simple setting in the translucency called Base Color Effect can be set to either Scatter Only or Scatter & Transmit. By default, UHT2 uses the Scatter & Transmit setting, but if you wish to see how the hair looks with Scatter Only, you can simply use the UHT2 Scatter OFF preset to switch the setting on all selected hair surfaces. UHT2 Scatter ON switches the setting back to Scatter & Transmit. Sometimes the effect is subtle, other times it can make a big difference in how the hair appears when rendered. 5. Shine Presets The shine presets are, quite simply, a set of presets to control the overall shine of the hair when rendered. You won't necessarily notice the difference in the viewport unless you have Iray Preview render activated, or until you do a test render. The presets use a combination of adjustments to the Glossiness and Top Coat settings to achieve a range of shine from barely glossy at all to very glossy. Four presets have been provided to help achieve the best look for your render. This was one reason it was suggested you set up your scene lighting before beginning to color the hair. If you have a high shine value set to the hair, and then add a bunch of light sources, you may end up with hair that is much shinier than you intended. The shine presets work with scalp textures as well as hair textures, and they work whether you use UHT2 textures or the original hair textures. If you use them with any shader other than the UHT2 shaders, results may vary since they were designed to take advantage of UHT2's glossiness maps. 6. Tiling Presets Traditionally, before Iray became available for Daz Studio, the ability to tile a hair texture map across a hair model was not an option. Increasing the number of Horizontal Tiles in a shader would globally tile ALL texture maps fed into the shader. Since transmapped hair, by definition, uses transparency maps to create the realistic look of thousands of strands of hair, or the irregular edge of a hairline, tiling all maps would have also tiled the transparency maps, effectively ruining the look of the hair. Now, with Iray, we are able to independently tile any map in any channel of the shader without affecting the other maps. The Tiling Presets in the Utilities folder provide the opportunity to tile all of the necessary maps without affecting the transparency. And the presets change all the maps at once, without the need to individually change them. Currently, the UHT2 shaders use 9 maps to control the texture of the hair, not counting the transparency maps. Imagine having to change all of them for every surface of the hair? Why tile the hair textures? Depending on how the UVs were created for a particular hair object, a texture might be stretched or compressed across the UV map. It can result in hair strands that look very coarse, or like spaghetti. By increasing the number of tiles horizontally across the UVs, you get a tighter concentration of individual strands, resulting in a smoother, more realistic hair. Base textures are loaded in tiled only once. For many hair objects, this is fine. Most, however, seem to benefit from at least 3 tiles. Ten tiling presets have been provided in the Utilities folder (UHT2 Tile 01 through 10) to help fit the strands to the UVs better. Keep in mind, if you change the tiling on the base texture, then decide later to load a different base texture, the tiling Page 12
13 will reset to 1. Changes made in the Color Mixer will not affect tiling, nor will any of the Utilities presets. Only applying a new Base Texture from the Base Textures folder will reset the tiling. If you change tiling to anything but 1, keep in mind that your Color Mixing will be tiled as well, so if you are going for large chunky highlights, they will get tiled, compressing them and they will not be as big or chunky as you might like. 7. Translucency Presets Translucency is basically how much a particular surface allows light to shine through an object. For example, a sheet of paper has one translucency value, while a sheet of aluminum foil has another translucency value. The paper will allow light to shine through it, while the foil will not. Even though they are the same thickness, aluminum is not as translucent as paper. With that in mind, the more translucent a surface is, the more its color is affected by light and by the shadow of the object behind it. In the case of 3d hair, what is behind a strip of hair is usually another strip of hair, which is going to block some of the light passing through the first strip of hair. As a result, the layers appear a bit darker the higher you set the translucency. In some cases, this is a really nice effect and can give volume and richness to the hair. However, in some lighting situations, or with some hair styles, this can actually cause odd shadows in the hair, so a lower translucency setting is desirable. UHT2 comes with five (5) Translucency Presets, from None to High, maxing out at 0.8. Any higher than 0.8 would leave the hair entirely to dark in some lighting or absolutely blown out white in a scene with back lighting. Setting the translucency to 0 can make the hair look very flat and papery. Using the None setting is not recommended except on scalps to help give the lighter colors a boost. VII: Tips and Tricks Though mentioned before, it bears repeating... If you plan to color the scalp, it is best to apply one of the default textures that is close to white in color before you attempt to apply a Scalp Texture. This will help keep the Scalp Textures colors as pure as possible. Some hair objects load in at base resolution, meaning it has not been subdivided. Subdividing hair can make it smoother with more curves and less sharp angles in the bend of the hair. Iray can handle subdivided hair meshes much better than previous render methods. It is recommended that you subdivide the hair. As with any material preset you use, some manual adjustments to the UHT2 materials may be required to suit your scene. Factors such as scene lights, HDRI lighting, distance from the camera, shadows cast from other objects in the scene, etc., all contribute to overall appearance of the hair. Users who are familiar with the Layered Image Editor (LIE) may even find better control of the color mixing by manually loading in masks and color overlays in several layers, instead of using the Color Mixer script. Base Colors and Masks are located in the Runtime/Textures/SloshWerks/UHT2 directory. Page 13

14 VIII: Saving Materials and Color Mixes Simply saving your scene will save any UHT2 settings you have applied to your hair, including Color Mixer layers. Scenes saved this way will recreate the Color Mixer layers upon reloading the scene, which will add a small amount of time to scene loading. Tests have shown that this extra time is minimal and not significant. Just be aware that there is a small lag time while UHT2 recalculates any Color Mixing you may have done. If you did not use Color Mixer, the load time will be normal as there is no calculating to be done. 1. Saving Materials to Use on Same Hair This is as simple as selecting the hair model in the scene tab, then saving a material preset. To save a material preset, go to File:Save As: Material(s) Preset... This will save your current texture work for use on the same hair model in future scenes. Be sure to save the preset in a location of your choice that you will remember later, and name it appropriately. For example, Portia Hair Blonde Mix 01 or something similar. When applying this new Material Preset to this hairstyle in future scenes, there will be a slight delay as the Layers are recalculated, but the delay is minimal. After applying the material preset, you can continue to add more color layers or use any of the Utility presets. 2. Saving as a Shader Preset to Use on Any Hair To save a shader preset, select the hair object in the scene tab. Then, select only ONE surface from the Surface Panel. Be sure the surface you select is one that you have applied UHT2 settings to. Go to File:Save As: Shader Preset... This will save your current texture work for use on any hair surface in future scenes. When the Shader Save dialog box comes up, expand the list shown and navigate to the Geometry section and uncheck Geometry (see picture below). This will ensure that you do not overwrite the transparency maps or displacement on other hairs that you apply the shader to. Be sure to save the preset in a location of your choice that you will remember later, and name it Page 14
15 appropriately. For example, Blonde Mix 01 Shader or something similar. When applying this new Shader Preset to hairstyles in future scenes, there will be a slight delay as the Layers are recalculated, but the delay is minimal. To apply the shader to any hair surface, simply select the hair model in the scene tab, then in the Surfaces Tab, select any hair surfaces you want to apply the shader to, then double-click the new preset you created. After a small delay, the new shader will be applied to the selected hair surfaces, complete with any tiling changes you made, or brightness, translucency, etc. Further adjustments may be needed to suit your scene lighting or the style of the hair. After applying the shader, you can continue to add more color layers or use any of the Utility presets. To watch an informal video on using the techniques for saving presets as described in this section, follow this link to YouTube: UHT2: Saving Presets to Use Later IX: Conclusion: Thank-you so much for purchasing UHT2: Ultimate Color. You may find yourself using it in every Iray render. I teamed up with DraagonStorm on this project, due to DraagonStorm's brilliance with Daz scripting. We tried to make the product as versatile and easy to use as we could by using a combination of scripting and traditional shader presets optimized to give the best look, with lots of text editing to control where the effects are placed without disrupting your other settings. Enjoy using the product and by all means, share your renders! There is no greater joy than seeing great art created with something you contributed to the process. I have made several videos showing some of the techniques described in this manual, as well as a few additional videos showing how to apply effects, such as ombre and root darkening. Please check out the playlist on YouTube: UHT2: How-To Videos Thanks again, Brian (SloshWerks) Page 15
Age Progression - Photoshop Tutorials
 Age Progression - Photoshop Tutorials Disclaimer: None of the given Photoshop Tutorials are written by me. They are all taken from various sources on the Internet and I compiled some of them for you. Hope
MRL Mutations. Mihrelle 2016
 MRL Mutations Mihrelle 2016 MRL Mutations This product is all about expanding possibilities. MRL Mutations is a toolset designed to enable you to push the boundaries of what is possible with Iray Character
Word Tattoo User Manual. 2017, RiverSoft Art
 User Manual Word Tattoo User Manual 2017, RiverSoft Art Contents Introduction... 1 Features... 1 How to use Word Tattoo... 2 Advanced Information about Word Tattoos for Fingers, Fingernails, and Toes...
BY: IGNISSERPENTUS DATE OF RELEASE: SEPTEMBER 2012 DAZ STORE DAMAGE INC WEBSITE
 BY: IGNISSERPENTUS DATE OF RELEASE: SEPTEMBER 2012 EMAIL : IGNISSERPENTUS@DAMAGEINC3D.NET DAZ STORE DAMAGE INC WEBSITE LIST OF CONTENTS :: EDEN'S FLAME OUTFIT :: CORSET PANTS CHOKER BELT HAT BOOTS EYESCOPE
PAINTING HAIR IN PHOTOSHOP
 PAINTING HAIR IN PHOTOSHOP Well, you guys have asked and asked for it... so it was high time I sat down and did a tutorial on how I paint my hair. Now, this will be a fairly long tutorial. There's a lot
Using BodyPaint 3D with LightWave
 Addendum 23 Plugins ADDENDUM 1 Exchange Plugins Using BodyPaint 3D with LightWave If you are a LightWave user, the quickest way to get your models from LightWave to BodyPaint 3D then back again once you
GUIDE TO GORGEOUS ACHIEVE AND MAINTAIN YOUR BEST GRAY WITH HELP FROM THE CLAIROL PROS
 GUIDE TO GORGEOUS ACHIEVE AND MAINTAIN YOUR BEST GRAY WITH HELP FROM THE CLAIROL PROS The crown, a gold standard of authority and excellence, is the icon of our brand. It is also our way to let you know
Using ONYX Separation Control Tool. Contents: What is Separation Control? Using ONYX Separation Control Tool. Separation Control Tips and Tricks
 Using ONYX Separation Control Tool Contents: What is Separation Control? Comparison to Basic/Advanced profiling workflow Advantages Using ONYX Separation Control Tool Enabling Separation Control Configuring
Instructions For Dyed Hair At Home After. Highlights >>>CLICK HERE<<<
 Instructions For Dyed Hair At Home After Highlights When you've already colored your hair, those strands have been through the permanent Follow instructions to finish hair color process and style as normal.
for more please visit :
 articlopedia.gigcities.com for more please visit : http://articlopedia.gigcities.com file:///d /important.html9/13/2006 8:50:19 PM Depending on the style, anime hair can be very complex. However, if you
Content. Manual Version Piercing Props Props Placing the Props Remarks...
 Manual Version 1.0 Content 1. Piercing Props........................................................ 1.1. Props.......................................................... 1.. Placing the Props..................................................
LAYERED STAR PICK-ME-UP
 learn. share. LAYERED STAR PICK-ME-UP Sexy, fun, super inspiring, crazy easy, and always gorgeous. Meet the hottest hook-up to hit the hair scene: the Layered Star Cut and Pick-Me-Up Color Technique the
Adobe InDesign. Figure 1 Apply fill and stroke color to text by using the Swatches panel
 How to manage colors Adobe InDesign provides a variety of ways for you to manage colors (Figure 1): from selecting and applying color, to using swatches and swatch libraries, and applying tints and transparencies.
THE COLOUR FUNDAMENTALS. Fundamental techniques outline all the skills required to master any highlighting colour placement
 FUNDAMENTALS Fundamental techniques outline all the skills required to master any highlighting colour placement Classic Full Head Highlights Classic Half Head Highlights Classic T-Section Highlights 1
Illustrator Tutorial: Holland Tulip Field
 Illustrator Tutorial: Holland Tulip Field This tutorial will show you how to create a beautiful Holland landscape filled full of colorful tulips and a traditional Dutch windmill. We will start by creating
Clothing Fit Helpers Genesis 8 Male and Female. Manual And Instructions. by SickleYield
 Clothing Fit Helpers Genesis 8 Male and Female Manual And Instructions by SickleYield Table of Contents Introduction...3 Chapter 1: Using Clothing Fit Helper to Fix Autofit Results...4 Chapter 2: DeCrackifier,
101 Style Shortcuts for Busy Women
 101 Style Shortcuts for Busy Women NANCY NIX-RICE MAKEUP MAGIC Makeup is also an accessory one we probably wear every day. Whether you consider it a necessary evil or a ton of fun, these tips will save
Buttons FAST Pack User Guide
 Buttons FAST Pack User Guide Buttons FAST Pack 3 Contents Introduction...4 How to install...4 Using the Buttons Action...5 Glass style buttons...5 Round Rect style buttons...6 Index...8 4 Buttons FAST
chromastics The Evolution of Hair Color Technical and Training Manual
 chromastics The Evolution of Hair Color Technical and Training Manual Chromastics Technical and Training Manual Table of Contents Hair Color Introduction 3 Pure Tone vs. Blended 4 Chromastics/American
CONTENTS CUTRIN AURORA 3 SOME CHROMATICS: PRIMARY COLOR, SECONDARY COLOR, COMPLEMENTARY COLOR 4 DARKNESS, SHADE, CUTRIN NUMBERING SYSTEM 6
 COLOR GUIDE CONTENTS CUTRIN AURORA 3 SOME CHROMATICS: PRIMARY COLOR, SECONDARY COLOR, COMPLEMENTARY COLOR 4 DARKNESS, SHADE, CUTRIN NUMBERING SYSTEM 6 CUTRIN AURORA PERMANENT COLOR 8 CUTRIN AURORA AMMONIA-FREE
From Marianne Walker s blog
 From Marianne Walker s blog www.ilikemarkers.blogspot.com NOTE: The colors as you see them on your computer monitor or printed may be different than the actual pens. Skin Colors - part 1 Since we are going
chromastics The Evolution of Hair Color Technical and Training Manual
 chromastics The Evolution of Hair Color Technical and Training Manual Chromastics Technical and Training Manual Table of Contents Hair Color Introduction 3 Pure Tone vs. Blended 4 Chromastics/American
Drawing the Eye. * Follow the directions below. Complete your packet in the spaces provided.
 Portrait in Pieces Exercise 1 Drawing the Eye The eye is one body part that is exceedingly detailed, and the appearance changes as the direction of its gaze changes. Eyes are also very expressive, which
QUESTIONS AND ANSWERS GUIDE
 Version 021518 1. DO STYLISTS AND COLORISTS WANT PERFORMANCE AND SPEED? TIME IS MONEY. NOW DEPOSIT HIGH PERFORMING COLOR FASTER. TRADITIONAL PROCESSING METHODS FOR DIMENSIONAL COLOR OR LIFT-AND-DEPOSIT
After THE PREP, the section regarding night time maintenance will follow. That section is labeled KEEP IT CUTE.
 INTRO Hey y all! I am very excited to bring you this Short Hair Bedside Bible Quick Guide. In the following pages I will walk you through how to kill it every time with your short hairstyles. This Guide
Chromastics The Evolution of Hair Color. Technical and Training Manual
 Chromastics The Evolution of Hair Color Technical and Training Manual 1 Table of Contents General Information Introduction 3 Chromastics/American Level System 4 Chromastics vs. Blended European 5 Converting
THE GUIDE TO GOING LIGHTEN YOUR LOOK WITH HELP FROM THE CLAIROL PROS - 1 -
 THE GUIDE TO GOING LIGHTEN YOUR LOOK WITH HELP FROM THE CLAIROL PROS - 1 - GO BLONDE CONFIDENTLY WITH CLAIROL S RANGE OF PROFESSIONAL PRODUCTS AND EDUCATION TO LIFT YOUR BLONDE TO NEW HEIGHTS. clairolpro.com/blonde
Hat And Hair Helper G2. A Manual By SickleYield
 Hat And Hair Helper G2 A Manual By SickleYield Table of Contents Introduction...3 Chapter 1: Locating The Product...4 Chapter 2: Using the Product With Hair...6 Chapter 3: Using Two Helpers On One Figure...11
Chapter 21 Haircoloring
 Chapter 21 Haircoloring MULTIPLE CHOICE 1. Clients who have their hair colored usually visit the salon every weeks. a. two to four b. three to six c. four to eight d. three to twelve ANS: D PTS: 1 REF:
BLONDES UNLIMITED TECHNICAL GUIDE 1
 NEW! BLONDES UNLIMITED TECHNICAL GUIDE 1 WHY CREATIVE HIGHLIGHTING For so many clients, finding just the right personalized, natural color look is a must. It s no surprise, then, that balayage continues
Crea2tive Color Techniques Class T T r r a a iinniinng g S c S hcehdeudleu le Techniques: Accent Lights- Tri-Lights- Partial Highlight
 Training There are various techniques for hair color. A single application process color is striking however, adding definition of lightness or darkness does so much more for your complexion. High lights
the Joico Creative Team found inspiration in the way the angles of a prism refract light to create many different plays on shape and color.
 diffusion the Joico Creative Team found inspiration in the way the angles of a prism refract light to create many different plays on shape and color. The collection is prism-like in both form and function,
Square Layer. Square Layer: Step-by-Step Guide
 Square Layer Square Layer: Step-by-Step Guide A one-length technique is used to create the baseline. This can be blunt cut or serrated depending on the texture. The hair is combed down to the natural fall
the Joico Creative Team found inspiration in the way the angles of a prism refract light to create many different plays on shape and color.
 diffusion the Joico Creative Team found inspiration in the way the angles of a prism refract light to create many different plays on shape and color. The collection is prism-like in both form and function,
RED LIPSTICK October 26,
 RED LIPSTICK October 26, 2017 1 QUESTION PLAN # Type Question Options 1 Open Question 2 Rating Question What are you experiences and feelings about red lipstick? What are some of your dislikes about red
There are four basic airbrush painting strokes that everybody should practice before they begin: dots, lines, fade lines, and dagger strokes.
 Airbrush Strokes and Techniques No matter what you plan to do with your airbrush cake decorating, t-shirt design, temporary tattoos, auto painting, etc. you ll need to first learn the basics. This will
Where creative colorists mix!
 Where creative colorists mix! Scruples Color Art Conditioning Color Gloss 0 ammonia-free, pure base mixing colors are all you need to produce over 50 no-lift, deposit-only haircolors Scruples COLOR ART
Male haircuts Parallel layers
 Male haircuts Parallel layers Hairdressing-Training.com Download - Page 1 of 24 Parallel layers You need to take extra care when cutting short hair and sharp, defined haircuts. The client's hairline and
FIBER OPTIC IRONING DIODE LASER EPILASION!
 THE LAST TECHNOLOGY IN IRON DIODE LASER FCD FIBER OPTIC IRONING DIODE LASER EPILASION! K142186/878.4810 17.04.2015 ADELA 810 FCD is THE FIRST AND THE ONLY "Ironing Diode Laser Hair Removal Device" in the
COLOR FRESH SERVICES COLOUR BALANCE COLOUR REFRESH COLOUR DISCOVERY 3 COLOUR SERVICES TO DELIGHT YOUR CLIENTS
 COLOR FRESH SERVICES 3 COLOUR SERVICES TO DELIGHT YOUR CLIENTS COLOUR REFRESH COLOUR BALANCE COLOUR DISCOVERY Keep your colour as beautiful as the day it was created while adding fabulous shine with perfect
A while back, G.K. artist Randy Pavatte started a thread on ClubHouse hobby forum entitled Moving up the scale...maybe.
 A while back, G.K. artist Randy Pavatte started a thread on ClubHouse hobby forum entitled Moving up the scale...maybe. Known as deepgroover on ClubHouse, Randy is an award-winning modeler and has been
DEMI-PERMANENT LIQUID COLOR 16 NEW SHADES THAT SHINE! LUMISHINE GRAY BLENDING SERVICE IDEAS SHADE TONE GLAZE SERVICE IDEAS REFRESH SERVICE IDEAS
 LUMISHINE DEMI-PERMANENT LIQUID COLOR 16 SHADES THAT SHINE! SHADE TONE GLAZE SERVICE IDEAS REFRESH SERVICE IDEAS GRAY BLENDING SERVICE IDEAS 10NC Natural Copper Lightest On hair prelightened to pale yellow,
EDUCATION IN-DEPTH PRODUCT KNOWLEDGE FLIP FOR WELLA COLOR CHARM
 EDUCATION WORKBOOK IN-DEPTH PRODUCT KNOWLEDGE FLIP FOR WELLA COLOR CHARM IRRESISTIBLE has a new name Embrace the Experience to Irresistibly Touchable Color Introducing Wella Color Tango, a permanent masque
Makeup Application Tips Eye Bigger Than The Other
 Makeup Application Tips Eye Bigger Than The Other I promise you, you can do all the eye makeup looks that everyone else can. but they're also extremely creased and a million times more oily than any other
INDEX. Nuance professional Crema. Sensitivity Test/Basic color application. Color Application - Virgin Hair. Color Application Basic
 COLOR MANUAL INDEX Nuance professional Crema Sensitivity Test/Basic color application Color Application - Virgin Hair Color Application Basic Nuance Crema & Contrast 1 2 3 4 Photo Mixing ratio Choosing
Introduction. Getting Started
 Introduction When it comes to alcohol markers, Copic Sketch markers are the gold standard. With over 350 colors in the line, an artist with the full collection of colors enjoys the freedom to create infinite
Haircoloring. Know client's motivation: Perform a predisposition & preliminary strand test. Porosity ability to absorb moisture & chemicals
 Haircoloring Know client's motivation: Perform a predisposition & preliminary strand test Hair structure is a determining factor: Cortex layer gives strength & elasticity Coarse large diameter = longer
REALISTIC WATERCOLOR FOR BEGINNERS with Kelly Eddington
 REALISTIC WATERCOLOR FOR BEGINNERS with Kelly Eddington Week 4: Limited-Palette Portrait Portraits are challenging, but they re a lot less difficult when you cut your colors down to just a few. You will
I took to the Internet and did a lot of searching and researching and found one that I really wanted to try...herbatint.
 Thursday, 16 November 2017 Review Herbatint Permanent Hair Colour - 7N Blonde Over the years I've bleached and highlighted my hair not realising how much damage I've been doing, I used to use a ton of
Colour 2 Advanced. COLOUR 1 INTRODUCTION TO COLOUR Colour
 Colour 2 Advanced COLOUR 1 INTRODUCTION TO COLOUR Colour WORKSHOP CONTENT Hair Science Colour Chart Tone and Reflect High-lift and Bleaching Application Techniques Colour Scenarios HAIR SCIENCE The three
Can I remove the hair from my nipples? Absolutely, the flash represents no risk. Caution is advised on dark nipples.
 F r e q u e n t l y A s k e d Q u e s t i o n s Clinical topics I want to remove all hair from the bikini zone, are there any risks? E>One is safe to use on every part of the body, without exception. Therefore,
Tease Thin Hair for Best Performance in Your 30 s, 40 s, 50 s and 60 s
 Tease Thin Hair for Best Performance in Your 30 s, 40 s, 50 s and 60 s To love your hair you have to know it the way it is today, not when you were in college. For instance, women in their 40 s may complain
COLOUR CHARTS ANALYSIS TIPS- WARM SKIN TONE:
 COLOUR CHARTS ANALYSIS TIPS- WARM SKIN TONE: I have analysed your skin tone and hair colour and provided you with a full colour chart, which you can use when buying make-up shades for your face. Use this
WHAT YOU NEED TO KNOW:
 The fastest growing color brand in the nation ushers in another innovation to give long-lasting, intense hair color that does not transfer onto other strands or into other colors! ChromaSilk VIVIDS Locked-In
 Shoot RAW ALWAYS Shirt a mess, hair a mess, either open or close the mouth, not in between. LOOK CLOSELY, HER MOUTH IS SLIGHTLY OPEN. ODD, VERY ODD. Clothing off. See wrinkle on side. Hair okay clone out
Well-shaped brows can also take years off your appearance. And although brow shapes may come and go the basics of shaping stay the same.
 SKIN CARE AND MAKEUP TIPS SKIN CARE: A great looking face at any age begins with great skin. Ask yourself, do you care for your skin? Everyday? A regular and high quality skin care program is critical
the six secrets to the perfect hairstyle veronica lee & jessica lee nvenn hair and beauty
 the six secrets to the perfect hairstyle veronica lee & jessica lee nvenn hair and beauty Good hair days make me feel like i can take over the world CONTENT 01 02 03 04 05 06 07 Introduction How do they
Performance Characteristics of the PD Vengeance
 Performance Characteristics of the PD Vengeance This document describes in detail the opening, flight and landing characteristics of the Vengeance (Airlocked nine-cell) in comparison to a similarly sized
Swatch Manual. The Art of Blonding, Simplified
 Swatch Manual The Art of Blonding, Simplified CONTENTS 1 THE ART OF BLONDING, SIMPLIFIED 3 LIFT CONTROL TONE PERFORMANCE 4 BLUE POWDER LIGHTENER 5 TRANSPARENT LIGHTENER SYSTEM 6 CLAY LIGHTENER 7 ULTRA
Design Decisions. Copyright 2013 SAP
 Design Decisions Copyright 2013 SAP ELEMENTS OF DESIGN FORM should be in proportion to the shape of the head and face, and the length and width of neck and shoulder SPACE is the area the style occupies;
Blonde. haircare tips. Collection. Best blonde. How to get the most natural blonde. NEW Blonde Packages. Modern. balayage
 Blonde Collection NEW Blonde Packages How to get the most natural blonde Modern balayage Best blonde haircare tips Blonde COLLECTION 2 Keeping it Soft & Natural All Blonde Packages include a cut, colour
CRYSTAL LIGHT TECHNIQUE featuring CRYSTALLIZE COLLECTION
 CRYSTAL LIGHT TECHNIQUE featuring CRYSTALLIZE COLLECTION JOICO COLLECTION GUIDE 2015 NEW SHADES! RUBY RED AMETHYST PURPLE SAPPHIRE BLUE Discover a new spectrum of brilliant color with Vero K-PAK Color
Using Graphics in the Math Classroom GRADE DRAFT 1
 Using Graphics in the Math Classroom GRADE 7 thebillatwood@gmail 2013 DRAFT 1 Problem Solving Problem solving often invokes an image of a chess player thinking for hours trying to find the right move,
SHINE NOW. Ribbon Lights NATURAL RED GOLD SERIES REPAIR+ PERMANENT CRÈME COLOR
 SHINE NOW Ribbon Lights NATURAL RED GOLD SERIES REPAIR+ PERMANENT CRÈME COLOR NEW REPAIR+ PERMANENT CRÈME COLOR NATURAL RED GOLD Want my secret formula for creating naturallooking reds that make everyone
Female haircuts Short, rounded layers
 Female haircuts Short, rounded layers Hairdressing-Training.com Download - Page 1 of 22 Short, rounded layers This haircut has an androgynous look and can be effective for both men and women. It is a versatile
SHAW ACADEMY NOTES. Diploma in
 SHAW ACADEMY NOTES Diploma in Diploma in Personal Beauty Lesson 6 Makeup Perfecting your Eyes & Brows Different Types of Makeup Categories Day Makeup - created with the use of neutral colours to enhance
Facing the Facts. My Drawing Journey. Before We Begin. Dina Wakley On Practice. On Expectations.
 Facing the Facts Dina Wakley dina@dinawakley.com http://www.dinawakley.com 2013 Dina Wakley. All Rights Reserved. My Drawing Journey All my life until 2010: I can t draw. August 2010: Why can t I? September
CUT. Release Section 2 and mist with Healing ColorCare Magic Bullet.
 Beauty Is... COLOR Take a journey through color. Cool pearls. Pastel patinas.. Vivid violets. Intense coppers. Infinite shine. Tailored texture makes tones come alive. It s color without limits. Beauty
with Mark Crilley Cincinnati, Ohio impact-books.com
 with Mark Crilley Cincinnati, Ohio impact-books.com Characters and Styles Shojo Elegance Just because people speak of a shojo style doesn t mean that all shojo illustrations look exactly the same. Every
Learn how to age young men and women with step-by-step instructions using Mehron makeup.
 Learn how to age young men and women with step-by-step instructions using Mehron makeup. Female: Elderly Step 1: Clean & dry face. The hair should be secured away from face. Choose an appropriate foundation
BESPOKE BOB SPOTLIGHT COLOR MELT
 learn. share. BESPOKE BOB SPOTLIGHT COLOR MELT Whoever thinks classic is boring doesn t know a thing about hairdressing. As hairstylists, we totally get that classics are deemed classic for a reason: they
Chapter 18 Haircoloring and Lightening
 Chapter 18 Haircoloring and Lightening MULTIPLE CHOICE 1. Which hair characteristic is an indication of the strength of the cortex, including cross-bonds and melanin molecules? a. Texture. c. Porosity.
Clothing Tips for Pregnancy Photoshoots
 Clothing Tips for Pregnancy Photoshoots What you wear for your photoshoot is completely up to you and depends on the style and type of photos that we ve decided on. However, there are a few tips below
SHADE SHIFT TECHNIQUE featuring DUOLIGHT
 SHADE SHIFT TECHNIQUE featuring DUOLIGHT JOICO COLLECTION GUIDE 2015 INTRODUCING DUOLIGHT 1-STEP TONAL CRÈME LIGHTENER FOR EFFORTLESS FREEHAND TECHNIQUES Want an all-in-one answer to effortless freehand
Parallel Layers (Male) Step by step guide
 Step by step guide") Parallel Layers (Male) Step by step guide Parallel layers: Step 1 To achieve the right haircut for your client, it is very important to look carefully at their features - the shape of their face; hair-growth
Parallel Layers (Male) Step by step guide Parallel layers: Step 1 To achieve the right haircut for your client, it is very important to look carefully at their features - the shape of their face; hair-growth
IQ Image Quality Enhancement
 IQ Image Quality Enhancement Viewing Images with Image Quality Image Quality (IQ) Customize the view of digital slides using IQ enhancement features to: Digitally adjust the stain colors. View the individual
Pushrod Garage. Created by John Park. Last updated on :07:30 PM UTC
 Pushrod Garage Created by John Park Last updated on 2018-08-22 04:07:30 PM UTC Guide Contents Guide Contents Overview Parts & Materials Tools Pushrod Mechanism Code it with MakeCode Functions On Start
Copyright 2017 Naturalislabs Pte Ltd. All rights reserved. Published by Eric Kelly.
 UltraFX10.com 1 Copyright 2017 Naturalislabs Pte Ltd. All rights reserved. Published by Eric Kelly. No part of this publication may be reproduced, stored in a retrieval system, or transmitted in any form
MANUAL Early Avenue, Torrance, CA Direct: Fax: Toll Free:
 MANUAL 23207 Early Avenue, Torrance, CA 90505 Direct: 310.539.9912 Fax: 310.539.9914 Toll Free: 888.993.9912 www.arteasecolors.com info@arteasecolors.com 1 CONTENTS PAGE 1. Hair Color and artease colors
Benefits. Pre-Lift Kera Protector. Toning. Bleach & Tone. Lifting. Coloring. White Blending
 BlondMe - Colour Click for more product information: Benefits Pre-Lift Kera Protector Transparent Gel Lifting System Premium Performance Lightener 9+ Toning Bleach & Tone Lifting Coloring White Blending
Fresh & Funky Fall by Tracy Meola
 Fresh & Funky Fall by Tracy Meola Fresh & Funky Fall By Tracy Meola Palette: DecoArt Americana Antique Gold 13009 Burnt Orange 13016 Burnt Sienna 13063 Cherry Red 13159 Dark Chocolate 13065 Driftwood 13171
FIBER OPTIC IRONING DIODE LASER EPILATION!
 THE LATEST TECHNOLOGY AT IRONING DIODE LASER FCD FIBER OPTIC IRONING DIODE LASER EPILATION! ICE HANDLE TOTAL BODY IN THE WORLD S LIGHTEST HANDLE (300gr) average minutes million SHOTS million guarantee
Prophet 600 GliGli mod
 Prophet 600 GliGli mod Created by Collin Cunningham Last updated on 2018-08-22 04:04:56 PM UTC Guide Contents Guide Contents Overview What you'll need Program the Teensy++ Modify the Teensy++ Prep header
SHINE NOW REPAIR+ DEMI-PERMANENT CRÈME COLOR CARAMEL CONTOUR
 SHINE NOW REPAIR+ DEMI-PERMANENT CRÈME COLOR CARAMEL CONTOUR A WHOLE NEW DIMENSION IN COLOR With NEW LumiShine DD Dimensional Deposit Demi-Permanent Crème Color, you can weave the artistry of depth and
Parallel Layers (Female) Step by step guide
 Step by step guide") Parallel Layers (Female) Step by step guide Parallel layer: Step 1 Take a profile line from the front hairline to the back of the crown. This should be taken from either side of the central parting and
Parallel Layers (Female) Step by step guide Parallel layer: Step 1 Take a profile line from the front hairline to the back of the crown. This should be taken from either side of the central parting and
HAIR SCIENCE AND BIOLOGY
 HAIR SCIENCE AND BIOLOGY Your hair is composed of keratin, a strong fibrous protein, and is built from cells similar to those of your skin. The average number of hairs on the human scalp is 120,000, although
Superheroes. Lesson Four. Focus on: Devising Make-Up Design. Created by Rosshall Academy
 Superheroes Lesson Four Focus on: Devising Make-Up Design Created by Rosshall Academy Learning Intentions Explore makeup production skills Awareness of skills required to complete appropriate paperwork.
FOR PROFESSIONALS. BY PROFESSIONALS.
 FOR PROFESSIONALS. BY PROFESSIONALS. JOANNA PROFESSIONAL EXCELENT QUALITY AND COMFORT FOR PROFESSIONALS Joanna Professional is a line specially developed for hair salons. It has been recognized by professionals
Properly Applying Loose Fitting Victoria 4 Clothing to Genesis or Genesis 2 Female in DAZ 3D
 Properly Applying Loose Fitting Victoria 4 Clothing to Genesis or Genesis 2 Female in DAZ 3D Those of you who have every tried to use Auto-fit to apply loose-fitting, upper torso clothing items for Victoria
B-SERIES CONVERSION INSTRUCTIONS
 B-SERIES CONVERSION INSTRUCTIONS The B-SERIES inks are designed to replace the OEM ink set for the Brother GT3 Direct To Garment printer. These inks are designed with high performance capabilities, 35
simply revolutionary MANNEQUIN a revolutionary concept of removable faces and removable make up evolution inspiration revolution innovation
 01/1 01/2 simply revolutionary C A M E L E O N MANNEQUIN a revolutionary concept of removable faces and removable make up create thousands of styles with the same mannequin evolution inspiration revolution
Colour Theory Training Manual
 Lesson Twelve Colour Theory Training Manual Hair tones Natural Hair Colour Hair can range from the palest blonde, white or silver to blue black or jet black. Hair colour is second in importance to the
Quick Start Guide. All Page Numbers in this Guide refer to the Chromastics Technical and Training Manual
 All Page Numbers in this Guide refer to the Chromastics Technical and Training Manual Also see Chromastics Color Formulary And Chromastics Website for Further Information http://chromastics.com #1 Start
LED Eyes. Created by Ruiz Brothers. Last updated on :50:55 AM UTC
 LED Eyes Created by Ruiz Brothers Last updated on 2018-01-13 05:50:55 AM UTC Guide Contents Guide Contents Overview Parts, Tools and Supplies Enameled Copper Magnet Wire 11 meters / 0.1mm diameter Adafruit
Bunny Ears with MakeCode
 Bunny Ears with MakeCode Created by Erin St Blaine Last updated on 2018-08-22 04:05:47 PM UTC Guide Contents Guide Contents Introduction Tools & Other Materials Programming with MakeCode Set Up the Light
Clipper Cut Step by step guide
 Clipper Cut Step by step guide The Clipper Cut: Step-By-Step Guide Our model has a square face shape. He has flat, even growth patterns and a well-defined head shape. There are a number of elements you
Vibrant Blooms. by Shirley Koenig
 Vibrant Blooms by Shirley Koenig Vibrant Blooms By Shirley Koenig Palette: DecoArt Americana Acrylics Bahama Blue #13249 Black Green #13157 Cool White #13240 Foliage Green #13259 Georgia Clay #13017 Hauser
Skintones. using Academy Watercolour Pencils
 The Skintones projects are designed to give you a greater understanding of using Academy Watercolour Pencils to create multicultural skin tones. The three projects will guide you through step by step instructions
¾ in. (19mm) InStyler Rotating Iron. InStyler User Manual. Getting The Best Results with Your New InStyler
 InStyler Rotating Iron. InStyler User Manual. Getting The Best Results with Your New InStyler") ¾ in. (19mm) InStyler Rotating Iron InStyler User Manual Getting The Best Results with Your New InStyler 1 IMPORTANT SAFETY INFORMATION WARNINGS: TO REDUCE THE RISK OF SERIOUS INJURY, READ ALL INSTRUCTIONS
¾ in. (19mm) InStyler Rotating Iron InStyler User Manual Getting The Best Results with Your New InStyler 1 IMPORTANT SAFETY INFORMATION WARNINGS: TO REDUCE THE RISK OF SERIOUS INJURY, READ ALL INSTRUCTIONS
DEPTH LEVELS STRIPE TESTING FOUNDATION FORMULAS
 DEPTH LEVELS Foundations come in many levels of depth, which vary in order to match the darkness or lightness of your skin and foundation. It is how light or how dark your skin and foundation APPEAR to